
The magic dcpromo command that we used during the installation of Active Directory Domain Services in Windows Server 2003, Windows Server 2008 and Windows Server 2008 R2 is now out of our lives with Windows Server 2012.
When you run this command on Windows Server 2012, Windows Server 2012 R2, Windows Server 2016 and Windows Server 2019, you get the following error.

Before proceeding with the installation and configuration of the Active Directory Domain Services role, we do the following steps.
- Editing the Computer Name of our server.
- IP Address configuration on our server
Do not lower your security standards by using Windows Server updates and configuring the recommended security settings using a weak AD administrator password.
Some new features in Windows Server 2019
With Server 2019, Azure Backup plans to significantly improve File Sync features such as computing, storage and network connections that will make it easier to connect to Microsoft Cloud services for disaster recovery situations.
Microsoft plans to reduce the size of the Server core image to 5 GB. Windows Admin Center full compatibility. Windows Defender Advanced Threat Protection. Extended Sets with Cluster Sets. Windows Defender ATP Exploit Protection. Protected VM: Offline Mode, VMConnect and Protected Linux support. Performance history for Direct Storage Spaces.
Setting the server name
The first thing we need to do after the server is installed is to change its name and IP address. While giving the IP address, we take care to give an empty IP address outside the DHCP pool.
We edit the Computer Name of our server as follows.

Setting a STATIC IP address
After editing the Computer Name of our server, we make the Internet Protocol Version 4 (TCP / IPv4) configuration. We write the IP Address of our server in the “Preferred DNS server” section. Together with Active Directory Domain Services, we configure it in this way as our server will operate as a Domain Name Server (DNS) Server in the environment. Every server that acts as a Server in your environment should always have an IP Address.
We follow the picture below to configure the computer network settings.

Aşağıdaki sayfada “Adaptör seçeneklerini değiştir” i tıklıyoruz.

Following the steps on the following page, “We enter the IP address and DNS. Since the DNS address is itself, we enter the same IP address.

Installing Windows Server 2019 Domain
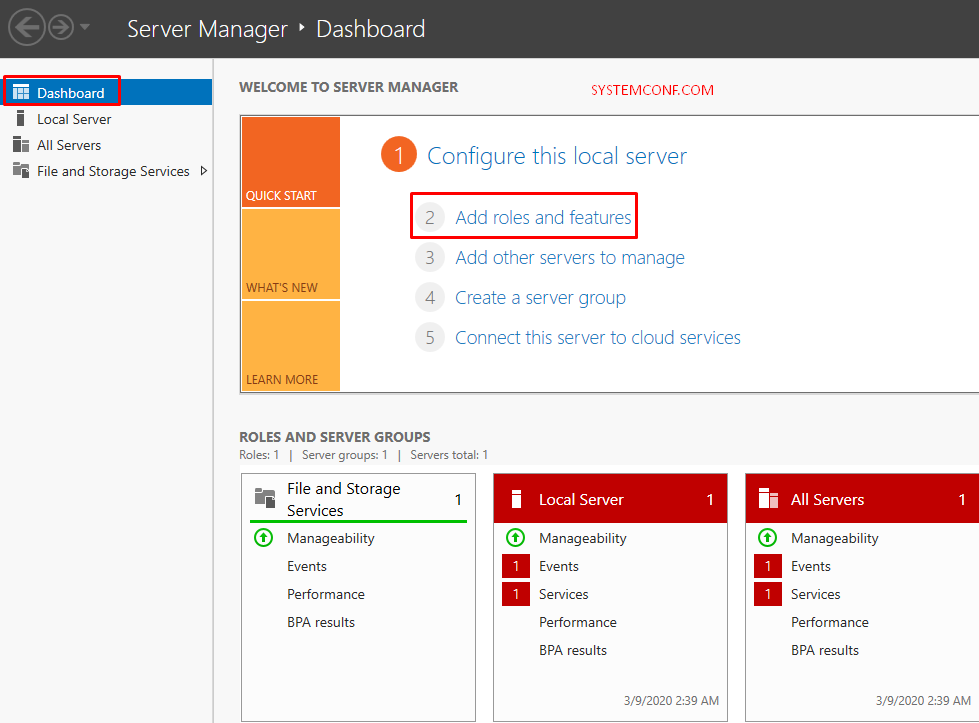
After completing the necessary configuration on our server, we open the “Server Manager” console.
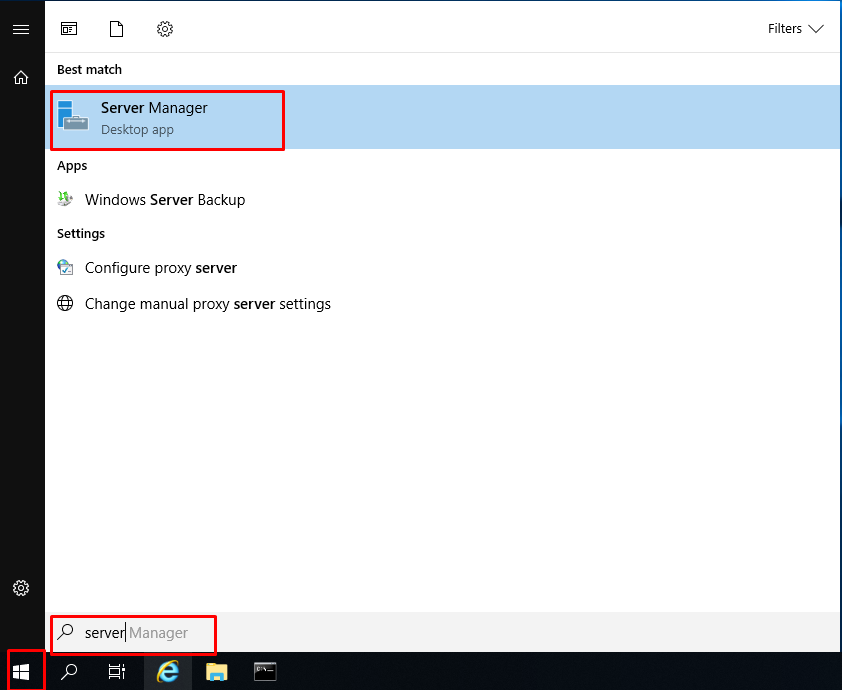
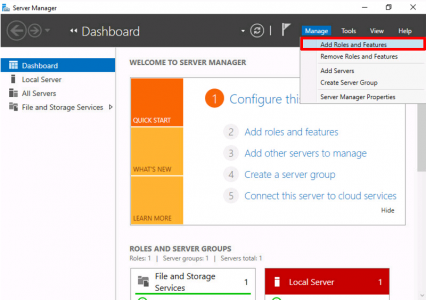
We click “Add Roles and Features” on the “Dashboard” screen. If you wish, we can open the “Add Roles and Features” wizard with the “Manage” menu in the upper right corner.
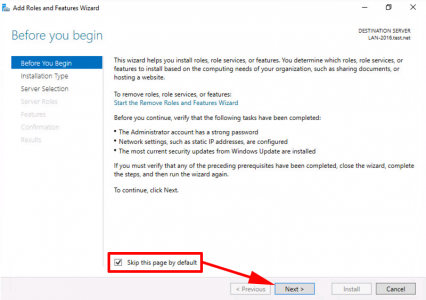
On the “Before You Begin” screen, we continue by saying “Next” to install and configure “Active Directory Domain Services Roles”.

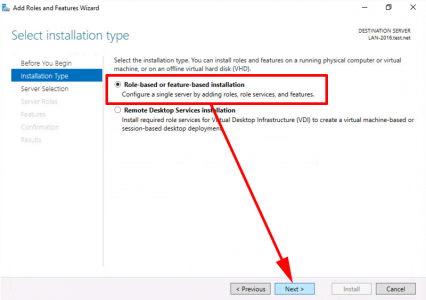
The “Role-based or feature-based installation” option on the “Select Installation Type” screen is the option that we install and configure. Roles and Features that we need on Windows Server 2019 can be installed and configured with this option.
“Remote Desktop Services installation” option You can do Remote Desktop Services (RDS) Remote Desktop installation and configuration with this option, which is formerly known as Terminal Service (TS).
Since we will configure the Active Directory Domain Services role on the “Select Installation Type” screen, we continue by saying “Next” with the “Role-based or features-based Installation” option.

On the “Select destination server” screen, we need to select the server on which server it will be installed. Since we will configure the “Active Directory Domain Services” role on ADSRV, we select this server and continue to configure it by saying Next.

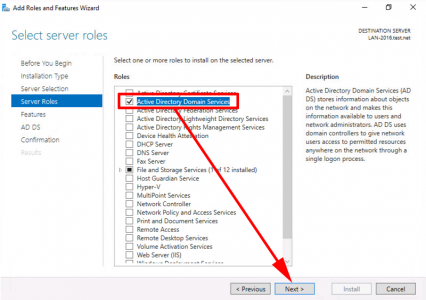
In the “Select server roles” screen, we mark the “Active Directory Domain Services” role as we will configure it by installing the “Active Directory Domain Services” role on our server.

When we select the “Active Directory Domain Services” role, we see the “Add Roles and Features Wizard” screen. We continue by saying “Add Required Features” to continue the installation and configuration of “Group Policy Management” and “Remote Administration Tools” roles along with the role of “Active Directory Domain Services“.

Since the “Select server roles” screen is ready to install and configure the “Active Directory Domain Services” role on our server, we continue by saying “Next“.

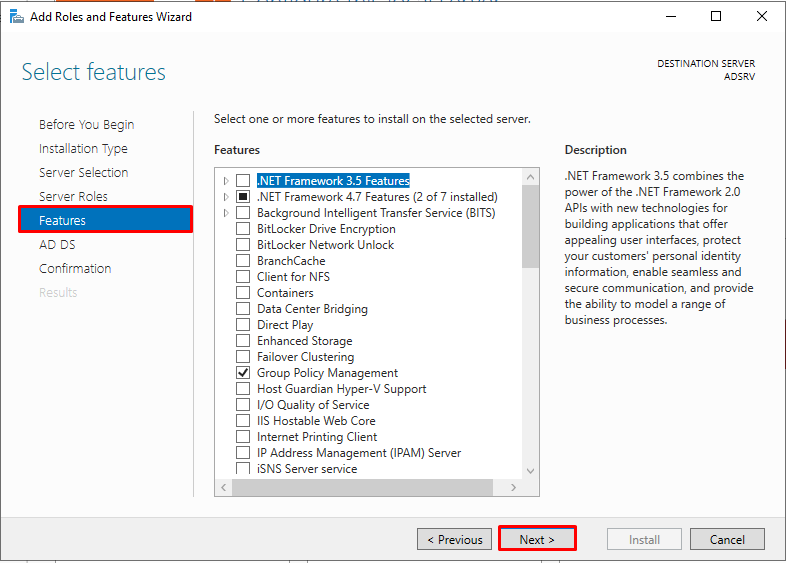
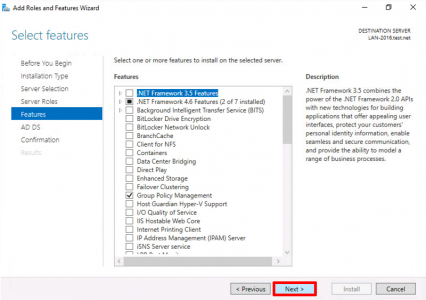
In the “Select features” screen, we see the Features that we can install on our server. When we selected the Active Directory Domain Services role, we permitted to install the Active Directory Module for Windows Powershell, Active Directory Administrative Center, AD DS Snap-Ins and Command Line Tools Features, which are required under the Group Policy Management and Remote Administration Tools required for the Active Directory Domain Services role. For this reason, we will not choose any Features of the Select features screen.
We continue by saying “Next” on the “Select features” screen without selecting anything.
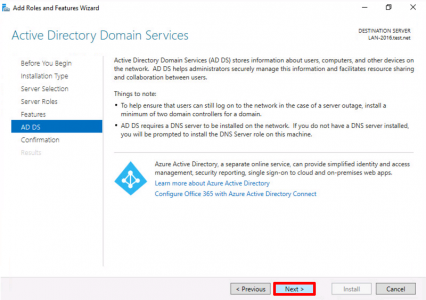
The “Active Directory Domain Services” screen appears this screen is one of the innovations we came across with Windows Server 2016. Here, we can enable the “Active Directory Domain Services” role that we will configure with “Configure Office 365 with Azure Active Directory Connect” option to work with “Office 365” and “Azure Cloud” Platform. We continue by saying “Next” on this screen.

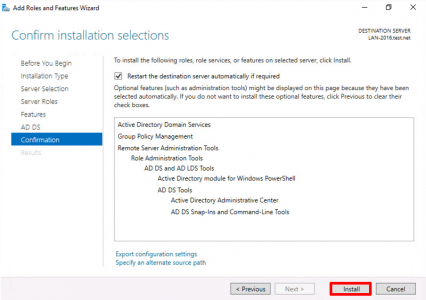
Here is a summary of our choices up to now on the “Confirm installation selections” screen. Let’s start the installation by selecting “Install“.

In the “Installation progress” screen, we see that the Active Directory Domain Services role and other features have been installed. Let’s continue by choosing “Close”.


Installation progress
We also see that the “Active Directory Domain Services” role has been installed and needs to be configured on the Server Manager.

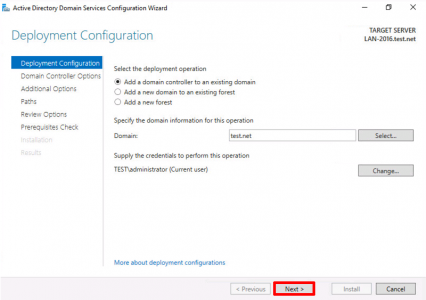
We have three options on the Deployment Configuration screen.
Add a domain to an existing domain: We need to select this option to configure a new Domain Controller within our existing Forest structure. So when we make an Additional Domain Controller configuration to our environment, we tick this option.
Add a new domain to an existing forest: We need to select this option to configure a new Domain within our existing Forest structure. In other words, there is a Domain named systemconf.local in our existing Forest structure and we mark this option when we are going to configure another Domain named systemconf.local in this Forest structure.
Add a new forest: We mark this option when we will make a new Forest and Domain configuration to our environment. In other words, if there is no Domain Controller structure in our environment, we continue with this option.

We mark the “Add a new forest” option as we will establish and configure a new Domain structure in a new Forest for our environment. We write the Domain Name that we will configure in the “Root domain name” section and continue by saying “Next”.

On the “Domain Controller Options” screen, “Forest functional level” and “Domain functional level” levels were the same as the current version. However, Windows Server 2016 Forest functional level and Domain functional level levels are used on Windows Server 2019.
In the “Specify domain controller capabilities” section, Domain Name System (DNS) Server has a similar hierarchical naming structure that can be presented as both Active Directory and DNS, both Active Directory objects and DNS domains and resource records. As a result of this integration, computers on the Windows Server Network use DNS Servers to locate computers running certain services that are specific to Active Directory. Windows Server requires pre-creating the DNS infrastructure of the Domain to be created before installing the Active Directory organization. If the DNS infrastructure of the Domain to be created is not prepared before the installation, the DNS infrastructure can be installed during the installation.
Global Catalog (GC): Global Catalog is the information store that carries a subset of the properties of all objects in Active Directory. These hosted features, by default, are the most commonly used features during queries.
Read-Only Domain Controller (RODC): It is the feature that comes with Windows Server 2008. Read-Only Domain Controller (RODC) has a different structure than Active Directory Domain Services servers. It is precisely a type of Domain Controller that hosts the Active Directory database but does not have the right to write to the database.
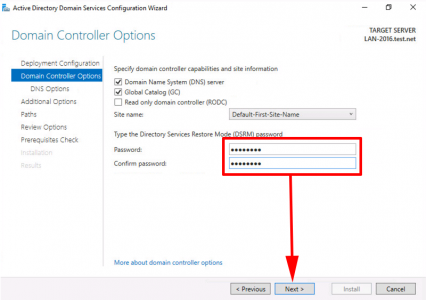
Directory Services Restore Mode (DSRM) password: This is the special method we use to return Active Directory backup in Microsoft Domain environments. To use Directory Services Restore Mode (DSRM), you need to select the directory services to restore mode section by pressing the F8 key while your computer or server is starting up.
In the Domain Controller Options screen, we are writing Complex Password that we will use for Active Directory Restore Mode in the password section without making any changes in the Specify domain controller capabilities section. We continue by saying “Next”.
NOTE: You can change the password you set for Directory Services Restore Mode (DSRM) later.

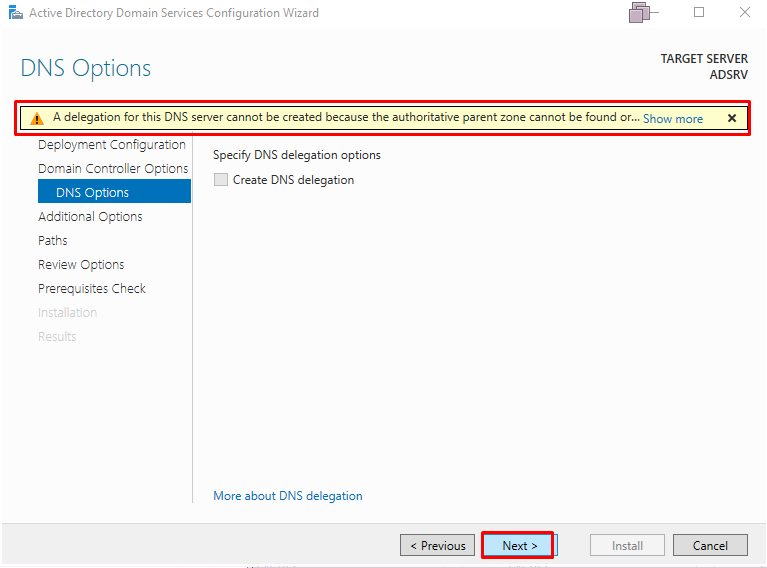
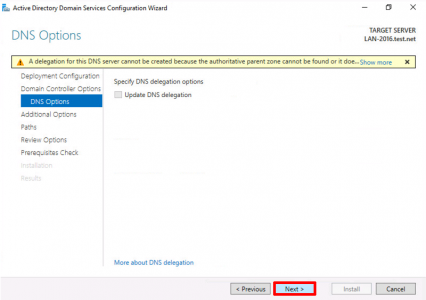
In the “DNS Options” screen, if we already have a DNS Server structure on our server, a Delegation assignment can be made to our newly established DNS Server server on the existing DNS Zone. We do not make any selection on the “DNS Options” screen, we continue by saying “Next”.
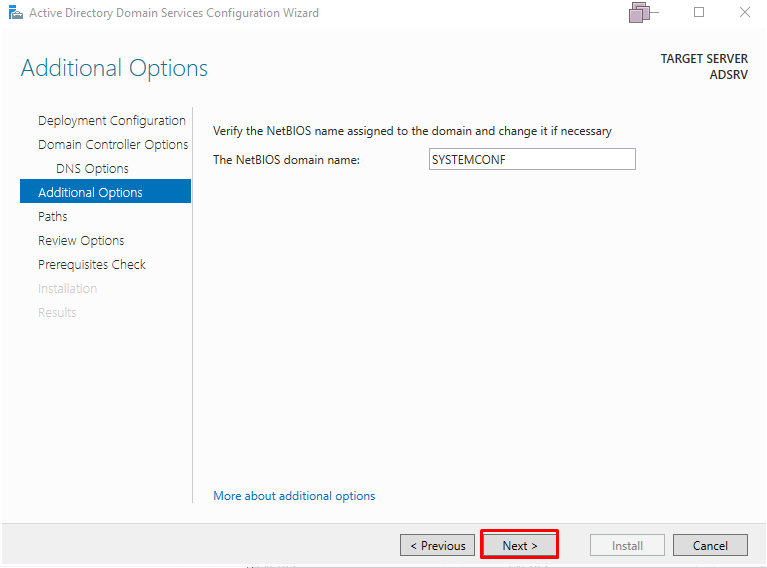
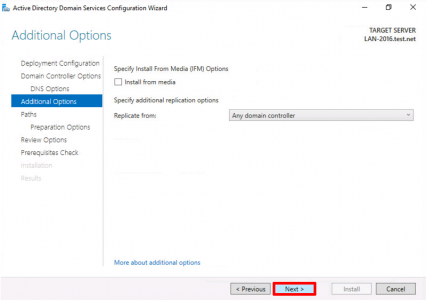
In the “Additional Options” screen, we see the name NETBIOS name that we will use for the Domain structure. We continue by saying Next.
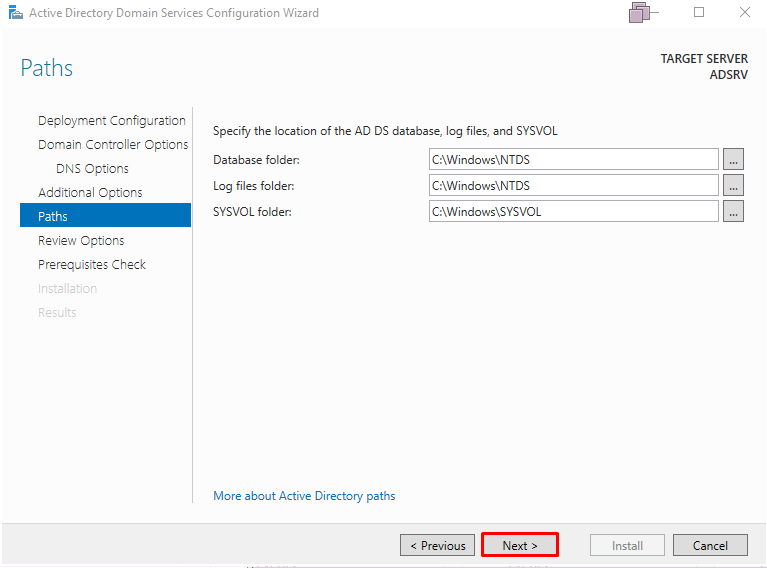
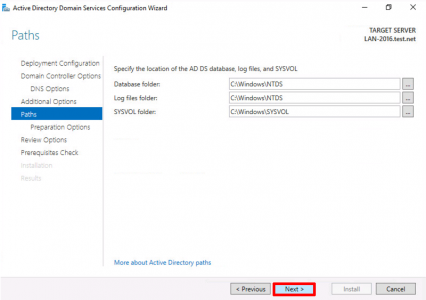
In the “Paths” screen, we determine the directories where our Active Directory Domain Services structure will be installed in the Database folder, Log files folder and SYSVOL folder. We do not make any changes to the default directories on the Paths screen and continue by saying “Next”.
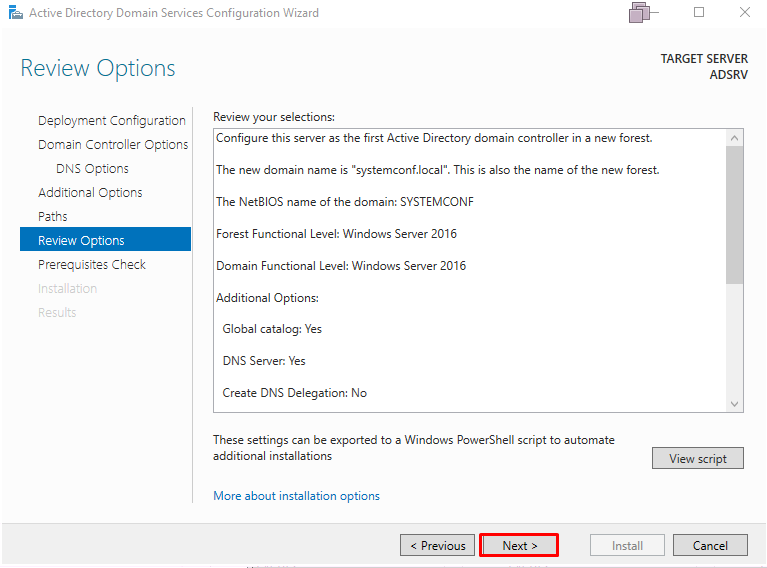
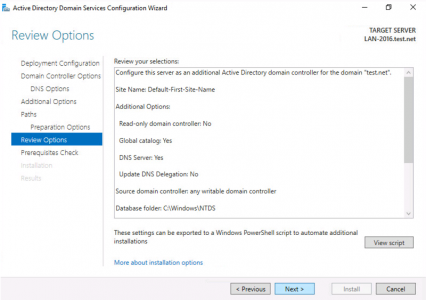
On the “Review Options” screen we see a list of the options we made during the configuration of the Active Directory Domain Services role. By clicking the “View Script” section, we can install the configuration we made for the role of Active Directory Domain Services as the “PowerShell” command.
We continue by saying “Next” to configure the Active Directory Domain Services role in the “Review Options” screen.
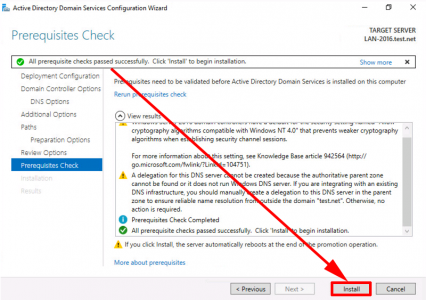
The “Prerequisities Check” screen will also check for the role of Active Directory Domain Services on our Windows Server 2019 server to check for any problems or deficiencies. When the necessary checks for the Active Directory Domain Services role are completed, “All Prerequisite check passed successfully. Click” Install “to begin installation”. We see the message. We can start the installation by saying “Install”

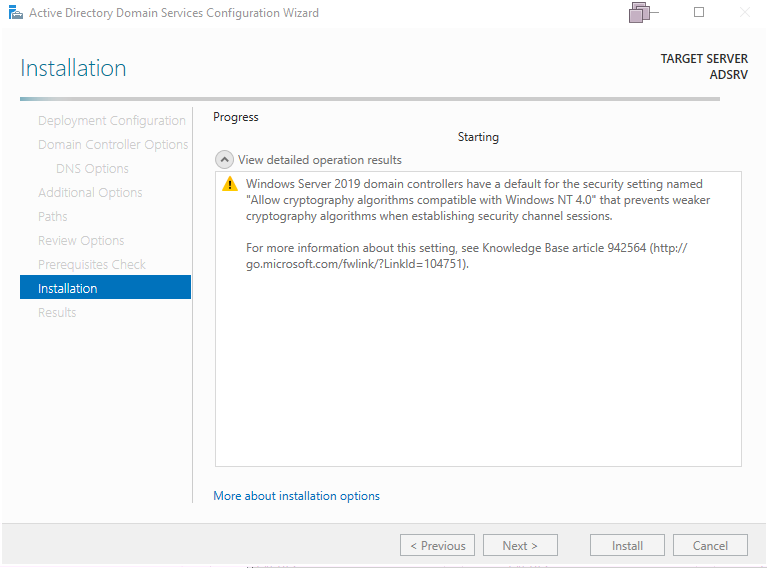
We see that the configuration of the Active Directory Domain Services role on the “Installation” screen has started on our server.
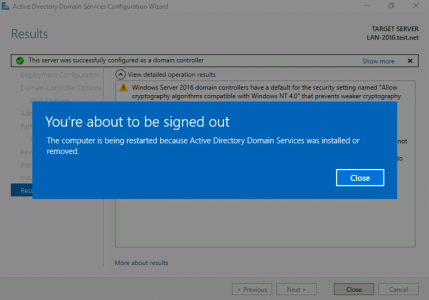
Configuration of the Active Directory Domain Services role on our server is completed. We get the information that our presentation will be restart.
After our server is restarted, we see that Active Directory Domain Services (AD DS) and Domain Name Server (DNS) roles come to the Server Manager console.
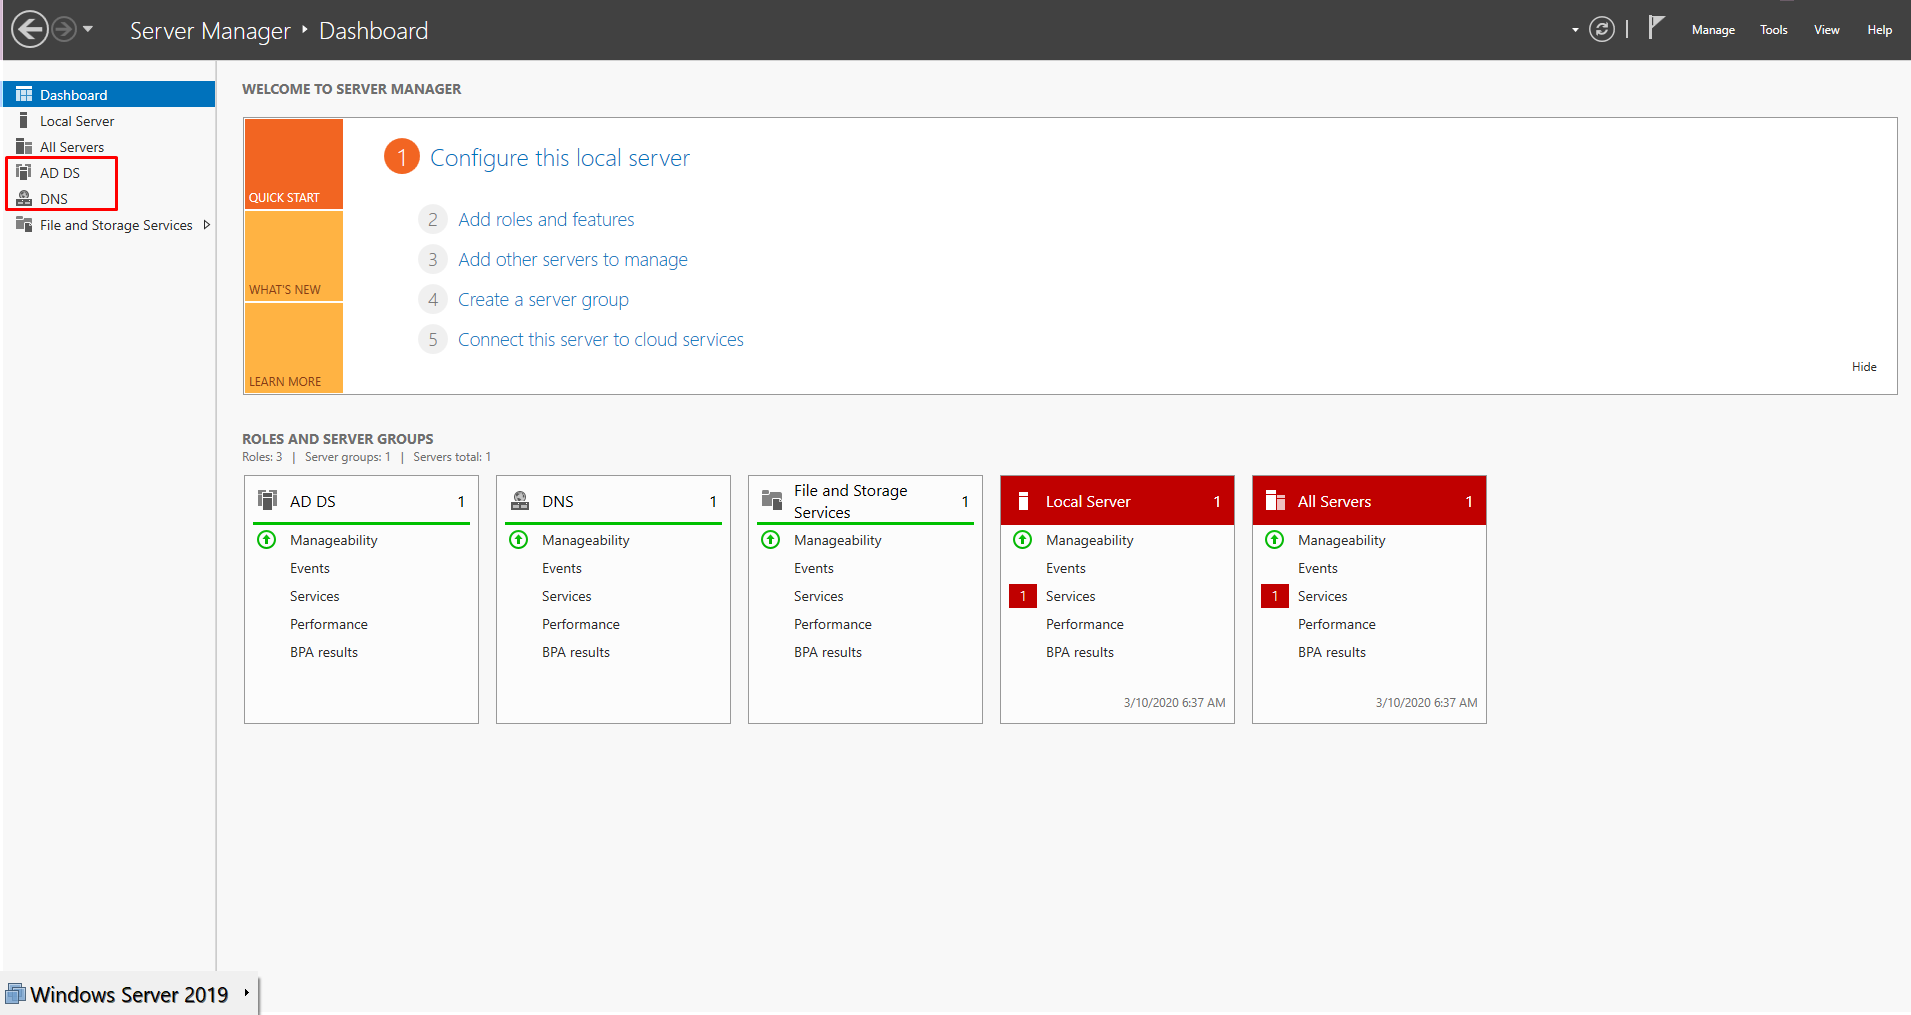
We see consoles related to the role of “Active Directory Domain Services” under “Administrative Tools“.

Adding a domain controller to an existing Windows Server 2019 environment is easy and straightforward. To do this, you need to install the Active Directory Domain Services (AD DS) role on the server, promote it as a domain controller, configure any desired additional settings and services, and then add users to the domain. This can be done using either graphical user interface tools or PowerShell commands.
To begin the process of adding a domain controller on your Windows Server 2019 system:
1. Open up Server Manager and select “Add Roles and Features” from the Manage menu.
2. On the Select Destination page, choose which server you want to install AD DS on by selecting “Specify an alternate source path.”
3. On the Select Server Roles page, check off “Active Directory Domain Services” in order to add that role to your server installation selection list.
4. Click Next until you reach Confirmation Page of Add Roles Wizard; click Install at that point in order for AD DS role installation process get started on selected destination computer/server(s).
5. Once AD DS has been installed successfully open Active Directory Users & Computers snap-in from Administrative Tools folder under Start Menu Programs list in order to create new forest root domain or extend existing one with newly promoted DCs (domain controllers). 6 .From within Active Directory Users & Computers use Action > New > Domain command – specify FQDN of new root forest during wizard setup steps iorder for new tree structure creation process get started properly – also don’t forget about DNS configuration part as well since every single DC must have valid A records configured both forward lookup zones hosted locally + reverse lookup zone too if needed !
7 .Once tree structure was created + initial replication between sites was finished – start adding members into it like user accounts , computers etc…so they will become part of managed directory service infrastructure based upon Microsoft’s solutions stack like Windows 2000/2003 / 2008 / 2012 / 2016 / 2019 servers etc…etc…
How do I manually install a domain controller?
Adding a domain controller to an existing Active Directory environment is a straightforward process, but there are several steps that should be followed in order to ensure a successful deployment. To add an additional domain controller to the existing domain, you will need administrative access on both the new and old server machines as well as access to the current Domain Controller’s DNS records. Follow these steps for adding a new Windows Server-based Domain Controller:
1. Install Windows Server OS onto your new machine.
2. Create and configure static IP address for the newly added server machine.
3. Configure DNS settings so that it points at the current Domain Controller’s DNS record(s).
4. Join the new server to your existing AD domain by running dcpromo or use PowerShell cmdlet ‘Add-WindowsFeature’ with parameter ‘ADDS’ (Active Directory Domain Services)
5. After joining successfully, promote this server as secondary DC using dcpromo command line utility or again using PowerShell cmdlet ‘Install-ADDSDomainController’
6. Once promotion is done, transfer all FSMO roles from primary DC (if applicable) . This can be done via GUI tool named Active Directory Users & Computers installed through RSAT tools which comes along with Windows Server installation media/ISO image file OR you can use Powershell Cmdlets like Move-ADDirectoryServerOperationMasterRole()
Following these steps should allow you to successfully add a secondary/additional Domain Controller in your existing active directory environment without any issues or disruption of services provided by other servers in network infrastructure..
How to add domain controller to existing domain Windows Server 2022?
Adding a domain controller to an existing Windows Server 2022 domain is a straightforward process. To accomplish this, you will need to complete the following steps:
1. Install Active Directory Domain Services (AD DS) on the new server using either Server Manager or PowerShell.
2. Once AD DS is installed, use dcpromo to promote the server as a domain controller in your existing domain.
3. After promotion is successful, configure any additional roles and features that you may require for the new server and integrate it into your organization’s network infrastructure accordingly.
How do I find my domain controller name in Windows 2019?
Finding the domain controller name in Windows 2019 is a relatively simple process. To do so, you can use the built-in command line tool called “netdom”. This allows you to query for information about your active directory environment. Here are the steps to follow:
1. Open an elevated command prompt window (right click on the Start menu and select Command Prompt as Administrator).
2. Type in “netdom query /domain DC” (without quotes) and press Enter.
This will list out all of the domain controllers that are associated with your current Active Directory forest or domain. You should be able to identify which server is functioning as your primary domain controller by looking at either its machine name or IP address.
3. Once you have identified which server is functioning as your primary domain controller, type in “hostname” into the elevated command prompt window and press Enter. The output of this command should give you the exact hostname of your primary domain controller, including any suffixes such as .local or .com if applicable in your environment setup thus completing finding a Domain Controller Name In Windows 2019!
What are the steps to setup a domain controller?
Setting up a domain controller involves several different steps, depending on the size of your organization and existing IT infrastructure. Generally speaking, you will need to perform the following tasks:
1. Install and configure server hardware: This includes purchasing and setting up the appropriate servers for running Active Directory Domain Services (AD DS).
2. Install an operating system: You’ll need to install Windows Server on each server you plan to use as a domain controller. Make sure that all versions of Windows Server are compatible with one another before proceeding.
3. Configure DNS services: You must configure DNS so that it can properly resolve names within your domain. Additionally, make sure that any external domains or public IP addresses used in your network are correctly configured in your DNS settings.
4. Create an AD DS forest: An AD DS forest is essentially a collection of Active Directory objects such as users, computers, groups, etc., which form the basis of authentication and authorization within a Windows network environment.
5 . Promote server(s) to be DCs : After configuring all necessary components and settings, promote one or more servers to be domain controllers by using PowerShell commands or other available tools like dcpromo utility (for older versions).
6 . Add additional DCs : If needed add additional DCs for redundancy by creating new accounts with administrative privileges on them then run adprep /forestprep command from Schema Master role holder machine followed by running adprep /domainprep command from Infrastructure Master role holder machine after promoting these machines into Domain Controllers roles respectively through GUI mode using dcpromo utilities (for older versions).
7 . Configure Group Policies : Set up group policies in order to define user access rights across multiple devices based on organizational security requirements like password policy configuration etc..
8 . Test & Verify functionality : Finally test functionality of newly created Domain Controller setup by validating proper replication between two or more DC’s , login attempts with single sign-on enabled credentials etc…
What is command to install domain controller?
To install a domain controller, you will need to use the Domain Controller Installation Wizard (DCWIZ). The DCWIZ is part of the Active Directory Domain Services installation option in Server Manager. To access it, open Server Manager and click on “Add Roles and Features”. In the resulting dialog box, select Role-based or feature-based installation and then select Active Directory Domain Services from the list of roles presented. After selecting this role, there will be an additional option to launch DCWIZ – select that as well before completing all other necessary steps for installing your domain controller.
Can you have 2 domain controllers on the same network?
Yes, it is possible to have two domain controllers on the same network. Multiple domain controllers can provide a more reliable and resilient service for your users, as well as providing additional functionality such as fault tolerance and load balancing. To set up multiple domain controllers, you will need to ensure that each server has its own unique IP address, then use Active Directory Domain Services (AD DS) to create a new forest or add an additional domain controller in an existing one. It is important to keep all of the servers updated with the latest security patches and antivirus software. Additionally, configure appropriate firewall rules if necessary for secure communication between the servers.
How do I add a domain controller to Active Directory sites and services?
Adding a domain controller to Active Directory Sites and Services can be achieved by following the steps below:
1. Open Server Manager and select Tools > Active Directory Sites and Services.
2. Expand the Sites node in the console tree, right-click on the site you wish to add a Domain Controller to, then select New > Domain Controller from the context menu.
3. In the Promotion wizard that appears, enter your credentials for an account with Enterprise Admin privileges in your environment (if prompted).
4. On the Deployment Configuration page, choose either Add a domain controller to an existing domain or Install a new forest option based on what type of deployment it is going to be part of i.e., if it will operate as part of an existing forest or create its own independent one respectively .
5. Once you have made your selections click Next until you reach the Summary page where you can review all selections before continuing with installation process by clicking ‘Next’ again followed by ‘Finish’ when done for completing setup which should take about 20 minutes depending upon size of AD environment being deployed into .
{“@context”:”https://schema.org”,”@type”:”FAQPage”,”mainEntity”:[{“@type”:”Question”,”name”:”How to add domain controller in an existing domain controller?”,”acceptedAnswer”:{“@type”:”Answer”,”text”:”nnAdding a domain controller to an existing Active Directory environment is a straightforward process, but there are several steps that should be followed in order to ensure a successful deployment. To add an additional domain controller to the existing domain, you will need administrative access on both the new and old server machines as well as access to the current Domain Controller’s DNS records. Follow these steps for adding a new Windows Server-based Domain Controller: nn1. Install Windows Server OS onto your new machine. n2. Create and configure static IP address for the newly added server machine. n3. Configure DNS settings so that it points at the current Domain Controlleru2019s DNS record(s). n4. Join the new server to your existing AD domain by running dcpromo or use PowerShell cmdlet u2018Add-WindowsFeatureu2019 with parameter u2018ADDSu2019 (Active Directory Domain Services) n5. After joining successfully, promote this server as secondary DC using dcpromo command line utility or again using PowerShell cmdlet u2018Install-ADDSDomainControlleru2019 n6. Once promotion is done, transfer all FSMO roles from primary DC (if applicable) . This can be done via GUI tool named Active Directory Users & Computers installed through RSAT tools which comes along with Windows Server installation media/ISO image file OR you can use Powershell Cmdlets like Move-ADDirectoryServerOperationMasterRole() nn Following these steps should allow you to successfully add a secondary/additional Domain Controller in your existing active directory environment without any issues or disruption of services provided by other servers in network infrastructure..”}},{“@type”:”Question”,”name”:”How to add domain controller to existing domain Windows Server 2022?”,”acceptedAnswer”:{“@type”:”Answer”,”text”:”nnAdding a domain controller to an existing Windows Server 2022 domain is a straightforward process. To accomplish this, you will need to complete the following steps: n1. Install Active Directory Domain Services (AD DS) on the new server using either Server Manager or PowerShell. n2. Once AD DS is installed, use dcpromo to promote the server as a domain controller in your existing domain. n3. After promotion is successful, configure any additional roles and features that you may require for the new server and integrate it into your organization’s network infrastructure accordingly.”}},{“@type”:”Question”,”name”:”How do I find my domain controller name in Windows 2019?”,”acceptedAnswer”:{“@type”:”Answer”,”text”:”nnFinding the domain controller name in Windows 2019 is a relatively simple process. To do so, you can use the built-in command line tool called “netdom”. This allows you to query for information about your active directory environment. Here are the steps to follow: nn1. Open an elevated command prompt window (right click on the Start menu and select Command Prompt as Administrator). nn2. Type in “netdom query /domain DC” (without quotes) and press Enter. nThis will list out all of the domain controllers that are associated with your current Active Directory forest or domain. You should be able to identify which server is functioning as your primary domain controller by looking at either its machine name or IP address. n3. Once you have identified which server is functioning as your primary domain controller, type in u201chostnameu201d into the elevated command prompt window and press Enter. The output of this command should give you the exact hostname of your primary domain controller, including any suffixes such as .local or .com if applicable in your environment setup thus completing finding a Domain Controller Name In Windows 2019!”}},{“@type”:”Question”,”name”:”What are the steps to setup a domain controller?”,”acceptedAnswer”:{“@type”:”Answer”,”text”:”nnSetting up a domain controller involves several different steps, depending on the size of your organization and existing IT infrastructure. Generally speaking, you will need to perform the following tasks: nn1. Install and configure server hardware: This includes purchasing and setting up the appropriate servers for running Active Directory Domain Services (AD DS). nn2. Install an operating system: You’ll need to install Windows Server on each server you plan to use as a domain controller. Make sure that all versions of Windows Server are compatible with one another before proceeding. nn3. Configure DNS services: You must configure DNS so that it can properly resolve names within your domain. Additionally, make sure that any external domains or public IP addresses used in your network are correctly configured in your DNS settings. n4. Create an AD DS forest: An AD DS forest is essentially a collection of Active Directory objects such as users, computers, groups, etc., which form the basis of authentication and authorization within a Windows network environment. nn 5 . Promote server(s) to be DCs : After configuring all necessary components and settings, promote one or more servers to be domain controllers by using PowerShell commands or other available tools like dcpromo utility (for older versions). nn 6 . Add additional DCs : If needed add additional DCs for redundancy by creating new accounts with administrative privileges on them then run adprep /forestprep command from Schema Master role holder machine followed by running adprep /domainprep command from Infrastructure Master role holder machine after promoting these machines into Domain Controllers roles respectively through GUI mode using dcpromo utilities (for older versions). nn 7 . Configure Group Policies : Set up group policies in order to define user access rights across multiple devices based on organizational security requirements like password policy configuration etc.. nn 8 . Test & Verify functionality : Finally test functionality of newly created Domain Controller setup by validating proper replication between two or more DC’s , login attempts with single sign-on enabled credentials etc…”}},{“@type”:”Question”,”name”:”What is command to install domain controller?”,”acceptedAnswer”:{“@type”:”Answer”,”text”:”nnTo install a domain controller, you will need to use the Domain Controller Installation Wizard (DCWIZ). The DCWIZ is part of the Active Directory Domain Services installation option in Server Manager. To access it, open Server Manager and click on u201cAdd Roles and Featuresu201d. In the resulting dialog box, select Role-based or feature-based installation and then select Active Directory Domain Services from the list of roles presented. After selecting this role, there will be an additional option to launch DCWIZ u2013 select that as well before completing all other necessary steps for installing your domain controller.”}},{“@type”:”Question”,”name”:”Can you have 2 domain controllers on the same network?”,”acceptedAnswer”:{“@type”:”Answer”,”text”:”nnYes, it is possible to have two domain controllers on the same network. Multiple domain controllers can provide a more reliable and resilient service for your users, as well as providing additional functionality such as fault tolerance and load balancing. To set up multiple domain controllers, you will need to ensure that each server has its own unique IP address, then use Active Directory Domain Services (AD DS) to create a new forest or add an additional domain controller in an existing one. It is important to keep all of the servers updated with the latest security patches and antivirus software. Additionally, configure appropriate firewall rules if necessary for secure communication between the servers.”}},{“@type”:”Question”,”name”:”How do I add a domain controller to Active Directory sites and services?”,”acceptedAnswer”:{“@type”:”Answer”,”text”:”nnAdding a domain controller to Active Directory Sites and Services can be achieved by following the steps below: n1. Open Server Manager and select Tools > Active Directory Sites and Services. n2. Expand the Sites node in the console tree, right-click on the site you wish to add a Domain Controller to, then select New > Domain Controller from the context menu. n3. In the Promotion wizard that appears, enter your credentials for an account with Enterprise Admin privileges in your environment (if prompted). n4. On the Deployment Configuration page, choose either Add a domain controller to an existing domain or Install a new forest option based on what type of deployment it is going to be part of i.e., if it will operate as part of an existing forest or create its own independent one respectively . n5. Once you have made your selections click Next until you reach the Summary page where you can review all selections before continuing with installation process by clicking u2018Nextu2019 again followed by u2018Finishu2019 when done for completing setup which should take about 20 minutes depending upon size of AD environment being deployed into .”}}]}
In this guide, we’ll walk you through the steps to install Active Directory on Windows Server 2012 R2 and up. Unlike previous versions where DCPROMO.EXE was used to install Active Directory, Microsoft now recommends using a different method. To install Active Directory on Windows Server 2012 and up, you need to follow these steps:
1 – Open “Server Manager” and select “Manage” → “Add Roles and Feature”.
2 – Click “Next”.
3 – Select “Role-based or feature-based Installation” and click “Next”.
4 – Choose “Select a server from the server pool” if you’re installing locally.
5 – Check the box next to “Active Directory Domain Services”. A box will appear explaining additional roles services or features required for domain services.
6 – Click Add Features.
7 – Check “Group Policy Management” and click “Next”.
8 – Click “Next”.
9 – Click “Install”.
Wait for the installation bar to complete.
10 – Once installed, open the Notifications Pane in Server Manager by selecting the Notifications icon at the top of Server Manager. and select “Promote this server to a domain controller”.
11 – Click on “Add a new forest” and enter your root domain name into the Root domain name field (e.g., “example.com”).
12 – Select a Domain and Forest functional level and enter a DSRM password in the provided password fields (used when booting into recovery mode).
13 – On the DNS Options tab, click OK then Next.
14 – Enter NETBIOS name and click “Next”.
15 – Choose locations for SYSVOL, Log files, and Database folders then click Next.
16 – Click “Install” and wait for completion (the server will restart several times).
The installation is now complete!
Conclusion
This article taught us how to install Active Directory in Windows Server 2012, 2016, and 2019. We followed several steps to add roles and features, promote the server to a domain controller, and configure the domain and forest functional levels. This process is essential for setting up a secure and efficient network environment where users and resources can be managed centrally.
Hello World,
Today, we are proceeding with our quick investigation of Windows 2019 Server and what’s new on this release. In the two previous posts, we have been through a standard installation of Windows 2019 Server. The previous posts has described the simple installation process of the operating system. The next logical step in a Windows environment is to setup an Active Directory. We are not expecting too many changes in the process but we wanted to have a quick look. So this post will quickly describe how to setup an Active Directory on top of Windows 2019 Server
Let’s go !
Overview
After having installed Windows 2019 Operating system, the next logical step is to promote your first domain controller in your new domain or add the domain controller into your existing domain. The process is quite similar to the one used in Windows 2012 and later. Windows 2019 Server does not introduce any forest or domain functional levels. So, as you will see, the highest forest level and domain level is Windows 2016.
In order to have a Windows 2019 server promoted as Domain controller, the existing Active Directory infrastructure needs to run Windows 2008 R2 functional level and the DFS-R needs to be present as well. (for more information, have a look here)
Installing the Active directory Service Role
As mentioned earlier, the process has not changed much. To promote a server into a Domain Controller, you will need to first install the Active Directory Service role and then we will need to perform the promotion operation.
Installing the Role
In the server Manager, click on Add Roles and Features link
Click on picture for Better Resolution
The wizard starts. In the Before you begin page, press Next
Click on picture for Better Resolution
In the installation type, select the first option install role and features and press Next
Click on picture for Better Resolution
In the Select server Page, specify the server where the role needs to be installed. Press Next
Click on picture for Better Resolution
In the Select Server Role Page, Select the option Active directory Domain Services. In the dialog box prompt, accept the settings and Press OK
Click on picture for Better Resolution
In the feature page, you can leave like this or do like me and select the .Net 3.5 option cause some applications are still relying on this one…
Click on picture for Better Resolution
In the AD DS page, review the information and Press Next
Click on picture for Better Resolution
In the confirmation page, review your settings and press Install
P.S.: If you have selected the option .NET 3.5, do not forget to specify the alternate path
Click on picture for Better Resolution
Wait for the installation to proceed
Click on picture for Better Resolution
Promoting a server to a Domain controller
When completed, you will see a small link that ask you to promote this server to a Domain controller
Click on picture for Better Resolution
The AD Service Configuration Wizard starts and you can start the promotion process. In the Deployment page, choose your configuration. In our case, we are setting up a brand new Forest based on Windows 2019 Server.
Click on picture for Better Resolution
In the domain controller page, select the forest level and domain level. As mentioned earlier, the highest functional level found here is Windows 2016. Provide also the DSRM password and Press Next when Done
Click on picture for Better Resolution
In the DNS Option page, select your options as required and Press Next
Click on picture for Better Resolution
In the Additional Page, the wizard will check the NetBios name. When done and if everything is ok, Press Next
Click on picture for Better Resolution
In the Paths Page, specify where to store your AD files. Please review the best practices for knowing where to store them accordingly. Press Next
Click on picture for Better Resolution
In the Review Page, Review your settings and optionally, you could click on the view script button so you can have the command line that can be used to automate the DCPromo operation. Press Next
Click on picture for Better Resolution
In the Prerequistes Page, if everything is ok, you should see a green check box and you would be able to press the Install Button
Click on picture for Better Resolution
Wait for the installation to proceed
Click on picture for Better Resolution
When done, review the summary page and you should be ready to go. Press Close and Start working with Active Directory and your domain….
Click on picture for Better Resolution
Final Notes
Voila ! This is done for this post. As we can see, there is basically not a lot of changes in the Active directory service installation in Windows 2019 Server. In this post, we have performed the installation from a Windows 2019 Server where the GUI was available and installed.
If you have installed the Core version and you want to promote the server to a domain controller, it’s possible and there are basically multiple options.
- Option 1 – You log on locally on the Core Server and you execute all the necessary Powershell command to have the domain controller installed;
- Option 2 – You can use Remote Powershell to connect to the core server and execute the necessary Powershell commands
- Option 3 – From another Server, you can launch the Server Manager, add the future domain controller into the console and perform the DCPromo operation remotely
- Option 4 – You can possibly use the new Windows Admin Center to perform the DCPromo. Actually, we have tried this and we were able to promote a Core Server. However, the installation was not that straight forward through The Windows Admin Center.
As Microsoft is promoting Core Server, we might want to look further in DCpromo operations on Core Server. In a future post, we will probably describe how to perform the installation on the core edition and see how the Windows Admin Center could be used to perform the installation and if this is worth the effort….
Till next time
See ya
KB ID 0001262
Problem
Once upon a time, adding a domain controller that was running a newer version of the Windows Server family involved opening command line and schema prepping, and GP prepping etc. Now all this happens in the background when adding a 2019 domain controller and the wizard is doing the heavy lifting for you.
Solution
2008 to 2019 Domain Controller
2008 to 2016 Domain Controller
Obviously the server needs to be a domain member first!
- For Server 2019 Forest and Domain Functional levels need to be at ‘Windows Server 2008‘. (The documentation says 2008 R2, but Server 2008 also works flawlessly).
- For Server 2016 Forest and Domain Functional levels need to be at ‘Windows Server 2003‘.
Before You Start!
Remember if your ‘retiring’ domain controller is also a DNS/DHCP server you will also need to address that, and make sure you don’t have a service or device that queries the old domain controller directly (Radius Devices, Firewalls, RSA Appliances, Proxy Filters, Security door software, etc).
Procedure: Deploy a 2019 Domain Controller
With a vanilla install Server Manager will open every time you boot, (unless you’ve disabled it!) To open it manually, run ‘servermanager.exe’ > Manage > Add Roles and Features.
I usually tick the ‘Skip this page by default’ option > Next.
Role Based… > Next.
Ensure the local server is selected, (if you are managing another server, you can of course do the role install from here as well, but let’s keep things simple) > Next.

Select Active Directory Domain Services > Next.
Next.
Next.
Ensure ‘Restart’ is selected > Next.
Next.

Promote Windows Server To Domain Controller
Back in Server Manager > In the ‘Notifications’ section, click the warning triangle > ‘Promote This Server To Domain Controller’.

Assuming you already have a domain, and this is not a greenfield Install > Add a domain controller to an existing domain > Next.
Type and confirm a Directory Services Restore Mode Password (DSRM,) make it something you will remember in a crisis, or store it securely somewhere > Next.
This is fine, You see this error because it’s trying to create a delegation for this DNS zone, and there isn’t a Windows server above you in the DNS hierarchy. For example if your domain name is petelnetlive.co.uk > Then I do not have access to create a delegation in the .co domain space. (So you can safely ignore) > Next
If you have a backup of AD you can ‘Install From Media’. This used to be handy on remote sites that had awful bandwidth, as it saved you having to replicate a large Active Directly over a ‘pants’ connection > I’ve not had to do that in a long time > Next.
Unless you want to change the default AD install locations > Next.
Next.
Read any warnings > Install
Go have a coffee, we ticked ‘reboot’ earlier so it will complete, then reboot the server, which will come back up as a domain controller.
You will notice, (if you’re interested,) that your schema version is now 88 (Server 2019), or 87 (Server 2016).

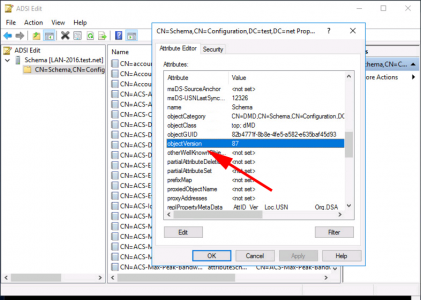
Find out your Domain Schema Version
Related Articles, References, Credits, or External Links
NA