
Windows Server 2019 Datacenter Desktop Experience: Комплексное управление данными
Windows Server 2019 Datacenter Desktop Experience — операционная система, разработанная специально для работы в крупных корпоративных сетях и обеспечения высокого уровня безопасности данных. Новая версия операционной системы обеспечивает мощь и универсальность Windows Server, а также для большего удобства содержит интерфейс, который знаком многим пользователям операционных систем Windows.
Test Text
Windows Server 2019 Datacenter Desktop Experience обеспечивает полный контроль, анализ и управление областями хранения данных во всем предприятии. Одна из главных целей новой версии операционной системы Datacenter Desktop Experience — адаптировать панель управления в соответствии с потребностями бизнеса. Результатом этого является удобный интерфейс, который охватывает все основные функции управления серверами, в том числе и функции виртуализации.
Функции Windows Server 2019 Datacenter Desktop Experience
- Улучшенная безопасность: Операционная система Windows Server 2019 Datacenter Desktop Experience предлагает широкий спектр инструментов для обеспечения высокого уровня безопасности данных предприятия.
- Хранение данных: Datacenter Desktop Experience предлагает несколько инновационных функций для хранения и обмена данными в корпоративной среде.
- Управление ресурсами: Новый интерфейс управления ресурсами превращает Datacenter Desktop Experience в мощный инструмент для работы с серверами и хранилищами данных.
Преимущества Windows Server 2019 Datacenter Desktop Experience
Windows Server 2019 Datacenter Desktop Experience предлагает несколько преимуществ, среди которых:
Безопасность — система Datacenter Desktop Experience обеспечивает высокий уровень защиты всех серверов и критичных данных корпоративной среды.

Автоматизация — возможность создания скриптов для автоматизации большинства процессов связанных с управлением серверами и хранилищами данных.

Масштабируемость — возможность расширения функциональности кластерных серверов при работе с большими объемами данных.

Заключение
Windows Server 2019 Datacenter Desktop Experience является мощной операционной системой, предназначенной для работы в крупных корпоративных сетях и обеспечения безопасности данных. Она предлагает много инструментов для управления серверами и хранилищами данных в корпоративной среде. Внедрение Datacenter Desktop Experience может стать хорошей инвестицией в будущее, так как эта операционная система может удовлетворить потребности бизнеса любого масштаба.
Windows Server 2019 Datacenter Desktop Experience
Windows Server 2019 Datacenter Desktop Experience is the latest edition of the Windows Server operating system from Microsoft. It comes with a wide range of new features and improvements that make it an ideal choice for enterprise-level environments.
What is Windows Server 2019 Datacenter Desktop Experience?

Windows Server 2019 Datacenter Desktop Experience is a specialized edition of the Windows Server operating system. It includes all the features and functionality of the standard Windows Server 2019 edition, along with additional desktop experience features.
The desktop experience features in Windows Server 2019 Datacenter Desktop Experience include a graphical user interface (GUI), support for desktop applications, and support for remote desktop connections. This makes it an ideal choice for organizations that need to run desktop applications on their servers or provide remote desktop access to their users.
New Features in Windows Server 2019 Datacenter Desktop Experience
Windows Server 2019 Datacenter Desktop Experience includes a wide range of new features and enhancements, including:
- Improved Security: Windows Server 2019 Datacenter Desktop Experience includes enhanced security features to help protect your organization from security threats.
- Improved Performance: Windows Server 2019 Datacenter Desktop Experience includes several performance improvements, including faster file transfers and improved virtual machine performance.
- Enhanced Storage Spaces Direct: Windows Server 2019 Datacenter Desktop Experience introduces several enhancements to Storage Spaces Direct, including support for deduplication and compression.
- Enhanced Hyper-V: Windows Server 2019 Datacenter Desktop Experience includes several enhancements to Hyper-V, including support for virtual GPUs and shielded VMs.
- Improved Containers: Windows Server 2019 Datacenter Desktop Experience includes several improvements to container support, including support for higher density and improved performance.
Advantages of Windows Server 2019 Datacenter Desktop Experience
Windows Server 2019 Datacenter Desktop Experience offers several advantages over other versions of Windows Server, including:
- Improved Security: Windows Server 2019 Datacenter Desktop Experience includes enhanced security features to help protect your organization from security threats.
- Improved Performance: Windows Server 2019 Datacenter Desktop Experience includes several performance improvements, including faster file transfers and improved virtual machine performance.
- Compatibility: Windows Server 2019 Datacenter Desktop Experience is compatible with a wide range of applications and services, making it an ideal choice for enterprise-level environments.
- Easy to Use: Windows Server 2019 Datacenter Desktop Experience includes a graphical user interface (GUI), making it easy to manage and configure your server.
Conclusion

Overall, Windows Server 2019 Datacenter Desktop Experience is an excellent choice for enterprise-level environments that require desktop experience features. It comes with a wide range of new features and improvements, including enhanced security, improved performance, and compatibility with a wide range of applications and services. If you are looking for a reliable and easy-to-use server operating system, you should definitely consider Windows Server 2019 Datacenter Desktop Experience.
Windows Server 2019 Datacenter Desktop Experience: опишем основные возможности
Windows Server 2019 Datacenter Desktop Experience – операционная система, входящая в семейство Windows Server 2019, которая предназначена для развертывания на серверах.
Основные возможности Windows Server 2019 Datacenter Desktop Experience:
- Позволяет управлять большим количеством виртуальных машин на одном сервере.
- Предоставляет надежный доступ к файлам и данным.
- Позволяет создавать резервные копии данных.
- Предоставляет высокую степень защиты данных.
- Позволяет решать задачи, связанные с обработкой большого количества данных.
Важным преимуществом Windows Server 2019 Datacenter Desktop Experience является его простота в использовании.
«Windows Server 2019 Datacenter Desktop Experience – это не только высокое качество и надежность, но и удобство использования. Для работы с данной операционной системой не нужно быть экспертом в области IT».

Функциональность Windows Server 2019 Datacenter Desktop Experience позволяет создавать целые инфраструктуры и обеспечивать их надежность и стабильность.
Основные аспекты Windows Server 2019 Datacenter Desktop Experience:
- Оптимизация работы с виртуализацией.
- Высокая степень надежности и защиты данных.
- Простота использования.
- Встроенная поддержка контейнеров Docker.
- Приложения Windows и Linux могут работать на одном сервере.
Windows Server 2019 Datacenter Desktop Experience позволяет управлять рабочим процессом в больших корпоративных сетях и обеспечивает легкий доступ к данным и файлам.
Почему стоит использовать Windows Server 2019 Datacenter Desktop Experience?
После знакомства с основными возможностями и преимуществами операционной системы Windows Server 2019 Datacenter Desktop Experience, можно сделать вывод о том, что стоит использовать данную систему для создания больших IT-инфраструктур.

Windows Server 2019 Datacenter Desktop Experience является надежной и функциональной операционной системой, которая предоставляет высокую степень защиты данных и удобство использования.
«Windows Server 2019 Datacenter Desktop Experience – это отличное решение для создания и развертывания серверных IT-инфраструктур любого уровня сложности».
Итоги
Windows Server 2019 Datacenter Desktop Experience – это надежная и функциональная операционная система, которая позволяет управлять большим количеством виртуальных машин на одном сервере, обеспечивает надежный доступ к файлам и данным, создание резервных копий данных, высокую степень защиты данных и решает задачи, связанные с обработкой большого количества данных.
Windows Server 2019 Datacenter Desktop Experience является простой и удобной в использовании операционной системой, позволяющей создавать и развертывать серверные IT-инфраструктуры любого уровня сложности.
Have you recently installed Windows Server 2019 and noticed that it lacks certain user interface features typically found in a desktop operating system? Don’t worry! In this tutorial, we will guide you through the steps to add the Desktop Experience feature to Windows Server 2019.
Step 1: Launch the Server Manager by clicking on the Windows icon in the taskbar and selecting «Server Manager» from the Start menu.
Step 2: In the Server Manager window, click on «Manage» located at the top-right corner and then select «Add Roles and Features» from the drop-down menu.
Step 3: The Add Roles and Features Wizard will open. Click «Next» to proceed.
Step 4: Select «Role-based or feature-based installation» and click «Next.«
Step 5: Choose the appropriate server from the server pool and click «Next.«
Step 6: Scroll down and expand «User Interfaces and Infrastructure» in the list of features. Check the box next to «Desktop Experience» and click «Next.«
Step 7: Review the information on the «Features» screen and click «Install» to begin the installation process. Wait for the installation to complete.
Once the installation is finished, you will have successfully added the Desktop Experience feature to Windows Server 2019. Now you can enjoy a more familiar desktop user interface and access features such as Windows Media Player, desktop themes, and various administration tools.
| Pros | Cons |
|---|---|
| 1. Enhanced user interface with desktop features. | 1. Consumes additional system resources. |
| 2. Provides access to familiar tools like Windows Media Player. | 2. Could potentially introduce additional security risks. |
| 3. Simplifies administration tasks with graphical interfaces. | 3. May not be necessary for server-only environments. |
By following these simple steps, you can easily add the Desktop Experience feature to Windows Server 2019 and enjoy a more intuitive user experience.
Video Tutorial:How do I add desktop experience feature?
To add the desktop experience to Windows Server, you can follow these steps:
1. Open Server Manager: Click on the Windows icon in the taskbar, type «Server Manager,» and click on the Server Manager app.
2. Add required features: In the Server Manager dashboard, click on «Manage» and select «Add Roles and Features.» This will open the Add Roles and Features Wizard.
3. Select server: On the Before You Begin page, click «Next» to proceed.
4. Installation Type: Choose «Role-based or feature-based installation» and click «Next.«
5. Select server: Choose the desired server on which you want to install the Desktop Experience feature and click «Next.«
6. Features: Scroll down and expand «User Interfaces and Infrastructure» category. Check the box next to «Desktop Experience» and click «Next.«
7. Confirmation: Review the selected features and click «Install.«
8. Installation progress: Wait for the installation to complete. You can monitor the progress in the progress bar.
9. Completion: Once the installation is finished, you will see the «Installation succeeded» message. Click «Close» to exit the wizard.
10. Restart the server: After adding the desktop experience, it is recommended to restart the server for the changes to take effect. You can either restart immediately or manually restart later.
Following these steps will add the desktop experience to your Windows Server, allowing you to have a more familiar desktop-like user interface. This can be particularly useful if you intend to use the server for tasks that require a graphical interface.
Note: Adding the desktop experience may increase the resource usage of the server, so make sure your server meets the hardware requirements to handle the additional load.
Can you install Windows Server Core and then upgrade to desktop experience?
Yes, it is possible to install Windows Server Core and then upgrade to the desktop experience. Here are the steps to follow:
1. Begin by installing the Windows Server Core edition on your system. This version of Windows Server has a minimal graphical interface and is optimized for server-related tasks.
2. Once the installation is complete, you can choose to upgrade to the Windows Server with Desktop Experience edition if you require a more traditional desktop environment similar to the client versions of Windows.
3. To initiate the upgrade process, you need to access the Server Manager. You can do this by typing «sconfig» at the command prompt and pressing Enter.
4. In the Server Manager, navigate to the «Add roles and features» section.
5. A wizard will open, guiding you through the upgrade process. Click on «Next» to proceed.
6. Select «Role-based or feature-based installation» and click «Next.«
7. Choose the local server from the server pool and click «Next» again.
8. Scroll down and locate the «User Interfaces and Infrastructure» section. Expand it and tick the box next to «Server Graphical Shell.» This option will install the desktop experience.
9. A pop-up window will appear, asking to install additional features required by the server graphical shell. Click «Add Features» to proceed.
10. Hit «Next» until you reach the «Confirmation» page.
11. Review your selections, confirm the upgrade, and click «Install» to initiate the process.
12. The system will now install the desktop experience components. This may take a while, so be patient.
13. Once the installation is complete, you will receive a notification. Restart your system to apply the changes.
After the reboot, your Windows Server Core will be upgraded to the Windows Server with Desktop Experience edition. You will now have a desktop environment similar to Windows client versions, along with the additional features and capabilities of Windows Server.
Does Windows Server 2019 have desktop experience?
Yes, Windows Server 2019 does have a desktop experience option. The desktop experience feature provides a Windows interface, similar to the desktop version of Windows, allowing users to interact with the server using a graphical user interface (GUI). This can be particularly useful for users who are more accustomed to working with a traditional desktop environment and prefer a visual interface over command-line interactions.
Here are the steps to install the desktop experience feature in Windows Server 2019:
1. Log in to your Windows Server 2019 machine with administrative privileges.
2. Open the Server Manager application.
3. On the Dashboard page, click on «Add roles and features.«
4. The «Add Roles and Features Wizard» will appear. Click «Next» to proceed.
5. Choose the installation type as «Role-based or feature-based installation» and click «Next.«
6. Select your server’s target server from the server pool and click «Next.«
7. In the «Server Roles» section, leave the default settings and click «Next.«
8. On the «Features» page, check the box next to «Desktop Experience» and click «Next.«
9. Review the information on the «Confirmation» page, then click «Install» to begin the installation process.
10. Once the installation is completed, you can access the desktop experience on your Windows Server 2019 machine.
Enabling the desktop experience feature can provide a familiar interface for tasks such as managing files, installing applications, and configuring server settings without relying solely on command-line interactions. However, it’s important to note that enabling the desktop experience may consume additional system resources compared to running Windows Server without it. Therefore, it is recommended to carefully evaluate your server’s specifications and requirements before deciding to install the desktop experience feature.
Which version of Windows Server 2019 has GUI?
Windows Server 2019 provides multiple editions, each with different features and capabilities. When it comes to graphical user interface (GUI), there are two editions to consider: Windows Server 2019 with Desktop Experience and Windows Server 2019 without Desktop Experience (also known as Windows Server Core).
1. Windows Server 2019 with Desktop Experience: This edition includes the standard GUI that most users are familiar with. It offers a full Windows desktop environment with features like a Start menu, Taskbar, and Windows Explorer. The Desktop Experience edition is suitable for organizations that prefer a traditional server environment and require a graphical interface for managing and configuring the server.
2. Windows Server 2019 without Desktop Experience (Server Core): This edition provides a minimalistic installation option without the traditional Windows desktop environment. It does not include the standard GUI elements and is managed primarily through command-line tools, PowerShell, and remote management. Server Core is designed for efficiency, reduced resource usage, and improved security by minimizing the attack surface.
Determining which edition to choose depends on your specific requirements and preferences. Below are a few reasons why you might opt for each edition:
Reasons for Windows Server 2019 with Desktop Experience:
– Familiarity: If you have extensive experience managing Windows servers with a graphical interface, the Desktop Experience edition provides a familiar environment that reduces the learning curve.
– Administrative Tools: The Desktop Experience edition includes a wide array of administrative tools and wizards accessible through the graphical interface.
– Compatibility: Certain legacy applications and software may rely on a full GUI to function properly. If you have dependencies on such software, the Desktop Experience edition ensures compatibility.
Reasons for Windows Server 2019 without Desktop Experience (Server Core):
– Improved Performance: Server Core has a smaller footprint compared to the Desktop Experience edition, resulting in lower resource usage. This can lead to improved performance and reduced maintenance.
– Enhanced Security: Removing the GUI elements in Server Core reduces the attack surface of the server. Fewer components running on the server means fewer potential vulnerabilities.
– Automation and Scripting: Server Core is designed to be managed through command-line tools and PowerShell. It provides a streamlined environment for automation and scripting, making it ideal for environments that heavily use these approaches.
Ultimately, the choice between Windows Server 2019 editions with or without GUI depends on factors such as your level of expertise, specific server requirements, compatibility needs, and security considerations.
How do I change Windows Server 2019 to desktop experience?
To change Windows Server 2019 to the desktop experience, follow these steps:
1. Open the Server Manager:
– Click on the Start button.
– Type «Server Manager» in the search bar.
– Select the Server Manager from the search results.
2. In the Server Manager window, click on «Manage» from the top toolbar, and then click on «Remove Roles and Features» from the dropdown menu.
3. This will open the «Remove Roles and Features Wizard.» Click «Next» to proceed.
4. In the «Server Selection» screen, the local server should be selected by default. If not, choose the appropriate server from the server pool. Click «Next» to continue.
5. In the «Features» screen, locate and expand the «User Interfaces and Infrastructure» option.
6. Select the «Desktop Experience» checkbox and click «Next.«
7. The wizard may prompt you to install additional features that are required by the Desktop Experience. If prompted, click «Add Features» to install the required features and then click «Next» to proceed.
8. In the «Confirmation» screen, review the selected options. If everything looks correct, click «Install» to start the installation process.
9. Once the installation is complete, you will see the «Results» screen. Verify that the installation was successful, and then click «Close» to exit the wizard.
10. Finally, restart your Windows Server 2019 for the changes to take effect. After the restart, the server will boot into the desktop experience.
Please note that switching to the desktop experience may impact the performance and security of your server. Consider the specific requirements and use cases of your server environment before making the switch.
- What is Server 2019 desktop experience?
- How do I install Desktop Experience on Windows Server 2019?
- Does Windows Server 2019 have a GUI?
- Which version of Windows Server 2019 will not support the desktop experience?
- Can I run Windows Server 2019 on a PC?
- How can I make my desktop a server?
- Can you install Windows Server on a desktop?
- How do I turn on Desktop Experience feature?
- Is Windows Server 2019 free?
- What are the versions of Windows Server 2019?
- Should I upgrade to Windows Server 2019?
- How do I download the server Server 2019 desktop experience ISO?
What is Server 2019 desktop experience?
Server with Desktop Experience installs the standard graphical user interface, usually referred to as GUI, and the full package of tools for Windows Server 2019. … Instead of the traditional desktop interface, a Core installation is designed to be managed via the command line using Windows PowerShell.
How do I install Desktop Experience on Windows Server 2019?
Add the Desktop Experience feature
- Open Server Manager and right-click the Features node.
- Select Add Features from the menu that appears. …
- Select the Desktop Experience check box. …
- Click Add Required Features, and then click Next. …
- Click Install.
Does Windows Server 2019 have a GUI?
WindowsServer 2019 Installation no GUI (desktop-experience)
Which version of Windows Server 2019 will not support the desktop experience?
However, this is not anymore the case with version 2019. Though converting between Datacenter to Standard is still supported, Server Core or Desktop Experience (GUI) cannot be converted anymore. Either Server Core or Desktop Experience are determined at setup, once and for entire life of the product.
Can I run Windows Server 2019 on a PC?
Windows Server is just an Operating System. It can run on a normal desktop PC. In fact, it can run in a Hyper-V simulated environment that runs on your pc too.
How can I make my desktop a server?
- Step 1: Download Apache Server Software. Download the apache http server software from this apache mirror site: …
- Step 2: Install It. Double click the . …
- Step 3: Run It. Once it’s installed I think it starts the server running right away. …
- Step 4: Test It.
Can you install Windows Server on a desktop?
While Windows Server does have a desktop option, Microsoft recommends installing Windows Server without a Graphical User Interface (or removing it), leaving just a command line to work which reduces the overhead needed to run the server.
How do I turn on Desktop Experience feature?
To install the Desktop Experience feature:
- Click Start > Control Panel. …
- Click Programs. …
- Click Turn Windows features on or off. …
- In the right pane, scroll to Features Summary section.
- Click the Add Features link. …
- Select Desktop Experience.
- Click Next. …
- The Add Features Wizard dialog box reappears with Desktop Experience and any required components selected.
Is Windows Server 2019 free?
Nothing is free, particularly if it’s from Microsoft. Windows Server 2019 will cost more to run than its predecessor, Microsoft admitted, though it did not reveal how much more. «It is highly likely we will increase pricing for Windows Server Client Access Licensing (CAL),» said Chapple in his Tuesday post.
What are the versions of Windows Server 2019?
Windows Server 2019 has three editions: Essentials, Standard, and Datacenter.
Should I upgrade to Windows Server 2019?
From the 14th of January 2020, Server 2008 R2 will become a serious security liability. … On-premise installations of Server 2012 and 2012 R2 should be retired and moved to the Cloud running Server 2019 before 2023. If you are still running Windows Server 2008 / 2008 R2 we strongly recommend you upgrade ASAP!
How do I download the server Server 2019 desktop experience ISO?
Windows Server 2019 FOD can be downloaded as an ISO file here. To download it form the Microsoft Evaluation page: expand Windows Server 2019, then select ISO and click Continue. Proceed with filling the required information and then two download options shall appear.
Обзор
Ссылки по теме:
- Документация по Windows Server
Каналы распространения
- Long-Term Servicing Channel (LTSC)
- поставляется в виде ISO образа
- включает редакции Standard и Datacenter (без рабочего стола)
- есть возможность выбрать вариант с рабочим столом для обоих редакций
- Semi-Annual Channel (SAC)
- поставляется в виде образов отдельных контейнеров с основными сервисами
- контейнер nano Server
Основные области применения
- гибридное облако
- безопасность
- платформа приложений
- гиперконвергентная инфраструктура (HCI)
Возможности
- Windows Admin Center — веб сервис для управления инфраструктурой серверов и кластеров
- можно ставить на Windows Server 2019, Windows 10, также поддерживается установка на предыдущие версии для серверов и рабочих станций
- может управлять серверами и рабочими станциями различных версий
- поставляется бесплатно (либо в составе ОС)
- Системная аналитика
- подсистема анализа и прогнозирования на базе машинного обучения
- анализирует системные данные, такие как события и счетчиков производительности
- предоставляет аналитические результаты
Windows Server release information
Оригинальные ISO
Файл:	SW_DVD9_Win_Server_STD_CORE_2019_64Bit_English_DC_STD_MLF_X21-96581.iso
Семейство:	Operating Systems
Версия:	Windows Server 2019 (Updated Sept 2018) - re-release
Язык:	Английский (США) - (en)
CRC-32:	4b67205e
MD5:	f1222583e87a979c516e431d10ae0b16
SHA-1:	e1da51796746668fb36864a7c3c6460d01f7d0aa
SHA-256:	61a391f0dc98e703da674df3c984ac2eb432ff757f949385360e68476c920478
SHA-512:	6eaf8b8e55b5ece6ea5ab6cd99e625de665e683c72f91405efd5c84b4167020251dacb0a7485682979241370cd24ab7ce3b3ed7b8d724ed5a41ec51e0ff0bb92
SHA3-256:	63a9737bf4f8591f08b0529e921dbca999afbf67b3b360125f7f99696217be02
SHA3-512:	be45b7e57178fb6243af2568045907dd97d554a928a53e216ca165012090731fe9c7af40e9697fe886f49b547981e489c6fc7d1bf6116220a90de709b65e72ff
Размер:	4.51 GB (4843016192 байт)
Установка
При установке Windows Server 2019 можно выбрать одну из четырех редакций:
- Windows Server 2019 Standard
- Windows Server 2019 Standard (Desktop Experience)
- Windows Server 2019 Datacenter
- Windows Server 2019 Datacenter (Desktop Experience)
В русском дистрибутиве список редакций выглядит так:
- Windows Server 2019 Standard
- Windows Server 2019 Standard (возможности рабочего стола)
- Windows Server 2019 Datacenter
- Windows Server 2019 Datacenter (возможности рабочего стола)
Windows Server 2019 Nano - является контейнером и может работать только внутри другой редакции ОС Windows.
Windows Server 2019 Standard
Редакция без полноценного графического интерфейса, считается базовой и рекомендуется для всех сервисов, которые могут работать без графического интерфейса.
Установка
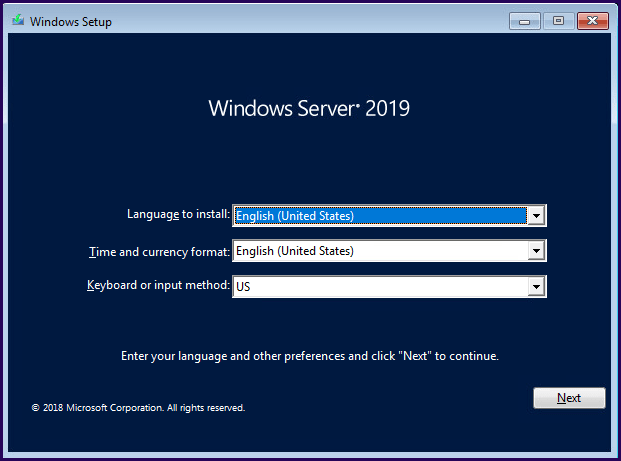
Выбор языковых настроек
Language to install:      [English(United States)]
Time and currency format: [English(United States)]
Keyboard or input method: [US]
Важно: Нельзя выбирать русские параметры, т.к. по умолчанию задается только одна раскладка и если она не [US], то вы не сможете вводить никакие команды
После установки
Смените региональные настройки на русские
# 203 Russia
# 244 United States
Set-WinHomeLocation -GeoId 203
Добавьте русскую раскладку
Get-ItemProperty "HKCU:\Keyboard Layout\Preload\"
New-ItemProperty "HKCU:\Keyboard Layout\Preload\" -Name 2 -Type String -Value "00000419"
Если необходимо, то измените сочетание клавиш для смены раскладки
Get-ItemProperty "HKCU:\Keyboard Layout\Toggle\"
Set-ItemProperty "HKCU:\Keyboard Layout\Toggle\" -Name "HotKey" -Value 2
# 1 - Alt+Shift
# 2 - Ctrl+Shift
Проверьте настройки «Current User» и скопируйте их на системный профиль и профиль по умолчанию, после чего смените локаль на русскую
intl.cpl
Formats
  Format: Russian (Russia)
Administrative
  [Copy settings]
    Current User
      Display language: English (United States)
      Input language:   English (United States) - US
      Format:           Russian (Russia)
      Location:         Russia
    Copy your current settings to:
      [v] Welcome screen and system accounts
      [v] New user accounts
    [OK]
  [Change system locale ...]
    Russian (Russia)
    [ ] Beta: Use Unicode UTF-8 for worldwide language support
  Перезагрузка
При установке с русского дистрибутива, важно выбрать
Устанавливаемый язык:               [Русский]
Формат времени и денежных единиц:   [Английский(США)]
Метод ввода (раскладка клавиатуры): [США]
Далее делаем все так же как и для англоязычного дистрибутива
Конфигурация
Включение RDP
powershell
Set-ItemProperty "HKLM:\SYSTEM\CurrentControlSet\Control\Terminal Server" -Name fDenyTSConnections -Value 0

Enable-NetFirewallRule -DisplayGroup "Remote Desktop"
утилиты, команды
reg add "HKLM\SYSTEM\CurrentControlSet\Control\Terminal Server" /v fDenyTSConnections /t REG_DWORD /d 0 /f
netsh advfirewal firewall set rule group="Remote Desktop" new enable=yes
Управление
Общее
Приложения
- Windows Admin Center
powershell
clear-host           # очистка экрана (синонимы: clear, cls)

get-childitem        # список дочерних объектов (синонимы: dir,ls), умеет перечислять каталоги и файлы, переменные среды, реестр
ls C:\
ls ENV:\
ls ENV:\username
ls HKLM:\SOFTWARE

Stop-Computer        # выключить компьютер
Restart-Computer     # перегрузить компьютер

# информация об ОС
systeminfo /fo csv | ConvertFrom-Csv | select OS*, System*

# полный номер версии ОС
cmd /c ver

# смена имени компьютера
Rename-Computer -NewName MyComp
Restart-Computer

# вывод имени компьютера
(Get-ComputerInfo).CsName
dir env:\computername

# список устройств с проблемой драйвера
Get-PnpDevice | where { ($_.Status -ne "OK") -and ($_.Present) }

# проверка активации
# если status=1, значит успешно активирована
Get-CimInstance -ClassName SoftwareLicensingProduct |where PartialProductKey | select Name, ApplicationId, LicenseStatus | Format-List *
Просмотр логов
# Вывод последних 100 записей из лога System
Get-EventLog -LogName System -Newest 100
Включение удаленного управления
# если категория сети на сетевом интерфейсе public, то необходимо изменить на private
Set-NetConnectionProfile -InterfaceIndex <номер_интерфейса> -NetworkCategory Private

# включение удаленного управления
Enable-PSRemoting -force

# определение доверенных хостов, которым разрешено подключение
Set-Item WSMan:\localhost\Client\TrustedHosts -Value *

# удаленное подключение
Enter-PSSession -ComputerName <server_IP> -Credential .\Administrator
утилиты, команды (выполняется в command shell, т.е. в cmd)
cls                  # очистка экрана
shutdown /s /t 0     # выключить компьютер
shutdown /r /t 0     # перегрузить компьютер

dir                  # перечисление каталогов и файлов
reg                  # работа с реестром
set                  # перечисление переменных среды

# вывод имени компьютера
echo %computername%

# работа с драйверами устройств
pnputil /?

# информация о системе (версия ОС, версия BIOS, процессоры, память, и т.д.)
systeminfo

# полный номер версии ОС
ver
Смена SID с помощью sysprep
# выполняется в command shell

cd C:\Windows\System32\sysprep
sysprep.exe

# в графическом окне
Enter System Out-of-Box Experience (OOBE)
[v] Generalize
Shutdown options
[Shutdown]

# Enter System Out-of-Box Experience (OOBE) - запустить мастер первичной настройки ОС при следующем старте системы
# Generalize - удалить SID и драйвера специфичные для текущего оборудования
Время
powershell
Get-TimeZone                  # получить текущую временную зону
Get-TimeZone -ListAvailable   # список доступных временных зон
Set-TimeZone -id "..."        # установка текущей временной зоны по id
Set-TimeZone -Name "..."      # установка текущей временной зоны по StandardName
Настройка NTP
- How to configure an authoritative time server in Windows Server
# включение NTP сервера
Set-ItemProperty -Path "HKLM:\SYSTEM\CurrentControlSet\Services\w32time\TimeProviders\NtpServer" -Name "Enabled" -Value 1

# проверка правила файрвола, разрешающего доступ к серверу времени
# на контроллерах домена оно включается в составе группы "Active Directory Domain Services"
Get-NetFirewallRule -DisplayName "Active Directory Domain Controller - W32Time (NTP-UDP-In)"
Get-NetFirewallRule | where {$_.DisplayName -match "W32time"}

# задание списка вышестоящих серверов времени для обновления (по умолчанию "time.windows.com,0x8")
Set-ItemProperty -Path "HKLM:\SYSTEM\CurrentControlSet\services\W32Time\Parameters" -Name "NtpServer" -Value "0.pool.ntp.org,0x1 1.pool.ntp.org,0x1 2.pool.ntp.org,0x1"


# выставление флагов (значение по умолчанию 0x0A)
Set-ItemProperty -Path "HKLM:\SYSTEM\CurrentControlSet\services\W32Time\Config" -Name "AnnounceFlags" -Value <0x05 или 0x0A>

# AnnounceFlags:
#   0x00 Not a time server
#   0x01 Always time server
#   0x02 Automatic time server
#   0x04 Always reliable time server
#   0x08 Automatic reliable time server

Restart-Service w32Time
Для управления синхронизацией времени можно также использовать утилиту w32tm /?
- W32tm
Дисковая подсистема
powershell
Get-Disk             # список физических дисков
Get-Volume           # список томов
Get-SMBOpenFile      # список файлов открытых по сети
Close-SMBOpenFile    # закрыть файл открытый по сети
утилиты
diskpart             # управление дисками и томами
openfiles            # управление открытыми по сети файлами (для управления локальными файлами нужна доп. настройка ОС)
Локальные группы и пользователи
powershell
Get-LocalUser        # вывести список локальных пользователей
Get-LocalGroup       # вывыести список локальных групп

# Список членов локальной группы
Get-LocalGroup -Name Administrators | Get-LocalGroupMember

# смена паролья локального администратора
Set-LocalUser -Name Administrator -Password $( Read-Host "pass" -AsSecureString )
Active Directory
powershell
Управление пользователями
# получить список всех пользователей AD в заданном контейнере
Get-ADUser -filter 'Name -like "*"' -SearchBase <путь_к_контейнеру> | ft name

# добавление нового пользователя
New-ADUser -Name <общее_имя> -PasswordNeverExpires $true -SamAccountName <имя_учетки> -path <путь_к_контейнеру>

# смена пароля пользователя AD
Set-ADAccountPassword <имя_учетки> -NewPassword $( Read-Host "Enter new password" -AsSecureString )

# установка атрибута смены пароля при входе
Set-ADUser <имя_учетки> -PasswordNeverExpires $false -ChangePasswordAtLogon $true

# включение учетки
Set-ADUser <имя_учетки> -Enabled $true
Управление группами
# список групп заданного типа
Get-ADGroup -filter 'GroupScope -eq "Global"' | ft Name
Get-ADGroup -filter 'GroupScope -eq "DomainLocal"' | ft Name
Get-ADGroup -filter 'GroupScope -eq "Universal"' | ft Name

# добавление учетки в группу
Add-ADGroupMember <имя_группы> -Members <имя_учетки>
Другое
# включение компьютера в домен
$credential = New-Object System.Management.Automation.PSCredential("Administrator@firma.ru",(Read-Host "password" -AsSecureString))
Add-Computer -DomainName "firma.ru" -Credential $credential [-OUPath ...]

# Работа с группами
Get-ADGroup
Get-ADGroupMember

# Работа с OU
Get-ADOrganizationalUnit

# определение Forest Level
Get-ADForest | select ForestMode

# определение Domain Level
Get-ADDomain | select DomainMode
Сеть
Ссылки по теме
- Настройка сети с помощью PowerShell (IP адрес, DNS, шлюз, маршруты)
- Объединение сетевых карт (Nic Teaming) в Windows Server 2019
powershell
# список командлетов включенных в модуль NetTCPIP
get-command -module NetTCPIP

# Список сетевых адаптеров
Get-NetAdapter

# переименование адаптера
Rename-NetAdapter -Name "Ethernet 3" -NewName "LAN"

# вывести текущие IPv4 адреса
Get-NetIPAddress -AddressFamily IPv4

# вывести текущие IP адреса (другой способ)
Get-NetIPConfiguration

# отключение DHCP на интерфейсе
Set-NetIPInterface -InterfaceIndex <номер_интерфейса> -Dhcp Disabled

# Set-NetIPAddress использует параметр IPAddress для поиска, но не для изменения
# для ручной настройки IP адреса, используйте командлет New-NetIPAddress
# например так
$ipParams = @{
InterfaceIndex = 4
IPAddress = "192.168.0.10"
PrefixLength = 24
AddressFamily = "IPv4"
DefaultGateway = "192.168.0.1"
}
New-NetIPAddress @ipParams

# после добавления IP адреса не забудьте проверить текущий список IP и корректность маршрута по умолчанию, лишнее удаляйте

# удаление IP адреса добавленного вручную
Remove-NetIPAddress -IPAddress <IP_адрес>

# вывод списка маршрутов
Get-NetRoute

# удаление маршрута
Remove-NetRoute -DestinationPrefix <префикс_назначения> ... прочие параметры однозначно идентифицирующие маршрут

# перезагрузка интерфейса, желательна после изменения конфигурации
Restart-NetAdapter -InterfaceAlias <имя_интерфейса>

# установка главного (primary) DNS суффикса
Set-ItemProperty -Path HKLM:\SYSTEM\CurrentControlSet\Services\Tcpip\Parameters -Name 'NV Domain' -Value 'example.com'
Restart-Computer

# указание DNS серверов для интерфейса
Set-DnsClientServerAddress -InterfaceIndex <номер_интерфейса> -ServerAddresses <IP_DNS1>,<IP_DNS2>

# проверка очередности DNS серверов
Get-NetAdapter LAN | Get-DnsClientServerAddress

# проверка флага RegisterThisConnectionAddress
Get-NetAdapter <имя_адаптера> | Get-DnsClient

# параметры сетевого подключения
Get-NetConnectionProfile
# в том числе выводит тип сети
# NetworkCategory  : Public

# изменение сети на private
Set-NetConnectionProfile -InterfaceIndex <номер_интерфейса> -NetworkCategory Private

# разрешение DNS имени
Resolve-DNSName <dns_name>

# выключение IPv6
Get-NetAdapterBinding -ComponentID ‘ms_tcpip6’ | Disable-NetAdapterBinding -ComponentID ‘ms_tcpip6’ -PassThru
Объединение сетевых карт (Nic Teaming)
- В Диспетчере серверов создаем группу и задаем ее имя
- Включаем в нее сетевые интерфейсы
- В разделе «Дополнительно» выбираем режим поддержки группы (Teaming Mode), доступны следующие настройки
- Режим поддержки групп
- Режим балансировки нагрузки
- Резервный адаптер
- Основной групповой интерфейс
Режим поддержки групп, возможны 3 варианта
- Не зависит от коммутатора (Switch independent)
- можно включать в разные коммутаторы
- не нужно ничего настраивать на стороне коммутаторов
- балансируется только исходящий трафик
- входящий трафик приходит на основной адаптер группы, если он выходит из строя, то все входящие идут на другой адаптер группы
- Статическая поддержка групп (Static Teaming) (IEE 802.3ad draft v1)
- Необходима настройка на стороне коммутатора, порты вручную объединяются в группу
- Все адаптеры должны быть подключены к одному коммутатору
- Данный режим обычно поддерживают коммутаторы серверного класса
- Исходящие будут балансироваться по алгоритму заданному на стороне сервера
- Входящие будут балансироваться по алгоритму заданному на стороне коммутатора
- LACP (Link Aggregation Control Protocol), IEE 802.1.ax
- Необходима настройка на стороне коммутатора
- Нет привязки к конкретным портам, настройка осуществляется на уровне коммутатора
- Переключение в другой порт обычно не требует внесения изменений в настройку коммутатора
- Согласование портов происходит динамически по протоколу LACP
Режим балансировки нагрузки также имеет 3 варианта
- Хеш адреса (Address Hash)
- Порт Hyper-V (Hyper-V Port)
- Динамический (Dynamic)
Firewall
powershell
# список команд
Get-Command -Module NetSecurity

# список групп правил файрвола
Get-NetFirewallRule | select DisplayGroup -Unique

# список правил файрвола в заданной группе
Get-NetFirewallRule -DisplayGroup "Remote Desktop" | ft Enabled, Name, DisplayName, Action, Profile
Hyper-V
Ссылки по теме:
- Using FreeRDP to connect to the Hyper-V console
- Работа с Hyper-V и Windows PowerShell
- Сжатие виртуальных динамических дисков Hyper-V
Get-Command -Module hyper-v    # список всех команд в модуле hyper-v

Get-VM                         # список виртуальных машин

Get-VM myVM | Get-Member       # вывод списка всех параметров и методов объекта

# вывод основных параметров
$VM = Get-VM myVM
$VM| ft Name,ProcessorCount,MemoryStartup
$VM.NetworkAdapters
$VM.HardDrives
$VM.DVDDrives

Start-VM -Name myVM            # запуск машины myVM
Stop-VM  -Name myVM            # штатное завершение работы гостевой системы, если нет активных сессий
Stop-VM  -Name myVM -Force     # штатное завершение работы гостевой системы, завершение всех сессий и принудительное завершение процессов, которые не могут корректно завершиться
Stop-VM  -Name myVM -Save      # сохранить текущее состояние и выключить (аналог гибернации)
Stop-VM  -Name myVM -Turnoff   # выключить виртуальную машину (аналог выключения питания)

Suspend-VM -Name myVM          # поставить виртуальную машину на паузу (аналог сна)
Resume-VM  -Name myVM          # снять виртуальную машину с паузы

Get-VMSnapshot -VMName myVM    # вывести список snapshot-ов

# создать snapshot для виртуальной машины myVM и присвоить ему имя BeforeUpdates
Checkpoint-VM -Name myVM -SnapshotName BeforeUpdates

# восстановление на момент создания указанной контрольной точки (изменения текущего состояния до момента вышестоящей контрольной точки теряются)
Restore-VMSnapshot -VMName myVM -SnapshortName <имя_контрольной_точки>

# удаление контрольной точки
Remove-VMSnapshot -VMName myVM -SnapshortName <имя_контрольной_точки>

# удаление контрольной точки включая все дочерние
Remove-VMSnapshot -VMName myVM -SnapshortName <имя_контрольной_точки> -IncludeAllChildSnapshots
Пример создания новой виртуальной машины
$VMName="SRV01"
$VM = @{
   Name = "$VMName"
   Generation = 2
   MemoryStartupBytes = 4GB
   NewVHDPath = "$VMName.vhdx"
   NewVHDSize = 50GB
   BootDevice = "VHD"
   SwitchName = "Default Switch"
}
New-VM @VM
Set-VMProcessor -VMName $VMName -Count 4
Add-VMDvdDrive -VMName $VMName -Path "D:\hyper-v\iso\win2019.iso"

# смотрим текущий порядок загрузки
$Boot = (Get-VMFirmware -VMName $VMName).BootOrder
$Boot

# задаем нужный порядок загрузки
Set-VMFirmware -VMName $VMName -BootOrder $Boot[2],$Boot[0],$Boot[1]

# отключаем создание автоматических контрольных точек, как минимум на период установки ОС
Set-VM -Name $VMName -AutomaticCheckpointsEnabled $false

# отключение динамической памяти, по необходимости (динамическая память может создать проблемы с производительностью)
Set-VMMemory -VMName $VMName -DynamicMemoryEnabled $false
Переключение виртуальной машины на другой виртуальный коммутатор
Get-VM myVM | Get-VMNetworkAdapter | Connect-VMNetworkAdapter -SwitchName "NewSwitch"
Подключение к консоли гостевой машины на Hyper-V из Linux
# получите идентификатор гостевой машины
(Get-VM <имя>).id

# подключение из ubuntu 20.04 (проверено)
sudo apt install freerdp2-x11
xfreerdp /cert-ignore /u:<username> /vmconnect:<vmid> /v:<hypervhost>

# в других дистрибутивах Linux возможен еще такой вариант (не проверено)
xfreerdp -ignore-certificate -no-nego -u <username> -pcb <vmid> -t 2179  <hypervhost>
Управление ролями и компонентами
# вывод дерева ролей и компонентов
Get-WindowsFeature

# установка компонента
Install-WindowsFeature "<имя_компонента>"

# удаление компонента
Uninstall-WindowsFeature -Name "<имя_компонента>" -Remove
Управление модулями Powershell
Get-Module -list
Управление пакетами
# вывод списка установленных провайдеров пакетов
Get-PackageProvider

# Установка провайдера пакетов
Install-PackageProvider -Name <имя_провайдера>
Удаление провайдера пакетов
# определение пути размещения провайдера пакетов
(Get-PackageProvider -Name <имя_провайдера>).ProviderPath

# обычно Windows загружает дополнительные провайдеры пакетов из каталога поиска провайдеров пакетов C:\Program Files\PackageManagement\ProviderAssemblies
# если провайдер расположен в другом месте, то вопрос удаления необходимо дополнительно изучить
# для удаления провайдера достаточно удалить все его файлы и подкаталог
# файлы провайдеров обычно открыты и просто так удалить не получится
# сначала файлы провайдера нужно переместить за пределы каталога провайдеров и перегрузить компьютер
# после этого можно удалить файлы и подкаталоги провайдера

# пример удаления провайдера пакетов NuGet
move "C:\Program Files\PackageManagement\ProviderAssemblies\nuget\2.8.5.208\Microsoft.PackageManagement.NuGetProvider.dll" C:\
rmdir "C:\Program Files\PackageManagement\ProviderAssemblies\nuget" -Recurse
Restart-Computer
del "C:\Microsoft.PackageManagement.NuGetProvider.dll"
Обновление
Ссылки по теме
- Что означают названия продуктов Windows 10 в WSUS
# Установка пакетного провайдера NuGet
Install-PackageProvider -Name NuGet -MinimumVersion 2.8.5.201 -Force

Install-Module -Name PSWindowsUpdate

Get-Content Function:\Start-WUScan
Get-Command -Module WindowsUpdateProvider
Терминальная ферма
# список серверов терминальной фермы и их ролей
# выполняется на активном RDCB
Get-RDServer
Установка приложений или правка реестра на хосте с установленным RDSH
# переключение текущей сессии в режим установки
change user /install

... устанавливаем приложения, правим реестр и т.п. ...

# переключение текущей сессии в режим выполнения
change user /execute
Возможности (Capabilities)
Список возможностей (на 5.07.2021)
- Accessibility.Braille
- Browser.InternetExplorer
- Hello.Face.17658
- Hello.Face.Migration.17658
- Kernel.Soft.Reboot
- Language.Basic*
- Language.Fonts.*
- Language.Handwriting*
- Language.OCR*
- Language.Speech*
- Language.TextToSpeech*
- MathRecognizer
- Media.WindowsMediaPlayer
- Microsoft.Onecore.StorageManagement
- Microsoft.Windows.StorageManagement
- Msix.PackagingTool.Driver
- NetFX3
- OpenSSH.Client
- OpenSSH.Server
- Print.EnterpriseCloudPrint
- Print.MopriaCloudService
- RIP.Listener
- ServerCore.AppCompatibility
- Tools.DTrace.Platform
- Tools.Graphics.DirectX
- WMI-SNMP-Provider.Client
- XPS.Viewer
Полный список содержит множество вариаций для различных языков, поэтому я использовал символ маски *, для обозначения группы элементов. Также из имени удален номер версии.
Особенности (Features)
Обзор
Особенности (Feature) бывают трех типов (FeatureType)
- Role
- Role Service
- Feature
На верхнем уровне иерархии особенностей располагаются роли и простые особенности.
Сервисы обычно входят в состав ролей.
Простые особенности также могут содержать вложенную иерархию особенностей.
Роли
- Active Directory Certificate Services
- Active Directory Domain Services
- Active Directory Federation Services
- Active Directory Lightweight Directory Services
- Active Directory Rights Management Services
- Device Health Attestation
- DHCP Server
- DNS Server
- Fax Server
- File and Storage Services
- Host Guardian Service
- Hyper-V
- Network Policy and Access Services
- Print and Document Services
- Remote Access
- Remote Desktop Services
- Volume Activation Services
- Web Server (IIS)
- Windows Deployment Services
- Windows Server Update Services
Особенности верхнего уровня (не имеющие статус роли)
- .NET Framework 3.5 Features
- .NET Framework 4.7 Features
- Background Intelligent Transfer Service (BITS)
- BitLocker Drive Encryption
- BitLocker Network Unlock
- BranchCache
- Client for NFS
- Containers
- Data Center Bridging
- Direct Play
- Enhanced Storage
- Failover Clustering
- Group Policy Management
- Host Guardian Hyper-V Support
- I/O Quality of Service
- IIS Hostable Web Core
- Internet Printing Client
- IP Address Management (IPAM) Server
- iSNS Server service
- LPR Port Monitor
- Management OData IIS Extension
- Media Foundation
- Message Queuing
- Multipath I/O
- MultiPoint Connector
- Network Load Balancing
- Network Virtualization
- Peer Name Resolution Protocol
- Quality Windows Audio Video Experience
- RAS Connection Manager Administration Kit (CMAK)
- Remote Assistance
- Remote Differential Compression
- Remote Server Administration Tools
- RPC over HTTP Proxy
- Setup and Boot Event Collection
- Simple TCP/IP Services
- SMB 1.0/CIFS File Sharing Support
- SMB Bandwidth Limit
- SMTP Server
- SNMP Service
- Storage Replica
- Telnet Client
- TFTP Client
- VM Shielding Tools for Fabric Management
- WebDAV Redirector
- Windows Biometric Framework
- Windows Defender Antivirus
- Windows Identity Foundation 3.5
- Windows Internal Database
- Windows PowerShell
- Windows Process Activation Service
- Windows Search Service
- Windows Server Backup
- Windows Server Migration Tools
- Windows Standards-Based Storage Management
- Windows Subsystem for Linux
- Windows TIFF IFilter
- WinRM IIS Extension
- WINS Server
- Wireless LAN Service
- WoW64 Support
- XPS Viewer
Active Directory Domain Services
Этапы:
- Настройте сетевой интерфейс:
- статический IP адрес
- маску подсети
- шлюз по умолчанию
- Смените имя компьютера на нужное и перегрузите компьютер
- Если компьютер клонирован с образа, то смените SID, в win2019 это важно, потому что в win2019 домен примет SID от первого контроллера, что создаст проблемы с включением в домен серверов с этого же образа.
- При включенном IPv6 добавление нового контроллера домена может зависнуть, нужно разбираться в причинах или отключить IPv6 на всех контроллерах домена
- Установите роль DNS сервера
- Установите роль Active Directory Domain Services
- Перегрузите компьютер
- Повысьте сервер до контроллера домена
# проверка конфигурации IP
Get-NetIPConfiguration
Get-NetIPAddress -AddressFamily IPv4
Установите роль DNS сервера
Install-WindowsFeature DNS

# Если не планируете разрешать имена от корня,
# то укажите DNS сервер для форвардинга

Set-DNSServerForwarder -IPAddress <DNS_сервер> -IncludeManagementTools
Установите роль Active Directory Domain Services
Install-WindowsFeature AD-Domain-Services -IncludeManagementTools
Создание нового леса
$params = @{
DomainName = "example.com"
CreateDnsDelegation = $false
DatabasePath = "C:\Windows\NTDS"
DomainMode = 7
DomainNetbiosName = "EXAMPLE"
ForestMode = "7"
InstallDns = $true
LogPath = "C:\Windows\NTDS"
NoRebootOnCompletion = $true
SysvolPath = "C:\Windows\SYSVOL"
Force = $true
}

Install-ADDSForest @params

Restart-Computer
Первая перезагрузка займет немного больше времени чем обычно.
Обратите внимание, что повышение до контроллера домена сбросила на сетевом интерфейсе порядок опроса DNS серверов на 127.0.0.1. В более ранних версиях Windows такая настройка могла создать проблему при загрузке, т.к. служба DNS стартовала позже и не могла ответить контроллеру. Если контроллер будет постоянно долго висеть на загрузке, то попробуйте изменить порядок DNS серверов, указав первым соседний контроллер домена.
Добавление контроллера домена в существующий домен
Install-ADDSDomainController -DomainName "example.com"
Remote Desktop Services
Состав роли, редакция: Windows Server 2019 Standard
[ ] Remote Desktop Services
    [ ] Remote Desktop Licensing
Состав роли, редакция: Windows Server 2019 Standard (Desktop Experience)
[ ] Remote Desktop Services
    [ ] Remote Desktop Connection Broker
    [ ] Remote Desktop Gateway
    [ ] Remote Desktop Licensing
    [ ] Remote Desktop Session Host
    [ ] Remote Desktop Virtualization Host
    [ ] Remote Desktop Web Access
Сокращения:
- RDWA (Remote Desktop Web Access)
- RD Licensing (Remote Desktop Licensing)
- RDCB (Remote Desktop Connection Broker)
- RDVH (Remote Desktop Virtualization Hosts)
- RDSH (Remote Desktop Session Host)
- RDG (Remote Desktop Gateway)
Схемы развертывания:
- Стандарт — RDCB, RDWA, RDSH — ставятся на 3 разных сервера
- Быстрый старт — все компоненты ставятся на один сервер
- Multipoint — вариант для учебных заведений, к серверу подключается несколько мониторов по HDMI и клавиатур по USB, Multipoint дает каждому свой рабочий стол.
- PSD (Personas Sessin Desktop) — нужно разобраться, это что-то типа каждому пользователю по своей виртуальной среде, типа почти как по своей виртуалке, но в рамках одной ОС сервера.
- RDCH — ?
Примеры установки
- win2019: Установка одного терминального сервера
- win2019: Установка терминальной фермы
Известные проблемы:
- RDP, черный экран
DNS Server
KMS SRV Record
Add-DnsServerResourceRecord -Srv -Name "_VLMCS._tcp" -ZoneName "mydomain.ru" -DomainName "kms.mydomain.ru" -Priority 0 -Weight 0 -Port 1688
DHCP Server
- Установка и настройка контроллера домена на Windows Server 2012R2 с помощью PowerShell
Не стоит экспериментировать с DHCP в рабочем сегменте сети. Ваш тестовый DHCP может выдать кому-то некорректный IP адрес, что может создать серьезные проблемы для всей сети.
Приведенные ниже инструкции предполагают, что будущий DHCP сервер уже включен в домен и все команды выполняются на DHCP сервере.
Установка роли DHCP сервера
# добавление роли и средств управления
Add-WindowsFeature -Name DHCP -IncludeManagementTools

# добавление локальных групп "DHCP Users" и "DHCP Administrators"
# если DHCP сервер является контроллером домена, то добавляются домен-локальные группы
Add-DHCPServerSecurityGroup

# перезапуск сервиса DHCP
Restart-Service DHCPServer

# добавление сервера в список авторизованных серверов в Active Directory
Add-DhcpServerInDC -DnsName <dhcp_server>

# получение списка DHCP серверов авторизованных в Active Directory
Get-DhcpServerInDC

# задание учетки, под которой DHCP сервис будет вносить изменения в DNS
# имя необходимо задавать в формате domain\user или user@domain.ru
Set-DHCPServerDnsCredential -Credential (Get-Credential)

# Добавление области
Add-DHCPServerv4Scope -Name <name> -StartRange <IP1> -EndRange <IP2> -SubnetMask <маска подсети> -State Active

# вывод текущего списка областей
Get-DHCPServerv4Scope

# определение опций на уровне сервера, которые наследуются всеми областями
Set-DHCPServerv4OptionValue -DnsServer <IP_dns1>, <IP_dns2> -DnsDomain <dns_domain> -Router <IP_gateway>

# вывод списка опций заданных на уровне сервера
Get-DHCPServerv4OptionValue
# удаление опции заданной на уровне сервера
Remove-DHCPServerv4OptionValue -OptionId <option_id>

# определение опций на уровне области
Set-DhcpServerv4OptionValue -ScopeId <scope_id> -Router <IP_gateway>

# вывод списка опций заданных на уровне области
Get-DHCPServerv4OptionValue -ScopeId <scope_id>

# удаление опции заданной на уровне области
Remove-DHCPServerv4OptionValue  -ScopeId <scope_id> -OptionId <option_id>
Текст ниже пока только скопипастил из статьи выше.
Нужно протестировать и причесать.
# Если после конфигурации DHCP выходит сообщение, что конфигурация не настроена, то выполняем:
Set-ItemProperty -Path registry::HKEY_LOCAL_MACHINE\SOFTWARE\Microsoft\ServerManager\Roles\12 -Name ConfigurationState -Value 2

# перезагрузка
Restart-Computer -Force
Windows Server Update Services
WSUS (Windows Server Update Services) — предназначен для централизации процесса обновления систем на базе Microsoft Windows
Ссылки по теме
- Windows Server Update Services best practices
- The complete guide to WSUS and Configuration Manager SUP maintenance
Install-WindowsFeature -Name UpdateServices -IncludeManagementTools

# настраиваем каталог данных WSUS
# каталог данных не рекомендуется размещать на системном диске
mkdir D:\WSUS
& 'C:\Program Files\Update Services\Tools\WsusUtil.exe' postinstall CONTENT_DIR=D:\WSUS

# определение в качестве вышестоящего источника обновлений Microsoft Update
Set-WsusServerSynchronization -SyncFromMU

# корректировка конфигурации WSUS
$wsus = Get-WsusServer
$wsusConfig = $wsus.GetConfiguration()

# включение языка
$wsusConfig.AllUpdateLanguagesEnabled = $false
$wsusConfig.SetEnabledUpdateLanguages("ru")
$wsusConfig.Save()

$subscription = $wsus.GetSubscription()
$subscription.StartSynchronizationForCategoryOnly()

Get-WsusProduct | where-Object {
    $_.Product.Title -in (
    'SQL Server 2019',
    'Exchange Server 2010',
    'Windows Server 2019')
} | Set-WsusProduct

Get-WsusClassification | Where-Object {
    $_.Classification.Title -in (
    'Update Rollups',
    'Security Updates',
    'Critical Updates',
    'Service Packs',
    'Updates')
} | Set-WsusClassification

$subscription.SynchronizeAutomatically=$true
$subscription.SynchronizeAutomaticallyTimeOfDay= (New-TimeSpan -Hours 0)
$subscription.NumberOfSynchronizationsPerDay=1
$subscription.Save()

# запуск синхронизации
$subscription.StartSynchronization()

# проверка текущего процесса синхронизации
$subscription.GetSynchronizationStatus()
Лабы
- win2019: Внедрение домена
Skip to content
Install and Configure Hyper-V in Windows Server 2019
Table of Contents
- Windows Server Desktop Experience(GUI) vs Server Core
- What is Windows Server 2019 Desktop Experience(GUI)?
- What is Windows Server 2019 Core?
- Download Windows Server 2019
- Installation of Windows Server 2019
- Installation of Hyper-V in Windows Server 2019 Desktop Experience (GUI)
- Creating Virtual Machines using Hyper-V Manager
- Install Hyper-V Role using PowerShell commands
- Installation of Windows Server 2019 Core
- Connect remotely to Hyper-V using Hyper-V Manager
- Protect your Hyper-V Environment with BDRSuite
- What type of Windows Server 2019 should you use?
- Final thoughts
Microsoft Hyper-V hypervisor – was initially launched in the Windows Server 2008 and its 1.0 VM configuration version release.
In the next releases, Microsoft added Hyper-V add-on not only for Windows Servers but also for Windows Workstations – Windows 8.1 & Windows 10.
Protect Your Data with BDRSuite
With Hyper-V, it is possible to create multiple Virtual Machines running different Operating Systems on a physical Windows Server. The hardware resources and computing option of hypervisor isolate the VM Guest OS from the Hypervisor OS.
There are two different Hyper-V versions:
- Microsoft Hyper-V Server-A stand-alone server that contains only the Windows Hypervisor (Hyper-V)
- Windows Server with Hyper-V Role -A stand-alone machine running a Windows Server OS on which the Hyper-V role is enabled
The Microsoft Hyper-V Server and Windows Server with Hyper-V role enabled are type-1 hypervisors that are used for different implementations

Difference between the two versions of Hyper-V:
| Microsoft Hyper-V Server | Windows Server with Hyper-V role |
|
|
Windows Server Desktop Experience(GUI) vs Server Core
In this section, we will discuss two forms of installations of Windows Server 2019. One being Windows Server 2019 Desktop Experience, also known as the Graphical User Interface (GUI) and the other is the Windows Server 2019 Core.
You can enable Hyper-V 2019 through the GUI of Windows Server 2019 or through Windows Server 2019 Core version and also from the Hyper-V Server 2019 ISO that can be downloaded from the Microsoft evaluation page.
Versions of Windows Server 2019:
- Windows Server 2019 Standard
- Windows Server 2019 Standard with Desktop Experience
- Windows Server 2019 Datacenter
- Windows Server 2019 Datacenter with Desktop Experience
Installation of Windows Server (Semi-Annual Channel), has the following options:
- Windows Server 2019 Standard
- Windows Server 2019 Datacenter
What is Windows Server 2019 Desktop Experience(GUI)?
Windows Server 2019 GUI is a Graphical User Interface Operating System, which means that all setting changes in the operating system are mainly done using GUI tools.
Advantages of Windows Server 2019 Desktop Experience:
- Presence of GUI makes it more user-friendly
- Easy to manage either remotely or locally
- Loaded with features and tools
Disadvantages of Windows Server 2019 Desktop Experience:
- Windows Server OS consumes more disk space and CPU/Memory resources since a number of features, applications, and service roles are installed by default
What is Windows Server 2019 Core?
The Windows Server 2019 Core has no user interface and all are managed through command line tools i.e. there is no GUI; the Windows Server Core is simply a Server Shell Package. It was first released in Windows Server 2008.
Advantages of Windows Server 2019 Desktop Experience:
- It is lightweight and ideally suited for large data centers and cloud environments
- Occupies less disk space and CPU/Memory since it is a non-graphical System Operation (similar to a Unix/Linux without Gnome Desktop or GUI)
Dis-advantages of Windows Server 2019 Desktop Experience:
- No GUI makes it less user friendly
- Limited Management tools, makes it hard to manage
- The non availability of some important features, drivers and roles make the initial setup process more difficult
Windows Server 2019 Core is mostly built to be managed by remote management tools, like the new Admin Center or even Hyper-V Manager. Both tools can be installed and used in Windows Servers, and also in Windows 8.1 and Windows 10.
Microsoft expects Windows Server Core to be the future server model that could be easily deployed in large data centers and also for the cloud.
Roles and Services that are not included in the Windows Server 2019 Core.
| Roles not in Server Core | Role Services not in Server Core |
|
|
Check Microsoft page for the full Roles and Services Features that are not included in Windows Server Core.
It’s possible to add more services and features to your Windows Server Core by using Feature on Demand (FOD).
Download Windows Server 2019
Before we start the Windows Server and Hyper-V implementation, we need to download the Windows Server 2019 ISO.
The ISO can be found here on the Microsoft evaluation page.
Users will have a free 180-day evaluation period after downloading the Windows Server 2019 Standard or Datacenter via Microsoft Evaluation Center.
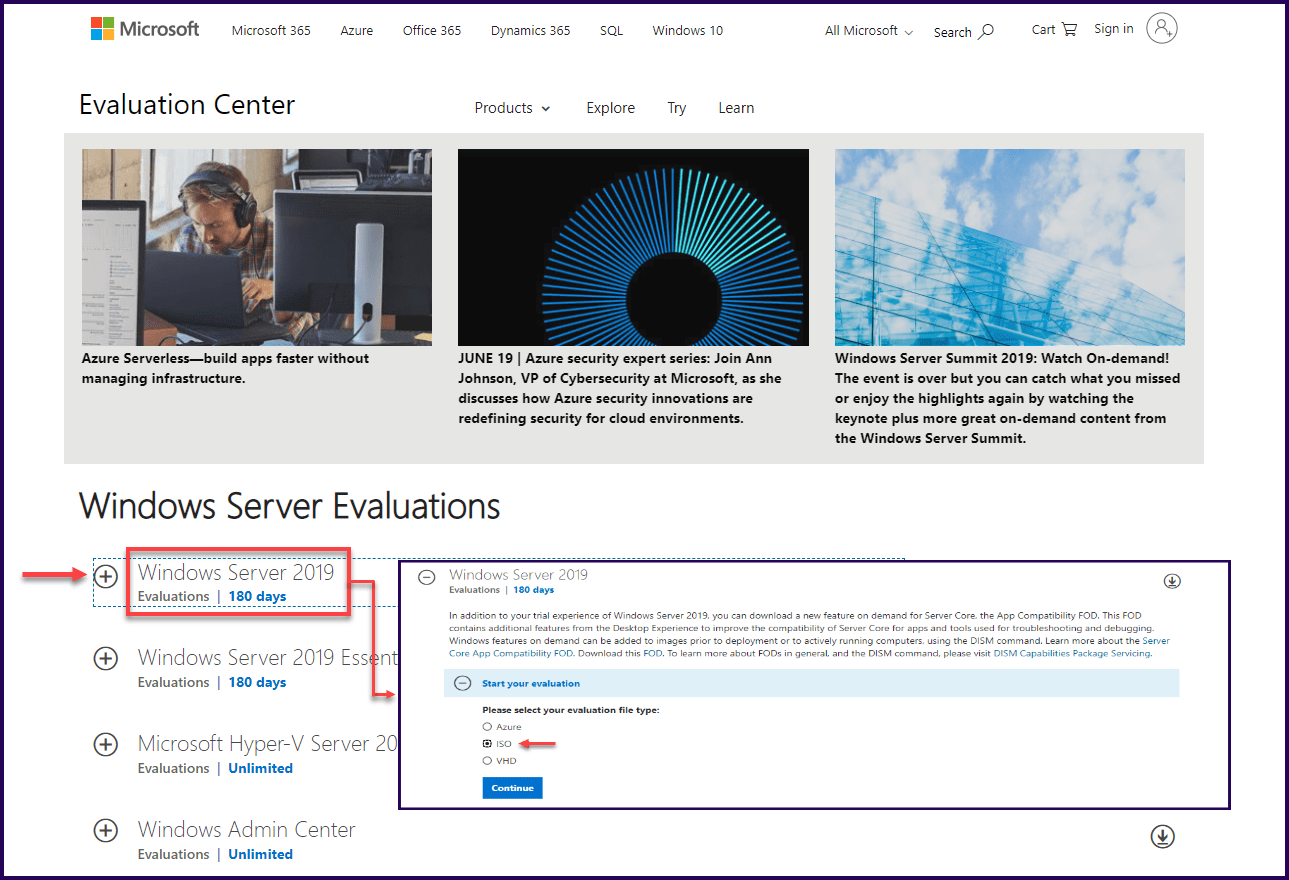
As we can see in the above image, we can download an ISO image, but also an Azure (for Azure deployments) and a VHD (for Hyper-V VM deployments).
We will use the ISO for a standard Windows Server 2019 Installation.
Installation of Windows Server 2019
Initially, there are no differences in the installation process while installing Windows Server 2019 GUI or Core.
Since the process to install Windows Server is the same from previous releases, I’ll show only a few steps in the next section.
First, select your Windows language, local time and currency, and your keyboard language.
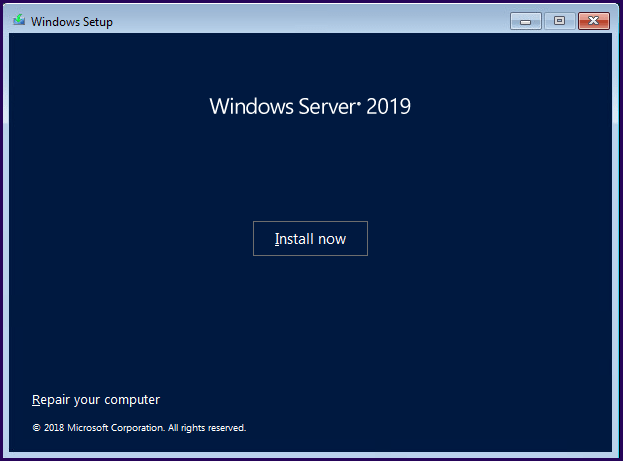
Next click Install Now.
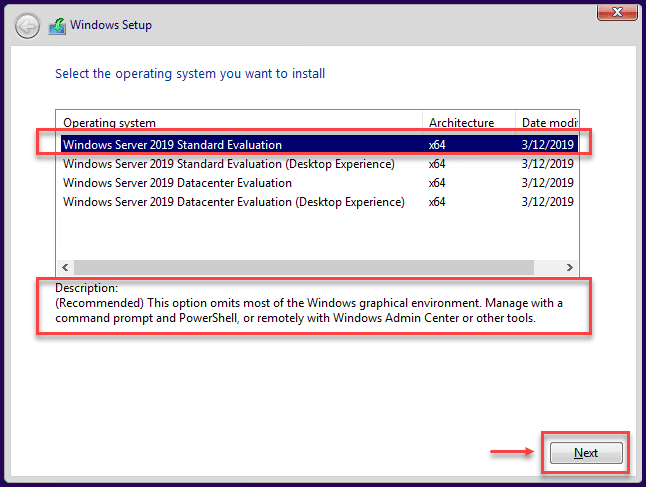
Then, select what type of Windows Server needs to be installed. Not only the edition (Standard or Datacenter) but also the type of Windows Server (Desktop Experience – GUI or Core).
For Windows Server 2019 Desktop Experience Install
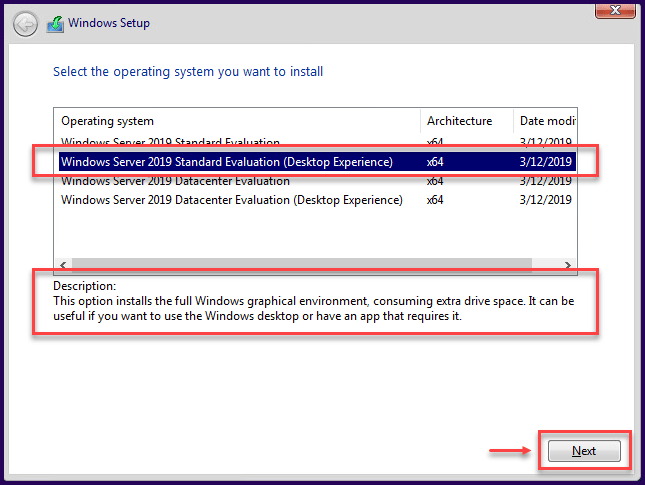
For Windows Server 2019 Core Install
Note: After you select to install Windows Server Core, it is not possible to convert to a Windows Server 2019 Desktop Experience. It needs a fresh install and cannot use the previous Windows Server Core installation. This was possible in previous releases.
You only need to select the type of Windows Server 2019, and the installation process is the same for both.
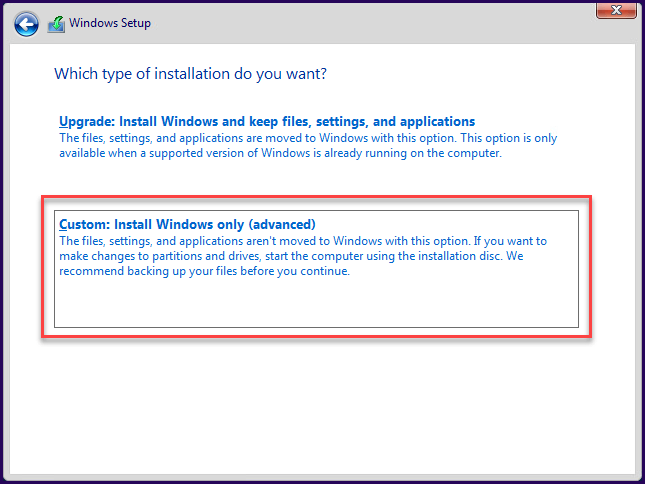
Since this is a fresh install, we will use the “Custom” option.
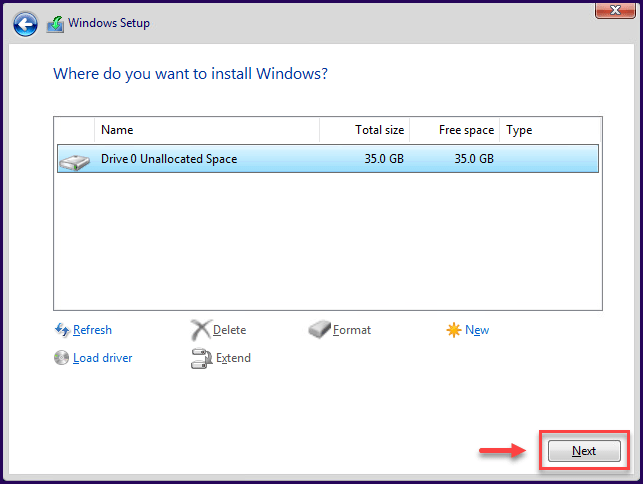
Choose the location to install Windows and click Next.
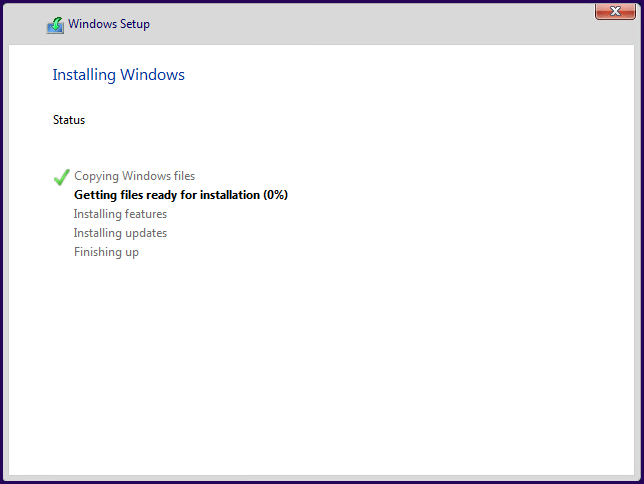
After the installation, the post configuration is different since one option has a GUI and the other has a command console to do all the changes and settings in the system operation like installing Hyper-V role.
Important Note: Before you install Hyper-V, run Windows Update so that you can get the latest updates and fixes.
Installation of Hyper-V in Windows Server 2019 Desktop Experience (GUI)
After the installation of the Operating System, login to your new Windows Server 2019, and install the Hyper-V role.
Install Hyper-V Role using Server Manager
Open Server Manager and in the top right corner select Manage tab
Under the Manage tab select Add Roles and Features and click “Next”
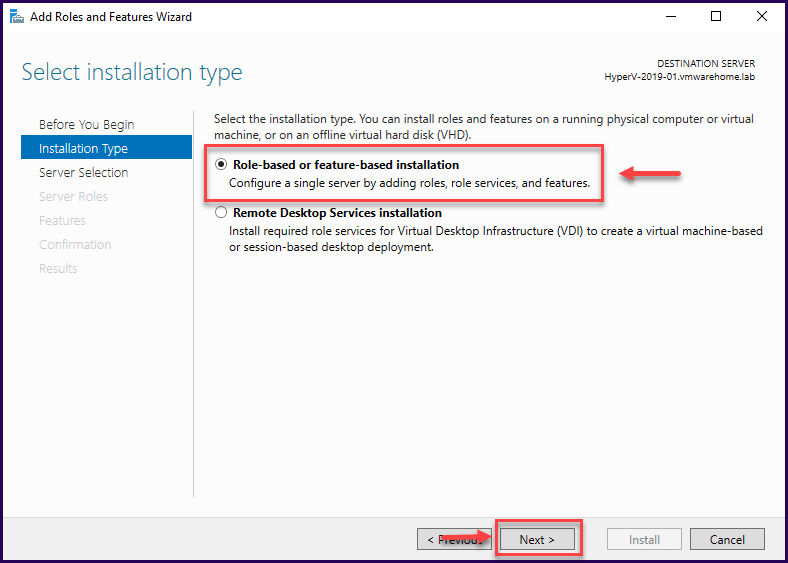
After clicking “Next” in the previous screen, in the Installation type select “Role-based or feature-based installation” and click “Next”.
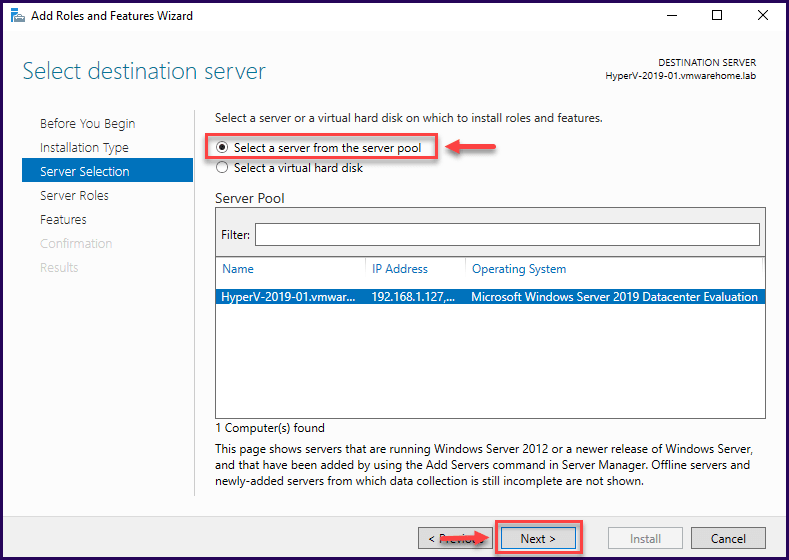
Select the Destination Server. If this is a local role installation or a remote role installation (another server), leave the default “Select a server from the server pool” and click “Next”.
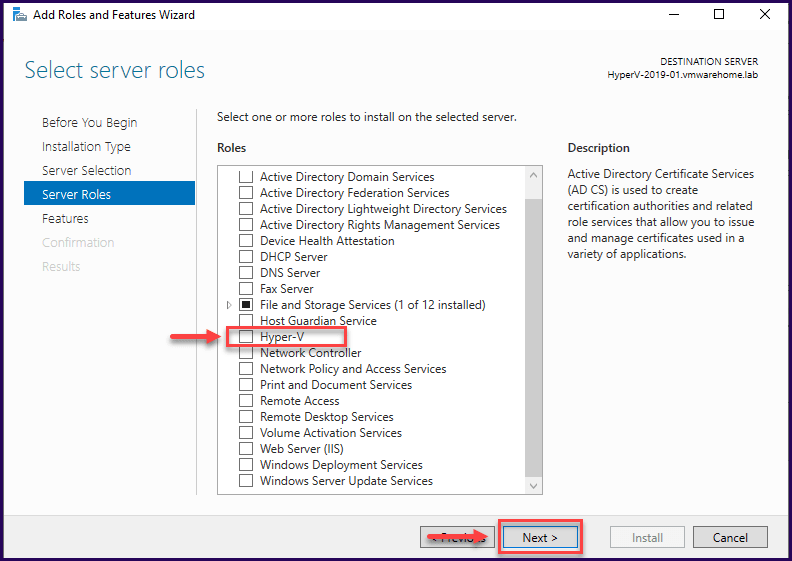
Select the Server Role that you plan to install, in this case, It’s the Hyper-V.
In the next screen, it is important to check if the option “Include management tools” is enabled.
Note: By default, the Hyper-V role installs the management tools, but double-check if it is enabled – since this tool is necessary to manage your Hyper-V Server.
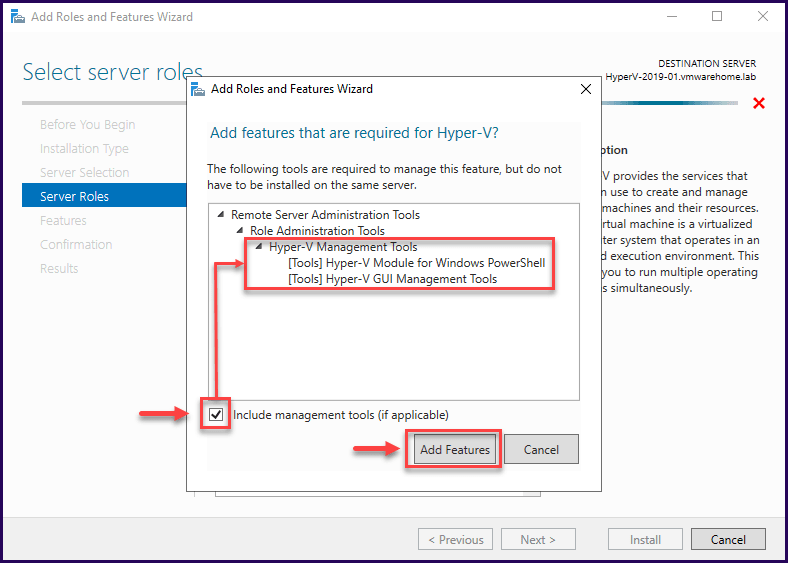
In the next screen, check if the Hyper-V Management Tools is set to install and then click “Next”.
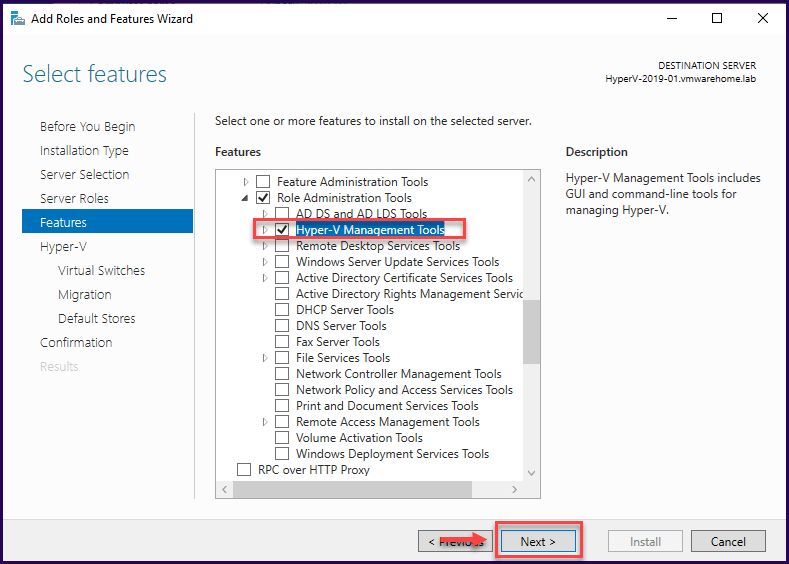
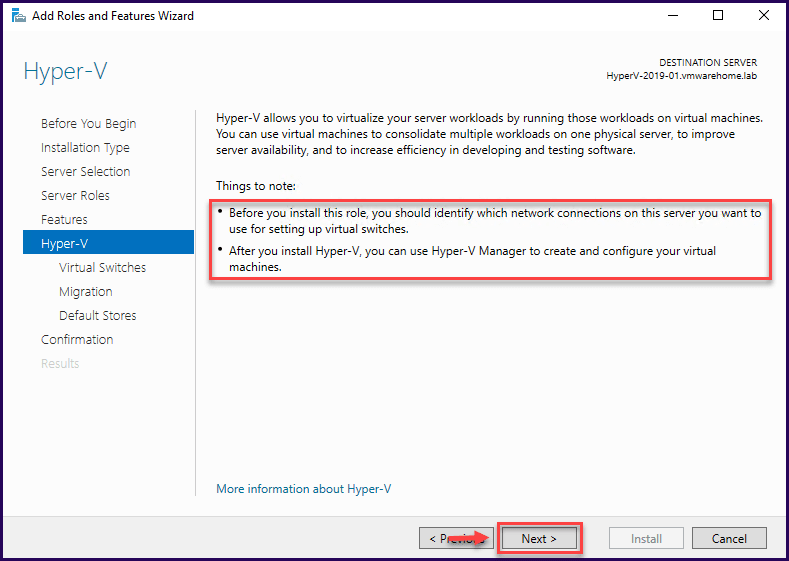
You get some information about your Hyper-V that you are planning to install, click “Next” to do some changes in your Hyper-V settings.654345r5t
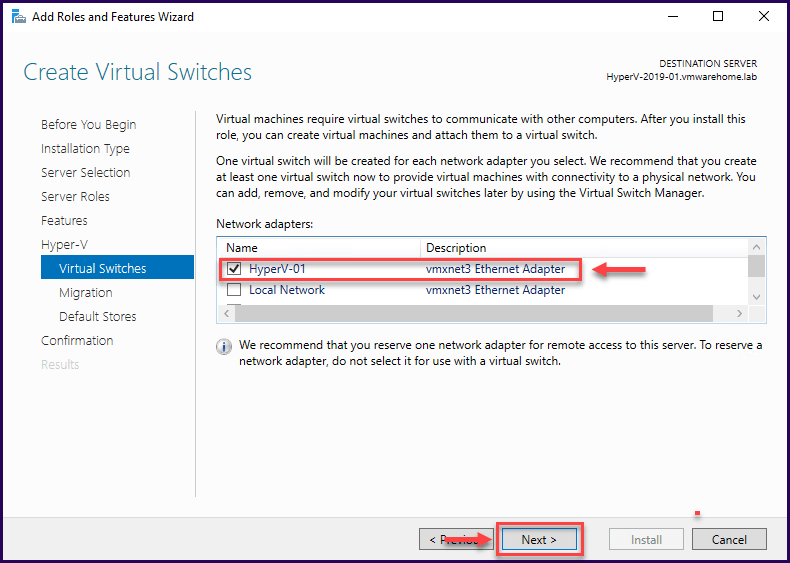
Create a Virtual Switch wizard that appears where you can reserve a network adapter to provide network connectivity for your VMs created. You can skip this section and configure later, or if you already know the Network adapter, select one.
Since I have pre-configured the Network adapter for Hyper-V, I’ve selected one – (Hyper-V-01).
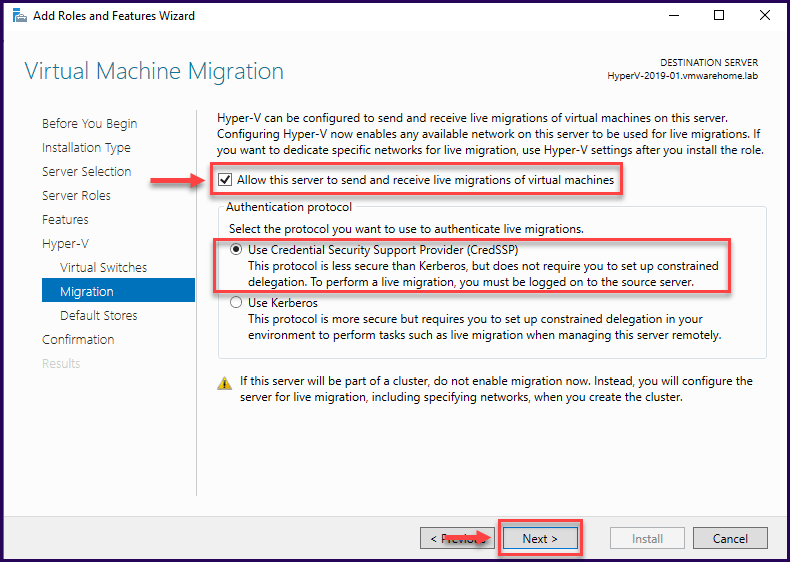
The next section is Virtual Machine Migration.
Enable the first checkbox “send and receive live migrations of Virtual Machines”, if you want this server to send and receive live migrations of Virtual Machines. This option is not a clustered Live Migration, but instead using Distributed File System (DFS).
This is not mandatory to be enabled; however, if you do not have implemented a Hyper-V Cluster, you should use it.
For the authentication protocol, CredSSP is easier to use since it doesn’t need to configure constrained delegations, but is required to sign in the source server.
However, using the Kerberos authentication protocol avoids signing into the server but requires constrained delegation set up.
In this case, we will use CredSSP authentication protocol.
Click “Next” to proceed with the settings.
The next section is where you need to select the location to allocate the Virtual Machines, Virtual Disks, and Configuration Files.
For better management, both locations should be different, and if you are using Storage Volume, you should create one for each option and separate the files.
In this case, we will use local Storage and the default path.
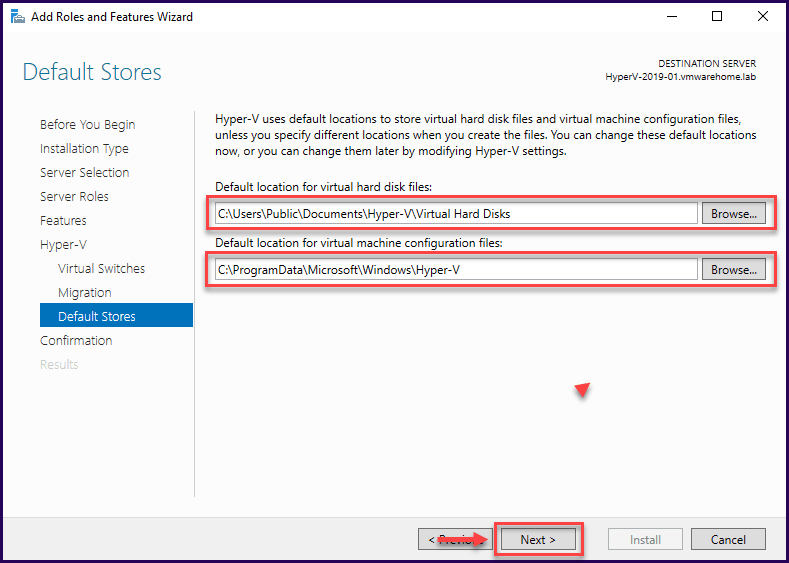
Now, all the settings are done, click the “Install” button to begin the installation process of Hyper-V role in our Windows Server 2019.
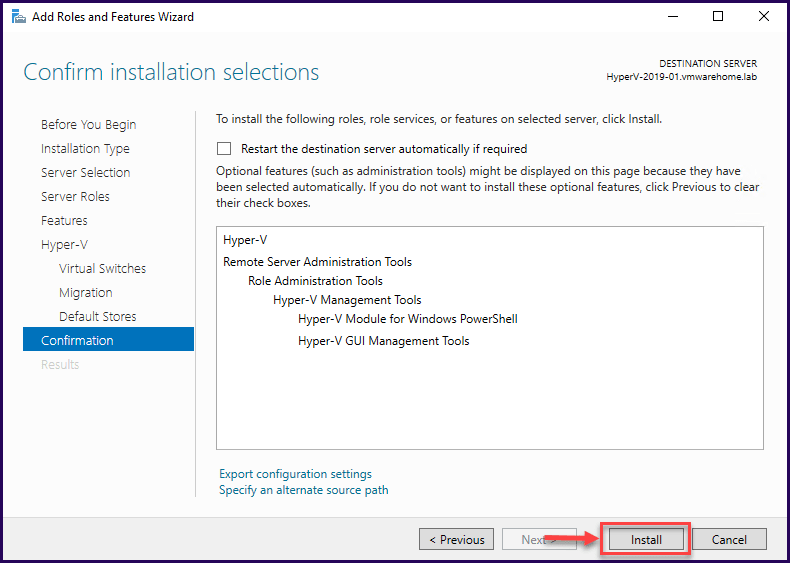
Note: We did not enable the checkbox “Restart the destination server automatically if required”, however, Windows Server needs a reboot after the installation, i.e, before it is ready to use. Reboot when it is possible.
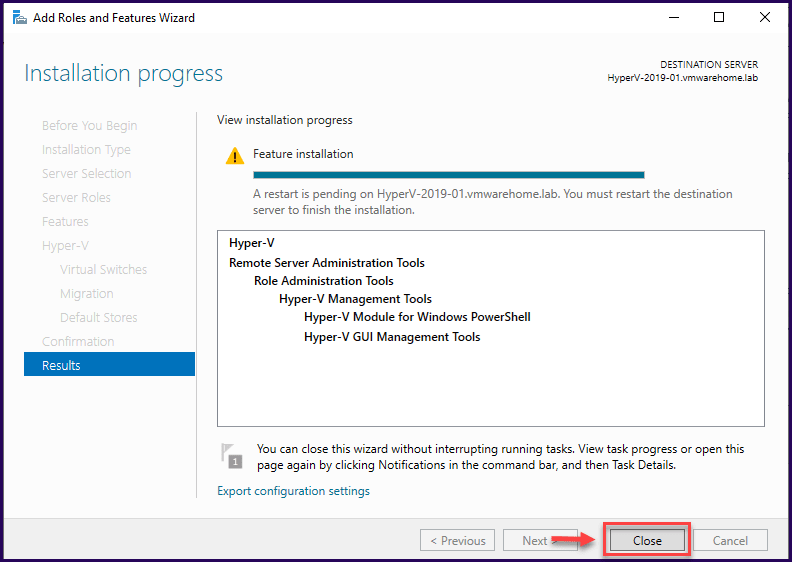
After you reboot your Windows Server 2019, your Hyper-V is ready to be used, and you can start creating Virtual Machines using Hyper-V Manager for GUI installation or with PowerShell commands for both GUI and Server Core installations.
Creating Virtual Machines using Hyper-V Manager
After installing the Hyper-V role in Windows Server 2019, we will use Hyper-V Manager to connect to Hyper-V and check Network Settings(Virtual Switch) and other configurations.
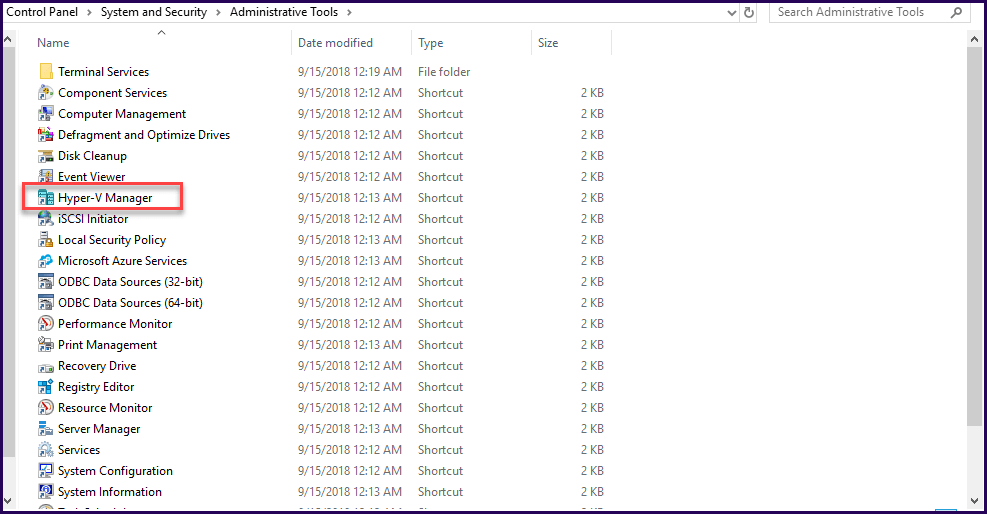
To create Virtual Machines and other Hyper-V tasks, we need to use the Hyper-V Manager.
Click “Start” and click on “Administrator Tools”, then click on the Hyper-V Manager icon.
Next, connect to your local Hyper-V.
In the next image, we can see the Hyper-V Manager with some of the options.
1. Hyper-V Settings, where it is possible to change the settings for the Hyper-V (the ones used when we were installing Hyper-V Role).
2. Virtual Switch Manager, with the Network Adapters that are used for this Virtual Switch (the physical and the virtual adapter).
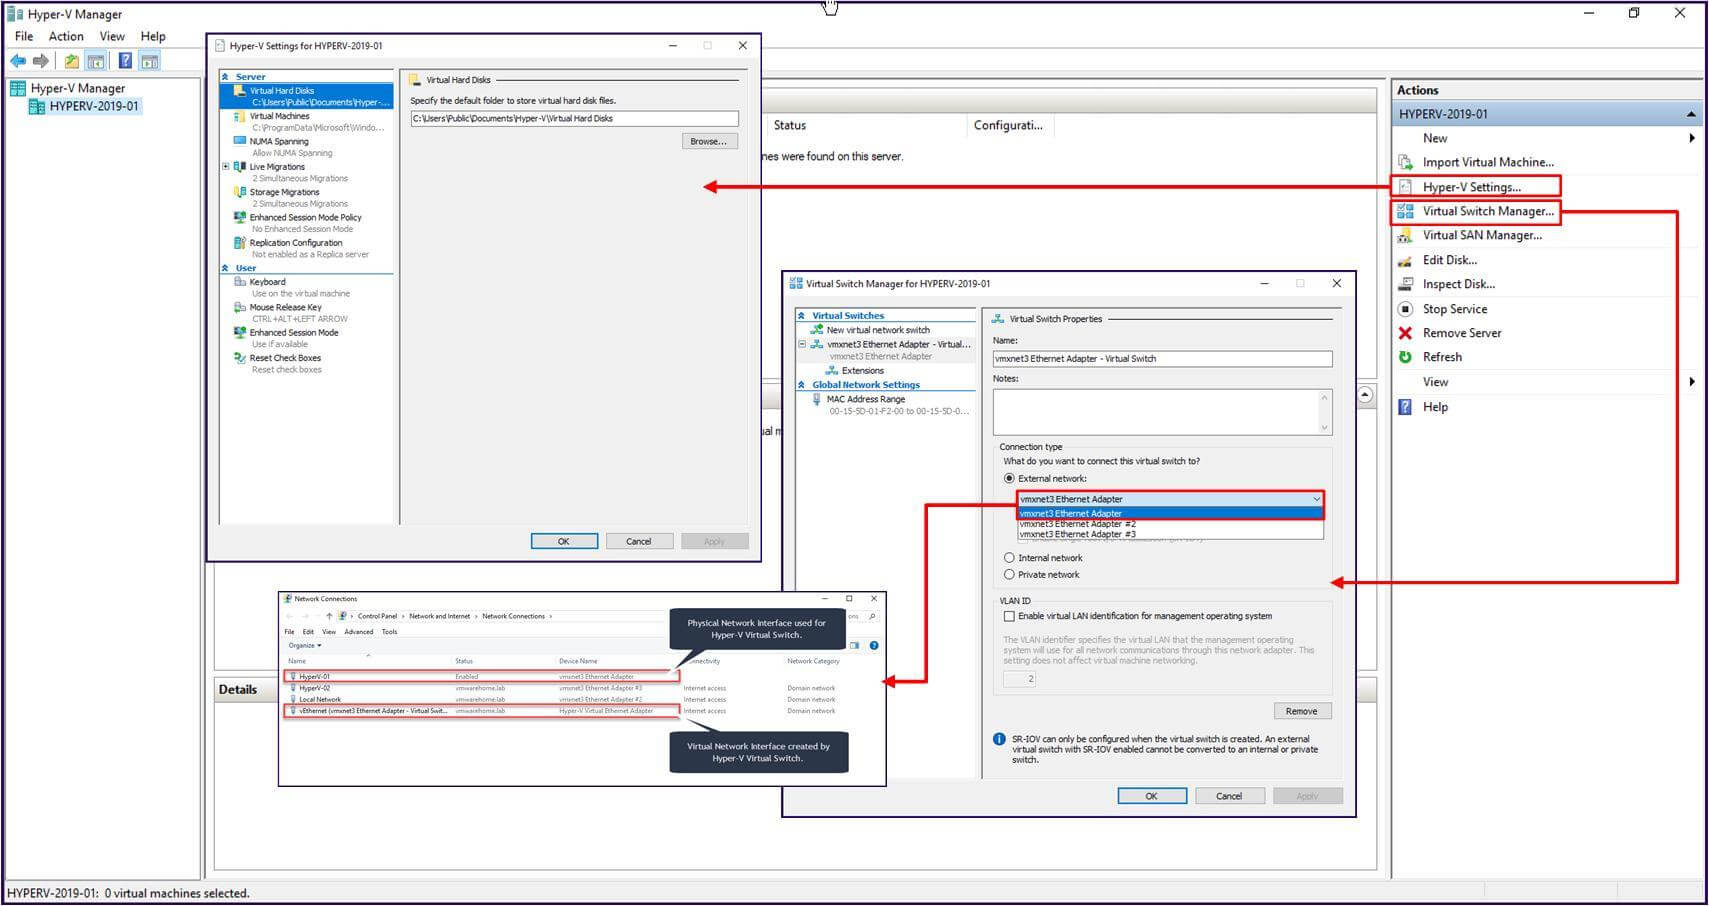
Note: To know more about Hyper-V Manager check the following article “What is Hyper-V Manager and how does it work”.
Install Hyper-V Role using PowerShell commands
Installing the Hyper-V role using PowerShell command in Windows Server 2019 is no different from previous versions and is very straight forward.
For the GUI version, Run PowerShell as Administrator and run the following command.
Cmd: Install-windows feature -Name Hyper-V -IncludeManagementTools
The above command installs the Hyper-V Role and also installs the Hyper-V Management Tools.
You can add –Restart to reboot your server after Hyper-V is installed automatically.
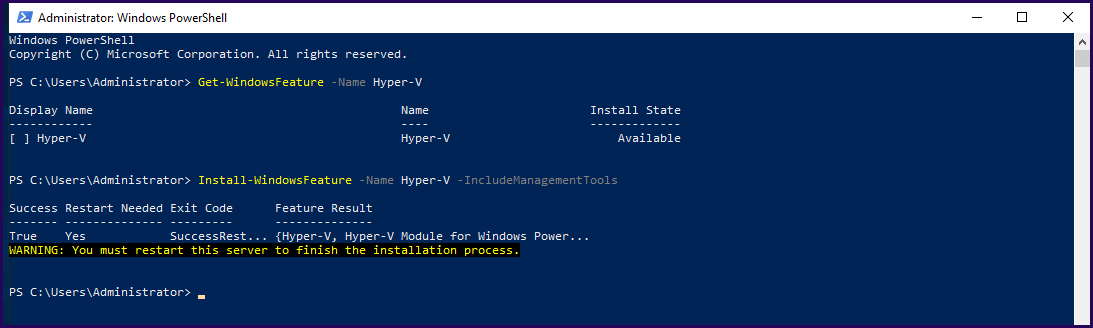
In the above picture, you can notice that we have also run the following command:
Cmd: Get-WindowsFeature -Name Hyper-V
This command shows us if Hyper-V is available to install on this server.
If Hyper-V is installed you can now manually restart your server if you did not add the option to restart automatically after the install.
Note: Installing Hyper-V Role with PowerShell is the same for Windows Server 2019 GUI or Windows Server 2019 Core. Both use the existing PowerShell in the OS, and the command is the same for both.
In Windows Server Core there is no Powershell shell icon to run, so we need to run the command to enter the PowerShell and run the commands.

In the above example, we used the automatic –Restart after the role is installed.
Installation of Windows Server 2019 Core
After installing Windows Server 2019 Core, we need to do some additional configuration to manage and connect to the server remotely.
Note: Installation of Windows Server Core is similar to the installation of Windows Server GUI
At first, the system asks to change the password.


Next, log in to Windows Server Core and do the remaining changes.
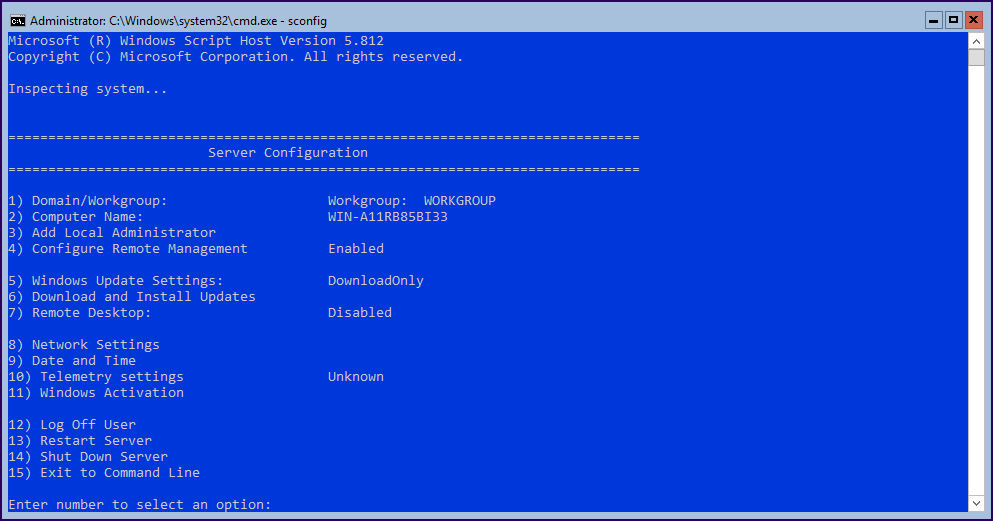
For the next change, we will use a Windows Server Core tool -sconfig. With this small tool, we can do many changes in our system:
- Domain/Workgroup
- Computer Name
- Add Local Administrator
- Configure Remote Management
- Windows Update Settings
- Download and Install Updates
- Remote Desktop
- Network Settings
- Date and Time
- Telemetry settings
- Windows Activation
- Log Off User
- Restart Server
- Shut Down Server
For this example, we will only do the next changes.
- Change Computer Name
- Add Computer to the domain
- Change Network Settings
- Enable Remote Desktop connections
- In the Core-shell console run “sconfig”
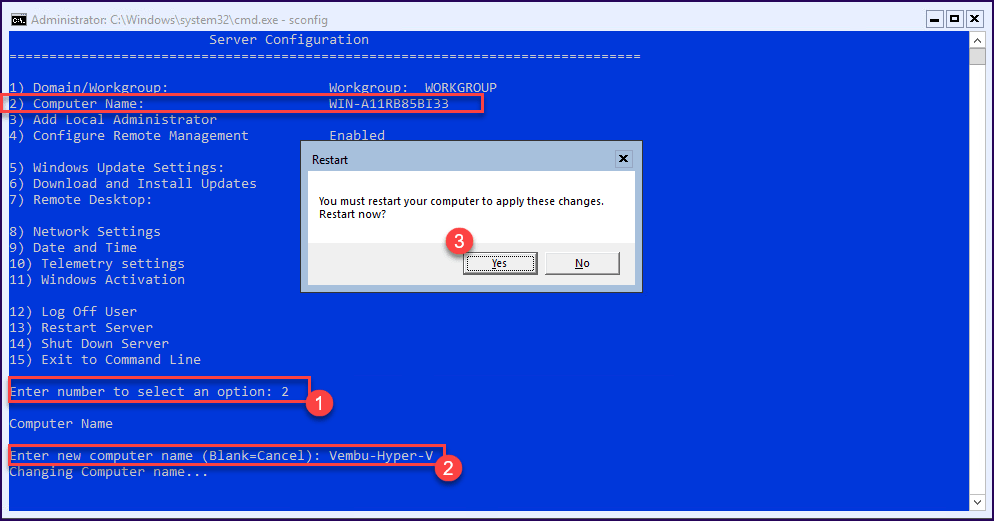
1 – Change Computer Name – Select option 2 and write the new hostname.
2 – Change Network Settings
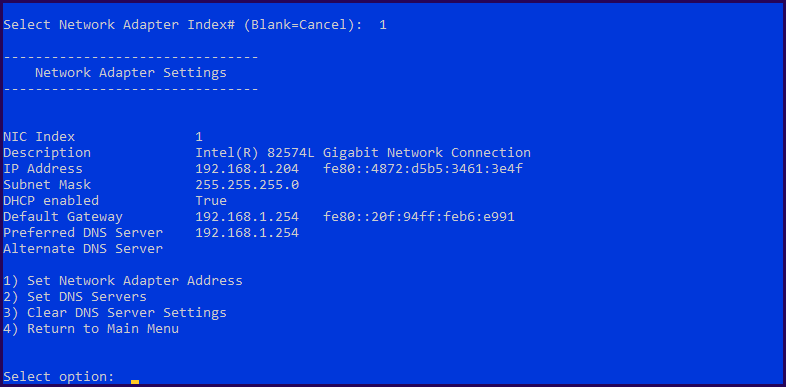
Next, change the IP address from DHCP to Static and add DNS Gateway, etc.
Select option 8 “Network Settings” and select the “Network Adapter” that you want to change.
In this case, there is only one, so select option 1.
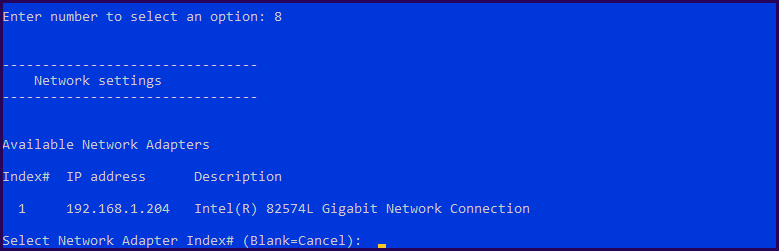
Next, we can change the settings for the IP Address and DNS.
3 – Enable Remote Desktop connections
Next, enable Remote Desktop so that we can connect to this Windows Server Core.
Select option 7 “Remote Desktop”, and then type “E” and for better security, the option 1 “Allow only Clients running Remote Desktop with Network Level Authentication”.
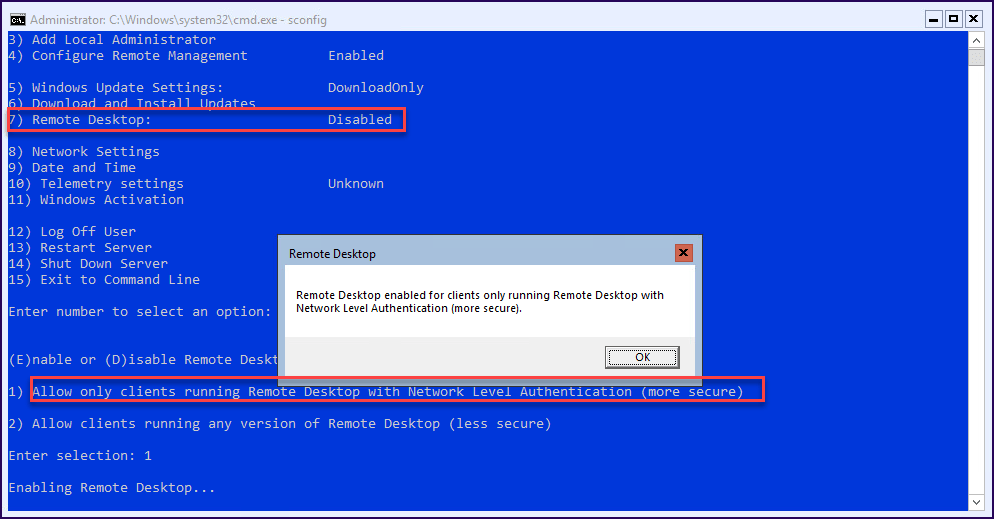
Finish the change in the sconfig, and with all settings done, now connect to the Windows Server 2019 Core using Remote Desktop.
To start using Hyper-V and to be able to connect to this server, we will connect remotely to this Hyper-V using a third server using Hyper-V Manager or Admin Center.
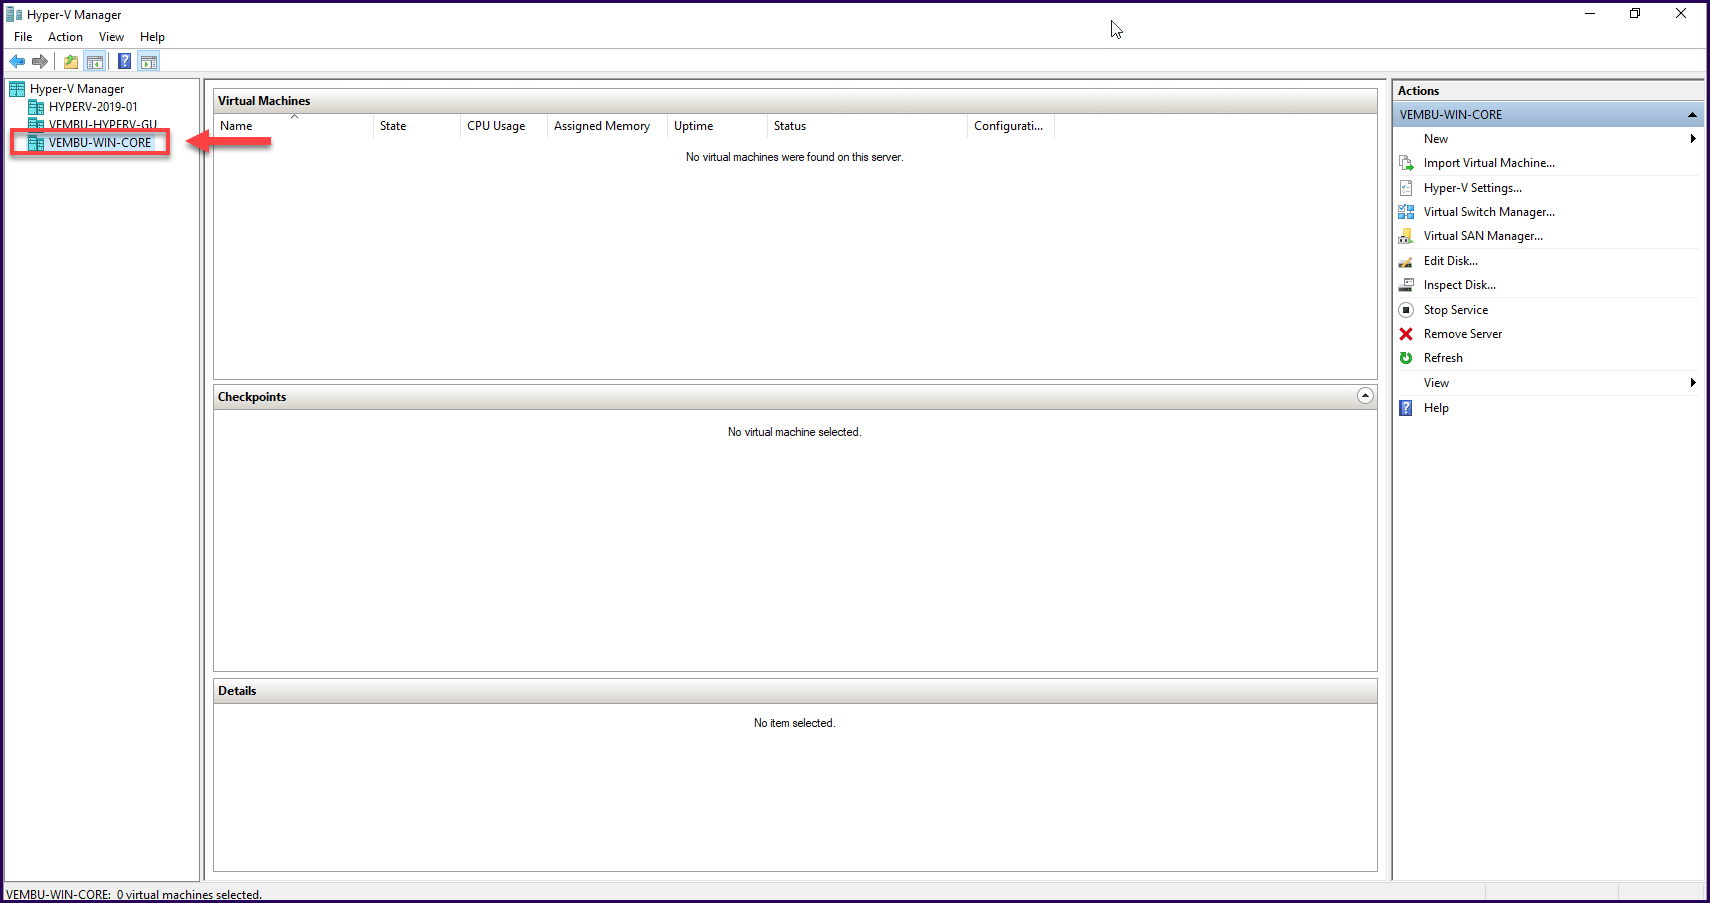
Connect remotely to Hyper-V using Hyper-V Manager
Using another Windows Server, or a Windows 10/8.1 where Hyper-V is installed, select “Connect to a server”.
Next, add your Windows Server Core name and click “OK”.
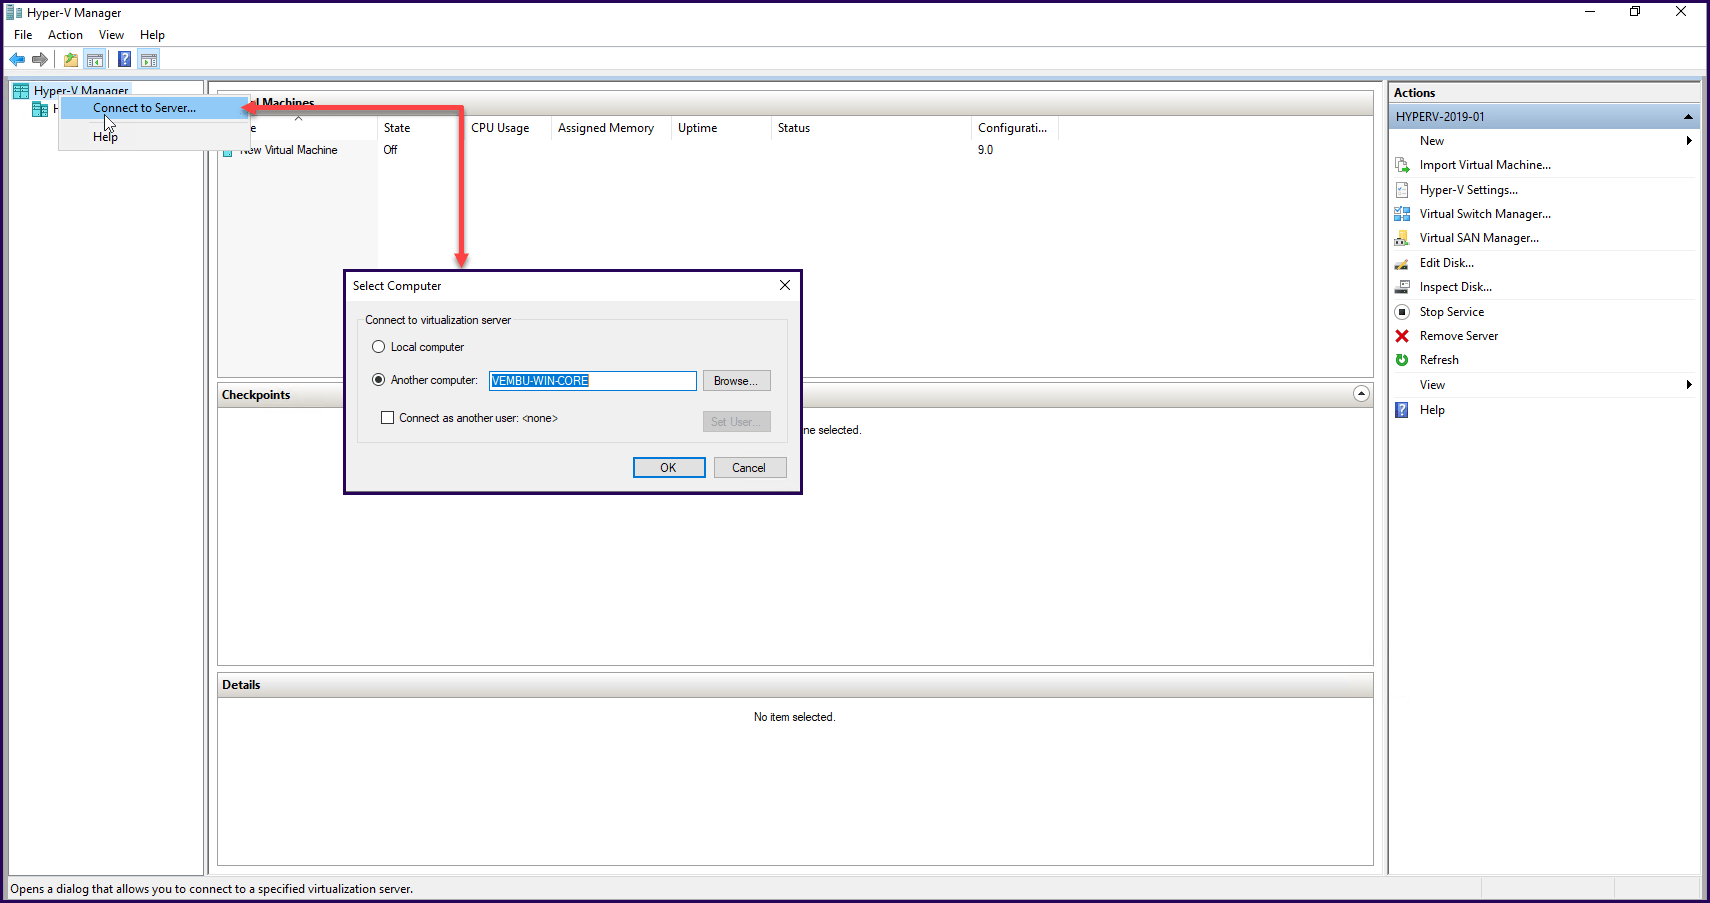
Next Windows Server 2019 Core shows up in the server list, and now we can manage our Hyper-V installed in a Windows Server 2019 Core.
Note: It is also possible to install the new tool Admin Center in Windows Server 2019 Core.
It’s a local install and then from a browser, we enter the IP address from the Windows Server 2019 Core, and we can manage the server with the Admin Center.
More information about Windows Server 2019 Core version can be found on the Windows Server Core page.
Protect your Hyper-V Environment with BDRSuite
Although Hyper-V includes platform-built mechanisms that enable production snapshots and replication of virtual machines into recovery environments, Hyper-V still lacks the native features and capabilities that facilitate organizations to have a comprehensive, single pane glass data protection solution that enables them to safeguard Hyper-V production workloads with confidence.
BDRSuite for Microsoft Hyper-V is the single solution to data protection that organizations need for today’s Hyper-V environments, that supports all aspects of high-availability for Hyper-V data, including support for the Hyper-V Cluster and SMB hosts, host and VM-level backups, high-performance changed block tracking and many other features with RPO & RTO less than 15 minutes.
Note: Know more on BDRSuite for Microsoft Hyper-V
What type of Windows Server 2019 should you use?
It depends on what is the purpose of your Server, and also depends on how you plan to manage the same Windows Server and Hyper-V.
If you like more graphical environments, then GUI is the best option. If you are more a Linux type of administrator and like a shell console and a more lightweight server, then Core is the best option.
Of course, security is also something to bear in mind when deciding which version to install.
Both options have pros and cons. Install the option that fits your environment.
Final thoughts
Windows Server 2019 and Hyper-V 2019 can be installed with the versions Desktop Experience and Core.
In both options, it is possible to enable the Hyper-V role using PowerShell commands and still use the same management tools to connect and manage Hyper-V (local or remotely).
Elevate the protection of your Hyper-V world effortlessly by acquiring BDRSuite: Download BDRSuite
Uncover the remarkable potential of Hyper-V backup with BDRSuite and witness its effectiveness firsthand: Hyper-V Backup with BDRSuite
Follow our Twitter and Facebook feeds for new releases, updates, insightful posts and more.
Try BDRSuite for Free!
Schedule a live demo with one of our product experts
Start your full-featured 30-day free trial
Explore detailed pricing, editions & features