
Сообщение от LENALENALENA
только нормальный гайд а не те что с хабра-они не помогли.
Сообщение от pEntity
Core не конвертируется в GUI
На хабре пример установки через FOD, который дополняет для поддержки приложений с GUI. К сожалению не всех. Т.е. можно будет запускать explorer, некоторые утилиты, но вряд ли полноценный офис, фотошоп и тем более рабочий стол привычного компа.
Поэтому, если требуется полный рабочий стол и все его прибамбасы, придется согласиться с pEntity.
Версия Core для размещения в облаке или серверах, где каждые мегабайты на диске и в оперативной памяти, это затраты на аренду сервера. Которые у всех есть желание снизить. Поэтому используется этот минимализм.
Но с другой стороны, если развернут CORE, зачем в этой системе полноценный десктоп и прочая графика. Это два противоречащих требования и понятия.
Когда-то развернул и сдал 19-й CORE. Ради спортивного интереса развернул через FODGUI. Будет некоторая сложность найти именно нужный FOD под конкретную версию Windows.
Простые проги запускаются. Была идея прокачать дальше, сдать как сервер-терминалов, где конечно используется офис или либбре. Не вышло. Точнее не стал искать и устанавливать требуемые библиотеки. Думаю это реально, но не имея подобной задачи, пропал интерес. Всё-таки этот софт и система точно не для этого.
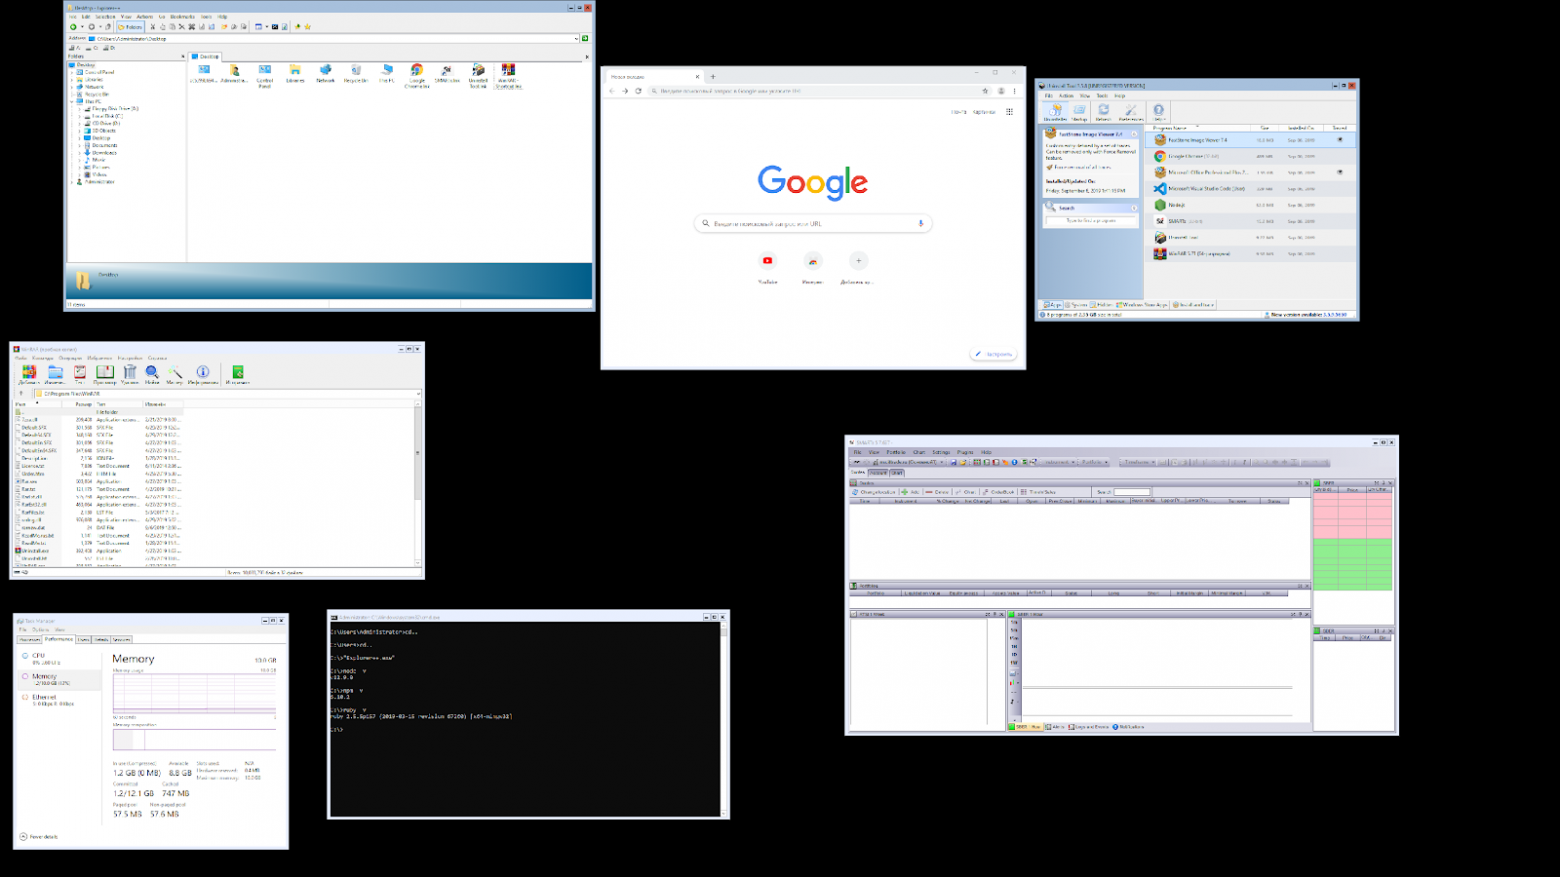
конфиги и результаты внизу:
Кликните здесь для просмотра всего текста
PS C:\Windows\system32\WindowsPowerShell\v1 .0> Get-Host
Name : ConsoleHost
Version : 5.1.17763.592
InstanceId : 0ab904e5-96cc-450a-a1a7-41a75ee84f7b
UI : System.Management.Automation.Internal.Ho st.InternalHostUserInterface
CurrentCulture : ru-RU
CurrentUICulture : ru-RU
PrivateData : Microsoft.PowerShell.ConsoleHost+Console ColorProxy
DebuggerEnabled : True
IsRunspacePushed : False
Runspace : System.Management.Automation.Runspaces.L ocalRunspace
PS C:\Windows\system32\WindowsPowerShell\v1 .0> GCI -Path ‘HKLM:\Software\Microsoft\NET Framework Setup\NDP’
Hive: HKEY_LOCAL_MACHINE\Software\Microsoft\NE T Framework Setup\NDP
Name Property
—- ———
CDF
v4
v4.0 (default) : deprecated
PS C:\Windows\system32\WindowsPowerShell\v1 .0> $PSVersionTable
Name Value
—- ——
PSVersion 5.1.17763.592
PSEdition Desktop
PSCompatibleVersions {1.0, 2.0, 3.0, 4.0…}
BuildVersion 10.0.17763.592
CLRVersion 4.0.30319.42000
WSManStackVersion 3.0
PSRemotingProtocolVersion 2.3
SerializationVersion 1.1.0.1
GCI ‘HKLM:\SOFTWARE\Microsoft\NET Framework Setup\NDP’ -recurse |Get-ItemProperty -name Version,Release -EA 0 | Where { $_.PSChildName -match ‘^(?!S)\p{L}’} | Select PSChildName, Version, Release
PSChildName Version Release
———— ——- ——-
Client 4.7.03190 461814
Full 4.7.03190 461814
Client 4.0.0.0
PS C:\Windows\system32\WindowsPowerShell\v1 .0> Get-WindowsFeature *FrameWork* |FT -Wrap
Display Name Name Install State
———— —- ————-
[ ] Функции .NET Framework 3.5 NET-Framework-Features Available
[ ] .NET Framework 3.5 (включает .NET 2.0 и 3.0) NET-Framework-Core Removed
[X] Функции .NET Framework 4.7 NET-Framework-45-Features Installed
[X] .NET Framework 4.7 NET-Framework-45-Core Installed
[ ] ASP.NET 4.7 NET-Framework-45-ASPNET Available
**********Ошибки запуска либре офис*****************
PS C:\Program Files\LibreOffice\program> soffice.exe
soffice.exe : Имя «soffice.exe» не распознано как имя командлета, функции, файла сценария или вы
полняемой программы. Проверьте правильность написания имени, а также наличие и правильность пути
, после чего повторите попытку.
строка:1 знак:1
+ soffice.exe
+ ~~~~~~~~~~~
+ CategoryInfo : ObjectNotFound: (soffice.exe:String) [], CommandNotFoundException
+ FullyQualifiedErrorId : CommandNotFoundException
Suggestion [3,General]: Команда soffice.exe не найдена, однако существует в текущем расположении. По умолчанию оболочка Windows PowerShell не загружает команды из текущего расположения. Если вы уверены в надежности команды, введите «.\soffice.exe». Для получения дополнительных сведений вызовите справку с помощью команды «get-help about_Command_Precedence».
PS C:\Program Files\LibreOffice\program> sbase.exe
sbase.exe : Имя «sbase.exe» не распознано как имя командлета, функции, файла сценария или выполн
яемой программы. Проверьте правильность написания имени, а также наличие и правильность пути, по
сле чего повторите попытку.
строка:1 знак:1
+ sbase.exe
+ ~~~~~~~~~
+ CategoryInfo : ObjectNotFound: (sbase.exe:String) [], CommandNotFoundException
+ FullyQualifiedErrorId : CommandNotFoundException
Suggestion [3,General]: Команда sbase.exe не найдена, однако существует в текущем расположении. По умолчанию оболочка Windows PowerShell не загружает команды из текущего расположения. Если вы уверены в надежности команды, введите «.\sbase.exe». Для получения дополнительных сведений вызовите справку с помощью команды «get-help about_Command_Precedence».
PS C:\Program Files\LibreOffice\program> .sbase.exe
.sbase.exe : Имя «.sbase.exe» не распознано как имя командлета, функции, файла сценария или выпо
лняемой программы. Проверьте правильность написания имени, а также наличие и правильность пути,
после чего повторите попытку.
строка:1 знак:1
+ .sbase.exe
+ ~~~~~~~~~~
+ CategoryInfo : ObjectNotFound: (.sbase.exe:String) [], CommandNotFoundException
+ FullyQualifiedErrorId : CommandNotFoundException
PS C:\Program Files\LibreOffice\program>
Server Core — это один из вариантов установки для Windows Server 2019. Поскольку Server Core содержит меньше компонентов, его не нужно устанавливать так часто, как при установке Server с графическим интерфейсом. Поскольку такие компоненты, как встроенный веб-браузер и графический интерфейс были удалены, Server Core менее уязвим для вредоносных программ, чем вариант установки Server with Desktop Experience.
Кроме того, поскольку для него не требуются все компоненты версии, включающей графический интерфейс, он требует меньше ресурсов. Server Core можно установить с установочного носителя Windows Server 2019 или развернуть различными способами из файла install.wim, расположенного на установочном носителе.

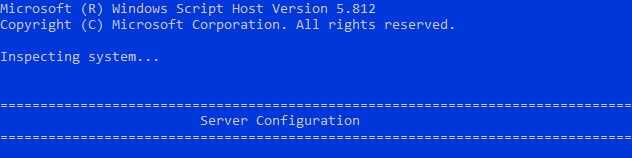
Server Core interface
Весь интерфейс Server Core представляет собой командную строку. Как показано на рисунке, для взаимодействия с командной строкой необходимо нажать Ctrl + Alt + Del, чтобы разблокировать ее. Затем вы можете войти в систему с учетной записью администратора домена или локального администратора (предварительно создав для него пароль).

Переименовать сервер, ввести в домен, настроить Windows Update, сконфигурировать подключение через RDP и выполнить другие настройки можно используя программу sconfig.exe.

После выполненных настроек можно запустить сеанс PowerShell, набрав PowerShell.exe. Хотя Server Core — это в первую очередь среда командной строки, но есть некоторые графические инструменты, которые можно запустить из командной строки или диспетчера задач. Они включают:
Диспетчер задач. Он работает так же, как и на сервере с возможностями рабочего стола или Windows 10, и его можно использовать для запуска задач, выбрав пункт «Выполнить новую задачу» в меню «Файл».
Notepad.exe. Можете запустить Блокнот для редактирования и просмотра содержимого текстовых файлов.
- MSInfo32.exe — просмотр сведений о системе, программных и аппаратных ресурсах.
- Regedit.exe and Regedt32.exe — редактирование реестра на Server Core.
- TimeDate.cpl — панель управления временем и датой.
- Intl.cpl — панель управления региональными настройками.
- Iscsicpl.exe — панель управления «Свойства: инициатор iSCSI«, для возможности подключаться к общему хранилищу через iSCSI.
Установка компонентов совместимости приложений позволяет получить доступ к еще большему количеству инструментов графического интерфейса при входе непосредственно на «рабочий стол» Server Core.
Подсказка.
Если вы введете Exit в командной строке Server Core, командная строка закроется. Чтобы вернуть командную строку назад, не обязательно перезагружать сервер, есть более простой способ. Нажмите Ctrl-Alt-Del, выберите «Диспетчер задач», нажмите «Файл» — «Выполнить новую задачу» и введите cmd.exe. Это откроет командную строку без необходимости выхода из системы или перезагрузки компьютера.
Роли Server Core
Server Core поддерживает следующие роли, которые можно установить с помощью командлета PowerShell Add-WindowsFeature, или мастера добавления ролей и компонентов, доступного в консоли Server Manager, или с помощью Windows Admin Center с удаленного компьютера, как показано на рисунке ниже.


Microsoft рекомендует управлять всеми серверами удаленно. На самом деле не имеет значения, что Server Core не имеет графического интерфейса, потому что в этом случае не нужно входить в систему локально. Вместо этого происходит подключение с помощью инструментов удаленного администрирования.
Windows Server 2012 и Windows Server 2012 R2 позволяют переключаться между вариантами Server Core и Server with Desktop Experience (Рабочим столом). Это дает возможность развернуть Server with Desktop Experience, а затем сократить его до Server Core, если обнаружится, что компоненты рабочего стола будут больше не нужны. Если не удается запустить определенное приложение на Server Core, всегда можно установить Desktop Experience. Windows Server 2019 не предоставляет такой возможности, поэтому выбирать версию нужно еще на этапе планирования, в противном случае придется выполнять повторную установку OS.
Совместимость приложений с Server Core
Одна из проблем использования приложений в Windows Server Core в том, что многие приложения так или иначе зависят от графического интерфейса. И развернув редакцию Core можно получить неработоспособное приложение.
Функции совместимости приложений по требованию (App Compatibility Features on Demand, FOD) повышают совместимость Server Core для большого количества приложений. Также устанавливаются дополнительные диагностические инструменты для устранения неполадок и отладки операций, включая:
Консоль управления (mmc.exe), просмотр событий (Eventvwr.msc), монитор производительности (PerfMon.exe) и ресурсов (Resmon.exe), диспетчер устройств (Devmgmt.msc), управление дисками (diskmgmt.msc), управление кластером (CluAdmin.msc).
Если сервер имеет доступ к Windows Update, можно выполнить онлайн-установку FOD, выполнив следующую команду из сеанса PowerShell и перезагрузить сервер:
Add-WindowsCapability -Online -Name ServerCore.AppCompatibility~~~~0.0.1.0


Если доступа к интернету нет, то вначале нужно заранее загрузить iso образ «Features on Demand» с веб-сайта Microsoft и установить, выполнив две команды. Первая монтирует iso образ, а вторая устанавливает компоненты.
Mount-DiskImage -ImagePath X:ISO_FolderISO_filename.iso
Add-WindowsCapability -Online -Name ServerCore.AppCompatibility~~~~0.0.1.0 -Source Mounted_Server_FOD_Drive -LimitAccess
В каких случаях устанавливать Server Core
Нужно заранее определить, подойдет ли Server Core для конкретной рабочей ситуации. Он идеально подходит для ролей инфраструктурного типа, таких как контроллер домена, DNS-сервер, DHCP-сервер и файловый сервер. Server Core является менее подходящим, в приложениях, имеющих сложные зависимости. При установке такой программы нужно заранее убедиться в ее работоспособности в режиме Windows Core.
Время на прочтение2 мин
Количество просмотров69K
В прошлом нашем посте мы рассказали как готовим стандартные клиентские виртуальные машины и показали на примере нашего нового тарифа с Ultralight windows vds за 99 рублей, как мы создавали стандартный образ Windows Server 2019 Core.
В службу поддержки стали поступать заявки как работать с Server 2019 Core без привычной графической оболочки. Мы решили показать работу с Windows Server 2019 Core и как установить на него GUI.

Не повторяйте это на рабочих машинах, не используйте Server Core как рабочий стол, отключите RDP, обезопасьте свою информационную систему, именно безопасность — это главная фишка «Core» инсталляции.
В одной из следующих наших статей мы рассмотрим таблицу совместимости программ с Windows Server Core. В этой статье мы затронем то, как установить оболочку.
Оболочка сторонними средствами
1. Сложный, но наиболее экономичный способ
В Server Core из коробки нет привычного нам explorer.exe, чтобы облегчить нам жизнь, мы скачаем explorer++. Он заменяет все, что умеет оригинальный explorer. Рассматривался только explorer++, но подойдет почти любой файловый менеджер, в том числе Total Commander, FAR Manager и другие.
Скачиваем файлы.
Сначала нам нужно скачать файл на сервер. Это можно сделать через SMB (общую папку), Windows Admin Center и Invoke-WebRequest, он работает с параметром -UseBasicParsing.
Invoke-WebRequest -UseBasicParsing -Uri 'https://website.com/file.exe' -OutFile C:\Users\Administrator\Downloads\file.exeГде -uri это URL файла, а -OutFile полный путь куда его скачивать, указывая расширение файла и
C помощью Powershell:
На сервере создаём новую папку:
New-Item -Path 'C:\OurCoolFiles\' -ItemType DirectoryРасшариваем общую папку:
New-SmbShare -Path 'C:\OurCoolFiles\' -FullAccess Administrator
-Name OurCoolShare
На вашем ПК папка подключается как сетевой диск.

Через Windows Admin Center создаем новую папку выбрав пункт в меню.
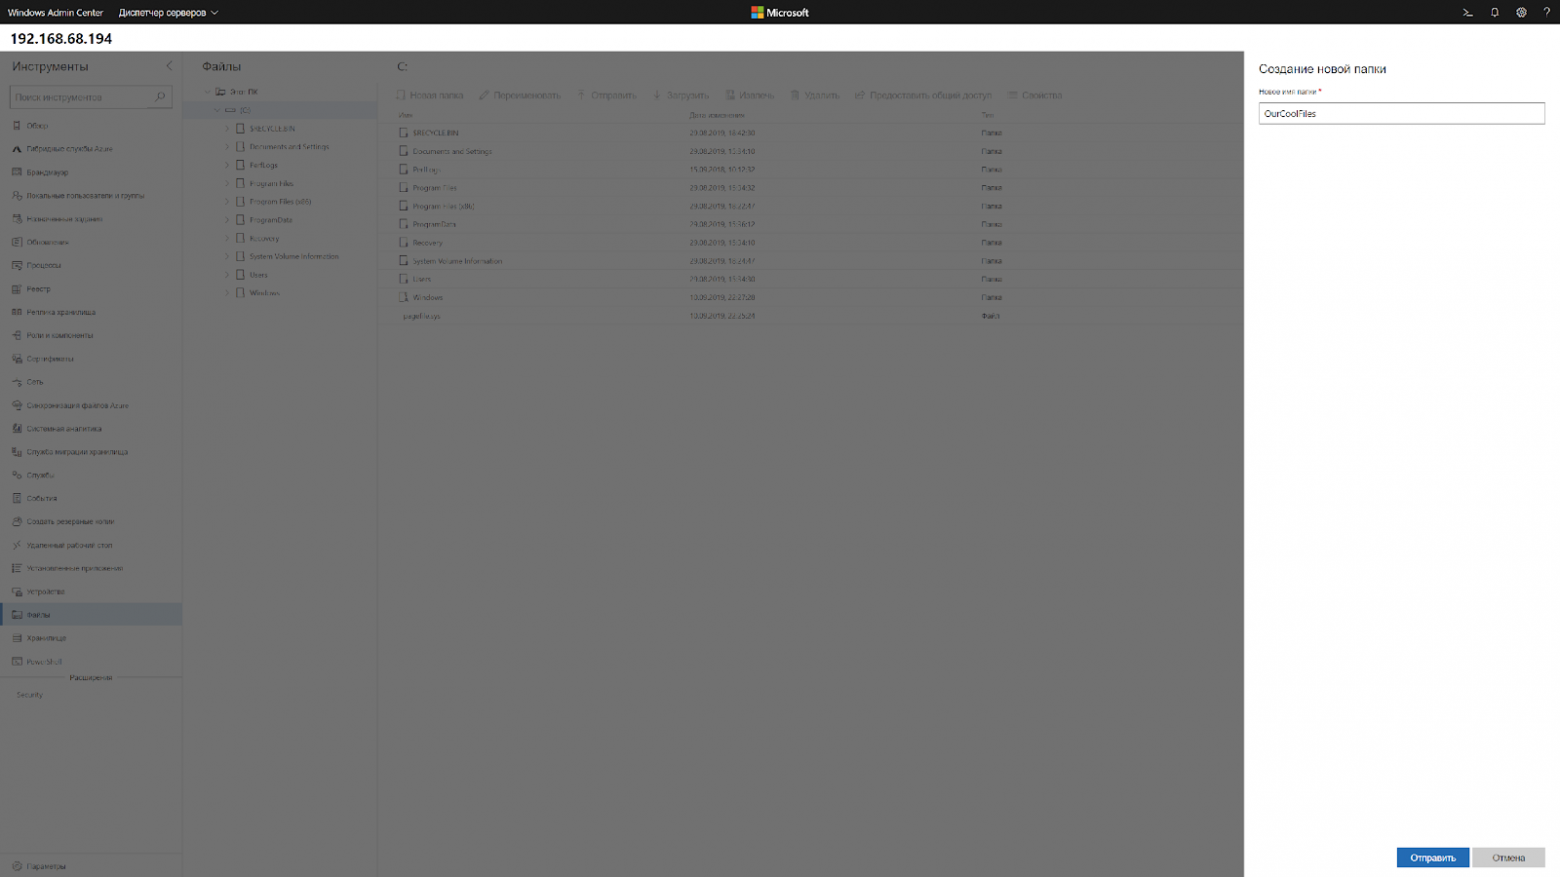
Переходим в общую папку и жмем кнопку отправить, выбираем файл.

Добавляем оболочку в планировщик.
Если вы не хотите запускать оболочку вручную при каждом входе в систему, то нужно добавить её в планировщик задач.
$A = New-ScheduledTaskAction -Execute "C:\OurCoolFiles\explorer++.exe"
$T = New-ScheduledTaskTrigger -AtLogon
$P = New-ScheduledTaskPrincipal "local\Administrator"
$S = New-ScheduledTaskSettingsSet
$D = New-ScheduledTask -Action $A -Principal $P -Trigger $T -Settings $S
Register-ScheduledTask StartExplorer -InputObject $D
Без планировщика можно запустить через CMD:
CD C:\OurCoolFiles\Explorer++.exeСпособ 2. Запускаем родной Explorer
Remember, no GUI
Server Core App Compatibility Feature on Demand (FOD), вернет в систему: MMC, Eventvwr, PerfMon, Resmon, Explorer.exe и даже Powershell ISE. Подробнее можете ознакомиться на MSDN. Существующий набор ролей и компонентов он не расширяет.
Запустите Powershell и введите следующую команду:
Add-WindowsCapability -Online -Name ServerCore.AppCompatibility~~~~0.0.1.0Затем перезагрузите сервер:
Restart-Computer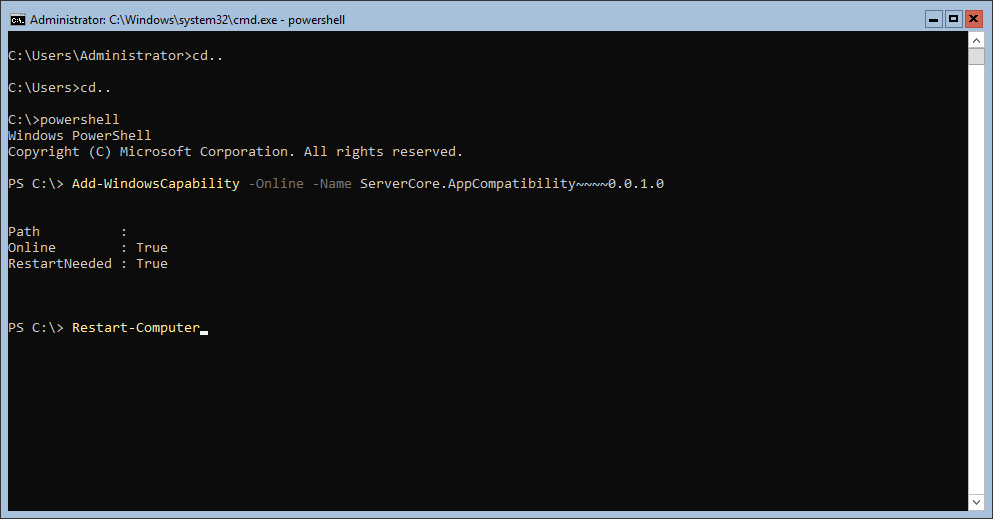
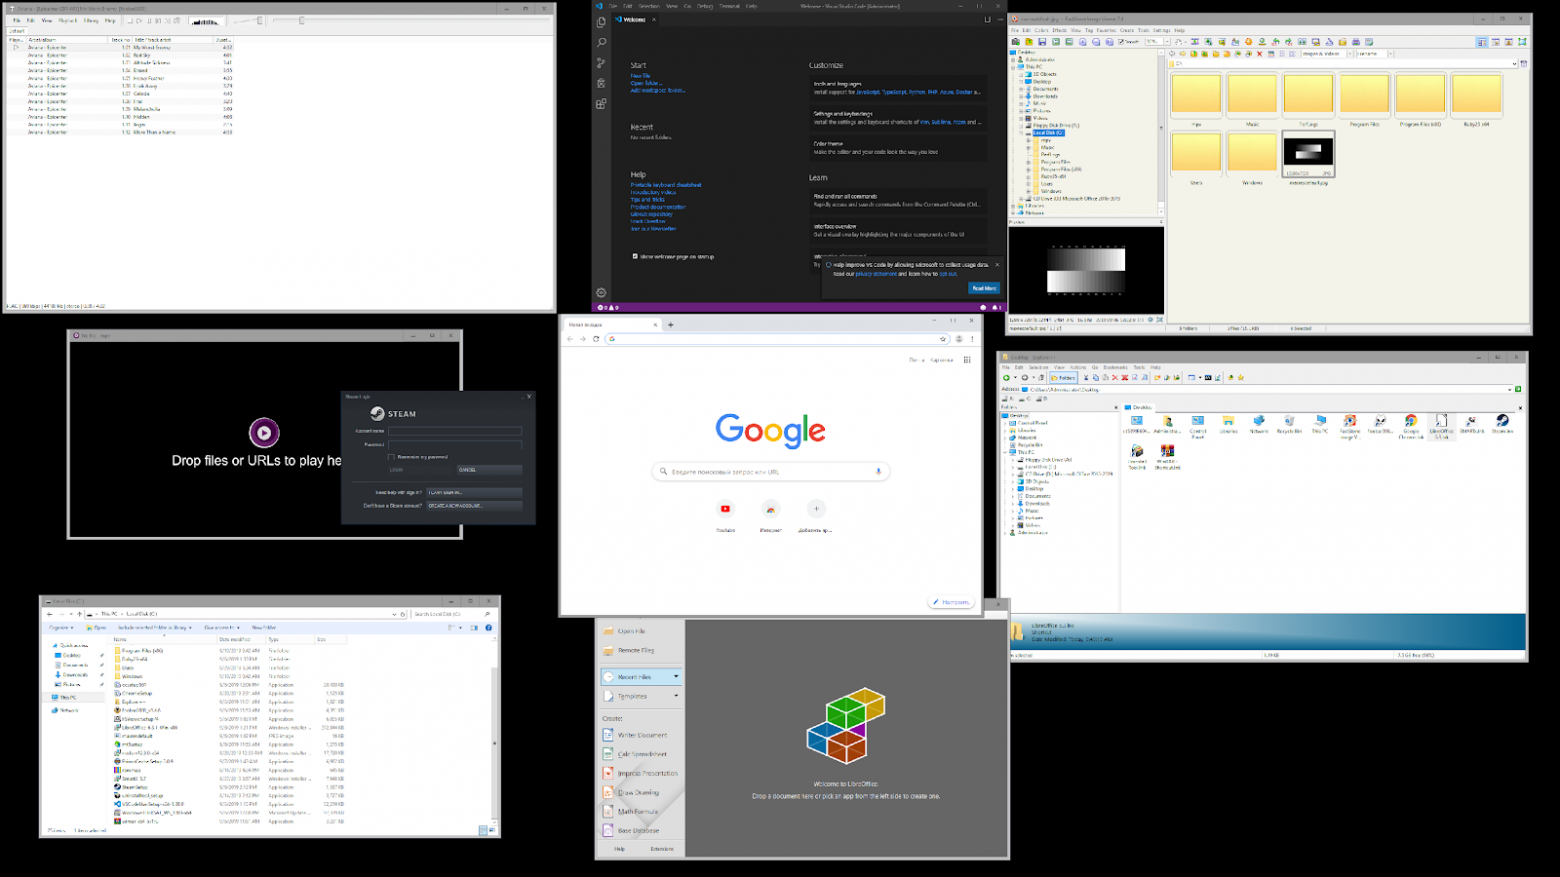
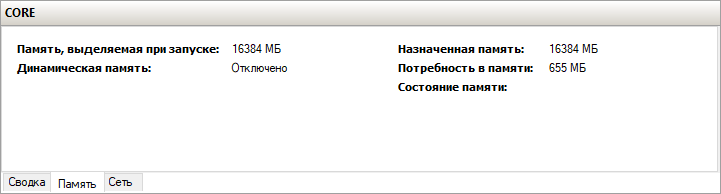
После этого вы сможете запускать даже Microsoft Office, но потеряете примерно 200 мегабайт ОЗУ навсегда, даже если в системе нет активных пользователей.

Windows Server 2019 c установленным Features on Demand
Windows Server 2019 CORE
На этом всё. В следующей статье мы рассмотрим таблицу совместимости программ с Windows Server Core.
Предлагаем обновлённый тариф UltraLite Windows VDS за 99 рублей с установленной Windows Server 2019 Core.

Have you recently installed Windows Server 2019 and noticed that it lacks certain user interface features typically found in a desktop operating system? Don’t worry! In this tutorial, we will guide you through the steps to add the Desktop Experience feature to Windows Server 2019.
Step 1: Launch the Server Manager by clicking on the Windows icon in the taskbar and selecting «Server Manager» from the Start menu.
Step 2: In the Server Manager window, click on «Manage» located at the top-right corner and then select «Add Roles and Features» from the drop-down menu.
Step 3: The Add Roles and Features Wizard will open. Click «Next» to proceed.
Step 4: Select «Role-based or feature-based installation» and click «Next.«
Step 5: Choose the appropriate server from the server pool and click «Next.«
Step 6: Scroll down and expand «User Interfaces and Infrastructure» in the list of features. Check the box next to «Desktop Experience» and click «Next.«
Step 7: Review the information on the «Features» screen and click «Install» to begin the installation process. Wait for the installation to complete.
Once the installation is finished, you will have successfully added the Desktop Experience feature to Windows Server 2019. Now you can enjoy a more familiar desktop user interface and access features such as Windows Media Player, desktop themes, and various administration tools.
| Pros | Cons |
|---|---|
| 1. Enhanced user interface with desktop features. | 1. Consumes additional system resources. |
| 2. Provides access to familiar tools like Windows Media Player. | 2. Could potentially introduce additional security risks. |
| 3. Simplifies administration tasks with graphical interfaces. | 3. May not be necessary for server-only environments. |
By following these simple steps, you can easily add the Desktop Experience feature to Windows Server 2019 and enjoy a more intuitive user experience.
Video Tutorial:How do I add desktop experience feature?
To add the desktop experience to Windows Server, you can follow these steps:
1. Open Server Manager: Click on the Windows icon in the taskbar, type «Server Manager,» and click on the Server Manager app.
2. Add required features: In the Server Manager dashboard, click on «Manage» and select «Add Roles and Features.» This will open the Add Roles and Features Wizard.
3. Select server: On the Before You Begin page, click «Next» to proceed.
4. Installation Type: Choose «Role-based or feature-based installation» and click «Next.«
5. Select server: Choose the desired server on which you want to install the Desktop Experience feature and click «Next.«
6. Features: Scroll down and expand «User Interfaces and Infrastructure» category. Check the box next to «Desktop Experience» and click «Next.«
7. Confirmation: Review the selected features and click «Install.«
8. Installation progress: Wait for the installation to complete. You can monitor the progress in the progress bar.
9. Completion: Once the installation is finished, you will see the «Installation succeeded» message. Click «Close» to exit the wizard.
10. Restart the server: After adding the desktop experience, it is recommended to restart the server for the changes to take effect. You can either restart immediately or manually restart later.
Following these steps will add the desktop experience to your Windows Server, allowing you to have a more familiar desktop-like user interface. This can be particularly useful if you intend to use the server for tasks that require a graphical interface.
Note: Adding the desktop experience may increase the resource usage of the server, so make sure your server meets the hardware requirements to handle the additional load.
Can you install Windows Server Core and then upgrade to desktop experience?
Yes, it is possible to install Windows Server Core and then upgrade to the desktop experience. Here are the steps to follow:
1. Begin by installing the Windows Server Core edition on your system. This version of Windows Server has a minimal graphical interface and is optimized for server-related tasks.
2. Once the installation is complete, you can choose to upgrade to the Windows Server with Desktop Experience edition if you require a more traditional desktop environment similar to the client versions of Windows.
3. To initiate the upgrade process, you need to access the Server Manager. You can do this by typing «sconfig» at the command prompt and pressing Enter.
4. In the Server Manager, navigate to the «Add roles and features» section.
5. A wizard will open, guiding you through the upgrade process. Click on «Next» to proceed.
6. Select «Role-based or feature-based installation» and click «Next.«
7. Choose the local server from the server pool and click «Next» again.
8. Scroll down and locate the «User Interfaces and Infrastructure» section. Expand it and tick the box next to «Server Graphical Shell.» This option will install the desktop experience.
9. A pop-up window will appear, asking to install additional features required by the server graphical shell. Click «Add Features» to proceed.
10. Hit «Next» until you reach the «Confirmation» page.
11. Review your selections, confirm the upgrade, and click «Install» to initiate the process.
12. The system will now install the desktop experience components. This may take a while, so be patient.
13. Once the installation is complete, you will receive a notification. Restart your system to apply the changes.
After the reboot, your Windows Server Core will be upgraded to the Windows Server with Desktop Experience edition. You will now have a desktop environment similar to Windows client versions, along with the additional features and capabilities of Windows Server.
Does Windows Server 2019 have desktop experience?
Yes, Windows Server 2019 does have a desktop experience option. The desktop experience feature provides a Windows interface, similar to the desktop version of Windows, allowing users to interact with the server using a graphical user interface (GUI). This can be particularly useful for users who are more accustomed to working with a traditional desktop environment and prefer a visual interface over command-line interactions.
Here are the steps to install the desktop experience feature in Windows Server 2019:
1. Log in to your Windows Server 2019 machine with administrative privileges.
2. Open the Server Manager application.
3. On the Dashboard page, click on «Add roles and features.«
4. The «Add Roles and Features Wizard» will appear. Click «Next» to proceed.
5. Choose the installation type as «Role-based or feature-based installation» and click «Next.«
6. Select your server’s target server from the server pool and click «Next.«
7. In the «Server Roles» section, leave the default settings and click «Next.«
8. On the «Features» page, check the box next to «Desktop Experience» and click «Next.«
9. Review the information on the «Confirmation» page, then click «Install» to begin the installation process.
10. Once the installation is completed, you can access the desktop experience on your Windows Server 2019 machine.
Enabling the desktop experience feature can provide a familiar interface for tasks such as managing files, installing applications, and configuring server settings without relying solely on command-line interactions. However, it’s important to note that enabling the desktop experience may consume additional system resources compared to running Windows Server without it. Therefore, it is recommended to carefully evaluate your server’s specifications and requirements before deciding to install the desktop experience feature.
Which version of Windows Server 2019 has GUI?
Windows Server 2019 provides multiple editions, each with different features and capabilities. When it comes to graphical user interface (GUI), there are two editions to consider: Windows Server 2019 with Desktop Experience and Windows Server 2019 without Desktop Experience (also known as Windows Server Core).
1. Windows Server 2019 with Desktop Experience: This edition includes the standard GUI that most users are familiar with. It offers a full Windows desktop environment with features like a Start menu, Taskbar, and Windows Explorer. The Desktop Experience edition is suitable for organizations that prefer a traditional server environment and require a graphical interface for managing and configuring the server.
2. Windows Server 2019 without Desktop Experience (Server Core): This edition provides a minimalistic installation option without the traditional Windows desktop environment. It does not include the standard GUI elements and is managed primarily through command-line tools, PowerShell, and remote management. Server Core is designed for efficiency, reduced resource usage, and improved security by minimizing the attack surface.
Determining which edition to choose depends on your specific requirements and preferences. Below are a few reasons why you might opt for each edition:
Reasons for Windows Server 2019 with Desktop Experience:
– Familiarity: If you have extensive experience managing Windows servers with a graphical interface, the Desktop Experience edition provides a familiar environment that reduces the learning curve.
– Administrative Tools: The Desktop Experience edition includes a wide array of administrative tools and wizards accessible through the graphical interface.
– Compatibility: Certain legacy applications and software may rely on a full GUI to function properly. If you have dependencies on such software, the Desktop Experience edition ensures compatibility.
Reasons for Windows Server 2019 without Desktop Experience (Server Core):
– Improved Performance: Server Core has a smaller footprint compared to the Desktop Experience edition, resulting in lower resource usage. This can lead to improved performance and reduced maintenance.
– Enhanced Security: Removing the GUI elements in Server Core reduces the attack surface of the server. Fewer components running on the server means fewer potential vulnerabilities.
– Automation and Scripting: Server Core is designed to be managed through command-line tools and PowerShell. It provides a streamlined environment for automation and scripting, making it ideal for environments that heavily use these approaches.
Ultimately, the choice between Windows Server 2019 editions with or without GUI depends on factors such as your level of expertise, specific server requirements, compatibility needs, and security considerations.
How do I change Windows Server 2019 to desktop experience?
To change Windows Server 2019 to the desktop experience, follow these steps:
1. Open the Server Manager:
– Click on the Start button.
– Type «Server Manager» in the search bar.
– Select the Server Manager from the search results.
2. In the Server Manager window, click on «Manage» from the top toolbar, and then click on «Remove Roles and Features» from the dropdown menu.
3. This will open the «Remove Roles and Features Wizard.» Click «Next» to proceed.
4. In the «Server Selection» screen, the local server should be selected by default. If not, choose the appropriate server from the server pool. Click «Next» to continue.
5. In the «Features» screen, locate and expand the «User Interfaces and Infrastructure» option.
6. Select the «Desktop Experience» checkbox and click «Next.«
7. The wizard may prompt you to install additional features that are required by the Desktop Experience. If prompted, click «Add Features» to install the required features and then click «Next» to proceed.
8. In the «Confirmation» screen, review the selected options. If everything looks correct, click «Install» to start the installation process.
9. Once the installation is complete, you will see the «Results» screen. Verify that the installation was successful, and then click «Close» to exit the wizard.
10. Finally, restart your Windows Server 2019 for the changes to take effect. After the restart, the server will boot into the desktop experience.
Please note that switching to the desktop experience may impact the performance and security of your server. Consider the specific requirements and use cases of your server environment before making the switch.
Windows Server Core 2019 — это вариант операционной системы Windows Server 2019, разработанный для серверов с минимальной графической оболочкой. Он предоставляет базовую функциональность серверной ОС с уменьшенным объёмом графического интерфейса пользователя, что позволяет сократить требования к ресурсам, уменьшить поверхность для атак и упростить управление и обслуживание.
Windows Server Core 2019 идеально подходит для инфраструктур, где важно минимизировать использование ресурсов и повысить безопасность, особенно в средах, где серверы управляются централизованно и удаленно.
Основным средством управления сервером в Windows Server Core является командная строка. Но зачастую для системного администрирования и автоматизации используется инструмент, который предлагает значительно более широкий функционал и гибкость за счет использования .NET объектов и сложных сценариев. Это — PowerShell.
Управление через PowerShell
Для запуска данной командной оболочки введите:
powershell
Например, следующая команда возвращает все IP-адреса на всех интерфейсах виртуального сервера:
Get-NetIPAddress
А следующая команда используется в PowerShell для установки роли Active Directory Domain Services. Она добавляет необходимые компоненты и службы, чтобы сервер мог функционировать как контроллер домена в среде Active Directory:
Install-WindowsFeature -Name AD-Domain-Services
Чтобы проверить текущее состояние брандмауэра для всех профилей, используйте команду:
Get-NetFirewallProfile
В свою очередь следующая команда включает брандмауэр Windows для всех указанных профилей сети (Domain, Public, Private). Это означает, что брандмауэр будет активен и будет фильтровать входящий и исходящий трафик в зависимости от настроенных правил для каждого профиля:
Set-NetFirewallProfile -Profile Domain,Public,Private -Enabled True
При помощи PowerShell можно установить текущий часовой пояс в настройках системы:
Set-TimeZone "Russia Time Zone 3
Также PowerShell можно использовать для изменения имени компьютера. Например, следующая команда назначает хосту новое имя windows-server, указывает, что команда должна вернуть объект, представляющий переименованный компьютер, после чего перезагружает сервер:
Rename-Computer -NewName windows-server -PassThru -Restart
При подключении к виртуальной машине на Windows Server Core по умолчанию открывается командная строка, то есть утилита cmd. При этом операционная система предоставляет администратору возможность запускать вместо этого командную оболочку PowerShell. Чтобы это осуществить, необходимо внести некоторые изменения в системный реестр Windows.
Для установки PowerShell в качестве интерфейса по умолчанию выполните следующую команду:
Set-ItemProperty -Path 'HKLM:\Software\Microsoft\Windows NT\CurrentVersion\WinLogon' -Name Shell -Value 'PowerShell.exe'
Затем перезагрузите систему:
Restart-Computer -Force
Основные настройки через sconfig
sconfig — это консольный инструмент для базовой настройки сервера. Его можно запустить из командной строки командой:
sconfig
Интерфейс sconfig представляет собой меню, состоящее из некоторого количества пунктов.
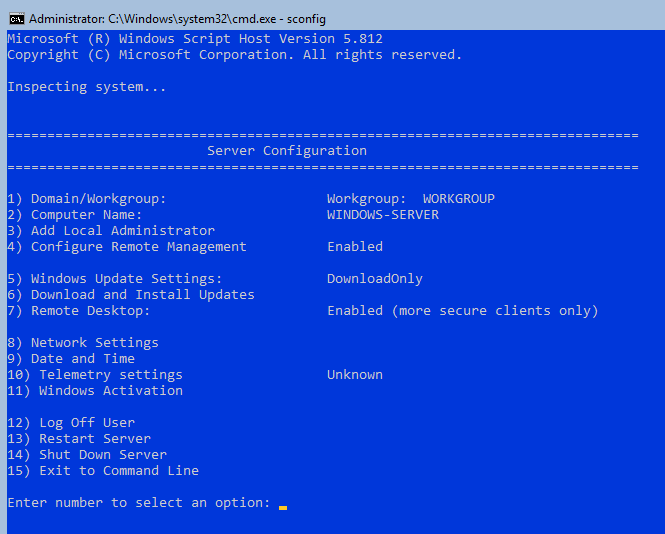
Данное меню предоставляет возможность:
- изменить принадлежность сервера к домену или рабочей группе;
- изменить имя хоста;
- добавить учётную запись локального администратора;
- сконфигурировать удалённое управление сервером;
- настроить параметры автоматического обновления операционной системы;
- проверить наличие и установить обновления операционной системы;
- включить и отключить удалённый рабочий стол;
- сконфигурировать сетевые настройки, такие как IP-адрес VPS, шлюза, DNS-сервера и т.д.;
- настроить на сервере дату и время;
- настроить уровень телеметрии, отправляемой в Microsoft;
- ввести лицензионный ключ и активировать копию операционной системы;
- выйти из текущей сессии пользователя;
- перезагрузить виртуальный сервер;
- выключить виртуальный сервер;
- покинуть интерфейс
sconfigпри помощи последнего пункта меню.
Для перехода между пунктами меню используйте соответствующее число, указанное в каждом пункте в качестве его номера.
Данный функционал помогает быстро и эффективно настраивать и управлять сервером в режиме Core без необходимости использования графического интерфейса.
В целом, работа в Windows Server Core может требовать некоторых навыков командной строки и PowerShell. При этом данный режим значительно повышает безопасность и производительность системы за счёт минимизации используемых компонентов.