
When looking to install Microsoft Hyper-V, you need to install the Hyper-V role on Window Server. One option is to use the GUI to run and manage your server and VMs. However, in certain situations, you can save resources by running Windows Server in command line (without GUI).
To install the Hyper-V role, you need to install the Windows Server 2016 Datacenter Server Core as your operating system (OS) platform. For the purposes of this walkthrough, we are using the Datacenter edition of Windows Server, as it unlocks the most powerful enterprise features for Hyper-V. Most enterprises use Windows Server Datacenter or Windows Server Standard because of the Windows licensing advantages. Note that the steps for other editions will differ.
Hyper-V Server is basically Windows Server Core with the Hyper-V role already installed. Thus, simply installing Hyper-V Server can get you up and running with the hypervisor for free. However, it may be better to install Hyper-V on Windows Server for advanced functionality if you have a license. In this case, you should install the OS first and then enable the Hyper-V role. Let’s cover how to install Windows Server 2016 Core and configuration.
Windows Server 2016 ISO Download
To start, you need to download the ISO file. You need MSDN or any other login with Microsoft to download the Windows Server 2016 ISO. However, if you don’t have that, you can download an evaluation copy of Windows Server 2016 from the TechNet Evaluation Center on the Windows Server 2016 download page. The TechNet evaluation copy is a time-limited 180-day version of Windows Server 2016 intended for trial purposes. You are asked to create an account with Microsoft before getting the Windows Server 2016 ISO download link.
Windows Server 2016 Datacenter Server Core Installation
You need to write the ISO image to a DVD disc or USB flash drive. Insert this medium into your computer and boot from this medium to start Windows Server installation.
When installing the Windows Server 2016 OS, you can choose to install the operating system alone, which is a Server Core installation. Server Core is a minimal installation without a graphical interface or management tools. This is the preferred installation method for use in a production environment over the Desktop Experience, which is the regular GUI Windows Server OS.
To demonstrate the installation process for a single standalone Hyper-V host, we use the Server Core installation of Windows Server 2016 Datacenter.
Note: For Windows Server 2016 Datacenter with the graphical user interface (GUI), you can read our blog post on running Hyper-V virtual machines (VMs).
Start by choosing Windows Server 2016 Datacenter in the list with Windows Server editions to install Server Core after you boot from the installation medium. See the screenshot of the Windows Server 2016 installer below with the OS list.

The Windows Server 2016 Core installation is similar to any other Windows Server installation. Go through the steps in the setup wizard:
- Accept the license agreement.
- Choose Custom Install.
- Select the target hard drive on which you want to install Windows.
- Proceed with the installation.
- Once the Windows Server 2016 Datacenter Server Core installation process is complete, you are asked to change the Administrator password. Press Enter.

- Once you set the password, press Enter (OK) to continue.

You have finished the Windows Server installation. Now you need to configure the operating system.
Windows Server 2016 OS Configuration
You now reach a CMD command prompt and no visible menu. It is recommended that you configure network settings for your Windows Server 2016 setup.
Configuring network settings
Network settings and most other settings in Windows Server 2016 Core are configured in the console interface:
- Type sconfig in the command prompt to launch the Server Core configuration utility.
- You are then presented with the Server Configuration menu.

- Type 8 and press Enter to open Network Settings and launch the network configuration menu. It is recommended that you assign a static IP address for Windows Server 2016 setup.
- Choose the network adapter you want to configure. Type the appropriate number and press Enter. You need to always press Enter after entering a value in this configuration menu.
- Now you should see the menu with four entries:
- Set Network Adapter Address
- Set DNS Servers
- Clear DNS Server Settings
- Return to Main Menu
- Type 1 to set the IP address, subnet, and gateway.

- Type S to use the static IP address configuration.
- Enter the appropriate values to meet your network configuration. Once done, you are returned to the previous Network Adapter Settings menu with four entries.

- Type 2 to set DNS servers for the network configuration.
- Enter a new preferred DNS server and alternate DNS server.
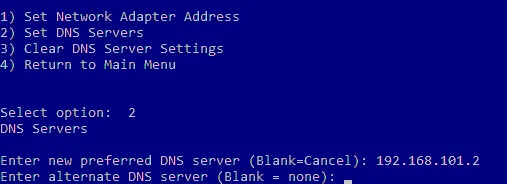
Once done, you are returned back to the previous Network Adapter Settings menu.
After configuring the network settings, you should test network connectivity. You can use option 15, Exit to Command Line. This takes you to the cmd prompt, where you can ping your gateway, DNS server, etc.
Changing the computer name
Now let’s run the sconfig command in cmd to open the Server Configuration menu again. You should join a Windows domain and change the computer name. Using an Active Directory domain with a domain controller allows you to manage all Windows machines centrally.
Do the following steps to change the computer name:
- Choose 2 in the Server Configuration menu.
- Enter a new computer name.
- Restart the computer to apply the changes.

Changing Domain/Workgroup options
Open the Server Configuration menu after computer restart (sconfig).
Do the following steps to change the Domain/Workgroup settings:
- Choose the 1) Domain/Workgroup option in the Server Configuration menu.
- Type D to join a domain.
- Enter the domain name.
- You are asked to provide the credentials of a user who has permissions for the needed domain.
- Once you have set up the domain configuration, reboot your Windows Server machine.

After the reboot, you have a functioning Windows Server 2016 Datacenter Server Core and are ready to install the Hyper-V server role.
You can also read about the difference between the GUI and Core Windows Server 2016 installation and configuration to run Hyper-V.
Conclusion
Windows Server installation is not a difficult process. Installing the core version of Windows Server 2016 Datacenter allows you to reduce the footprint and related overhead, as well as install the Hyper-V role on the Windows Server to run VMs. As for the core version, Windows Server 2016 setup is performed mostly in the command line interface.
If you use Hyper-V, don’t forget to back up virtual machines. Download NAKIVO Backup & Replication to protect your physical and virtual environments. The NAKIVO solution supports physical Windows Server backup, Active Directory backup, Hyper-V VM backup and more.
Item Preview
There Is No Preview Available For This Item
This item does not appear to have any files that can be experienced on Archive.org.
Please download files in this item to interact with them on your computer.
Show all files
4,370
Views
4
Favorites
DOWNLOAD OPTIONS
Uploaded by
gordanfarmer3
on
SIMILAR ITEMS (based on metadata)

Attach the ISO of the Windows Server 2016 to the virtual machine and power on the virtual machine. (If you are not familiar with Hyper-V, please take a look on my Deep Dive into Hyper-V 2016 series)
First thing to choose is the language, time format and keyboard. Select the appropriate information and click next.

Click Install now .

The next screen is an interesting one and it is very important to choose right. What we can see here is that we have 2 different installation options for Windows Server 2016. Windows Server 2016 Standard/Datacenter is actually what we have known to be the Core installation and if you just click next, next.. you will find yourself in the end with an installation of Server Core.
If your goal is Server Core than this is the right option for you. Second option Windows Server 2016 (Desktop Experience) is the full Windows Server graphical interface and that is the option we want to choose for the purposes of this series.
OBS!!! In some previous versions we had the ability to migrate back and forth from a full GUI to Server Core and back again, even after the operating system was installed. THIS CAN’T BE DONE IN WINDOWS SERVER 2016 so plan carefully from the beginning.

Accept the license terms and click next.

Select Custom installation since this will be a new installation.

Select the Drive partition where you want Windows installed and click Next

Server installer will copy files, install features, and get everything ready on the hard drive and will finish the installation by asking for a new password for the Administrator account.


Once you choose a password, you will find yourself on the Windows desktop. Server Manager will launch after you have logged in.

In the next part of this series we will give some power to our server by installing Active Directory and configuring domain.
Stay tuned!
Cheers,
Nedim
Windows Windows Server 2016 installation is one of the key tasks in the network. As an administrator you should know how to install and configure Windows server. To start administrating your network, surely you first need to install Windows server and configure it. Before installing Windows server make a plan for the installation. Surely you can plug installation media (DVD, USB flash, etc) to the server and click on next button several times. Then you’re done and Windows server is installed. But that doesn’t work surely.
Make a plan
Choose an appropriate edition of the Windows server. An edition of Windows server supports specific role/roles that others doesn’t support. Think of your present needs and what you may need in the future. How many virtual machines (VM) do you need? How many VMs you may need in the future? Does your network need Web server now? What about the future? How many users work in your network? They are all the things that you should pay attention to while making a good plan for Windows server installation.
If you work on your personal lab, click on the link below to learn how to install Windows server 2016 on VMware Workstation.
- Install Windows Server 2016 on VMware Step by Step
Prepare the installation media (DVD, USB flash, etc) and start the installation process. If you don’t have the Windows Server 2016 installation software, click here and download the software from Microsoft website.
1. Plug the Windows Server 2016 boot drive (DVD, USB) to the computer and boot your computer. When the Windows Setup page appears, select your language, time format and keyboard then click on Next button.

2. Now click on Install now button to start the installation process.

3. Select the appropriate version of the windows server that meets your organization’s needs then click Next. Make sure that you’ve chosen an appropriate edition of Windows server.

4. Put a check mark in the box next to the I accept license terms and click on the Next button. License term is about the way you want to buy license for your server from Microsoft.

5. Select the Custom: Install Windows only (advanced) option for clean installation. Clean installation is the term used against upgrade. When you upgrade a Windows server you can have your settings, apps, etc from previous version of Windows. When you do the clean installation you can’t have the settings, apps, etc.

6. Select the hard drive that you want to install the windows server on, then click on the New button to do the partitions.

7. After clicking on the New button, some options appear. Specify the amount of the drive based on MB and click on the Apply button. A warning appears which wants you to give the permission to system to create a drive for system files. Click on ok button, if you want to add more drives do this process again. When finished hit Next.

8. After clicking Next the System starts coping all the files from the external drive to internal hard drive. It will take a while so be patient. Be aware that your system will be restarted several times.

9. When the system copied all the files and restarted, finalize your task by entering the required details. Type complex password (composed of uppercase, lowercase, symbol and numbers) twice in the boxes and click on the Finish button. User name is Administrator by default.

10. Press Ctrl+Alt+Del buttons to jump start the screen to a login page and inside the box below the administrator user name, enter the password and press Enter button from the keyboard to sign in the Windows.

11. After you logged in the Windows you see the some thing like the picture below. Welcome to Windows Server 2016.

Conclusion
Finally, we’ve installed the Windows Server 2016 successfully and is ready to work. When Windows installed you can’t go back and for example change the edition. If so, do the clean installation again. For any question leave a comment below. I answer your questions as soon as possible.
Now you need to initially configure Windows Server. Click on the link below to learn how to do the initial configurations.
- Install Active Directory on Windows Server 2016 step by step
- Download the Utility
- Load Windows onto the USB
- Create the USB Drive
- Enable .NET 2.0
Windows Server 2016 can be installed in a similar fashion as the last several releases. In this example, we will create a bootable USB drive with Windows Server 2016 available to install. The classic method of creating a Windows Installation USB drive is to use the free utility Windows USB/DVD Download Tool.
Download the Utility
Download the latest version of the Windows USB/DVD Download Tool from Codeplex.
Install and run the utility on a Windows desktop system with a USB drive attached.
The utility is still called “Windows 7 USB/DVD Download Tool”
.NET may be required to be enabled as the utility requires .NET 2.0 To enable .NET 2.0 simply go to Control Panel and enable .NET Framework 3.5 (see screenshot below)
Load Windows onto the USB
When the Utility is started, a four-step wizard begins.

Step one asks for the Windows ISO source file. This will be the Windows distribution that will be copied and installed onto the USB drive.

Select USB Device. DVD is also an option for creating bootable DVD disks.

Make sure the correct USB drive is selected. The contents of the USB drive will be destroyed.
Create the USB Drive
Select Begin Copying to create the USB bootable drive.

The utility gives you a chance to cancel, otherwise select Erase USB Device.

You are given one more chance to back out. Select Yes.
In Step four, the USB drive is partitioned, formatted and Windows is unloaded, and the USB drive is configured as a bootable device.


And the USB drive is complete. Either exit or create another Windows setup distribution.
To install Windows from the USB, boot a computer from the USB and the Windows Installer OS will initiate the Windows Installation.
Enable .NET 2.0
If during installation the utility displays a message requiring .NET 2.0, open Control Panel and enable the feature .NET 3.5 (and thereby .NET 2.0).
