
Большинство современных приложений Windows требуют наличия установленного .NET Framework. Например, в Windows 11/10 и Windows Server 2022/2019 по умолчанию уже установлена версия NET Framework 4.8. Однако некоторые старые приложения требуют наличия установленного .NET Framework 3.5, 2.0 или даже 1.0.
В этой статье мы рассмотрим, как установить .NET 3.5 в Windows 11/10 и Windows Server 2022/2019/2016.
Содержание:
- Установка .NET Framework 3.5 в Windows 11 и 10
- Как установить .NET 3.5 в Windows Server 2022/2019/2016?
- Настройка параметров офлайн установка .Net 3.5 помощью GPO
Установка .NET Framework 3.5 в Windows 11 и 10
Проверьте, что .NET Framework 3.5 (включает в себя .NET 2.0 и 3.0) не установлен на вашем компьютере. Для этого, откройте консоль PowerShell с правами администратора и выполните команду:
Get-WindowsCapability -Online -Name NetFx3~~~~

В нашем случае .NET 3.5 не установлен (
State=NotPresent
).
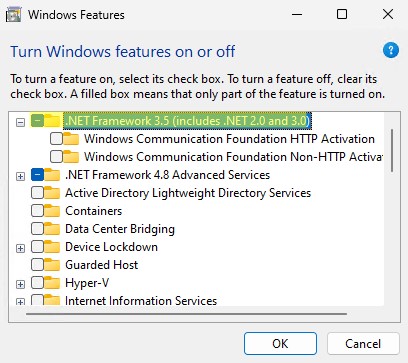
В Windows 10/11 вы можете установить .Net Framework из панели Turn Windows Features on or off:
- Выполните команду
optionalfeatures.exe
; - В списке компонентов выберите .NET Framework 3.5 (includes .NET 2.0 and 3.0), нажмите ОК;

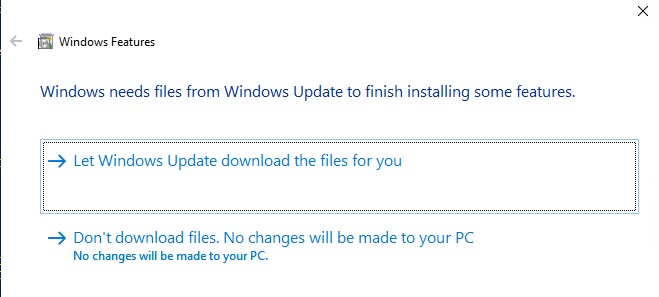
- Если на вашем компьютере есть доступ в Интернет, в следующем окне выберите Let Windows Update download the files for you;
-

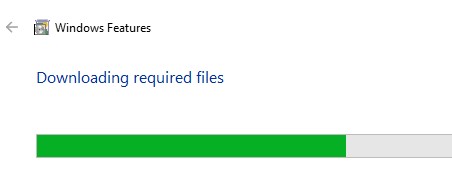
- Windows скачает и установить последнюю версию компонента .NET Framework 3.5 с серверов Microsoft Update.

Также вы можете установить .NET Framework 3.5 из командной строки:
- С помощью DISM:
DISM /online /Enable-Feature /FeatureName:"NetFx3" - Из PowerShell:
Enable-WindowsOptionalFeature -Online -FeatureName "NetFx3"
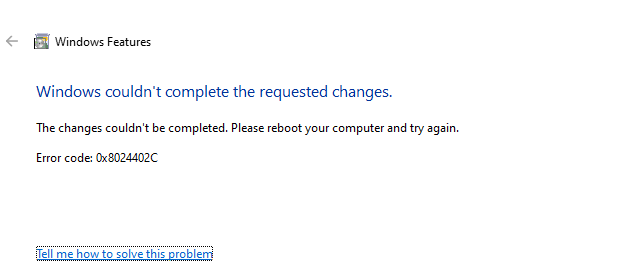
Если ваш компьютер не подключен к интернету или находится в изолированной сети, то при установке .NET 3.5 появится ошибка:
Windows couldn’t complete the requested changes.
The changes couldn’t be completed. Please reboot your computer and try again.
Error code: 0x8024402C
В этом случае вы можете вручную установить компоненты NET 3.5 с вашего установочного образа (диска) Windows. Для этого вам понадобится установочная USB флешка или файл с ISO образом вашей версии Windows (как проверить версию Windows в ISO образе):
- Подключите ваш носитель с ставочным образом Windows к компьютеру. В моем случае у меня есть файл Windows11-22h2.iso. Щелкните по файлы и выберите Mount, чтобы смонтировать образ в виртуальный DVD привод (или воспользуйтесь командой PowerShell:
Mount-DiskImage -ImagePath "C:\distr\Windows11-22h2.iso"
); - В моем случае виртуальному приводу с образом была назначена буква диска E: (мы будем использовать эту букву в следующих командах);
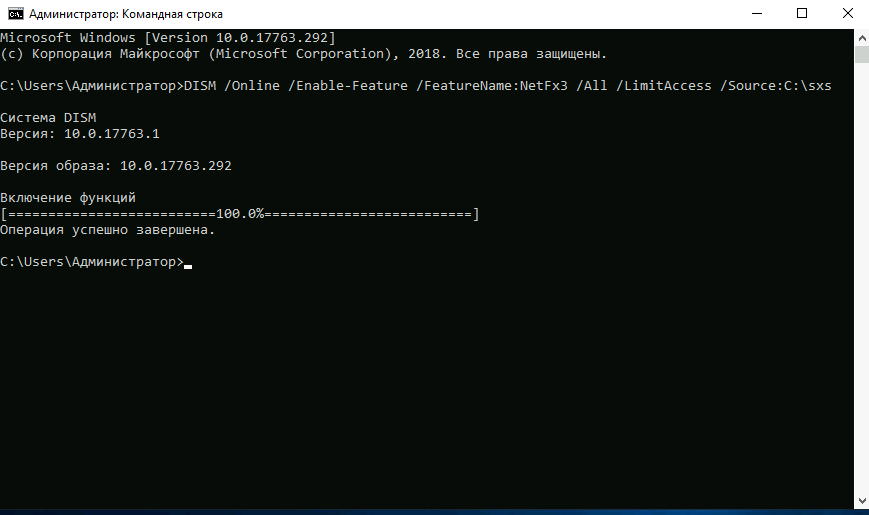
- Чтобы установить .Net 3.5 из файлов компонентов на установочном диске выполните команду:
DISM /online /enable-feature /featurename:NetFX3 /All /Source:E:\sources\sxs /LimitAccess
Или (аналогичная PowerShell команда):
Add-WindowsCapability -Online -Name NetFx3~~~~ -Source E:\Sources\SxS
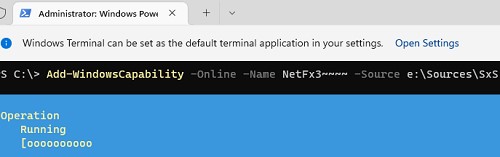
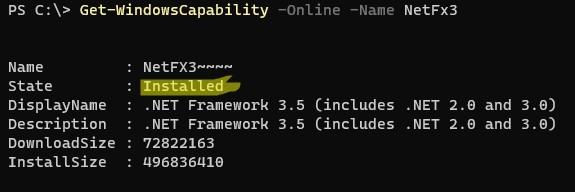
Чтобы проверить, что .NET Framework успешно установлен, выполните команду:
Get-WindowsCapability -Online -Name NetFx3~~~~
Name         : NetFX3~~~~
State        : Installed
DisplayName  : .NET Framework 3.5 (includes .NET 2.0 and 3.0)
Description  : .NET Framework 3.5 (includes .NET 2.0 and 3.0)
DownloadSize : 72822163
InstallSize  : 496836410
Выведите список версий .NET Framework, которые установлены на вашем компьютере:
Get-ChildItem 'HKLM:\SOFTWARE\Microsoft\NET Framework Setup\NDP' -Recurse | Get-ItemProperty -Name version -EA 0 | Where { $_.PSChildName -Match ‘^(?!S)\p{L}’} | Select PSChildName, version
[/alert]
Как установить .NET 3.5 в Windows Server 2022/2019/2016?
В Windows Server 2022,2019,2016 и 2012 R2 вы можете установить NET Framefork 3.5 несколькими способам:
- ерез Server Manager (Add roles and features -> Features -> .NET Framework 3.5 Features -> .NET Framework 3.5 (includes .NET 2.0 and 3.0 );
- С помощью DISM:
DISM /Online /Enable-Feature /FeatureName:NetFx3 /All - С помощью PowerShell:
Install-WindowsFeature NET-Framework-Core
При этом установочные файлы .NET 3.5 для вашей версии Windows Server будут загружены с серверов Windows Update. Чтобы сработал этот метод установки нужно убедиться:
- Ваш Windows Server должен иметь прямой доступ в Интернет. Настройки прокси-сервера и файервола не должны ограничивать доступ к серверам Windows Update.
- Хост не должен быть настроен на получения обновлений с локального WSUS сервера (проверьте настройки обновлений Windows в групповых политиках или напрямую в реестре);
Проверьте значение параметра UseWUServer в реестре:
Get-ItemProperty -Path "HKLM:\SOFTWARE\Policies\Microsoft\Windows\WindowsUpdate\AU" -Name "UseWUServer" | select -ExpandProperty UseWUServer
Если значение параметра равно 1, значить ваш хост будет пытаться получить обновления с локального WSUS сервера. В этом случае при установке .NET 3.5 появится ошибка 0x800F0954. Измените значение параметра на 0 или удалите его, чтобы подключиться напрямую к серверам обновлений Windows Update.
Если ваш сервер имеет доступ в Интернет, но настроен на получение обновлений со WSUS, при устапновке NET Framework появится ошибка 0x800f081f.
Решение: установить .Net 3.5 онлайн с серверов Microsoft и игнорировать локальный WSUS:
- Экспортируйте в reg файл текущие настройки Windows Update в ветке HKLM\Software\Policies\Microsoft\Windows\WindowsUpdate (
reg export HKLM\Software\Policies\Microsoft\Windows\WindowsUpdate c:\WindowsUpdateRegFile.reg
) - Удалите данную ветку (
Remove-Item -Path HKLM:\Software\Policies\Microsoft\Windows\WindowsUpdate -Recurse
) и перезапустите службу:
net stop wuauserv & net start wuauserv - Запустите установку .Net из Интернета:
DISM /Online /Enable-Feature /FeatureName:NetFx3 /All - После окончания установки верните настройки WU, импортировав reg файл (
Reg import c:\WindowsUpdateRegFile.reg
) и еще раз перезапустите службу Windows Update
Если с вашего сервера нет прямого доступа в Интернет, то при попытке установить .NET 3.5 в Windows Server через консоль Server Manager появится ошибка 0x800F081F (The source files could not be found), 0x800F0950, 0x8024402c, 0x800F0906 или 0x800F0907 (в зависимости от версии Windows Server).
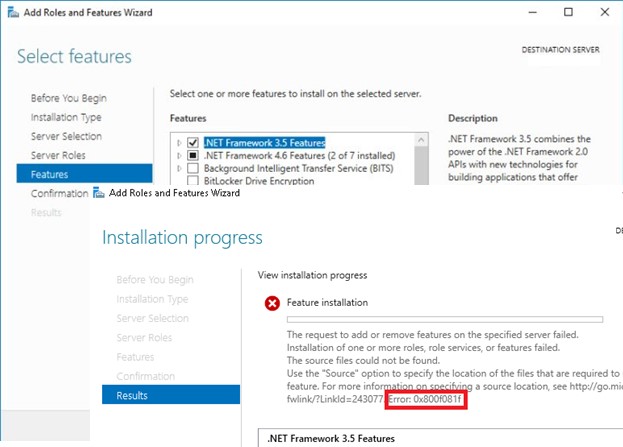
Хотя .NET Framework 3.5 присутствует в списке компонентов Windows Server 2022/2019/2016/2012R2, на самом деле его бинарные файлы в хранилище компонентов Windows отсутствуют (концепция Features on Demand). Это сделано, чтобы уменьшить размер образа операционной системы на диске. Вы можете проверить наличие.NET Framework 3.5 в локальном хранилище компонентов Windows Server с помощью команды:
Get-WindowsFeature *Framework*
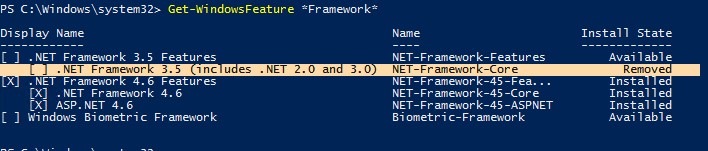
Как вы видите статус компонента
NET-Framework-Core
– Removed.
Для установки NET-Framework-Core вам потребуется дистрибутив с вашей версией Windows Server в виде ISO файла, или в распакованном виде в сетевой папке. Смонтируйте ISO образ с дистрибутивом в отдельный виртуальный диск (например, диск D:).
Теперь вы можете установить .Net Framework 3.5 с помощью графической консоли Server Manager:
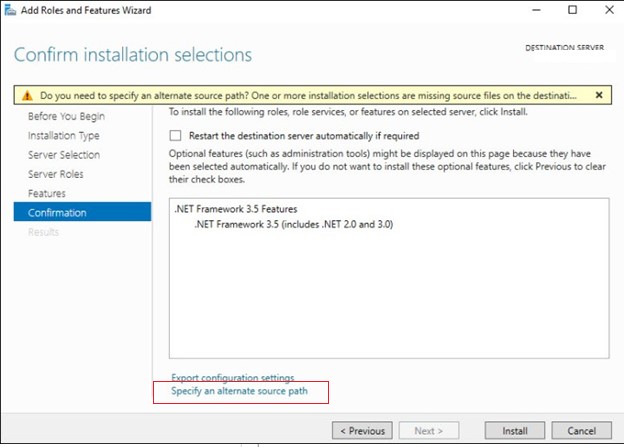
Установить компонент .Net 3.5 можно из графической консоли Server Manager. Для этого выберите компонент .Net Framework 3.5 Features, но, перед тем, как нажать кнопку Install, нажмите небольшую ссылку внизу мастера — Specify an alternative source path.
- Для этого выберите компонент .Net Framework5 Features. Перед тем, как нажать кнопку Install, нажмите на ссылку Specify an alternative source path внизу;

- Укажите путь к хранилищу компонентов (SXS) дистрибутива Windows Server. Если вы смонтировали дистрибутив в виртуальный привод, это может быть путь
D:\sources\sxs
. Также это может быть сетевая папка, куда вы предварительно скопировали дистрибутив (например,
\\server1\distr\ws2022\sources\sxs
). Нажмите ОК.

Гораздо проще установить компонент Net Framework 3.5 Features из командной строки или консоли PowerShell, запущенной с правами администратора. Просто выполните команду:
Dism.exe /online /enable-feature /featurename:NetFX3 /All /Source:D:\sources\sxs /LimitAccess
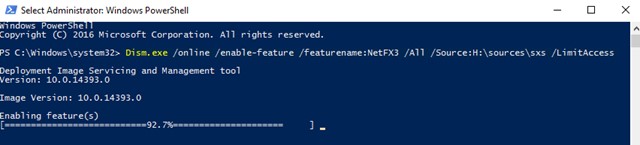
Где
D:\
— диск с вашим дистрибутивом Windows Server.
Параметр LimitAccess запрещает DISM подключение к серверам обновлений для получения установочных файлов компонентов. Используются только файлы в указанном каталоге.
Если вы хотите установить компонент Windows Server с помощью PowerShell, воспользуйтесь командой Add-WindowsFeature:
Add-WindowsFeature NET-Framework-Core -Source d:\sources\sxs
После завершения установки компонента, перезагрузка сервера не требуется.
Также вы можете вручную скопировать 2 cab файла
microsoft-windows-netfx3...
из каталога sources\sxs вашего дистрибутива. В этом случае для установки .Net 3.5 достаточно выоплнить команду:
dism /online /Add-Package /PackagePath:C:install\net35\microsoft-windows-netfx3-ondemand-package~31bf3856ad364e35~amd64~~.cab.
Настройка параметров офлайн установка .Net 3.5 помощью GPO
С помощью групповой политики Specify settings for optional component installation and component repair (находится в разделе GPO Computer Configuration -> Administrative Templates -> System) можно настроить особые параметры установки компонентов Windows из локального источника или Windows Update даже при использовании WSUS.
На отдельностоящем компьютере вы можете включить этот параметр политики с помощью редактора локальной GPO (gpedit.msc). В среде Active Directory вы можете создать политику для всех компьютеров/серверов с помощью консоли GPMC.
Здесь можно указать, что при установки или восстановлении компонентов Windows необходимо всегда загружать файлы из Интернета с серверов Windows Update вместо локального WSUS (опция Download repair content and optional features directly from Windows Update instead of Windows Server Update Services — WSUS).
Также можно указать путь к каталогу с компонентами Windows Server (или wim файлу), который нужно использовать при офлайн установке (указывается в параметр Alternate source file path). Вы можете указать:
-
- Путь к сетевой папке в UNC формате (
\\server\distr\ws2016\sxs
) (здесь можно указать несколько UNC путей через точки с запятой:
\\srv1\ws22\sxs;\\fs01\ws22\sxs;\\fs3\sxs
- Путь к сетевой папке в UNC формате (
- Также допустимо указывать WIM файл в качестве источника:
WIM:\\srv1\distr\ws2016\install.wim:2
(в этом случае
2
– это индекс образа вашей редакции Windows Server в WIM файле. Список доступных редакций в файле можно вывести так:
DISM /Get-WimInfo /WimFile:"\\server\distr\ws2016\install.wim"
)
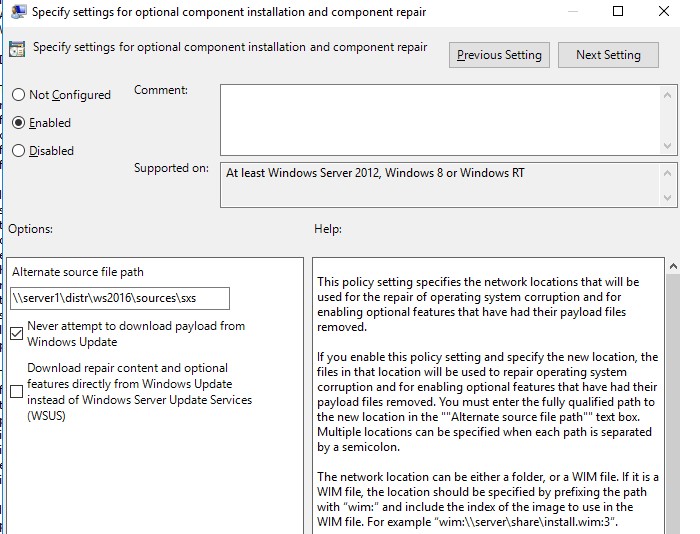
Для разных версий Windows Server нужно использовать разные источники с каталогом SXS. Если в вашей сети есть несколько версии Windows Server, нужно создать отдельные GPO с разными UNC путями к сетевой папке с SXS. Чтобы GPO применялась только к хостам с определенными версиями Windows Server, можно использовать WMI фильтры групповых политик.
Установка .NET Framework 3.5 на Windows Server 2012/2016
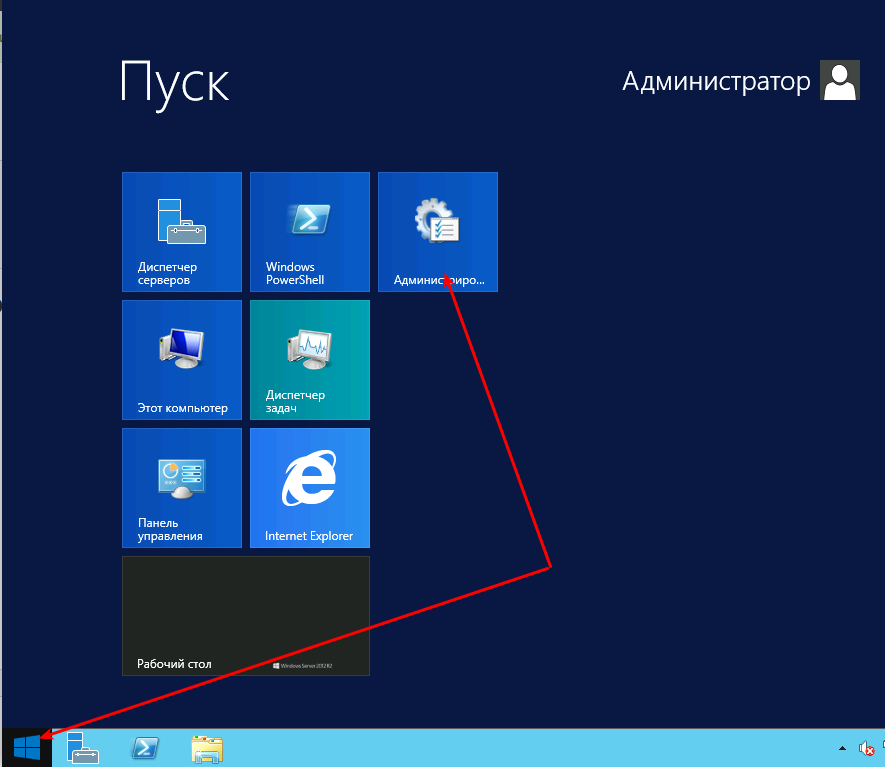
Запустите службу «Центр обновления Windows»
Нажмите «Пуск» и выберите «Администрирование»:
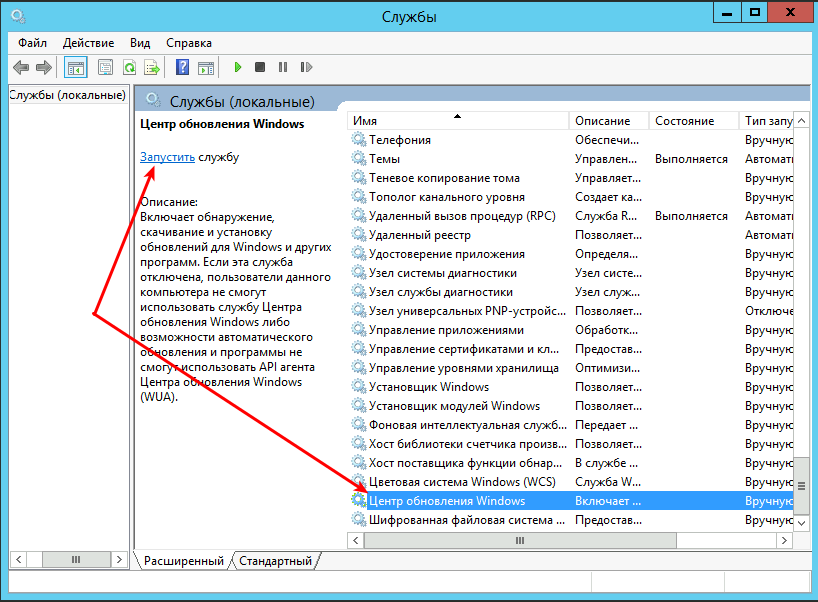
В открывшемся окне перейдите в «Службы»:

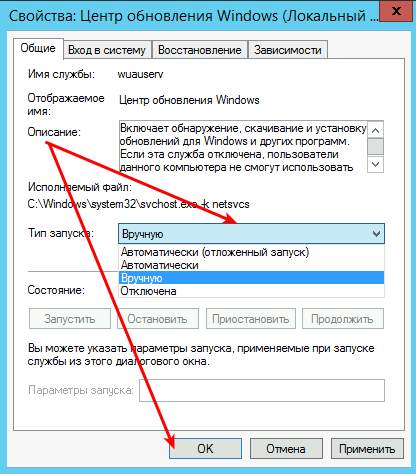
Нажмите правой кнопкой мыши на службе «Центр обновления Windows» и выберите «Свойства»:

Установите тип запуска «Вручную» и нажмите «ОK»:
Запустите службу:
Установите .NET Framework 3.5
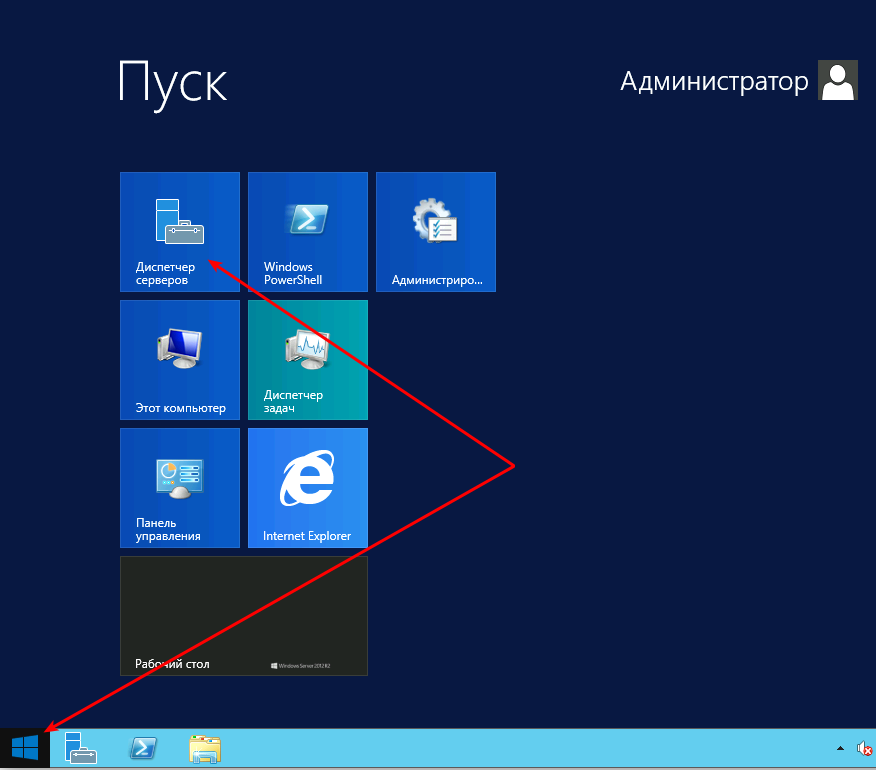
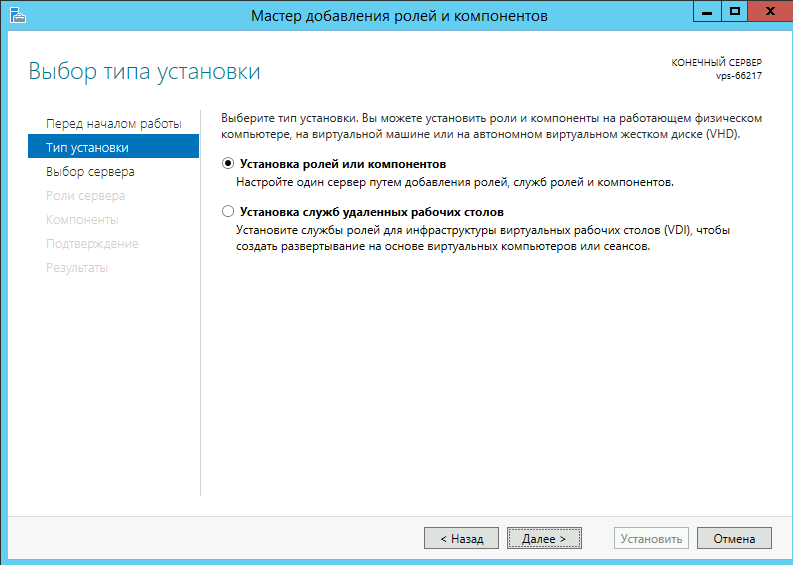
Нажмите «Пуск» и откройте «Диспетчер серверов»:
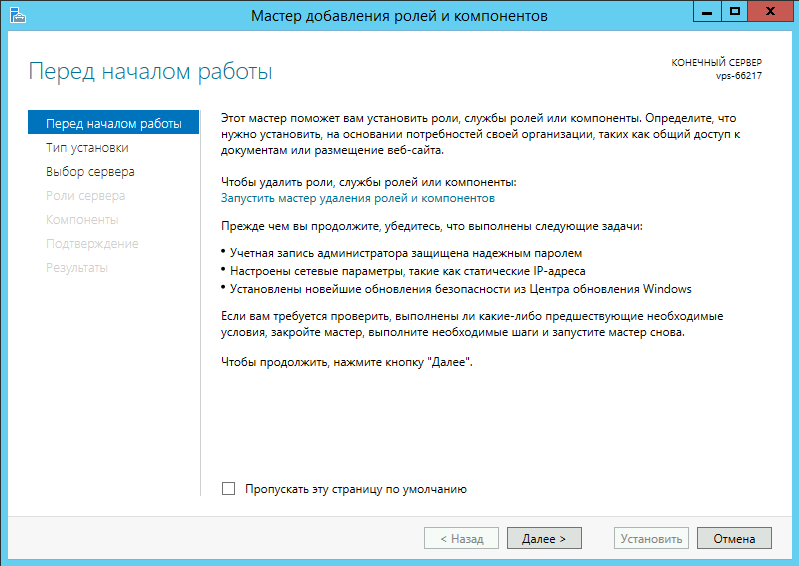
Нажмите «Управление» и выберите «Добавить роли и компоненты»:

Нажмите «Далее»:
«Далее»:
«Далее»:

«Далее»:
«Далее»:
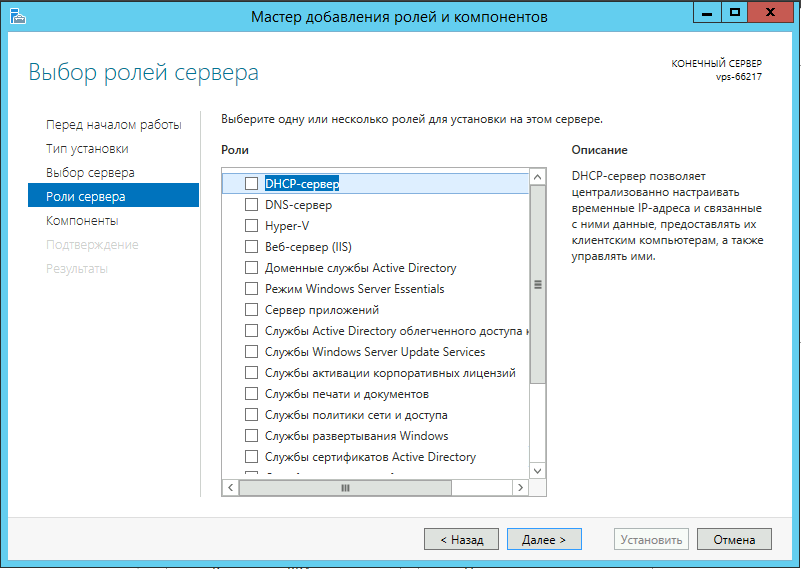
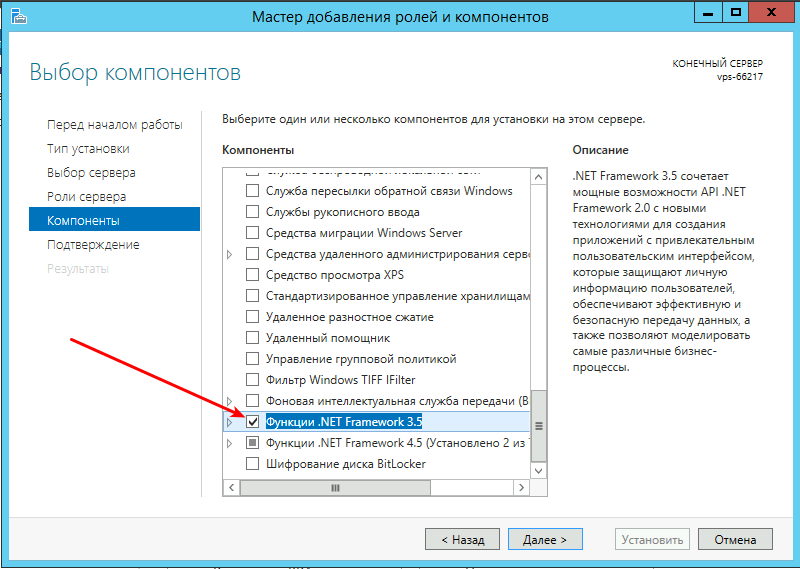
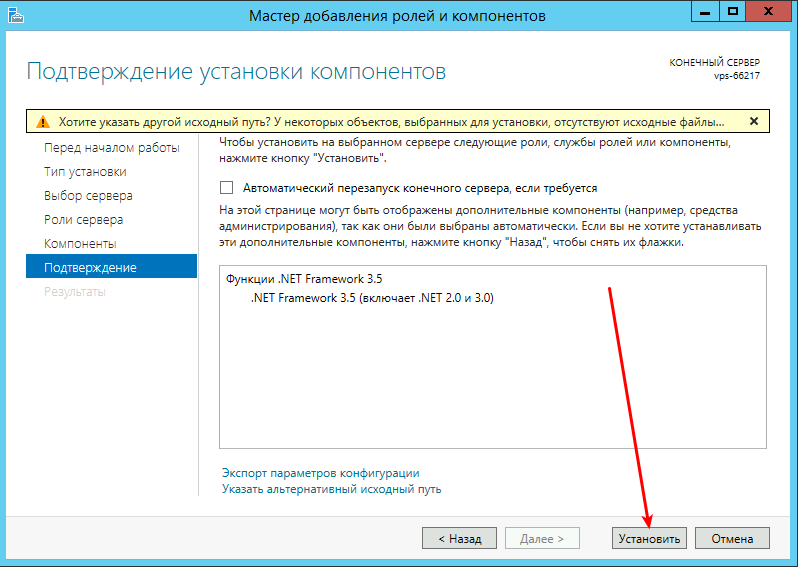
Поставьте галочку напротив компонента «Функции .NET Framework 3.5» и нажмите «Далее»:
Нажмите «Установить»:
Дождитесь завершения установки:
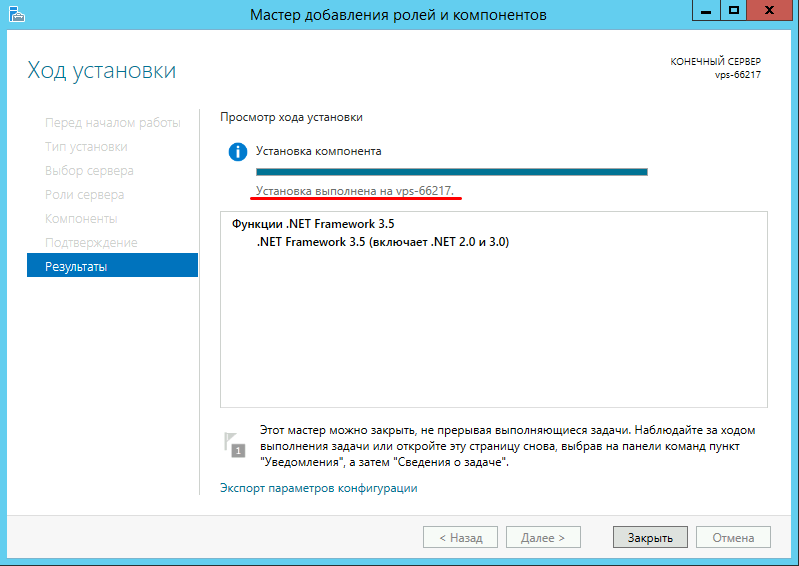
Можете закрыт окно, — .NET Framework 3.5 установлен.
Установка .NET Framework 3.5 на Windows Server 2019
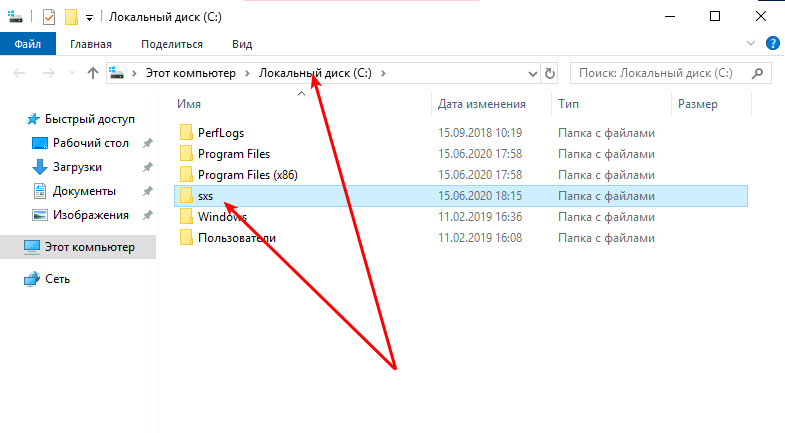
1. Скачайте архив с необходимыми компонентами sources.zip
2. Распакуйте файлы в корень диска С:\:
3. Запустите «Командную строку» от имени администратора:
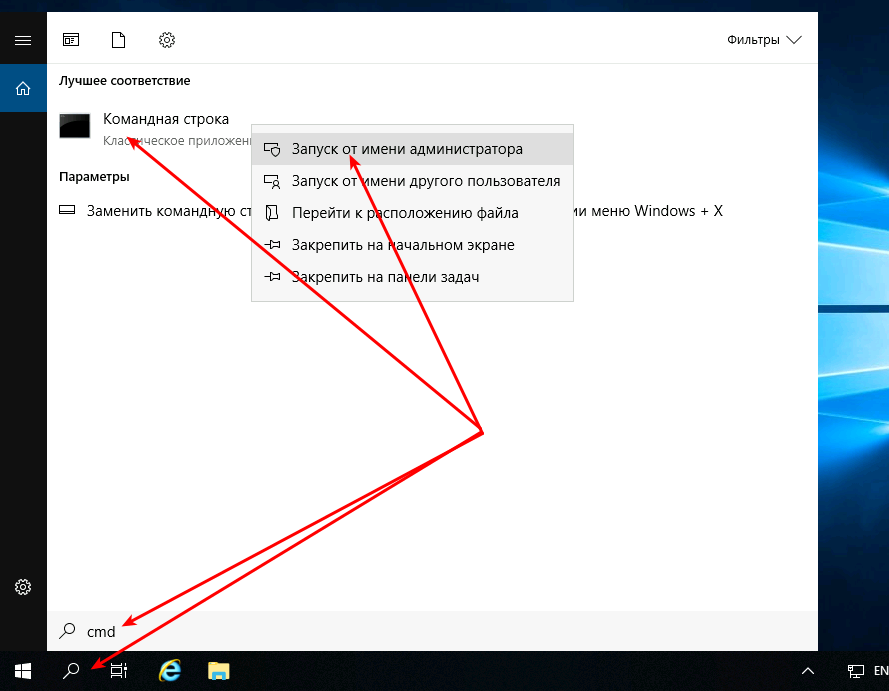
4. Выполните команду с учётом пути к распакованным файлам из архива:DISM /Online /Enable-Feature /FeatureName:NetFx3 /All /LimitAccess /Source:C:\sxs
Таким образом компонент Microsoft .NET Framework 3.5 установлен.
Installing .Net Framework 3.5 on Windows Server 2016 can be a bit of a challenge, especially for those who are new to the process or have limited experience with Windows Server systems. However, with the right preparation and understanding of the methods involved, it is possible to successfully install .Net Framework 3.5 and ensure your server is equipped with the necessary tools to run applications and services that rely on this framework.
In this blog post, we will explore the challenge of installing .Net Framework 3.5 on Windows Server 2016 and provide detailed instructions on how to install it using four different methods. We will also discuss common issues that may arise during the installation process and provide solutions to help you overcome them.
Video Tutorial:
The Challenge of Installing .Net Framework 3.5 on Windows Server 2016
Installing .Net Framework 3.5 on Windows Server 2016 can be challenging due to the fact that it is not installed by default. Unlike previous versions of Windows Server, where .Net Framework 3.5 was included in the operating system, Windows Server 2016 requires manual installation of this framework.
Without installing .Net Framework 3.5, you may encounter compatibility issues when running applications and services that rely on this framework. Therefore, it is necessary to install .Net Framework 3.5 on your Windows Server 2016 in order to ensure smooth operation of your server.
Things You Should Prepare for
Before proceeding with the installation of .Net Framework 3.5 on Windows Server 2016, there are a few things you should prepare for:
1. Windows Server 2016 installation media: You will need the installation media for Windows Server 2016 to install .Net Framework 3.5. Make sure you have the appropriate installation media available before proceeding.
2. Administrative access: You will need administrative access to the server in order to install .Net Framework 3.5. Ensure that you have the necessary privileges to perform the installation.
3. Internet connection: In some cases, an internet connection may be required to download the necessary files for the installation of .Net Framework 3.5. Make sure your server is connected to the internet before proceeding.
Now that you are prepared, let’s explore the different methods for installing .Net Framework 3.5 on Windows Server 2016.
Method 1: How to Install .Net Framework 3.5 via Server Manager
Before we begin, it’s important to note that this method requires an internet connection, as it will download the necessary files from the Windows Update service. If your server is not connected to the internet, you may need to consider one of the other methods outlined in this blog post.
1. Open Server Manager: Launch Server Manager from the Start Menu or by clicking the Server Manager icon on the taskbar.
2. Add Roles and Features: In the Server Manager window, click on «Add roles and features» from the dashboard.
3. Installation Type: In the «Add Roles and Features Wizard» window, select «Role-based or feature-based installation» and click «Next«.
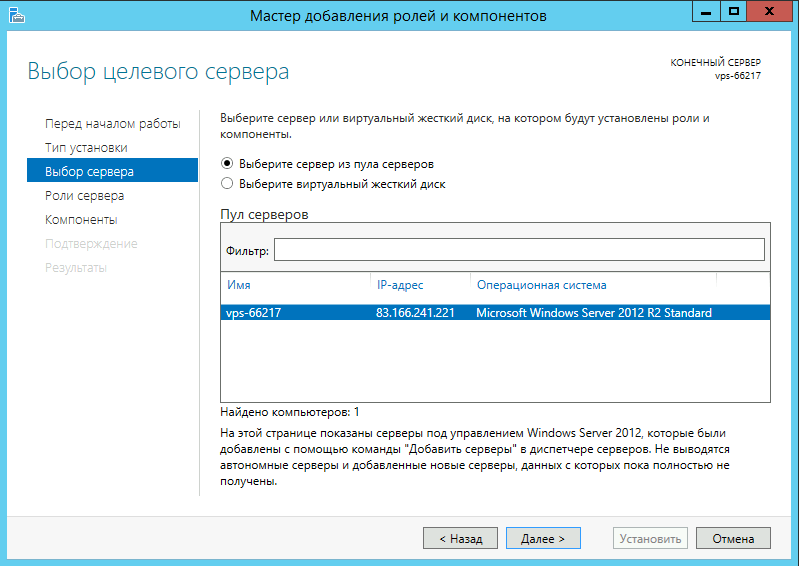
4. Select Server: Choose the appropriate server from the server pool and click «Next«.
5. Server Roles: Skip this step by clicking «Next«.
6. Features: Select «.NET Framework 3.5 Features» from the list of features and click «Next«.
7. Confirmation: Review the information on the «Confirm installation selections» page and click «Install«.
8. Installation Progress: Wait for the installation to complete. This may take some time depending on your server’s resources and internet connection.
9. Installation Results: Once the installation is complete, you will see a summary of the installation results. Click «Close» to exit the wizard.
| Pros | Cons |
|---|---|
| Easy to follow the step-by-step process | Requires an internet connection |
| No need for additional media or downloads | Dependent on the availability of Windows Update service |
Method 2: How to Install .Net Framework 3.5 via PowerShell
If the Server Manager method is not suitable for your situation, you can also install .Net Framework 3.5 using PowerShell.
1. Open PowerShell: Launch PowerShell as an administrator. You can do this by right-clicking on the Start Menu and selecting «Windows PowerShell (Admin)«.
2. Run Installation Command: In the PowerShell window, run the following command to install .Net Framework 3.5:
Install-WindowsFeature -Name NET-Framework-Core
3. Confirmation: Press «Y» to confirm the installation.
4. Installation Progress: Wait for the installation to complete. This may take some time depending on your server’s resources.
5. Installation Results: Once the installation is complete, you will see the installation results in the PowerShell window.
| Pros | Cons |
|---|---|
| No need for an internet connection | Requires familiarity with PowerShell |
| Can be automated and scripted | May take longer to complete compared to the Server Manager method |
Method 3: How to Install .Net Framework 3.5 via DISM
DISM (Deployment Image Servicing and Management) is another method you can use to install .Net Framework 3.5 on Windows Server 2016. This method requires access to the Windows Server 2016 installation media.
1. Mount the Installation Media: Insert the Windows Server 2016 installation media into your server and open a Command Prompt as an administrator.
2. Mount the Installation Media: Run the following command to mount the installation media:
Dism /online /enable-feature /featurename:NetFX3 /All /Source::\sources\sxs /LimitAccess
Replace with the drive letter of the mounted installation media.
3. Installation Progress: Wait for the installation to complete. This may take some time depending on your server’s resources.
4. Installation Results: Once the installation is complete, you will see the installation results in the Command Prompt window.
| Pros | Cons |
|---|---|
| Does not require an internet connection | Requires access to the Windows Server 2016 installation media |
| Can be scripted for automation | May require additional time for mounting the installation media |
Method 4: How to Install .Net Framework 3.5 via Offline Installation
If your server is not connected to the internet and you do not have access to the Windows Server 2016 installation media, you can still install .Net Framework 3.5 using an offline installation method.
1. Download the .Net Framework 3.5 Offline Installer: Go to the Microsoft website and download the .Net Framework 3.5 Offline Installer.
2. Copy the Installer to the Server: Transfer the downloaded installer file to your Windows Server 2016.
3. Run the Installer: Double-click on the offline installer to run it.
4. Installation Progress: Wait for the installation to complete. This may take some time depending on your server’s resources.
5. Installation Results: Once the installation is complete, you will see the installation results on the screen.
| Pros | Cons |
|---|---|
| No internet connection required | Additional download and transfer of the offline installer file |
| Can be used on multiple servers | May take longer to complete compared to online installations |
Why Can’t I Install .Net Framework 3.5?
There can be several reasons why you might encounter issues while trying to install .Net Framework 3.5 on Windows Server 2016. Let’s list a few common reasons and their fixes:
1. Missing or inaccessible installation media: Ensure that you have the appropriate Windows Server 2016 installation media available and accessible.
2. Internet connection issues: If you are using the Server Manager method, ensure that your server is connected to the internet and can access the Windows Update service.
3. Insufficient privileges: Make sure you have administrative access to the server and sufficient privileges to perform the installation.
Additional Tips
Here are some additional tips to keep in mind when installing .Net Framework 3.5 on Windows Server 2016:
1. Keep your server up to date: It’s important to regularly update your server’s operating system and installed components to ensure optimal performance and security. After installing .Net Framework 3.5, make sure to check for updates and install any available patches.
2. Use official sources: When downloading the .Net Framework 3.5 offline installer or any other files related to the installation, make sure to use official and trusted sources to avoid malware or other security risks.
3. Test compatibility: Before installing .Net Framework 3.5 on a production server, it’s recommended to test compatibility with your applications and services on a non-production environment to avoid any potential compatibility issues.
5 FAQs about Installing .Net Framework 3.5 on Windows Server 2016
Q1: Can I install .Net Framework 3.5 on Windows Server 2016 without an internet connection?
A: Yes, you can install .Net Framework 3.5 on Windows Server 2016 without an internet connection using methods like PowerShell, DISM, or offline installation.
Q2: Is it necessary to install .Net Framework 3.5 on Windows Server 2016?
A: It is necessary to install .Net Framework 3.5 on Windows Server 2016 if you have applications or services that depend on this framework.
Q3: Can I install .Net Framework 3.5 on Windows Server 2016 using the Server Manager method on a server without internet access?
A: No, the Server Manager method requires an internet connection as it downloads the necessary files from the Windows Update service.
Q4: How long does it take to install .Net Framework 3.5 on Windows Server 2016?
A: The installation time for .Net Framework 3.5 on Windows Server 2016 can vary depending on your server’s resources, internet connection speed (if applicable), and the method you choose. It can range from a few minutes to several hours.
Q5: Can I uninstall .Net Framework 3.5 from Windows Server 2016?
A: Yes, you can uninstall .Net Framework 3.5 from Windows Server 2016 if necessary. You can do this through the control panel or by using PowerShell commands.
In Conclusion
Installing .Net Framework 3.5 on Windows Server 2016 is a crucial step to ensure compatibility and smooth operation of applications and services that rely on this framework. By following the methods outlined in this blog post and preparing accordingly, you can successfully install .Net Framework 3.5 on your Windows Server 2016.
Remember to choose the method that best suits your situation, whether it’s using the Server Manager, PowerShell, DISM, or an offline installation. Keep in mind the potential challenges and common issues that may arise during the installation process and refer to the additional tips and FAQs to navigate through them.
With .Net Framework 3.5 installed, your Windows Server 2016 will be equipped with the necessary tools to support a wide range of applications and services, ensuring efficient and reliable operations.
In this article, we will explain How to Install .NET Framework 3.5 on Windows Server 2016 (Offline Mode) and (Online Mode).
-
1
Install .NET Framework 3.5 on Windows Server 2016-
1.1
Why I can’t install .Net Framework 3.5 on Windows Server 2016? -
1.2
How to Install .NET Framework 3.5 on Windows Server 2016 (Offline)? -
1.3
How to Install .NET Framework 3.5 on Windows Server 2016 (Offline) using Command prompt? -
1.4
How to Install .NET Framework 3.5 on Windows Server 2016 (Online)?
-
1.1
You might also like to read telnet is not recognized Windows Server 2016
- We have tried to install Workflow Manager on SharePoint 2016 environment on Windows Server 2016, we got the below message:
The .Net Framework 3.5 is not installed on your server.
- So that, we tried to add a new feature from Server Manager.

- We have followed the wizard until we got the Features section, and we checked the .NET Framework 3.5 Features, then we clicked on Install button.

- But , we got the below error:
The feature Installation failed because the source files could not be found!

- Again, we have tried to specify an alternative source path as shown below.

- Then we specified the source path to the .Net Framework 3.5 offline package that located in a newly created folder located in the path
E:\sources\SxS. - Press > OK > Install.

But, we still can’t install .Net Framework 3.5 on Windows Server 2016!!
Why I can’t install .Net Framework 3.5 on Windows Server 2016?
In Windows Server 2012 R2 as well as Windows Server 2016, the .Net Framework 3.5 feature is an on-demand feature that its files are not saved on the server with the windows installation due to decreasing the disk space taken by the Operating System.
How to Install .NET Framework 3.5 on Windows Server 2016 (Offline)?
The .Net 3.5 Framework feature should be installed from the below sources:
- The same Windows media that was used when the Windows is being installed.
- The Windows media with the same current installed version (eg. If Windows server 2016 has been installed on your machine, you must use an installation media for Windows Server 2016).
If you don’t have the same Windows installation media. you can download the corresponding Windows ISO for your current installed Windows from Microsoft as a trial version.
Steps
- Mount the Windows installation media (ISO/CD) with the same version of the current installed windows.
- Specify the alternative source path to
U:\Sources\SXS- Note:
U:\is the drive that Windows Server 2012 ISO has mounted.
- Note:
- Click install > wait a moment till the feature installed successfully. 🙂

How to Install .NET Framework 3.5 on Windows Server 2016 (Offline) using Command prompt?
Alternatively, you can use the Deployment Image Servicing and Management (DISM) command-line tool to enables the .NET Framework 3.5 feature without internet connection as the following:
Note: Deployment Image Servicing and Management (DISM) is a command-line tool that is used to mount and service Windows images before deployment. for more details check DISM – Deployment Image Servicing and Management.
Steps
- Open Command prompt as Administrator.
- Type the below cmdlet.
DISM /Online /Enable-Feature /FeatureName:NetFx3 /All /LimitAccess /Source:d:\sources\sxs- d:\ is the drive that the Windows Server ISO has mounted.
- /All to enable all parent features of the specified feature.
- /LimitAccess to prevent DISM from contacting Windows Update/WSUS.
- /Source to specify the location of the files that are needed to restore the feature.

How to Install .NET Framework 3.5 on Windows Server 2016 (Online)?
You can also use the Deployment Image Servicing and Management (DISM) command-line tool to enables the .NET Framework 3.5 feature with an internet connection as the following:
Steps
- Open Command prompt as Administrator.
- Type the below cmdlet.
DISM /online /enable-feature /featurename:NetFx3 /all
Conclusion
In this article, we have explained How to install .NET Framework 3.5 feature on Windows Server 2016 (Online/Offline).
Applies To
- Windows Server 2016.
- Windows Server 2012.
See Also
- DISM – Deployment Image Servicing and Management.
- Enable or Disable Windows Features Using DISM.
- Evaluation Period expired for Windows Server 2012 R2, How to extend it?
Windows · September 28, 2024
Installing .NET Framework 3.5 on Windows Server 2016 can be a crucial step for applications that rely on this version of the framework. While Windows Server 2016 comes with .NET Framework 4.6 pre-installed, many legacy applications still require .NET 3.5. This article will guide you through the various methods to install .NET 3.5 on Windows Server 2016, ensuring that you can run your applications smoothly.
Understanding .NET Framework 3.5
.NET Framework 3.5 is a software development framework developed by Microsoft. It includes a large class library and provides language interoperability across several programming languages. The framework is essential for running applications developed with older versions of .NET, making it necessary for many businesses that rely on legacy software.
Methods for Installing .NET 3.5
There are several methods to install .NET Framework 3.5 on Windows Server 2016. Below are the most common approaches:
Method 1: Using Server Manager
- Open Server Manager from the Start menu.
- Click on Add roles and features.
- In the wizard, click Next until you reach the Features section.
- Scroll down and check the box for .NET Framework 3.5 Features.
- Click Next and then Install.
This method is straightforward and allows you to install the framework directly from the server’s GUI.
Method 2: Using PowerShell
If you prefer command-line tools, you can use PowerShell to install .NET Framework 3.5. Here’s how:
Install-WindowsFeature -Name NET-Framework-CoreRun this command in an elevated PowerShell window. This method is efficient and can be easily scripted for automation.
Method 3: Using DISM Command
Another method involves using the Deployment Image Servicing and Management (DISM) tool. This is particularly useful if you do not have internet access on your server:
Dism /Online /Enable-Feature /FeatureName:NetFx3 /All /LimitAccess /Source:D:sourcessxsIn this command, replace D: with the drive letter of your Windows Server installation media. This method allows you to install .NET 3.5 from local files, which can be beneficial in environments with strict internet access policies.
Troubleshooting Installation Issues
Sometimes, the installation of .NET Framework 3.5 may fail. Here are some common issues and their solutions:
- Windows Update Error: Ensure that your server is up to date with the latest Windows updates. Sometimes, missing updates can prevent the installation.
- Missing Source Files: If you are using the DISM method, ensure that the source path is correct and that the necessary files are present.
- Group Policy Restrictions: Check if there are any group policies that might be preventing the installation of features.
Conclusion
Installing .NET Framework 3.5 on Windows Server 2016 is essential for running legacy applications. Whether you choose to use Server Manager, PowerShell, or DISM, each method has its advantages. By following the steps outlined in this article, you can ensure a smooth installation process.
For those looking for reliable hosting solutions, consider exploring USA VPS Hosting options that can support your application needs effectively.