
In today’s article, we will see a typical installation of Windows Server 2016 Desktop Experience, the ‘full’ version including the graphical user interface (GUI).
Before the installation
I mention the following for typical reasons as it is not self-evident for everyone.
- Check the system requirements and instructions given by Microsoft.
- Download the Windows Server 2016 installation ISO from the Evaluation Center, if you like.
- If you are going to install it on a physical machine then you have to burn it to a DVD or a USB flash drive. Personally, I prefer to do it with Rufus.
- You must select the DVD or USB as the boot device in the BIOS/UEFI settings.
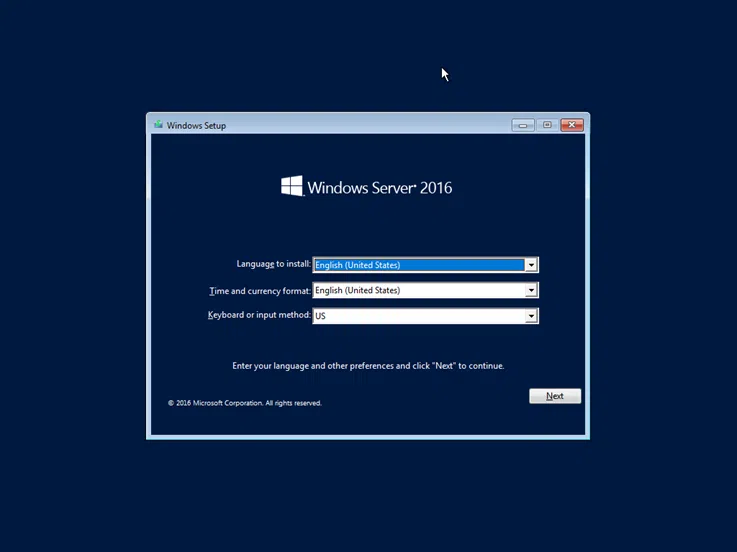
Select Language, Time, and keyboard language and click Next to continue.
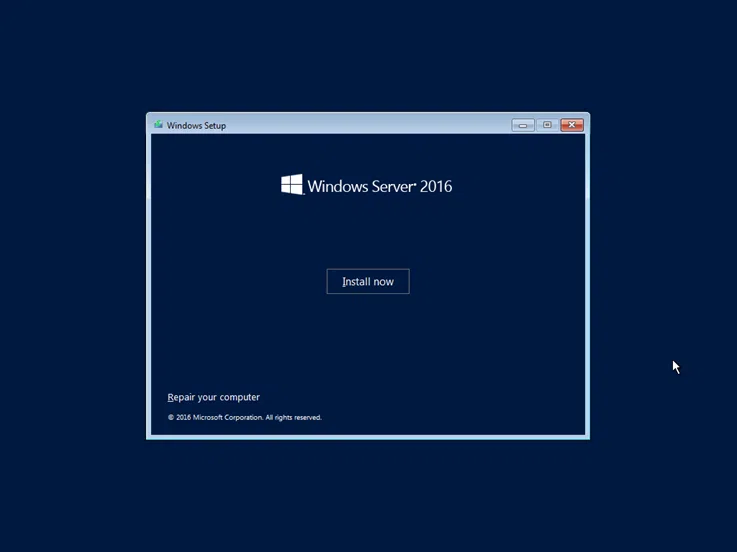
Click the Install now button to continue.
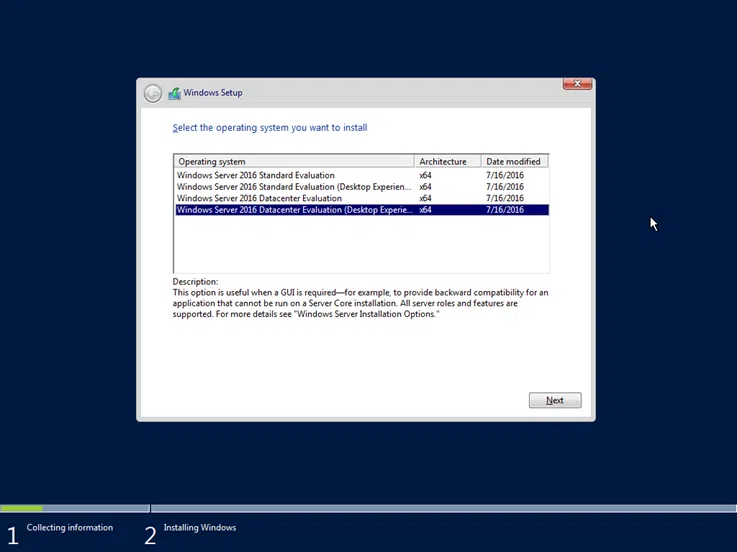
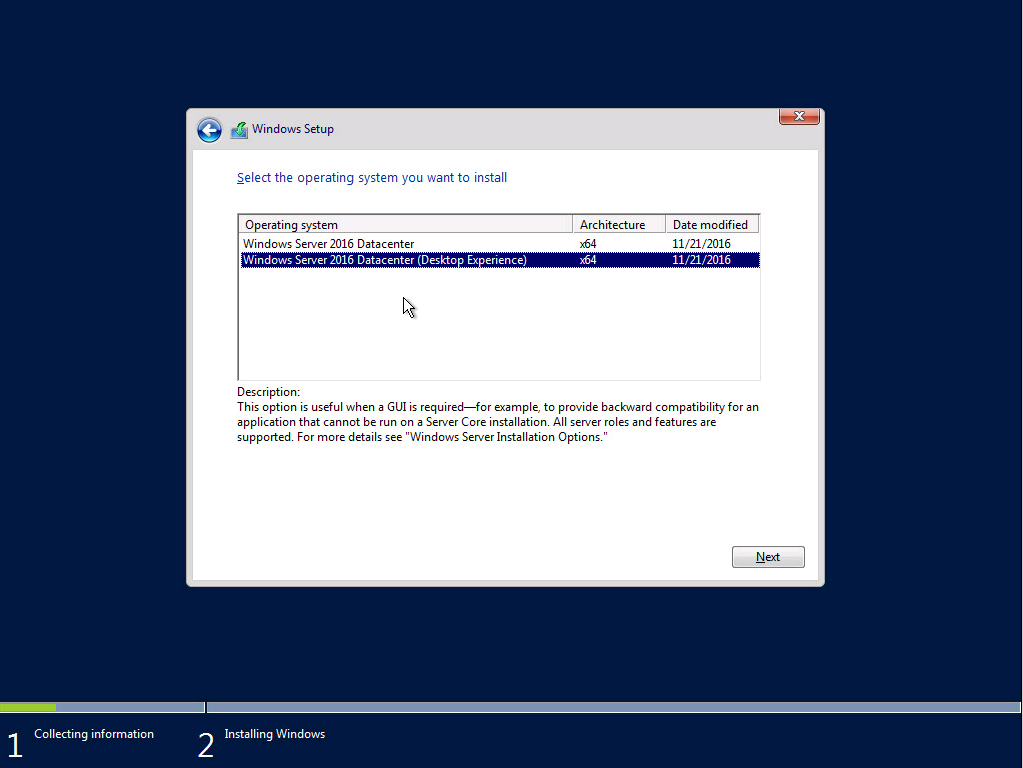
Here, select the version of Windows Server 2016 you are about to install. What you need to keep in mind is selecting the Desktop Experience version, which means the version with the graphical interface will be installed.
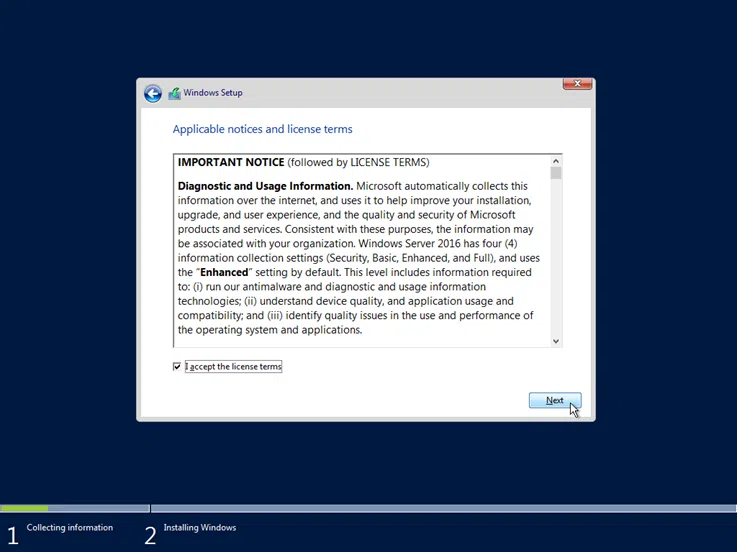
Accept the terms of use by selecting I accept license terms option and click Next to continue.
Since it is a clean installation rather than upgrading a previous version, click Custom: Install Windows only (advanced).

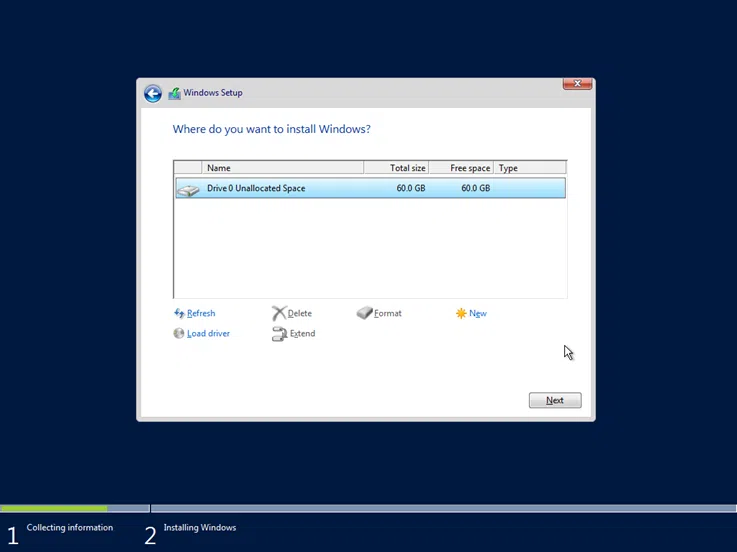
Select the disk to be installed in Windows Server 2016. At this point, you can create different partitions as well as load the respective drivers for the drives as long as required by the manufacturer. In a typical installation, you do not have to do anything more than simply selecting the disk.
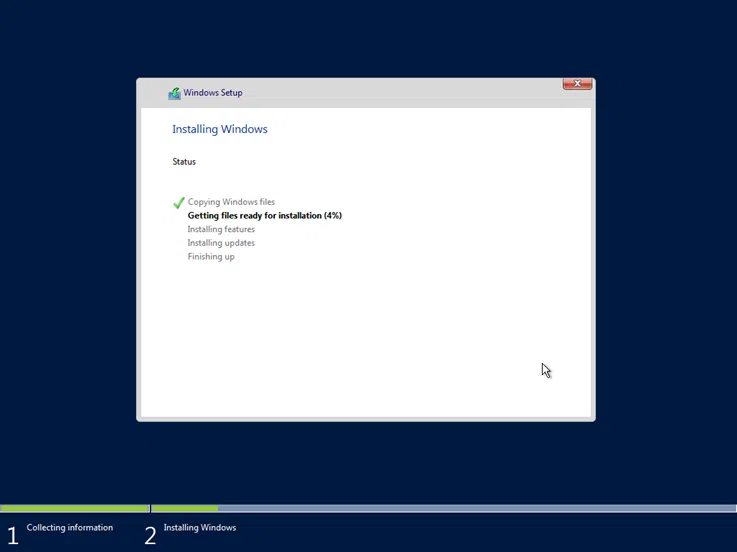
The installation of Windows Server 2016 is in progress. You will have to wait a few minutes.
After restarting the server, you will be prompted to type the local administrator account password. Ensure that the password meets the basic complexity requirements.

Immediately after, the last actions will be performed and you will be ready to use Windows Server 2016. As you can see, by pressing the Ctrl + Alt + Delete key you can connect to the local administrator account you created in the previous step.

That’s it!
After you’ve finished installing Windows Server 2016, you can go ahead with some of the basic settings you’ll need to do first. Indicatively, the most common are:
- Set time, time zone, and date
- Change server name
- Change basic IPv4 network settings
- Join a local Active Directory domain
When it comes to Windows Server 2016 Standard Edition, there are several significant differences between the two. Windows Server 2016 Standard Edition is the server version of the operating system that delivers rock-solid performance with modern infrastructure. The Datacenter Edition shares many features with the Standard Edition, including increased support for Hyper-V containers, new storage features, and enhanced security for network communications. Desktop Edition is geared towards smaller businesses, so it does not offer features such as remote administration or advanced management features.
The biggest difference between Windows Server 2016 Standard and Desktop Edition is the amount of RAM capacity. Both are compatible with 2 TB of RAM, but the Server version has a 24 TB capacity. This is far too much RAM for most PC users and is not necessary. Servers have more advanced capabilities than the consumer version of Windows, but the price difference is more than worth it. Both versions of Windows are highly secure, with different levels of security.
What Does Desktop Experience Mean?
There are two types of server installation available: Desktop Experience and Server Core. Desktop Experience is more user-friendly and comes with a graphical user interface (GUI), while Server Core is less user-friendly and requires more manual configuration. The two types of installation have different pros and cons. Desktop Experience offers an easier installation and management process for many users, but there are some tradeoffs. Learn how to decide which type of installation is best for your needs and your budget.
If you’d like to install all the Windows 7 features on your server, the Server with Desktop Experience option will be your best bet. This option will allow you to install the full set of features and applications without any of the headaches of installing extra components. Desktop Experience will also install all the tools that are required to manage your server, including its GUI. But you’ll need to reboot your server first to complete the installation.
Can a Desktop Be Used As a Server?
The answer to the question “Can a desktop be used as a server” depends on the type of server you’re using. Desktops cannot run applications that were designed for servers. In fact, they’re not designed for 24/7 usage. However, desktop computers can act as file servers, sharing files with other clients on the same network. They’re not as secure, though, as a server.
One of the biggest differences between a desktop and a server is their form factor. A desktop computer is typically smaller and shaped like a mini tower. It’s designed to fit under a desk, but some vendors still sell tower-style servers. The vast majority of servers are rack-mounted. Rack-mounted servers have a 1U or 2U form factor, and a 2U server takes up twice as much space as a 1U machine.
One way to turn a desktop into a server is to install a server program. Most servers require you to install additional software and configure your router so that it can receive the server traffic. A server software application that enables you to share files between users, such as FTP, is an ideal choice. However, if you’re not sure about the installation of software, you can always consult a professional.
What are the Types of Windows Server?
There are two primary versions of Windows, the desktop version and the server version. Desktop is used for everyday use, whereas Windows Server is used for managing computers, services, and files. Both are designed to run on the same hardware. Both can be used in the same network, but Desktop is a bit more powerful than Server. Desktop Exp. is designed for use in homes. It does not have the server features that a full-blown server does.
The difference between the two editions of Windows Server lies in their interfaces. While the Core version comes with the standard graphical user interface, it lacks certain components. Desktop Experience comes with more advanced features and application compatibility. Server Core lacks compatibility with a large number of applications, including those that require a graphical user interface (GUI). Microsoft lists many applications that are incompatible with the standard edition: Windows Tiff IFilter, XPS Viewer, and Internet Printing Client.
Can I Use Windows Server 2016 As a Normal PC?
You may be wondering if you can use Windows Server 2016 as a normal PC. It looks, feels, and installs much like a regular Windows PC. That’s because it was designed as a server. The only thing that’s different is that you need to load the Server Desktop version of Windows and learn how to use the server roles. You’ll also need to enable WiFi and audio and graphics.
Windows Server 2016 is different from its predecessor, Windows 10. It’s designed for businesses, and has several key differences from the standard version. The first is that it’s not updated nearly as often as Windows 10, and it requires authorization for updates. It’s also missing Cortana, so it’s a bit more complicated to get started. And it lacks features like Cortana, which is designed for foreground tasks.
Another difference between Windows Server and normal PCs is power. Windows 10 has two processor limits: 32 and 64-bit. Hence, a 64-bit version of Windows can support up to 256 cores. Windows Server, on the other hand, can handle an unlimited number of cores. As for quality of life, Windows Server doesn’t have Microsoft Store, Cortana, Your Phone, or Edge. You can’t even log into your Microsoft account with the server version of Windows. This is because Windows Server is designed for enterprise use, so it lacks the features you’d find on a normal PC.
What is Desktop Experience Feature Server 2016?
What is Desktop Experience Feature Server 2016? This option is similar to the Full installation option in Windows Server 2012 R2. It comes with the Desktop Experience feature, and the standard graphical user interface and Server Graphic Shell. Desktop Experience is no longer supported on Server Core. In order to enable Desktop Experience, you must choose Server Core during the installation process. Here’s how to install Desktop Experience:
Does Windows Server 2019 Have Desktop Experience?
If you are considering upgrading your Windows Server, you will find a host of new features and security enhancements in this version. In addition to these features, Windows Server 2019 also offers two different user experiences: the desktop experience and the Server Core experience. While the latter is more focused on security and privacy, the desktop experience comes with a graphical user interface, allowing you to manage the system remotely with PowerShell or the command line.
The first screen that you’ll see when you log in to the server is the Server Manager. It provides a central configuration area for the server, as well as a convenient menu to manage different server roles and features. You’ll also find an updated version of the MultiPoint Services role here, which is included in Windows Server 2019.
What are the Versions of Windows Server 2016?
Windows Server 2016 comes in three different editions. The Foundation edition is no longer available. The Standard edition is suitable for small-to-medium-sized businesses that do not need advanced IT features but still need to virtualize to some extent. The Essentials edition is free and has a limit of 25 users and 50 devices. You can also upgrade to a Datacenter edition if your needs change. The Standard edition is not a great option for large enterprises, as it only allows two virtual machines.
The previous versions of Windows Server had two main types of installation. The “Desktop Experience” version of the server does not require an administrator’s password. This version provides a more flexible way to install applications. This version also includes the Nano Server. Both versions have additional features like a new encryption system for Hyper-V and the ability to interact with Docker to virtualize applications. Moreover, Network Controller is used for management of physical and virtual network devices. What are the Versions of Windows Server 2016?
Learn More Here:
1.) Windows Help Center
2.) Windows – Wikipedia
3.) Windows Blog
4.) Windows Central
If you have installed Microsoft Windows Server 2016 and are wondering where the GUI now called Desktop Experience is, then unfortunatly the only way to have the Desktop is to re-install the OS.
I have just installed Windows Server 2016 today for the first time, and as its just for testing purposes, never really paid much attention to the installation procedure. I’ve installed Windows countless times, so just always click next, next select disk finish. Unfortunatly this time, Windows Server Core (thats what it was called in the old days) appeared. No big deal, lets have a quick google and install it.
The first article you come to is from petri.com (everyones favourite source of Windows fixes) and it gives you some tips on how to install the GUI using PowerShell. Perfect! Unfortunatly no! It doesnt work. This article was written when W2k16 was in Tech Preview. The install feature isnt supported in the GA version.

After somemore googling time, I found the official Microsoft article “Install Server with Desktop Experience”
Make sure you read the important NOTE
Note
Unlike some previous releases of Windows Server, you cannot convert between Server Core and Server with Desktop Experience after installation. If you install Server with Desktop Experience and later decide to use Server Core, you should do a fresh installation.
So, the only option was to re-install and select the right option:
Windows Server 2016 Datacenter (Desktop Experience)
Its a bit annoying. Surely Microsoft must realise people may want to change server roles without re-installing Windows everytime. Anyway, hopefully this will help others and save countless google searches.
In this post, we’gonna explain if it’s possible to Switch from Windows Server 2016 Core to GUI (Desktop Experience).

You may be also interested to check Windows Server 2016: Expand Virtual Machine Hard Disk & Extend the Operating System Drive.
Switch from Windows Server 2016 Core to Desktop Experience
-
1
Switch from Windows Server 2016 Core to Desktop Experience-
1.1
How to Convert from Windows Server 2016 Core to GUI? -
1.2
Is there any workaround to Switch from Windows Server 2016 Core to GUI Without Performing a Fresh Installation?
-
1.1
-
2
Install Windows Server 2016 Step by Step-
2.1
Windows Server 2016 Hardware Requirements -
2.2
Download Windows Server 2016 -
2.3
Windows Server 2016 Installation Steps
-
2.1
When I tried to install Windows Server 2016, I got the below dialog that ask me to select the operating system that I would like to install as shown below:
Actually, I have confused which option should I use
- Windows Server 2016 Standard or,
- Windows Server 2016 Standard (Desktop Experience).
Unfortunately, I selected the first option “Windows Server 2016 Standard“, after taking a long time to install the windows server 2016, it was the shock, I got the Windows Server 2016 console interface, not the normal Windows Server 2016 GUI Desktop Experience interface as shown below:

You might also like to read Convert from Windows Server 2019 Core to GUI
How to Convert from Windows Server 2016 Core to GUI?
Actually, In previous Windows Server releases like Windows Server 2012, 2008, we were able to add the Windows Server GUI functionality to the Windows Server core without performing a fresh installation.
But, In Windows Server 2016 and later, it’s no longer doable to convert from Windows Server 2016 core to Windows Server 2016 with Desktop experience and vice versa!
Is there any workaround to Switch from Windows Server 2016 Core to GUI Without Performing a Fresh Installation?
Unfortunately, there is no workaround to convert from Windows Server 2016 Core to GUI, the only available solution is performing a fresh installation from scratch again!
Install Windows Server 2016 Step by Step
In this section, we’ll explain how to install Windows Server 2016 Standard with GUI by doing the following:
- Exploring Windows Server 2016 Hardware Requirements.
- Download Windows Server 2016.
- Install Windows Server 2016.
Windows Server 2016 Hardware Requirements
The hardware requirements for Windows Server 2016 with desktop experience is differ from Windows Server 2016 Core.
Below is the minimum hardware requirements for Windows Server 2016 with desktop experience:
- CPU: 1.4 GHz 64-bit processor.
- RAM: 2 GB, (512 for core)
- Disk: 32 GB as absolute minimum value, (4 GB for core).
Download Windows Server 2016
Below are the official links to download Windows Server 2016 as well as Windows Server 2019.
- Download Windows Server 2016 Evaluation ISO.
- Download Windows Server 2019 Evaluation ISO.
The Windows Server 2016 Evaluation Period is 180 days that can be extended 6 times for additional 180 days.
To extend Windows Server 2016 Evaluation Period, please check Evaluation Period expired for Windows Server 2016, How to extend it?
Windows Server 2016 Installation Steps
- Mount your Windows Server 2016 ISO image.
- Run the Setup file.
- Select your language, time, currency format, and input method.

- Click on “Install now” button to start Windows Server 2016 installation.
- Select, “Windows Server 2016 Standard (Desktop Experience)“, then click “Next”.

Note: Windows Server 2016 Standard option refers to the core!
- Accept the license terms and click “Next”.

- Select “Install Windows Only“.

It’s strongly recommended to perform a clean installation for Windows Server 2016.
- The Windows Server 2016 installation will start!

- Finally, the Windows Server 2016 GUI has been installed with desktop experience as shown below!

Conclusion
Unlike previous Windows Server releases, you can’t convert from Windows Server 2016 core to GUI and vice versa, the only solution is performing a fresh installation!
So in this post, we have learned how to download and install Windows Server 2016 and Which option should we select during Windows Server installation to install Windows Server 2016 with Desktop Experience instead of Windows Server 2016 Core.
Applies To
- Windows Server 2019.
- Windows Server 2016.
You might also like to read
- Extend Volume option is disabled within Disk Management in Windows Server 2012.
- Error extending volume: Size Not Supported, During extending Operating System partition In Windows Server 2012.
- Windows failed to start: The Boot Configuration Data for your PC is missing or contains errors.
- Extend SQL Server Evaluation Period.
Have a Question?
If you have any related questions, please don’t hesitate to ask it at deBUG.to Community.
,
This tutorial contains detailed instructions on how to install Windows Server 2016 Standard. Windows Server 2016 comes in 3 Editions: Essentials, Standard & Datacenter.
- Windows Server 2016 Essentials is ideal for small businesses with 25 users and up to 50 devices and does not support virtualization.
- Windows Server 2016 Standard is ideal for companies that require advanced features and virtualization (up to 2 virtual machines).
- Windows Server 2016 Datacenter is for companies that require advanced features and needs more that 2 virtual machines (unlimited).
Suggestion: Before buying (installing) the new server, choose the appropriate Windows Server 2016 edition according to your needs. View the detailed comparison of Windows Server 2016 Standard and Windows Server 2016 Datacenter.
Minimal System Requirements for Windows Server 2016.
| CPU: | 1.4 GHz 64-bit processor |
| RAM: | 512 MB ECC (Error Correcting Code) without Desktop Experience installation & 2GB with Desktop Experience installation. |
| Disk space: | 32 GB (Computers with more than 16 GB of RAM will require more disk space for paging, hibernation, and dump files). *
* Ideally use a disk with at least 80-100GB disk space. |
| Network adapter: | 1x Ethernet capable of at least gigabit throughput. |
| Other requirements: | UEFI 2.3.1c-based system & Firmware that supports secure boot. Trusted Platform Module if you want to use the BitLocker Drive Encryption. Internet access. |
How to Install Windows Server 2016 Step by Step.
1. Place the Windows Server 2016 DVD (or the USB) installation media and boot from it.
* Notes:
1. You can download an evaluation version of Windows Server 2016 in ISO format, from here.
2. To create a USB installation media, you can use Rufus USB creator utility.
2. At the first screen, choose your Language, Time & currency format and the Keyboard or input method and click Next.

3. Then press Install now.

4. Choose the appropriate Server 2016 version,* according to your needs and click Next.
* Note:
The Windows Server 2016 (Desktop Experience) installation includes the Windows 10 GUI and the Server Manager.
The Windows Server 2016 without the Desktop Experience, is what we have known to be the Core installation and doesn’t include a GUI interface and the Server manager.
Important: Unlike some previous releases of Windows Server, you cannot convert between Server Core and Server with Desktop Experience after installation. For example, if you install Server Core and later decide to user Server with Desktop Experience, you should do a fresh installation (and vice versa).
In this tutorial, we choose to install the Windows Server 2016 Standard with the Desktop Experience. I prefer this option, because many companies have server based applications and needs the full GUI to operate well.

5. Accept the License terms and click Next.

7. Provided that it is a new installation, choose Custom: Install Windows.

8. Then select the disk to install the OS and click Next. *
* At this point you can press the New button, in order to give a specific disk space in GB for the OS.

9. Let Windows setup to copy the required files and to finish the installation.

10. After a few restarts you ‘ll be prompted to specify a password for the (standard) Administrator account. Type a complicated password (composed of uppercase, lowercase, symbol and numbers) and click Next.

11. When prompted, press Ctrl + Alt + Delete, type the Administrator password and press Enter to login to your new server.

12. After login, Server Manager will start automatically. Proceed to configure your new server.

That’s it! Let me know if this guide has helped you by leaving your comment about your experience. Please like and share this guide to help others.
If this article was useful for you, please consider supporting us by making a donation. Even $1 can a make a huge difference for us in our effort to continue to help others while keeping this site free:
- Author
- Recent Posts
Konstantinos is the founder and administrator of Wintips.org. Since 1995 he works and provides IT support as a computer and network expert to individuals and large companies. He is specialized in solving problems related to Windows or other Microsoft products (Windows Server, Office, Microsoft 365, etc.).