
How to Install OpenSSH Server/Client on Windows Server 2016 1607 or Before
OpenSSH is the premier connectivity tool for remote login with the SSH protocol. It encrypts all traffic to eliminate eavesdropping, connection hijacking, and other attacks. In addition, OpenSSH provides a large suite of secure tunneling capabilities, several authentication methods, and sophisticated configuration options. Installation of OpenSSH server/client on Windows 2016 1709 onward is really easy. its just few powershell commands away from using it but for older versions it can be a time wasting activity. The easiest way to install is still very long but I would to wrap in few basic steps:
Download OpenSSH
First you need to Download OpenSSH using the attached URL. A zip file will be downloaded on your desired system. Unzip it and copy it under Windows\system32 directory.
Open PowerShell ISE
Open PowerShell ISE with administrative privileges so that you can run the desired commands without any problem. Change the directory to c:\windows\system32\openssh
Run the Commands
First you need to modify the required permission so run the under given command from OpenSSh Directory. The commands are given in the picture below:

Run the commands in the given order and OpenSSH server will be installed on the Windows Server 2016 1607 or earlier version.
Environment Variables
Copy the directory path and set the system environment variables so that the commands can work without giving the exact path. You can use PowerShell commands to set the path or go to system settings and manually set the path.
Start the services
Change the service startup type from manual to automatic and start the service to use OpenSSH server.
Windows Firewall Settings
SSH works on TCP port 22 so you need to open in-bound port in Windows firewall so that in-coming connections can be accepted. Opening firewall port is pretty simple and I think there is no need to share any command or process to do it.
Thanks for visiting. I hope you like the post.
You might find it useful to install OpenSSH on your Windows server. Running SSH on your Windows server means that you can transfer files using Secure Copy (SCP) or SFTP. Aside from SCP and SFTP, you can open a secure Powershell shell or a Bash shell if Windows Subsystem for Linux (WSL) is enabled on your Windows server.
By default, you will enter into a Windows CMD shell when you connect to the server using SSH.
This guide will explain the steps to install and configure OpenSSH in Windows Server 2016. It would be best if you were prepared to log in to your Hostwinds Windows Server to continue with this guide.
Step 1: Download and Install OpenSSH
Start by accessing your server via RDP (from Mac), and download the latest release of OpenSSH (OpenSSH-Win64.zip).
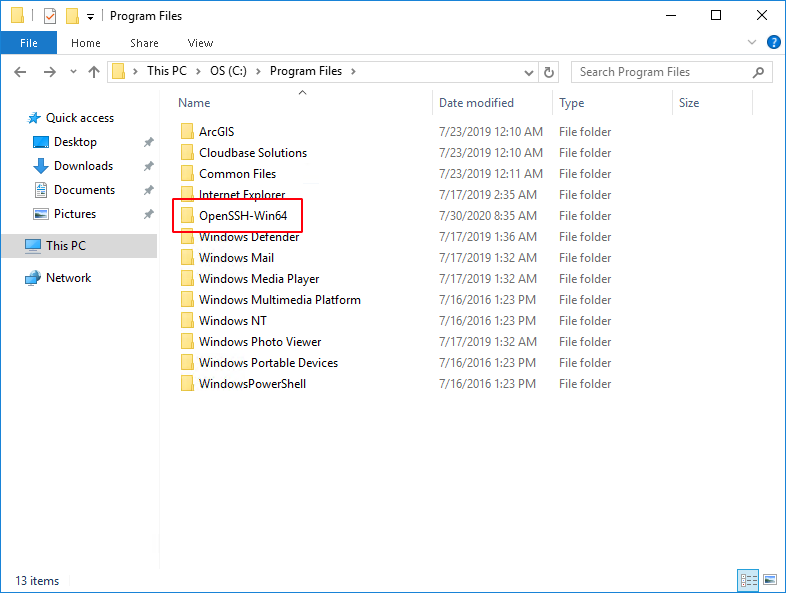
Locate the downloaded file, right-click it, and Extract All to C:\Program Files\OpenSSH-Win64.
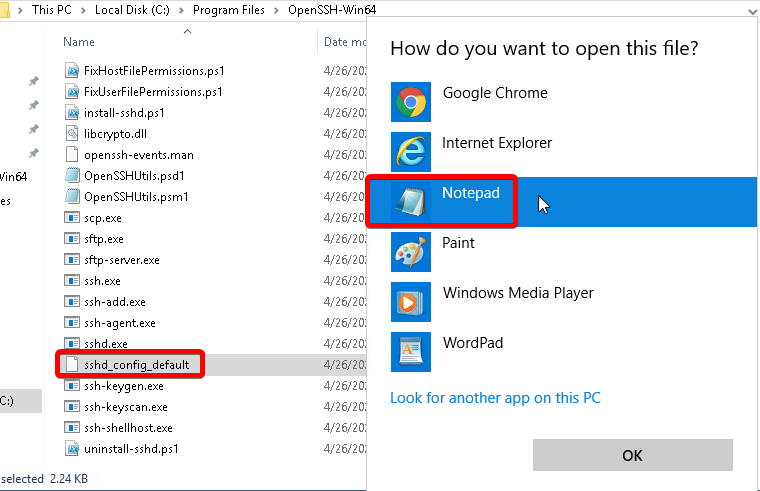
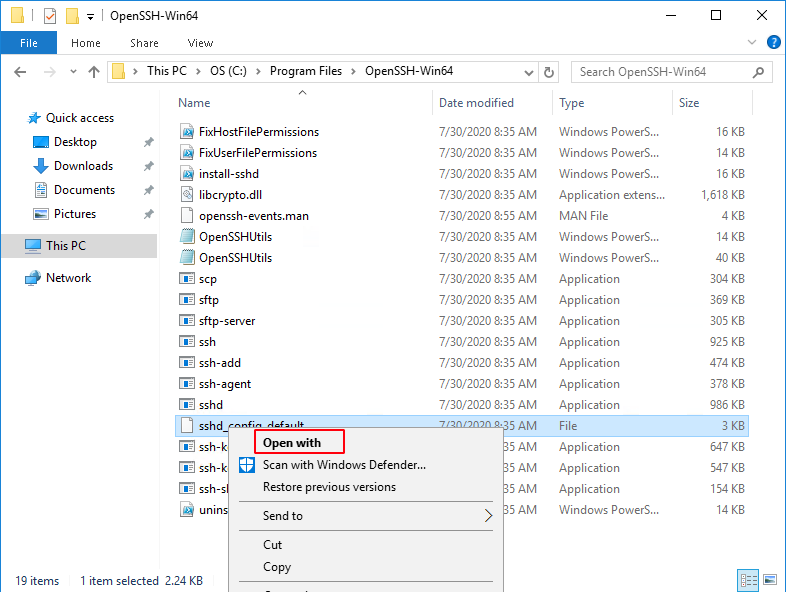
Optional: To change the default SSH port to something other than 22, select the sshd_config_default file in the OpenSSH folder and open with a text editor:
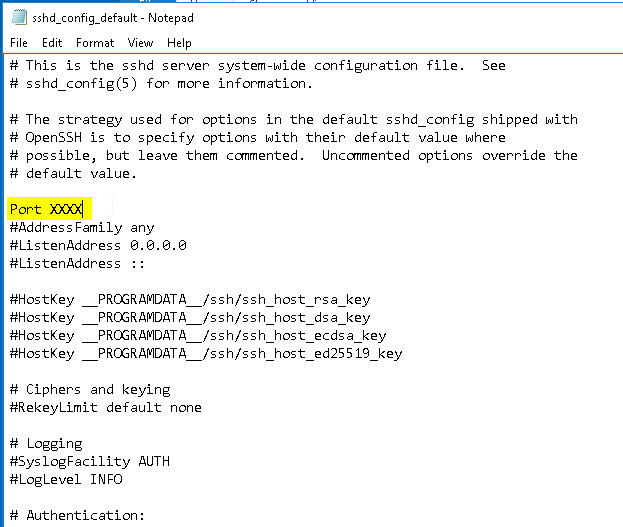
Uncomment Port 22 and change it to your desired port, then save the file:
End optional step.
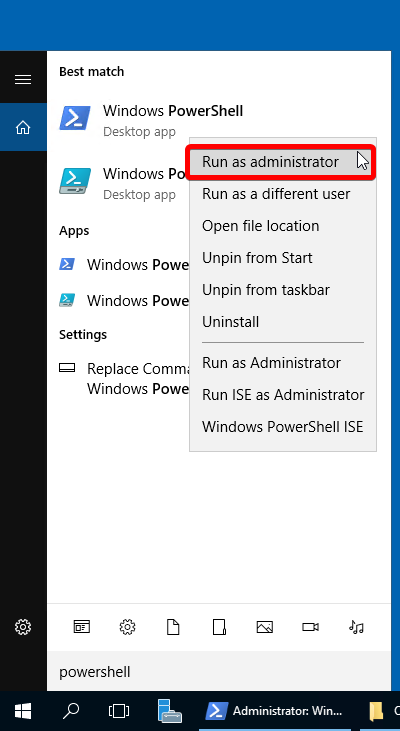
Next, search for and right-click Powershell to Run as administrator:
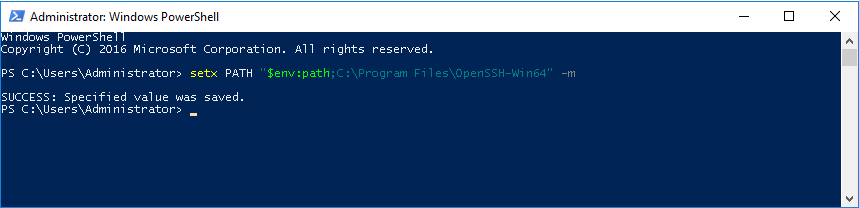
Modify the Path system environment variable by running the command:
setx PATH "$env:path;C:\Program Files\OpenSSH-Win64" -m
You should see the following output:
SUCCESS: Specified value was saved.
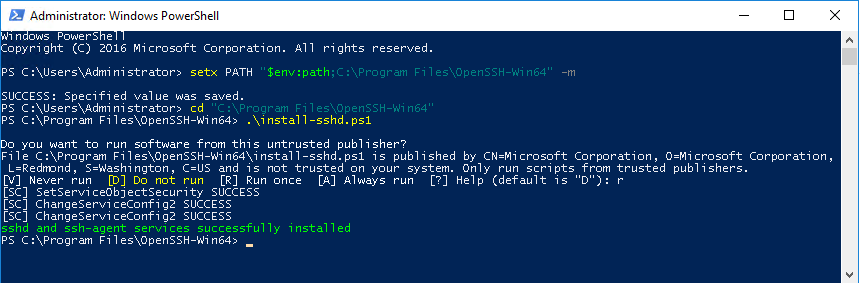
Next, change to the OpenSSH directory:
cd "C:\Program Files\OpenSSH-Win64"
Then run the install script:
.\install-sshd.ps1
Next, enable automatic startup and start sshd and ssh-agent:
Set-Service sshd -StartupType Automatic; Set-Service ssh-agent -StartupType Automatic; Start-Service sshd; Start-Service ssh-agent
Step 2: Allow Access in Windows Firewall
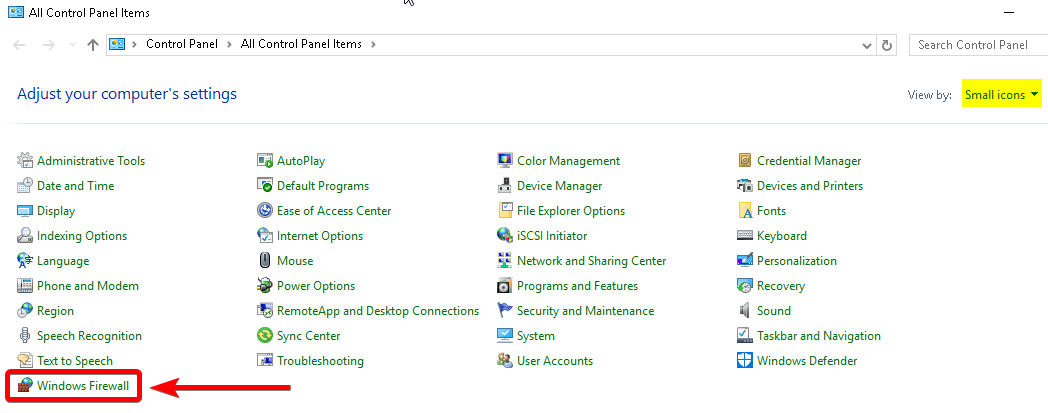
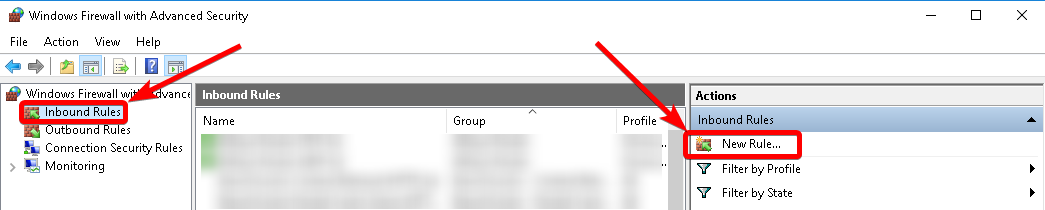
Start by opening Control Panel > Windows Firewall:
Select Advanced Settings on the left-hand side, then select Inbound Rules > New Rule…:
Under Rule Type, select Custom > Next.
Under Program, select All programs > Next.
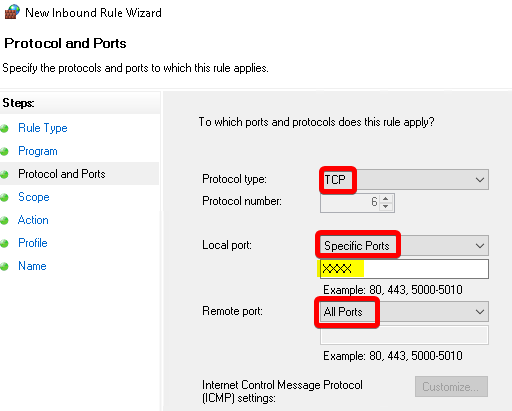
Under Protocols and Ports, enter your desired SSH port with the following selections:
Under Scope, let the rule apply to Any IP address for remote and local IP addresses, then Next.
Under Action, select Allow the connection > Next.
Under Profile, leave Domain, Private, and Public checked > Next.
Lastly, name the rule and select Finish.
Now you can access your Windows server using SSH!
OpenSSH client and server – installation on Windows Server 2012R2 and 2016
In this tutorial, I will explain how to install the OpenSSH client and Server on Windows Server 2012R2 and 2016.
At the time of writing this tutorial, this feature is native to Windows 10 and Windows Server 2019 and you might also want to have OpenSSH client or server on an earlier version.
Personally, I use the SSH client very regularly through PowerShell or Command Prompt windows, it avoids having to install Putty.
Recover Win32 OpenSSH
The first step is to retrieve from the GitHub repository PowerShell/Win32-OpenSSH: Win32 port of OpenSSH (github.com), the latest version available.
Go to the realeases page and download the latest version available corresponding to the architecture of the Windows installation (32 or 64 bits).
For me, it will be the 64 Bits version.
Once the archive has been downloaded, unzip it.
“Installation” of files on the server
Now, we will copy the folder from the unzipped archive to the C: \ Program Files folder.
The SSH client is now functional, but for ease of use, we will configure its location in the environment variables so as not to have to call the executable by its full path.
Adding the environment variable
Open the system window and click on Advanced system settings 1 .
On the Advanced system parameters tab, click on the Environment variables 1 button.
In the System variable part, find the Path 1 variable, once selected, click on the Modify 2 button.
On Windows 2012R2, add at the end; C: \Program Files\OpenSSH-Win64\
On Windows 2016, click on New 1 .
Add the location of the OpenSSH folder: C:\Program Files\OpenSSH-Win64\ 1 and click on OK 2 .
Close the various windows.
Use the SSH client of Windows Server 2012R2 / 2016
Open a command prompt or PowerShell.
The easiest way to find out if it’s okay is to enter the ssh command. This command should return the various parameters of the SSH utility.
To connect to a server (Linux) enter the command ssh USER @ IP_SERVER
Install the OpenSSH server on Windows Server 2012R2 / 2016
It is also possible to configure an OpenSSH server on Windows Server with Win32 OpenSSH which will allow you to connect to the Windows server in the same way as a Linux OS.
From a PowerShell window, go to the C: \ Program Files \ OpenSSH-Win64 \ folder, in the folder is a PowerShell script that will configure the server part.
Run the install-sshd.ps1 PowerShell script
If the installation is successful, the message is displayed: sshd and ssh-agent services successfully installed.
Open Windows Service Manager and search for OpenSSH SSH Server, by default it is stopped. Start the service.
If necessary, configure the service to start automatically
Depending on your configuration, remember to allow incoming connections on port 22.
The server part is operational.
Connect to Windows on the SSH server
From another computer, use an SSH client to connect, being in an Active Directory environment, I just need to use the ssh IP_SERVER command and then enter my password.
Once connected, enter a command such as ipconfig or hostname to validate that the command has been executed on the remote server.
Conclusion
For the client part, for my part, I find the use in native practical which avoids going through a third-party tool and we quickly get used to when we use Windows 10 and the SSH client I find, missing on Windows 2012R2 and Windows 2016 , the problem is now resolved 🙂
For the server part, I find it useful for non-domain servers, because configuring WinRM and PSSession for connection can quickly become “a headache”.
Источник
Установка OpenSSH
Область применения Windows Server 2019, Windows 10: Windows Server 2022,
OpenSSH — это средство подключения для удаленного входа, использующее протокол SSH. Оно шифрует весь трафик между клиентом и сервером для предотвращения перехвата информации, перехвата подключения и других атак.
OpenSSH можно использовать для подключения устройств с Windows 10 (версия 1809 и более поздние) или Windows Server 2019 с установленным клиентом OpenSSH к таким устройствам с установленным сервером OpenSSH.
Если вы скачали OpenSSH из репозитория GitHub по адресу PowerShell/openssh-portable, следуйте приведенным в репозитории инструкциям, а не инструкциям в этой статье.
Установка OpenSSH с помощью приложения «Параметры» в Windows
Оба компонента OpenSSH можно установить с помощью «Параметров» Windows на устройствах Windows Server 2019 и Windows 10.
Чтобы установить компоненты OpenSSH, сделайте следующее:
Откройте приложение Параметры, выберите элементы Приложения > Приложения и возможности, щелкните Дополнительные возможности.
Просмотрите этот список и определите, установлено ли средство OpenSSH. Если нет, выберите пункт Добавить компонент в верхней части страницы и сделайте следующее:
- Найдите Клиент OpenSSH и щелкните Установить.
- Найдите Сервер OpenSSH и щелкните Установить.
После завершения установки вернитесь в раздел Приложения > Приложения и возможности и Дополнительные возможности, где теперь должно появиться средство OpenSSH.
При установке серверного компонента OpenSSH будет создано и включено правило брандмауэра с именем OpenSSH-Server-In-TCP . Правило разрешает входящий трафик SSH через порт 22. Если это правило не включено и этот порт не открыт, подключения будут отклонены или сброшены.
Установка OpenSSH с помощью PowerShell
Чтобы установить OpenSSH с помощью PowerShell, запустите PowerShell от имени администратора. Для проверки доступности OpenSSH выполните следующий командлет:
Если ни один из них не установлен, должно отобразиться следующее:
Затем установите нужный серверный или клиентский компонент:
Оба командлета должны вернуть такие выходные данные:
Запуск и настройка OpenSSH Server
Чтобы запустить и настроить OpenSSH Server для первого использования, откройте PowerShell от имени администратора и выполните следующие команды для запуска sshd service :
Подключение к OpenSSH Server
После установки вы можете подключиться к серверу OpenSSH с устройства Windows 10 или Windows Server 2019, на котором установлен клиент OpenSSH, с помощью PowerShell, как показано ниже. Обязательно запустите PowerShell от имени администратора:
Когда подключение будет установлено, отобразится примерно следующее сообщение:
Если выбрать Да, этот сервер будет добавлен в список известных узлов SSH в клиенте Windows.
На этом этапе нужно ввести пароль. В целях безопасности пароль не будет отображаться по мере ввода.
После подключения вы увидите командную оболочку Windows:
Удаление OpenSSH с помощью приложения «Параметры» в Windows
Чтобы удалить OpenSSH с помощью приложения «Параметры» в Windows, сделайте следующее:
- Откройте приложение Параметры, а затем выберите Приложения > Приложения и возможности.
- Откройте страницу Дополнительные возможности.
- В списке выберите компонент Клиент OpenSSH или Сервер OpenSSH.
- Выберите Удалить.
Удаление OpenSSH с помощью PowerShell
Чтобы удалить компоненты OpenSSH с помощью PowerShell, выполните следующие команды:
Если служба использовалась во время удаления, может потребоваться перезагрузка Windows.
Источник
Get started with OpenSSH for Windows
Applies to: Windows Server 2022, Windows Server 2019, Windows 10 (build 1809 and later)
OpenSSH is a connectivity tool for remote sign-in that uses the SSH protocol. It encrypts all traffic between client and server to eliminate eavesdropping, connection hijacking, and other attacks.
An OpenSSH-compatible client can be used to connect to Windows Server and Windows client devices.
If you downloaded the OpenSSH beta from the GitHub repo at PowerShell/Win32-OpenSSH, follow the instructions listed there, not the ones in this article. Some information in the Win32-OpenSSH repository relates to prerelease product that may be substantially modified before it’s released. Microsoft makes no warranties, express or implied, with respect to the information provided there.
Prerequisites
Before you start, your computer must meet the following requirements:
- A device running at least Windows Server 2019 or Windows 10 (build 1809).
- PowerShell 5.1 or later.
- An account that is a member of the built-in Administrators group.
Prerequisites check
To validate your environment, open an elevated PowerShell session and do the following:
Type winver.exe and press enter to see the version details for your Windows device.
Run $PSVersionTable.PSVersion . Verify your major version is at least 5, and your minor version at least 1. Learn more about installing PowerShell on Windows.
Run the command below. The output will show True when you’re a member of the built-in Administrators group.
Install OpenSSH for Windows
Both OpenSSH components can be installed using Windows Settings on Windows Server 2019 and Windows 10 devices.
To install the OpenSSH components:
Open Settings, select Apps, then select Optional Features.
Scan the list to see if the OpenSSH is already installed. If not, at the top of the page, select Add a feature, then:
- Find OpenSSH Client, then select Install
- Find OpenSSH Server, then select Install
Once setup completes, return to Apps and Optional Features and you should see OpenSSH listed.
Installing OpenSSH Server will create and enable a firewall rule named OpenSSH-Server-In-TCP . This allows inbound SSH traffic on port 22. If this rule is not enabled and this port is not open, connections will be refused or reset.
To install OpenSSH using PowerShell, run PowerShell as an Administrator. To make sure that OpenSSH is available, run the following cmdlet:
The command should return the following output if neither are already installed:
Then, install the server or client components as needed:
Both commands should return the following output:
To start and configure OpenSSH Server for initial use, open an elevated PowerShell prompt (right click, Run as an administrator), then run the following commands to start the sshd service :
Connect to OpenSSH Server
Once installed, you can connect to OpenSSH Server from a Windows or Windows Server device with the OpenSSH client installed. From a PowerShell prompt, run the following command.
Once connected, you get a message similar to the following output.
Entering yes adds that server to the list of known SSH hosts on your Windows client.
At this point, you’ll be prompted for your password. As a security precaution, your password won’t be displayed as you type.
Once connected, you’ll see the Windows command shell prompt:
Uninstall OpenSSH for Windows
To uninstall OpenSSH using Windows Settings:
- Open Settings, then go to Apps > Apps & Features.
- Go to Optional Features.
- In the list, select OpenSSH Client or OpenSSH Server.
- Select Uninstall.
To uninstall the OpenSSH components using PowerShell, use the following commands:
You may need to restart Windows afterwards if the service was in use at the time it was uninstalled.
Next steps
Now that you’ve installed OpenSSH Server for Windows, here are some articles that might help you as you use it:
- Learn more about using key pairs for authentication in OpenSSH key management
- Learn more about the OpenSSH Server configuration for Windows
Источник
SSH является неотъемлемым инструментом для администрирования серверов. Для того чтобы добавить функциональность на ваш Windows Server 2016, рекомендуется использовать OpenSSH. Эта статья поможет вам в установке и настройке.
1. Загрузка дистрибутива OpenSSH:
Перейдите по ссылке https://github.com/PowerShell/Win32-OpenSSH/releases Здесь хранятся все версии OpenSSH для Windows. Скачайте актуальную для вашей системы версию. На момент написания этой статьи последняя доступная версия была v9.2.2.0p1-Beta, представленная в виде файла OpenSSH-Win64.zip.
2. Распаковка и установка дистрибутива OpenSSH
Вы можете вручную создать директорию C:\Program Files\OpenSSH и распаковать в неё содержимое загруженного архива.
Или же, запустите PowerShell с правами администратора и выполните следующие команды для установки:
[Net.ServicePointManager]::SecurityProtocol = [Net.SecurityProtocolType]::Tls12

$installDir = "C:\Program Files\OpenSSH"

if (-not (Test-Path $installDir)) {
    mkdir $installDir
}

cd $installDir

$downloadLink = "https://github.com/PowerShell/Win32-OpenSSH/releases/download/v9.2.2.0p1-Beta/OpenSSH-Win64.zip"
Invoke-WebRequest -Uri $downloadLink -OutFile .\openssh.zip
Expand-Archive .\openssh.zip -DestinationPath $installDir

Move-Item "C:\Program Files\OpenSSH\OpenSSH-Win64\*" "C:\Program Files\OpenSSH\"
Remove-Item "C:\Program Files\OpenSSH\OpenSSH-Win64" -Force -Recurse
Remove-Item .\openssh.zip
После этого нужно включить эту службу следующей командой:
setx PATH "$env:path;$installDir\" -mТеперь установим службу sshd.
powershell.exe -ExecutionPolicy Bypass -File install-sshd.ps13. Настройка сетевого доступа.
OpenSSH по умолчанию использует порт TCP 22. Чтобы разрешить входящие соединения, необходимо добавить соответствующее правило в брандмауэр Windows:
New-NetFirewallRule -Protocol TCP -LocalPort 22 -Direction Inbound -Action Allow -DisplayName SSHДополнительно, вы можете сделать это вручную через графический интерфейс, используя инструмент Windows Firewall with Advanced Security.
-
Запуск службы OpenSSH.
Для управления службами Windows используйте services.msc. Откройте его, найдите службу «OpenSSH SSH Server». В настройках этой службы выберите автоматический запуск и активируйте её.
5. Проверка.
Чтобы убедиться, что служба работает корректно и порт 22 слушается, выполните:
netstat -a | findstr "22"Если 22 порт активен, это означает, что ваш сервер теперь готов к приему SSH-соединений.
6. Тестирование SSH соединения:
Теперь давайте попробуем подключиться к вашему серверу через SSH. Используйте любой SSH-клиент (например, PuTTY или встроенный SSH-клиент в вашей ОС) и попробуйте установить соединение с вашим сервером, указав его IP-адрес и порт 22.
7. Дополнительная настройка дистрибутива OpenSSH:
После успешного тестирования рекомендуется настроить аутентификацию по ключам для повышения безопасности. Это также позволит вам автоматически подключаться к серверу без ввода пароля.
В заключение, OpenSSH — это надежный и безопасный способ установить SSH-сервер на вашем Windows Server 2016. С его помощью вы можете безопасно и удобно управлять своим сервером удаленно.
Также предлагаем рассмотреть другие полезные статьи:
- Как поднять OpenSSH на Windows 2019
- Подключение к VPS серверу по SSH ключу
- Как поднять OpenSSH на Windows 2012
Prerequirements
Windows Server 2016 VM must be created,
allow_ping_ssh_rdp security group must be allocated,
Floating IP address must be associated.
What We Are Going To Do
Download and install OpenSSH,
Allow access in Windows Firewall,
Connect to Windows via SSH from Linux or Windows,
Access files via SFTP.
Download and install OpenSSH
Log in to your VM via RDP
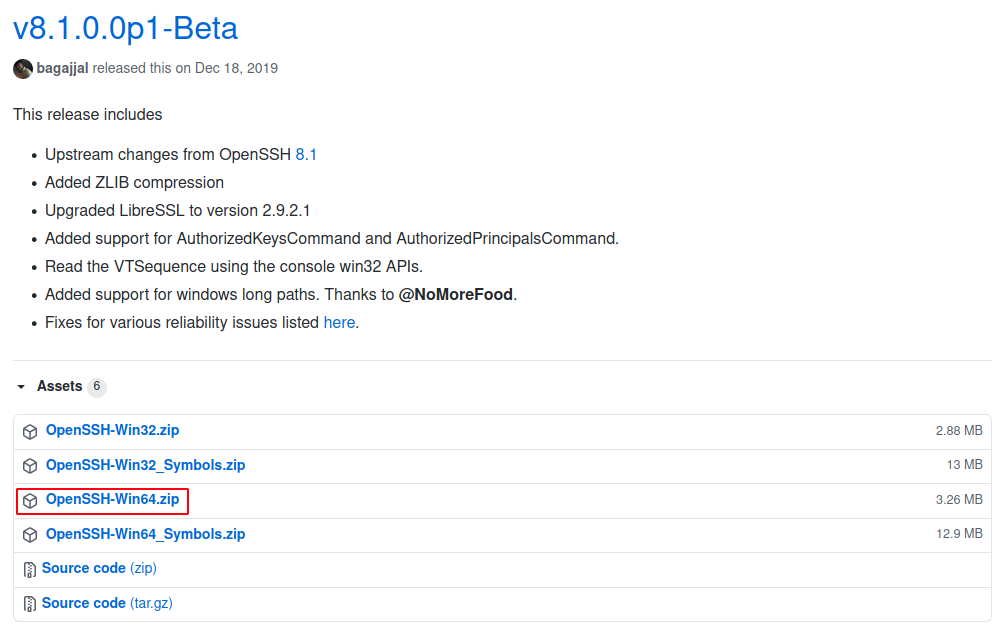
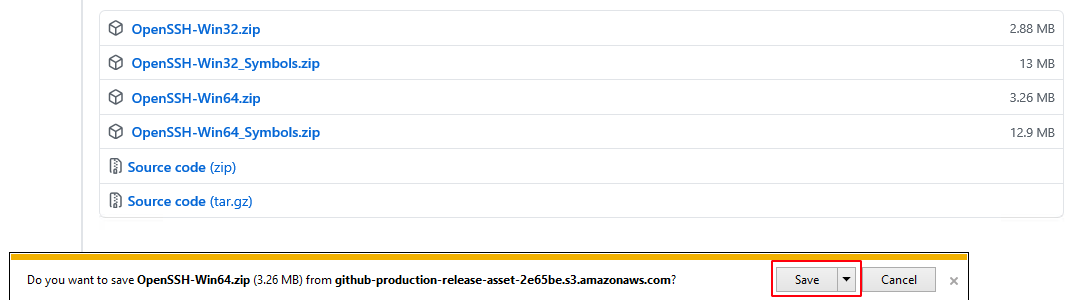
Download the newest OpenSSH server from GitHub ( https://github.com/PowerShell/Win32-OpenSSH/releases )
In our case it is v8.1.0.0p1-Beta, 64-bit version.
If you can not download the file you can change security settings.
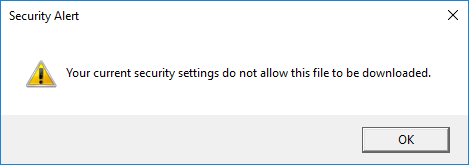
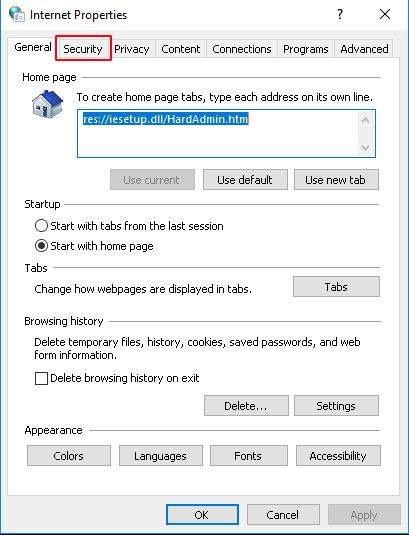
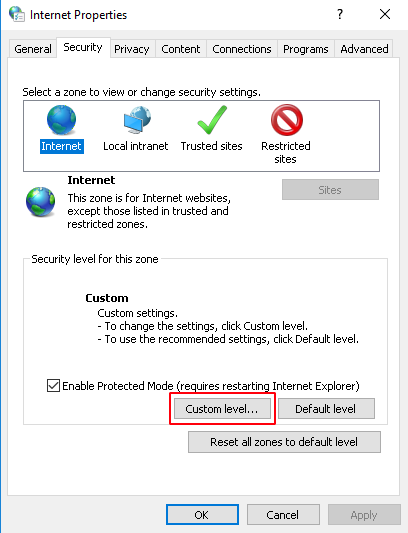
Go to “Control Panel” → “Network and Internet” → “Internet Options” and choose “Security” tab.
Click the Custom level… button.
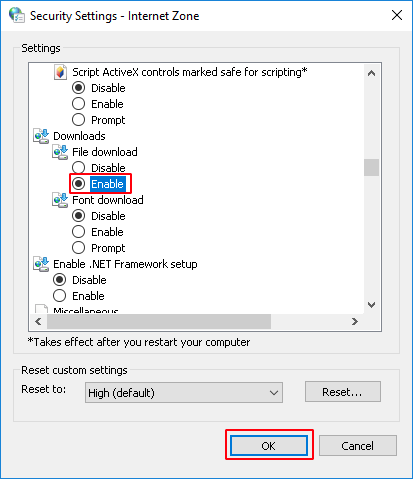
Find the “Downloads” section and change the “File download” option to “Enable” then click OK.
Confirm by clicking Yes then click Apply.
Now you can download the file.
-
Open the downloaded file and copy the “OpenSSH-Win64” folder to “C:Program Files”.
-
Go to “C:Program FilesOpenSSH-Win64” and edit the “sshd_config_default” file.
-
Find and uncomment following lines by removing the “#” at the beginning then save the file.
#Port 22
#PasswordAuthentication yes
After the changes it should be:
Port 22
PasswordAuthentication yes
6. Now you have to modify system environment variable.
To do it run Windows PowerShell as administrator …
… and type the following command:
setx PATH "$env:path;C:\Program Files\OpenSSH-Win64" -m
You should see the output “SUCCESS: Specified value was saved.”.
-
Change to the OpenSSH directory and run the install script.
cd "C:\Program Files\OpenSSH-Win64"; .\install-sshd.ps1
-
Enable automatic startup and start “sshd” and “ssh-agent” services.
Set-Service sshd -StartupType Automatic; Set-Service ssh-agent -StartupType Automatic; Start-Service sshd; Start-Service ssh-agent
Allow access in Windows Firewall
We have to add new firewall rule to open port which we will use to connect via SSH, default is 22.
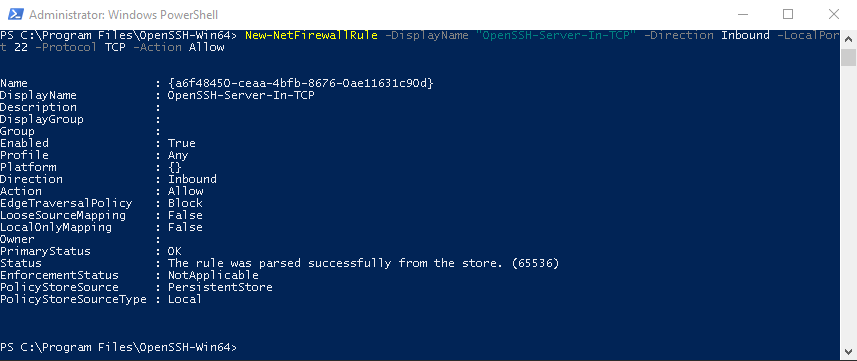
To add the rule just run the following command in Windows PowerShell.
New-NetFirewallRule -DisplayName "OpenSSH-Server-In-TCP" -Direction Inbound -LocalPort 22 -Protocol TCP -Action Allow
Connect to Windows via SSH
From Linux
Connect to the VM by typing the following command in terminal. Remember to type your VM’s IP address.
ssh Administrator@<your-vm-ip-address>
Type the password.
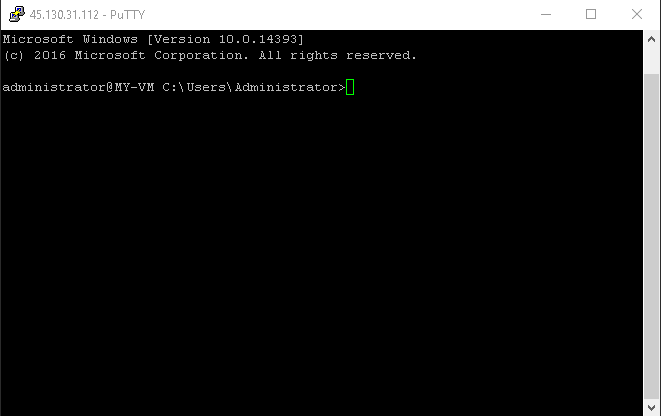
If you are connected you should be in Administrator’s home directory.
From Windows (via Putty)
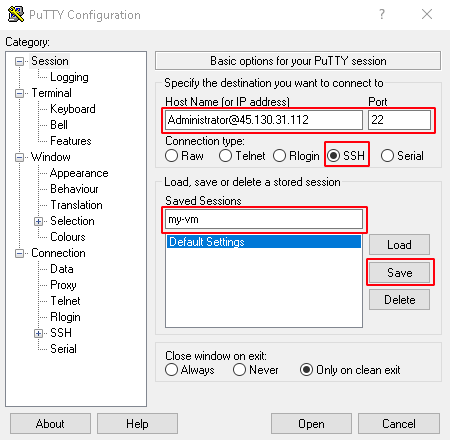
Open Putty and create new session. Complete the fields as below.
Host Name for IP address: Administrator@<your-vm-ip-address>
Port: 22
Connection type: SSH
Saved Sessions: <your-vm-name>
Click Save button.
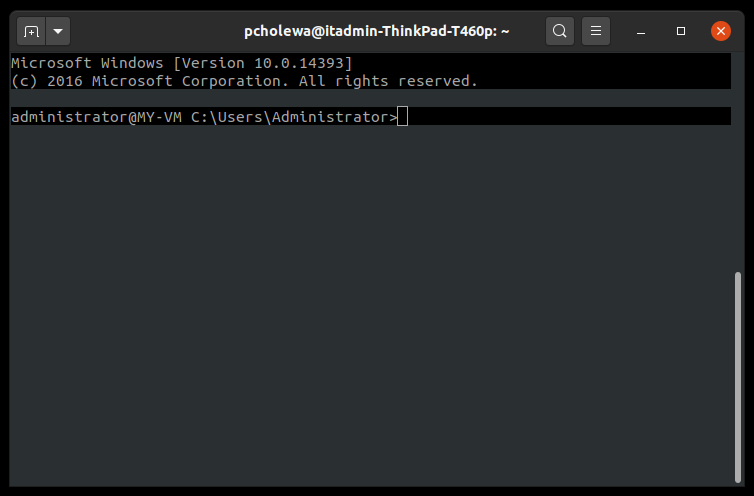
Double click on your new saved session to connect then click Yes.
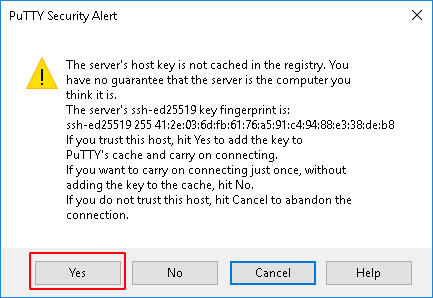
Now you are connected to your Windows VM via SSH.
Accessing files via SFTP
WinSCP
Prerequirements
WinSCP must be installed
Open WinSCP and click New Session.

Complete fields as below and click Save.
Host name: <your-vm-ip-address>
Port number: 22
User name: Administrator
Password: <your-password>
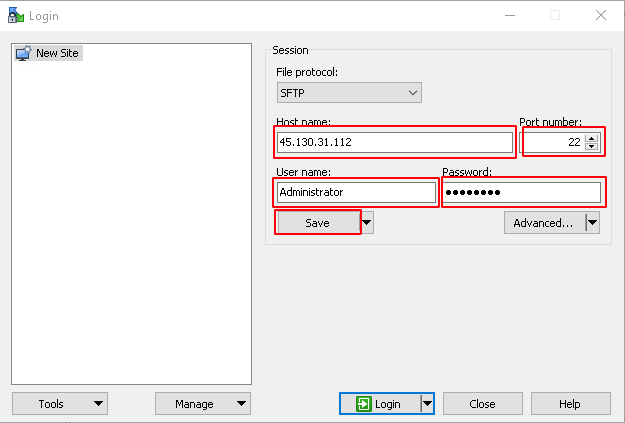
Click OK. You can also save your password.
Confirm by clicking Yes.
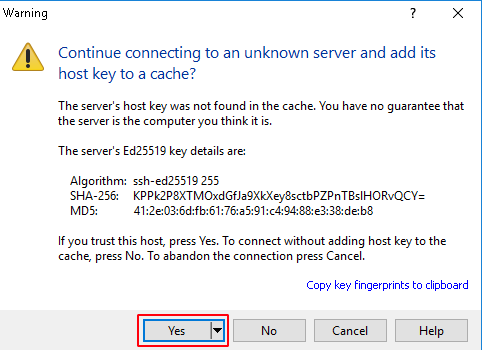
Now you can browse your files.
