
Эта статья позволит разобраться, как администраторы могут управлять SSL/TLS сертификатами, которые используются для защиты RDP подключений в Windows. Мы рассмотрим, как заменить самоподписанный TLS сертификат RDP на доверенный сертификат. Если у вас развернут собственный центр сертификации (Certificate Authority, CA), на нем можно настроить специальный шаблон для выпуска RDP сертификатов, а через GPO можно автоматически выпускать и привязывать SSL/TLS сертификаты к службе Remote Desktop Services.
Содержание:
- Предупреждение о самоподписанном сертификате RDP
- Как вручную установить (заменить) SSL сертификат для RDP?
- Создаем шаблон RDP сертификата в центре сертификации (CA)
- Настройка групповой политики для выдачи RDP сертификатов
- Подписываем RDP файл и добавляем отпечаток доверенного RDP сертификата
Предупреждение о самоподписанном сертификате RDP
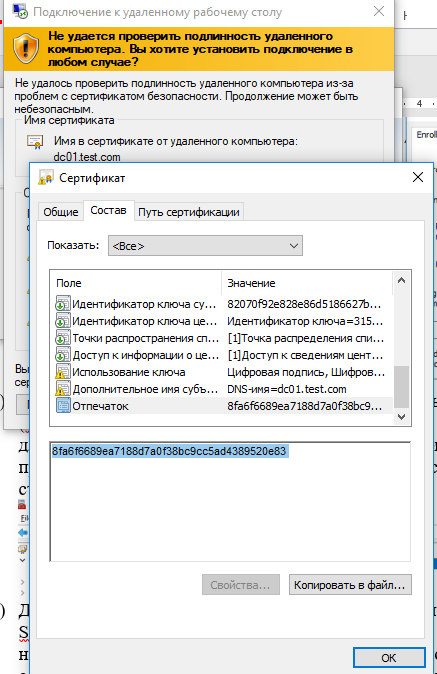
По умолчанию в Windows для защиты RDP сессии генерируется самоподписанный сертификат. При первом подключении к RDP/RDS хочту через клиент mstsc.exe, у пользователя появляется предупреждение:
Не удалось проверить подлинность удаленного компьютера из-за проблем с сертификатом безопасности.
Ошибка сертификата: сертификат выдан не имеющим доверия центром сертификации.
Чтобы продолжить установление RDP подключении пользователь должен нажать кнопку Да. Чтобы RDP предупреждение не появлялось каждый раз, можно включить опцию Больше не выводить запрос о подключениях к этому компьютеру.
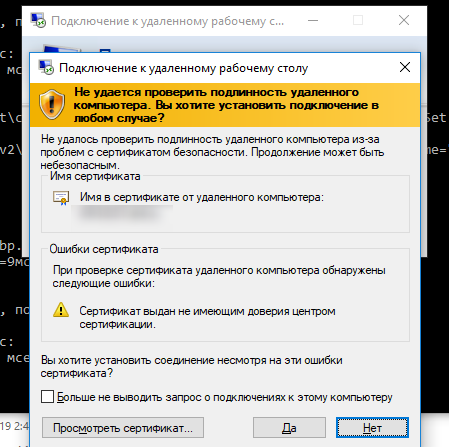
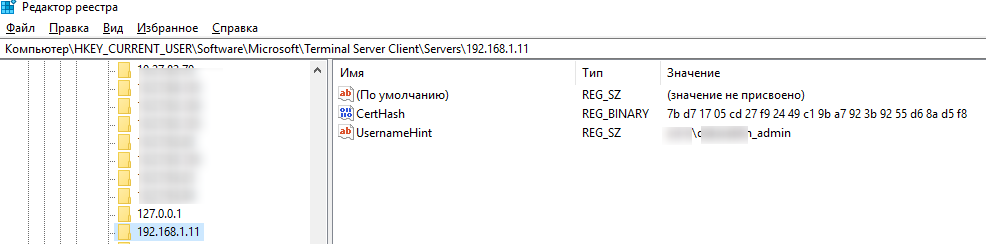
В этом случае отпечаток RDP сертификата будет сохранен на клиенте в параметре CertHash в ветке реестра с историей RDP подключений (HKEY_CURRENT_USER\Software\Microsoft\Terminal Server Client\Servers\). Если вы скрыли уведомление о невозможности проверить подлинность RDP сервера, чтобы сбросить настройки, удалите ключ с отпечатком сертификата из реестра.
Несмотря на то, что для подключения используется самоподписанный сертификат, ваше RDP подключение защищено, а трафик зашифрован.
Как вручную установить (заменить) SSL сертификат для RDP?
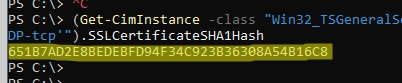
Как определить какой SSL сертификат привязан и используется сейчас для RDP? Откройте консоль PowerShell и выполните:
(Get-CimInstance -class "Win32_TSGeneralSetting" -Namespace root\cimv2\terminalservices -Filter "TerminalName='RDP-tcp'").SSLCertificateSHA1Hash
Команда вернет отпечаток (thumbprint) сертификата, который сейчас назначен для RDP.
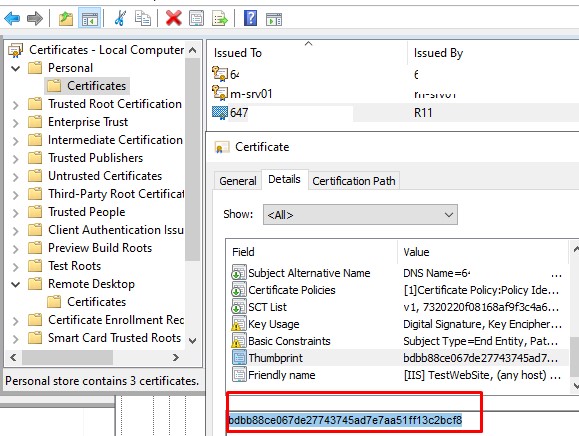
Откройте консоль управления сертификатами компьютера (
certlm.msc
) и перейдите в раздел Remote Desktop -> Certificates. Отройте свойства сертификата, перейдите на вкладку Details и проверьте отпечаток сертификата (поле Thumbprint) соответствует тому, которое вы получили в консоли.

Если вы получили сторонний доверенный SSL сертификат (это может быть сертификат коммерческого CA или бесплатный Let’s Encrypt сертификат), можно заменить им самоподписанный сертификата RDP.
Вам понадобится сертификат в формате PFX (с закрытым ключом), который нужно импортировать в Personal хранилище сертификатов компьютера. В моем случае это сертификат Let’s Encrypt, который уже выпущен для IIS через утилиту WACS под Windows (сертификат находится в секции Web Hosting -> Certificates).
Скопируйте сертификат в секцию Personal -> Certificates. Скопируйте значение отпечатка сертификата.
Чтобы заменить старый сертификат RDP на новый, вставьте скопированный отпечаток SSL сертификата в следующую команду:
$certHash = "bdbb88ce067de27743745ad7e7aa51ff13c2bcf8"
Set-ItemProperty -Path "HKLM:\SYSTEM\CurrentControlSet\Control\Terminal Server\WinStations\RDP-Tcp" -Name "SSLCertificateSHA1Hash" -Value $certHash
Чтобы применить новые настройки, перезапустите службу:
Restart-Service -Name TermService -Force
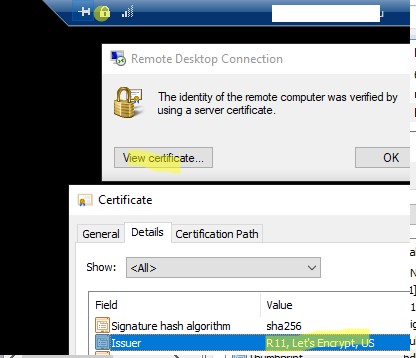
Затем подключитесь к RDP хосту еще раз, щелкните по замочку в верхней панели и убедитесь, что теперь для RDP используется доверенный TLS сертификат.
Обратите внимание, что сертификаты let’s encrypt выдаются на 90 дней. По умолчанию каждые 60 дней такие сертификаты перевыпускаются автоматически. Поэтому нужно через планировщик задач запускать PowerShell скрипт для замены сертификата для RDP.
Создаем шаблон RDP сертификата в центре сертификации (CA)
Если у вас развернут корпоративный центр сертификации Microsoft Certificate Authority (CA), можно настроить автоматическую выдачу доверенных SSL/TLS сертификатов для RDP службы на всех компьютерах и серверах в Windows домене.
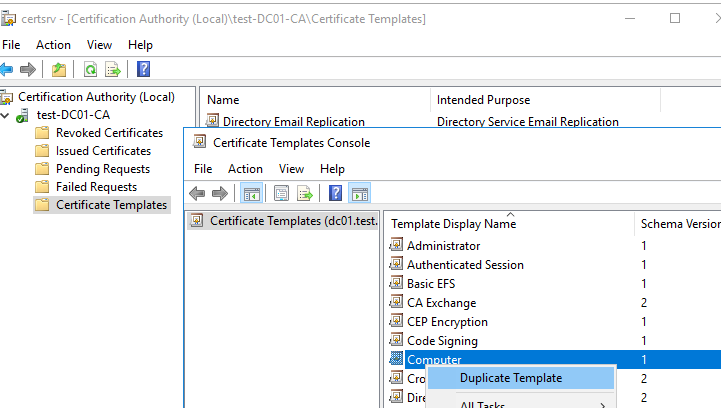
Создадим на CA новый тип шаблона сертификата для RDP/RDS серверов.
- Запустите консоль Certificate Authority и перейдите в секцию Certificate Templates;
- Сделайте копию шаблона сертификата Computer (Certificate Templates -> Manage -> Computer -> Duplicate);

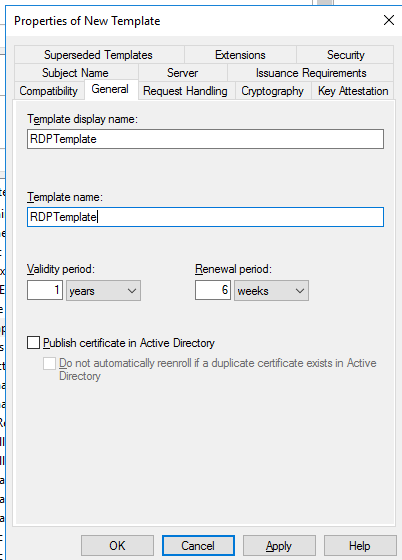
- На вкладке General укажите имя нового шаблона сертификата – RDPTemplate. Убедитесь, что значение поля Template Name полностью совпадает с Template display name;
- На вкладке Compatibility укажите минимальную версию клиентов в вашем домене (например, Windows Server 2016 для CA и Windows 10 для клиентов). Тем самым будут использоваться более стойкие алгоритмы шифрования;
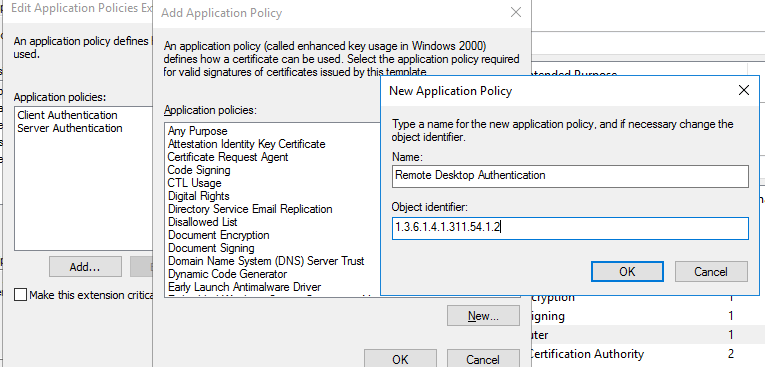
- Теперь на вкладке Extensions в политике приложений (Application policy) нужно ограничить область использования такого сертификата только для Remote Desktop Authentication (укажите следующий object identifier — 1.3.6.1.4.1.311.54.1.2).
- В настройках шаблона сертификата (Application Policies Extension) удалите все политики кроме Remote Desktop Authentication
- Чтобы использовать данный шаблон RDP сертификатов на контролерах домена, откройте вкладку Security, добавьте группу Domain Controllers и включите для нее опцию Enroll и Autoenroll
- Сохраните шаблон сертификата;
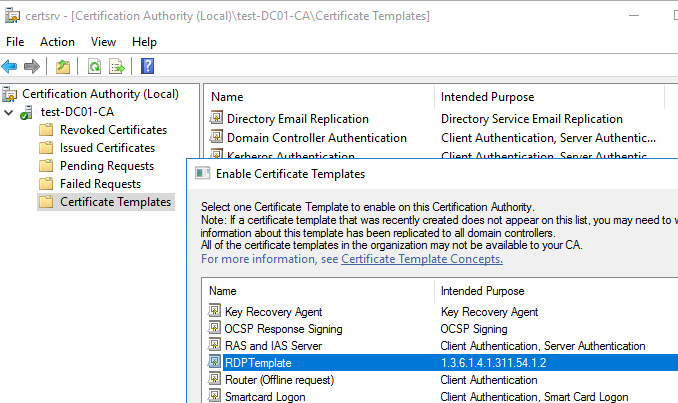
- Теперь в оснастке Certificate Authority, щёлкните по папке Certificate Templates, выберите New -> Certificate Template to Issue -> выберите созданный шаблон RDPTemplate.
Настройка групповой политики для выдачи RDP сертификатов
Теперь нужно настроить доменную GPO, которая будет автоматически назначать RDP сертификат компьютерам/серверам согласно настроенного шаблона.
Предполагается, что все компьютеры домена доверяют корпоративному CA, т.е. корневой сертификат через GPO добавлен в доверенные.
- Откройте консоль управления доменными групповыми политиками gpmc.msc, создайте новый объект GPO и назначьте его на OU с RDP/RDS серверами или компьютерами, для которых нужно автоматически выдавать TLS сертификаты для защиты RDP.
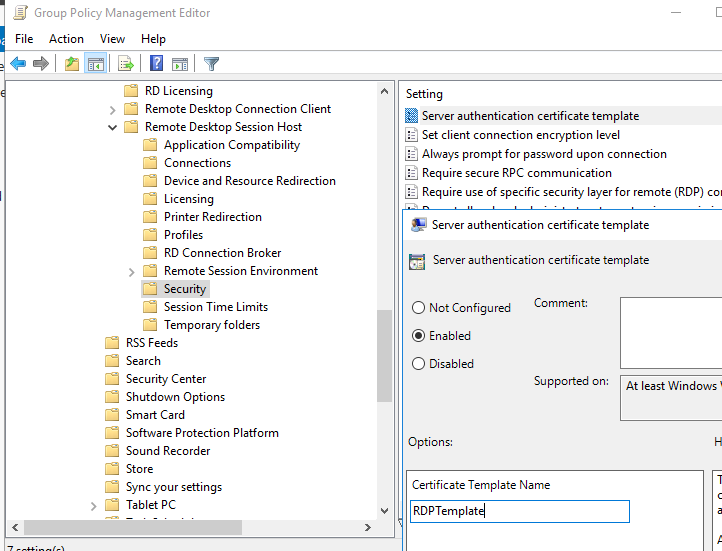
- Перейдите в раздел GPO: Computer Configuration -> Policies -> Administrative Templates -> Windows Components -> Remote Desktop Services -> Remote Desktop Session Host -> Security. Включите политику Server Authentication Certificate Template. Укажите имя шаблона CA, который вы создали ранее (RDPTemplate);
- Затем в этом же разделе GPO включите политику Require use of specific security layer for remote (RDP) connections и установите для нее значение SSL;
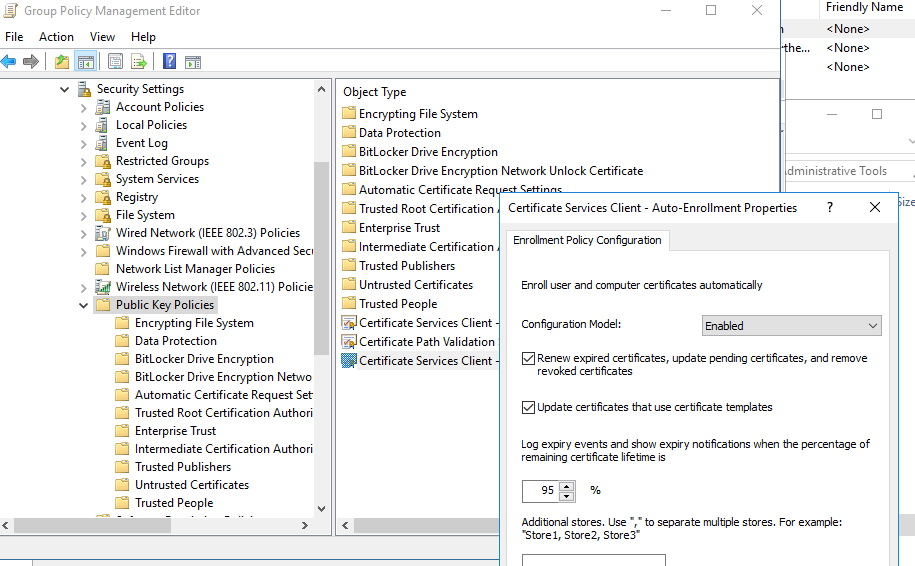
- Для автоматического продления RDP сертификата, перейдите в раздел GPO Computer configuration -> Windows settings -> Security Settings -> Public Key Policies и включите политику Certificate Services Client – Auto-Enrollment Properties. Выберите опции “Renew expired certificates, update pending certificates and remove revoked certificates” и “Update certificates that use certificate templates”;

-
- Если вы хотите, чтобы клиенты всегда проверяли сертификат RDP сервера, нужно включить политику Configure Authentication for Client = Warn me if authentication fails (секция GPO Computer Configuration -> Policies -> Administrative Templates -> Windows Components -> Remote Desktop Settings -> Remote Desktop Connection Client);
- Если нужно, можете через политики файервола открыть входящий RDP порт TCP/UDP 3389;
Осталось обновить политики на клиенте, запустить консоль сертификатов компьютера (Certlm.msc), и проверить, что в разделе Personal -> Certificates появился сертификат для Remote Desktop Authentication, выданный вашим CA.
Если политики не применились воспользуйтесь, для диагностики GPO утилитой gpresult и этой статьей.


Для применения нового RDP сертификата, перезапустите службу Remote Desktop Services:
Get-Service TermService -ComputerName msk-dc01| Restart-Service –force –verbose
Теперь при RDP подключении к серверу перестанет появляться запрос на доверие сертификату (чтобы появился запрос о доверии сертификату, подключитесь к серверу по IP адресу вместо FQDN имени сервера, для которого выпущен сертификат). Нажмите кнопку “Посмотреть сертификат”, перейдите на вкладку “Состав”, скопируйте значение поля “Отпечаток сертификата”.
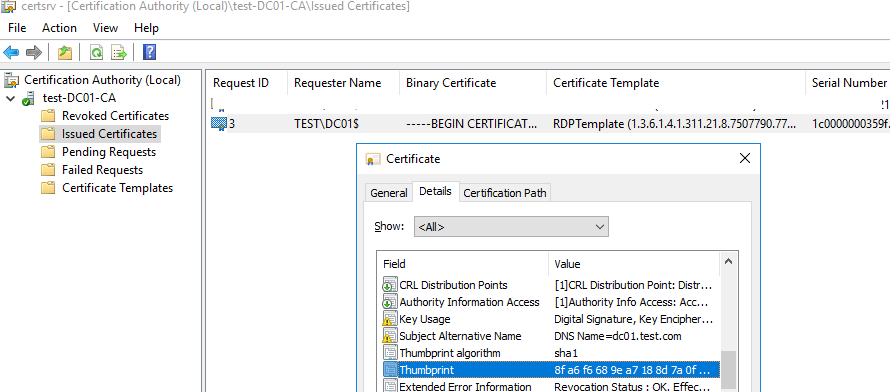
Также можете в консоли Certification Authority в секции Issued Certificates проверить, что по шаблону RDPTemplate был выдан сертификат определённому Windows компьютеру/серверу. Также проверьте значение Thumbprint сертификата:
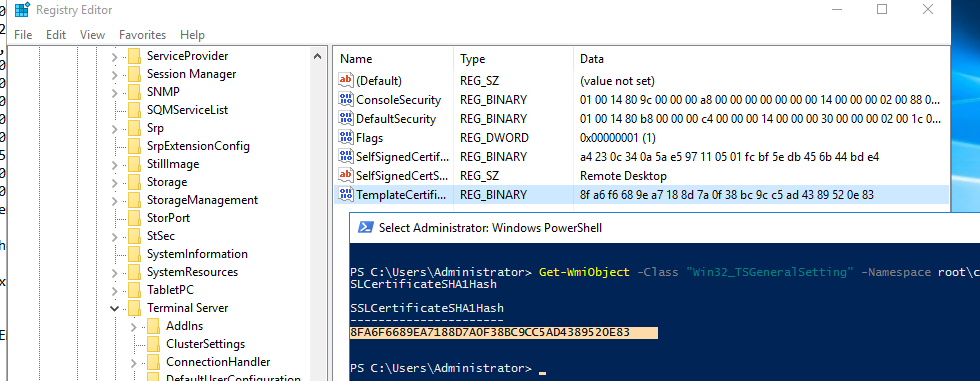
Теперь сравните полученные данные с отпечатком сертификата, который используется службой Remote Desktop Service. Вы можете посмотреть значение отпечатка сертификата службы RDS в реестре (ветка HKLM:\SYSTEM\CurrentControlSet\Control\Terminal Server\WinStations, параметр TemplateCertificate) или командой PowerShell:
Get-WmiObject -Class "Win32_TSGeneralSetting" -Namespace root\cimv2\terminalservices|select SSLCertificateSHA1Hash
Подписываем RDP файл и добавляем отпечаток доверенного RDP сертификата
Если у вас отсутствует CA, но вы хотите, чтобы при подключении к RDP/RDS серверу у пользователей не появлялось предупреждения, вы можете добавить сертификат сервера в доверенные на компьютерах пользователей.
Как описано выше получите значение отпечатка (Thumbprint) RDP сертификата:
Get-WmiObject -Class "Win32_TSGeneralSetting" -Namespace root\cimv2\terminalservices|select|select SSLCertificateSHA1Hash
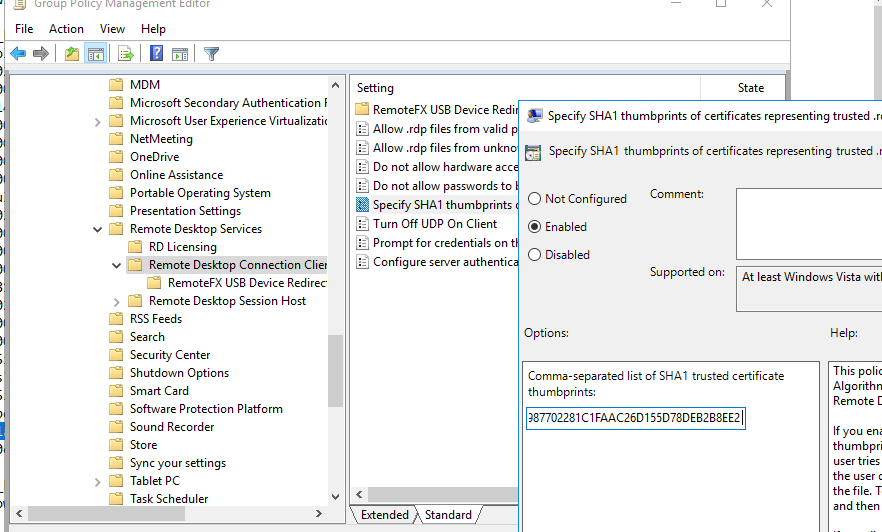
Используйте этот отпечаток для подписывания .RDP файла с помощью RDPSign.exe:
rdpsign.exe /sha256 65A27B2987702281C1FAAC26D155D78DEB2B8EE2 "C:\Users\root\Desktop\rdp.rdp"
Теперь через GPO добавьте этот отпечаток сертификата в доверенные на компьютерах пользователей. Укажите отпечатки (через точку с запятою) в политике Specify SHA1 thumbprints of certificates representing trusted .rdp publishers (Указать отпечатки SHA1 сертификатов, представляющих доверенных издателей RDP) в секции Computer Configuration -> Policies -> Administrative Templates -> Windows Components -> Remote Desktop Settings -> Remote Desktop Connection Client.
Чтобы работал прозрачных RDP вход без ввода пароля (RDP Single Sign On), нужно настроить политику Allow delegation defaults credential и указать в ней имена RDP/RDS серверов (см. статью).
If you always feel annoyed of clicking and accepting an unknown or at least untrusted SLL certificate on a RDP (Remote Desktop Protocol) connection negotiation, you can provide a SSL certificate at this place. This can either be a purchased one for your public domain or just a common, locally-used certificate.
This guide shows how to put your certificate to a Microsoft Windows Server 2016 Standard (Build 14393) RDP connection.
First of all: If you are just hosting an internal Windows server (either physically or on a virtual machine) without having access to the internet, you do not need a certificate at all — assuming you trust yourself and your Firewall. But since you provide your system to be accessible from another public network and others are using your server, you confirm them a secure connection and a secured transaction of their data.
Follow these steps to put a certificate to your RDP connection
- Think about a fitting domain name of your server. If the server will be provided to external useres, this is probably your public domain name (e.g. rdp.sbuechler.de) which is usually defined by the DNS name that you can set in your hosting provider management console. If it is provided internally, you can choose an arbitrary domain name (e.g.intern.myTest.de). You can set the domain name of your server in the computer properties.
- Create a certificate by creating it on your own with OpenSSL or let it be issued by a common Certificate Authority (like Let’s encrypt, DigiSign, etc.). The Subject of the certificate must be equal to your domain name which you have defined in advance.
- Activate the RD license server: The RD (Remote Desktop) Services license server issues client access licenses (CALs) to users and devices when they access the RD Session Host. You can activate the license server by using the Remote Desktop Licensing Manager [2]
- If not done yet, you have to convert your certificate files into the industrial standard #PKCS12: How to convert certificate *.pem to *.pfx files (coming soon)
- Now you are able to install your converted certificate to the certificate store of your server. Make sure to install it at computer level, not at user level.
- In order to assign the imported certificate to your RDP connection, we first need the thumbprint of your certificate. Get it by executing the following command on your Windows Powershell:
Get-ChildItem "Cert:\LocalMachine\My"
Save it to a temporary text file, we’ll need it later.
- Now we extend the Path variable:
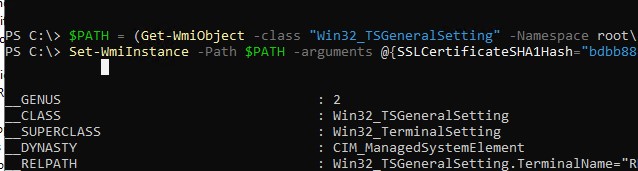
$PATH = (Get-WmiObject -class "Win32_TSGeneralSetting" -Namespace root\cimv2\terminalservices)
- The final step is to set our new certificate to be the active one of the RDP Listener. Make sure to replace the value of «SSLCertificateSHA1Hash by the value you previously stored in your temporary text file:
Set-WmiInstance -Path $PATH -argument @{SSLCertificateSHA1Hash="thumbprint"} - Done! Your next connection attempt over RDP will no longer prompt you to trust an untrusted or unavailable SSL certificate.
Props go out to Bogdan Lashkov who has figured out this workaround [1].
Sources
[1]: Serverfault.com — how-install-ssl-certificate-for-rds-on-windows-server-2016
Related / Read more
Save RDP file (winaero.com)
RDS Activate License Server
There is no question, there have been a lot of organizations that have had to shift their focus to remote working over the past few weeks/months. If you are a Windows Server shop and also maintain Windows clients for your end users, one of the easiest ways to extend remote work from home is to setup a Remote desktop gateway server 2016 or 2019 to allow remote workers to access a desktop environment to run their normal business applications. If in a panic or a hurry you simply “poked a hole” in your firewall for RDP services directly to a server, now is the time to revisit that solution and make things more secure. Folding RDP services back in to the internal network and only exposing a remote desktop gateway server 2016 or 2019 to the perimeter is by far the better solution. In this post, we will take a look at remote desktop gateway server 2016 or 2019 configuration and see how you can easily stand up a server in the perimeter with the gateway services running that will proxy RDP traffic inside to your internal RDP resources.
Before we get into the technical details of the solution, let’s look at this question a bit further. Why do you want to go through the trouble to stand up an additional layer in front of your RDP servers? In short, exposing an RDP server directly to the Internet is dangerous. There have been countless RDP flaws that have been revealed over the past few years and these will no doubt continue, especially with the current remote work situation.
Microsoft has a built-in solution in the Remote Desktop Gateway services role that allows proxying these incoming connections over a secure SSL 443 tunnel connection to the Gateway server over which the RDP connection is established to the internal RDP servers that house the actual resources and applications you want your end users to be able to use.
This is way more secure and keeps the highly problematic RDP protocol concealed on the inside underneath a separate layer of security that can be applied with the Remote Desktop Gateway server 2016 or 2019. Let’s take a look at installing a remote desktop gateway server 2016 or 2019 in front of your Remote Desktop Session Host (RDSH) servers internally.
Remote Desktop Gateway Server 2016 or 2019 Configuration
Let’s look at the steps to configure our Remote Desktop Gateway Server (RDGW). The steps for Remote Desktop Gateway Server 2016 or 2019 configuration involve the following:
- Install the Remote Desktop Services role on your 2016 or 2019 server you are going to use for the Remote Desktop Gateway server.
- Configure the Network Policy Server
- Configure an SSL certificate for the Remote Desktop Gateway server
- Configure your client connection to use the Remote Desktop Gateway Server 2016 or 2019 for connecting to internal RDP resources.
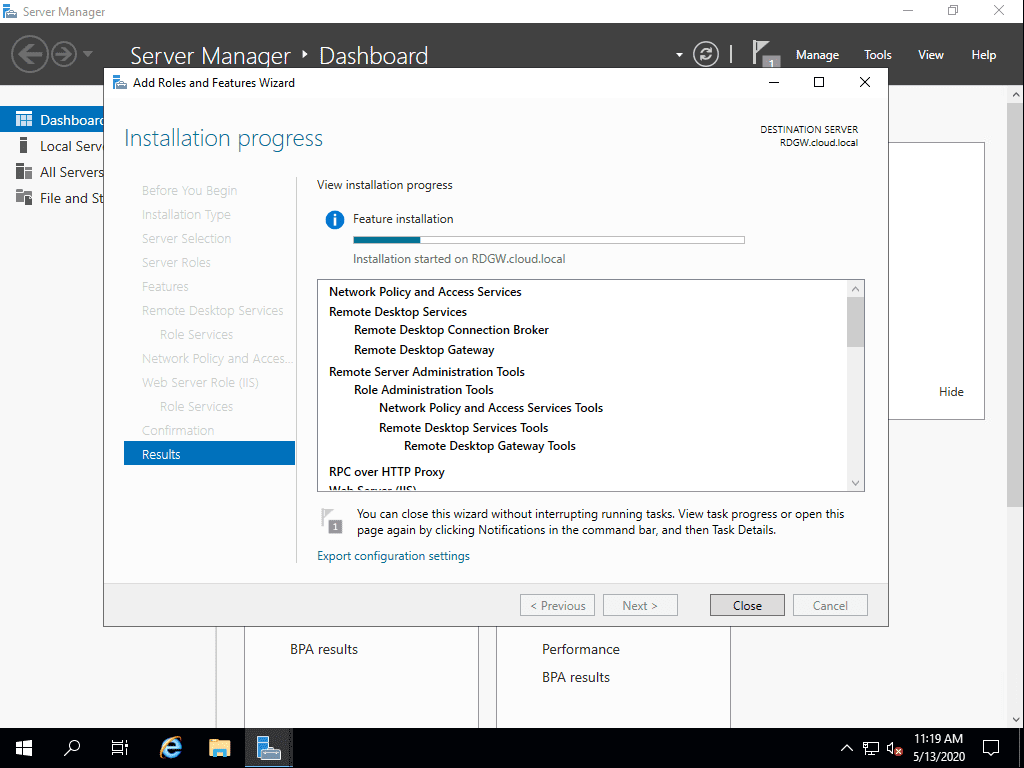
Installing the Remote Desktop Services Role in 2016 or 2019
The first thing we need to do is install the role for Remote Desktop Services. You can easily do this in the Server Manager Roles and Features wizard.
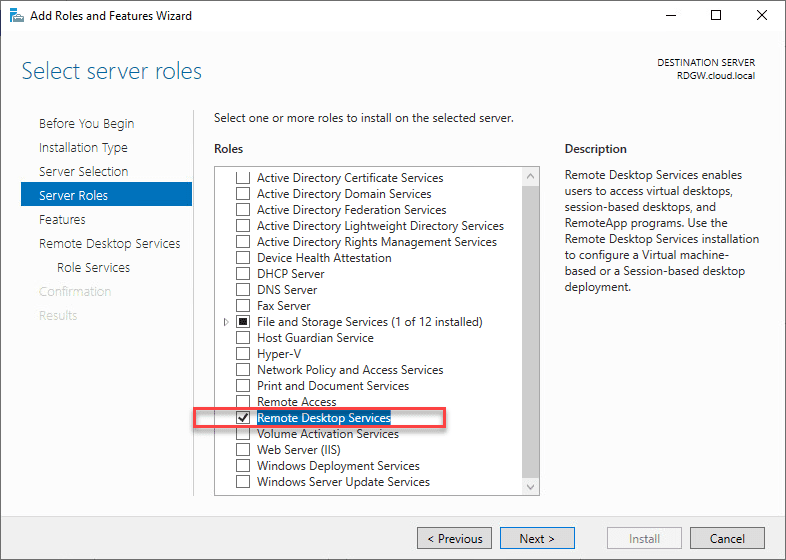
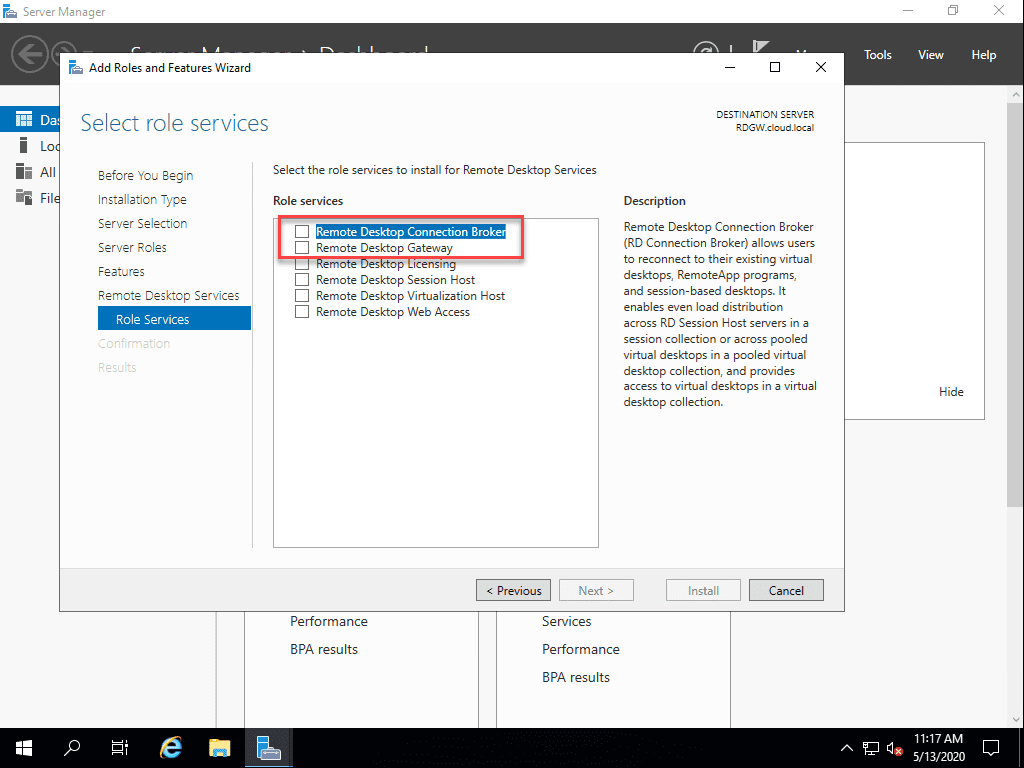
The Select role services wizard will ask which specific Remote Desktop Services will be installed.
The Network Policy and Access Services is installed in the installation of Remote Desktop Gateway services.

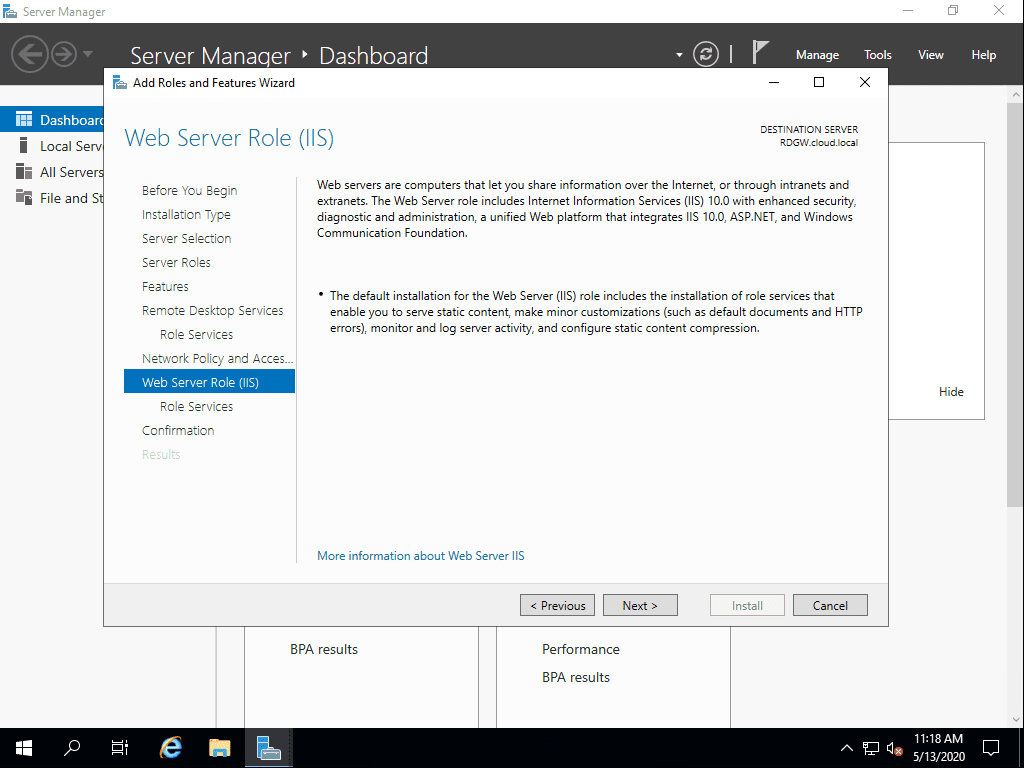
The Web Server Role (IIS) is installed along with the Remote Desktop Gateway role service.
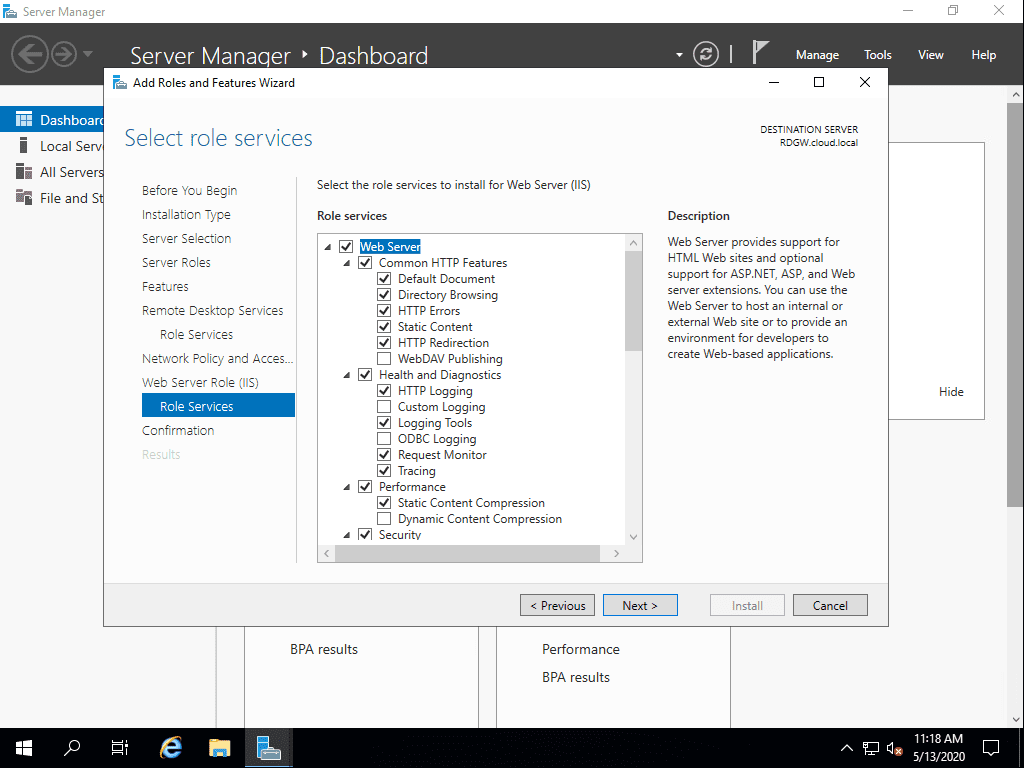
The Web Server role services that will be installed in the process.
Confirm the installation of the selected services supporting the Remote Desktop Gateway role.
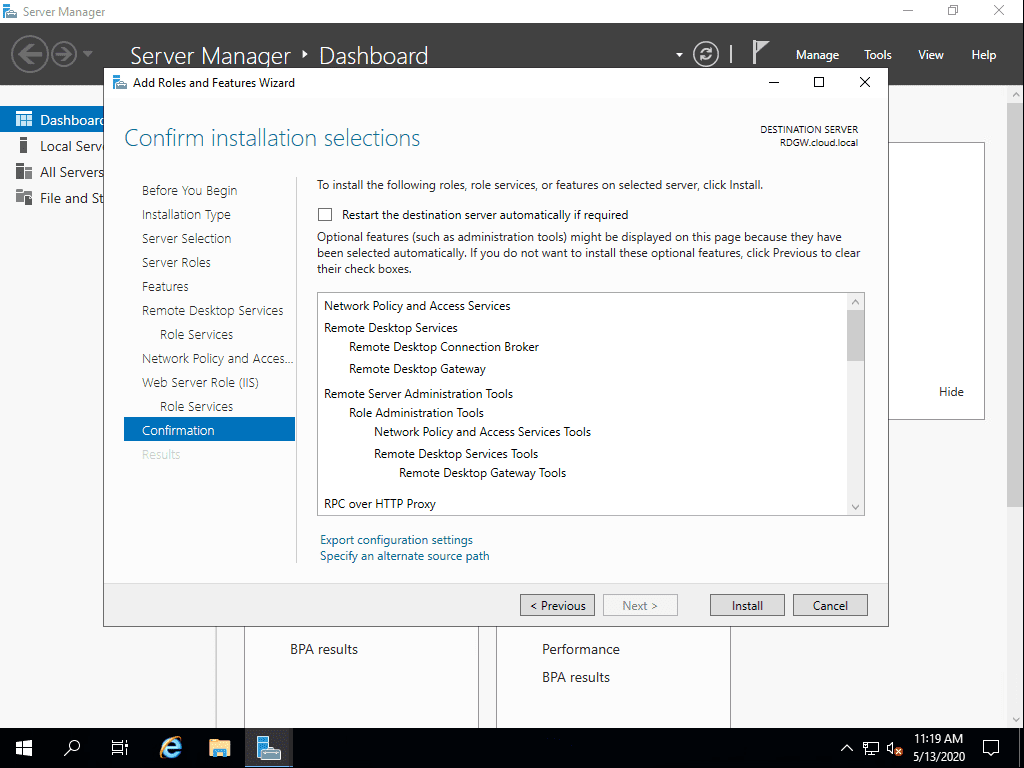
The Remote Desktop Gateway role service is installed along with the NPS role and Web Server IIS role.
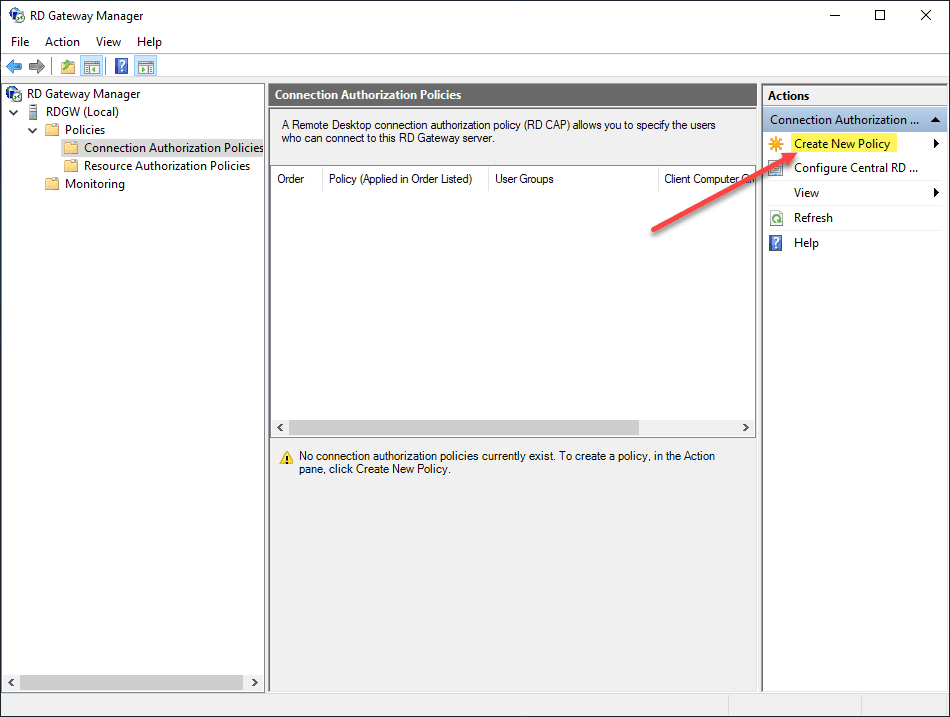
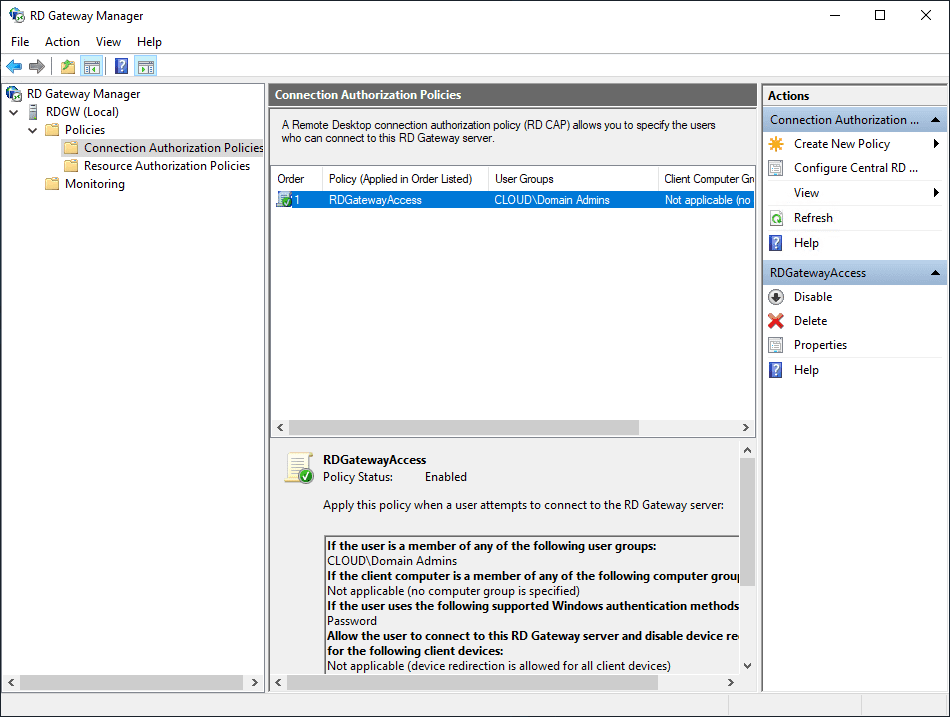
After installation, launch the RD Gateway Manager console. You will need to create new policies for:
- Connection Authorization
- Resource Authorization
Create a Connection Authorization Policy
Create a New Policy under the Connection Authorization Policies.
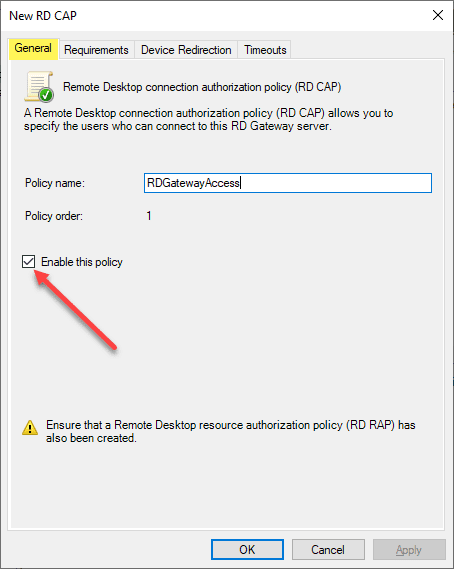
You have the choice to use a wizard or custom creation for the authorization policy.
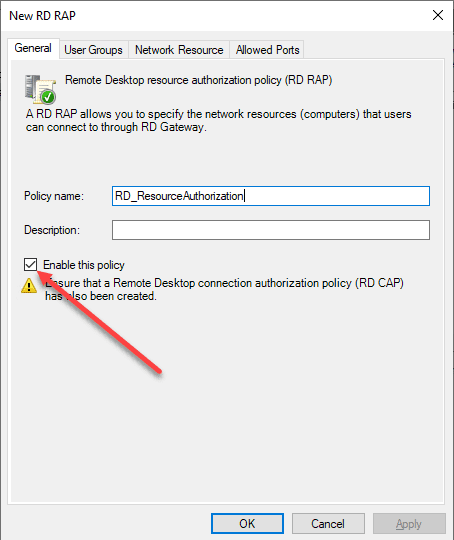
Below is the custom creation of the connection authorization policy. First, name the policy and make sure it is enabled (it is by default).
Under the requirements tab, add the group that will be allowed to connect. This is a required configuration. You can also add a computer group that is optional which defines the computer group allowed to connect.
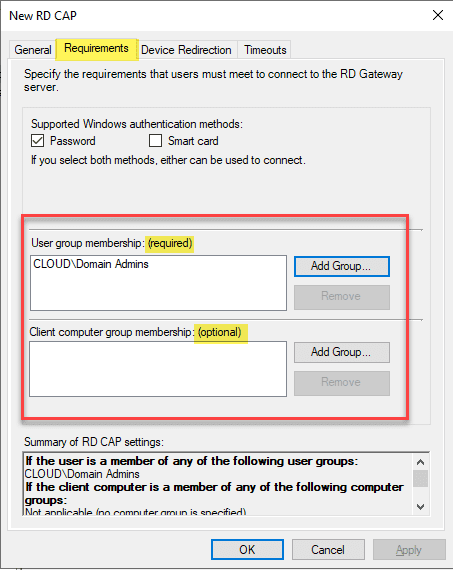
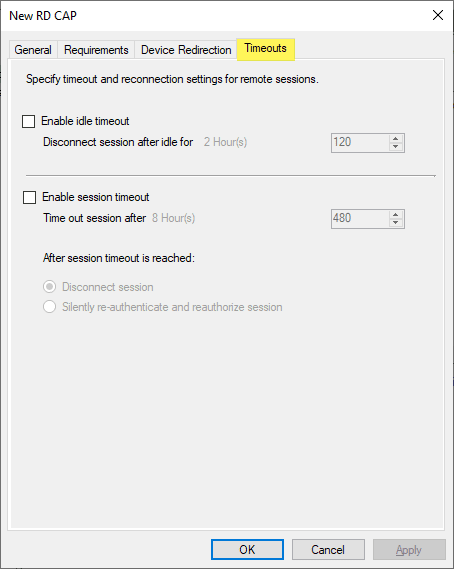
There are Device Redirection and Timeouts options that can be configured.
The Connection Authorization Policy is created successfully.
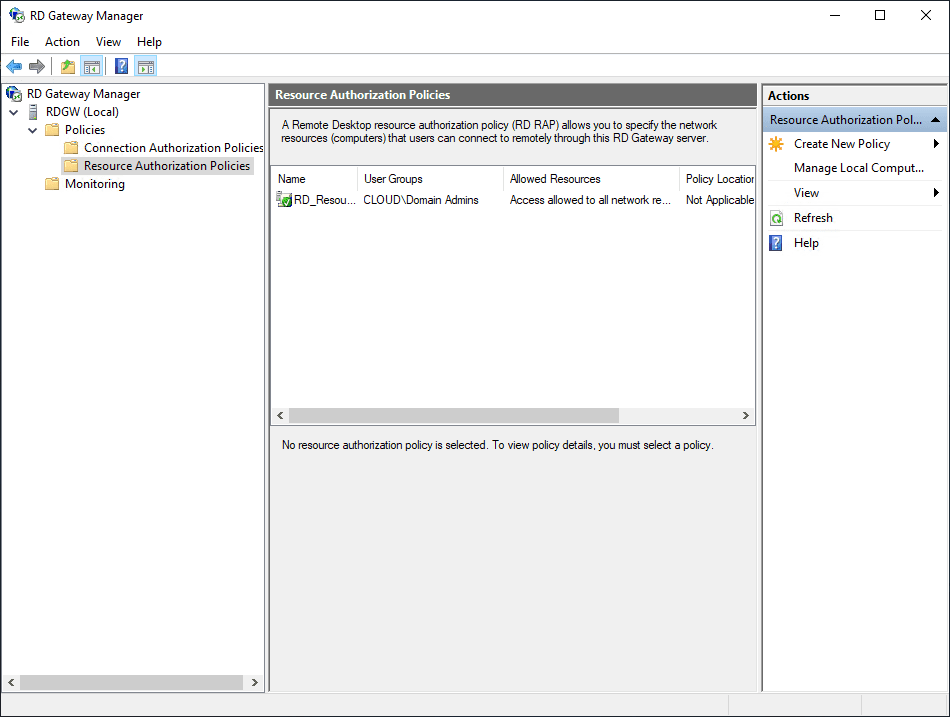
Create a Resource Authorization Policy
Create the Resource Authorization Policy. Click the Create New Policy.
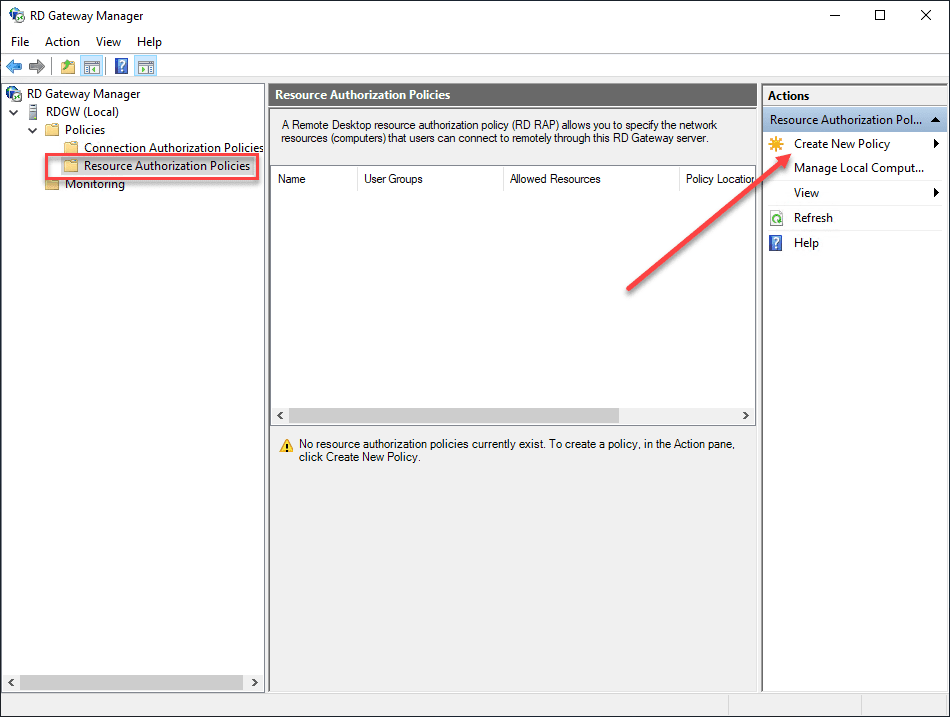
Create the New Policy using the Wizard or the Custom option.
Name the Resource Authorization Policy (RAP) and make sure it is enabled (it is by default).
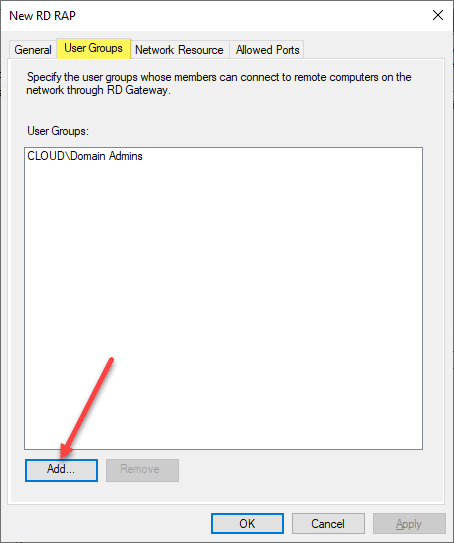
Add the user groups whose members can connect to the remote computers on the network through the RDGW.
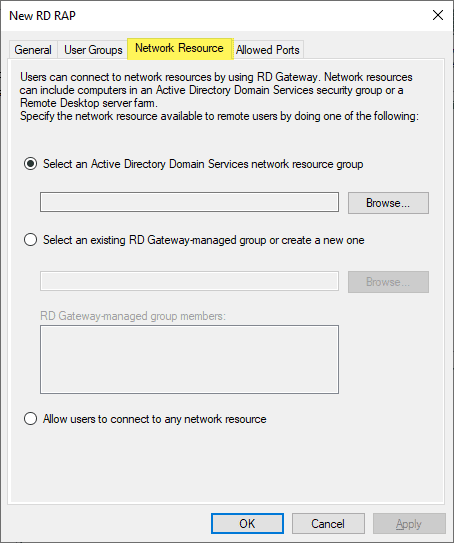
Configure which network resources the users are allowed to connect to. You can select a group that contains the computers that authenticated users are allowed to connect to. Also, you can select to Allow users to connect to any network resource.
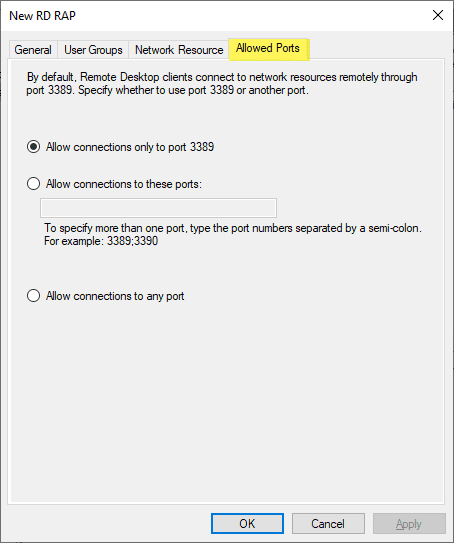
Allowed ports allows configuring a different port besides 3389 if desired.
The resource authorization policy is created successfully.
Install an SSL Certificate on the Remote Desktop Gateway Server
Aside from creating the connection authorization policy and the resource authorization policy, the Remote Desktop Gateway Server needs an SSL certificate installed. Click the View or modify certificate properties.
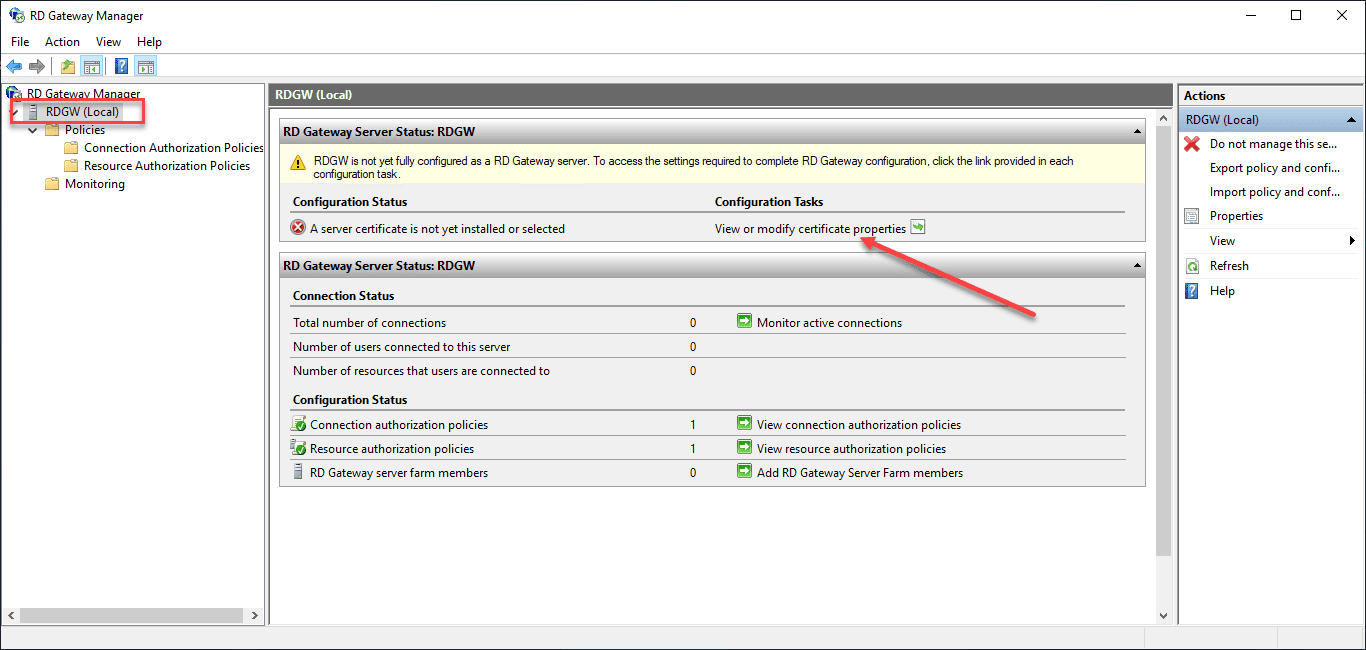
For production systems, you need to install a trusted SSL certificate from a certificate authority. However, the great thing about the RDGW properties under the SSL Certificate tab, there is a means to Create and Import Certifiate which allows creating a self-signed certificate.

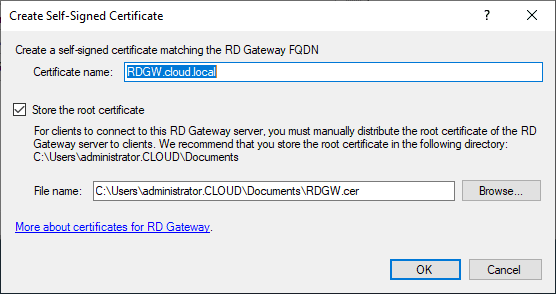
The Create Self-Signed Certificate dialog box will automatically create the certificate and export the self-signed certificate out so you can import on client machines that will be connecting to the Remote Desktop Gateway 2016 or 2019 server.
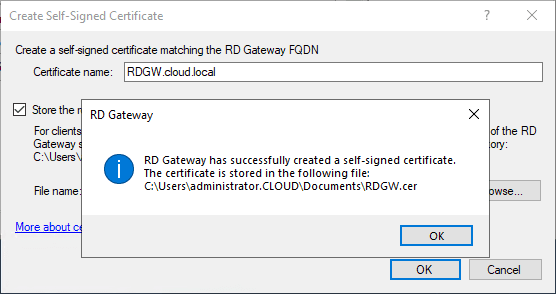
The certificate is successfully installed and exorted.
Now, under the tab, you will see the following certificate is installed on RDGW.
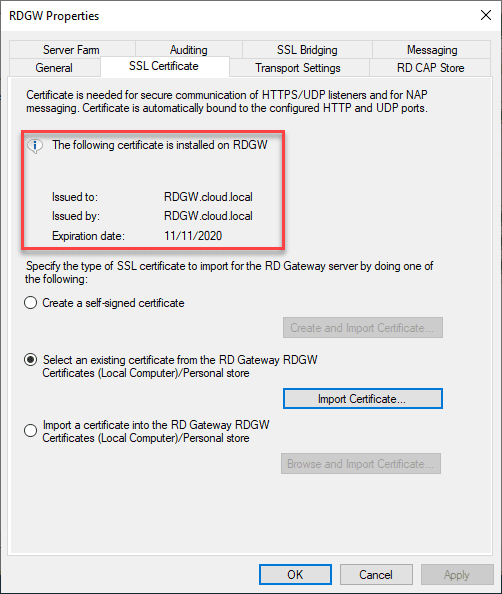
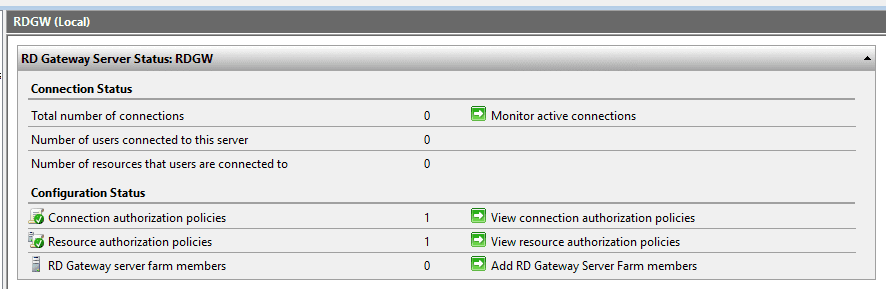
All of the statuses now show green and ready.
Connect to RDSH with Remote Desktop Gateway Server
On a client the mstsc client for Remote Desktop Connection under Advanced > Settings is where you set the Remote Desktop Gateway server.
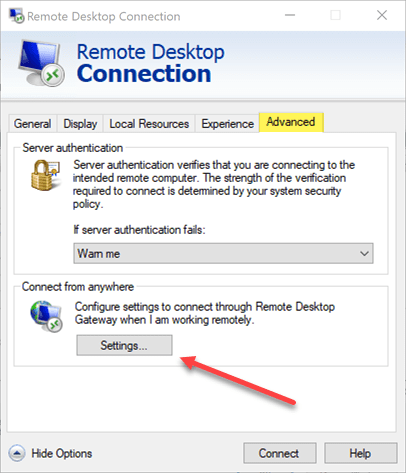
Enter the Remote Desktop Gateway address under the Use these RD Gateway server settings. You can also set or unset the Bypass RD Gateway server for local addresses as well as the Use my RD Gateway credentials for the remote computer.
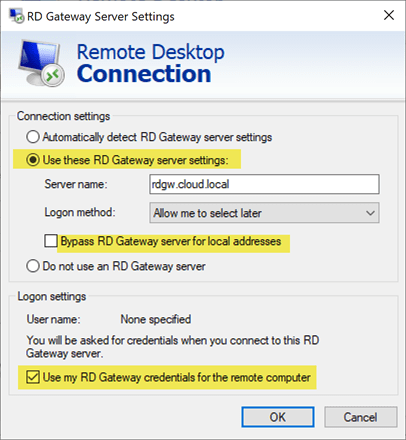
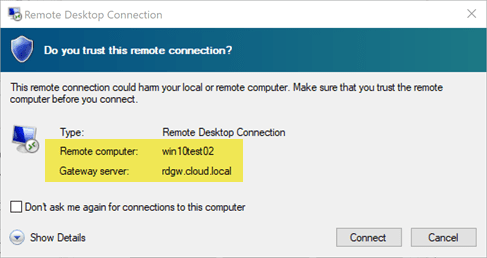
If a client does not have the certificate trusted on the client machine, they will see the following message. If you are using a self-signed certificate, the certificate will need to be imported on the client machine.

Once you hit Connect you will be successfully connected to your remote desktop through the proxy of the Remote Desktop Gateway Server 2016 or 2019.
Final Thoughts
Remote Desktop Gateway Server 2016 or 2019 Configuration is a straightforward process involving a few steps. This involves installing the role services needed, setting up the Network Policy Server authorization rules, installing the SSL certificate, and then configuring the end user client including installing the certificate.
For those looking for a secure solution to access remote desktops, the Remote Desktop Gateway server is the secure way to do this. For those that may have direct RDP access enabled, pulling back and installing a Remote Desktop Gateway server 2016 or 2019 in front of your RDSH servers will help to secure your remote RDP access.
Удаленное подключение к серверу – важная функция, предоставляемая ОС Windows Server 2016. Однако стандартное подключение по протоколу RDP (Remote Desktop Protocol) может быть уязвимым для атак, и, следовательно, не гарантирует безопасность передаваемых данных. Чтобы обеспечить безопасное подключение и защитить сервер от несанкционированного доступа, настройка RDP SSL является обязательной процедурой.
Настройка RDP SSL на Windows Server 2016 представляет собой установку и настройку собственного сертификата SSL для шифрования трафика между клиентом и сервером. Это позволяет обеспечить безопасность при передаче конфиденциальных данных по сети.
В данной статье мы рассмотрим подробное руководство по настройке RDP SSL на Windows Server 2016. Мы покажем, как сгенерировать и установить сертификат SSL, настроить службу RDP для его использования, а также оптимизировать безопасность подключения к удаленному серверу.
Настройка RDP SSL на Windows Server 2016
В данном руководстве будет описан процесс настройки RDP (Remote Desktop Protocol) SSL на операционной системе Windows Server 2016. RDP SSL позволяет безопасно подключаться к удаленному рабочему столу сервера с использованием зашифрованного соединения.
Перед началом настройки необходимо убедиться, что у вас есть учетная запись администратора на сервере и установлен сертификат SSL.
Для начала откройте «Диспетчер сервера» и перейдите в раздел «Удаленный рабочий стол». Нажмите правой кнопкой мыши на «Объект» и выберите «Настроить RDS».
В открывшемся окне «Настроить утилиту управления RDS» выберите «Общие настройки» и нажмите «Далее».
В следующем окне выберите «SSL-сертификат» и нажмите «Обзор». Укажите путь к вашему сертификату SSL и нажмите «Далее».
Затем выберите «Указать дополнительные параметры» и нажмите «Далее». В следующем окне вы можете настроить параметры доступа к серверу, такие как тип аутентификации и протоколы шифрования.
После этого нажмите «Готово» и подтвердите настройки. Дождитесь завершения процесса настройки.
Теперь у вас настроен RDP SSL на Windows Server 2016. Вы можете подключаться к удаленному рабочему столу сервера, используя защищенное соединение SSL.
Обратите внимание:
Для полноценной работы RDP SSL необходимо настроить правила брандмауэра, чтобы разрешить входящие соединения по порту 443.
Настройка RDP SSL на Windows Server 2016 дает вам возможность обеспечить безопасность при удаленном подключении к серверу и защитить передаваемые данные от несанкционированного доступа.
Подготовка к настройке RDP SSL
Перед тем, как приступить к настройке RDP SSL на Windows Server 2016, необходимо выполнить несколько предварительных шагов:
1. Удостоверьтесь, что у вас имеются все необходимые права администратора для настройки сервера.
2. Установите все последние обновления для вашего сервера, чтобы убедиться, что у вас есть все исправления и улучшения безопасности.
3. Убедитесь, что на вашем сервере установлены следующие компоненты: Роль службы терминалов, Роль службы удаленного рабочего стола (RD Web Access), Криптографический провайдер Microsoft Base Smart Card и служба удаленных рабочих столов удаленных рабочих столов (Remote Desktop Services Remote Desktop Virtualization Host).
4. Создайте самозаверяющий сертификат SSL или приобретите сертификат у надежного удостоверяющего центра.
5. Следуйте инструкциям для установки и настройки полученного сертификата SSL на ваш сервер Windows Server 2016.
После выполнения этих шагов вы будете готовы приступить к настройке RDP SSL на вашем сервере.
Установка и настройка SSL-сертификата на Windows Server 2016
Шаг 1: Войдите на сервер с правами администратора и откройте управление сервером.
Шаг 2: В консоли управления сервером выберите «Роли и компоненты» и нажмите на «Добавить роли и компоненты».
Шаг 3: В мастере установки ролей и компонентов пройдите через приветственное окно и выберите сервер, на котором вы хотите установить SSL-сертификат.
Шаг 4: В списке доступных ролей выберите «Серверный агент службы удаленных рабочих столов (RDS)» и нажмите «Далее».
Шаг 5: В появившемся окне выберите «Сервер шлюза RD7 и сертификаты RD» и нажмите «Далее».
Шаг 6: Пройдите через остальные окна мастера установки, при необходимости установите дополнительные компоненты и нажмите «Готово».
Шаг 7: После установки откройте консоль управления сервером и перейдите в «Серверный агент службы удаленных рабочих столов».
Шаг 8: Нажмите правой кнопкой мыши на сервере шлюза RD и выберите «Свойства».
Шаг 9: Перейдите на вкладку «Сертификаты» и нажмите на кнопку «Сертификаты RD».
Шаг 10: В появившемся окне выберите «Пользовательский сертификат», затем «Обзор» и найдите свой сертификат SSL.
Шаг 11: Укажите пароль для сертификата и нажмите «ОК».
Шаг 12: Перезапустите сервер шлюза RD для применения изменений.
Поздравляю! Вы успешно установили и настроили SSL-сертификат на Windows Server 2016. Теперь ваш сервер RDP будет использовать защищенное соединение.
Настройка RDP Gateway на Windows Server 2016
RDP Gateway позволяет пользователям подключаться к удаленному компьютеру через защищенное соединение с использованием SSL-шифрования. Это обеспечивает безопасный доступ к ресурсам компании из любого места, где есть доступ к Интернету.
Для настройки RDP Gateway на Windows Server 2016 следуйте этим шагам:
- Установите службу RDP Gateway с помощью функции «Управление сервером». В разделе «Роли сервера» выберите «Добавить роли и компоненты» и установите «Сервер RDP».
- Запустите мастер конфигурации RDP Gateway, выбрав опцию «Добавить сервер RDP Gateway» в «Управлении серверами».
- В мастере настройки выберите «Использовать существующую сертификационную службу» и укажите сервер сертификации, на котором установлен сертификат SSL. Если у вас нет сервера сертификации, выберите «Создать новый сервис сертификации».
- Выберите целевую группу пользователей, которым разрешено использование RDP Gateway.
- Укажите внешний FQDN (полностью определенное доменное имя), который будет использоваться для доступа к RDP Gateway снаружи сети. Проверьте, что у вас есть правильное DNS-запись для этого домена, чтобы пользователи могли получить доступ к RDP Gateway.
- Выберите тип аутентификации, например, пароль или сертификат, и настройте параметры для выбранного типа.
- Настройте порты, которые будут использоваться для входящего и исходящего соединения через RDP Gateway. Рекомендуется использовать стандартные порты, но вы можете изменить их по своему усмотрению.
- Проверьте настройки и завершите мастер конфигурации.
После завершения настройки RDP Gateway пользователи смогут подключаться к удаленным компьютерам через защищенное соединение с использованием SSL-шифрования. Они смогут получить доступ к ресурсам компании безопасно и эффективно.
Настройка RDP SSL на Windows Server 2016: шаг за шагом
Ниже представлено пошаговое руководство по настройке RDP SSL на сервере Windows Server 2016:
- Установите и настройте службу удаленных рабочих столов (Remote Desktop Services) на сервере.
- Создайте или включите сертификат SSL для использования с RDP.
- Откройте «Центр удаленного управления сервером» и выберите «Опции соединения».
- Установите флажок рядом с «Использовать сертификат SSL» и выберите свой установленный или включенный сертификат.
- Выберите «Опции сети» и установите флажок рядом с «Использовать транспортный уровень SSL».
- Сохраните изменения и закройте «Центр удаленного управления сервером».
- Установите правила брандмауэра, чтобы разрешить входящие подключения RDP.
- Проверьте конфигурацию, выполнив тестовое подключение с использованием RDP-клиента.
После выполнения этих шагов у вас будет настроена RDP SSL на сервере Windows Server 2016 и вы сможете получить защищенное удаленное подключение к серверу.
Leave a reply
It is typical for a Windows server to have a auto-generated self-signed certificate for its Remote Desktop service. Not a good practice. Especially when RDP service is exposed on the internet (via TCP port 3389 that would be open in firewall).
Here are a few simple steps to install a valid SSL certificate to be used with RDP to protect the host identity and encrypt your remote desktop sessions properly:
- Obtain a valid certificate for domain matching the server DNS name by either a) purchasing from an online certificate vendor (such as Namecheap.com), or, b) through other means (if you work for a bigger firm then the corporate IT or its security department may have a way to issue a certificate). In case your external server name is server9.bogushosting.net, then the certificate should be issued for that exact name, or, a wildcard certificate for *.bogushosting.net could be used. We skip the details here on how to generate a CSR and private key during certificate request process as that would be out of scope of this article.
- You would need a certificate bundle in a PKCS #12 or PKCS #7 formats, same as used for web services, IIS or Tomcat, with file extensions .p12, .pfx or .p7b, or from an existing key store. Once you have that file on the server, start MMC by running command line:
mmc.exe - In MMC you need to launch Certificates administration console by going via menu File – Add/Remove Snap-in, then choose Certificates snap-in and click on Add button to add that to MMC for a Computer account.
- In Certificates console you would right click on Personal and choose All tasks – Import, then select your certificate file and add it to the Personal certificate store. You may close MMC at this point.
- Launch Remote Desktop Session Host Configuration.
- Right click on RDP-Tcpconnection and click Select button to set your certificate.
- Check that there is no more warnings when you connect by RDP to your server.
A similar scenario would work for Windows 2012 and Windows 2016 server OS versions as well, but instead of RD Session Host configuration you would need to use Remote Desktop Gateway Manager: right click on the server, choose Properties and then, via SSL Certificate tab, select an existing certificate to import the certificate from Personal store. But if you do not have Remote Desktop Gateway installed, you may just employ this PowerShell script scenario. Below is a version of that script that we saved for later use. It locates the first certificate from Personal store and sets it for Remote Desktop services:
# get a reference to the config instance
$tsgs = gwmi -class "Win32_TSGeneralSetting" -Namespace root\cimv2\terminalservices -Filter "TerminalName='RDP-tcp'"

# grab the thumbprint of the first SSL cert in the computer store
$thumb = (gci -path cert:/LocalMachine/My | select -first 1).Thumbprint

# set the new thumbprint value
swmi -path $tsgs.__path -argument @{SSLCertificateSHA1Hash="$thumb"}

$path = (Get-WmiObject -class "Win32_TSGeneralSetting" -Namespace root\cimv2\terminalservices -Filter "TerminalName='RDP-tcp'").__path
Set-WmiInstance -Path $path -argument @{SSLCertificateSHA1Hash="$thumb"}
In some cases it might be necessary to grant read permission for NETWORK SERVICE to access the key. That is done in MMC, Certificates snap-in (described in above recipe). You would just need to navigate to your installed certificate under Personal store, right click and choose Manage private keys and grant Read permission to user NETWORK SERVICE.