
This article explains how to check for new Windows® updates without installing
them. This guide applies to Windows Server 2016 and 2019.
- Navigate to Settings > Update & Security > Windows Updates.
- Click Check for Updates. Windows downloads and installs all
available updates. - The update statuses are Downloading, Pending Install, and Pending
Restart. - The server reboots outside of the active hours, 8:00 AM to 5:00 PM, unless
otherwise specified. You also have the option to schedule the reboot.
You can check for Windows updates without downloading or installing them by
using one of the following methods:
- Open PowerShell® and type sconfig.
- Type 6 to open the Windows Updates menu.
- Type a to look for all available updates or r to search for only
recommended updates. - All available updates now display in the list.
- Type n to close the menu without installing any updates.
-
Open PowerShell and use the following command, which requires Administrator permissions:
Install-Module -Name PSWindowsUpdate -RequiredVersion 2.1.1.2` -
Confirm that you want to install the cmdlet by typing Y.
-
After the installation finishes, type
get-windowsupdateto see a list of
all available updates.
Updated 2 months ago
Установка обновлений рекомендуется для повышения стабильности и производительности системы, для установки или апгрейда новых компонентов, которые используются многими программами и системой, например установка Net Framework 4.7 выполняется через установку обновлений. Также регулярные обновления помогают устранять уязвимости и повышают безопасность системы в целом.
Самый простой способ установить обновления — через Центр обновлений Windows.
Для всех версий Windows Server процедура установки обновлений почти одна и та же, за исключением минимальных отличий.
Установка обновлений на Windows Server 2012 R2
Чтобы попасть в Центр обновлений Windows, нужно нажать на кнопку Стартового Меню в левом нижнем углу рабочего стола и проследовать по пути:
Старт Меню (Start Menu) -> Панель управления (Control Panel) -> Система и безопасность (System and Security) -> Центр обновления Windows (Windows Update)
Либо можно войти в Старт Меню, ввести текст «update», если у Вас англоязычная версия Windows или «Центр обновления» для русскоязычной версии Windows, Вы увидите в списке найденных программ — Центр обновления Windows (Windows Update), нажмите на данную опцию.
Также в Центр обновления Windows можно попасть через командную строку Powershell, набрав команду «control update» и подтвердив ввод кнопкой Enter
В центре обновления Windows нажмите кнопку Поиск обновлений (Cheсk for updates).
После окончания поиска видно, что найдены важные и опциональные пакеты обновлений, нажмите кнопку Установить обновления (Install updates):
После того, как пакеты обновлений будут скачаны и установлены, Вы увидите сообщение об успешном обновлении, либо кнопку с требованием перезагрузить сервер для применения новой конфигурации (после нажатия кнопки сервер перезагрузится, все программы остановят свою работу, связь через удалённый рабочий стол станет недоступна, поэтому обязательно сохраните все Ваши файлы и незавершённые настройки/программы перед нажатием кнопки).
Если готовы, нажмите кнопку Перезагрузить сейчас (Restart now):
Также сервер можно перезапустить из Стартового меню:
Далее начнётся завершение работы и установка новых компонентов, иногда это может занимать несколько минут, а иногда может занять и полчаса, поэтому Ваш сервер может быть некоторое время недоступен для подключения, подождите 5-30 минут и затем пробуйте подключаться к серверу. (Вы всегда можете отслеживать процесс загрузки системы на наших серверах, используя окно VNC/IPMI-подключения.)
Обновления установлены.
Рекомендуется повторить процедуру установки обновлений и перезагрузить сервер снова, так как не все обновления устанавливаются сразу, некоторые становятся доступны только после установки предыдущих.
Установки обновлений на Windows Server 2016 и Windows Server 2019
Процедура такая же как и для Windows Server 2012 (смотрите выше в данной статье), поэтому описывать процесс детально не буду, лишь приложу несколько скриншотов, так как графический интерфейс отличается от Windows Server 2012 r2
Чтобы попасть в Центр обновлений Windows, нужно нажать на кнопку Стартового Меню в левом нижнем углу рабочего стола и проследовать по пути:
Старт Меню (Start Menu) -> кнопка Настройки (Settings) -> Обновления и безопасность (Update and Security) -> Центр обновления Windows (Windows Update)
Или найдите через поиск в Стартовом меню, затем перейдите в опцию «Windows Update settings«:
Поиск обновлений:
Скачивание и дальнейшая установка обновлений:
По окончанию установок перезапустите систему:
Система начнет перезапуск и соединение с сервером через удалённый рабочий стол будет разорвано на время его перезапуска.
Дождитесь пока сервер снова станет доступен к подключению, приблизительное время: 5-30 минут. (Вы всегда можете отслеживать процесс загрузки системы на наших серверах, используя окно VNC/IPMI-подключения.)
Рекомендуется повторить всю процедуру, так как многие обновления становятся доступны только после установки предыдущих.
Однако обратите внимание, что не рекомендуется устанавливать полностью все обновления в Windows Server 2016-2019 на серверах с размером диска 20 Гб или менее, так как обновления имеют большой размер и могут занять все свободное пространство.
In today’s digital age, keeping your computer system up to date with the latest software updates is essential. These updates not only enhance the performance and security of your system but also ensure that you have access to the latest features and functionalities. Windows Server 2016, the popular operating system for servers, regularly releases updates to address bugs, improve system stability, and fix security vulnerabilities. Therefore, it is crucial to keep track of the installed updates on your Windows Server 2016 to ensure that your system is running smoothly. In this blog post, we will explore different methods to check the installed updates on Windows Server 2016 and discuss some additional tips to help you manage your system effectively.
Video Tutorial:
Checking the installed updates on your Windows Server 2016 is vital for several reasons. Here are a few:
1. Security: Keeping your server up to date with the latest security patches is crucial to protect your system from potential threats and vulnerabilities. Regularly checking the installed updates ensures that you have the latest security fixes and patches installed.
2. Performance: Updates often include performance improvements and bug fixes that can enhance the overall performance of your server. By checking the installed updates, you can identify any performance-related issues and ensure your system is running optimally.
3. Compatibility: Software updates may also include compatibility enhancements, ensuring that your server is compatible with the latest applications and technologies. By checking the installed updates, you can ensure that your server is compatible with the latest software releases.
Now that we understand the importance of checking installed updates on Windows Server 2016 let’s explore different methods to accomplish this task.
Method 1: Using the Control Panel
Checking installed updates on Windows Server 2016 can be easily done through the Control Panel. Follow the steps below to see the installed updates on your server:
1. Open the Control Panel by clicking on the Start menu and selecting “Control Panel.”
2. In the Control Panel, click on “Programs” or “Programs and Features,” depending on your Control Panel view.
3. In the Programs window, click on “View installed updates” located on the left side of the window.
4. A list of all the installed updates on your Windows Server 2016 will be displayed. You can browse through the list to see the update names, installation dates, and other relevant details.
| Pros | Cons |
|---|---|
| 1. Easy and straightforward process to check installed updates. | 1. Limited information provided about the updates in terms of their functionality. |
Method 2: Using Windows PowerShell
Windows PowerShell is a powerful command-line shell and scripting language that can be used to manage and automate various tasks in Windows Server 2016, including checking installed updates. Here’s how you can use Windows PowerShell to check the installed updates:
1. Open Windows PowerShell by pressing “Win + X” on your keyboard and selecting “Windows PowerShell” or “Windows PowerShell (Admin)” from the menu.
2. In the PowerShell window, type the following command and press Enter:
Get-WmiObject -Class "Win32_QuickFixEngineering"
3. A list of installed updates along with their names, installation dates, and other details will be displayed in the PowerShell window.
| Pros | Cons |
|---|---|
| 1. Provides detailed information about the installed updates. | 1. Requires basic knowledge of Windows PowerShell commands. |
| 2. Offers more advanced filtering and sorting options compared to the Control Panel method. | 2. May be less user-friendly for those unfamiliar with Windows PowerShell. |
Method 3: Using the Windows Update Catalog
The Windows Update Catalog is an online repository where you can find and download updates for various Microsoft products, including Windows Server 2016. Here’s how you can use the Windows Update Catalog to check the installed updates:
1. Open a web browser and navigate to the Windows Update Catalog website (https://www.catalog.update.microsoft.com/Home.aspx).
2. In the search box, enter your Windows Server 2016 version (e.g., “Windows Server 2016 Standard”).
3. Click on the “Search” button to view the available updates for your Windows Server 2016 version.
4. Scroll through the list of updates to find the installed updates. You can identify the installed updates by comparing their version numbers with those displayed in the Control Panel or PowerShell methods.
| Pros | Cons |
|---|---|
| 1. Provides access to a comprehensive list of updates. | 1. Requires manual comparison of version numbers to identify installed updates. |
| 2. Allows you to download updates directly from the website if needed. | 2. May be time-consuming to navigate and search for specific updates. |
Method 4: Using Windows Update PowerShell Module
Windows Server 2016 includes a Windows Update PowerShell module that allows you to manage Windows updates using PowerShell commands. Here’s how you can use the Windows Update PowerShell module to check the installed updates:
1. Open Windows PowerShell as an administrator by pressing “Win + X” on your keyboard and selecting “Windows PowerShell (Admin)” from the menu.
2. In the PowerShell window, type the following command and press Enter to install the Windows Update PowerShell module if it’s not already installed:
Install-Module -Name PSWindowsUpdate
3. After the module is installed, import it by typing the following command and pressing Enter:
Import-Module -Name PSWindowsUpdate
4. To check for installed updates, type the following command and press Enter:
Get-WUInstall -KBArticleID "*" | Where-Object {$_.Installed -eq $true}
5. The PowerShell window will display a list of installed updates along with their KB article IDs, installation dates, and other details.
| Pros | Cons |
|---|---|
| 1. Allows you to manage Windows updates using PowerShell commands. | 1. Requires installation of the PSWindowsUpdate module if not already available. |
| 2. Provides detailed information about the installed updates. | 2. Requires basic knowledge of Windows PowerShell commands. |
What to Do If You Can’t Check Installed Updates on Windows Server 2016
If you are unable to check the installed updates on your Windows Server 2016 using the methods mentioned above, here are a few possible fixes:
1. Restart the Server: Sometimes, a simple restart can resolve temporary system glitches and allow you to check the installed updates. Try restarting your Windows Server 2016 and then attempt to check the installed updates again.
2. Update Windows: If you are unable to check the installed updates due to outdated Windows or missing system files, consider updating your Windows Server 2016 to the latest version. Updates often include bug fixes and improvements that can address the issue at hand.
3. Check Windows Update Service: Ensure that the Windows Update service is running on your server. To do this, open the Services console (press “Win + R,” type “services.msc,” and press Enter), locate the “Windows Update” service, and verify that its status is set to “Running.”
4. Use Windows Update Troubleshooter: Windows Server 2016 includes a built-in troubleshooter to diagnose and fix common Windows Update-related problems. Run the Windows Update troubleshooter by going to Settings > Update & Security > Troubleshoot > Windows Update > Run the troubleshooter.
Bonus Tips
Here are three bonus tips to help you better manage the updates on your Windows Server 2016:
1. Schedule Automatic Updates: To ensure that your Windows Server 2016 stays up to date, consider configuring automatic updates. You can schedule the server to automatically download and install updates at a convenient time, minimizing manual intervention.
2. Enable WSUS for Centralized Update Management: Windows Server Update Services (WSUS) is a Microsoft tool that allows you to centrally manage the distribution of updates within your network. By configuring a WSUS server, you can have better control over the update management process, ensuring consistency across multiple servers.
3. Maintain a Testing Environment: Before applying updates to your production environment, consider setting up a testing environment to evaluate the impact of updates on your applications and services. This can help identify any compatibility issues or system behavior changes before rolling out updates to your production servers.
5 FAQs
Q1: How often should I check for updates on Windows Server 2016?
A: It is recommended to check for updates on a regular basis, preferably monthly. Microsoft releases security updates on the second Tuesday of each month, commonly known as “Patch Tuesday.”
Q2: Can I roll back installed updates on Windows Server 2016?
A: Yes, you can uninstall or roll back installed updates on Windows Server 2016. In the Control Panel, go to “Programs” or “Programs and Features,” click on “View installed updates,” and select the update you want to uninstall. Follow the on-screen instructions to remove the update.
Q3: Are all updates necessary, or can I selectively install them?
A: While security updates are crucial for maintaining the security of your system, some updates may not be necessary for your specific environment. You can selectively install updates based on your requirements, but critical security updates should never be ignored.
Q4: Can I download updates manually and install them on Windows Server 2016?
A: Yes, you can manually download and install updates from the Windows Update Catalog or other trusted sources. However, it is generally recommended to use the built-in Windows Update feature or a centralized update management solution for easier management.
Q5: What should I do if an update fails to install on Windows Server 2016?
A: If an update fails to install on Windows Server 2016, try restarting the server and running the update again. If the issue persists, check for any error messages or error codes provided during the installation process. You can search for the specific error message or code online for troubleshooting steps or contact Microsoft support for assistance.
Final Thoughts
Regularly checking the installed updates on your Windows Server 2016 is crucial for maintaining the security, performance, and compatibility of your system. By using the Control Panel, Windows PowerShell, Windows Update Catalog, or the Windows Update PowerShell module, you can easily check the installed updates and ensure that your server is up to date. Additionally, following the bonus tips and troubleshooting steps provided in this blog post will help you effectively manage and maintain your Windows Server 2016 updates. Remember to schedule regular checks for updates and stay informed about the latest security patches and enhancements released by Microsoft.{“@context”:”https://schema.org”,”@type”:”FAQPage”,”mainEntity”:[{“@type”:”Question”,”name”:” How often should I check for updates on Windows Server 2016?”,”acceptedAnswer”:{“@type”:”Answer”,”text”:” It is recommended to check for updates on a regular basis, preferably monthly. Microsoft releases security updates on the second Tuesday of each month, commonly known as “Patch Tuesday.””}},{“@type”:”Question”,”name”:” Can I roll back installed updates on Windows Server 2016?”,”acceptedAnswer”:{“@type”:”Answer”,”text”:” Yes, you can uninstall or roll back installed updates on Windows Server 2016. In the Control Panel, go to “Programs” or “Programs and Features,” click on “View installed updates,” and select the update you want to uninstall. Follow the on-screen instructions to remove the update.”}},{“@type”:”Question”,”name”:” Are all updates necessary, or can I selectively install them?”,”acceptedAnswer”:{“@type”:”Answer”,”text”:” While security updates are crucial for maintaining the security of your system, some updates may not be necessary for your specific environment. You can selectively install updates based on your requirements, but critical security updates should never be ignored.”}},{“@type”:”Question”,”name”:” Can I download updates manually and install them on Windows Server 2016?”,”acceptedAnswer”:{“@type”:”Answer”,”text”:” Yes, you can manually download and install updates from the Windows Update Catalog or other trusted sources. However, it is generally recommended to use the built-in Windows Update feature or a centralized update management solution for easier management.”}},{“@type”:”Question”,”name”:” What should I do if an update fails to install on Windows Server 2016?”,”acceptedAnswer”:{“@type”:”Answer”,”text”:” If an update fails to install on Windows Server 2016, try restarting the server and running the update again. If the issue persists, check for any error messages or error codes provided during the installation process. You can search for the specific error message or code online for troubleshooting steps or contact Microsoft support for assistance.”}}]}
В Windows Server 2016 можно столкнуться с ситуацией, когда встроенный клиент Windows Update очень долго выполняет проверку обновлений. Характерно то, что проблема может проявляться плавающим образом и воспроизводиться не всегда. Замечено, что чаще всего проблема проявляется в случае, если система была недавно включена или перезагружена. В этой заметке мы поговорим о том, какие могут быть причины у такого поведения и как это можно попробовать исправить.
При попытке вызвать проверку обновлений из интерфейса настроек системы в Settings > Update & security > Windows Update мы можем столкнуться с длительным циклом ожидания в статусе «Checking for updates…»
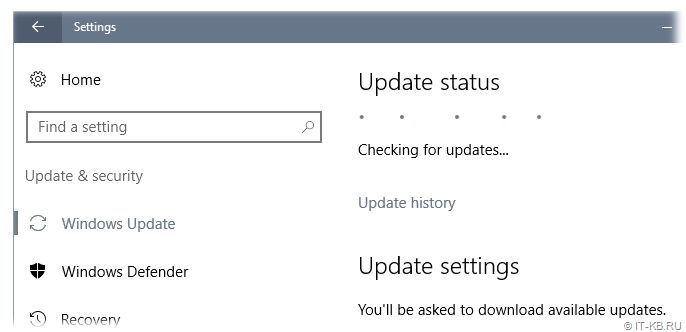
Результатом такого ожидания может стать возникновение ошибки типа:
We couldn't connect to the update service. We'll try again later, or you can check now. If it still doesn't work, make sure you're connected to the Internet.
Это привносит проблемы и в других операциях обслуживания системы.
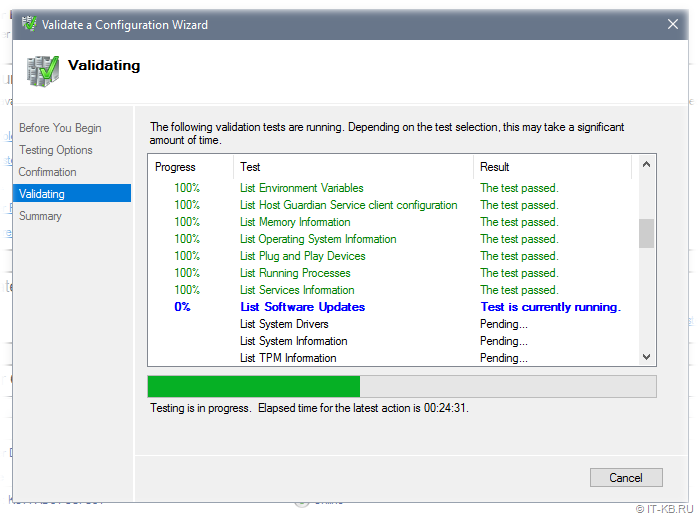
Отражение проблемы с Windows Update в Failover Cluster Manager
В качестве примера отрицательного влияния проблемной работы Windows Update можно привести мастер проверки конфигурации кластера, вызываемый из оснастки Failover Cluster Manager. В ходе выполнения валидации кластера, на этапе сбора информации об установленных на кластерных узлах обновлениях («List Software Updates«) мы можем получить состояние длительного ожидания.
В ходе изучения ситуации по следам «коллективного разума» я обнаружил, что самые разнообразные проблемы c Windows Update в Windows Server 2016 известны давно и с ними столкнулись многие:
- TechNet Forums : Windows Server 2016 Updates slow!
- Superuser : Windows Update stuck on Checking for updates
- Born’s Tech and Windows World : Windows Server 2016: Slow updates
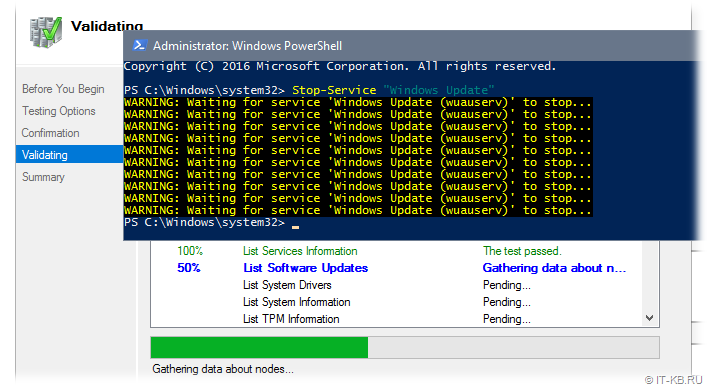
Методом «а если попробовать…» было выявлено, что в качестве обходного решения в вышеописанной ситуации с Failover Cluster Manager, может быть простой перезапуск службы «Windows Update«.
Возможно, потребуется сделать лишь остановку этой службы, а запустится служба через несколько секунд автоматически. Если служба не остановилась с первого раза (остановка привела к ошибке), то пробуем выполнить остановку повторно. Выполнить остановку службы можно как через оснастку управления службами services.msc, так и через PowerShell.
Stop-Service "Windows Update"
Сразу после того, как служба будет остановлена (а затем сама автоматически запустится) мы увидим сдвиг в работе механизма проверки обновлений.
В случае с кластером, выполнить остановку/перезапуск службы «Windows Update» нам может потребоваться на всех узлах кластера, начиная с того, на котором запущен мастер проверки.
В попытках понять, что же не так с проверкой обновлений в Windows Server 2016 и проведения ряда экспериментов с видимыми настройками клиента Windows Update в графической среде, стало очевидно то, что наличие включённой опции «Defer feature updates» в Settings > Update & security > Windows Update > Advanced options явным образом влияет на воспроизведение проблемы.

То есть, как только мы отключаем данную опцию, включенную в Windows Server 2016 по умолчанию, то механизм проверки обновлений начинает работать так, как мы этого от него ожидаем при наличии сервера WSUS.
Дальнейшее изучение вопроса показало, что причиной странного поведения клиента Windows Update может являться механизм «Dual Scan» (подробней в статьях «Improving Dual Scan on 1607» и «Demystifying Dual Scan»), который заставляет при проверке обновлений в качестве источника использовать не только форсировано настроенный в доменных групповых политиках сервер WSUS в локальной сети, но и Интернет-службы Windows Update.
Соответственно, при условии, что компьютеры имеют ограниченный доступ в Интернет или не имеют его вовсе, может возникнуть эффект длительного ожидания с возникновением ошибок разного содержания.
Чтобы решить описанную проблему, нам потребуется провести настройку групповой политики Active Directory, с помощью которой настраиваются наши серверы на базе Windows Server 2016. Однако, как выяснилось, в этом вопросе всё не так очевидно, понятно и однозначно, как хотелось бы.
Варианты решения с готовыми политиками GPO (неработающие в нашем случае)
Примечание: Если важен только готовый рецепт и не интересны эксперименты по следам ранее предложенных в Интернете приёмов(которые в нашем случае не помогли), то можете смело пропустить этот раздел заметки и читать заключительный раздел.
В ранних выпусках Windows 10 (с версии 1607) и Windows Server 2016 за отключение попыток использования онлайн репозитория Windows Update отвечала политика:
«Do not allow update deferral policies to cause scans against Windows Update«
в разделе:
Computer Configuration > Administrative Templates > Windows Components > Windows Update.
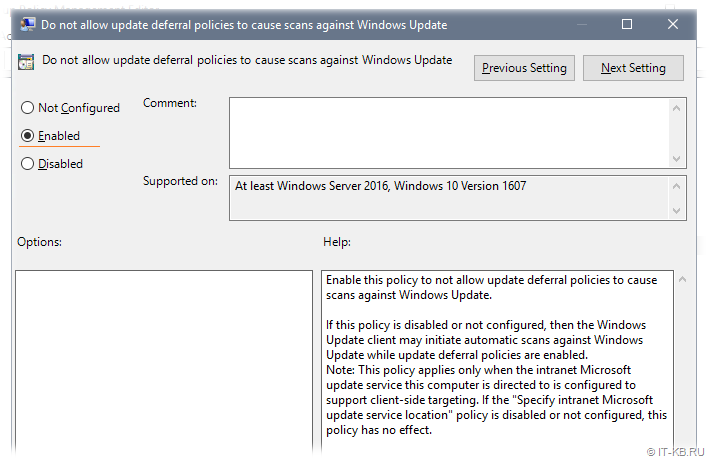
В результате применения этой политики в системном реестре Windows появляется параметр DisableDualScan, установленный в 1:
Windows Registry Editor Version 5.00

[HKEY_LOCAL_MACHINE\SOFTWARE\Policies\Microsoft\Windows\WindowsUpdate]
"DisableDualScan"=dword:00000001
И, судя по старым статьям, на более ранних версиях Windows 10 описанная политика могла быть полезна для решения проблемы.
Однако, в более поздних версиях Windows 10 (начиная с версии 2004), Windows 11, а так же, возможно, в более новых версиях Windows Server, данная политика была перенесена в подраздел Legacy Policies и была заменена новой политикой:
«Specify source service for specific classes of Windows Updates«
в разделе:
Computer Configuration > Administrative Templates > Windows Components > Windows Update > Manage updates offered from Windows Server Update Service.
Предполагается включение этой политики и выбор WSUS в качестве источника для всех предлагаемых типов обновлений.
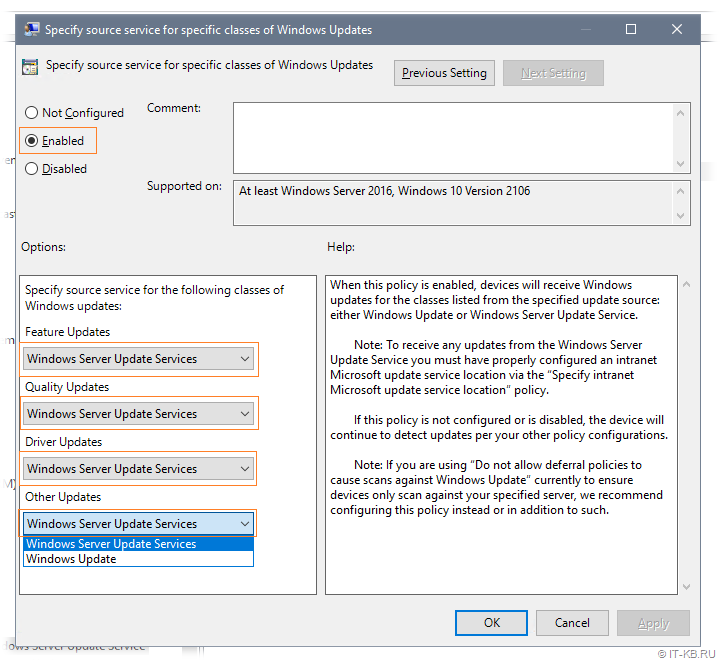
В результате применения этой политики в системном реестре Windows появляется 4 параметра с соответствующими именами, установленных в 1:
Windows Registry Editor Version 5.00

[HKEY_LOCAL_MACHINE\SOFTWARE\Policies\Microsoft\Windows\WindowsUpdate]
"SetPolicyDrivenUpdateSourceForFeatureUpdates"=dword:00000001
"SetPolicyDrivenUpdateSourceForQualityUpdates"=dword:00000001
"SetPolicyDrivenUpdateSourceForDriverUpdates"=dword:00000001
"SetPolicyDrivenUpdateSourceForOtherUpdates"=dword:00000001
Логично предполагать, что включать и настраивать данную политику резонно лишь для серверных систем, которые в локальных сетях, как правило, обновляются с сервера WSUS и имеют ограниченный доступ в Интернет. Для клиентских же систем, часть из которых может оказаться мобильными и периодически перемещающимися из локальной сети во внешние сети с доступом в Интернет, в некоторых ситуациях может оказаться логичней использовать настроенный по умолчанию механизм выбора источника (то есть, чтобы в качестве дополнительного источника мог выступать онлайн репозиторий Windows Update).
Эксперименты с двумя выше описанными политиками показали, что на данный момент времени сами по себе (ни по отдельности ни вместе) эти политики не решают проблему в нашем конкретном случае.
В ходе дальнейшего изучения опыта борьбы коллег со странностями работы Windows Update в Windows Server 2016 обнаружил статью «Windows admin blog : Некорректное отображение информации на WSUS | Проблемы обновления со WSUS (Dual Scan)», где в качестве одного из решений предложено включение «олдскульной» политики:
«Do not connect to any Windows Update Internet locations«
в разделе:
Computer Configuration > Administrative Templates > Windows Components > Windows Update > Manage updates offered from Windows Server Update Service.
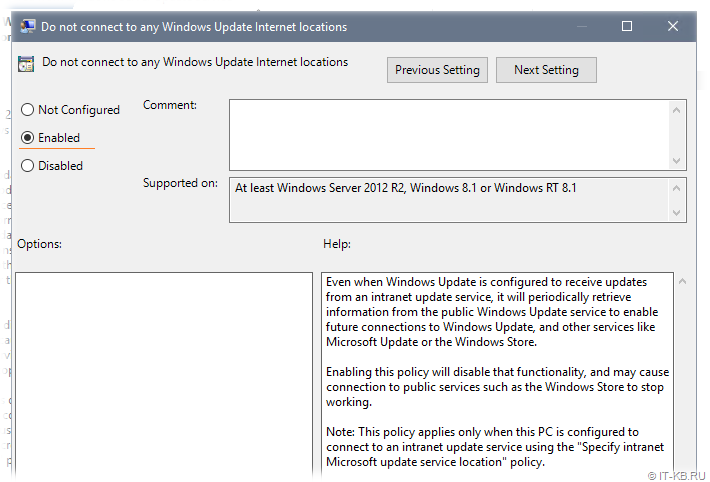
В результате применения этой политики в системном реестре Windows появляется параметр DoNotConnectToWindowsUpdateInternetLocations, установленный в 1:
Windows Registry Editor Version 5.00

[HKEY_LOCAL_MACHINE\SOFTWARE\Policies\Microsoft\Windows\WindowsUpdate]
"DoNotConnectToWindowsUpdateInternetLocations"=dword:00000001
Однако, практика показала, что применение данной политики может привести к появлению новой ошибки в ходе проверки обновлений:
There were some problems installing updates, but we'll try again later. If you keep seeing this and want to search the web or contact support for information, this may help: (0x8024500c)
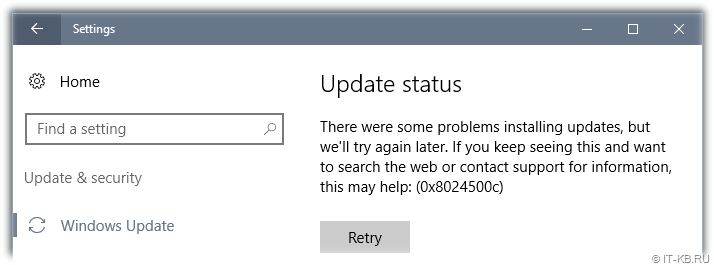
Причём избавиться от этой ошибки не поможет ни перезапуск службы, ни перезагрузка системы, а по свидетельствам очевидцев, эта ошибка воспроизводится так же и на Windows 10.
Понимая то, что данная политика не решает проблемы, можно было бы не упоминать о ней в нашей заметке. Однако помимо того, что она не только не закрывает исходную проблему, но и может создать новую трудно интерпретируемую проблему, мы и упоминаем здесь о ней, как о неподходящем варианте решения.
Перебрав ряд других групповых политик, как по одиночке, так и в в разных комбинациях, мне так и не удалось найти решения на базе каких-либо готовых политик.
Отключение опции «Defer feature updates» с помощью GPP
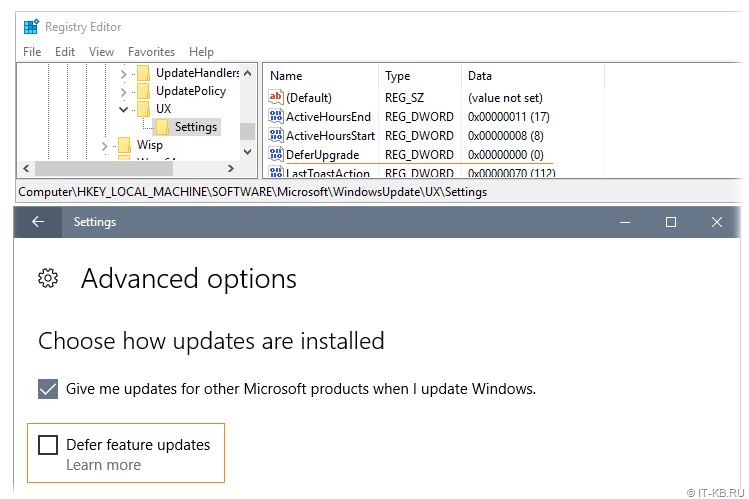
В конечном итоге пришлось прибегнуть к помощи Group Policy Preferences (GPP) для управления опцией «Defer feature updates«, отображаемой в графической оболочке Windows Server 2016.
Отключение данной опции приводит к следующему изменению в системном реестре:
Windows Registry Editor Version 5.00

[HKEY_LOCAL_MACHINE\SOFTWARE\Microsoft\WindowsUpdate\UX\Settings]
"DeferUpgrade"=dword:00000000
Соответственно, для настройки серверов с Windows Server 2016 на явное отключение данной опции мы можем создать в доменной групповой политике, применяемой к серверам, объект GPP, настраивающий параметр реестра DeferUpgrade.

С помощью Item-level targeting можем указать то, что данный параметр реестра будет обновляться только на системах семейства Windows Server 2016.
Для оперативной проверки результата выполняем на конечном сервере обновление групповых политик и инициируем процедуру проверки обновлений:
gpupdate /force
UsoClient.exe startscan
Убедимся в том, что после применения GPO в реестре на серверных системах с Windows Server 2016 применились изменения и в графической консоли настроек системы опция «Defer feature updates» отображается в выключенном состоянии.
Все последующие проверки обновлений Windows теперь должны начать работать напрямую с WSUS без длительных попыток обращения к Интернет-службам Windows Update.
,
If you want to run Windows Update from Command Prompt or PowerShell in Windows 10/11, continue reading below.
Microsoft releases updates regularly to enhance security, fix bugs, and introduce new features that improve the functionality of Windows devices.
Windows updates are divided into 2 categories: Quality updates, which are constantly released for security reasons and to fix glitches, and Feature updates, which offer improved versions and additional features.
The usual way to update Windows 10/11 is by going to Settings > Update & Security and to check and install updates, but in some cases may needed to install updates from the command line or PowerShell if the usual way doesn’t work.

This tutorial contains instructions on how run Windows Update and install or uninstall Updates with commands in Command Prompt & PowerShell.
How to Check and Install Updates from PowerShell or Command Prompt in Windows 10/11 & Server 2016/2019.
- Part 1. Install Updates from Command Line.
- Part 2. Install Updates from PowerShell.
- Part 3. Uninstall Updates from PowerShell.
Part 1. How to Run Windows Update from Command Prompt.
In previous versions of Windows you could update Windows using the command «wuauclt /detectnow /updatenow».
In latest Windows 10 versions the command ‘WUAUCLT.EXE’ does not work anymore and has been replaced by the command ‘USOCLIENT.EXE’.
Info: The ‘USOCLIENT.EXE’ is the Update Session Orchestrator client that used to download and install Windows Updates. *
* Notes:
1. According to reports, not all Windows 10 and 11 versions support the USOCLIENT. If the same is true for your device, update your system using the PowerShell method.
2. Since USOCLIENT commands do not display anything on the screen at the time they are executed, the only way to determine if the command is working is to look at the events in the following destinations.
- C:\Windows\SoftwareDistribution\ReportingEvents.log
- Task Scheduler -> Microsoft -> Windows -> Update Orchestrator
To install updates with ‘USOCLIENT.EXE’, follow these steps:
1. Launch Command Prompt or PowerShell as an Administrator and ask Yes at the UAC prompt.
2. Force Windows to Check for Updates with one of the following commands: *
-
- UsoClient StartScan
- USOClient.exe StartInteractiveScan
* Note: Some users reported that in their case one command worked and not the other. To see which of the 2 commands works in your case open Windows Update at the same time as running the command to make sure that Windows is checking for updates.

3. After finding Updates, download them with one of the following commands:
-
- UsoClient StartDownload
- ScanInstallWait
4. Proceed to install downloaded updates with this command:
- UsoClient StartInstall
5. When the updates installed, reboot your pc with this command: *
- UsoClient RestartDevice
* Note: I suggest to wait at least 30 minutes before restarting your PC.

Part 2. How to Run Windows Update from PowerShell in Windows 10/11.
If you want to download and install Windows or Drivers updates using PowerShell commands, use the instructions below.
To Install Windows Updates from PowerShell:
1. Open PowerShell as Administrator.
2. Proceed and install the ‘PowerShell Windows Update module’ with this command and ask Yes (press ‘y’), when prompted to install any other provider needed: *
- Install-Module PSWindowsUpdate
* Notes:
1. The ‘PSWindowsUpdate’ is a necessary module to install updates from PowerShell. To see all the commands available in the module, give this command:
- Get-Command -module PSWindowsUpdate
2. By default the module only look for Windows and driver updates. If you have other Microsoft Products installed (e.g. Office), and you want to get updates for them too, give also this command:
- Add-WUServiceManager -MicrosoftUpdate

3. Then give the following command to allow the execution of scripts on your machine and ask Yes at the warning when prompted.
- Set-ExecutionPolicy -ExecutionPolicy RemoteSigned

4. Now force Windows to download and list all available updates in PowerShell. *
- Get-WindowsUpdate
5. Now proceed according to what you want:
A. To install all available Windows Updates from PowerShell give this command:
- Install-WindowsUpdate

B. To install all available Windows Updates and the updates for all other Microsoft Products, give this command:
- Install-WindowsUpdate -MicrosoftUpdate
C. To install a specific Windows Update from PowerShell, give this command and ask Yes (y) when prompted: *
- Get-WindowsUpdate -KBArticleID «KB-Number” -Install
e.g. to install the KB5005463 in this example:
- Get-WindowsUpdate -KBArticleID «KB5005463» -Install

D. To prevent a Windows Update from being installed, give this command in PowerShell:
- Get-WindowsUpdate -NotKBArticle “KB-Number” -AcceptAll
e.g. to prevent the installation of the KB5005463 in this example:
- Get-WindowsUpdate -NotKBArticle “KB5005463” -AcceptAll

E. To exclude specific categories from updating, (e.g. the «Driver updates or the Feature updates, give this command:
- Install-WindowsUpdate -NotCategory «Drivers»,»FeaturePacks» -AcceptAll
Part 3. How to Uninstall Windows Updates from PowerShell.
To remove Updates using PowerShell:
1. Open PowerShell as Administrator.
2. In the PowerShell window, give the following command to get a list of all installed updates.
- wmic qfe list brief /format:table

2. Take note of the KB number associated with the Windows Update you wish to remove.

3. Now execute the following command to remove the desired update in PowerShell:
- wusa /uninstall /kb:Number
Note: Replace ‘Number’ with the KB number of the update you want to remove. For example: to remove the KB5005635 give this command:
- wusa /uninstall /kb:5005635

That’s it! Which method worked for you?
Let me know if this guide has helped you by leaving your comment about your experience. Please like and share this guide to help others.
If this article was useful for you, please consider supporting us by making a donation. Even $1 can a make a huge difference for us in our effort to continue to help others while keeping this site free:
- Author
- Recent Posts
Konstantinos is the founder and administrator of Wintips.org. Since 1995 he works and provides IT support as a computer and network expert to individuals and large companies. He is specialized in solving problems related to Windows or other Microsoft products (Windows Server, Office, Microsoft 365, etc.).