
Технология NIC Teaming (или Load Balancing/Failover – LBFO, или NIC bonding) позволяет объединить несколько физических сетевых адаптеров (NIC) в одну логическую сетевую карту. В этой статье мы рассмотрим, как настроить NIC Teaming в Windows Server 2019/2016/2012R2 и в десктопых версиях Windows 10 и 11.
Содержание:
- Настройка NIC Teaming в Windows Server 2019
- Используем PowerShell для настройки NIC Teaming в Windows Server
- Создаем группу сетевых адаптеров NIC Teaming в Windows 10 и 11
Для чего может понадобится объединять сетевые адаптеры в группу NIC Teaming?
- Увеличение пропускной способности. Например, объединив две сетевые 1 Гб сетевые карты в одну группу NIC Teaming, вы получите общую полосу пропускания на логическом адаптере 2 Гбит/с;
- Управление балансировкой нагрузки на сетевые карты – можно управлять распределением трафика между NIC сервера;
- Отказоустойчивость – при выходе из строя любой из сетевых карт, добавленных в группу NIC teaming, остальные подхватывают ее функции, и связь с сервером не прерывается. Для критически важных серверов этот механизм может защитить от простоя сервиса во время выхода из строя сетевого коммутатора или Ethernet порта на нем, сетевого кабеля (которым ваш хост подключен к коммутатору). Для реализации такой возможности, достаточно подключить сетевые карты в разные физические коммутаторы.
В Windows Server 2012R2/2016/2019/2022 технология NIC Teaming не совместима с Single-root I/O virtualization (SR-IOV), TCP Chimney и Remote Direct Memory Access (RDMA).
Настройка NIC Teaming в Windows Server 2019
Вы можете настроить NIC Teaming в Windows Server начиная с версии 2012. Рассмотрим, как объединить несколько сетевых адаптеров в Windows Server 2019 в одну группу NIC Teaming. Режим NIC Teaming по умолчанию отключен в Windows Server.
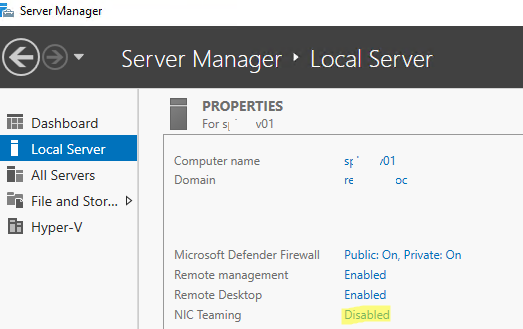
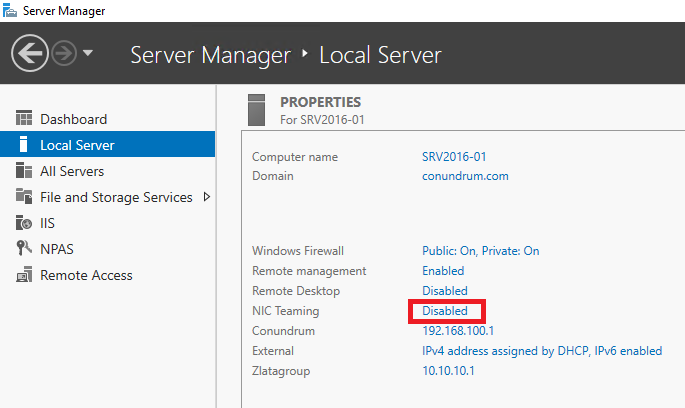
Чтобы включить его, откройте консоль Server Manager, выберите локальный сервер (Local Server) и в его свойствах выберите пункт “NIC Teaming: Disabled“.
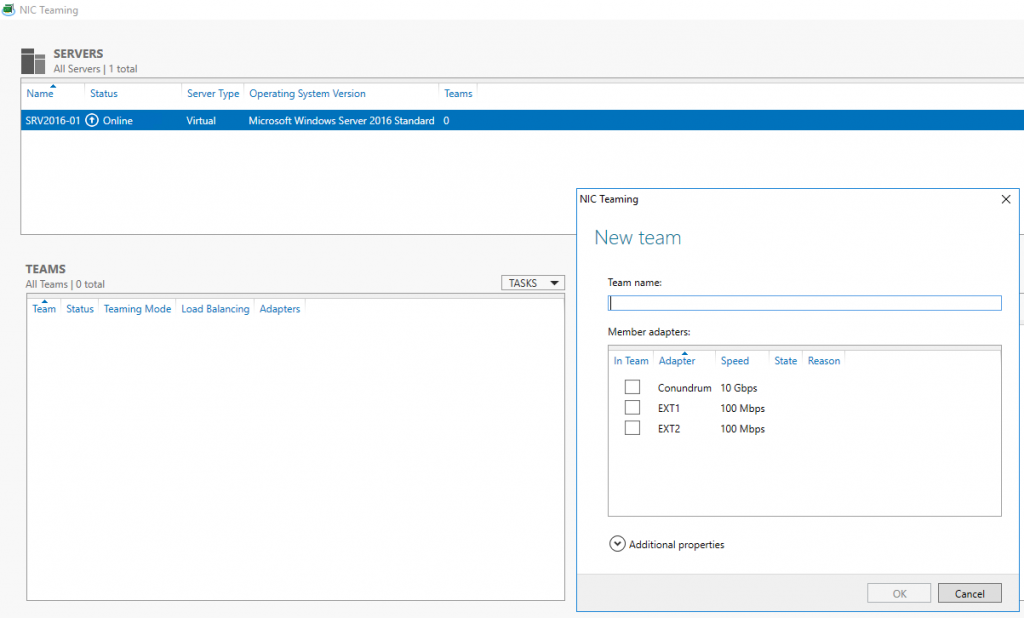
В появившемся окне в левой нижней панели выберите пункт Tasks -> New Team (Создать группу).
Далее нужно указать имя группы (Team Name) и выбрать сетевые адаптеры, которые будут входить в эту группу.
В Windows Server 2019 в одну NIC Teaming групп можно объединить до 32 физических сетевых адаптеров, главное, чтобы они работали на одной скорости.
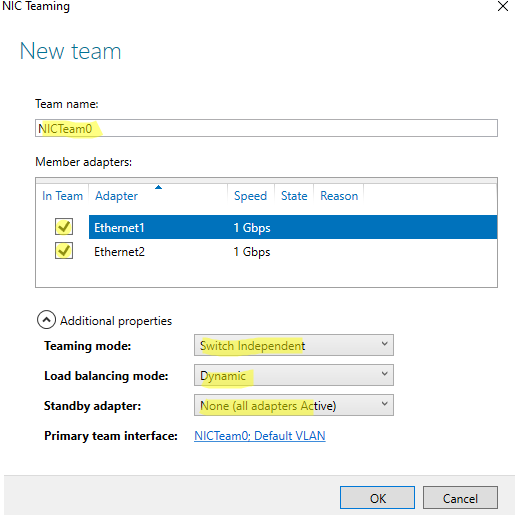
Ниже можно настроить специальные параметры группы. От данных параметров зависит правила и эффективность NIC Teaming. Рассмотрим эти настройки подробнее.
Режим поддержки групп (Teaming Mode). Данный параметр определяет способ взаимодействия группы с сетевым оборудованием (коммутатором)
- Static Teaming (IEEE 802.3ad)— статический режим работы с зависимостью от сетевого оборудования. Все адаптеры группы должны быть подключены к одному коммутатору, Ethernet порты которого настроены на использование статической агрегации каналов (требуется настройка на коммутаторе);
- Switch Independent (режим по-умолчанию) – группа работает независимо от коммутатора, для реализации не нужно дополнительно настраивать сетевое оборудование. В этом режиме разные сетевые адаптеры группы можно подключить к разным коммутаторам для повышения отказоустойчивости (защита от сбоев в коммутаторах);
- LACP (Link Aggregation Control Protocol, LACP, IEEE 802.1ax) – режим также зависит от сетевого оборудования. Нужно включить и настроить на коммутаторе динамическую агрегацию каналов по протоколу LACP.
Режим балансировки нагрузки (Load Balancing mode) – задает как распределяется сетевой трафик по NIC в группе.
- Address Hash — для каждого из адаптеров вычисляется специальный хэш (на основании MAC или IP-адресов отправителя и получателя) и привязывается определенному физическому адаптеру. Весь трафик от данного отправителя будет идти через этот NIC;
- Hyper-V Port — режим можно использовать для сервера с ролью Hyper-V. Позволяет привязать конкретный адаптер группу NIC teaming к конкретному порту на виртуальном коммутаторе Hyper-V;
- Dynamic – опция по умолчанию, совмещает оба типа балансировки нагрузки.
Один из адаптеров в группе можно назначить резервным (Standby adapter). В обычном режиме работы данная NIC не используется для передачи трафика. При неполадке на любом другом адаптере в группе NIC Teaming, он тут-же занимает его место. В общем случае и без данной функции при выходе из строя любой сетевой карты, не будет простоя сервиса, т.к. ее нагрузка автоматически распределится между оставшимися картами в группе.
Выберите нужные параметры, нажмите ОК и новая группа Nic Teaming будет создана.
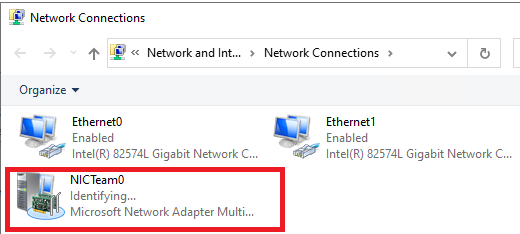
Откройте список сетевых подключения в панели управления Windows. Убедитесь, что в Windows Server появился новый сетевой адаптер Microsoft Network Adapter Multiplexor Driver (его иконка немного отличается). Это и есть виртуальный адаптер группы NIC Teaming.
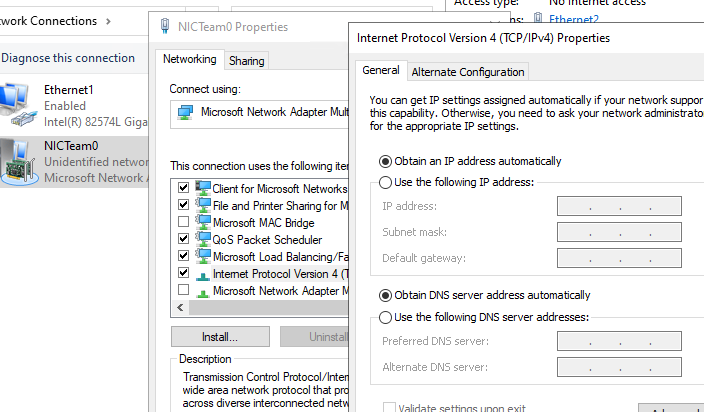
Дальнейшая настройка параметров сетевой карты (протоколы, IPv4/v6 адрес) осуществляется теперь в свойствах этого адаптера.
У всех остальных сетевых адаптеров, которые вы добавили в группу NIC Teaming уже не будет собственных IP адресов.
При удалении группы NIC Teaming предыдущие настройки сетевых адаптеров восстанавливаются.
В дальнейшем вы можете добавить или удалить сетевые адаптеры в группу NIC Teaming.
Вы можете использовать группу NIC Teaming для настройки нескольких VLAN интерфейсов в Windows Server. Для этого можно даже создать группу NIC Teaming из одного сетевого адаптера.
Используем PowerShell для настройки NIC Teaming в Windows Server
Вы можете создавать и управлять группами NIC Teaming не только из графического интерфейса Windows, но и с помощью PowerShell. Вы можете использовать PowerShell для настройки NIC Teaming в Windows Server Core
В Windows Server для управления MIC Teaming есть встроенный модуль NetLbfo. Выведите список сетевых адаптеров на сервере:
Get-NetAdapter

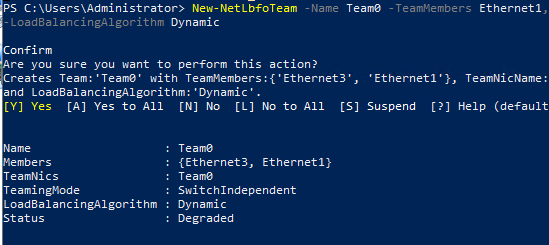
Создайте новую группу с Team0 из адаптеров с именами Ethernet1 и Ethernet3. Выберите режим работы NIC Teaming: Switch Independent с динамической балансировкой.
New-NetLbfoTeam -Name Team0 -TeamMembers Ethernet1,Ethernet3 -TeamingMode SwitchIndependent -LoadBalancingAlgorithm Dynamic
Доступные параметры:
- TeamingMode:
Static
,
SwitchIndependent
,
Lacp - LoadBalansingAlgorithm:
TransportPorts
,
IPAddresses
,
MacAddresses
,
HyperVPort
,
Dynamic
Информацию о группах NIC Teaming на сервере можно вывести с помощью команды:
Get-NetLbfoTeam
Name : Team0
Members : {Ethernet3, Ethernet1}
TeamNics : Team0
TeamingMode : SwitchIndependent
LoadBalancingAlgorithm : Dynamic
Status : Up
Можно настроить IP адрес интерфейса NIC Teaming с помощью PowerShell:
New-NetIPAddress -InterfaceAlias team0 -IPAddress 192.168.13.100 -PrefixLength 24 -DefaultGateway 192.168.13.1
Set-DnsClientServerAddress -InterfaceAlias team0 -ServerAddresses 192.168.13.10
Выполните команду
Get-NetAdapter
. Обратите внимание, что LinkSpeed сетевого адаптера группу NIC Teaming — 2 Гбит/с.

Чтобы изменить настройки группы NIC Teaming используется командлет Set-NetLbfoTeam:
Set-NetLbfoTeam -Name team0 -TeamingMode LACP
Если выполнить эту команду в ВМ, появится ошибка
Set-NetLbfoTeam : 'SwitchIndependent' is the only TeamingMode value supported in a Virtual Machine
Чтобы через NIC Teaming добавить отдельный VLAN интерфейс, используйте команду:
Add-NetLbfoTeamNIC -Team Team0 -VlanID 10
Удалить группу NIC Team можно командой:
Remove-NetLbfoTeam -Name Team0
Создаем группу сетевых адаптеров NIC Teaming в Windows 10 и 11
Вы можете использовать NIC Teaming для объединения сетевых карт не только в Windows Server, но и в клиентских версиях Windows 10 и 11. Главное, чтобы производитель вашей сетевой карты поддерживал для нее режим Link aggregation / NIC teaming/ LBFO.
Например, NIC Teaming работает из коробки с драйверами картами Realtek PCIe GbE Family Controller ( 10.35.510.2019) или Intel(R) 82574L Gigabit Network Connection.
Чтобы собрать группу NIC Teaming в Windows 10 (в этом примере это Windows 10 20H2), откройте консоль PowerShell и выведите список сетевых адаптеров:
Get-NetAdapter
Соберем группу NIC Team из адаптеров Ethernet0 и Ethernet1.
New-NetSwitchTeam -Name "MyNICTeam" -TeamMembers "Ethernet0","Ethernet1"

Проверьте, что в системе появился новый интерфейс NIC Teaming.
Get-NetSwitchTeam
Не забудьте задать для него сетевые настройки. Теперь у вас появился новый интерфейс с пропускной способностью 2 Гбит/с.

Для удаления созданной группы NIC Team, также нужно использовать PowerShell:
Remove-NetSwitchTeam -Name "MyNICTeam"
Прочитано: 6 354
Задача: Самостоятельно проработать, как поднять/организовать Nic Teaming средствами Windows Server 2016 в GUI составляющей. Ранее я уже делал, но использовал Windows Server 2008 R2, а тут хочу посмотреть также это все легко или есть определенные нюансы.
Итак, под Virtualbox развернута виртуальная система с осью на борту Windows Server 2016 Standard (Microsoft Windows [Version 10.0.14393]) с двумя сетевыми адаптерами.
Авторизуюсь в системе с правами, либо локального администратора, либо Администратора домена.
Win + R — cmd.exe с правами Администратора (Обязательно)
C:\Users\Администратор>netsh interface teredo set state disabled
C:\Users\Администратор>netsh interface isatap set state disabled
C:\Users\Администратор>netsh interface 6to4 set state disabled

Win + R — control – Просмотр: Категория — Мелкие значки — Центр управления сетями и общим доступом и вижу, что система увидела два сетевых адаптера:
Чтобы сделать объединение сетевых интерфейсов в один для увеличения пропускной способности:
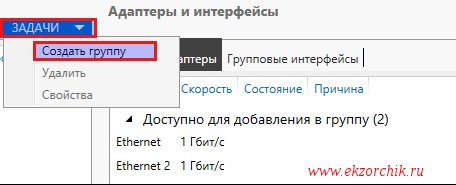
Win + R — control – Просмотр: Категория — Мелкие значки — Администрирование — Диспетчер серверов (ServerManager.exe) — Локальный сервер — по умолчанию настройка «Объединение сетевых карт» в состоянии «Отключено», щелкаю левой кнопкой мыши по настройке и перехожу в диалоговое окно «Объединение сетевых карт» (Приложение: LbfoAdmin.exe), в элементе «Группы» – «Задачи» – выбираю «Создать группу»
именую группу, к примеру:
Имя группы: nic
и отмечаю галочками сетевые интерфейсы которые буду объединять, также нужно через «Дополнительные свойства» указать режим работы объединенных интерфейсов:
- Режим поддержки групп: LACP или «Динамически» (но на коммутаторе куда подключен также нужно будет сделать объединение интерфейсов и назначить роль lacp)
- Режим балансировки нагрузки: → может принимать: Хэш адреса, Порт Hyper-V, Динамический, т. к. я не использую Hyper-V то и не указываю, а выбираю «Хэш адреса» это Вычисление хэша на основе портов позволяет распределять трафик более равномерно. Однако для трафика отличного от TCP или UDP применяется хэш на основе IP-адреса, для не IP-трафика – хэш на основе MAC-адресов.
- Резервный адаптер: выставлено и затемнено мастером “Нет (Все адаптеры активны)”. Если не указывать LACP, то можно сделать если линк на одном адаптере пропадает на его место встает другой.
Основной групповой интерфейс: nic (виртуальная локальная сеть по умолчанию)
и нажимаю кнопку «ОК»
Итого объединение интерфейсов в системе сформировано:
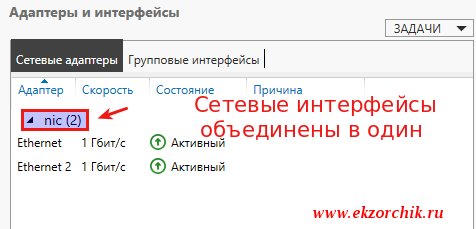
Если переключиться в оснастку: «Центр управления сетями и общим доступом», то будет видно, что сформировался/появился новый интерфейс, где уже ему Вы задаете либо статический IP-адрес (Маска, Шлюз), либо настройками коммутатора/маршрутизатора.
В случае если линк обрывается на одном сетевом интерфейсе, доступ к системе Вы не теряете.
Если обратить внимание на свойства первого и второго сетевого адаптера, то у них выставлена всего лишь одна настройка «Протокол мультиплексора сетевого адаптера», а у нового с именем группы nic:
- Клиент для сетей Microsoft
- Общий доступ к файлам и принтерам
- Планировщик пакетов QoS
- Microsoft Load Balancing/Failower Provider
- IP версии 4 (TCP/IPv4)
- IP версии 6 (TCP/IPv6) — снимаю галочку, так как не использую во всей сети.
- Отвечающее устройство обнаружение топологии (делает компьютер видимым в сети)
Ответчик обнаружения топологии канального уровня (используется для обнаружения других компьютеров, устройств и компонентов в сети).
Смотрю текущие настройки сети от DHCP–сервиса в локальной сети:
Win + R — cmd.exe с правами Администратора (Обязательно)
C:\Users\Администратор>ipconfig
Настройка протокола IP для Windows
Адаптер Ethernet nic:
DNS-суффикс подключения . . . . . :
IPv4-адрес. . . . . . . . . . . . : 172.40.40.6
Маска подсети . . . . . . . . . . : 255.255.255.0
Основной шлюз. . . . . . . . . : 172.40.40.1
Как видно, сетевой адрес получает лишь общий интерфейс, а не вспомогательные.
На заметку: Если Ваши наблюдения показываю, что объединение интерфейсов требуют изменения, то все также через оснастку «Объединения сетевых карт» можно поменять настройки. Вот только желательно это делать имея к системе еще один вид подключения, к примеру консоль Hyper-V, vSphere Client, iDRAC, IPMI и т. д. Чтобы если что не остаться у разбитого корыта и подстраховаться.
На заметку: Если физическое железо может на уровне железа объединять интерфейсы или использует специализированное программное обеспечение, то лучше делать через него, чем средствами Windows, а если не хочется от него зависить, то средствами операционной системы и не важно Windows это или Linux.
Вот на этом я прощаюсь, как я мог убедиться нет ничего сложно в настройке объединения сетевых карт в системе Windows Server 2016. Если у меня буду какие-либо дополнения и наблюдения, то я постараюсь отразить их в этой заметке. А пока у меня всё, с уважением автор блога Олло Александр aka ekzorchik.
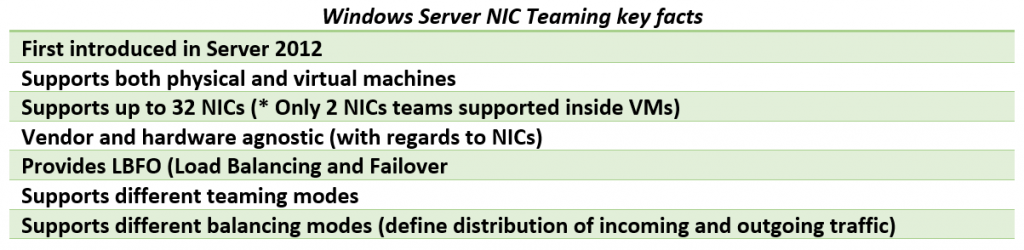
NIC teaming is not something we got with Windows Server 2016, but I just find it interesting to review this functionality as we have it in the current iteration of Windows Server, as usual, touching a bit on the basics and history of this feature.
The NIC teaming feature reached its maturity in Server 2012 R2, and there have been (almost) no major changes in this department in Server 2016, yet if you are just starting out with a practical use of NIC teaming on prepping for any related Microsoft exam you may find it useful to review this feature thoroughly.
Link Teaming was first introduced as OOB feature in Windows Server 2012 with the intent to add simple affordable traffic reliability and load balancing for server workloads. First-hand explanations from pros of this feature by Don Stanwyck, who was the program manager of the NIC teaming feature back then, can be found here. But long story short, this feature gained special importance because of the arrival of virtualization and high-density workloads: knowing how many services can be run inside of multiple VMs hosted by a Hyper-V host, you just cannot afford connectivity loss, which impacts all of them. This is why we got NIC teaming: to safeguard against a range of failures from plain accidental network cable disconnection to NIC or switch failures. The same workflow density pushes for increased bandwidth too.

Conventional Disaster Recovery options for virtualized IT environments running on Microsoft Windows Server 2016
Learn from this video about:
- What you should prepare your IT environment for
- Storage Replica vs. Veeam Backup & Replication vs. Hyper-V Replica
- Demonstrating each disaster recovery site option in use
Free of Charge. No Registration.
In a nutshell, Windows Server NIC teaming provides hardware-independent bandwidth aggregation and transparent failover suitable both for physical and virtualized servers. Before Server 2012, you had to rely on hardware/driver based NIC teaming which obliged you to buy NICs from the same vendor and rely on third party software to make this magic happen. This approach had some major shortcomings, e.g.: you were not able to mix NICs from different vendors inside the team, and each vendor had its own approach to the management of teaming, and such implementations also lacked remote management features – basically it was not simple enough. Once Windows Server NIC teaming was introduced, hardware specific teaming solutions fell out of common use as it no longer made sense for hardware vendors to reinvent the wheel/offer functionality, which is better handled by the OOB Windows feature that simply supports any WHQL certified Ethernet NIC.
Like I said earlier, Windows Server 2016 did not introduce any major changes to NIC Teaming except for Switch Embedded Teaming, which is positioned to be the future way for teaming in Windows. Switch Embedded Teaming or SET is an alternative NIC Teaming solution that you can use in environments that include Hyper-V and the Software Defined Networking (SDN) stack in Windows Server 2016. SET integrates some NIC Teaming functionality into the Hyper-V Virtual Switch.
On the LBFO teaming side, Server 2016 added the ability to change LACP timer between a slow and fast one – which may be important for those who use Cisco switches (there seems to be an update allowing you to do the same in Server 2012 R2).
Gains and benefits of Windows Server NIC teaming are somewhat obvious, but what can give you a hard time (especially if you’re in for some Microsoft exams) is the attempt to wrap your head around all possible NIC teaming modes and their combinations. So, let’s see if we can sort out all these teaming modes, which can be then naturally configured both via GUI and PowerShell.
Let’s start with teaming modes as it is the first step/decision to make when configuring NIC teaming. There are three teaming modes to choose from: Switch Independent and two Switch Dependent modes – LACP and static.
Switch Independent mode means we don’t need to configure anything on the switch and everything is handled by Windows Server. You can attach your NICs to different switches in this mode. In this mode, all outbound traffic will be load balanced across the physical NICs in the team (exactly how, will depend on the load balancing mode), but incoming traffic won’t be load balanced as in this case switches are unaware about the NICs team (this is an important distinction which sometimes takes a while to spot, especially, if you frame your question to Google as something like “LACP VS switch independent performance” or something along these lines).
Switch dependent modes require configuring a switch to make it aware of the NICs team and NICs have to be connected to the same switch. Once again, quoting official documentation: “Switch dependent teaming requires that all team members are connected to the same physical switch or a multi-chassis switch that shares a switch ID among the multiple chassis.”
There are a lot of switches allowing you to try this at home, for example, I have a quite affordable yet good D-Link DGS-1100-18 switch from DGS-1100 Series of their Gigabit Smart Switches. This switch has support for 802.3ad Link Aggregation supporting up to 9 groups per device and 8 ports per group and costs around 100 EUR at this point in time.
Static teaming mode requires us to configure the individual switch ports and connect cables to specific switch ports, and this is why it is called static configuration: we assign static ports here and if you connect a cable to a different port, you’ll break your team.
LACP stands for Link Aggregation Control Protocol and, essentially, it is the more dynamic version of switch dependent teaming, meaning that you configure the switch rather than individual ports. Once the switch is configured, it becomes aware about your network team and handles dynamic negotiation of the ports.
In both of the switch dependent teaming modes, your switches are aware about the NICs team and, hence, can load balance incoming network traffic.
To control how load distribution is handled, we have a range of load balancing modes (you can think about them as “load balancing algorithms”), which include: address hash, Hyper-V port and Dynamic mode which was first introduced in Server 2012 R2.
Address hash mode uses attributes of network traffic (IP address, port and MAC address) to determine which specific NIC traffic should be sent.
Hyper-V port load balancing ties a VM to specific NIC in the team, which may work well for Hyper-V host with numerous VMs on it, so that you distribute their NIC traffic across multiple NICs in your team, but if you have just a few VMs, this may not be your best choice as it leads to underutilization of NICs within the team.
Dynamic is a default option introduced in Server 2012 R2, which is recommended by Microsoft and gives you the advantages of both previously mentioned algorithms: it uses address hashing for outbound and Hyper-V port balancing for inbound, with additional logic built into it, to rebalance in case failures/traffic breaks within the team.
So now that we covered the things you’re supposed to know to make informed NIC teaming configuration decisions or take Microsoft exams, let’s have a look at the practical side of configuring this.
GUI way to manage NIC teams available through Server Manager – you just click on the Disabled link for NIC teaming to start the configuration process:
This will get you into the NIC teaming console where things are straightforward and easy (provided you read the first half of this article):
In case you are doing this VM, you may notice that your choices in Additional properties of New team dialog may be limited to switch independent mode and Address Hash distribution mode, so that two first drop downs are greyed out/inactive – this simply means that we have to review what’s supported and required when it comes to NIC teams inside VMs. From the supportability point of view, only two member NIC teams are supported by Microsoft, and NICs participating in the team have to be connected to two different external Virtual Switches (which means different physical adapters). And with all these requirements met inside VMs, NIC Teams must have their Teaming mode configured as Switch Independent and Load Balancing mode for the NIC Team in a VM must be configured with the Address Hash distribution mode.
After looking at these limitations, it is tempting to say that it is better to go for configuring NIC teaming on the Hyper-V host itself and just don’t use it inside a VM. But I bet there may be the use case for doing teaming inside of a VM – just can’t think of anything right now (if you do – just let me know in the comments to this blog post).
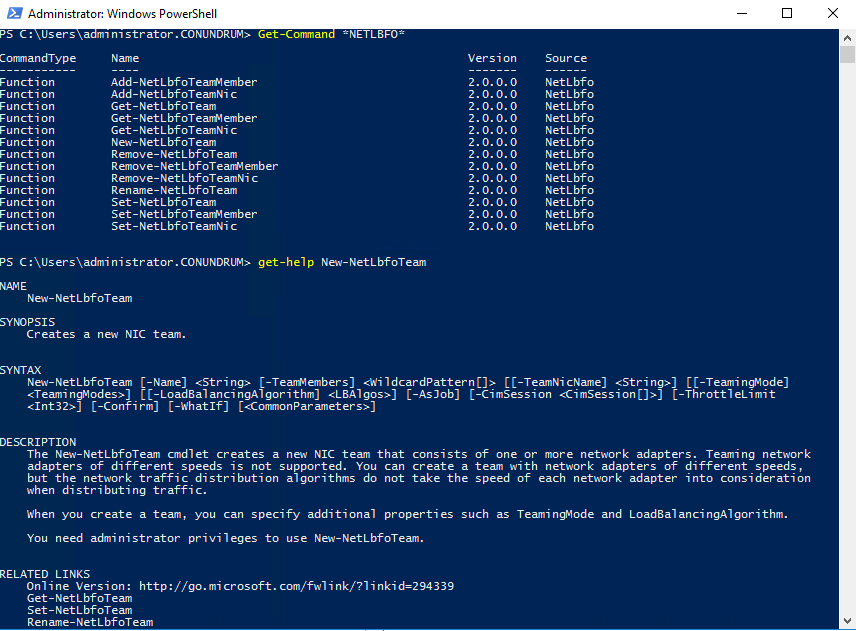
In case you want to manage NET teaming via PowerShell, you can get all the required information in NetLbfo Module documentation on TechNet, or just issue Get-Command *NETLbfo* and further on leverage Get-Help as necessary:
I think this blog post provided enough information to get you started with NIC teaming, especially, if you have not read anything on it just yet. If you had known most of the stuff already, maybe things are clearer on the Switch Independent VS Switch Dependent dilemma now. All in all, in the current versions of Windows Server, Microsoft did a great job making this functionality as easy to use as possible and pushing it forward via the GUI, so that it sits right in Server Manager, literally asking you to set it up. In case you want to go into details with that, I would recommend you read a great document from Microsoft – “Windows Server 2016 NIC and Switch Embedded Teaming User Guide,” which will give you complete and detailed guidance about all facets of NIC teaming in Server 2016 (old versions of this document are still available, too, both for 2012 and 2012 R2 versions of Windows, and the current Microsoft documentation on NIC teaming is also very good).
- How to Deploy Switch Embedded Teaming (SET) Using SCVMM 2016?
- Hyper-V Networking 101. Part 1: NICs and Switches
What is NIC Teaming?
NIC Teaming allows you to combine up to 32 network adapters and then use them as a single network interface. NIC Teaming provides redundancy, allowing network communication to occur over the combined network interface even when one or more of the network adapters fail. The combination of network adapters also increases the bandwidth available to the combined network interface. NIC Teaming is a feature that is available in the Windows Server 2016 operating system. Both the Hyper-V host and the Hyper-V virtual machines can use the NIC Teaming feature. A NIC team can contain only one network adapter, but when it has only one network adapter, the NIC team cannot provide load balancing and failover. Still, you can use a NIC team with only one network adapter in it for the separation of network traffic when you are also using virtual local area networks (VLANs).
For more information, please browse to : https://docs.microsoft.com/en-us/windows-server/networking/technologies/nic-teaming/nic-teaming
Lets get started.
1 – Open Server Manager, and then on the Tools, click Hyper-V Manager.

2 – Right-click on VM Settings as shown in image below.

3 – Go to Adapter then Advanced Features, tick Enable this network adapter to be part of a team in the guest operating system.

4 – In the Server Manager console tree, click the Local Server node.

5 – In the Properties details pane, next to the NIC Teaming item, click the Disabled hyperlink.
6 – In the NIC Teaming diog box, in the Adapters and Interfaces pane, click LAN 001, and then in the Tasks list, select Add to new team.

7 – In the Add to new team dialog box, in the Team name box, type Host NIC Team, and Member adapters list Select NIC LAN 002, then click OK.

8 – In the NIC Teaming dialog box, in the Teams pane, note the following details:
a. Team: Host NIC Team
b. Status: OK
c. Teaming Mode: Switch Independent
d. Load Balancing: Address Hash
e. Adapters: 2

9 – Verify that Your Server.

that’s all for now.., any Doubts type a commend.. 🙂
How to Create/Configure a NIC Teaming on Server 2016/ 2012 Physical and VM’s

NIC Teaming Overview
NIC Teaming, also known as load balancing and failover (LBFO), allows multiple network adapters on a computer to be placed into a team for the following purposes:
- Bandwidth aggregation
- Traffic failover to prevent connectivity loss in the event of a network component failure
This feature has been a requirement for independent hardware vendors (IHVs) to enter the server network adapter market, but until now NIC Teaming has not been included in Windows Server operating systems.
Also the NIC teaming allows you to team up to 32 interfaces in one single group which provides you better performance and redundancy.
More Info:
https://technet.microsoft.com/en-us/windows-server-docs/networking/technologies/nic-teaming/nic-teaming
Creating a NIC Teaming and assigning VLAN and IPV4 Step by Step
I’ve made this tutorial on a Hyper-V 2016 Virtual Machine with Server 2016 and 4 Virtual NICs. This will be applicable to physical hosts as well.
Go to your Server Manager Console, then Click on Local Server .

On Local Server view, select Disable on the NIC Teaming to open the NIC Teaming window.

On the NIC Teaming window, click under the TEAMS section TASKS then New Team.

On the New Team page, set Name and Select the Adapters that you would like to add to your new team.

On the New Team Page, expand the Additional Properties and select the <YourTeamName> Default VLAN then Configure VLAN ID.

After assigning the VLAN ID then you should be able to complete your NIC Team.

Now that your new Team is created you should be able to assign an IP by going to the properties of your Multiplexor NIC Team Adapter as displayed below.


This is it now you have created your NIC teaming configuration. There are other extension which I will cover soon which talks about Converged Networks, configuring the easy way and also understating their benefits and usage.
Thanks for watching !
Follow me on twitter @davidiacevedo