
В этой статье мы покажем, как настроить сервер централизованной аутентификации, авторизации и аккаунтинга (RADIUS) на операционной системе Windows Server 2016, а также как настроить Radius-аутентификацию на Cisco устройствах с помощью службы Политики сети и доступа (Network Policy Server).
RADIUS (англ. Remote Authentication in Dial-In User Service) — протокол для реализации аутентификации, авторизации и сбора сведений об использованных ресурсах, разработанный для передачи сведений между центральным севером и различными сетевым оборудованием и клиентами.
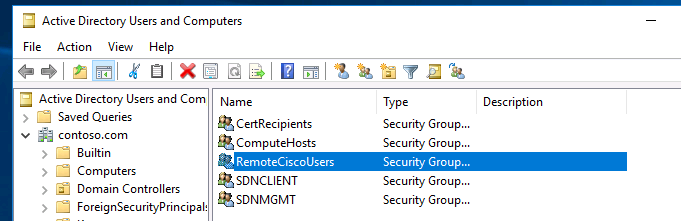
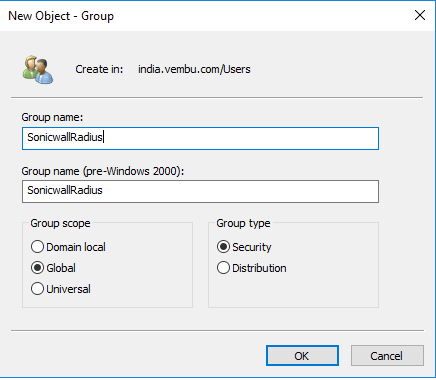
В первую очередь создайте в домене Active Directory группу безопасности AllowRemoteCiscoUsers, в которую нужно добавить пользователей, которым будет разрешена аутентификации на маршрутизаторах и коммутаторах Cisco.
Далее нужно установить на сервере, с помощью которого будет выполнятся аутентификация клиентов и назначаться права доступа, роль RADIUS сервера. Для этого на сервере Windows Server 2016 откройте оснастку Server Manager и вызовите мастер добавления ролей — Add Roles and features.
В открывшемся мастере на шаге выбора ролей отметьте роль Network Policy and Access Services. На шаге выбора служб роли в нашей ситуации достаточно будет выбрать только службу Network Policy Server.
Протокол Remote Authentication Dial In User Service (RADIUS) в Windows Server 2016 включен в состав роли Network Policy Server.
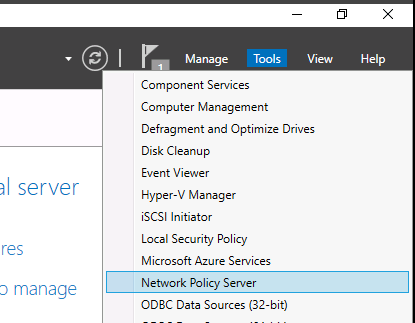
В консоли Server Manager выберите меню Tools и откройте консоль Network Policy Server (nps.msc).
Для полноценного использования NPS-сервера в домене необходимо зарегистрировать его в домене Active Directory. В оснастке на NPS, щелкните ПКМ по вашему NPS узлу и выберите Register server in Active Directory.
Подтвердите регистрацию сервера в Active Directory:
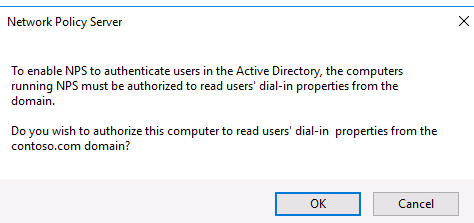
При этом мы должны предоставите серверу полномочия на чтение свойств учётных записей пользователей, касающихся удалённого доступа. Сервер при этом будет добавлен во встроенную доменную группу RAS and IAS Servers.
Теперь можно добавить клиента Radius. Для этого в дереве консоли NPS разверните раздел RADIUS Clients and Servers и на элементе RADIUS Clients выберите пункт New.
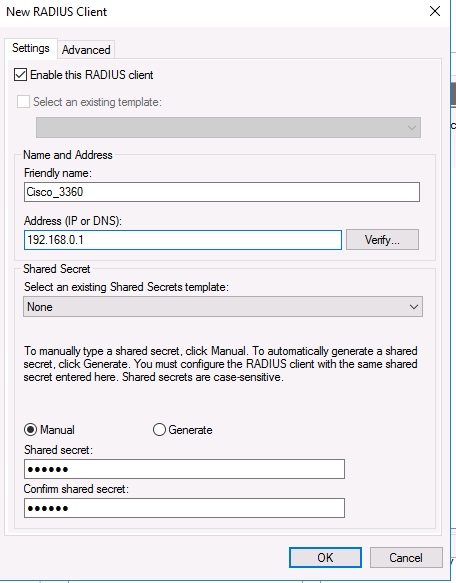
На вкладке Settings заполните поля Friendly name, Client address (можно указать IP адрес или DNS имя подключающегося сетевого устройства) и пароль — Shared Secret + Confirm shared (этот пароль вы будете использовать в настройках коммутатора или маршрутизатора Cisco для установления доверительных отношений с Radius сервером).
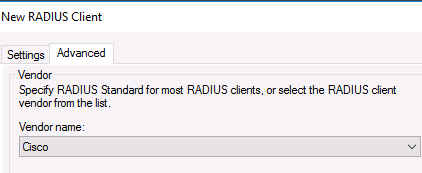
Во вкладке Advanced выберите в поле Vendor name — Cisco.
Теперь нужно создать политики доступа на сервере RADIUS. С помощью политик доступа мы свяжем клиента Radius и доменную группу пользователей.
Раскройте ветку Policies —> Network Policies, и выберите пункт меню New:
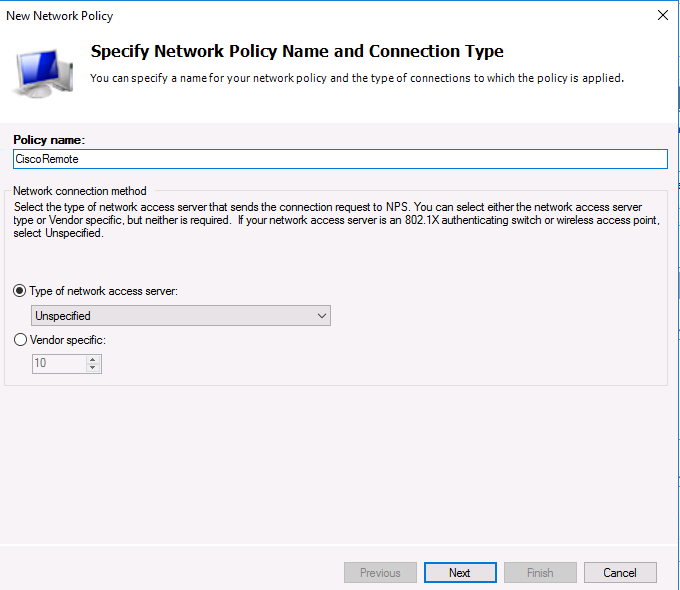
Укажите Имя политики (Policy name). Тип сервера доступа к сети (Type of network access server) оставьте без изменения (Unspecified):
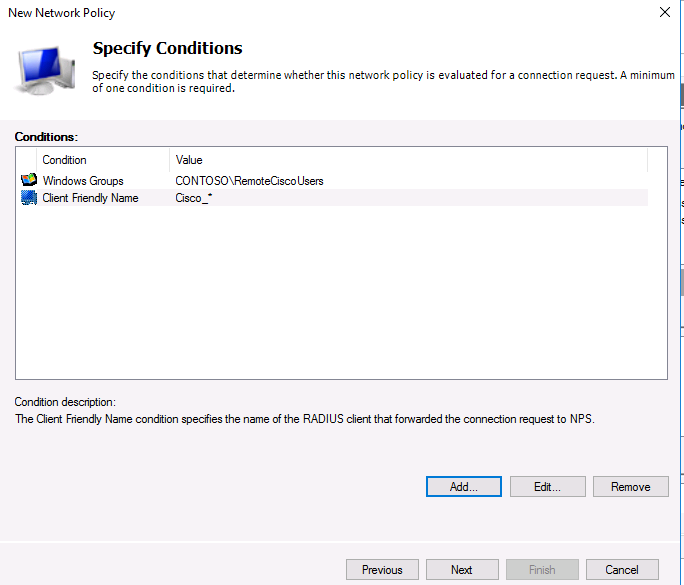
На следующем шаге Specify conditions нам нужно добавить условия, при которых будет применяться данная политика RADIUS. Добавим два условия: вы хотите, что для успешной авторизации пользователь входил в определенную доменную группу безопасности, и устройство, к которому осуществляется доступ, имело определённое имя. С помощью кнопки Add добавим сначала условие, выбрав тип Windows Group (добавьте группу RemoteCiscoUsers) и укажите Client Friendly Name (Cisco_*).
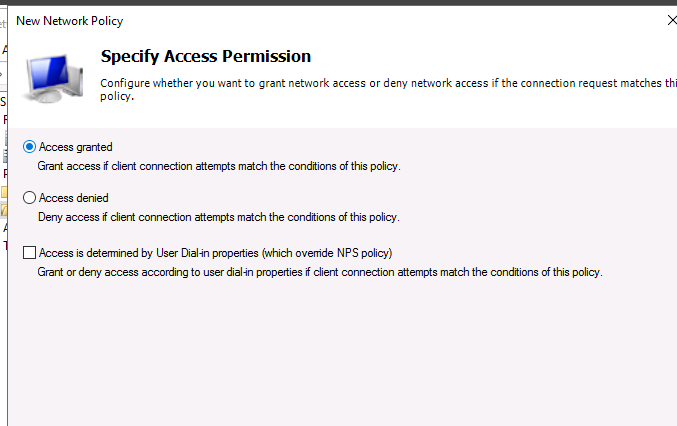
На следующем выберите значение Доступ разрешен (Access Granted).
Т.к. наш коммутатор Cisco поддерживает только метод аутентификации Unencrypted authentication (PAP, SPAP), снимите все остальные флажки.

Следующий шаг настройки ограничений (Constraints) мы пропустим.
В разделе Configure Settings перейдите секцию RADIUS Attributes -> Standard. Удалите имеющиеся там атрибуты и нажмите кнопку Add.
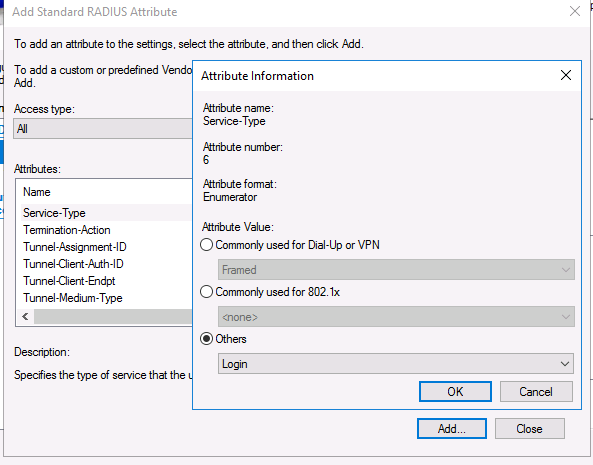
Выберите Access type -> All, затем Service-Type->Add. Укажите Others=Login.
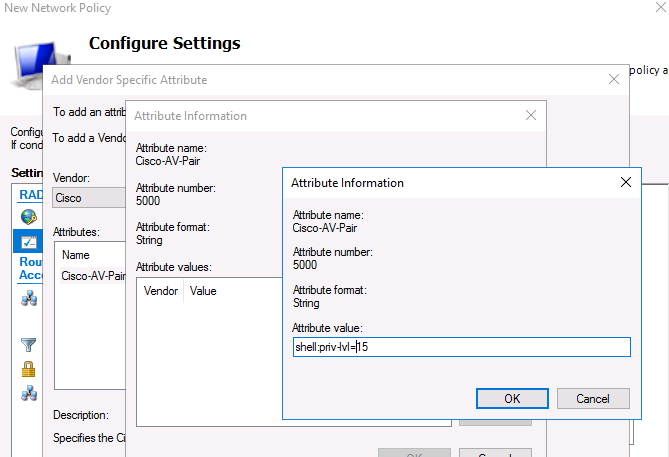
Теперь в секции RADIUS Attributes -> Vendor Specific добавьте новый атрибут. В пункте Vendor, найдите Cisco и нажмите Add. Здесь нужно добавить сведения об атрибуте. Нажмите Add и укажите следующее значение атрибута:
shell: priv-lvl = 15
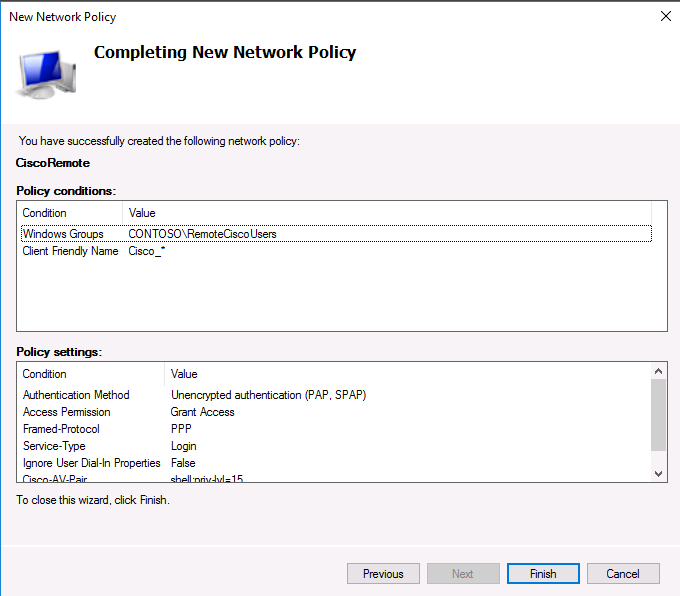
На последнем экране будут указаны все созданные вами настройки политики NPS. Нажмите Finish:
При создании и планировании политик обратите внимание на то, что имеет значение их порядок. Политики обрабатываются сверху вниз, и все условия очередной политике соблюдены, эта политика применяется к клиенту, а дальнейшая обработка других политик прекращается. То есть с точки зрения безопасности и разрешения конфликтов между политиками правильнее будет располагать политики в порядке возрастания административных полномочий.
После создания политики, можно переходить к настройке маршрутизаторов и коммутаторов Cisco для аутентификации на сервере Radius NPS.
AAA работает таким образом, что, если не получен ответ от сервера, клиент предполагает, что аутентификация не выполнена. Чтобы не потерять доступ к своим сетевым устройствам, которые вы переключаете на авторизацию на Radius сервера, обязательно создайте локальных пользователей на случай если RADIUS сервер станет недоступен по какой-либо причине.
Ниже пример конфигурации для авторизации на Radius (NPS) сервере для коммутатора Cisco Catalyst:
aaa new-model
aaa authentication login default group radius local
aaa authorization exec default group radius if-authenticated
radius-server host 192.168.1.16 key R@diu$pa$$
service password-encryption
На этом минимальная настройка коммутатора закончена и можно испытать новый механизм аутентификации и авторизации в действии.
Наконец «Долгая дорога в дюнах» закончилась, и мы пришли к корпоративному управляемому Wi-fi решению. В начале думали про решение Cisco или Aruba, но к сожалению текущий бюджет никак не располагает к решениям подобного плана. В итоге, в ходе долгих поисков истины и раздумий, решили остановиться на решении Ubnt (отдельно благодарю Александра за нужные советы). Конечно, это не одного поля ягоды с решением Cisco или Aruba, но в текущей ситуации, что есть, то есть.
Как говорил мой командир: «На пожаре и Х… водопровод» (да простят меня за мой русский).
Итак, решение выбрано, задача настроить корпоративный внутренний и гостевой сегменты Wi-fi с авторизацией на Radius сервере.
VPN сервер уже готов, осталось настроить RADIUS, сегодня как раз об этом. На первый взгляд, развернуть и настроить RADIUS сервер, не такая уж сложная задача, но немного загнались с сертификатом, пришлось «поплясать с бубном», ну об этом далее по порядку.
Для начала необходимо запросить сертификат с Центра сертификации, центр сертификации у нас уже есть, поэтому его установку в этом посте я пропущу.
MMC-Файл-Добавить или удалить оснастку-Добавляем Сертификаты-Учетной записи компьютера-Локальным компьютером.
Находим наш центр сертификации

Запрашиваем сертификат (*.p12), сохраняем его на диск, далее устанавливаем его в Личные сертификаты на будущий радиус сервер

Далее добавляем роль самого RADIUS сервера

Далее запускаем Сервер политики сети

Добавляем в раздел RADIUS-клиенты свои Wi-fi точки доступа или сервер управления точками доступа если он поддерживает эту возможность (в этом случае он будет выполнять роль RADIUS клиента)

Общий секрет, указываем тот, который в последствии укажем на Wi-fi точке (IP адрес точки в той подсети, где она находится).
Переходим к политике запросов на подключение


Вот тут, если нажать на:защищенные EAP(PEAP)-Изменить, мы должны видеть свой сертификат, если он был правильно запрошен и установлен.

Далее настраиваем Сетевые политики


На первый взгляд настройка RADIUS сервера на этом закончена, но это еще не все.
На эту тему есть четкие рекомендации, про которые я совсем забыл (спасибо Александру, что он напомнил):
https://technet.microsoft.com/en-us/library/cc754198.aspx?f=255&MSPPError=-2147217396
если сервер не включен в группу RAS and IAS, то его надо туда добавить:
https://msdn.microsoft.com/en-us/library/cc754878(v=ws.11).aspx
На всякий случай проверяем, что все так, как должно быть, открываем на сервере локальную политику (gpedit.msc)
И проверяем следующий пункт

Далее на точке или точках Wi-fi указываем авторизацию WPA Enterprise.

Здесь же хотел поблагодарить Романа, за подробные разъяснения по неясным моментам по серверу управлению Wi-fi и настройкам непосредственно Wi-fi.
И получаем далее авторизуем с доменными учетными данными, пользователей подключаемых к корпоративному Wi-fi.
Почитать по теме можно здесь:
How to Configure Windows 2012 NPS for Radius Authentication with Ubiquiti Unifi
или здесь:
https://habrahabr.ru/post/142070/
Всем хорошей работы!!!
06.12.2016 —
Опубликовал: |
ms windows server 2016
Sorry, the comment form is closed at this time.
Skip to content
Configuring RADIUS Authentication in Windows Server 2016 AD – Sonicwall
Quick Bites:
RADIUS (Remote Authentication Dial-In User Service) authentication is a networking protocol that provides a centralized authentication, authorization, and accounting (AAA) system for managing user access to network resources. It is commonly used in enterprise environments, particularly for remote access scenarios such as virtual private networks (VPNs), wireless networks, and dial-up connections.
By using RADIUS authentication, organizations can centralize user authentication, enforce strong security measures, and simplify the management of user access to network resources. It offers a scalable and flexible solution for managing user authentication in complex network environments.
Protect Your Data with BDRSuite
SonicWall is a company that specializes in network security solutions, and a SonicWall device refers to one of their hardware appliances used for network security and firewall protection. SonicWall devices are designed to provide robust security features, advanced threat protection, and network management capabilities.
In this blog, we are going to see how to Create User Groups and configure User Management for RADIUS Authentication in Windows Server 2016 AD
What is Radius:
Remote Authentication Dial-In User Service (RADIUS) is a client/server protocol and software that provides remote access servers to communicate with a central server to authenticate dial-in users and authorize their access to the requested system or service. RADIUS allows a company to maintain user profiles in a central database that all remote servers can share. It provides better security, allowing a company to set up a policy that can be applied at a single administered network point.

Using Radius Authentication method we are going to communicate with Sonicwall Device. Create a Radius Client in the NPS. After creating Radius client, create an NPS Policy to perform authorization.
We are going to configure Radius authentication in SonicOS 6.5, which was released in September 2017. This release includes significant user interface changes and many new features that are different from the SonicOS 6.2 and previous firmware.
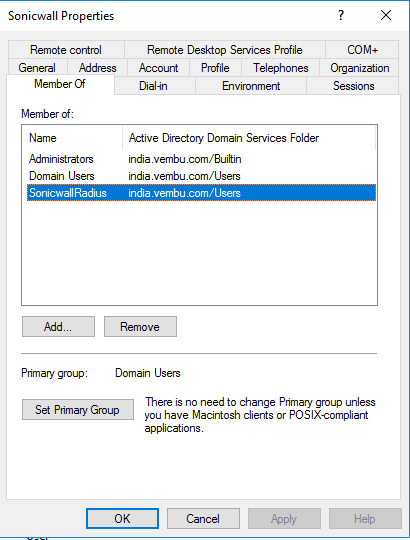
- Open AD Users and Computers and create a new group in the user folder
- Create a new user and add as a member for the new user group
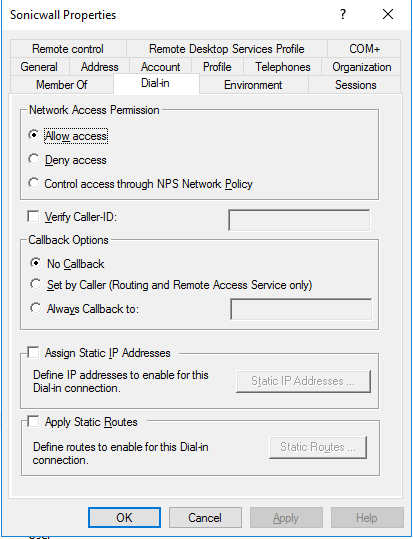
- Open the user properties and go to Dial-in users and select Allow access for Remote Access Permission (Dial-in or VPN)
Configuring the NPS to Support RADIUS Clients
- Open Network Policy Server from Administrative Tools
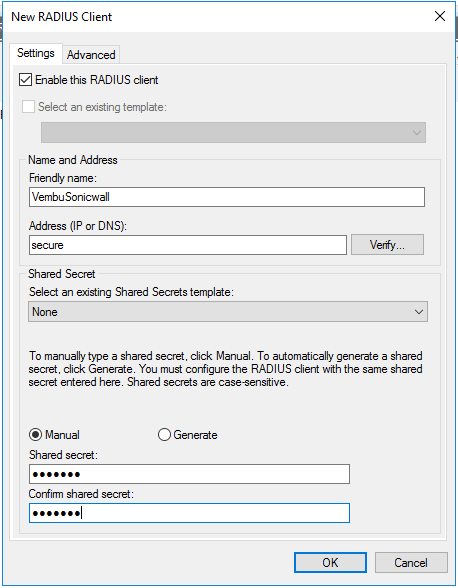
- Right click on the RADIUS Clients folder and click New
- Enter a friendly name for the client and give IP or FQDN
- Enter a Shared Secret. This shared secret is needed later, so note this for future reference
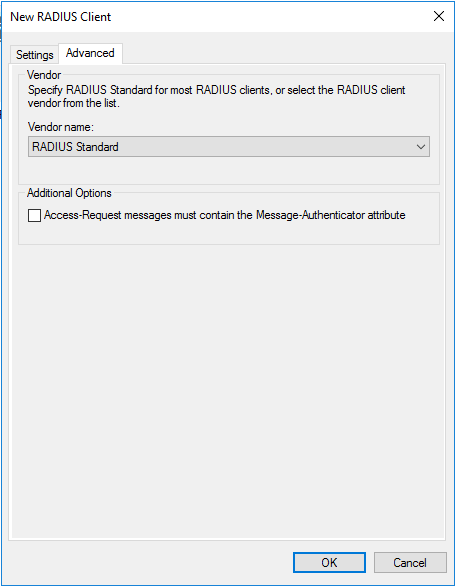
- Now click Advance tab on the top and select Radius Standard in the Vendor name drop down
- Click OK to create the Radius client
To set up the permission for users,
- Expand Policies and right click on the Network Policies and select New
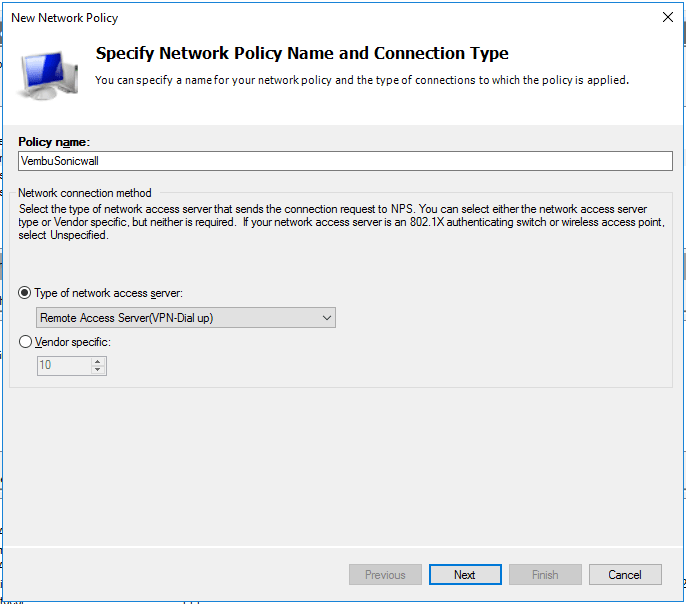
- Specify a friendly Network Policy Name and select Connection Type “Remote Access Server(VPN-Dial ap)” and give Next
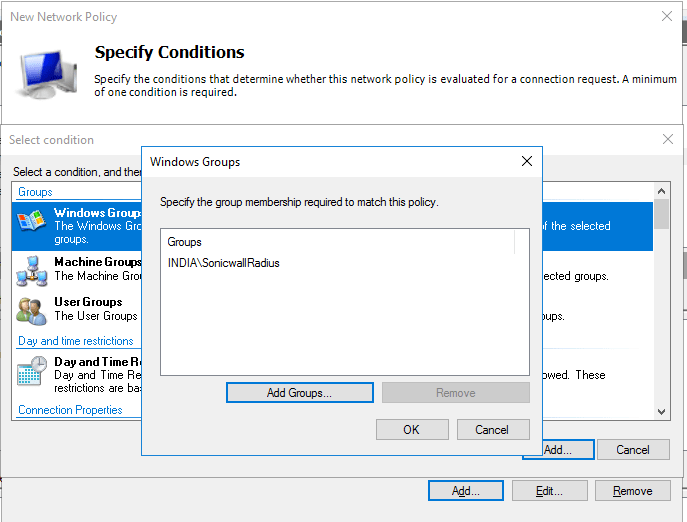
- In Specify Conditions page, click add and select “Windows Group” and click Add Group to add the group which we have created in the beginning
- Click Next to specify Access Permission
- Click Access Granted option and give Next to configure Authentication Methods
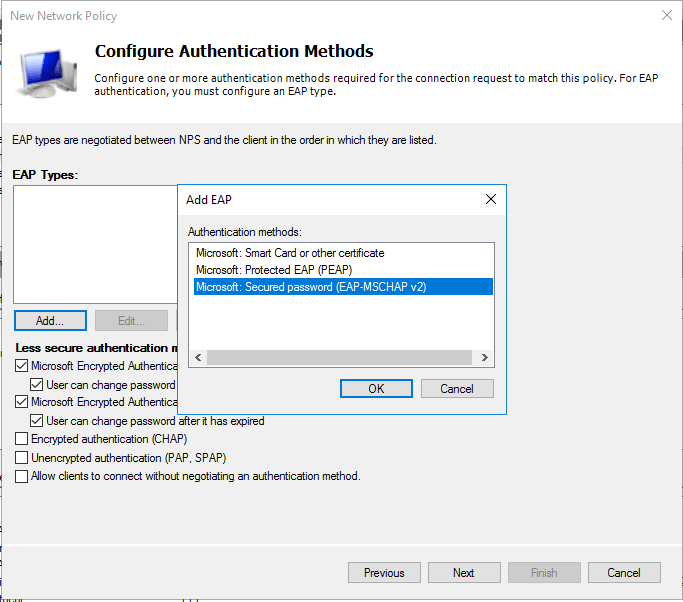
- Click Add and select Microsoft: Secured password (EAP-MSCHAP v2) and give Next
- Keep Default in the Configure Constraints page and move on to the next page
- Pass this Configure page and give Next and review the overall configurations and click Finish
Now we can check Radius Server settings from the Sonicwall Firewall
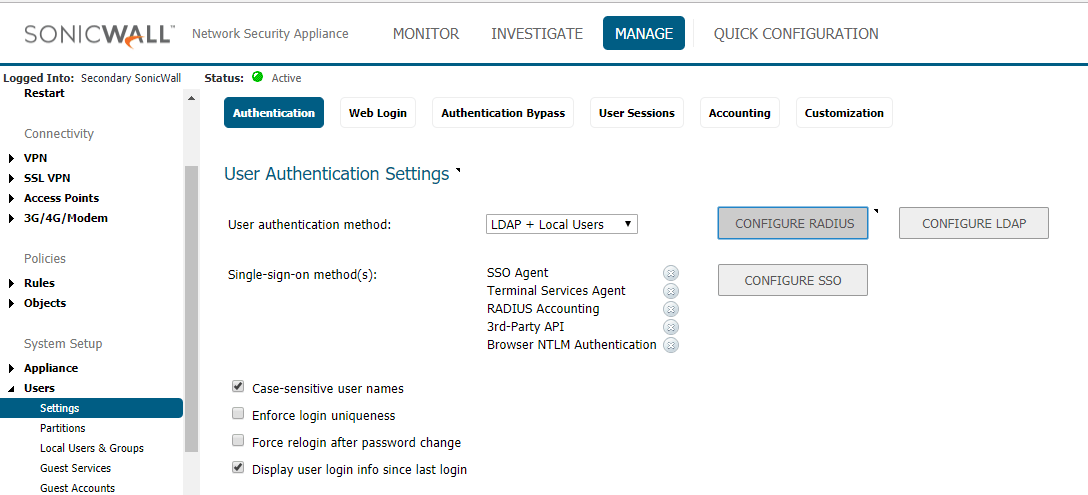
- Login to the Sonicwall in configuration mode and go to Manage tab
- Click Users on the left side pane and select Settings
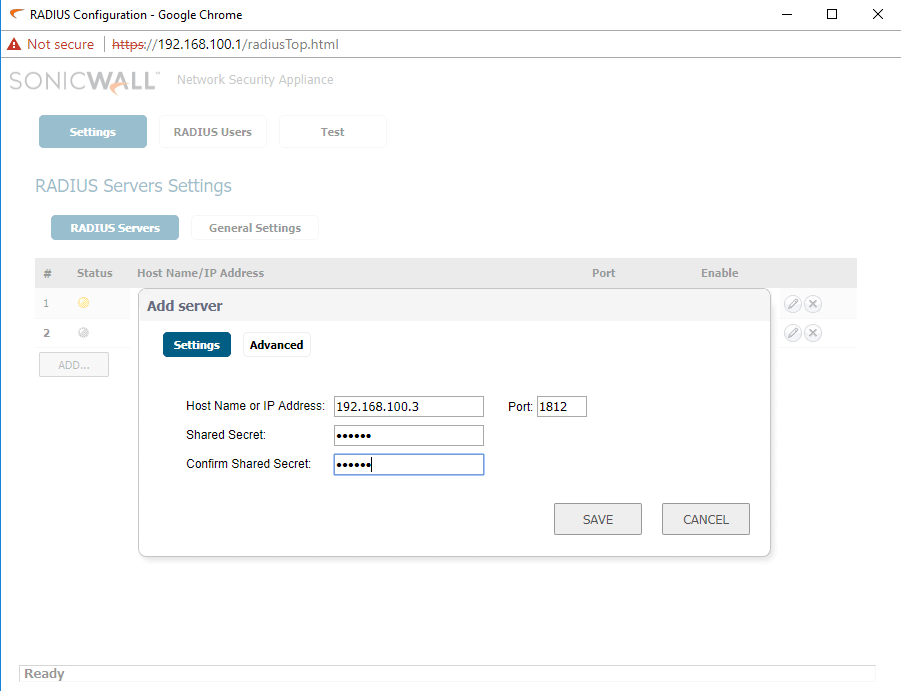
- In Settings page, click Configure Radius option
- Now click add and enter the radius server details and Shared secret key and save it
- After saving the settings move on to the Test tab to test the Radius Server connectivity
- Select the Radius Server in the drop list and select the authentication method to test
- Provide valid user account details of the Radius Server and check the connectivity
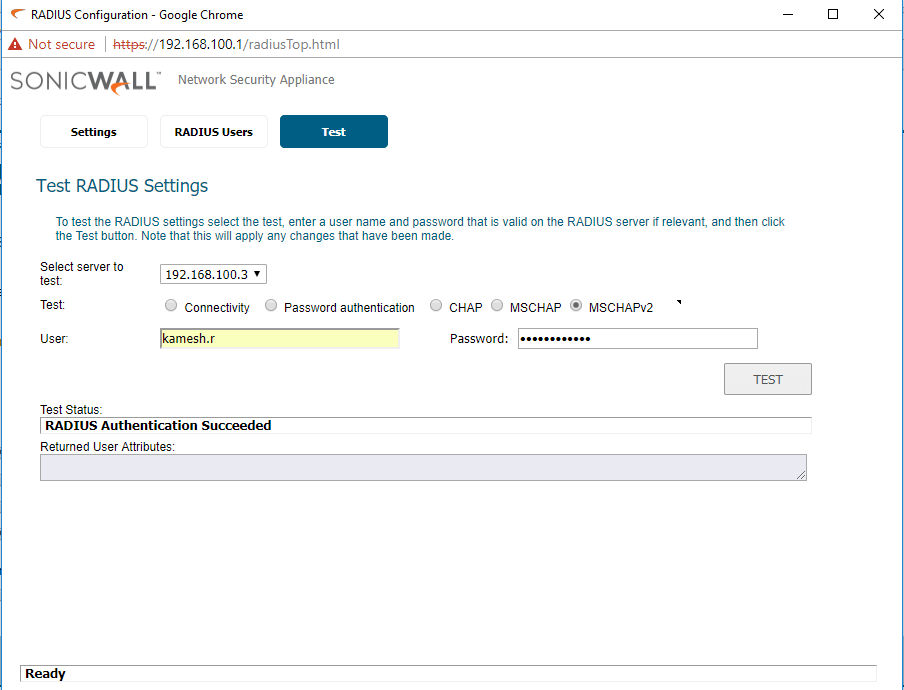
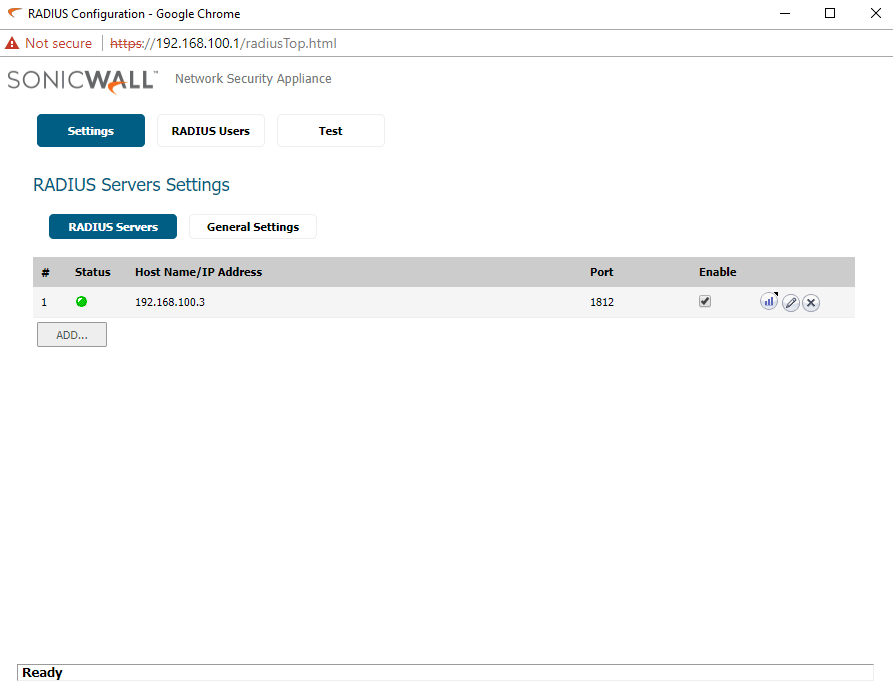
Here we have completed the NPS configuration, If all the configurations are correct, the test status will show the result, “Radius Authentication Succeeded”. You can also check the Settings tab to confirm the status of the Radius Server. If it is green, then the communication with the Radius Server is verified and connection is established.
Experience modern data protection with this latest BDRSuite v3.9.0 FREE edition. Try the 30 days free trial here: https://www.bdrsuite.com/vembu-bdr-suite-download/
Got questions? Email us at: vembu-support@vembu.com for answers.
Follow our Twitter and Facebook feeds for new releases, updates, insightful posts and more.
Try BDRSuite for Free!
Schedule a live demo with one of our product experts
Start your full-featured 30-day free trial
Explore detailed pricing, editions & features
RADIUS (Remote Authentication in Dial-In User Service) is a network protocol that provides centralized management of authentication, authorization, and accounting (AAA), and designed to exchange of information between a central platform and client devices. RADIUS server can communicate with a central server for example, Active Directory domain controller) to authenticate remote dial-in clients and authorize them to access specific network services or resources.
The Network Policy Server (NPS) role implements the RADIUS server function in the Windows environment and allows you to authenticate remote clients against Active Directory. In this article, we’ll show how to configure a RADIUS server on Windows Server 2022/2019/2016, and how to configure RADIUS authentication on Cisco and MikroTic network devices (RADIUS clients) under AD user accounts.
Installing Network Policy Server (RADIUS) on Windows Server
Windows Server with the NPS (RADIUS) role forwards connecting user authentication requests to Active Directory domain controller, which performs user authentication. Therefore, the presence of an on-premises Active Directory is a mandatory requirement before the start of an NPS deployment.
Now you can to install the RADIUS server role on your Windows Server 2022/2019/2016. Open the Server Manager console, run the Add Roles and Features wizard > select the Network Policy and Access Services role.
Note. Also, you can install NPS role and management tools from an elevated PowerShell console:
Install-WindowsFeature NPAS –IncludeManagementTools
Check if the NPAS role is installed on your Windows Server host:
Get-WindowsFeature -Name NPAS

After the role installation is completed, open the Network Policy Server (nps.msc) in the Tools menu.

Right-click on a root node of the NPS console and click Register server in Active Directory.
Confirm the new NPS server registration in Active Directory.

Also, you can register your NPS server in Active Directory with a command:
netsh ras add registeredserver
The AD machine account on the NPS server is given permission to read the properties Active Directory user accounts to authenticate users. Your NPS host computer account will be added to the built-in domain group RAS and IAS Servers.
Next, create a new security group in the Active Directory domain (for example, RemoteCiscoUsers) and add all users who will be allowed to authenticate on Cisco routers and switches to this group.

The next step is to add the Radius client. Radius client is the device from which your server can receive authentication requests. This could be a Cisco router, switch, Wi-Fi access point, etc.
Expand the RADIUS Clients and Servers > RADIUS Clients, select New.
On the Settings tab, fill the fields Friendly name, client Address (you can specify IP address or DNS name), and Shared Secret + Confirm shared password (you will use this password in the configuration of the Cisco switch/router).
Note. The shared secret password is rarely used in large corporate networks due to the problems with the distribution of shared secrets. It is recommended to use certificates instead of shared passwords. If you have a corporate Certification Authority (CA) deployed to implement PKI infrastructure, you can request a *.p12 certificate for the Radius/NPS server. Just import the certificate to the personal certification store of the Local Machine.

In the Advanced tab, select Vendor name – Cisco.

You can use the PowerShell command instead of the NPS GUI to add a new RADIUS client. In this case, you can use the New-NpsRadiusClient PowerShell cmdlet:
New-NpsRadiusClient –Address "192.168.31.1" –Name "cisco2960" –SharedSecret "Zb+kp^JUy]v\ePb-h.Q*d=weya2AY?hn+npRRp[/J7d"
Note. On Windows Server Datacenter edition you can add RADIUS clients to NPS by IP address range. This allows to add a large number of RADIUS clients (such as wireless access points) rather than adding them individually. You can specify the IP range using the format 10.1.0.0/22.
By default, NPS uses the following UDP ports to send and receive RADIUS traffic: 1812, 1813, 1645, and 1646. When you install the NPS role on Windows Server, rules for these ports are automatically created and enabled in Windows Defender Firewall. You can list these Windows Firewall rules using PowerShell:
Get-NetFirewallRule -DisplayGroup "Network Policy Server"
If your RADIUS client is located in a DMZ network or an external security perimeter, you must create the appropriate firewall rules on your network firewall.
Configure NPS Policies on the RADIUS Server
NPS policies allow you to authenticate remote users and grant them access permissions configured in the NPS role. NPS access policies allow you to associate the RADIUS client to the domain security group that determines the user privileges on CISCO devices.
There are two types of policy on a RADIUS server:
- Connection request policies — determine which RADIUS servers should authenticate and authorize connection requests received from RADIUS clients;
- Network policies — allow you to specify who is authorized to connect to your network and a list of assigned privileges.
In our case, we will use only the NPS Network policies. Expand the Policies > Network Policies branch and select New:
Specify the Policy name, the type of network access server should remain unchanged (Unspecified).

In the Specify conditions step, you need to add the conditions under which this RADIUS policy will be applied. Let’s add two conditions — the authorized user must be a member of a specific domain security group, and the device you want to access has a specific name. Use the Add option to create a new condition by selecting the Windows Group type (add the RemoteCiscoUsers group) and specifying the Client Friendly Name (Cisco_*).
Note. The Client Friendly Name field may differ from the DNS name of your device. We will need it in the further steps to identify a specific network device when creating a Remote Access Policy. For example, you can use this name to specify a mask through which several different RADIUS clients are processed by a single access policy.

On the next screen, select Access Granted.

My Cisco switch only supports Unencrypted authentication methods (PAP, SPAP), so I’ve disabled all other options.

Skip the next configuration Constraints step.
In the Configure Settings section, go to the RADIUS Attributes > Standard section. Delete the existing attributes there and click the Add button.
Select Access type > All, then Service-Type > Add. Specify Others = Login.

Now add a new attribute in the RADIUS Attributes > Vendor Specific section. Under Vendor, select Cisco, and click Add. Here you need to add information about the attribute. Click Add and specify the following value:
shell: priv-lvl = 15
This value means that the user authorized by this policy will be granted a maximum (15) administrative access privileges on the Cisco device.

The last screen displays all selected NPS policy settings. Click Finish.

If you have created several network policies in the NPS console, please note that they are processed from top to bottom, so the order of the policies is important. Further processing will stop if all conditions in the next policy are met. You can change the priority of policies in the NPS console using the Processing Order value.

By default, all AD accounts can be used to authenticate using RADIUS. You can check this using the Active Directory Users and Computers snap-in (dsa.msc). Open any user properties, go to the Dial-In tab, and check that the Control access through NPS Network Policy option in enabled in the Network Access Permission section.

Configuring RADIUS Authentication on Cisco Devices
Once you have created the NFS policy, you can proceed to configure your Cisco routers or switches for authentication on the newly installed RADUIS server.
As it is insecure to send unencrypted user credentials over the network, you should disable the Telnet protocol on your Cisco devices. To disable Telnet and enable SSH, use the following commands in Configuration Mode on the Cisco device:
configure terminal

crypto key generate rsa modulus 1024

ip ssh version 2
You should create a local user on your Cisco device to avoid losing access to it if the RADIUS server or AD is unavailable. Create a local user with the following command:
username cisco_local password $UPerrP@ssw0rd
To make the use of SSH mandatory and disable remote access using Telnet, execute the following commands:
line vty 5 15

transport input ssh
Below is an example of the configuration for authorizing a Radius server for the Cisco Catalyst Switch:
aaa new-model

aaa authentication login default group radius local

aaa authorization exec default group radius if-authenticated

radius-server host 192.168.1.16 key Sfs34e#sf

#Specify your RADIUS server IP address and key for encryption (the shared secret that we specified on the RADIUS server)

service password-encryption

# Enable password encryption
If you have several Radius servers, add them to the group:
aaa group server radius radius_srv_group

server 192.168.1.16

server 192.168.101.16
This completes the minimum switch configuration and you can try to check Radius authentication on your Cisco device.
How to Enable MikroTik (RouterOS) User Authentication via RADIUS
In this part, we will show you how to configure RADIUS authentication for VPN user connections on a MikroTik router (RouterOS based).
Open the Network Policy Server console (nps.msc) and create a new Radius client.
Select New RADIUS Client and configure the following settings:
- Enable this RADIUS Client;
- Friendly Name — enter the name of your MikroTik router;
- Address — specific the IP address of the MikroTik router;
- Specify your Pre-shared secret key.
Create a new Network Policy with the following settings:
- User Groups — specify the name of the domain user group that is allowed to authenticate on your MikroTik router;
- Authentication Type — MS-CHAPv2;
- Tunnel Type — Point-to-Point Tunneling Protocol (PPTP);
- Access Permissions — Access granted;
- In the Configure Authentication Methods window, leave only MS-CHAPv2 and allow users to change expired passwords (User can change password after it has expired option);
- Multilink and Bandwidth Allocation Protocol (BAP) – Do not allow Multilink connections;
- In the Standard section, remove Service-Type – Framed and leave only Framed-Protocol PPP;
- Encryptions — leave only the strongest encryption (MPP 128-bit) method.

Once you have created a new policy, open the Network Policy Server settings.
Leave only the following UDP ports for the RADIUS server communications:
- Authentication — 1812;
- Accounting — 1813.

Check if these UDP ports are open in Microsoft Defender Firewall Rules. If not, open them manually.
Now you need to configure the connection settings for Windows Server RADIUS in the MikroTik configuration (we assume that PPP VPN Server is already configured on RouterOS).
Check in the PPTP server settings that only mschap2 is allowed to use for authentication.
Now we need to configure the connection to Radius NPS server. Select New Radius Server and specify the following options:
- Service: ppp;
- Address: IP address of the RADIUS server;
- Secret: pre-shared key that you specified in the network policy settings;
- Src/ Address: MikroTik IP address from which traffic will be sent to NPS;
- Authentication Port: 1812;
- Accounting Port: 1813.
Add appropriate access rules to MikroTik Firewall.
Then go to Secrets > PPP Authentication and Accounting and enable the Use Radius option.
It remains to configure a PPTP VPN connection to your MikroTik VPN on users’ computers. Users can use their Active Directory account credentials to authenticate against Mikrotik (accounts must be added to the AD group that you have specified when creating the MiktoTik Network Policy on NPS).
How to View the NPS/RADIUS Event Logs on Windows?
To enable NPS Server Radius Authentication logging, you need to enable the Network Policy Server audit policy via the local Group Policy Editor (gpedit.msc). Go to Computer Configuration > Policies > Windows Settings > Security Settings > Advanced Audit Policy Configuration > Audit Policies > Logon/Logoff > Audit Network Policy Server and check the option to audit both success and failure logon attempts.
Now you can open the Event Viewer console (eventvwr.msc), go to the Windows Logs > Security, and filter the event by the Event ID 6272.
Network Policy Server granted access to a user.

If the user has entered an incorrect password or is not authorized to log on through the RADIUS Client, Event ID 6272 is displayed:
Network Policy Server denied access to a user.
If the user has entered an incorrect user name and password, an event will be displayed in the Event Viewer:
Authentication failed due to a user credentials mismatch
If the user is not a member of the correct security group, or if Network Access Permission= Deny is set in the AD user properties on the Dial-in tab, the following event will occur:
The Network Access Permission setting in the dial-in properties of the user account in Active Directory is set to Deny access to the use
If a user enters an incorrect password multiple times, their account will be locked out in accordance with your Account Lockout Policy in AD.
Event ID: 6279
Network Policy Server locked the user account due to repeated failed authentication attempts.
If you need to find all NPS authorizations events for the specific user (Richard.Doe in this example), use the next PowerShell script:
$Query = @"

<QueryList>

<Query Id="0" Path="Security">

<Select Path="Security">

*[EventData[Data[@Name='SubjectUserName'] and (Data=theitbros\richard.doe')]] and

*[System[(EventID='6272')]]

</Select>

</Query>

</QueryList>

"@

$events = Get-WinEvent -FilterXML $Query

$ipaddr = @{ label="IP"; Expression={$_.properties[9].value} }

$events | select $ipaddr | group "IP" | format-table Count, Name -autosize
A WPA-2 Enterprise network is incomplete without a RADIUS server, thanks to its triple role of Authentication, Accounting, and Authorization (AAA). Any robust network security demands all three functions for smoother functioning of the entire network infrastructure, given the sharp increase in the incidents of authentication failure owing to the prevalence of on-premise setups.
Microsoft has been proactively updating its RADIUS servers since the inception of the Windows 2003 server. We have discussed a great deal about the configuration of 2008/12 in depth in our earlier blogs, and now we will help you configure the Windows 2016 server, which is the eighth edition of the prestigious Windows server and was developed in parallel with the Windows 10 operating system.
Before configuring the Windows Server 2016, ensure that you meet the following requirements for successfully configuring the Windows 2016 server.
Prerequisites for Windows RADIUS Server 2016:
❖ System Requirements:
- Processor: You need a processor of at least 1.4 GHz clock frequency for x64 processors.
- RAM: The minimum requirement of RAM is 512 MB. But Microsoft recommends using 2GHz for smooth functioning and Servers with a Desktop Experience installation option.
- Disk space: You need a minimum disk space of 32 GB or more, but Microsoft usually recommends using 40 GB or more disk space. Also, the disk space requirements vary with the processor and RAM used in the system.
❖ Active Directory Setup:
You must update the Active Directory environment before adding the domain controller.
❖ Server Core Installation:
Unlike Windows Server 2008 version, the admin need not select the Full Installation or Server Core Installation option beforehand in Windows Server 2012/16.
These features are merged in the 2012/16 version to give three optional features which the admin can install or uninstall at will.
❖ Network adapter requirements:
- An Ethernet adapter with a minimum throughput of 1 Gigabit per second.
- An Ethernet adapter that conforms to the PCI Express architectural standard.
❖ Miscellaneous Requirements:
- System and firmware that is based on UEFI 2.3.1c and support secure boot.
- A graphics card and a display with at least Super VGA (1024 x 768) resolution.
- Turn off your antivirus software, as the installation process can be hampered by virus protection software. For instance, checking each file that is copied locally to your computer might significantly slow down the installation.
- Ensure that the Windows Firewall is enabled by default.
- Ensure that all the relevant data and information are appropriately backed up before the configuration.
Overview of Windows RADIUS Server 2016 Configuration:
- Install and set up Windows Server 2016.
- Install Active Directory Domain Services (ADDS) to configure the new domain.
- Install Certificate Authorities (CA) with Active Directory Certificate Services (ADCS).
- Install NPS ( Network Policy Server).
- Configure Certificate Authorities (CA), i.e., Active Directory Certificate Services (ADCS) for Certificates.
- Configure NPS ( Network Policy Server) for the authentication protocol.
- Configure RADIUS.
- Define Network policies for users/devices.
- Configure Access Point.
- Set up zero clients, and select 802.1x authentication.
- Configure Wireless Connection Request.
Now we will see each step involved in configuring Windows 2016 server in detail:
Install and Configure AD DS:
For configuring ADDS, follow the given instructions:
- Navigate to Windows Server 2016.
- Click Start.
- Click Server Manager.
- Navigate to Role Summary.
- Click Add Roles and Features.
- Select Role-based or Feature-based installation.
- Navigate to the Before You Begin page and click Next.
- Navigate to the Select Server Roles page.
- Select the Active Directory Domain Services.
- Click Next.
- Click Install on the Confirm Installation Selections
- Navigate to the Installation Results page and click Close.
ADDS is installed.
Install AD CS and NPS :
For configuring ADDS, follow the given instructions:
- Navigate to Server Manager.
- Select Roles and Click Add Roles.
- Click Next on the Before you Begin page.
- Select Active Directory Certificate Services (AD CS) and Network Policy and Access Services.
- Click Next.
- Click Next on Network Policy and Access Services
- Navigate to Role Services and select Network Policy Server.
- Click Next.
- Select Create a self-signed certificate for SSL encryption and click Next.
- Click Next on the Introduction to Active Directory Certificate Services
- Select Certification Authority on the Select Role Services page and click Next.
- Select Enterprise on Specify Setup Page and Click Next.
- Select Root CA on Specify CA Type Page and Click Next.
- Select Create a new private key on the Set Up Private Key Page and Click Next.
- Click Next on Configure Cryptography for CA.
- Enter details on Configure CA Name page and click Next.
- Enter the validity period on the Set Validity Period page and click Next.
- Click Next on Configure Certificate Database page.
- Click Next on the Web Server (IIS) page.
- Click Next on the Select Role Services page.
- Click Install on the Confirm Installation Selection page.
- Click Close.
Now the AD CS (Active Directory Certificate Services), Web Server (IIS), and NPS are installed successfully.

Configure NPS ( Network Policy Server) and RADIUS authentication.
- Click on the Start button and select Administrative tools.
- Click NPS on the Network Policy Server.
- Select Register Server in Active Directory and click OK.
- Click OK.
- On the NPS (Local) page, select RADIUS server for 802.1x Wireless or Wired Connections.
- Click Configure 802.1x.
- Select Secure Wireless connections on the Configure 802.1x page.
- Type Name and click Next.
- Add RADIUS clients on the Configure 802.1x page and click Next.
- Type the following details on the New RADIUS Client page.
- Name
- IP Address
- Shared Secret (Manual)
- Click OK and click Next.
- Select Microsoft Protected EAP (PEAP) on the Configure 802.1x
- Click Configure.
- Select Secured password on the Edit Protected EAP Properties page and click Edit.
- Enter the Number of authentication retries and click OK and click Next.
- Select Groups and click Next.
- Click Next again and click Finish.
- Restart NPS again.
Define Network Policies for users/devices.
You can follow the given steps for Defining the network policies.
- Navigate to the NPS console and click NPS (local).
- Click and expand Policies.
- Select Network Policies.
- Click New.
- Enter a Policy Name.
- Select the Type of Network Access Server to Unspecified while using Netscaler or RCdevs OpenLDAP while using OTP.
- Click Add in Specify Conditions
- Select Windows Groups and click Add.
- Click Add Groups and click OK.
- Select NAS Identifier in the Select Conditions
- Enter a Name and select Next to continue.
- Select Access Granted in Specify Access Permission
- Under Configure Authentication Method, select MS-CHAP v2 for maximum security.
- Click Next.
- Select RADIUS attributes as Standard in Configure Settings.
- Click Add.
- Enter the attribute value in String and click OK.
- Click Next and click Finish.
You can use the Network Policy Wizard to create and add new conditions, constraints, and setting to the network policies.

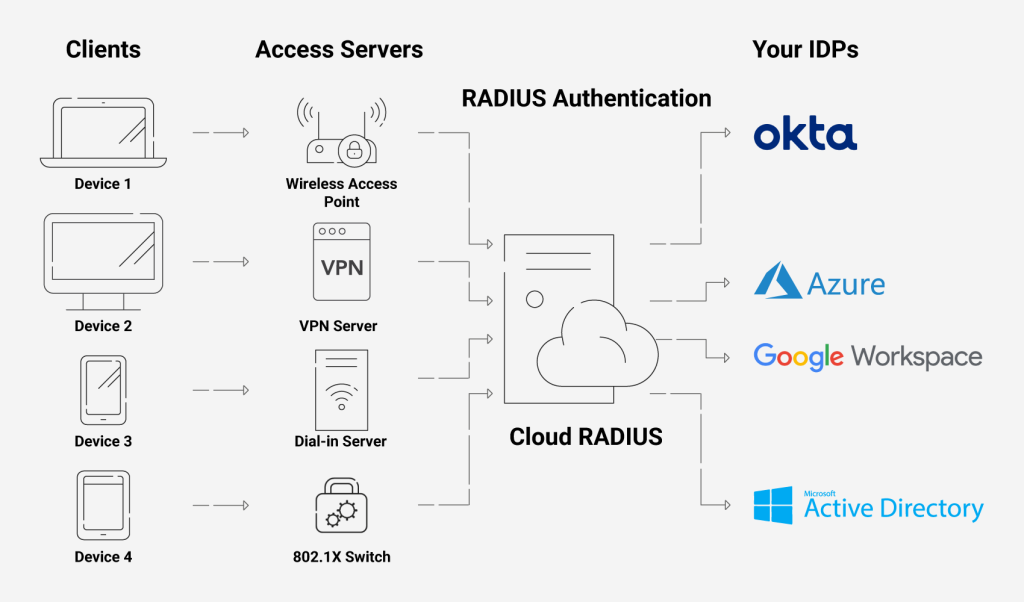
Administrators can define and implement a wide range of policies using our Cloud RADIUS, including lookup policies applied at the moment of authentication. For instance, depending on the time of day, you can decide whether to accept or reject people and devices. You may also restrict access to devices running a specific operating system.
Set up Zero Clients, and Select 802.1x Authentication
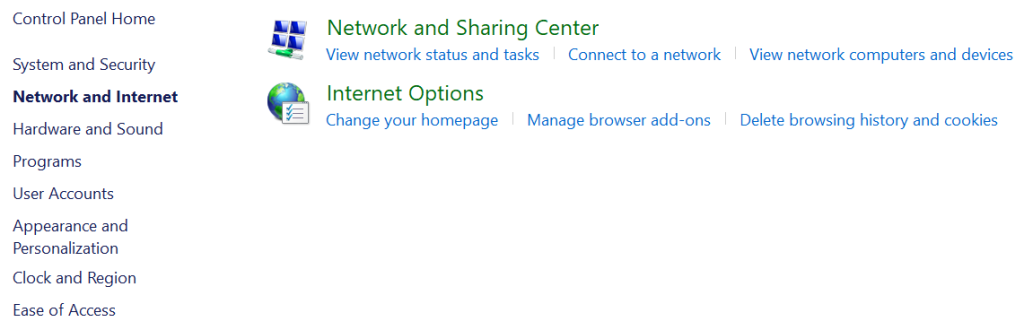
- Navigate to the Control panel and open the Network and Sharing center.
- Click Change adapter settings.
- Select Local Area Connection and click Properties.
- Select Authentication and click Enable IEEE 802.1x authentication.
- Select the desired protocol in the dropdown button.

Configure Wireless Connection Request
- Navigate to the Control panel and open the Network and Sharing center.
- Click Manage Wireless Networks.
- Select Manually Create a network profile.
- Enter your SSID in Network Name and click Next.
- Click Change Connection settings.
- Select Security and click Settings.
- Select the Trusted Root CA and click OK.
- Navigate to Advanced Settings.
- Select Specify Authentication Mode and click OK.
Drawbacks of On-Premise RADIUS Server
Traditional RADIUS servers housed on an organization’s premises are prone to numerous security vulnerabilities. On-premise infrastructure commonly uses Windows RADIUS servers, built from NPS, which have many susceptibilities of their own that hackers frequently exploit in zero-day attacks. On top of that, they need a great deal of time and expertise to set up.
Additionally, due to its physical accessibility, the NPS server’s location on-premises expose it to a variety of physical security risks, including break-ins, natural disasters, or even simple power outages. Rarely does on-premise RADIUS prove to be more affordable than cloud RADIUS, given the price of maintaining highly secure physical sites!
NPS is not natively compatible with any cloud infrastructure, including Microsoft’s own cloud solutions, such as Azure AD. Even with other Microsoft-owned cloud-based solutions like Azure AD, cloud integration of NPS, which was created especially for on-premise AD deployments, has serious drawbacks. A separate authentication server or proxy is necessary if you wish to utilize Azure with NPS in order to streamline the procedure. These procedures are not only complex and time-consuming but also rather pricey.
Cloud RADIUS: The Way Ahead

The move to the cloud offers several benefits over the risky on-premises environment full of security threats, and what’s better than utilizing our ground-breaking Cloud RADIUS? You can solve virtually all the problems of on-premise RADIUS servers by employing a cloud-based server like Cloud RADIUS, supported by SecureW2.
Our Cloud RADIUS is designed for vendor neutrality, so you can use it with any IDP (including cloud directories). You can enforce policies with real-time user lookup against Azure, Okta, & Google Workspace.
Also, integrating with Securew2 gives you more options for customization with our many innovative features like Azure MFA auth, Intune auto revocation, Windows Hello for Business login, and more. Our RADIUS services can be set up quickly, cost a fraction of what on-prem solutions do, and has no infrastructure costs because of its cloud presence.
If you are interested in taking that first step towards security for your organization, look no further and click here to inquire about pricing.