
Установка и настройка DNS-сервера и Active Directory в Windows Server 2016 практически не отличается от предыдущих выпусков серверов компании Microsoft, таких как Windows Server 2012, 2008. Пройдя несколько шагов устанавливается роль DNS и Доменные службы Active Directory, также для сервера имён потребуется небольшая настройка.
Установка и настройка роли DNS-сервера и Доменные службы Active Directory
До установки ролей сервера, требуется задать имя будущему серверу, а также статический IP-адрес. Также, если имеются, указываем IP-арес шлюза.
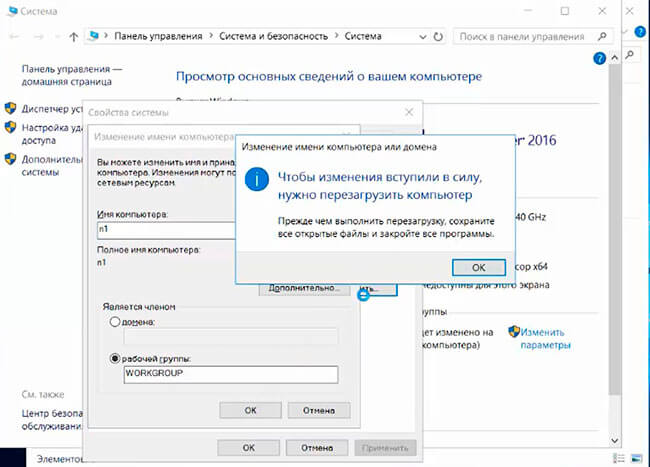
1. Нажимаем правой клавишей мыши на «Этот компьютер» и выбираем «Свойства». В открывшемся окне — «Изменить параметры» — «Изменить». Задаём имя компьютера и нажимаем «ОК». Для того, чтобы изменения вступили в силу, перезагружаем компьютер.
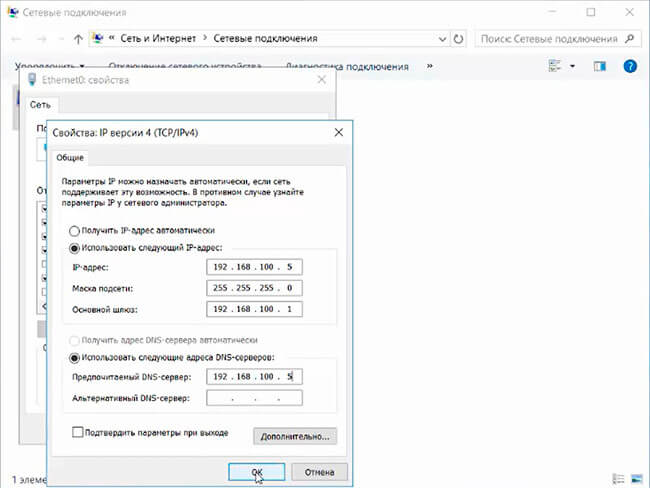
2. Для того, чтобы открыть сетевые соединения, в поле «Поиск» набираем команду ncpa.cpl. Выбираем нужный сетевой интерфейс, правой клавишей мыши — «Свойства». IP версии 6(TCP/IPv6) выключаем, если не используем. Затем выбираем IP версии(TCP/IPv4). Заполняем поля:
IP-адрес: адрес сервера (например, 192.168.100.5)
Маска подсети: маска сети (например, 255.255.255.0)
Основной шлюз: шлюз, если имеется (например, 192.168.100.1)
Предпочитаемый DNS-сервер: (например, 192.168.100.5)
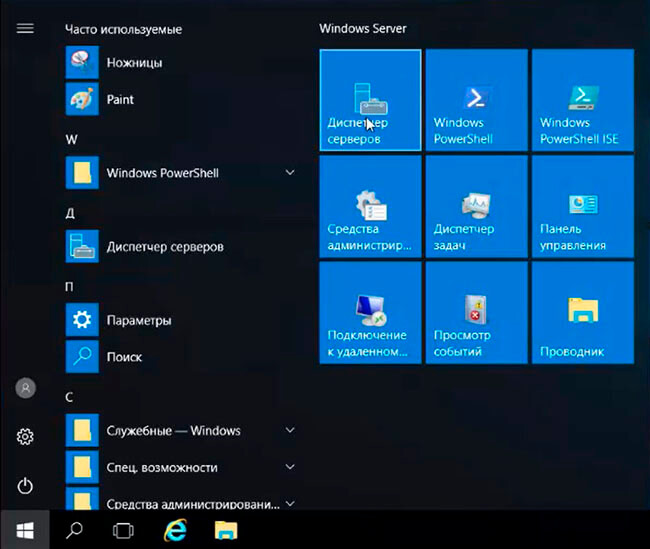
3. Теперь можно начать установку ролей сервера. Для этого выбираем «Диспетчер серверов».
4. В следующем окне — «Добавить роли и компоненты».

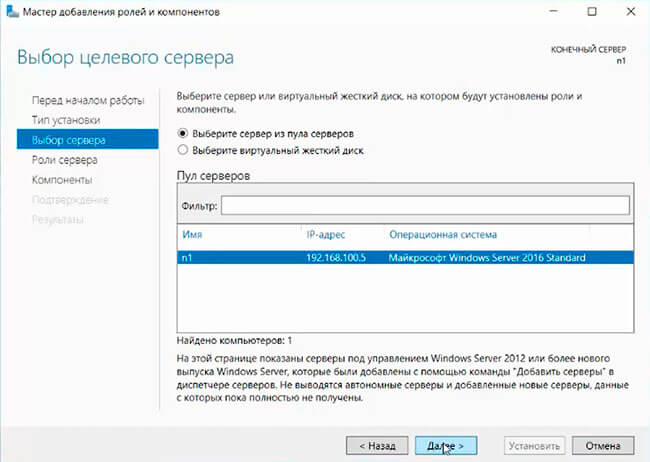
5. Читаем «Перед началом работы» и нажимаем «Далее». Затем оставляем по умолчанию чекбокс «Установка ролей или компонентов» и снова «Далее». В следующем окне выбираем сервер, на который будем устанавливать роли и «Далее».
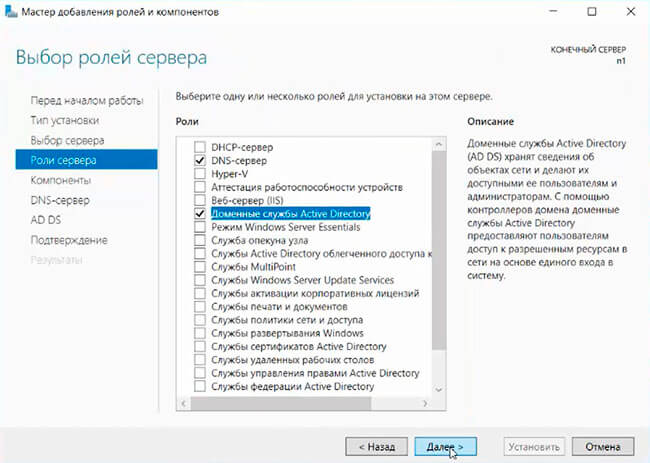
6. Выбора ролей сервера — ставим галочки напротив «DNS-сервера» и «Доменные службы Active Directory». При появлении запроса о добавлении компонентов — «Добавить компоненты». Затем «Далее».
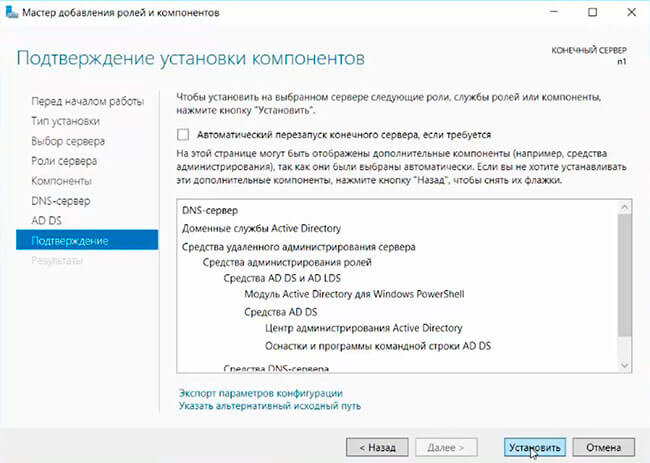
7. В следующих окнах нажимаем «Далее», а в окне «Подтверждение установки компонентов» выбираем «Установить». Этот мастер можно закрывать, по окончании установки появится предупреждение в диспетчере серверов.
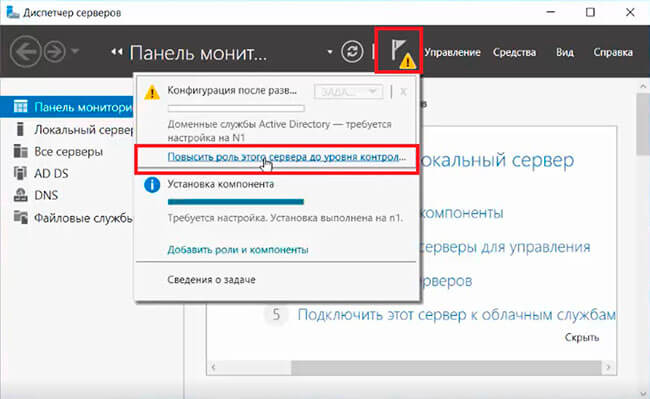
8. После окончания установки выбранных ролей сервера, нажимаем на значок предупреждения в «Диспетчере серверов» и выбираем «Повысить роль этого сервера до уровня контроллера домена».
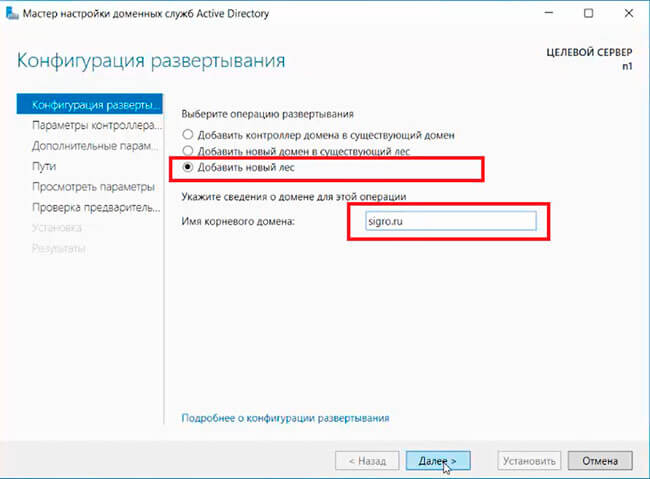
9. В следующем окне — «Добавить новый лес». Имя корневого домена — уникальное имя вашего домена.
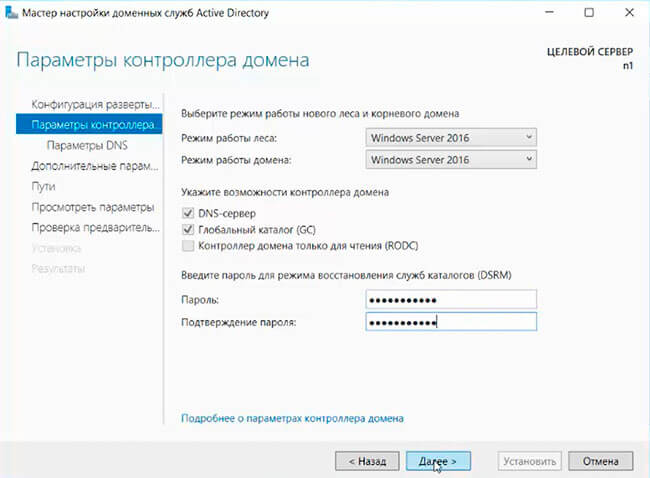
10. В «Параметрах контроллера домена» оставляем по умолчанию режим работы леса и домена — «Windows Server 2016». Вводим пароль для режима восстановления служб каталогов (DSRM).Этот пароль может пригодиться, его обязательно надо запомнить или записать в надежное место.
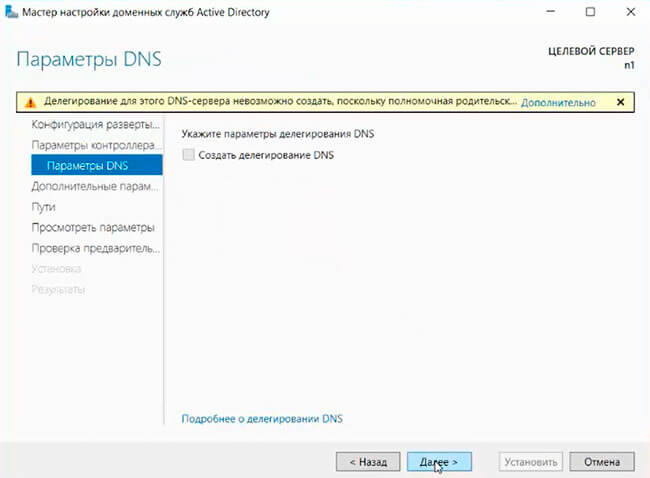
11. В окне «Параметры DNS» — нажимаем «Далее».
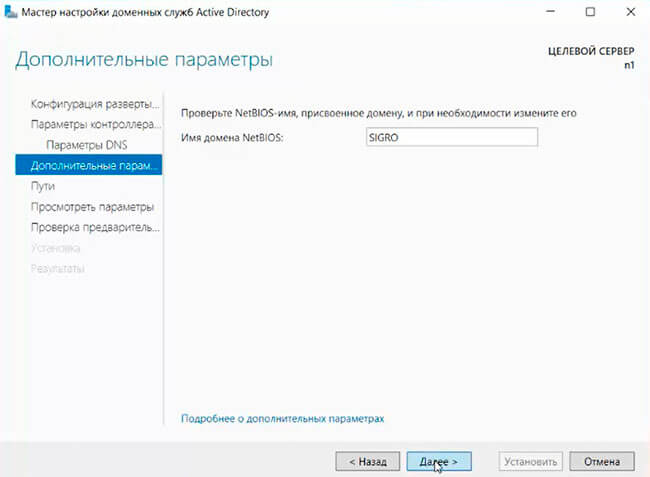
12. В «Дополнительные параметры» — «Далее».
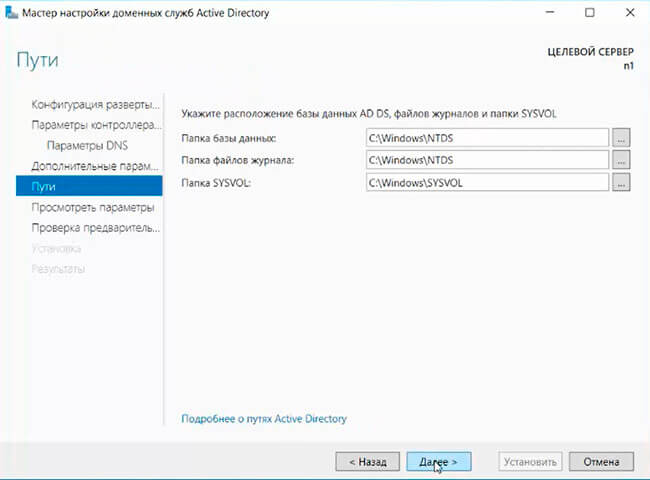
13. Расположение базы данных AD DS, файлов журналов и попок SYSVOL оставляем по умолчанию, нажимаем «Далее».
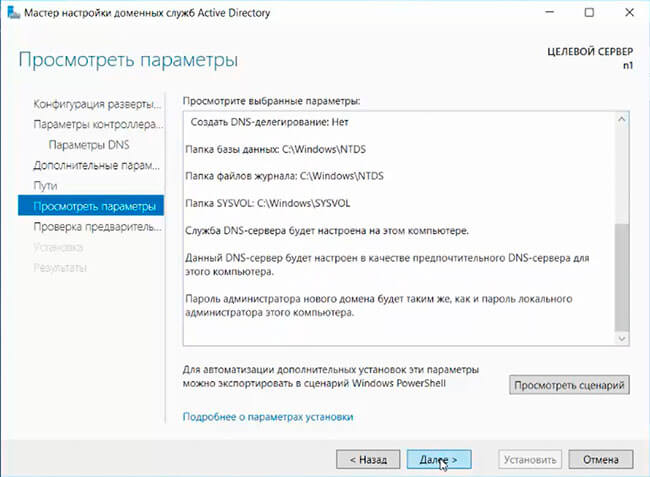
14. Проверяем параметры, затем «Далее».
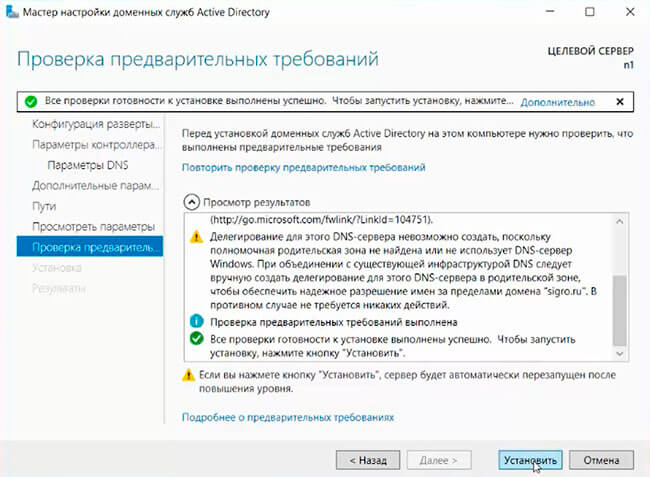
15. После того, как сервер проверит соответствие предварительных требований, можно нажимать «Установить».
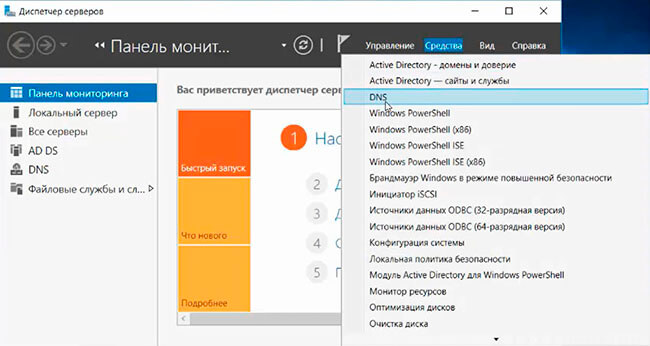
16. После настройки контроллера домена, можно перейти к настройке обратной зоны DNS-сервера. Для этого в «Диспетчер серверов» выбираем «Средства», далее «DNS».
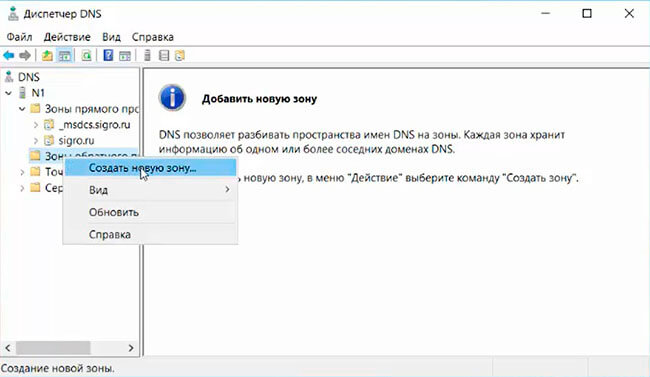
17. В открывшемся окне выбираем наш сервер, затем «Зона обратного просмотра». Правой клавишей мыши — «Создать новую зону…».
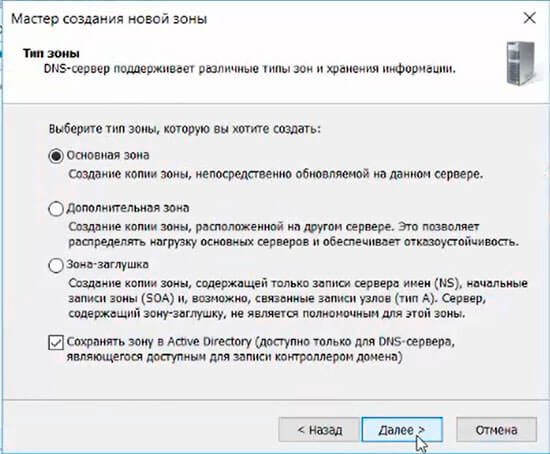
18. В мастере создания новой зоны оставляем тип зоны — «Основная зона», затем «Далее».
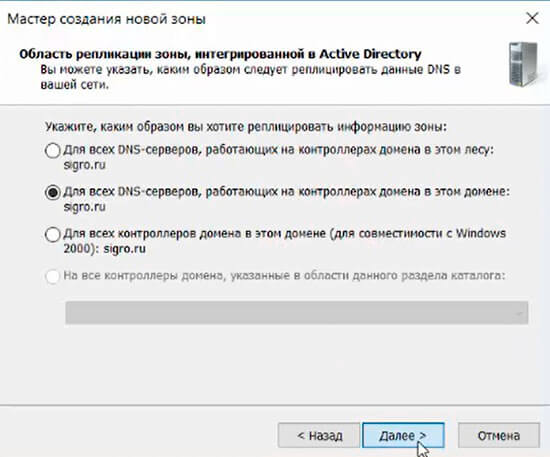
19. Оставляем по умолчанию чекбокс на «Для всех DNS-серверов, работающих на контроллерах домена в этом домене, снова «Далее».
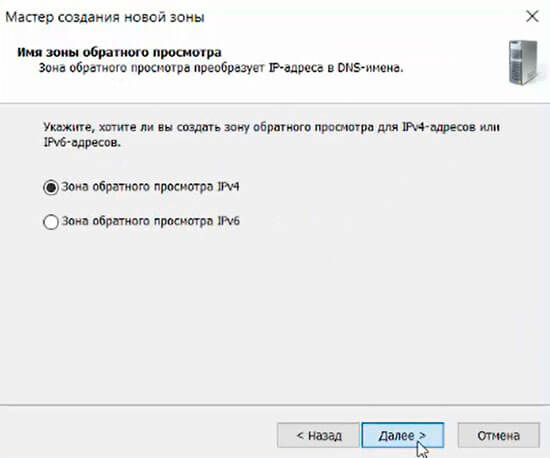
20. В следующем окне — «Зона обратного просмотра IPv4», затем «Далее».
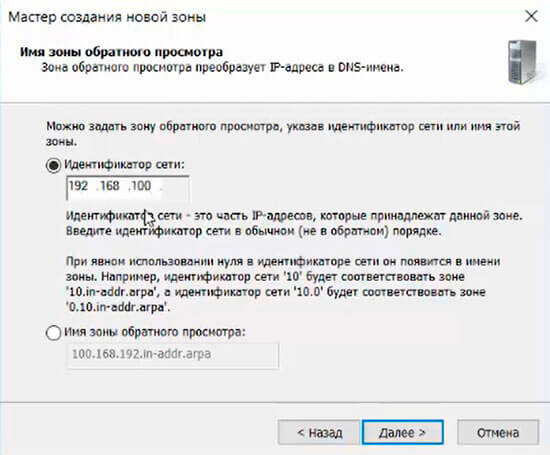
21. Для настройки зоны обратного просмотра задаем «Идентификатор сети» (например 192.168.100). После этого появится автоматически зона обратного просмотра. Нажимаем «Далее».
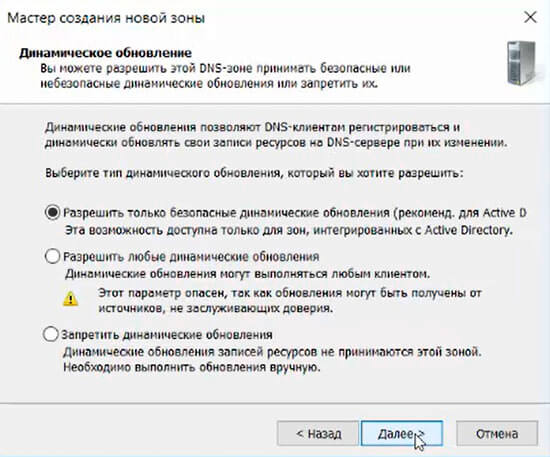
22. В следующем окне оставляем по умолчанию «Разрешить только безопасные динамические обновления, затем «Далее».
23. Для завершения настройки создания новой зоны проверяем настройки и нажимаем «Готово».
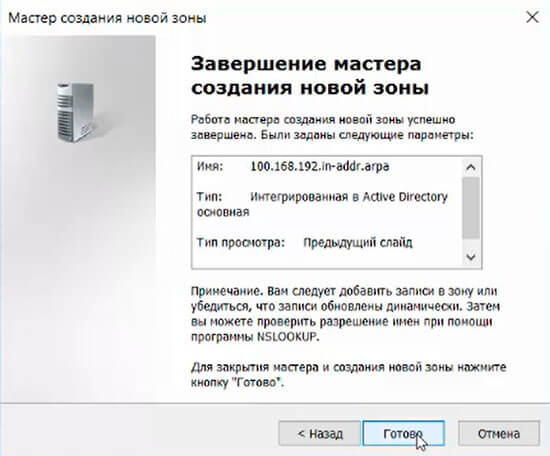
24. Появится зона обратного просмотра для домена.

25. В «Диспетчере серверов» выбираем «Пользователи и компьютеры Active Directory». Проверяем работу Active Directory.
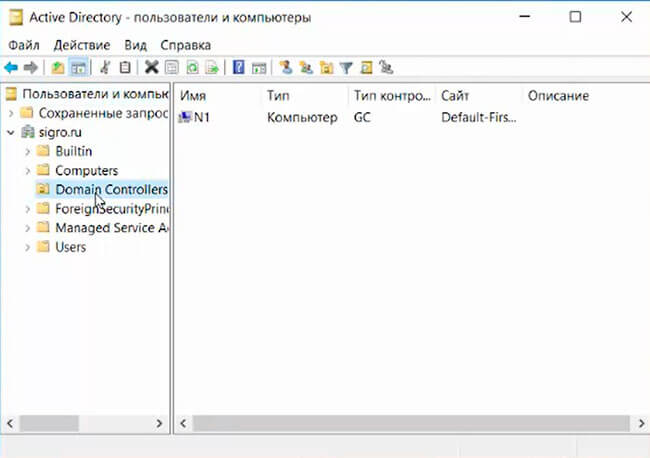
На этом установка и настройка выбранных ролей сервера заканчивается.
Посмотреть, что и как делать, можно здесь:
Читайте также:
- Установка и настройка DHCP — Windows Server 2016
- Второй контроллер домена — Windows Server 2016
- Создание и удаление пользователя, восстановление из корзины — Windows Server 2016
- Ввод компьютера в домен — Windows Server 2016
- Переименование учётной записи администратора домена — Windows Server 2016
- Windows server 2019 — установка и настройка Active Directory, DNS, DHCP
Efficient internet connectivity plays a central role in enhancing website performance, which is possible with the help of proper server configuration. The Domain Name System (DNS) is currently the primary backbone of the Internet which helps with efficient connection services.
This enables users to access websites and online applications easily.

To install and configure a DNS server, you need to learn about the basics of Domain Name System- what is DNS, and what are the prerequisites for DNS server installation. In this blog, let’s look at the basics, along with the step-by-step process of DNS server installation and configuration. This helps with smooth implementation across various platforms and client settings.
What is a Domain Name System (DNS)?
Domain Name System or DNS is part of the Internet and is an efficient, distributed database. It translates user-friendly domain names into IP addresses so that different types of computers and servers can find and communicate with each other across the Internet.
Proper DNS configuration helps ensure that websites, internet-based applications, and other relevant services are accessible and load quickly for all users. When DNS is inefficient or misconfigured, it can result in extended loading times, sluggish website performance, and complete unavailability. DNS configuration directly impacts a user’s experience when navigating the web.
What is a DNS Server?
A DNS server plays a key role in the DNS resolution process. This specialized computer server queries its database before returning the required IP address to the client. It specifically happens when a user enters a domain name into their web browser. This enables an efficient connection to the domain for better system functioning.
Your browser communicates with a network of root domain name servers when you enter a domain name, such as wwW .xyz. com. These servers act as reference books and provide the IP address associated with the same domain name. Then, the browser communicates directly with the hosting server using that IP address.
DNS helps translate user requests into IP addresses. Without DNS, you may have to memorize and enter long IP addresses when connecting to other websites rather than typing the website’s name.
DNS Hierarchy and Components
The DNS system usually operates in a hierarchical structure which includes several key components. These are very important to the correct functioning of networking systems.
•Root Servers: These servers hold information regarding top-level domains (TLDs) like .com, .org, and .net. They often remain at the top of the DNS hierarchy.
•Top-Level Domain (TLD) Servers: These servers manage TLDs like .com or .edu, which are often considered generic TLDs and country-code TLDs (ccTLDs).
•Authoritative DNS Servers: These servers provide specific domain names and authoritative answers to users for the same domains.
•Recursive DNS Servers: Third-party DNS providers and internet service providers (ISPs) operate these servers. They usually help resolve domain names on behalf of users and recursively query authoritative DNS servers until they get their IP addresses.
Prerequisites for DNS Server Installation
Before installing and configuring a DNS server, you must have the following information:
•Your domain name.
•The IP address and hostname of each server that you want to provide name resolution for.
You always need to verify that the following minimum conditions are proper before configuring your computer as a DNS:
•A Windows Server 2012R2, 2016, 2019, or 2022 operating system.
•An open Remote Desktop Protocol (RDP) 3389 port.
•A domain user with the required administrative privileges to configure the DNS.
•Minimum of 4 GB of RAM and a 2-core CPU.
Steps to Install and Configure a DNS Server
The process of installing and configuring a DNS server in Windows is very simple and straightforward. It enables you to configure and manage the same server for your network. It also involves adding the DNS server role to your Windows Server machine, creating and managing DNS records, and configuring basic DNS settings.
Make sure to sign in as an administrator user to the Windows Server and follow the steps below to install the DNS server. Please note that the same steps apply to the installation and configuration of DNS on Windows Server 2016/2019/2022.
Step 1: Prepare Your Server
You must change the name that was automatically given to your server when it was deployed. It is a good practice to make the server have a fixed IP address for at least one network connection before installing DNS into it.
Step 2: Add the DNS Role
Open Server Manager from the Manage menu once you’ve prepared your server. Then, select the option ‘Add Roles and Features.’ Make sure to read the introductory information on the screen and then click on Next.
Step 3: Select the Installation Type
You must select an installation type on the next screen, which comes with two options:
•Role-based or feature-based installation
•Remote desktop services installation
Select a Role-based or feature-based installation based on your requirements, and click on “Next”.
Step 4: Select the Server for Installing the DNS Role
Scroll down to find the DNS Server role on the “Select server roles” screen and click on it. A window will appear asking whether you want to ‘Add features required for DNS Server’. Tick the checkbox saying “Include management tools” (if applicable), and click on Add features. Then, click on “Next” again.
Step 5: Add the DNS Server Role and Other Relevant Management tools
You will get to see some information about the Domain Name System (DNS) on the next screen. Please note that this will just be for informative purposes, so click on “Next.” Now, you will be asked to confirm your choices. Review the information carefully and click on Install if everything is correct.
Step 6: Check for Multiple Installation Choices
The installation process shouldn’t take you too long, so click on the “install” option as soon as you see it. You may also choose to click on the “Close” option even before the process has finished. Conversely, if you want to return to the progress screen, you may find it again under the Notifications menu.
Step 7: Analyze the Progress of the DNS Role installation
You must restart the server for the changes to take effect once the installation process has finished. You will see a new section on the left-hand side of Server Manager and a new card in the middle of the screen once you’ve restarted.
To continue configuring your DNS service, click on the Tools menu and select the DNS option. Analyze if the DNS service is visible in the Server Manager.
Step 8: Configure Your DNS Server
You can easily configure the server after having installed the DNS server role. Right-click on the name of the server on the DNS Manager window, and select Configure a DNS Server. You will now be able to see the option that says ‘Configure a DNS Server Wizard’. Then, click on “next.”
The next window presents you with three different options:
•Create a forward lookup zone
•Create forward and reverse lookup zones
•Configure root hints only
For this tutorial, let’s select the first option, which says, “Create a forward lookup zone.” Then, click on “Next” again.
Step 9: Select the Configuration Action That Must be Carried Out
The next screen will ask you to select which DNS server will maintain your primary forward lookup zone:
•This server maintains the zone
•An ISP maintains the zone
For this tutorial, let’s select the option that says “this server maintains the zone” and click on the “Next” option.
On the next screen, you will be asked by the system to give a name to your DNS zone. Try to select something descriptive related to the organization or the use of the same server. Click on “next” again after you’ve entered the name. This enables you to give an identity to the specific DNS zone.
At this point, the wizard asks whether you want to create a new zone file or use an existing file copied from another server. For this tutorial, let’s select the option that says “create a new file with this file name”, use the default name suggested, and click on “next.”
Step 10: Choose the Name to be given to the DNS Zone File
The system will ask you to choose which dynamic updates to allow on the next screen. You will specifically find three options if you have an AD DS and only two if you don’t.
For this tutorial, let’s select the option Do not allow dynamic updates.” This means that all records will only be updated manually. Click on “next” once you have made your choice.
You can add forwarders on the next screen, which are the servers to which the DNS queries are sent in case the server can’t answer. The two options to choose from are:
•Yes, it should forward queries to DNS servers with the following IP addresses.
•No, It should not forward queries.
You will need to add an IP address for the forwarder if you choose the first option. You can add the forwarders if applicable. Then, you will need the final screen. Then, click on the “finish” option to save your changes and close the wizard.
Step 11: Check the Server Configuration
The final step for you is to check that the DNS server has been configured correctly. You can begin to create your DNS records manually after your server is successfully installed and configured.
Conclusion
A DNS server is a key aspect of technology infrastructure that shouldn’t be overlooked. Understanding and implementing proper DNS configuration is the key to ensuring efficient and secure internet connectivity. This also helps ensure the optimal performance of all internet-connected applications and services.
Individuals and organizations can navigate the digital world more efficiently and securely by following best practices and optimizing DNS server settings. Efficient DNS configuration can make a lot of difference in delivering a safer, faster, and more reliable online experience.
Need more assistance with DNS server installation and configuration?
Публичное облако на базе VMware с управлением через vCloud Director
В инструкции рассказываем, как изменить настройки DNS-серверов в операционной системе Windows Server. Для сервера с ОС Linux воспользуйтесь этой статьей.
В инструкции ниже мы будем прописывать публичные DNS-серверы Google: 8.8.8.8 и 8.8.4.4, но вы можете указывать любые нужные вам DNS (например, DNS Cloudflare: 1.1.1.1 и 1.0.0.1 и др.).
Windows Server 2012 R2
- Подключитесь к серверу по RDP или через веб-консоль в панели управления.
- Кликните правой кнопкой мыши на «Пуск» и выберите «Сетевые подключения».

- Кликните правой кнопкой мыши на Ethernet-адаптер и выберите «Свойства».
- В списке компонентов найдите «Протокол Интернета версии 4 (TCP/IPv4)», выделите его кликом и нажмите кнопку «Свойства».
- Отметьте пункт «Использовать следующие адреса DNS-серверов» и пропишите нужные DNS.
- Нажмите «Ок» для сохранения и закройте все предыдущие окна.
Чтобы проверить, что настройки изменились, откройте командную строку (кликните правой кнопкой на «Пуск» и выберите «Командная строка») и выполните команду:
ipconfig /allЕсли все настроено корректно, в выводе отобразятся заданные вами DNS-серверы:
- Подключитесь к серверу по RDP или через веб-консоль в панели управления.
- Кликните правой кнопкой мыши на «Пуск» и выберите «Сетевые подключения».
- Кликните правой кнопкой мыши на Ethernet-адаптер и выберите «Свойства».
- В списке компонентов найдите «IP версии 4 (TCP/IPv4)», выделите его кликом и нажмите кнопку «Свойства».
- Отметьте пункт «Использовать следующие адреса DNS-серверов» и пропишите нужные DNS.
- Нажмите «Ок» для сохранения и закройте все предыдущие окна.
Чтобы проверить, что настройки изменились, откройте командную строку (кликните правой кнопкой на «Пуск» и выберите «Командная строка») и выполните команду:
ipconfig /allЕсли все настроено корректно, в выводе отобразятся заданные вами DNS-серверы:
Windows Server 2019
- Подключитесь к серверу по RDP или через веб-консоль в панели управления.
- Кликните правой кнопкой мыши на «Пуск» и выберите «Сетевые подключения».
- Выберите пункт «Настройка параметров адаптера».
- Кликните правой кнопкой мыши на Ethernet-адаптер и выберите «Свойства».
- В списке компонентов найдите «IP версии 4 (TCP/IPv4)», выделите его кликом и нажмите кнопку «Свойства».
- Отметьте пункт «Использовать следующие адреса DNS-серверов» и пропишите нужные DNS.
- Нажмите «Ок» для сохранения и закройте все предыдущие окна.
Чтобы проверить, что настройки изменились, откройте PowerShell (кликните правой кнопкой на «Пуск» и выберите «Windows PowerShell») и выполните команду:
ipconfig /allЕсли все настроено корректно, в выводе отобразятся заданные вами DNS-серверы:
Windows Server 2022 En
- Подключитесь к серверу по RDP или через веб-консоль в панели управления.
- Кликните правой кнопкой мыши на «Пуск» и выберите «Network Connections».
- Кликните «Change adapter options».
- Кликните правой кнопкой мыши на Ethernet-адаптер и выберите «Properties».
- В списке компонентов найдите «Internet Protocol Version 4 (TCP/IPv4)», выделите его кликом и нажмите кнопку «Properties».
- Отметьте пункт «Use the following DNS server addresses» и пропишите нужные DNS.
- Нажмите «Ок» для сохранения и закройте все предыдущие окна.
Чтобы проверить, что настройки изменились, откройте PowerShell (кликните правой кнопкой на «Пуск» и выберите «Windows PowerShell») и выполните команду:
ipconfig /allЕсли все настроено корректно, в выводе отобразятся заданные вами DNS-серверы:
Была ли статья полезна?
Ваша оценка очень важна
In this tutorial, we want to learn how to install and configure DNS on Windows Server 2016 step by step.
Note: Before installing DNS on your virtual server, you must set the IP address of your server statically, otherwise you will encounter an error during installation.
Table of Contents
Tutorial How to Install and Configure DNS on Windows Server 2016
DNS stands for Domain Name System, which in its general sense is responsible for translating domain names to IP addresses.
DNSs have zones within them that, when installed and configured by network administrators, make them use their network domain name and use them.
Install DNS on Windows Server 2016
1- First open your Server Manager.
2. Click Add Roles and Features to open the Add Roles page.
3. On the page that opens, click Next.
4. Then click on Role-based or feature-based installation and click Next.
5- In this step, select Select a server from the server pool and select the name of your server in the box below, and finally click Next.
6- In this section, find the phrase DNS Server and check it.
After checking DNS Server, Windows will give you a message stating that you need to install some necessary features to control DNS, in this section click on Add Features and click Next.
7- Pass the Features and DNS Server pages without changing and click on Install at the end.
Then wait for the DNS server to be installed on your server.
How to open DNS management console in Windows Server 2016
After installing the full DNS server roll on the Windows VPS, the 2016 server will explain how to open DNS Management, or DNS Management Console, in several different ways.
1: Open the DNS console from the Start menu
A) Open the Start menu and select Administrative Tools.
B) On the page that opens, click DNS to open the DNS management console.
2: Open the DNS management console from the Server manager
A) Open the Server Manager console.
B) From the Tools menu, click DNS Management to open the console.
3: Open the DNS management console from the Run window
A) Open the Run window by pressing the Winkey + R key combination on your keyboard.
B) Type dnsmgmt.msc and click OK.
This will open the DNS management console in a variety of ways.
After installing DNS, of course, you need to configure DNS because it is an important task to make DNS work correctly. DNS stands for Domain Naming System and the goal of DNS is to change name to IP address and and IP address to name like when you open a server or a web page, you enter a name like www.tactig.com, here the DNS server changes the name to the IP and you can visit the web page or get access to server sources. In this article, I show you how to come along to configure DNS Server fully on Windows Server.
Configure DNS Server Fully Step by Step
The DNS configuration is somehow like installing it, means you don’t need to worry or call any administrator to do it because you can do it along by this article, let’s move towards it.
1. When the DNS Server role installed, open the Server Manager window, click on tools tab that the dropdown menu appears and click on the DNS icon to open the DNS. Here I have named my server tactig-dc01.

2. At the first, what we need to do is creating a zone, it is a part of a DNS that the records are restored, for that purpose right click on your computer DNS server name and click on the New zone.

3. Skip the welcome page and on the next page, you’ll see three kinds of zone available.
- Primary zone: is rewritten zone that is not copied from somewhere.
- Secondary zone: is the copy of another zone, when you create a secondary zone you should copy the records from another source.
- Stub zone: is providing information whatever server holds a special zone. We want to create a primary zone, then click on that then hit Next.

4. In the next page, you will be asked about replication method.
- The first option, (To all DNS servers running on domain controller in this forest: <domain name> is used when you want to replicate with the domains and subdomains in the forest but that increases the network traffic.
- The second option, (To all DNS servers running on domain controllers in the domain: <domain name> is used when you want you DNS server replicate with all DNS servers in in your own domain.
- The third option, (To all domain controllers in this domain (for Windows 2000 compatibility): <domain name> is used when you want your server replicate with only domain controllers in your own domain. Select the 2nd option. Hit Next.

5. In the forward or reverse lookup zone page, select Forward lookup zone. The Forward lookup zone translates DNS name to IP address and the 2nd option, Reverse lookup zone translates IP to DNS name, just select Forward lookup zone then hit Next, we will configure the Reverse lookup zone later.

6. Specify a name for the zone then click on the Next button.

7. How do you want your zone contents update mode? The recommended option is Allow only secure updates. This option helps you DNS server not to be affected by spywares and viruses, select the first option and hit Next.

8. After continuing, your primary zone is created, just click on the Finish button to start working it.

Now the zone has created successfully but the DNS configuration is not done fully yet and the secondary zone as mentioned before is copy of another zone. It means you should copy the contents from somewhere else. Now I want to show you how to create a secondary zone. You need one another server, DNS server installed on. I name the new DNS server: tactig-dns02. The new server that we try to use as a second DNS server should be member of the Active Directory Directory Services. You can do that. If not read the articles about in this website.
1. Now we’ll work on tactig-dns02 server, open the DNS Manager tool and right-click on the Forward lookup zone, click on the New zone then skip the welcome page by hitting Next. In the Zone Type page, select the Secondary zone.

2. In the forward or reverse lookup zone page, select the Forward lookup zone option. It changes the DNS names to IP address. Then click on Next button.

3. Specify a name for the zone. Enter name of a zone that you’ve created before as a primary zone. Here you will have copy of the primary zone as a secondary zone.

4. In the Master DNS Servers page, you need to specify the master server. The Master server is the server that you’ve a zone out there and you want to copy its contents in your new secondary zone. Enter the master server’s IP address and the IP will be resolved. If the IP is correct, a green check mark will appear next to the IP address box then click on Next button.

5. When the Secondary zone is created, just click on the Finish button.

6. Now click on the new zone you just created, you’ll see the Red x means no content is present and not working properly as mentioned before you should copy the contents from somewhere else.

7. Go back to tactig-dns01 server, expand the Forward lookup zone mode and right-click on the zone that you want to get a copy from then select Properties.

8. Here select the Name Servers tab and add the server that you’ve installed the secondary zone on, here. When you add the name in the list you can copy the contents. For the purpose click on the Add button.
9. Type the server’s fully qualified domain name (FQDN) in the box as shown and below that box, enter the server’s IP address. When you resolve the server a message appears, don’t be worried because the message tells you that your server is not authoritative for the zone that’s what we know that. We just we want to make a copy of the zone and click on OK button.

10. Now come back to tactig-dns02 server, right-click on the zone you created and select Transfer from Master.

11. Refresh the page clicking on the Refresh button and you’ll see all the records you could see in tactig-dns01 server zone, now the secondary zone is created and configured properly.

Another next important point for the DNS configuration is that you should learn what is Reverse Lookup Zone. The Reverse Lookup Zone do opposite to what Forward Lookup Zone does means It change IP address to DNS name, when you’ve or give an IP address, it gives you the DNS name. For doing this, we need just one DNS server and I’ll use my root DNS server (tactig-dns01).
1. It is created the same as primary and secondary zones so expand the server name and right-click on the Forward Lookup Zone then select New Zone. When the page appears, skip the welcome page and select Primary zone then hit Next, leave the next step as default and hit Next. Here Select IPv4 Reverse Lookup Zone or IPv6 reverse lookup zone then hit Next, we use IPv4 version in our networks so you can choose the one you want to use.

2. At this point, the Network ID is needed for the zone, specify the Network ID then hit Next ( The Network ID is your network’s IP address.

3. Select the Allow only secure dynamic update option and click on Next button then finish the wizard to completely finish the configuration.

4. Run PowerShell as administrator. Type this command: ipconfig /registerdns. Press Enter button.

5. Refresh the Forward Reverse Zone node, you will see that an IP address is added there and you are done!

Conclusion: The DNS configuration is completely done. Yes, this was the basic configuration of DNS and the Advanced configuration of the DNS is more complicated, Practice till the time you feel you’ve already learned the configuration. For any further question leave a comment below.