
Posted by
on January 30, 2017
In this post we will show you how to use group policy to configure computers within an Active Directory domain to perform automatic Windows updates from either the Internet or a WSUS server that you manage.
This post is part of our Microsoft 70-744 Securing Windows Server 2016 exam study guide series. For more related posts and information check out our full 70-744 study guide.
Automating updates will save you a lot of administration time and speed the patching process up in the long run. By automatically applying Windows updates you will not need to log into each machine manually and perform updates. When combined with WSUS we can also report on which servers have which updates installed, allowing us to see the patch level of the entire Windows environment.
Configure Group Policy
In this example we will create a group policy object (GPO) which applies to all of our Windows computers. We already have all of our computer objects stored within the same organizational unit (OU) called “Servers” in this example, so this is where we will apply our GPO to.
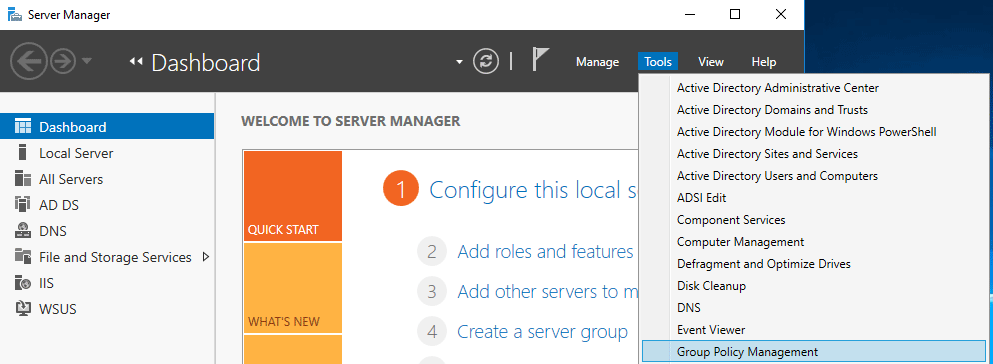
To configure group policy, open the Group Policy Management console from within the Tools menu in Server Manager as shown below.
In this instance we’re going to create a new GPO to apply our changes rather than simply updating the existing Default Domain Policy as this is the best practice. Within the Group Policy Objects, right click and select New.
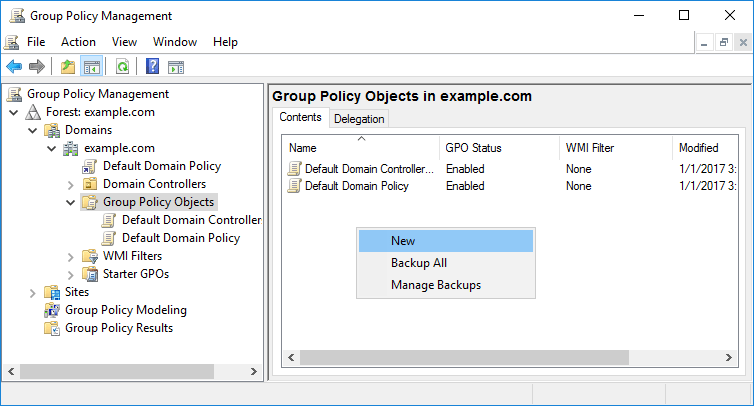
Give the GPO a sensible name so that it will be easy for others to identify in the future.
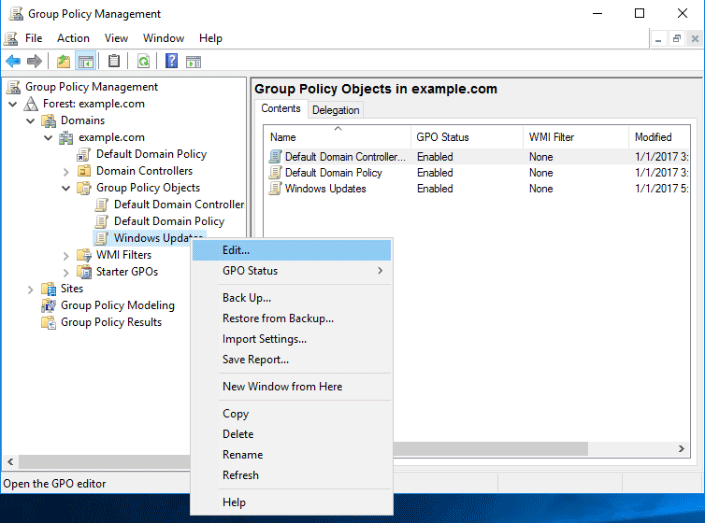
Right click your newly created GPO and select Edit.
From within the Group Policy Management Editor (GPME) select Computer Configuration > Policies > Administrative Templates > Windows Components > Windows Update. From here you’ll be able to see all of the configuration options you have regarding Windows update.
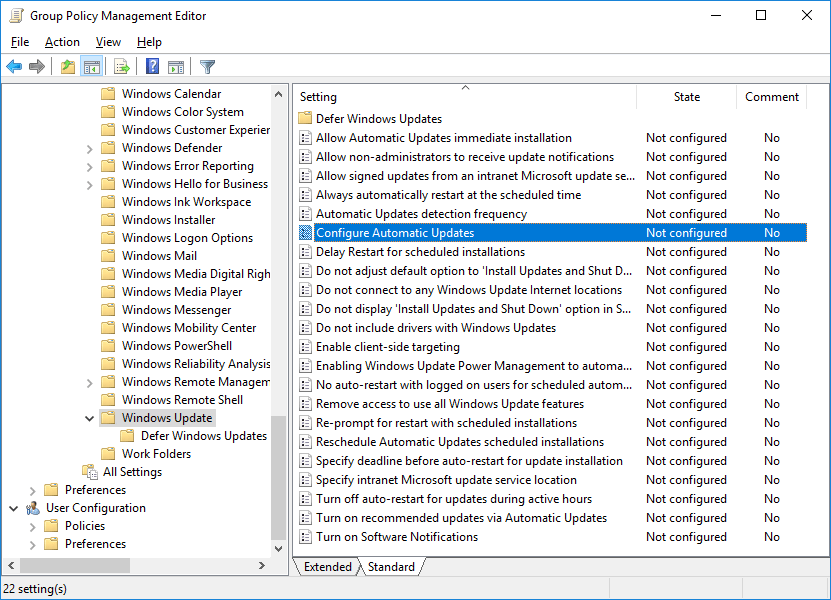
Configure Automatic Windows Updates
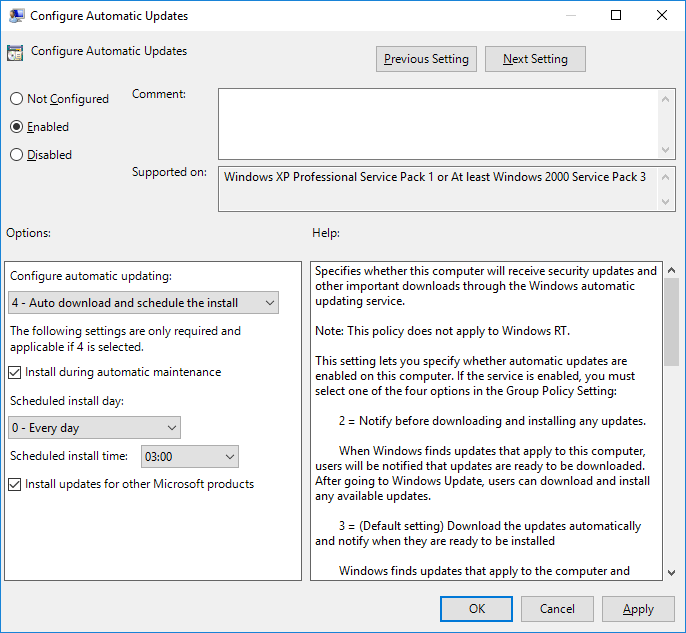
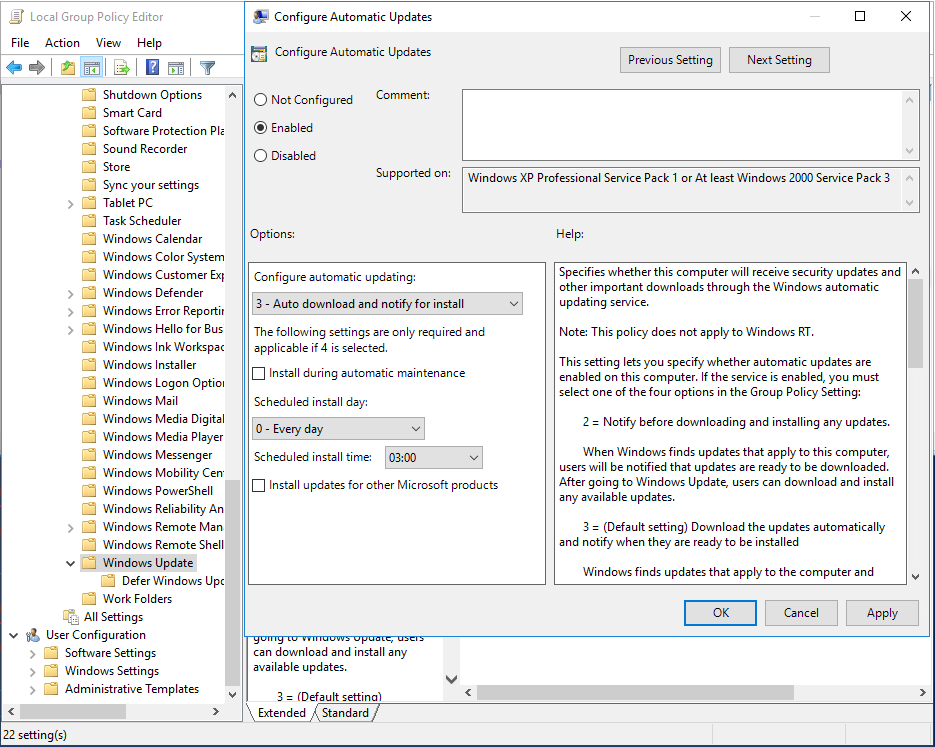
The primary policy for configuring automatic updates is, unsurprisingly, “Configure Automatic Updates” as highlighted above. Set this policy to enabled and then specify one of the four options. If this policy is left in the default Not Configured state, automatic updates are not configured and will be controlled manually on a per computer basis by the local administrator.
The following is a list of the different options you can apply when configuring automatic updates through this policy.
- 2. Notify for download and notify for install: If updates are found that need to be installed on the computer the user will be notified that there are updates ready to be downloaded and installed. This option will allow users to download and install the updates.
- 3. Auto download and notify for install: This is the default setting, and will automatically download required updates without notifying or interrupting the user. Once the downloaded updates are ready for installation the user will be notified, the user is then able to install them. Personally I prefer this option over the one above, as having the updates pre-downloaded and ready to go will speed up the installation process.
- 4. Auto download and schedule for install: This is the best option for deploying automatic Windows updates in my opinion. You specify a date and time for Windows updates to download and install, if a restart is required then the computer will also restart automatically in order to complete the update process. Any signed in user will be warned that the computer is scheduled to restart shortly.
- 5. Allow local admin to choose setting: Only local administrators will be able to use Windows update to configure the updates. This is usually the least desirable option when you’re trying to automate updates in a large environment.
If you choose number 4, you can optionally check the box to install during automatic maintenance. Automatic Maintenance installs updates when the computer is not in use and is available in Windows 8 and newer. The updates will also not happen if the computer is running on battery power. If the updates do not install within two days the updates will be installed right away.
We can then specify if we want updates to install automatically every day, or specify a specific day of the week followed by the time the updates should begin from. We can also optionally select to automatically update other Microsoft products, such as Microsoft’s Office suite for example.
There are some other useful policy options here that can also be used to customize how automatic Windows updates are performed. For example we can further tweak the automatic restarting, control how users are prompted regarding update notifications, or set the automatic update detection frequency just to name a few.
Point to WSUS Server
Optionally if you’re using a WSUS server you will want to set the “Specify Intranet Microsoft update service location” policy to point to the WSUS server for both updates and statistics. Simply enable the policy and specify your WSUS server as shown below.
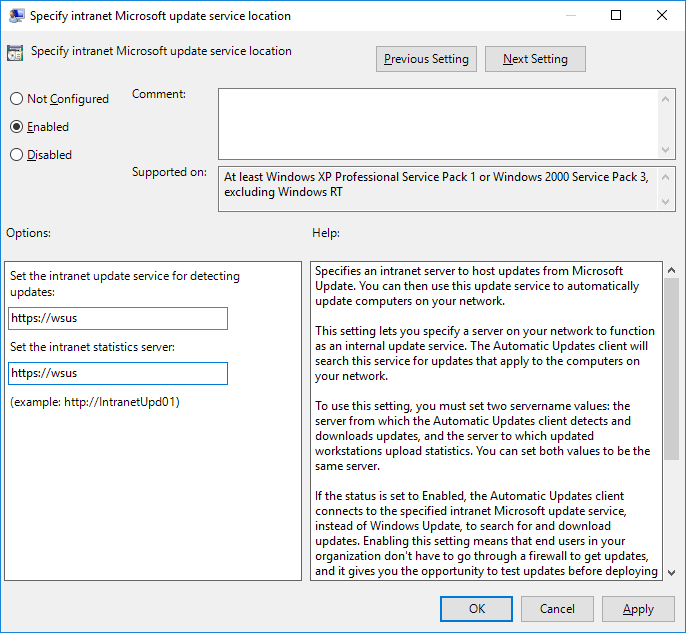
You may also want to look at using the “Enable client-side targeting” policy to specify which computer groups in WSUS the computers should belong to, more information can be found here on computer groups.
If you’re not using a WSUS server there’s no need to enable these policies, your computers will attempt to connect out to the Internet directly by default.
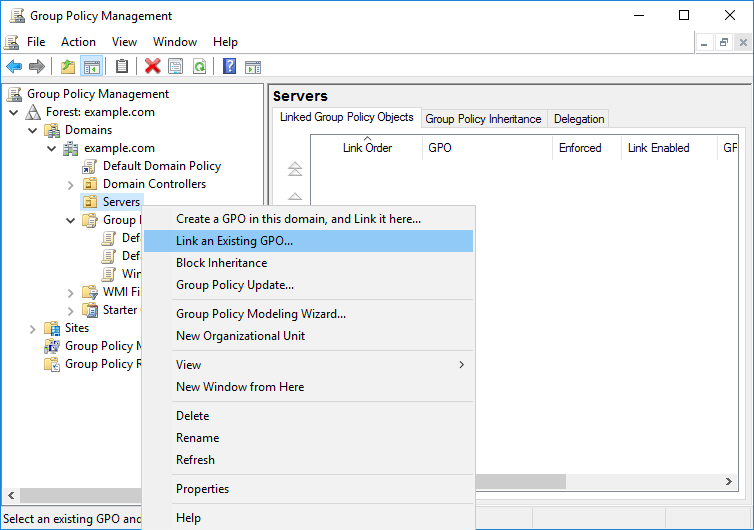
Link The Policy
Once you’ve completed configuring the GPO, close the Group Policy Management Editor and return back to the Group Policy Management window. Right click the container or OU that you want to link the policy to and select “Link an Existing GPO…” as shown below.
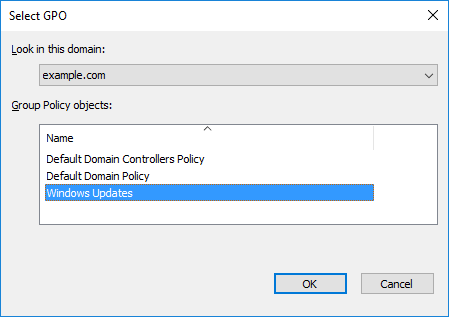
From the Select GPO window that appears next, pick the GPO that you wish to link. In this case we’re after our Windows Updates GPO which contains all of the changes that we’ve just made.
Alternatively you can also drag and group the GPO from the Group Policy Objects container straight onto the location of your choosing.
Keep in mind that it can take up to 90 minutes for the GPO to roll out to the computers within the linked OU, so you may wish to manually run the “gpupdate” command on a computer directly which will perform the group policy update straight away if you’re keen to test.
Summary
We have shown you how to use group policy to configure Windows computers to automatically download and install Windows updates. Optionally you can also set a policy to configure all servers to make use of a WSUS server, this way you can view more detailed reporting information in WSUS and easily see which servers have received a set of updates.
With automatic updates in place we can now sit back and relax, and by that I mean spend the time fixing some other problem instead.
This post is part of our Microsoft 70-744 Securing Windows Server 2016 exam study guide series. For more related posts and information check out our full 70-744 study guide.
В этой статье мы подробно рассмотрим процесс установки и настройки сервера обновлений WSUS (Windows Server Update Services) на операционных системах Windows Server 2019, 2016 и 2012 R2. WSUS позволяет централизованно управлять обновлениями продуктов Microsoft, таких как Windows, Office, SQL Server, Exchange, и других. Мы рассмотрим шаги установки, настройки, а также оптимизацию производительности WSUS.
Приобрести оригинальные ключи активации можно у нас в каталоге:
Windows Server 2019 — от 2740 ₽
Windows Server 2016 — от 2470 ₽
Windows Server 2012 R2 — от 1370 ₽
Как работает WSUS?
Сервер WSUS представляет собой отдельную роль Windows Server, которая выполняет следующие функции:
— Периодическая синхронизация с серверами обновлений Microsoft для получения новых обновлений.
— Администратор выбирает и одобряет установку необходимых обновлений для рабочих станций и серверов.
— Клиенты WSUS скачивают и устанавливают обновления в соответствии с политиками, настроенными администратором.
Установка роли WSUS в Windows Server
Начиная с Windows Server 2008, WSUS выделен в отдельную роль, которую можно установить через консоль управления сервером (Server Manager) или с помощью PowerShell.
Установка через Server Manager:
1. Откройте консоль Server Manager.
2. Отметьте роль Windows Server Update Services. Система автоматически выберет необходимые компоненты веб-сервера IIS.
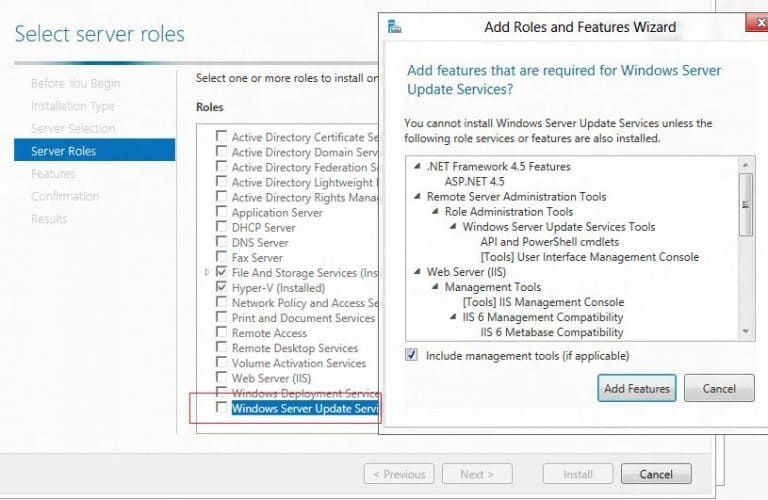
В окне выбора компонентов WSUS выберите WSUS Services. Далее выберите, какую базу данных будет использовать WSUS:
— Windows Internal Database (WID) — встроенная база данных Windows. Это рекомендуемый вариант, особенно для больших инфраструктур.
— Microsoft SQL Server — для использования локальной или удалённой базы данных SQL Server. Это опция SQL Server Connectivity.
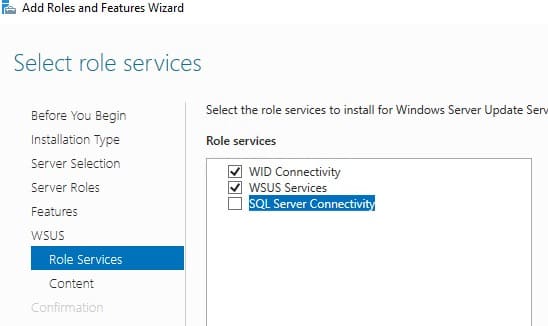
Важно: SQL Server для WSUS не может быть установлен на контроллере домена Active Directory, и WSUS не должен работать на сервере с ролью Remote Desktop Services.
База WID по умолчанию называется SUSDB.mdf и хранится в каталоге %windir%\wid\data.
Для её администрирования используйте строку подключения \\.\pipe\MICROSOFT##WID\tsql\query в SQL Server Management Studio.
Если вы хотите хранить файлы обновлений локально на сервере WSUS, включите опцию Store updates in the following locations и укажите путь к каталогу. Это может быть папка на локальном диске (рекомендуется использовать отдельный физический или логический том), или сетевой каталог (UNC путь). Обновления скачиваются в указанный каталог только после их одобрения администратором WSUS.
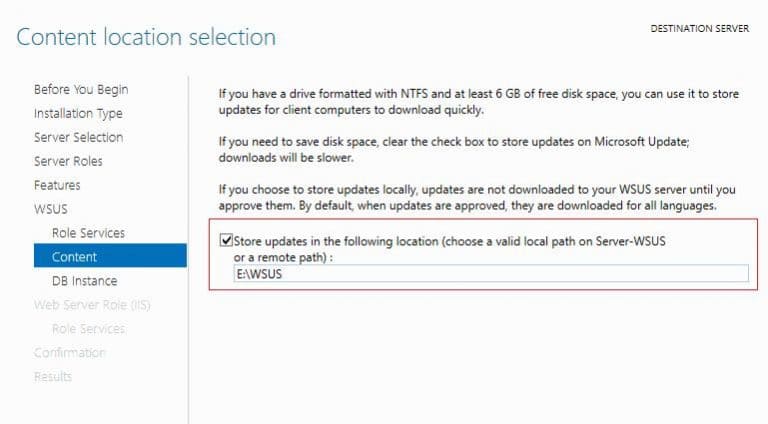
Размер базы данных WSUS сильно зависит от количества продуктов и версий ОС Windows, которое вы планируете обновлять. В большой организации размер файлов обновлений на WSUS сервере может достигать сотни Гб.
Если у вас недостаточно места на дисках для хранения файлов обновлений, отключите эту опцию. В этом случае клиенты WSUS будут получать одобренный файлы обновлений из Интернета (вполне рабочий вариант для небольших сетей).
Установка через PowerShell:
Чтобы установить сервер WSUS с использованием WID, выполните следующую команду:
Install-WindowsFeature -Name UpdateServices, UpdateServices-WidDB, UpdateServices-Services, UpdateServices-RSAT, UpdateServices-API, UpdateServices-UI –IncludeManagementTools
Начальная настройка сервера обновлений WSUS в Windows Server
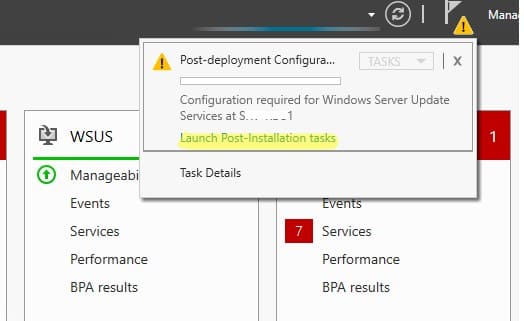
После установки роли WSUS выполните начальную настройку через Post-Deployment Configuration => Launch Post-Installation tasks в Server Manager.
Основные шаги настройки:
1. Запустите мастер начальной настройки.
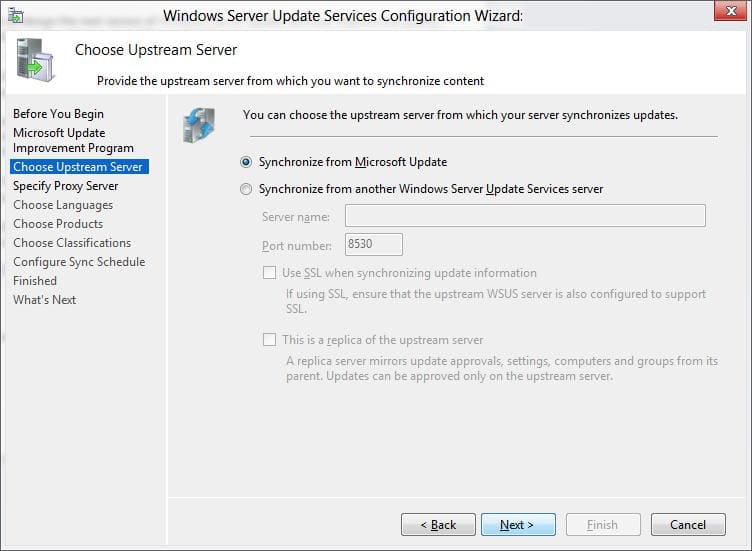
2. Выберите, будет ли сервер WSUS синхронизироваться с Microsoft Update или с вышестоящим WSUS сервером.
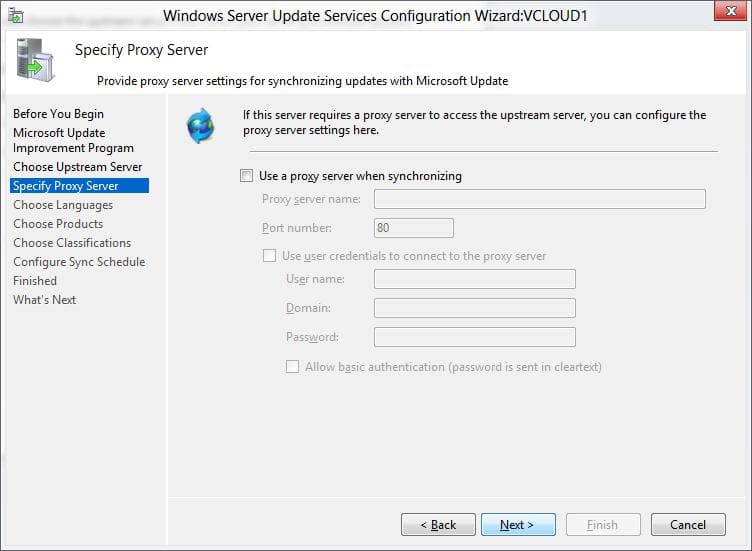
3. Укажите настройки прокси, если используется прокси-сервер для доступа в Интернет.
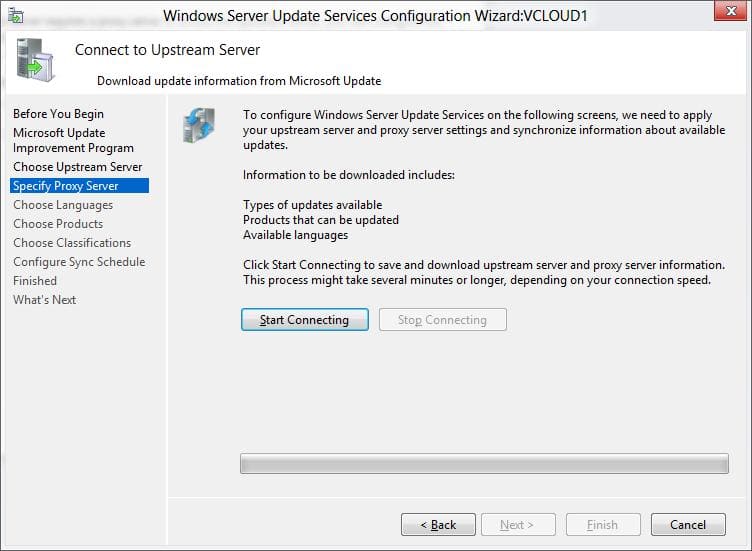
4. Проверьте подключение к вышестоящему серверу обновлений (или Windows Update). Нажмите кнопку Start Connecting.
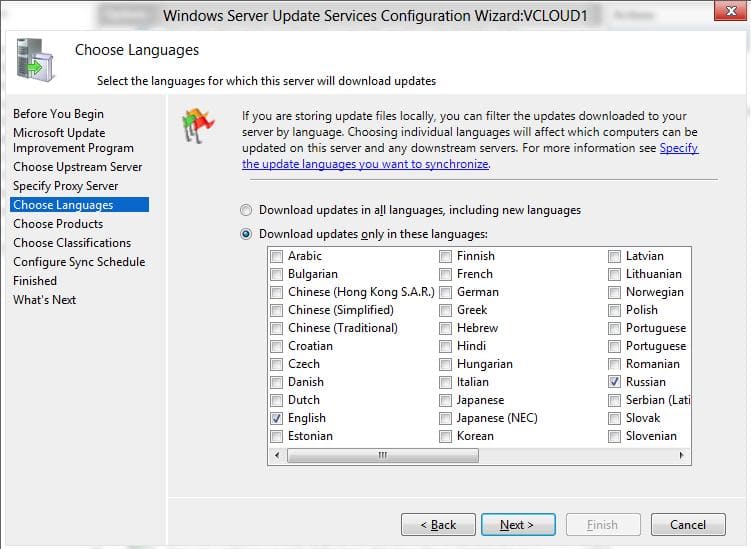
5. Выберите языки и продукты, для которых WSUS будет скачивать обновления.
Выберите продукты Microsoft, которые актуальны для вашей инфраструктуры. Например, если компьютеры с Windows 7 больше не используются, отключите обновления для этой версии ОС.
Обязательно включите в классификации следующие общие разделы:
— Developer Tools, Runtimes, and Redistributable — для обновления библиотек Visual C++ Runtime
— Windows Dictionary Updates в категории Windows
— Windows Server Manager – Windows Server Update Services (WSUS) Dynamic Installer
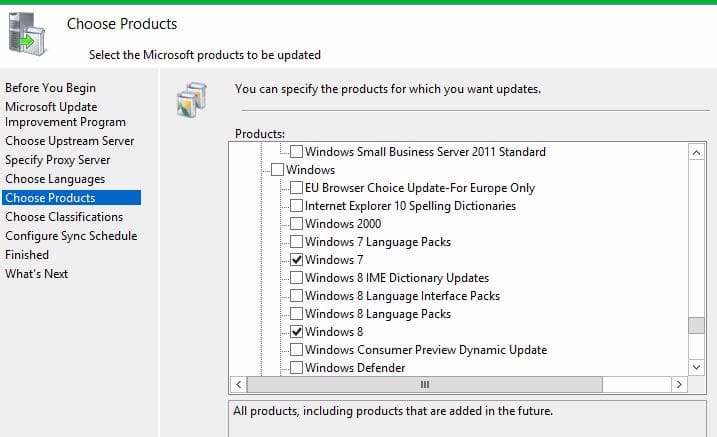
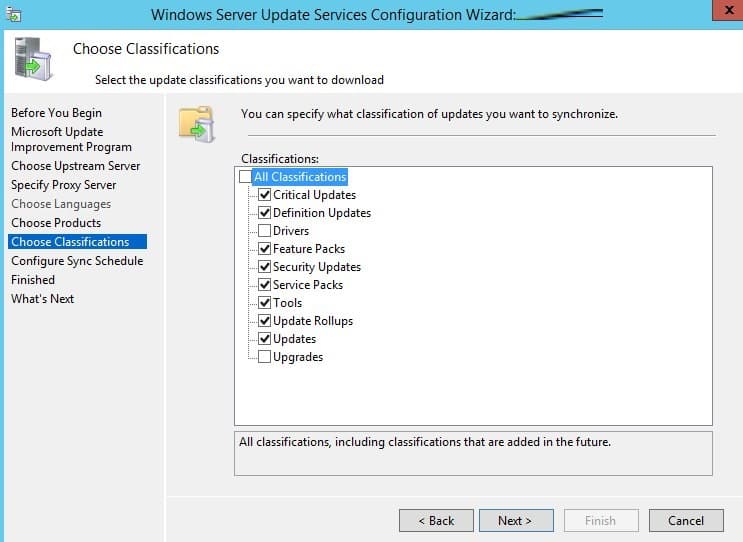
На этапе выбора типов обновлений рекомендуем включить следующие классификации:
— Critical Updates
— Security Updates
— Service Packs
— Updates
— Update Rollups
Задайте расписание синхронизации. Оптимально настроить автоматическую ежедневную синхронизацию в ночные часы, чтобы не перегружать сеть в рабочее время.

Первоначальная синхронизация сервера WSUS с вышестоящим сервером обновлений может занять несколько дней (в зависимости от количества продуктов, которое вы выбрали ранее).
После окончания работы мастера запустится консоль WSUS.
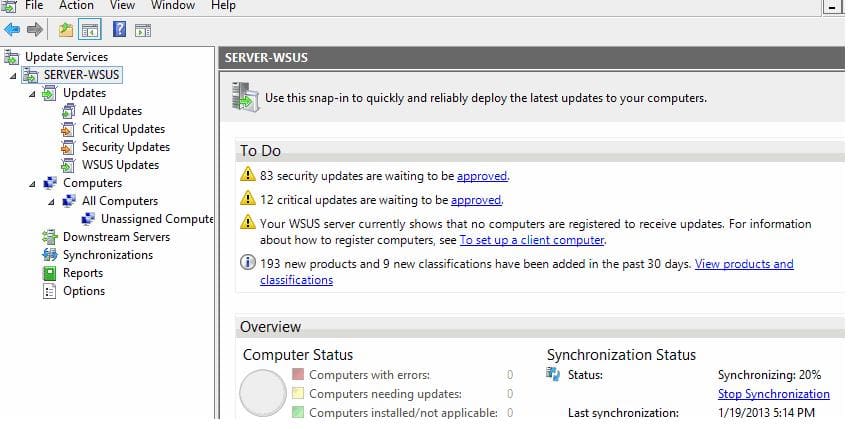
Консоль WSUS состоит из нескольких разделов:
Updates – обновления, доступные на сервере WSUS (здесь можно управлять одобрением обновлений и назначать их для установки).
Computers – здесь можно создать группы клиентов WSUS (компьютеры и серверы).
Downstream Servers – позволяет настроить, будете ли вы получать из обновления Windows Update или вышестоящего сервера WSUS.
Syncronizations – расписание синхронизации обновлений.
Reports – отчёты WSUS.
Options – настройка сервера WSUS.
Клиенты теперь могут получать обновления, подключившись к WSUS серверу по порту 8530 (в Windows Server 2003 и 2008 по умолчанию использоваться 80 порт). Проверьте, что этот порт открыт на сервере обновлений:
Test-NetConnection -ComputerName wsussrv1 -Port 8530
Если порт закрыт, создайте соответствующее правило в Windows Defender Firewall.
Установка консоли администрирования WSUS в Windows 10/11
Для администрирования сервера обновления WSUS используется консоль Windows Server Update Services ( wsus.msc ).
Консоль WSUS (wsus.msc) доступна как в локальной установке на сервере, так и удалённо через RSAT (Remote Server Administration Tools) на рабочих станциях с Windows 10 или 11.
Установка RSAT для WSUS:
Для установки WSUS консоли на Windows 10/11 выполните команду PowerShell:
Add-WindowsCapability -Online -Name Rsat.WSUS.Tools~~~~0.0.1.0
Для установки консоли WSUS на сервере используйте:
Install-WindowsFeature -Name UpdateServices-Ui
После установки создаются две локальные группы:
— WSUS Administrators — для пользователей с полным доступом к управлению WSUS.
— WSUS Reporters — для пользователей с доступом к отчетам.
Чтобы формировать отчеты в WSUS, необходимо установить:
— Microsoft System CLR Types для SQL Server 2012
— Microsoft Report Viewer 2012 Runtime
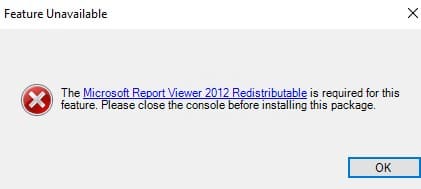
Если компоненты не установлен, при формировании любого отчета WSUS появится ошибка:
«The Microsoft Report Viewer 2012 Redistributable is required for this feature. Please close the console before installing this package.»
Оптимизация производительности WSUS
Для оптимальной работы WSUS рекомендуется следующее:
1. Минимум 4 Гб оперативной памяти и 2 процессорных ядра.
2. При большом количестве клиентов (1500+) может потребоваться увеличение ресурсов, чтобы избежать ошибок производительности, таких как 0x80244022 или Event ID 7053.
Для решения проблемы нужно добавить RAM на сервер и оптимизировать настройки пула IIS. Воспользуетесь следующими командами:
Import-Module WebAdministration
Set-ItemProperty -Path IIS:\AppPools\WsusPool -Name queueLength -Value 2500
Set-ItemProperty -Path IIS:\AppPools\WsusPool -Name cpu.resetInterval -Value "00.00:15:00"
Set-ItemProperty -Path IIS:\AppPools\WsusPool -Name recycling.periodicRestart.privateMemory -Value 0
Set-ItemProperty -Path IIS:\AppPools\WsusPool -Name failure.loadBalancerCapabilities -Value "TcpLevel"
Включите автоматическое одобрения для обновлений антивируса Microsoft В противном случае WSUS станет существенно тормозить и потреблять всю доступную оперативную память.
Исключения для антивируса:
Добавьте следующие папки в исключения антивируса, чтобы не снизить производительность WSUS:
— \WSUS\WSUSContent
— %windir%\wid\data
— \SoftwareDistribution\Download
Эти действия помогут улучшить работу WSUS и обеспечить своевременное обновление клиентов
Теперь, следуя этим инструкциям, вы сможете установить и настроить сервер WSUS на Windows Server, обеспечить централизованное управление обновлениями и оптимизировать его работу в вашей инфраструктуре.
In Windows Server 2016 there are no GUI options available to change the update behavior.
In this blog I was outline the different ways to change the Windows Server 2016 Update settings.
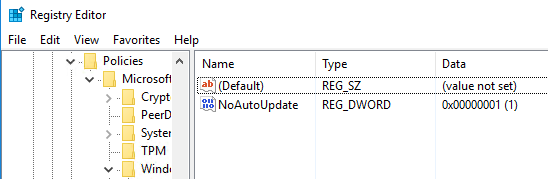
Windows always looks at registry keys located in the following hive:
HKEY_LOCAL_MACHINE\SOFTWARE\Policies\Microsoft\Windows\WindowsUpdate\AU
Typically there is a key named ‘AUOptions’ with a value in the range 2-5, and have the following meaning:
– 2 = Notify before download.
– 3 = Automatically download and notify of installation.
– 4 = Automatically download and schedule installation. Only valid if values exist for ScheduledInstallDay and ScheduledInstallTime.
– 5 = Automatic Updates is required and users can configure it.
But if there is a ‘NoAutoUpdate’ key with the value of ‘1’, no updates will be processed by Windows.
Powershell
You can change the registry key with the help of Powershell directly:
Set-ItemProperty -Path HKLM:\SOFTWARE\Policies\Microsoft\Windows\WindowsUpdate\AU -Name AUOptions -Value 3
In Windows Server 2012 I used to change the setting using the .NET object as below, this doesnt work anymore in 2016 as the API only allows “GET” statements.
$WUSettings = (New-Object —com «Microsoft.Update.AutoUpdate»).Settings
$WUSettings.NotificationLevel=3
$WUSettings.save()
SCONFIG
Sconfig is basically a simple batch script, which is sufficient for configuration tasks such as update settings.
In the sconfig prompt you can select options ‘5’ to enter the update settings configuration and then choose:
A – Automatically scan, download and install updates. After installation perform a reboot.
D – Automatically scan, download updates
M – Never check for updates, trigger manually.
Open a command prompt with administrative permissions and run SCONFIG from there.
Group Policy
You can always use the trusted GPO’s in an Active Directory domain environment. The settings are located under ‘Local Computer Policy > Computer Configuration > Administrative Templates > Windows Components > Windows Update’.
You can configure the same range of numbers here.
More info on managing update polices with GPO’s here:
https://technet.microsoft.com/nl-nl/library/cc720539(v=ws.10).aspx
Scheduling Day / Time
When you set the update settings to “Automatically download and schedule installation” it could be that you also want to decide yourself which day/time it should update. This can be done using the ScheduledInstallDay and ScheduledInstallTime keys in the registry.
ScheduledInstallDay
| Value | |
| 0 | Install every day |
| 1-7 | Specific day of the week where Sunday =1 and Saturday = 7 |
ScheduledInstallTime
| Value | |
| 0-23 | Time of the day in 24-hour format |
Setting the Scheduled Install Day to Tuesday:
Set-ItemProperty -Path HKLM:\SOFTWARE\Policies\Microsoft\Windows\WindowsUpdate\AU -Name ScheduledInstallDay -Value 3
Setting the Scheduled Install time to 6 AM:
Set-ItemProperty -Path HKLM:\SOFTWARE\Policies\Microsoft\Windows\WindowsUpdate\AU -Name ScheduledInstallTime -Value 6
The changes take effect after logoff
More info on this Windows Update settings here: https://msdn.microsoft.com/en-us/library/dd939844(v=ws.10).aspx
—
Thank you for reading my blog.
If you have any questions or feedback, leave a comment or drop me an email.
Darryl van der Peijl
http://www.twitter.com/DarrylvdPeijl
In Windows Server 2016, Microsoft has removed direct option to change Windows updates settings. In this article, we will explain how can you enable/disable Windows automatic updates in Windows Server 2016.
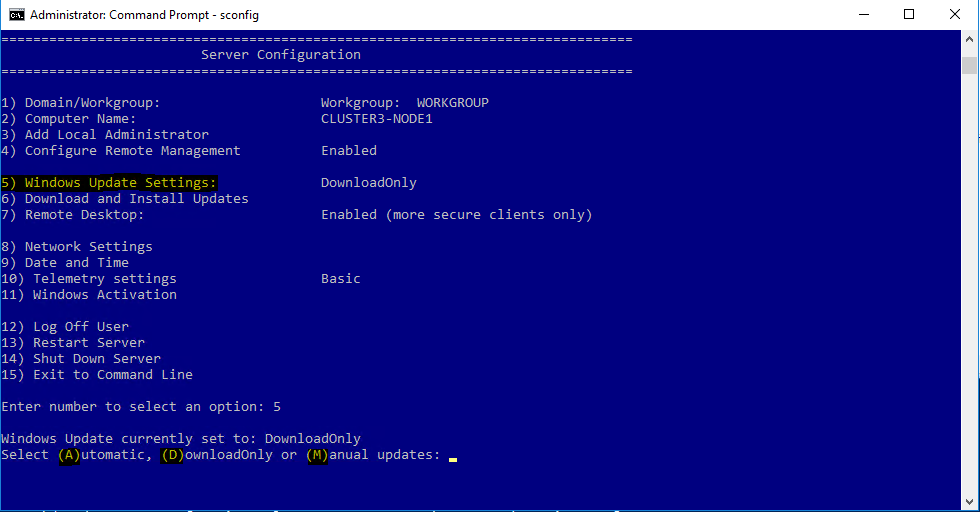
By default in Windows Server 2016, Windows updates are set to download only. If you wish to change it to install updates automatically, you can use sconfig utility to change this option. Following are the steps to change Windows updates setting on Windows Server 2016:
[1] Open Windows command prompt and type the following command:
sconfig
You will get a screen as shown in the following image:

[2] Check the setting for option 5 which is “Windows Update Settings”. By default, it should be “DownloadOnly“.
[3] Press 5 to change the Windows update settings and you will get the options as shown in the following image:

Following options are available to select:
(A)utomatic – This option will install updates automatically.
(D)ownloadOnly – This option will download the updates only.
(M)anual updates – This option will disable updates and you will need to check and install updates manually.
To set Windows Server 2016 to install updates automatically, type A and hit Enter key. You will get a pop up message stating that Windows updates will be installed automatically.
We hope this article will help you enable/disable Windows automatic updates on your Windows server. If you have any question or query related to your Windows server, you can join our web hosting community.
Есть у меня сервер с операционной системой Windows Server 2016, который находится не в домене. Остальные сервера в домене и обновляются через WSUS. Естественно, службой информационной безопасности доступ к внешнему миру закрыт, в том числе к серверам Microsoft. Вопрос, как устанавливать обновления на такой сервер?
Ничего сложного, настроим Windows Server 2016 через локальные групповые политики таким образом, чтобы он качал обновления с доменного WSUS.
gpedit.mscПереходим в раздел Computer Configuration → Policies → Administrative templates → Windows Component → Windows Update (Конфигурация компьютера → Административные шаблоны → Компоненты Windows → Центр обновления Windows).
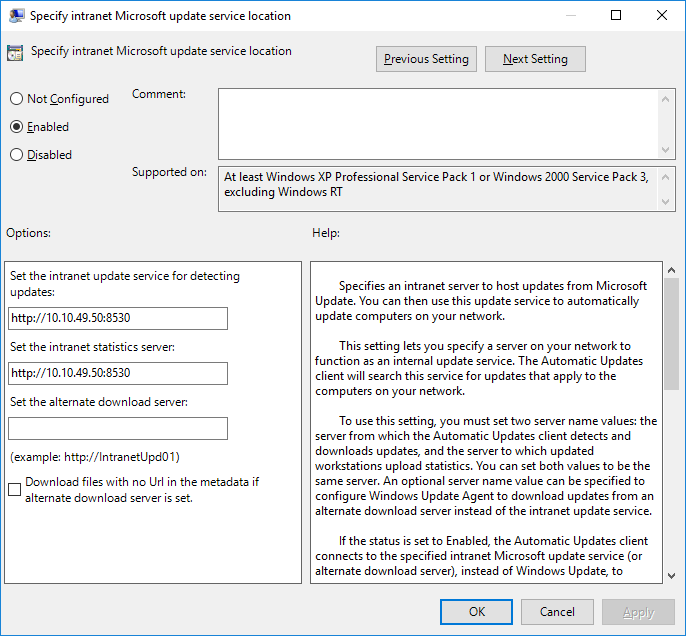
Настраиваем политику Specify Intranet Microsoft update service location (Указать размещение службы обновлений Майкрософт в интрасети).
- Enabled: включаем политику.
- Set the intranet update service for detecting updates (Укажите службу обновлений в интрасети для поиска обновлений): указываем URL с портом на WSUS, например, http://10.10.49.50:8530. Поскольку я не использую на данном сервере доменный DNS, то указываю IP адрес.
- Set the intranet statistics server (Укажите сервер статистики в интрасети): http://10.10.49.50:8530. Сервер статистики обычно совпадает с сервером WSUS.
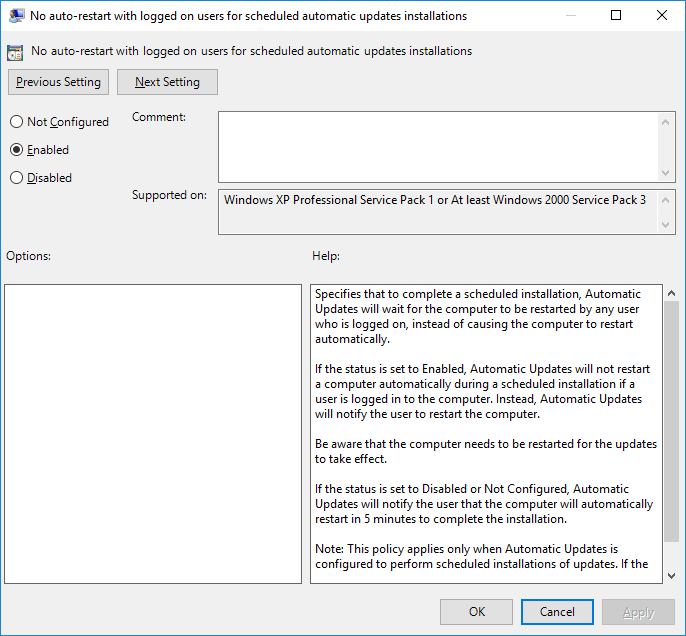
Настраиваем политику No auto-restart with logged on users for scheduled automatic updates installations (Не выполнять автоматическую перезагрузку при автоматической установке обновлений, если в системе работают пользователя).
- Enabled: включаем политику.
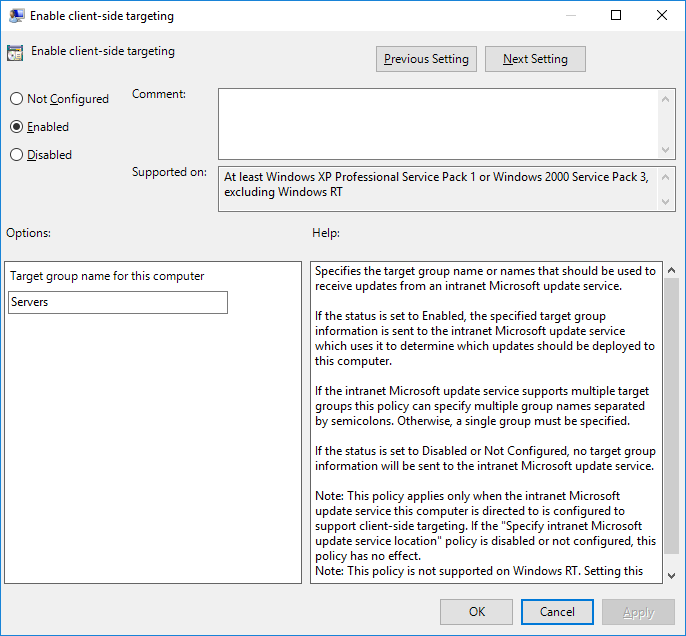
Настраиваем политику Enable client-side targeting (Разрешить клиенту присоединение к целевой группе).
- Enabled: включаем политику.
- Target group name for this computer (Имя целевой группу для данного компьютера): Servers. Относим наш сервер к группе Servers.
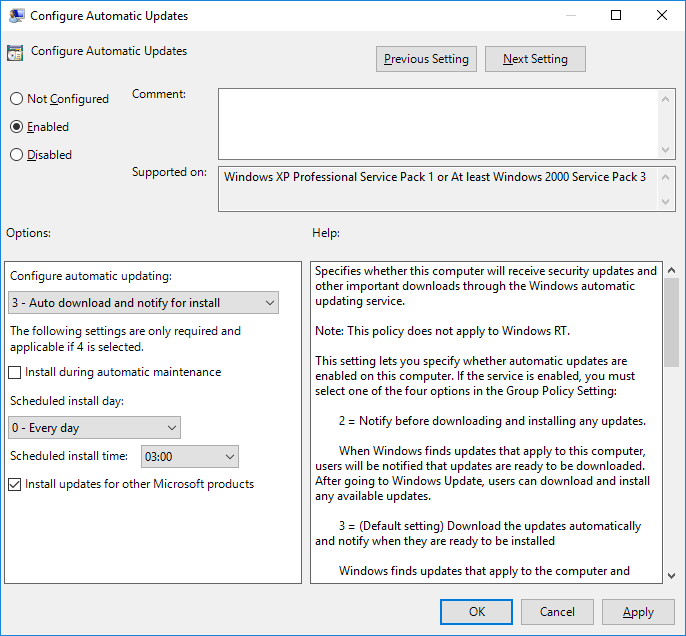
Настраиваем политику Configure Automatic Updates (Настройка автоматического обновления).
- Enabled: включаем политику.
- 3 – Auto download and notify for install (Автоматически загружать обновления и уведомлять об их готовности к установке).
- Install updates for other Microsoft products (Получать обновления для других продуктов Microsoft).
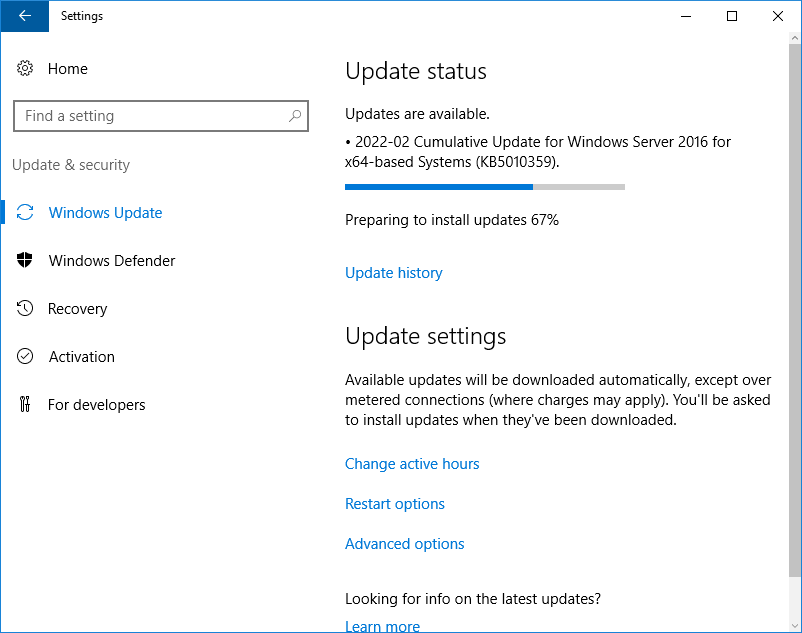
Проверяем работу Центра обновления Windows. Обновления скачиваются и устанавливаются.
Расходимся.