
Групповые политики являются одним из самых эффективных способов управления компьютерной сетью, построенной на базе Windows-сетей. Групповые политики используют для упрощения администрирования, предоставляя администраторам централизованное управление привилегиями, правами и возможностями как пользователей, так и компьютеров сети.
При помощи политики возможно:
- назначать сценарии пользователя и сценарии компьютера, запускающиеся в конкретно указанное время;
- определять политики параметров пароля учетных записей, блокировку пользователей;
- распространять программное обеспечение на компьютеры сети при помощи публикации или назначения;
- выполнять набор настроек безопасности для удаленных машин;
- ввести контроль над доступом к windows-компонентам, системным ресурсам, сетевым ресурсам, утилитам панели управления, рабочему столу и экрану;
- проводить настройку по распределению прав на доступ к файлам и папкам;
- настраивать перенаправление определенных папок из профиля пользователя.
Групповые политики возможно применять сразу на нескольких доменах, на отдельных доменах, на подгруппах в домене, на отдельных системах.
Политики, применяемые к отдельным системам, называются локальными групповыми политиками. Такие политики хранятся только на локальном компьютере. Остальные групповые политики соединены в объекты и хранятся в хранилище данных Active Directory.
Управление групповых политик имеется только в профессиональных и серверных версиях Windows.
Для каждой новой версии Windows вносились новые изменения в групповую политику. В некоторых случаях старые политики не применяются на новые версии Windows.
Обычно большинство политик прямо совместимы. Это означает, что, как правило, политики, предоставленные в Windows Server 2003, могут использоваться на Windows 7 и более поздних, а также на Windows Server 2008 и более поздних. Однако, политики для Windows 8/10 и Windows Server 2012/2016 обычно не применимы к более ранним версиям Windows. Для того, чтобы узнать какие версии поддерживает политика, можно открыть окно ее свойств – там посмотреть на поле Требование к версии или поддерживается. В нем указаны версии ОС, на которых эта политика будет работать:

Редактирование групповых политик
Консоль редактирования групповой политики входит в состав сервера, ее требуется установить в диспетчере сервера как дополнительный компонент управления групповыми политиками:

После этого в составе программ меню Администрирование появляется задача Управление групповыми политиками.
В оснастке Управление групповой политикой назначаются политики к подразделениям, а благодаря иерархической структуре можно визуально понять к какой группе относятся какая-либо политика:

Групповая политика изменяется в редакторе управления групповыми политиками – для этого требуется выбрать команду Изменить в меню Действия. Так же новую групповую политику можно создать либо «с нуля», для этого выбираем Объекты групповой политики выбираем команду Создать в меню Действие. Записываем новое имя объекта групповой политики после этого нажимаем ОК. Можно скопировать в нее параметры уже существующей политики в зависимости от требуемой задачи.

Чтобы применить созданную политику, требуется установить для нее связь с соответствующим объектом службы каталогов в оснастке Управление групповой политикой:

Примененную политику можно настроить по фильтру безопасности. Таким способом параметры данного объекта групповой политики возможно разделить только для заданных групп, пользователей и компьютеров, входящих в домен:

Рекомендации по применению политик
Главное заключается в том, чтобы не изменять политику по умолчанию. Потому как если в политике возникнет какая-либо серьезная ошибка, то возврат к начальному состоянию приведет к удалению не только последних настроек, но и всех других параметров. Поэтому для административных действий по управлению системой создавайте новые политики, тогда для изменения настроек вам потребуется только отключать/включать привязку политик к организационной структуре.
Обработка одной политики с наибольшим числом назначенных параметров, не отличается по времени от обработки нескольких политик, в каждой из которых назначается только часть этих параметров. Поэтому удобнее создавать несколько политик, чем включать все изменения в одну.
Не стоит удалять ранее созданные групповые политики – желательно просто отключить привязку их от объекта службы каталогов. Они могут потребоваться в дальнейшем для анализа в случае каких-либо проблем.
В рамках нашей услуги ИТ-обслуживание мы не только настраиваем групповые политики, но и берем на себя обслуживание всей ИТ-структуры клиента, включая все настройки, обновления ПО и поддержку в режиме 24/7.
Group Policy Management Background
Over the past versions of Windows Server the tools used to manage Group Policy have matured and the names have changed over time. Originally Group Policy was managed with the Active Directory Tools. Next a dedicated Group Policy Management Tool called the Group Policy Management Console (GPMC) was released, this tool replaced the Group Policy functionality in the Active Directory Tools. In Windows Server 2016 the Group Policy Management Tools are simply named Group Policy Management.
Prerequisites for installing Group Policy Management Console (GPMC)
You will require a Windows Server 2016 computer with the “Graphical Management Tools and Infrastructure” installed to install the Active Directory Management Tools using the Server Manager graphical user interface.
Instructions for installing Group Policy Management
To install Group Policy Management Tools (GPMC) on Windows Server 2016 please follow these instructions.
- Open the Windows Server 2016 Server Manager Dashboard. If Server Manager does not start by default press the “Windows + R” keys, Type “servermanager” in the “Open” field and press “Enter” or click the OK button.
- In the Server Manager main window, click “Add roles and features”.

- In the “Add Roles and Features Wizard” under “Installation Type” check the “Role-based or feature-based installation” radio button and click “Next”
- In the “Add Roles and Features Wizard” under “Server Selection” check the “Select a server from the server pool” radio button, select the server you want to install the Group Policy Management Console Tools (GPMC) on and click “Next”
- In the “Add Roles and Features Wizard” under “Server Roles” click “Next”
- In the “Add Roles and Features Wizard” under “Features” scroll down and check “Group Policy Management”. Click “Next” If prompted to install any supporting roles accept the defaults and continue.
- In the “Add Roles and Features Wizard” at the “Confirmation” page click “Install” to begin the installation of the Group Policy Management Tools.
- The installation of the Group Policy Management Tools will begin and the progress will be displayed. This installation should not require a restart of the server.
- The Group Policy Management Tools can now be found under the “Tools” menu in “Server Manager”.


Administrators who work with Group Policy will appreciate that the structure hasn’t changed in Windows Server 2016, but there are new policies unique to the release worth noting.
Microsoft introduced a lot of new features and capabilities in Windows Server 2016, but group policies remain largely unchanged from the previous version. Although Microsoft has presumably introduced some Windows Server 2016- and Windows 10-specific Group Policy settings, the overall group policy structure hasn’t changed.
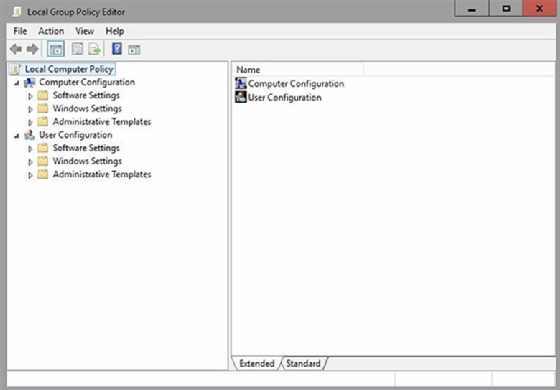
Group Policy allows Active Directory administrators to set up configurations for users and machines on the network. Examples of Windows Server 2016 Group Policy settings include setting a default Start menu style on Windows client machines or placing a threshold on login attempts before a user account gets locked.
In Windows Server 2016, Group Policy settings still exist for users and computers (Figure 1). These policy settings may be applied at the domain, organizational unit, site or local computer level.
What’s changed in Windows Server 2016 Group Policy
What’s changed is the way the Group Policy configuration process works. In Windows Server 2016, Microsoft encourages customers to deploy servers with as small of a footprint as possible.
The preferred deployment method does not include a GUI (Figure 2). The descriptive text beneath the installation options explains that you should only install Windows with the local administrative tools if you need backward-compatibility.
How to access the Group Policy Editor
In Windows Server 2016, Microsoft encourages customers to deploy servers with as small of a footprint as possible.
This raises the question of how to access the Group Policy Editor. The method you use will vary depending on the type of installation you have performed. Currently, Windows Server is in its preview release, so things could change by the time it’s in general availability. But if you installed the local administrative tools, then accessing the Group Policy Editor is somewhat similar to the method used in Windows Server 2012.
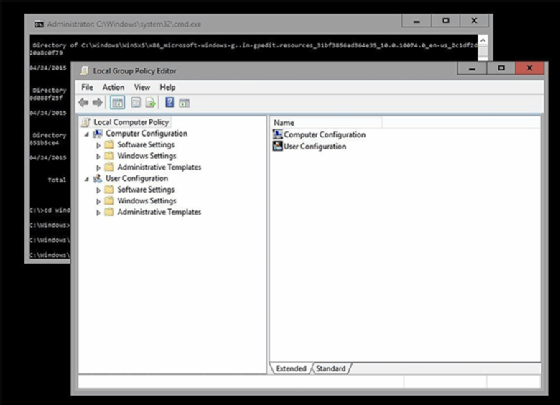
Currently, even an installation that includes the local administrative tools is somewhat bare bones. The interface includes a Command Prompt window and Server Manager, but nothing else. There is no desktop and no Start menu (Figure 3).
Finding management tools requires effort
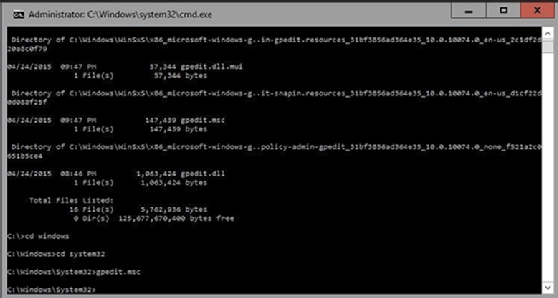
Most of the Windows Server 2012 R2 style management tools still exist, but accessing those tools isn’t always intuitive. The Server Manager, for example, includes a link to the Local Security Policy, but not to domain-based group policies. If you want to access the user and computer portion of the local security policy, you will need to switch to the Command Prompt window and navigate to C:\%systemroot%\system32, and then enter the gpedit.msc command to open the Group Policy Editor. (Figure 4).
For deployments that do not include local management tools, you will have to either manage the group policies remotely or use PowerShell. If you want to manage Windows Server 2016 Group Policy remotely, then you will need at least one server that has the management tools installed.
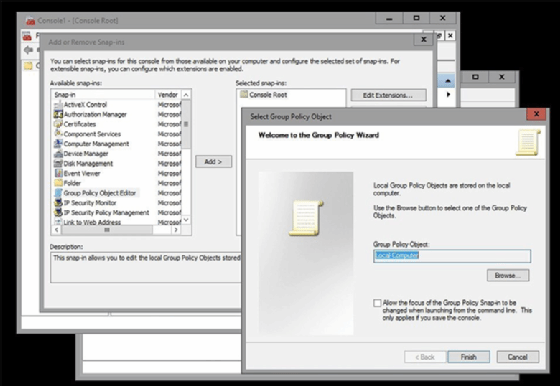
From this server, enter the Microsoft Management Console command at the server’s command prompt. When the console loads, select the Add or Remove Snap-ins command from the File menu. When you do, Windows will present a list of snap-ins. Choose the Group Policy Object Editor from the list of snap-ins and click Add. You will then be asked which Group Policy to manage. Click the Browse button and then select the desired Group Policy (Figure 5).
Making Group Policy changes with PowerShell
The other option is to edit group policies with PowerShell. Windows Server 2012 has an entire PowerShell module dedicated to Group Policy management. However, the Group Policy module is not installed by default. The Group Policy module is only installed if the server was either configured as a domain controller or if the server had the Group Policy Management Console installed.
Microsoft has not yet documented the conditions in which the Windows Server 2016 Group Policy module will be available.
When Windows Server 2016 becomes available, most organizations will probably opt to perform remote management of group policies rather than installing the management tools locally. PowerShell is a viable option, as well, but GUI-based management tools tend to be more efficient for small scale tasks.
Next Steps
Get back to basics and learn how Active Directory works
Find out how Active Directory differs from Azure Active Directory
Use PowerShell to manage groups in Active Directory
Dig Deeper on Microsoft identity and access management
-
What is Active Directory (AD)?
By: Rahul Awati
-
How to use Ansible with Windows for server management
By: Anthony Howell
-
Windows Server Update Services (WSUS)
By: Kinza Yasar
-
New Active Directory features coming in Windows Server 2025
By: Brien Posey


Group
Policy, a feature found in Microsoft Windows NT family of operating systems is
deployed to control the working environment of user accounts and computer
accounts. This feature provides centralized management and configuration of
operating systems, applications and user settings on Active Directory
environments.
A standalone version called Local Group Policy (LGPO or LocalGPO)
allows Group Policy Object management in non-domain computers.
Exploring
Group Policy Objects
Windows
server 2016 installations come with Group Policy Management as default. Perform
a search for the console and launch it. Be aware that just like the past lesson
on Implementing DNS in Windows Server 2016, there are a lot of components that make
up Group Policy implementation and management.
IT
engineers and network administrators stand to benefit from understanding the
concept to streamline user resource allocations, management and enforcement of
security policies across an organization’s domain. Let’s take a closer look at
the console.

Expand
the forest to display the Default Domain Policy, Sites, Group Policy Modelling
and Group Policy Results. Notice the organizational units we created in earlier
lessons appears in this window.

Expand
Domains tree and click on your local domain to inspect the tabs associated with
the object. The Status tab shows the status of Active Directory and SYSVOL
replication for your domain as it relates to Group Policy. If you have other
domain controllers on the network, clicking Detect Now will gather information
from all those domain controllers.

Any
linked Group Policy Objects will be displayed in this tab. Notice the default
policy is linked but not currently enforced.

Any Group Policy Inheritance will be displayed here. The tab contains
the default domain policy.

The
delegation tab displays all users and groups with permissions for containers
and all child containers in the domain. You can add or remove more users or
groups by clicking the button.
Creating Group Policy
Objects in Server 2016
When the Group Policy
Management console is launched, you will see any organizational units available
including the Group Policy Object container. Bear in mind that this object is
not available in Active Directory and any new policies created will have to be
linked to the Domain or Sites as pictured below.

Expand
the Group Policy Object Tree to reveal Default Domain Controller Policies and let’s
begin.
1. Right
Click on the Group Policy Object tab and select New to create a new group
policy.

2. A dialogue box
should open prompting you to name the GPO, try choosing self-explanatory names
like Printers or Mapped Drives. We’ll settle for New Demo GPO in this example.

3. Notice an option to
select Source Starter GPO. Group Policy Manager has starter GPO templates
available which could be assigned to any group policy you create. We’ll explore
that feature later so just click OK to create the new demo GPO.

4. Once the new GPO is
created, you have the option to link containers which correspond to the
Organizational Units we created in our previous lesson. Right Click on the
container you wish to apply group policies to and select Link an Existing GPO.

5. A dialog box should
now open specifying the domain you’re looking to apply policies to at the top.
Notice the New Demo GPO we created, listed at the bottom. Select and Click OK
to apply policy settings to Users or Computers contained in that particular
Organizational Container Unit.

6. Bear in mind, there
are two ways of creating GPOs. The first is achieved by Right Clicking Group
Policy Objects > New, offering administrators the tool to set all the
policies before linking them to a container.
The second method involves Right
Clicking the specific OU container and selecting ‘Create a GPO in this domain,
and Link it here’. As pictured below, all policies are applied immediately to
the OU container.

7. We are now ready to
edit our newly created New Demo GPO. Right click on the object and Edit.

8. You should see the
Group Policy Management Editor window open with two main settings for Computer
Configuration and User Configuration. Any changes made can be applied to either
users and or computers in your domain. Notice both configurations have editable
Policies and Preferences.

9. Becoming familiar with
all the settings and what functionality can be configured, is a good idea.
Expand the configuration tree and inspect all the tabs.

Below
are elements found in Computer Management > Policies;
Software Settings > Software
installation.
Windows Settings > Name
Resolution Policy, Scripts (Startup/Shutdown), Deployed Printers, Security
Settings, Policy-based QoS.
Administrative Templates > Control
Panel, Network, Printers, Server, Start Menu and Taskbar, System, Windows
Components, All settings.

10. Expand the tree to inspect elements for
Computer Management > Preferences. Various configuration settings can be
found as elaborated below;

Windows Settings > Environment,
Files, Folders, Ini Files, Registry, Network Shares, Shortcuts.
Control Panel Settings >
Data Sources, Devices, Folder Options, Local Users and Groups, Network Options,
Power Options, Printers, Scheduled Tasks, Services.
11. Very
similar settings tabs can be found under User Configuration, with only a
different in naming of Scripts as Logon/Logoff opposed to Startup/Shutdown for
Computer Configuration Policies. A
Folder Redirection tab can also be found under the User Configuration settings,
which is absent from Computer Configuration settings we inspected above.
Expand the User Configuration
tree > Policies to reveal settings listed below;

Software Settings > Software
installation
Windows Settings > Scripts
(Logon/Logoff), Security Settings, Folder Redirection, Policy-based QoS,
Deployed Printers.
Administrative Templates > Control Panel,
Network, Printers, Server, Start Menu and Taskbar, System, Windows Components,
All settings.

Expand
the User Configuration tree > Preferences to reveal settings listed below;
Windows Settings >
Applications, Drive Maps, Environment, Files, Folders, Ini Files, Registry,
Shortcuts.
Control Panel Settings >
Data Sources, Devices, Folder Options, Internet Settings, Local Users and
Groups, Network Options, Power Options, Printers, Regional Options, Scheduled
Tasks, Start Menu.
12. A section of grave importance and worth paying attention
to is User Configurations > Administrative Templates, where administrators
will spend a lot of time configuring user settings. A ton of information is
available in this tab so spend some time to get familiar with them.

Click
on Policies > Administrative Templates > System to see a host of settings
such as Removable Storage Access, Folder Redirection, Prevent Access to
registry editing tools among others.
To
see all available settings at your disposal, Click All Settings.
A Quick Glance at Starter GPOs
On the
main Group Policy Management interface, you will see a tab labelled Starter GPO
which may contain pre-set condition policies that may be applied to users and
or computers in your domain.
Click on
the tab and inspect its properties on the right pane. You may find this folder
has not been created yet. Click to Create Starter GPOs Folder.

Depending
on the server operating system you’re running, a handful of policies should
appear in this window. Further customized policies can be downloaded from Microsoft
or third parties, however this lab will focus on creating and setting our own
policies to affect domain users and computers.

Final
Thoughts
We hope this introductory article was useful at explaining Group Policy Infrastructure in Windows server, how to access it, the various components and settings that make up the editor.
You may want to pin the icon to your taskbar, as we’ll be delving deeper into using Group Policy tools, to implement structured restricted access control over resources on our network.
Do leave some
comments on other ways to perform this task to help other students learn more.
Thank you
for investing your time with us.
Credits to all organisations and development teams at Microsoft
Corporation
In this article, we see about How to create Group policy in windows server 2016. First open Group Policy Management console by using server manager. By using GPM we can assign various polices for Organizational units(OU). We show simple example to create GP.
Right click domain name and click to create GPO in this domain and link here.
Give a name for New GPO, we give Information Security and click OK.
Right click Group Policy Object and click Edit.
Here we showing simple example for editing GPO, click policies-Windows settings-Security Settings-Account polices-password Policy and click Maximum password age change password expire days and click OK.
Click GPO and click Settings to check what are the policy enabled.
Block Inheritance Group Policy To Block Inheritance of group policy to parent Organizational unit, it’s used to not apply any policy to blocked inheritance. For Example Right click Organizational unit and click Block Inheritance
We see now blocked Organizational units as BPO and Technical Dept.
Enforced Group policy
Enforcing Policy will take presence and apply to all the OUs followed in the Active Directory. which means that Even you blocked any OU using the Block Inheritance, Enforce will take override of that settings and apply the policy what ever enforced. So be careful, when selecting the Enforce has it will override and apply which may cause issues if any OUs defined and required different settings.. To enable Enforce, Right click GPO and select Enforced.
Link enabled GPO Link enabled that the group policy is linked to the OU. So the policy applies to the objects within the OU. Right click GPO and select Link enabled.
By Default Group Policy will take 90 Minutes of frequency to update to Clients which means client will contact Active Directory every 90 Minutes to check any policy changes are there and update if any changes or new Policies available and applicable for that particular client. If you want to update immediately, We can us gpupdate /force in the clients which will do check and update.
#Grouppolicy #BlockInheritance #GPO #Enforcedgrouppolicy #LinkenabledGPO
-
Founder & Author, Windowstechpro