MikroTik WPA2-Enterprise (EAP) with Windows Server 2012 RADIUS
This guide provides a step-by-step process to configure MikroTik as a WPA2-EAP Access Point using Windows Server 2012 RADIUS (NPS).
1. Setup Windows Server 2012 RADIUS (NPS)
Step 1: Install Network Policy Server (NPS)
- Open Server Manager → Click Manage → Add Roles and Features.
- Select Role-based or feature-based installation.
- Select the Network Policy and Access Services role.
- Check Network Policy Server and complete the installation.
Step 2: Configure NPS as a RADIUS Server
- Open Network Policy Server (NPS) from Administrative Tools.
- Expand RADIUS Clients and Servers → Right-click RADIUS Clients → Click New.
- Enter a Friendly Name (e.g., «MikroTik AP»).
- Set IP Address to the MikroTik router’s IP.
- Choose RADIUS Shared Secret and enter a strong key (this will be used in MikroTik).
- Click OK.
Step 3: Configure a Network Policy for WPA2-EAP
- In NPS, go to Policies → Network Policies → Right-click New.
- Name the policy MikroTik WPA2-Enterprise.
- Set Type of network access server to Unspecified.
- Click Add Conditions → Choose Windows Groups → Select a security group (e.g., «WiFi Users»).
- Under Authentication Methods, check Microsoft: Protected EAP (PEAP).
- Click Configure next to PEAP, and select the SSL Certificate issued by the AD Certificate Services.
- Click Next → Grant Access → Next.
- Set Encryption Settings: Enable AES and TKIP.
- Click Finish.
2. Configure MikroTik for WPA2-EAP with RADIUS
Step 1: Create the Wireless Security Profile
- Open MikroTik WinBox.
- Navigate to Wireless → Security Profiles → Click +.
- Name it WPA2-EAP.
- Set Mode to Dynamic Keys.
- Check WPA2-EAP (uncheck WPA-PSK).
- Under EAP Methods, select PEAP, TLS, TTLS.
- Under Certificates, select the CA certificate exported from the Windows server.
- Click OK.
Step 2: Configure the Wireless Interface
- Go to Wireless → Interfaces.
- Select the WiFi interface → Click Wireless tab.
- Set Mode to AP Bridge.
- Set SSID (e.g., «Enterprise-WiFi»).
- Select WPA2-EAP under the Security Profile.
- Click Apply → OK.
Step 3: Configure RADIUS on MikroTik
- Navigate to RADIUS → Click +.
- Enable Service for wireless.
- Set Address to the IP of the Windows Server running NPS.
- Enter the Secret (same as the one used in NPS).
- Set Authentication Port to 1812 and Accounting Port to 1813.
- Click Apply → OK.
Step 4: Enable RADIUS Authentication in Wireless
- Go to Wireless → Interfaces → Select your WiFi interface.
- Enable RADIUS MAC Authentication (if using MAC authentication).
- Click Apply → OK.
3. Configure Windows Clients or Phone wifi
- On the Windows client, go to Wi-Fi settings.
- Select the Enterprise-WiFi SSID.
- Choose WPA2-Enterprise with PEAP.
- If prompted, select Do not validate server certificate (or manually trust the CA).
- Enter domain credentials (Username & Password).
- Connect and verify access.
4. Troubleshooting Tips
MikroTik Logs:
- Run
log printin MikroTik terminal to check authentication errors.
Check NPS Logs:
- Open Event Viewer → Go to Custom Views → Server Roles → Network Policy and Access Services.
- Look for authentication failures.
Check Connectivity:
- Use
pingfrom MikroTik to Windows Server to confirm network reachability. - Ensure UDP ports 1812 and 1813 are open on Windows Firewall.
Conclusion
This guide outlines the full setup for WPA2-Enterprise using MikroTik as an AP and Windows Server 2012 as the RADIUS server. If configured correctly, clients will authenticate using their Active Directory credentials for secure network access.
-
-
dutq
just joined
- Posts: 11
- Joined: Mon Nov 20, 2017 4:31 pm
Configuring VPN L2TP Mikrotik use Radius windows server 2012
- #1
Mon Nov 20, 2017 4:54 pm
Hi Guys,
How to Configuring VPN L2TP Mikrotik use Radius windows server 2012 ??
I done follow guide https://mum.mikrotik.com//presentations … 423579.pdf but i don’t connect . How to can I check connect Radius client windows between Radius client Mikrotik?
Thanks a lot!!!!
-
berry2012
newbie
- Posts: 36
- Joined: Thu Apr 25, 2013 4:07 pm
- Location: Nigeria
- Contact:
Re: Configuring VPN L2TP Mikrotik use Radius windows server 2012
- #2
Thu Nov 23, 2017 7:22 am
Post what you’ve done so far, the config on your router and a snapshot of your Windows client and NPS server.
That will give a good starting point for that will help in solving the problem.
-
-
dutq
just joined
- Posts: 11
- Joined: Mon Nov 20, 2017 4:31 pm
Topic Author
Re: Configuring VPN L2TP Mikrotik use Radius windows server 2012
- #3
Mon Nov 27, 2017 7:06 am
Thanks berry2012,
I check my MikrotikCBR 1009 but itn’t User manager.i will updare firmware and need more time for research.
Whether you need to authenticate your users for PPP or any other Mikrotik service, you can do that either through the internal database or using the external RADIUS server. On the other hand, your corporate users want to use one login for all network services.
Additionally, you can connect any Mikrotik device with your Windows AD.
Let’s make the magic!
The scenario
Let’s assume that we have one Mikrotik router that will serve as your company’s VPN concentrator. This means that all company users will establish their VPN sessions through that device. That may be your main router or you can deploy another Mikrotik device in the DMZ zone.
You want to use the same username and password for the VPN as your corporate users use to log on to their computers. This is also known as Single Sign-On or SSO.
Starting with Windows 2000, Microsoft replaced their internal user database with the structure named Active Directory or AD for short. In its essence, Active Directory is the LDAP system. And yes, LDAP is the open standard for directories. However, Mikrotik devices can’t connect directly to the LDAP server.
Although your Mikrotik device doesn’t use the LDAP protocol, it is perfectly capable of using another open standard – RADIUS. The Remote Authentication Dial-In User Service protocol is described in RFC 2865.
The answer for this scenario is very simple – use the Microsoft implementation of RADIUS server and integrate your Mikrotik devices with your domain. This service exists in every Windows Server (from 2008 R2 onward) and its named Network Policy Server or NPS.
Even better, it exists even in ye olde Windows 2000 and 2003 Servers and it’s named IAS. However, those platforms are obsolete and we will not take them into further consideration.
The recipe
In an essence, we need:
- At least one working AD server (a.k.a. the domain controller)
- Your users already can log on to this domain and work regularly with other network services, like file servers
- At least one server in that domain must have a NPS role
- Your Mikrotik device must be properly configured for other network roles and accessible from your local network and the Internet
Please, note the following information:
- all LAN IP addresses of all devices you will use
- the short domain name (like Contoso)
- all user groups in that domain that will use this service
- check your password policies for communication between devices
When all those steps are fulfilled, we can continue with this process.
Install the NPS role on the server
The first step is to install the NPS role on one of your servers. You may have more than one NPS server in your network. Later, you will see that one Mikrotik device may use more than one RADIUS server. In my scenario, I will use one Mikrotik device and one NPS server.
This process it the same regardless of the version of Windows Server. I found those screenshots in my archive and I luckily made them 5-6 years ago when I configured NPS for the first time. When I upgraded that server to 2012R2, I used them to repeat this process smoothly.
Open the Server Manager GUI on your server and add new role – Network Policy and Access Services.

You need to select only the Network Policy Server role. In Windows Server 2012R2, you will not see the Routing and Remote Access Services option here. Don’t worry, you don’t need it at all.

Finish the installation process.

It will take a while, so grab a coffee and prepare for the next step.
Configuration of the NPS service
Open the Network Policy server console from the Administrative Tools.

When the console opens, you can start to configure it. Choose RADIUS server for Dial-Up or VPN Connections from the dropdown menu.

Then click on the button named Configure NAP. We are just starting the configuration process.
The next step is to name it and choose the type. We need the policy for VPN connections.

Now, we need to add all RADIUS clients that will use this policy. Yes, you may have more than one client related to the same policy.

Click on the button [ Add… ] and the new dialog will pop up. You need to define:
- a friendly name for that device (like Mikrotik router)
- specify its IP address (or DNS name)
- enter the RADIUS secret – a password that will be used later in communication

This RADIUS secret is important and therefore write it down. You must enter it correctly later on your Mikrotik device. As you already concluded, you may use the different secrets for different clients.
Repeat this process for all clients you want to configure here. When you finish, just continue to the next step.

We should choose the authentication method.

I left this on MS-CHAPv2 protocol. It is not important here, as it’s related to Microsoft Windows based services.
The next step is to add users that will be processed with this policy. This dialog is very similar to that related to the network clients. This is a very important step.

Again, click on the button [ Add… ] and the new dialog will pop up. This is the standard dialog to select users or groups that you can see anywhere in Windows.

Choose all the groups you want to include. As this policy will cover all users in the domain and all users are always the part of group named Domain Users, I added only this one group here. Again, when you finish adding all necessary group, go to the next step – the IP filters.

Just leave it on None and continue.

Those settings are also not important for this policy as they are only Microsoft related. Just continue further.

You don’t need to use the REALM name so leave it blank. In case you want to use it, you need to specify it later in Mikrotik.

And that’s it. We have our new policy that will process all VPN logins from our Mikrotik router.
Check your new policy
Before we switch on the Mikrotik side, we will check our setup on the NPS side. This is also a good way to do the troubleshooting steps.
The first step is the RADIUS Clients list – your device must be enlisted and enabled

The second step is to check the Connection Request Policies – the VPN policy must be enabled.

The third step is to check the Network policies – the policy for VPN connections must be enabled

Now, we are ready to configure our Mikrotik device.
Configuring our Mikrotik device as the RADIUS client
We know that our NPS server works and we can configure the client side. In this scenario, I will enable the RADIUS authentication for PPP services. I used WinBox here, but you can do the same using the terminal.
Preparing the PPP service for RADIUS
I opened the PPP options in WinBox and then chose the tab named Secrets. On this tab, I clicked on the button named PPP Authentication & Accounting.

The new dialog opened and I checked the option named Use Radius
I closed this dialog and the PPP settings. Now, all my PPP services may use the RADIUS service. Keep in mind that Mikrotik can simultaneously use both the local user database and the remote RADIUS server for the user authentication.
Configuring the RADIUS client
The RADIUS client is hidden behind the command named RADIUS in the main menu of the WinBox GUI.
The new window will open and here we can see all configured RADIUS clients. As I already mentioned, we can use more than one RADIUS server with the same Mikrotik device.

If you need to define the new RADIUS server connection, click on the button [ + ] or just double-click on the existing definition to edit it. Now we can configure our connection.
We need to specify:
- the service (ppp in this scenario)
- the Windows AD Domain name (like Contoso)
- the IP address of NPS server
- the RADIUS secret – the same password we defined in the NPS policy
- the source address of our device – this IP address must match the IP address we have already specified in the NPS policy
When you configure all those parameters, click on the button [ OK ] to save them. Now you can test your VPN connections.
If you want to see the statistics, you can open this RADIUS connection and choose the tab named Status, where you can see the parameters of the communication.
You should see that most of your requests are accepted.
And the RADIUS server served well for many years
This was my story about this interesting integration. Again, there was a bit of magic that makes great things.
By the time you finish read this, my server will be upgraded to Windows Server 2016 and I used this same magic to transfer NPS on it. This service may finish more tasks but I used it only for this purpose.
As you can see, both sides are very flexible to configure. You may add more client devices or more servers, according to your needs. Even more, you can configure additional RADIUS servers for other Mikrotik network services, like hotspot.
Stay tuned.
День добрый всем форумчане.
Прошу помочь мне разобраться в ситуации.
Есть у меня задача, в нескольких офисах где стоят Mikrotik 951, настроить там WIFI через RADIUS с доменной авторизацией «пользователь — пароль»
есть сервер Windows 2012 R2 на нем развернут NPS и сделаны настройки для WIFI:
настройки на Mikrotike:
при тестовом соединение пользователя с WIFI видим логах сервера 3 записи
настройки на Mikrotik:
на mikrotike мы видим следующие в логах:
как мы видим подключение не проходит, поиск по просторам интернета ни к чему не привел, или просто не нашел я, вообщем прошу помощи, кто сталкивался или кто настраивал подобное, поделитесь опытом
Mikrotik — Active Directory Authentication
Mikrotik — Active Directory Authentication
Would you like to learn how to configure the Mikrotik Active directory authentication using Radius? In this tutorial, we are going to show you how to authenticate Mikrotik users on the Active Directory database using the Radius protocol.
MikroTik Tutorial:
On this page, we offer quick access to a list of tutorials related to MikroTik.
Tutorial — Radius Server Installation on Windows
• IP — 192.168.15.10.
• Operacional System — Windows 2012 R2
• Hostname — TECH-DC01
• Active Directory Domain: TECH.LOCAL
Open the Server Manager application.
Access the Manage menu and click on Add roles and features.

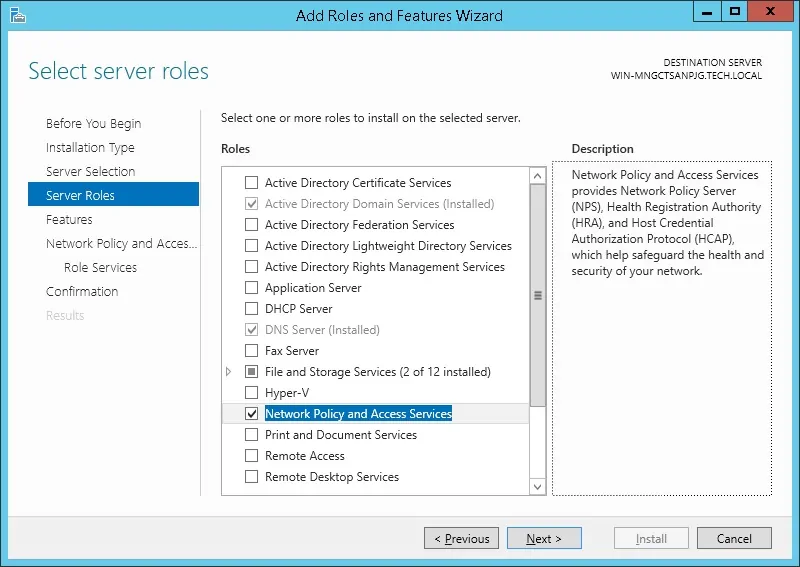
Access the Server roles screen, select the Network Policy and Access Service option.
Click on the Next button.
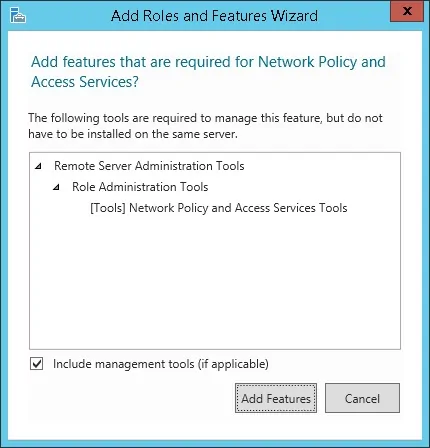
On the following screen, click on the Add features button.
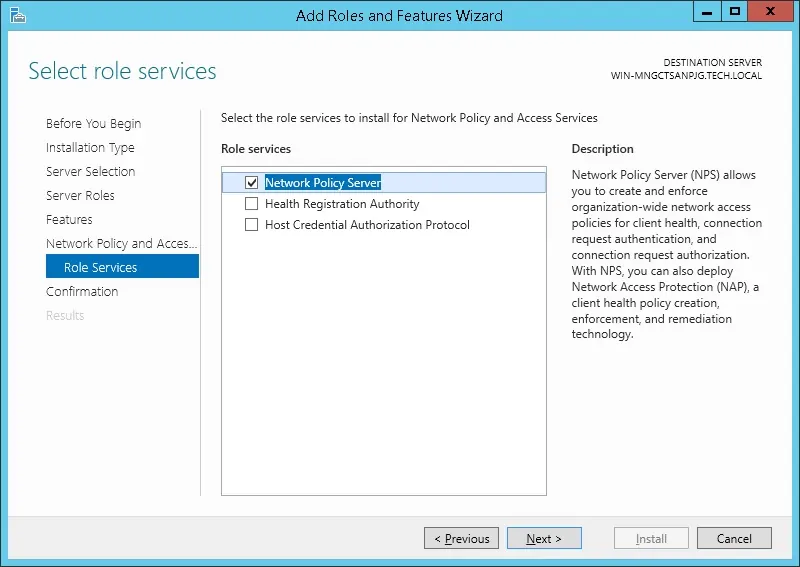
On the Role service screen, click on the Next Button.
On the next screen, click on the Install button.
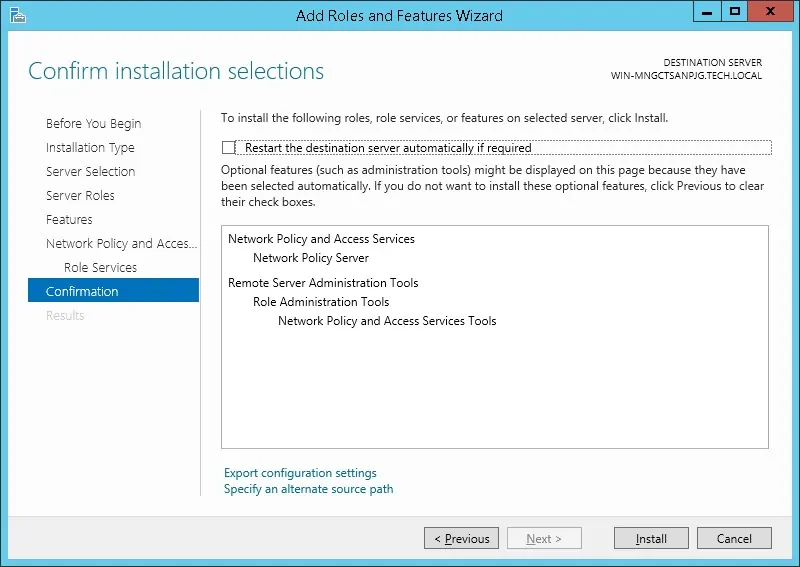
You have finished the Radius server installation on Windows 2012.
Tutorial Radius Server — Active Directory Integration
Next, we need to create at least 1 account on the Active directory database.
The MIKROTIK account will be used to login on the Mikrotik device.
On the domain controller, open the application named: Active Directory Users and Computers
Create a new account inside the Users container.
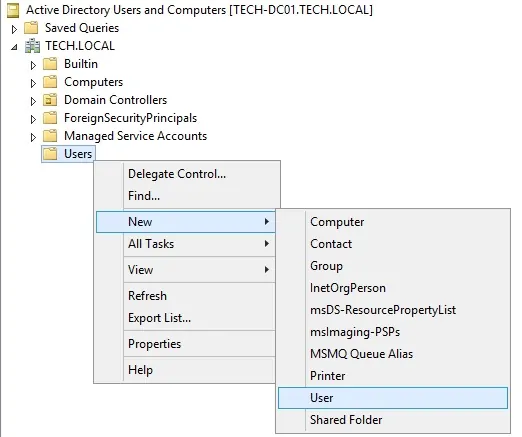
Create a new account named: mikrotik
Password configured to the MIKROTIK user: 123qwe..
This account will be used to authenticate as admin on the Mikrotik device.
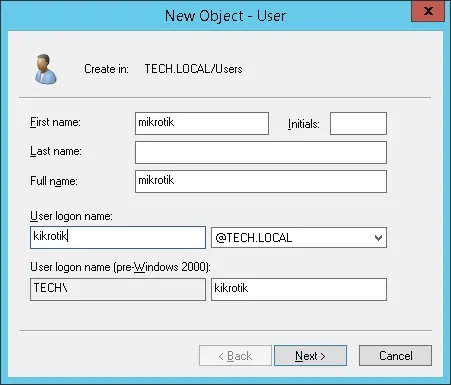
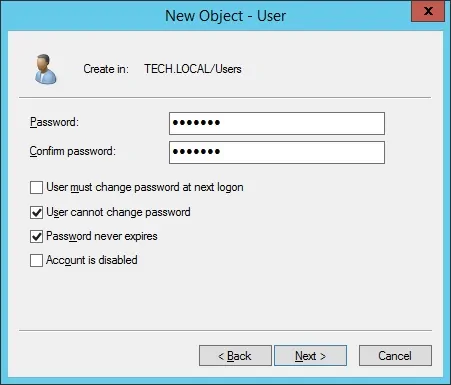
Congratulations, you have created the required Active Directory accounts.
Next, we need to create at least 1 group on the Active directory database.
On the domain controller, open the application named: Active Directory Users and Computers
Create a new group inside the Users container.
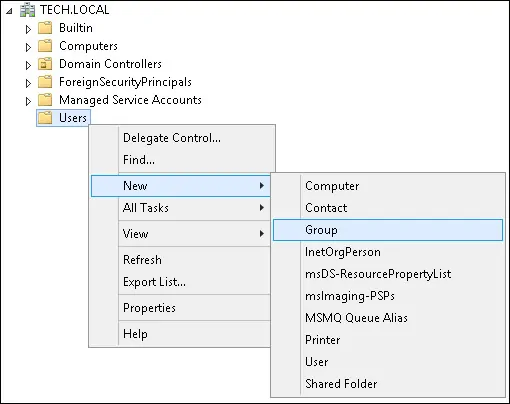
Create a new group named: Mikrotik-admin
Members of this group will have the Admin permission on the Mikrotik device.
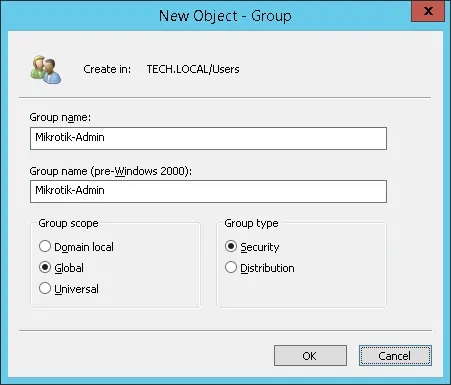
Important! Add the mikrotik user as a member of the Mikrotik-admin group.
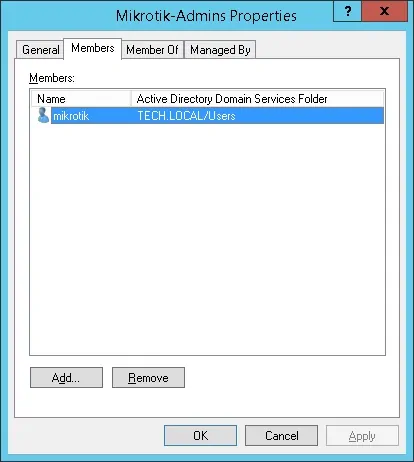
Congratulations, you have created the required Active Directory group.
Tutorial Radius Server — Add Client Devices
On the Radius server, open the application named: Network Policy Server
You need to authorize the Radius server on the Active directory database.
Right-click on NPS(LOCAL) and select the Register server in Active Directory option.
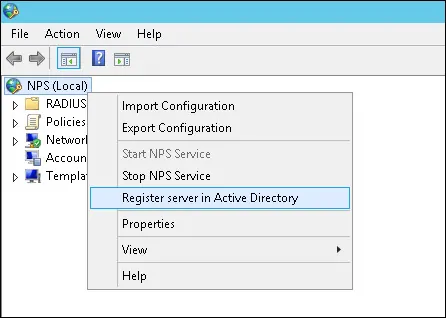
On the confirmation screen, click on the OK button.
Next, you need to configure Radius clients.
Radius clients are devices that will be allowed to request authentication from the Radius server.
Important! Do not confuse Radius clients with Radius users.
Right click on Radius Clients folder and select the New option.
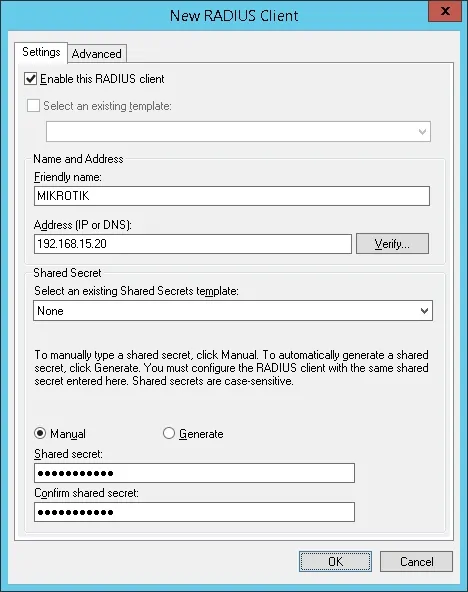
Here is an example of a Client configured to allow a Mikrotik device to connect to the Radius server.
You need to set the following configuration:
• Friendly name to the device — Add a description to your Mikrotik
• Device IP Address — IP address of your Mikrotik
• Device Shared secret — kamisama123
The Shared secret will be used to authorize the device to use the Radius server.
You have finished the Radius client configuration.
Tutorial Radius Server — Configure a Network Policy
Now, you need to create a Network Polity to allow authentication.
Right click on the Network Policies folder and select the New option.
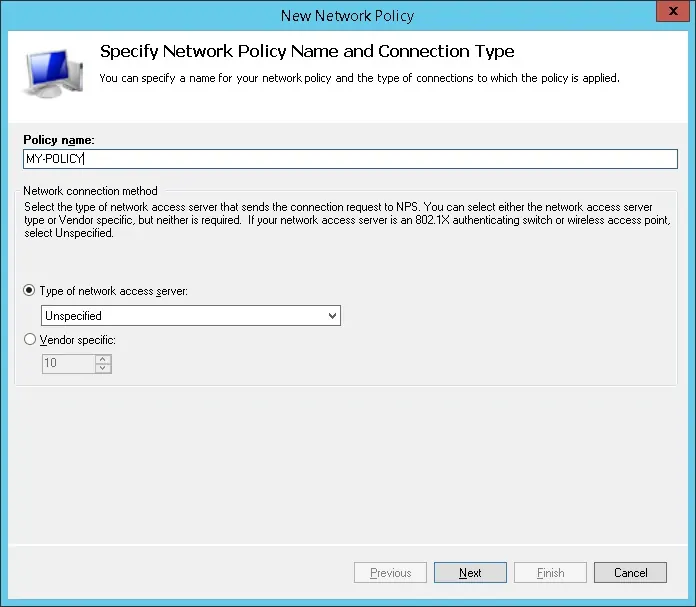
Enter a name to the network policy and click on the Next button.
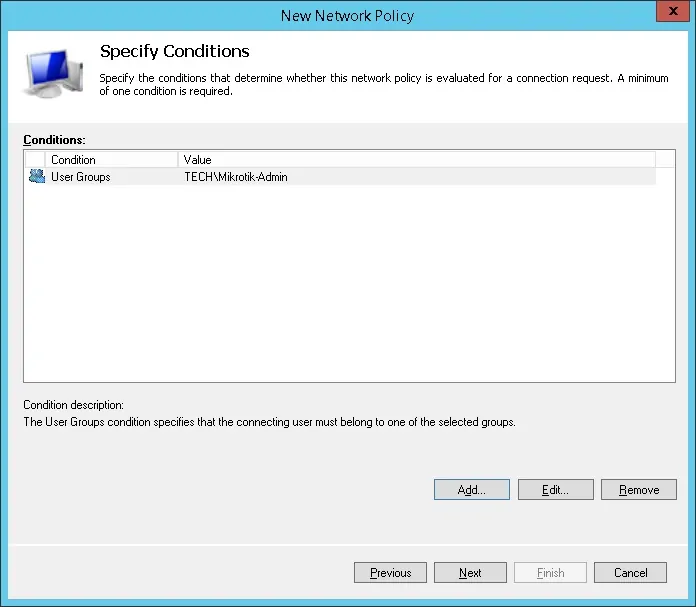
Click on the Add condition button.
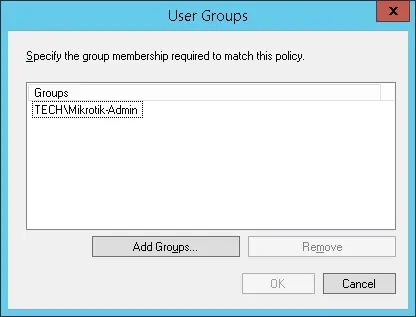
We are going to allow members of the MIKROTIK-ADMIN group to authenticate.
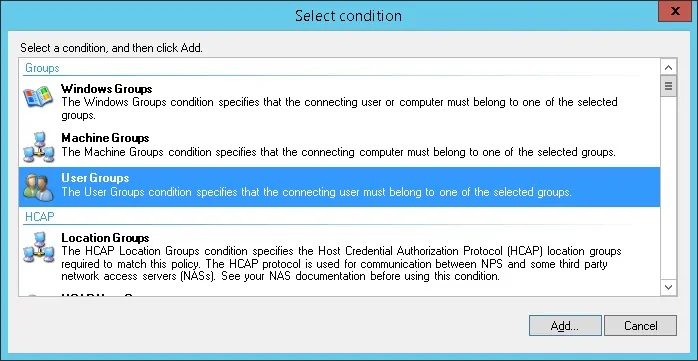
Select the User group option and click on the Add button.
Click on the Add Groups button and locate the MIKROTIK-ADMIN group.
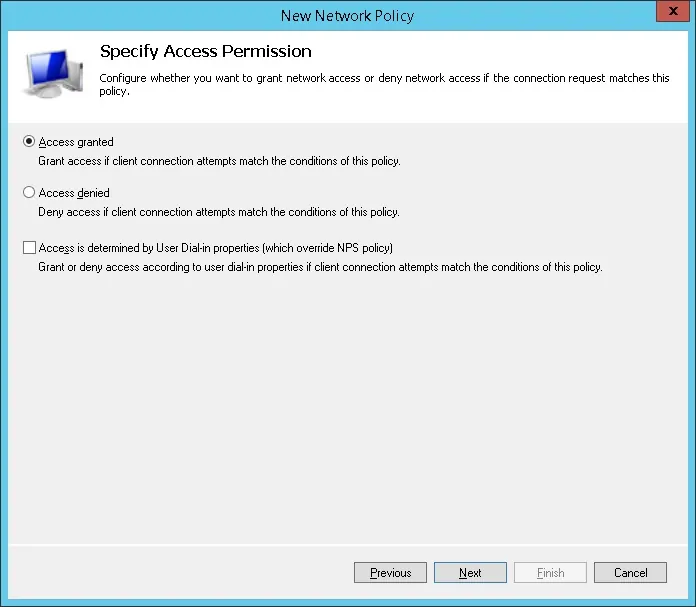
Select the Access granted option and click on the Next button.
This will allow members of the MIKROTIK-ADMIN group to authenticate on the Radius server.
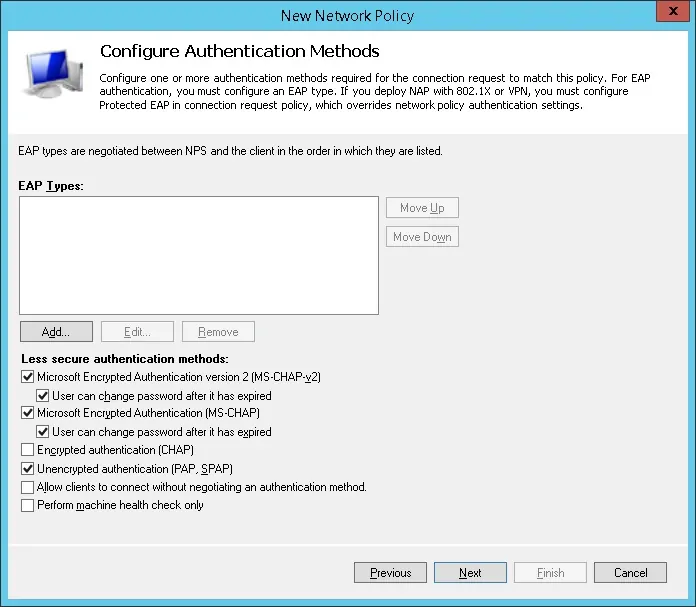
On the Authentication Methods screen, select the Unencrypted authentication (PAP, SPAP) option.
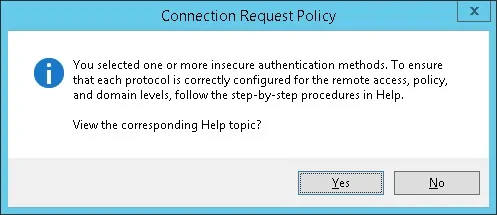
If the following warning is presented, click on the No button.
Select the Vendor Specific radius attribute option and click on the Add button
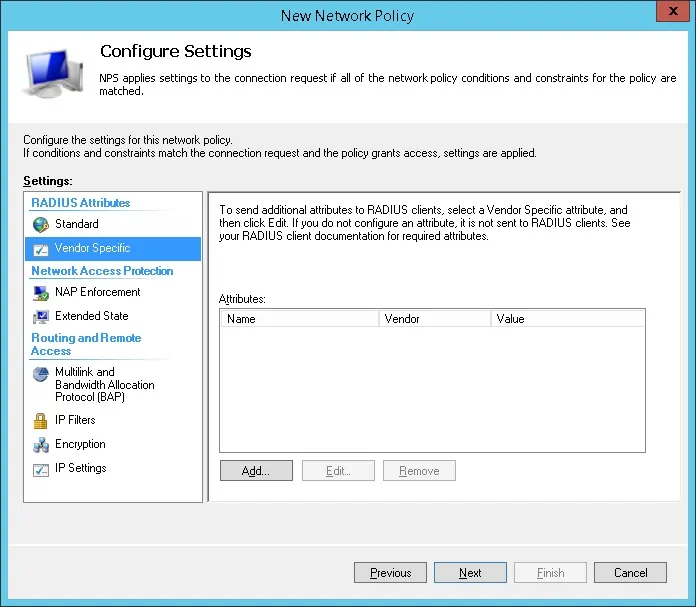
Select the Custom vendor option.
Select the Vendor-Specific Attribute and click on the Add button.
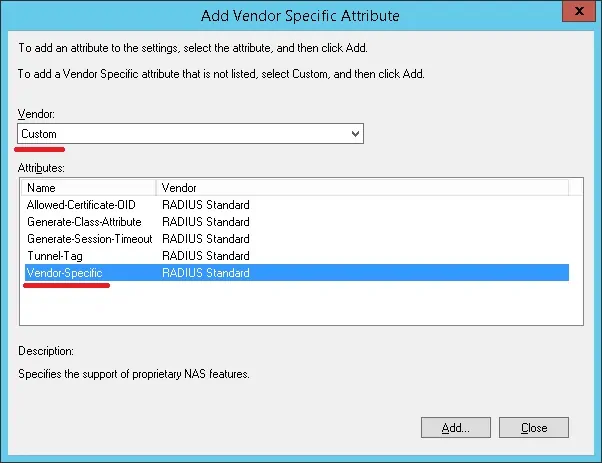
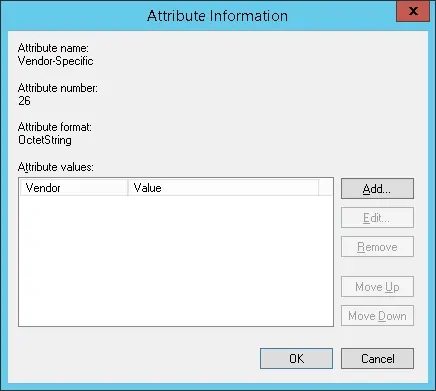
Set the Vendor Code: 14988
Select: Yes, it conforms.
Click on the Configure Attribute button.
Set the Vendor-assigned attribute number: 3
Select the Atribute format: String
Enter the Attribute Value: full
The NPS Radius server will pass the vendor specific information back to the Mikrotik device.
The Mikrotik will give the authenticated users read-write permission over the device.
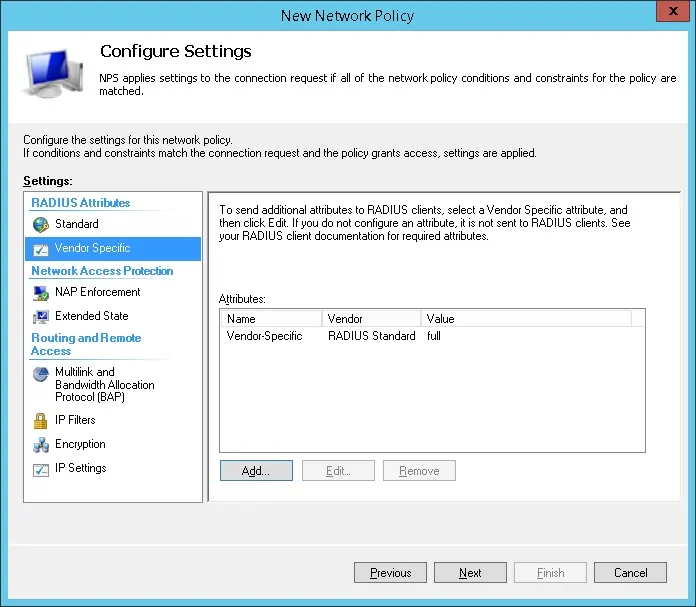
Verify the Radius server configuration summary and click on the Finish button.
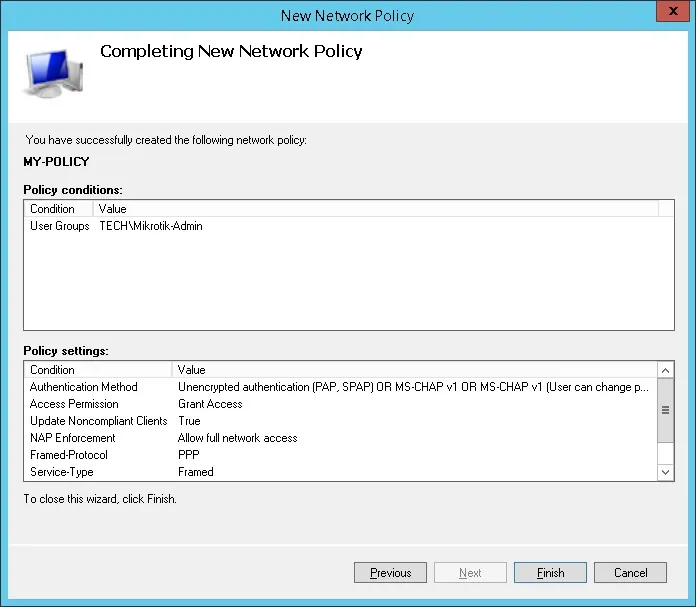
Congratulations! You have finished the Radius server configuration.
Tutorial — MikroTik Radius Authentication
• IP — 192.168.15.20.
• Operacional System — RouterOS 6.45.7
• Hostname — MikroTik
On the Mikrotik router console, use the following command to
Perform the following Radius configuration:
• Radius IP address — 192.168.15.10
• Radius Shared Secret — The Radius Client shared secret (kamisama123)
You need to change IP address of the Radius server to reflect your Radius server IP address.
You need to change the Shared secret to reflect your Radius client shared secret.
Here is the command output:
Enable the local user authorization to use Radius.
Here is the command output:
Congratulations! You have configured the Mikrotik active directory authentication using Radius.
Tutorial — MikroTik Active Directory Authentication Test
Now, you need to test the Mikrotik Radius authentication.
Download the PUTTY software and try to authentication on the Mikrotik using the SSH protocol.
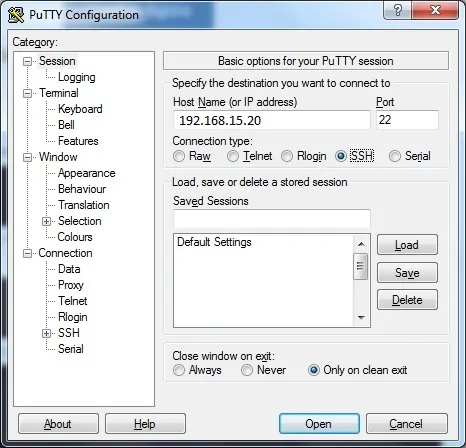
If you authenticate using the account named mikrotik you will have read-write permissions.

Congratulations! You have tested the Mikrotik active directory authentication.
VirtualCoin CISSP, PMP, CCNP, MCSE, LPIC22019-11-10T02:54:34-03:00
Related Posts
Page load link
Ok
