
Enabling the Administrator account on Windows Server 2012 R2 gives you elevated privileges and access to perform various administrative tasks. In this tutorial, we will walk through the steps on how to enable the Administrator account on Windows Server 2012 R2. By following these steps, you will have full control and unrestricted access to manage your server effectively.
Step 1: Accessing the Local Users and Groups Manager
– Press the Windows key + R on your keyboard to open the Run dialog box.
– Type «lusrmgr.msc» and press Enter to open the Local Users and Groups Manager.
Step 2: Navigating to the Users folder
– In the Local Users and Groups Manager, click on «Users» in the left pane.
– Look for the «Administrator» account in the middle pane.
Step 3: Enabling the Administrator account
– Right-click on the «Administrator» account and select «Properties.«
– In the General tab, uncheck the «Account is disabled» option.
– Click «OK» to save the changes.
Step 4: Setting a Password for the Administrator account (optional)
– Right-click on the «Administrator» account again and select «Set Password.«
– Follow the prompts to set a new password for the Administrator account.
Step 5: Logging in with the Administrator account
– Log out of your current user account.
– At the login screen, click on the «Administrator» account.
– Enter the password (if set) and press Enter to log in with the Administrator account.
Pros Cons
1. Elevated privileges: 1. Increased security risk.
The Administrator account Since the Administrator account has unrestricted access to the system, it can be targeted by malicious actors if not used or secured properly.
allows you to perform various
administrative tasks and
troubleshoot system issues.
2. Full control: 2. Risk of accidental modifications.
By enabling the With great power comes great responsibility. It’s important to exercise caution while using the Administrator account to avoid unintended modifications that may affect system stability.
Administrator account,
you have complete control over
the server, including installing,
configuring, and managing
software and services.
3. Flexibility and compatibility: 3. Limited usage scenarios.
Enabling the Administrator While the Administrator account is beneficial for system administration tasks, it may not be suitable for everyday use. Regular user accounts provide better security and stability for general usage.
account ensures compatibility
with certain applications and
software that may require
Administrator access.
By following these steps, you can enable the Administrator account on Windows Server 2012 R2. Remember to use the Administrator account responsibly and take necessary precautions to secure your server.
Enabling the Windows administrator account can be useful in certain situations where you need full administrative privileges. Here are the steps to enable the Windows administrator account:
1. Open the Command Prompt as an administrator: Right-click on the Start button and select «Command Prompt (Admin)» from the context menu. If you’re using Windows 10, you can also use the Windows key + X keyboard shortcut to access the Power User menu, and then choose «Command Prompt (Admin)«.
2. In the Command Prompt, type the following command and hit Enter:
«`
net user administrator /active:yes
«`
3. If the command executes successfully, you will see a message confirming that the command completed successfully.
4. Restart your computer to apply the changes.
After following these steps, you should now have the Windows administrator account enabled on your PC. Keep in mind that the administrator account should be used with caution. It has full control over your system and can make changes that may affect the stability and security of your computer.
It is worth mentioning that enabling the Windows administrator account may not be necessary for most users. It is recommended to use a standard user account for everyday tasks and only switch to the administrator account when you need to perform administrative actions.
How to find administrator password Windows Server 2012 R2?
As a tech blogger, I can provide guidance on finding the administrator password on Windows Server 2012 R2. It’s important to note that access to administrator passwords should only be sought for legitimate purposes and within the legal scope. Here’s a step-by-step guide to help you:
1. Method 1: Resetting the Administrator Password
a. Start by booting the Windows Server 2012 R2 system.
b. When the initial boot screen appears, press the F8 key to access the Advanced Boot Options menu.
c. Using the arrow keys, select «Safe Mode» or «Safe Mode with Networking» and press Enter.
d. Once the system boots into Safe Mode, log in with the built-in Administrator account or any other account with administrative privileges.
e. Open the «Control Panel» and navigate to «User Accounts» or «User Accounts and Family Safety.«
f. Select «Manage another account» and choose the user account for which you want to reset the password.
g. Click on «Change the password» and enter a new password for the account.
h. Restart the system and log in with the newly set password.
2. Method 2: Using the Offline NT Password & Registry Editor
a. Download the Offline NT Password & Registry Editor from its official website or a trusted source.
b. Create a bootable USB drive or CD containing the tool using a different system (follow the instructions provided on the website).
c. Insert the bootable USB drive or CD into the Windows Server 2012 R2 system where you need to find the administrator password.
d. Restart the system and boot from the USB drive or CD.
e. Follow the on-screen instructions provided by the Offline NT Password & Registry Editor to locate the administrator account and reset the password.
f. Once the password has been reset, remove the USB drive or CD and restart the system.
Remember to exercise caution and use these methods responsibly and as per local laws and regulations. It is also recommended to consult official documentation or seek professional advice if you are unfamiliar with these processes or have any concerns about system security.
How do I restore administrator privileges?
Restoring administrator privileges can be essential in various scenarios, such as regaining access to certain settings or making system-level changes on your device. Here are the steps you can follow to restore administrator privileges:
1. Check your current user account: Make sure you are signed in with an account that has administrative access. On Windows, you can verify this by going to the Control Panel, accessing User Accounts, and checking the account type under your username. On macOS, administrative accounts are labeled as «Admin» under the Users & Groups section in System Preferences.
2. Use the «Run as administrator» option: If your account doesn’t have full administrator privileges, you can often perform specific actions with elevated privileges using the «Run as administrator» option. Right-click on the program or application you want to run with elevated privileges, and choose the «Run as administrator» option from the context menu. This might prompt you to enter the credentials of an account with administrative privileges.
3. Enable the built-in administrator account: On Windows, there is a built-in administrator account that you can enable to regain administrative privileges. Open the Command Prompt or PowerShell with administrative rights by searching for «cmd» or «PowerShell» in the Start Menu, right-clicking on the application, and selecting «Run as administrator.» Then, enter the command «net user administrator /active:yes» and press Enter. You can now sign in using the «Administrator» account.
4. Restore from a system restore point: If you recently lost administrator privileges due to system changes or modifications, you can use system restore points (Windows) or Time Machine backups (Mac) to revert your computer to a previous state when you had administrative access. This process will undo system changes but may not revert personal files.
5. Contact technical support: If none of the above steps are applicable or successful, it may be necessary to seek technical support from your device’s manufacturer, the operating system’s support forum, or an IT professional. They can guide you through specific troubleshooting steps or provide further assistance to restore your administrator privileges.
Remember, restoring administrator privileges should only be done if necessary, and it is essential to exercise caution when making system-level changes to avoid any unintended consequences or security issues.
How do you unlock administrator settings?
Unlocking administrator settings can vary depending on the specific operating system or device you are using. Here are the general steps to unlock administrator settings on various platforms:
1. Windows:
– Click on the «Start» button and select «Settings» (or press the Windows key + I).
– In the Settings window, click on «Accounts» and then select «Your info» on the left sidebar.
– Under the «Your info» section, click on «Manage my Microsoft account» or «Sign in with a local account instead» if you are using a local account.
– Follow the on-screen prompts to sign in or switch to an administrator account.
2. macOS:
– Click on the Apple menu in the top-left corner and select «System Preferences.«
– In the System Preferences window, click on «Users & Groups.«
– If the lock icon at the bottom-left corner of the window is locked, click on it and enter the administrator password.
– Select the user account you want to promote to administrator, click on the padlock icon again to unlock it, and then click on the checkbox next to «Allow user to administer this computer.«
3. iOS (iPhone/iPad):
– Open the «Settings» app on your device.
– Tap on your name at the top of the Settings screen.
– Scroll down and select «iCloud» or «iTunes & App Store.«
– If prompted, enter your Apple ID password.
– In the next screen, toggle on the «Administer Settings» or similar option to grant administrative privileges.
4. Android:
– Open the «Settings» app on your device.
– Scroll down and tap on «System» or «About phone.«
– Look for «Build number» or «Software information» and tap on it seven times quickly.
– After tapping seven times, you should see a message like «You are now a developer!» or similar.
– Go back to the main Settings screen, scroll down, and you should find a new option called «Developer options» or «Developer settings.«
– Tap on «Developer options,» and you should be able to access administrator settings.
These steps are general guidelines, and the exact process might vary depending on the specific version of the operating system or device you are using. It’s always recommended to refer to the official documentation or support resources provided for your specific device or operating system for detailed instructions.
How do I unblock system administrator?
To unblock a system administrator, you need to follow these steps:
1. Identify the specific system or application that you are referring to. It’s important to know which system administrator you want to unblock and the context behind the block.
2. Communicate. Reach out to the system administrator via an alternate means of communication like email, phone, or in person if possible. Explain the situation or concern politely and express your desire to have the block lifted.
3. Provide necessary information. Be prepared to provide any relevant details or documentation that supports your reasoning for requesting the unblock. This may include user identification, account credentials, or any other information requested by the system administrator.
4. Seek resolution. Engage in a constructive conversation with the system administrator to understand why you were blocked and discuss potential resolutions. It’s important to remain respectful and open to their perspective while effectively communicating your concerns.
5. Follow their instructions. If the system administrator provides instructions on how to proceed, follow them diligently. This could involve taking specific actions, changing certain settings, or meeting specific requirements.
6. Demonstrate responsible behavior. Once the unblock has been granted, ensure that you abide by the system’s terms and guidelines moving forward. This includes adhering to any rules, security protocols, or guidelines set by the system administrator to maintain a positive and secure computing environment.
Remember, unblocking a system administrator is typically a process of communication, understanding, and accepting responsibility. It’s crucial to approach the conversation respectfully and cooperatively to achieve a favorable outcome.
How to unlock Windows Server 2012 administrator account?
Unlocking the Windows Server 2012 administrator account can be done through several methods. Here’s a guide on how to accomplish this:
1. Method 1: Using the Command Prompt
a. Log in to the server using another administrator account or an account with administrative privileges.
b. Press the Windows key + X and select «Command Prompt (Admin)» or «Windows PowerShell (Admin)«.
c. In the command prompt, type «net user administrator /active:yes» and press Enter. This command activates the administrator account.
d. Restart the server, and the administrator account should now be unlocked. You can log in to the server using the administrator credentials.
2. Method 2: Using the Computer Management Snap-in
a. Log in to the server using another administrator account or an account with administrative privileges.
b. Press the Windows key + R to open the Run dialog box. Type «compmgmt.msc» and press Enter. This opens the Computer Management snap-in.
c. In the Computer Management window, expand «System Tools» and navigate to «Local Users and Groups» > «Users«.
d. Right-click on the Administrator account and select «Properties«.
e. Uncheck the «Account is disabled» checkbox if it is selected. Then click «OK«.
f. Now, the administrator account should be unlocked. You can log in to the server using the administrator credentials.
3. Method 3: Using the Server Manager
a. Log in to the server using another administrator account or an account with administrative privileges.
b. Open the Server Manager by clicking on the Windows icon in the taskbar and selecting «Server Manager«.
c. In the Server Manager window, click on «Local Server» on the left-hand side.
d. Under «Properties» on the right-hand side, click on the text next to «Administrator» to open the «Local Users and Groups» window.
e. Right-click on the Administrator account and select «Properties«.
f. Uncheck the «Account is disabled» checkbox if it is selected. Then click «OK«.
g. The administrator account should now be unlocked, and you can log in to the server using the administrator credentials.
Remember to exercise caution when making changes to administrator accounts and be sure to adhere to your organization’s security policies and best practices.
В Windows для выполнения некоторых действий недостаточно иметь права администратора. Например, вы не сможете заменить или удалить системные файлы, некоторые ветки реестра, остановить системные службы или выполнить другие потенциально небезопасные действия, которые могут нарушить стабильность системы. Системному администратору в таких случая приходится назначать себе владельцем таких объектов или выполнять действия от имени системы. В этой статье мы рассмотрим, как запустить программу или командную строку в Windows от имени привилегированного аккаунта SYSTEM (Local System).
Содержание:
- Запуск командной строки от Local System в старых версиях Windows (до Vista)
- Запуск программ от имени системы с помощью PSExec в Windows 10
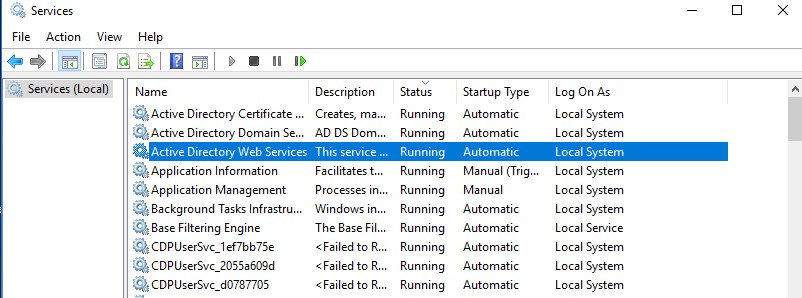
Встроенная учетная запись SYSTEM используется диспетчером управления службами SCM (Service Control Manager) для запуска и управления системными службами. Из-под учетной записи System (может называться NT AUTHORITY\SYSTEM, Local System или Computer\LocalSystem)запускается большинство системных служб и процессов (в том числе ядро NT Kernel). Откройте оснастку управления службами services.msc и обратите внимание на службы, у который в столбце LogOnAs указано Local System. Эти службы запушены из-под учетной записи SYSTEM.
Запуск командной строки от Local System в старых версиях Windows (до Vista)
В снятых с поддержки Windows XP и Windows Server 2003 была интересная возможность, позволяющая запустить программу или же интерактивную командную строку (cmd) с правами системы через планировщик. Достаточно войти с правами администратора, открыть командную строку и набрать в ней:
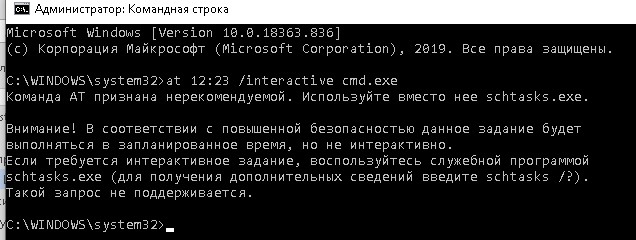
at 12:23 /interactive cmd.exe
, где
12:23
– текущее время + одна минута (в 24 часовом формате).
После наступления указанного времени перед вами открывается окно командной строки, запущенное с правами Local System. Если вы выполнили эту команду в терминальном (rdp) сессии Windows Server 2003/XP, имейте в виду, что командная строка с правами System отображается только в консольной сессии (как подключиться к rdp консоли).

В Windows 10 запуск интерактивной строки с помощью команды at не поддерживается. Вместо него рекомендуется использовать
schtasks.exe
.
Команда AT признана нерекомендуемой. Используйте вместо нее schtasks.exe.
Внимание! В соответствии с повышенной безопасностью данное задание будет  выполняться в запланированное время, но не интерактивно. Если требуется интерактивное задание, воспользуйтесь служебной программой schtasks.exe (для получения дополнительных сведений введите schtasks /?). Такой запрос не поддерживается.
Запуск программ от имени системы с помощью PSExec в Windows 10
Начиная с Windows 7 трюк с запуском интерактивной командной строки от имени системы через планировщик не работает. Для запуска команд от имени NT Authority\ System можно использовать утилиту PSExec.exe от Sysinternals.
Утилиту
PSExec.exe
можно скачать на сайте Microsoft https://docs.microsoft.com/en-us/sysinternals/downloads/psexec. Утилита PSExec знакома любому администратору и в первую очередь предназначена для удаленного управления Windows, однако в ней есть полезная возможность запуска процессов от имени System. Некоторые антивирусы могут опознавать PSExec.exe как потенциально небезопасную программу (с помощью psexec кстати распространялся печально известный вирус notpetya),
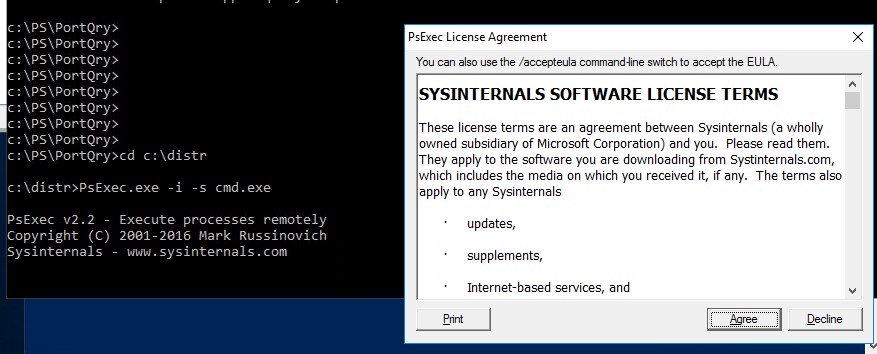
Утилита PSExec не требует установки. Откройте командную строку с правами администратора (“Run as administrator”) перейдите в каталог, в котором находится исполняемый файл PSexec.exe и наберите:
psexec -i -s cmd.exe
параметр -i запускает приложение в интерактивном режиме (пользователь может взаимодействовать с программой на рабочем столе, если это параметр не указывать, процесс запускается в консольной сесии), —s означает что командную строку нужно запустить из-под системы
При первом запуске PsExec попросит вас принять лицензионное соглашение.
После выполнения команды появится новое окно с командной строкой, запущенной из-под учетной записи NT Authority\System. Проверьте это, выполнив команду:
whoami

Таким образом вы запустить любую программу, команду или скрипт с правами системы. Достаточно в параметре утилиты PsExec изменить cmd.exe на имя исполняемого файла нужной программы.
В открывшемся окне командной строки вы можете выполнять любые команды в контексте SYSTEM. Теперь вы сможете изменить, переименовать или удалить системные файлы/ветки реестра, владельцем которых является TrustedInstaller или SYSTEM. Все программы или процессы, которые вы запустите их этого окна также будут запущены с повышенными привилегиями LocalSystem. Например, можно остановить системную службу, или закрыть дескриптор занятого системой файла.
С помощью PSExec вы можете получить интерактивную командную с правами NT AUTORITY\СИСТЕМА с удаленного компьютера. Для этого используется команда:
psexec -s \\msk-PCBuh2 cmd.exe
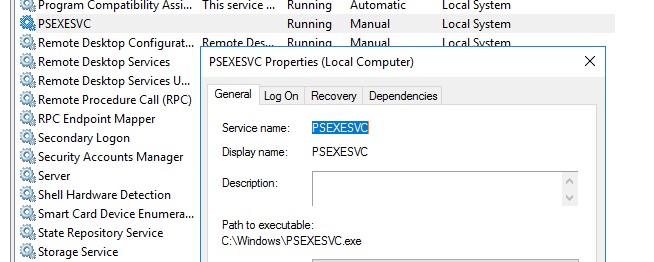
При появлении ошибки
couldn’t install PSEXESVC service
, убедитесь, что:
- командная строка запущена от имени администратора;
- проверьте, возможно служба PSEXESVC уже запущена.

Есть еще ряд сторонних утилит для запуска программ от имени System (AdvancedRun , RunAsSystem, PowerRun), но я не вижу смысла использовать их смысла. Т.к. во-первых это сторонние утилиты, и вы не можете гарантировать что в их коде нет вредоносных закладок, и во-вторых официальная утилита PsExec от Microsoft отлично справляется с задачей.
Рубрики
Get-PowerShell ВКонтакте
Крайние записи
Крайние комментарии
Метки
Рубрики
Свежие записи
Свежие комментарии
Метки
MSC в Windows расшифровывается как Microsoft System Console, еще проще это окна или как их еще называют оснастки, для управления теми или иными функциями операционной системы. Ранее я вас уже знакомил с методом создания удобной оснастки mmc, в которой мы добавляли все, что нужно системному администратору для повседневного администрирования.
И вы наверно спросите, а при чем тут командная строка и все такое, а вот при чем. Представим себе ситуацию, у вас в организации существует домен Active Directory, рядовые пользователи не имеют прав локального администратора на своих рабочих станциях, все идет и работает как часы, случается ситуация, что например вам нужно у пользователя поменять какие либо настройки, и сделать нужно сейчас, так что искать эти настройки в групповой политике нет времени. Что делать заходить под собой не вариант, так как нужно произвести изменения в другом профиле пользователя, и как открыть например оснастку Управление компьютером или Система.
Во тут нам и поможет знание названия msc windows оснасток и командная строка. Все что вам нужно это открыть командную строку от имени администратора (найти, набираем cmd и правой кнопкой выбираем “Запустить от имени администратора”),
далее ввести нужное название msc оснастки в командной строке. Ниже представлен список. Как видите открыв командную строку cmd.exe я для примера ввел значение открывающее панель управления с правами администратора системы.

Элементы оснастки Консоли управления msc
- appwiz.cpl — Установка и удаление программ
- certmgr.msc — Сертификаты
- ciаdv.msc — Служба индексирования
- cliconfg — Программа сетевого клиента SQL
- clipbrd — Буфер обмена
- compmgmt.msc — Управление компьютером
- dcomcnfg — Консоль управления DCOM компонентами
- ddeshare — Общие ресурсы DDE (на Win7 не работает)
- desk.cpl — Свойства экрана
- devmgmt.msc — Диспетчер устройств
- dfrg.msc — Дефрагментация дисков
- diskmgmt.msc — Управление дисками
- drwtsn32 — Dr.Watson
- dxdiag — Служба диагностики DirectX
- eudcedit — Редактор личных символов
- eventvwr.msc — Просмотр событий
- firewall.cpl — настройки файерволла Windows
- gpedit.msc — Групповая политика
- fsmgmt.msc — Общие папки
- fsquirt — Мастер передачи файлов Bluetooth
- chkdsk — Проверка дисков (обычно запускается с параметрами буква_диска: /f /x /r)
- control printers — Принтеры и факсы — запускается не всегда
- control admintools — Администрирование компьютера — запускается не всегда
- control schedtasks — Назначенные задания (планировщик)
- control userpasswords2 — Управление учётными записями
- compmgmt.msc — Управление компьютером (compmgmt.msc /computer=pc — удаленное управление компьютером pc)
- lusrmgr.msc — Локальные пользователи и группы
- mmc— создание своей оснастки
- mrt.exe — Удаление вредоносных программ
- msconfig — Настройка системы (автозапуск, службы)
- mstsc — Подключение к удаленному рабочему столу
- cleanmgr — Очистка диска
- ncpa.cpl — Сетевые подключения
- ntmsmgr.msc — Съёмные ЗУ
- mmsys.cpl — Звук
- ntmsoprq.msc — Запросы операторов съёмных ОЗУ (для XP)
- odbccp32.cpl — Администратор источников данных
- perfmon.msc — Производительность
- regedit — Редактор реестра
- rsop.msc — Результирующая политика
- secpol.msc — Локальные параметры безопасности (Локальная политика безопасности)
- services.msc — Службы
- sfc /scannow — Восстановление системных файлов
- sigverif — Проверка подписи файла
- sndvol — управление громкостью
- sysdm.cpl — Свойства системы
- syskey — Защита БД учётных записей
- taskmgr — Диспетчер задач
- utilman Диспетчер служебных программ
- verifier Диспетчер проверки драйверов
- wmimgmt.msc — Инфраструктура управления WMI
- timedate.cpl — Оснастка «Дата и время»

Список msc оснасток для Windows Server
Давайте рассмотрим как запускаются Административные оснастки Windows из командной строки cmd.exe
- domain.msc — Active Directory домены и доверие
- dsa.msc — Active Directory Пользователи и компьютеры (AD Users and Computers)
- tsadmin.msc — Диспетчер служб терминалов (Terminal Services Manager)
- gpmc.msc — Консоль управления GPO (Group Policy Management Console)
- gpedit.msc — Редактор объектов локальной политики (Group Policy Object Editor)
- tscc.msc — Настройка терминального сервера (TS Configuration)
- rrasmgmt.msc — Маршрутизация и удаленый доступ (Routing and Remote Access)
- dssite.msc — Active Directory Сайты и Доверие (AD Sites and Trusts)
- dompol.msc — Политика безопасности домена (Domain Security Settings)
- dсpol.msc — Политика безопасности контроллера домена (DC Security Settings)
- dfsgui.msc — Распределенная файловая система DFS (Distributed File System)
- dnsmgmt.msc — DNS
- iscsicpl.exe — Инициатор ISCSI
- odbcad32.exe — Администратор источника данных ODBC 32 бита
- odbcad64.exe — Администратор источника данных ODBC 64 бита
- powershell.exe -noexit -command import-module ActiveDirectory — Модуль powershell Active Directory
- dfrgui.exe — Оптимизация дисков
- taskschd.msc /s — Планировщик заданий
- dsac.exe — Центр администрирования Active Directory
- printmanagement.msc — Управление печатью
- vmw.exe — Средство активации корпоративных лицензий
- eventvwr.msc /s — Просмотр событий
- adsiedit.msc — Редактор ADSIedit
- wbadmin.msc — Система архивации данных Windows Server
- ServerManager.exe — Диспетчер серверов
- dhcpmgmt.msc — DHCP сервер
- Inetmgr.exe — Оснастка IIS
- dfsmgmt.msc- DFS менеджер
Как видите msc windows оснастки очень полезные инструменты системного администрирования. Мне даже некоторые оснастки быстрее открыть чем щелкать мышкой по куче окон, особенно если сервер или компьютер тормозит или нет мышки. Да и в любом случае знать такие вещи всегда полезно. Большая часть всего, что мы используем хранится в c:\Windows\System32. Если вы пройдете в эту папку то сможете обнаружить очень много интересного.
nbtstat -a pc — имя пользователя работающего за удаленной машиной pcnet localgroup group user /add — Добавить в группу group, пользователя usernet localgroup group user /delete — Удалить пользователя из группыnet send pc ''текст '' — отправить сообщение пользователю компьютера pcnet sessions — список пользователейnet session /delete — закрывает все сетевые сессииnet use l: \\имя компа\папка\ — подключить сетевым диском l: папку на удаленном компьютереnet user имя /active:no — заблокировать пользователяnet user имя /active:yes — разблокировать пользователяnet user имя /domain — информация о пользователе доменаnet user Имя /add — добавить пользователяnet user Имя /delete — удалить пользователяnetstat -a — список всех подключений к компьютеруreg add — Добавить параметр в реестрreg compare — Сравнивать части реестра.reg copy — Копирует из одного раздела в другойreg delete — Удаляет указанный параметр или разделreg export — Экспортировать часть реестраreg import — Соответственно импортировать часть реестраreg load — Загружает выбранную часть реестраreg query — Выводит значения заданной ветки реестраreg restore — Восстанавливает выбранную часть реестра из файлаreg save — Сохраняет выбранную часть реестраreg unload — Выгружает выбранную часть реестраshutdown — выключение компьютера , можно удаленно выключить другой.SystemInfo /s machine — покажет много полезного об удаленной машине
Списка команд элементов Панели управления Windows
- control /name Microsoft.AutoPlay — Автозапуск
- control /name Microsoft.OfflineFiles — Автономные файлы
- control /name Microsoft.AdministrativeTools — Администрирование
- control /name Microsoft.BackupAndRestore — Архивация и восстановление
- control /name Microsoft.WindowsFirewall — Брандмауэр Windows Windows
- control /name Microsoft.Recovery — Восстановление
- control /name Microsoft.DesktopGadgets — Гаджеты рабочего стола
- control /name Microsoft.DateAndTime — Дата и Время
- control /name Microsoft.DeviceManager — Диспетчер устройств
- control /name Microsoft.CredentialManager — Диспетчер учетных данных
- control /name Microsoft.HomeGroup — Домашняя группа
- Windowscontrol /name Microsoft.WindowsDefender — Защитник Windows
- control /name Microsoft.Sound — Звук
- control /name Microsoft.NotificationAreaIcons — Значки области уведомлений
- control /name Microsoft.GameControllers — Игровые устройства
- Keyboardcontrol /name Microsoft.Keyboard — Клавиатура
- control /name Microsoft.Mouse — Мышь
- control /name Microsoft.TaskbarAndStartMenu — Панель задач и меню «Пуск»
- control — Панель управления
- control /name Microsoft.Fonts — Папка «Fonts»
- control /name Microsoft.IndexingOptions — Параметры индексирования
- control /name Microsoft.FolderOptions — Параметры папок
- control /name Microsoft.PenAndTouch — Перо и сенсорные устройства
- control /name Microsoft.Personalization — Персонализация
- control /name Microsoft.RemoteAppAndDesktopConnections — Подключения к удаленным рабочим столам
- control /name Microsoft.GetPrograms — Получение программ
- control /name Microsoft.GettingStarted — Приступая к работе
- control /name Microsoft.ProgramsAndFeatures — Программы и компоненты
- сontrol /name Microsoft.DefaultPrograms — Программы по умолчанию
- control /name Microsoft.SpeechRecognition — Распознавание речи
- control /name Microsoft.ParentalControls — Родительский контроль
- control /name Microsoft.InternetOptions — Свойства обозревателя
- control /name Microsoft.TextToSpeech — Свойства речи
- control /name Microsoft.System — Система
- control /name Microsoft.ScannersAndCameras — Сканеры и камеры
- control /name Microsoft.PerformanceInformationAndTools — Счетчики и средства производительности
- control /name Microsoft.PhoneAndModem — Телефон и модем
- control /name Microsoft.ColorManagement — Управление цветом
- control /name Microsoft.Troubleshooting — Устранение неполадок
- control /name Microsoft.DevicesAndPrinters — Устройства и принтеры
- control /name Microsoft.UserAccounts — Учетные записи пользователей
- control /name Microsoft.MobilityCenter — Центр мобильности
- control /name Microsoft.WindowsUpdate — Центр обновления
- control /name Microsoft.ActionCenter — Центр поддержки
- control /name Microsoft.SyncCenter — Центр синхронизации
- control /name Microsoft.EaseOfAccessCenter — Центр специальных возможностей
- control /name Microsoft.NetworkAndSharingCenter — Центр управления сетями и общим доступом
- control /name Microsoft.BitLockerDriveEncryption — Шифрование диска
- control /name Microsoft.Display — Экран
- control /name Microsoft.PowerOptions — Электропитание
- control /name Microsoft.RegionAndLanguage — Язык и региональные стандарты
- control folders — параметры проводника
Exchange Goodies
Exchange, Entperise Vault and AD…Just Sort It Out
- Home
- About
Home
> Windows 2012 Server > Windows 2012 R2 Server Run File Explorer as Administrator
February 18, 2015
psherwin0 Leave a comment
Go to comments
runas.exe /user:Administrator "cmd /c explorer"Categories: Windows 2012 Server
Tags: 2012 server, file explorer, run as
Comments (0)
Trackbacks (0)
Leave a comment
Trackback
- No comments yet.
- No trackbacks yet.
Leave a comment
Export List of AD Sites and Subnets
Windows 8.1 PC Settings wont Open
RSS feed
- Youdao
- Xian Guo
- Zhua Xia
- My Yahoo!
- newsgator
- Bloglines
- iNezha
Search
Search for:
Categories
- Active Directory (19)
- Enterprise Vault (8)
- Exchange 2007 (28)
- Exchange 2010 (1)
- Exchange ActiveSync (4)
- Office 365 (12)
- Powershell (40)
- Scripts (14)
- Tools (2)
- Uncategorized (7)
- VMWare (5)
- Windows 2008 Server (9)
- Windows 2012 Server (1)
Tag Cloud
-ActiveSyncEnabled
activesync
active sync
activesync users
active sync users
AD
AD cmdlets
add
ADFS
ADFS 2.0
ad tool
archive point
Backup
bulk
CCR
cmdlets
compare
compare 2 files
connect
Connect-Mailbox
Create File Share
database
Disable
doesn’t change
Enable
Enterprise Vault
exchange
Exchange 2007
Exchange Address List
Exchange Goodies
file
file share
fsautility
Get-MailboxStatistics
Group
Hide
Inherited
Inherited Permissions
Legacy Mailbox
Limit
Limits
Linked
mailbox
Mailbox Move
Mailbox Quota
Mailbox Size
MB
Membership
Move
Nested
Nested Group
New
New Account
office 365
Organisational Unit
OU
Permissions
Powershell
poweshell
Preplogic
Public Folders
Purge
Quota
Remove
Renew certificate
restore
Scam
script
shortcut
Size
stub
Symantec Enterprise Vault
Transaction Logs
Unlimited Access
vmware
Recent Posts
- Export List of AD Sites and Subnets
- Windows 2012 R2 Server Run File Explorer as Administrator
- Windows 8.1 PC Settings wont Open
- Export List of IPs From Exchange 2010 Receive Connector
- LastPass and BigCommerce
Top Rated Posts
Archives
- October 2015 (1)
- February 2015 (1)
- August 2014 (1)
- October 2013 (2)
- August 2012 (1)
- April 2012 (1)
- March 2012 (1)
- January 2012 (1)
- December 2011 (2)
- October 2011 (6)
- September 2011 (11)
- July 2011 (2)
- June 2011 (3)
- May 2011 (1)
- April 2011 (2)
- February 2011 (4)
- January 2011 (2)
- December 2010 (1)
- November 2010 (2)
- October 2010 (1)
- September 2010 (1)
- August 2010 (2)
- July 2010 (3)
- March 2010 (27)
Blog Stats
- 146,356 hits
Top
Create a free website or blog at WordPress.com.