
Собственный KMS сервер позволяет значительно упростить процесс активации продуктов Microsoft в корпоративной сети, и в отличии от обычной процедуры активации, не требует предоставления каждому компьютеру доступа в интернет к серверам активации Майкрософт. Инфраструктура KMS достаточно простая, надежная и легко расширяется (один KMS сервер может обслуживать тысячи клиентов).
В этой статье мы опишем процесс установки в локальной корпоративной сети KMS сервера на базе Windows Server 2012 R2 и его активацию.
Установка и настройка роли Volume Activation Services
Для работы службы KMS нужно установить и настроить отдельную роль сервера — Volume Activation Services. Сделать это можно с помощью консоли Server Manage или PowerShell:
Install-WindowsFeature -Name VolumeActivation -IncludeAllSubFeature
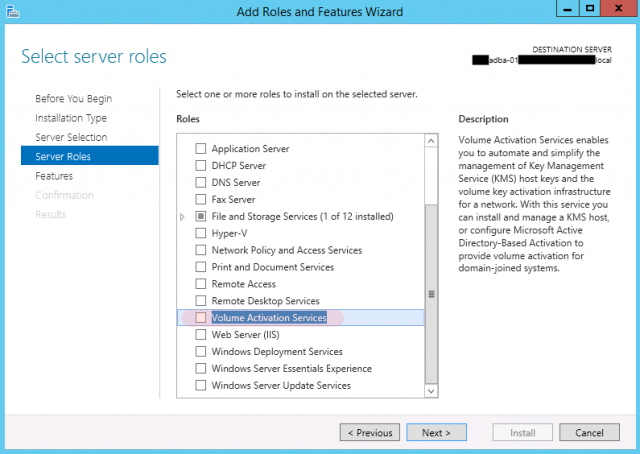
При установке через графический интерфейс консоли Server Manager, запустите мастер установки ролей (Add Roles and Features Wizard), и на этапе выбора ролей сервера (Server Roles) выберите пункт Volume Activation Services.
")
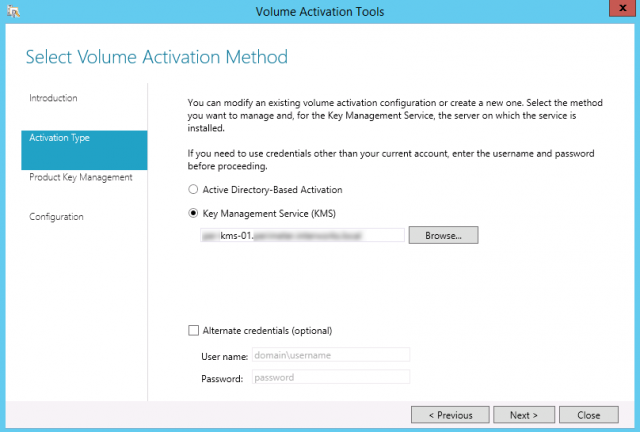
После окончания установки запустите консоль Volume Activation Tools. Запустится мастер установки службы активации. Укажите, что будет устанавливаться сервер Key Management Service (KMS).
Примечание. Если все ОС Windows, которые будут активироваться на KMS сервере, состоят в одном домене Active Directory и используемые в сети версии ОС не ниже Windows 8 / Windows Server 2012 — можно воспользоваться специальным расширением технологии KMS – Active Directory Based Activation, активацией через AD.

Примечание. Учетная запись, из-под которой выполняется настройка KMS сервера, должна обладать правами Enterprise Admin.
Далее на сайте Microsoft (https://www.microsoft.com/Licensing/servicecenter/home.aspx) в личном разделе необходимо получить свой корпоративный KMS ключ (KMS host key, это ключ активации KMS сервера). Найти его можно в разделе Downloads and Keys -> Windows Server -> Windows Server 2012 R2.

Найдите ключ с типом KMS (не MAK) и скопируйте его в буфер обмена.
Вставьте скопированный KMS ключ в соответствующее поле мастера установки KMS сервера (Install your KMS host key).

Если система примет ключ, сразу же будет предложено его активировать. На основании введенного ключа система определит продукт, к которому он относится, и предложит два варианта активации (по телефону или Интернету). Во втором случае придется предоставить серверу временный доступ в Интернет (только на период активации).

После активации ключа, нужно настроить параметры службы управления ключами: интервал активации и реактивации (по умолчанию клиенты продляют активацию каждые 7 дней), порт (по умолчанию служба KMS использует TCP порт 1688), исключения для Windows Firewall. Чтобы автоматически создать запись в DNS, необходимую для автоматического поиска сервера KMS в домене (SRV запись _vlmcs._tcp), включите опцию DNS Records – Publish.
Если KMS сервер должен обслуживать клиентов из разных доменов, можно опубликовать DNS записи в других DNS зонах. Укажите данные зоны в списке Publish to Custom DNS zones.

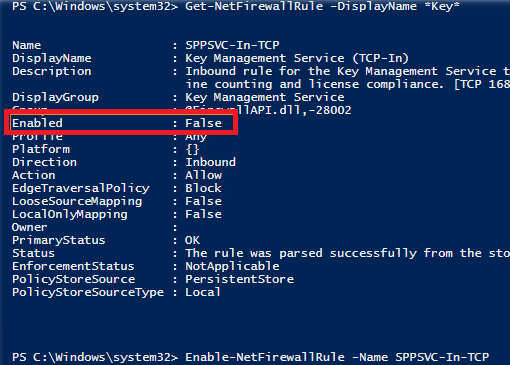
Примечание. Если у вас включен Windows Firewall, убедитесь, что активно правило, разрешающее входящие подключения на порт 1688. Если правила нет, включите правило брандмауэра из PoSh:
Get-NetFirewallRule -DisplayName *key*
Enable-NetFirewallRule -Name SPPSVC-In-TCP
На это процесс настройки сервера окончен. Проверьте, что в DNS создалась специальная запись, указывающая на ваш kms сервер (подробности в статье Как найти в домене KMS сервер):
nslookup -type=srv _vlmcs._tcp.corp.winitpro.ru
Далее получим информацию о текущем состоянии KMS сервера:
slmgr.vbs /dlv

Нас интересуют следующие поля:
- Partial Product Key – отображены последние 5 символов KMS ключа
- License status – статус активации лицензии (должно быть Licensed)
- Total requests received — количество запросов на активацию от клиентов(пока 0)
Внимание. Напомним, что у KMS сервера есть т.н. порог активации. Это означает, что активированный KMS сервер начинает активировать клиентов, только тогда, когда количество обратившихся к нему за последние 30 дней клиентов превысит предопределенные пороги (activation count):
- Порог активации для клиентских ОС Vista / Windows 7 / Win 8 / Win 10 – 25 клиентов
- Для серверных ОС: Windows Server 2008/ 2008 R2 / 2012 / 2012 R2 / 2016– 5 клиентов
Теперь KMS сервер может активировать клиентов. Что нужно выполнить на стороне клиента для успешной активации на KMS сервере:
- Задайте на клиенте публичный KMS (GVLK) ключ от соответствующей редакции Windows (ссылка ниже):
slmgr /ipk xxxxx- xxxxx - xxxxx - xxxxx – xxxxx - Если KMS сервер не опубликован в DNS, укажите его адрес вручную:
slmgr /skms kmssrvwinitpro.ru:1688 - Активируйте ОС командой:
slmgr /ato
Совет. Подробнее о том, как активировать клиентов на KMS сервере описано тут).
Активированный KMS сервер ключом для WS 2012 R2 (VOLUME_KMS_WS12_R2 channel) поддерживает активацию всех ОС Windows вплоть до Windows 8.1 / Windows Server 2012 R2 (для поддержки активации Windows 10 и WS 2016 нужно установить специальное обновление и активировать KMS сервер новым ключом).
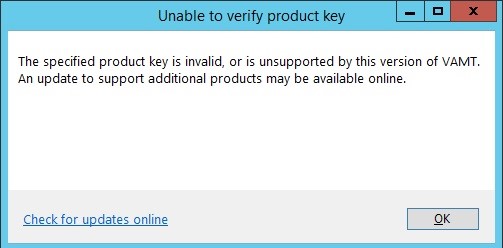
В том случае, если попытаться установить новый KMS ключ для Windows 10 на KMS сервер под управлением Windows Server 2012 R2 с помощью VAMT без установки указанного обновления, появиться ошибка:
Unable to verify product key. The specified product key is invalid, or is unsupported by this version of VAMT. An update to support additional products may be available online.
Несколько советов.
- Общедоступные KMS ключи для Windows 7/ Server 2008/ 2008 R2 можно найти здесь, для Windows 8.1 / Server 2012 R2 здесь, для Windows 10 / Windows Server 2016/2019/2022 здесь и здесь соответственно
- Для удобного управлениями ключами продуктами MS, активации клиентов и построения отчетов можно воспользоваться утилитой Microsoft Volume Activation Management Tool — VAMT 3.0
- С помощью этого же KMS сервера можно активировать не только ОС Windows, но и продукты MS Office ( подробности в статье Активация MS Office 2013 VL, KMS активация Office 2016)
- Для активации виртуальных машин, запущенных на сервере Hyper-V можно воспользоваться специальным типом активации: AVMA (Automatic Virtual Machine Activation)
Начиная внедрять в инфраструктуру новые системы Windows 8.1 и Windows Server 2012 R2, одна из первых вещей, о которых стоит задуматься – это активация новых систем, и поэтому первый сервер, который мы разворачиваем на Windows Server 2012 R2, будет у нас выступать в качестве сервера Key Management Service (KMS). В нашем случае, текущим сервером KMS является сервер на базе Windows Server 2012. Этот сервер настроен на активацию систем до уровня Windows 8/Windows Server 2012, а также обеспечивает активацию Office 2010/2013. Перед нами стоит задача перенести функционал KMS на новый сервере на базе Windows Server 2012 R2.
Базовые приёмы работы c KMS были описаны ранее в заметке Основные приемы работы с Key Management Service (KMS) на Windows 7 и Windows Server 2008 R2 и для новой версии Windows эти приёмы остаются в силе. В документе TechNet Library — Volume Activation — Appendix A: KMS Client Setup Keys расширена информация о ключах GVLK, которые нужны для преобразования клиентов MAK/Retail в KMS. Выдержка из этого документа относительно новых систем:
Windows Server 2012 R2 and Windows 8.1 Client Setup Keys
| Operating system edition | KMS Client Setup Key |
|---|---|
| Windows 8.1 Professional | GCRJD-8NW9H-F2CDX-CCM8D-9D6T9 |
| Windows 8.1 Professional N | HMCNV-VVBFX-7HMBH-CTY9B-B4FXY |
| Windows 8.1 Enterprise | MHF9N-XY6XB-WVXMC-BTDCT-MKKG7 |
| Windows 8.1 Enterprise N | TT4HM-HN7YT-62K67-RGRQJ-JFFXW |
| Windows Server 2012 R2 Server Standard | D2N9P-3P6X9-2R39C-7RTCD-MDVJX |
| Windows Server 2012 R2 Datacenter | W3GGN-FT8W3-Y4M27-J84CP-Q3VJ9 |
| Windows Server 2012 R2 Essentials | KNC87-3J2TX-XB4WP-VCPJV-M4FWM |
Windows Server 2012 and Windows 8 Client Setup Keys
| Operating system edition | KMS Client Setup Key |
|---|---|
| Windows 8 Professional | NG4HW-VH26C-733KW-K6F98-J8CK4 |
| Windows 8 Professional N | XCVCF-2NXM9-723PB-MHCB7-2RYQQ |
| Windows 8 Enterprise | 32JNW-9KQ84-P47T8-D8GGY-CWCK7 |
| Windows 8 Enterprise N | JMNMF-RHW7P-DMY6X-RF3DR-X2BQT |
| Windows Server 2012 | BN3D2-R7TKB-3YPBD-8DRP2-27GG4 |
| Windows Server 2012 N | 8N2M2-HWPGY-7PGT9-HGDD8-GVGGY |
| Windows Server 2012 Single Language | 2WN2H-YGCQR-KFX6K-CD6TF-84YXQ |
| Windows Server 2012 Country Specific | 4K36P-JN4VD-GDC6V-KDT89-DYFKP |
| Windows Server 2012 Server Standard | XC9B7-NBPP2-83J2H-RHMBY-92BT4 |
| Windows Server 2012 MultiPoint Standard | HM7DN-YVMH3-46JC3-XYTG7-CYQJJ |
| Windows Server 2012 MultiPoint Premium | XNH6W-2V9GX-RGJ4K-Y8X6F-QGJ2G |
| Windows Server 2012 Datacenter | 48HP8-DN98B-MYWDG-T2DCC-8W83P |
При установке нового сервера для роли KMS мы используем дистрибутив Windows Server 2012 R2, доступный нам по подписке TechNet Subscription, из образа en_windows_server_2012_r2_x64_dvd_2707946.iso. И так как система, устанавливаемая с этого дистрибутива по умолчанию сконфигурирована для использования ключа MAK, преобразуем её в KMS-клиента путём ввода соответствующего ключа из первой вышеприведённой таблицы ещё на этапе установки. Так как мы желаем установить редакцию Windows Server 2012 R2 Server Standard, вводим соответствующий ключ…

По введённому ключу программа установки автоматически ограничит для нас доступ возможных вариантов установки…

После окончания установки входим в систему и убеждаемся в том, что она сконфигурирована как KMS-клиент…

Предполагается, что у нас уже имеется KMS-ключ для Windows Server 2012 R2, полученный с веб-узла Microsoft Volume Licensing Service Center (VLSC), и мы можем приступить к последовательности действий по вводу и активации это KMS-ключа.
Slmgr.vbs /ipk XXXXX-XXXXX-XXXXX-XXXXX-XXXXX
Slmgr.vbs /ato
Slmgr.vbs /cdns
net stop sppsvc
net start sppsvc
Третья команда отключает регистрацию KMS сервера в DNS (в нашем случае она не используется). Последние две команды выполняют перезапуск службы Software Protection service
Проверяем состояние нашего KMS-сервера:
Slmgr.vbs /dli

После успешной активации наш сервер готов отвечать на клиентские вопросы, если конечно мы не забыли в Windows Firewall включить правило, разрешающее входящие подключения к сервису KMS (по умолчанию TCP 1688). Включить соответствующее правило можно как через оснастку управления WF, так и с помощью PowerShell. Получаем статус правил, с вхождением в имени Key и узнав имя правила и убедившись в том что оно выключено, — включаем его
Get-NetFirewallRule -DisplayName *key*
Enable-NetFirewallRule -Name SPPSVC-In-TCP

Для того, чтобы направить наших клиентов на новый KMS-сервер, в случае, если по каким то причинам не используется публикация в DNS, воспользуемся ранее описанным методом настройки через механизмы Group Policy Preferences (GPP) — Управляем клиентами KMS с помощью GPP
Теперь приступим к настройке активации Office. Начнём с Office 2013.
Скачиваем пакет Microsoft Office 2013 Volume License Pack
Запускаем с правами администратора office2013volumelicensepack_x86_en-us.exe.
Будет произведена распаковка файлов в каталог C:\Program Files (x86)\MSECache\OfficeKMS и установлена роль — Volume Activation Services

Поверх этого окна откроется графическая утилита Volume Activation Tools установленная в систему с активацией роли Volume Activation Services. С помощью этой утилиты мы установим и активируем KMS ключ для Office 2013. На шаге выбора типа активации выбираем KMS и указываем FQDN имя нашего сервера

Далее вводим имеющийся у нас KMS-ключ Office 2013, полученный с веб-узла Microsoft Volume Licensing Service Center (VLSC)

Если ключ успешно установлен, нам сразу будет предложено выполнить его активацию…

По введённому ключу будет определён продукт к которому он относится и предложено два варианта активации. Выбираем активацию через интернет.

После успешной активации мы получим статусный экран с информацией об установленных KMS-ключах, где увидим что в нашей службе управления ключами теперь два ключа – от Windows Server 2012 R2, установленный нами ранее с помощью Slmgr.vbs, и от Office 2013, установленный в ходе работы этой графической утилиты. После этого мы сможет настроить параметры службы управления ключами. Укажем порт (по умолчанию 1688) и включим исключения для Windows Firewall (хотя по сути мы это уже сделали ранее).

Закрываем утилиту Volume Activation Tools и переходим к настройке KMS для поддержки Office 2010.
Скачиваем пакет Microsoft Office 2010 KMS Host License Pack и запускаем с правами администратора файл KeyManagementServiceHost_en-us.exe
Будет произведена распаковка файлов поддержки Office 2010 в уже существующий каталог C:\Program Files (x86)\MSECache\OfficeKMS , после чего сразу появится запрос на установку KMS-ключа для Office 2010

… введём имеющийся у нас KMS-ключ …

После чего ключ будет установлен и активирован через интернет.

Теперь можем проверить состояние всех установленных нами KMS ключей:
cscript C:\windows\system32\slmgr.vbs /dlv all
Так как вывод этой команды может оказаться весьма существенным, используем вывод на консоль с помощью cscript
Для того, чтобы отдельно получить информацию только об установленном нами KMS-ключе для Office 2010 выполним:
slmgr.vbs /dlv bfe7a195-4f8f-4f0b-a622-cf13c7d16864
…для Office 2013:
slmgr.vbs /dlv 2e28138a-847f-42bc-9752-61b03fff33cd
…для Windows Server 2012 R2 идентификатор в явном виде можно не указывать:
slmgr.vbs /dlv
Теперь по сути наш новый KMS-сервер готов, однако не забываем про то, что для того чтобы сервер смог выдавать установленные ключи KMS-клиентам, — должен быть набран нижний предел обращений от уникальных клиентов:
— для KMS-ключа Office 2010/2013 этот порог – 5 клиентов;
— для KMS-ключа WS2012R2 этот порог – 5 клиентов для активации серверных ОС и 25 клиентов для активации клиентских ОС.
После того как новый KMS-сервер заработал, нам нужно удалить ключи активации со старого сервера KMS, и если на старом сервере KMS ещё остаются какие-то другие роли и он должен какое-то время оставаться в работе, то мы должны конвертировать его в KMS-клиента.
Итак, на старом сервере удаляем все установленные ключи командой:
slmgr -upk
Так как наш старый сервер работает на базе Windows Server 2012 Standard, то для его конвертации в KMS-клиента воспользуемся ключом, приведённым в вышеуказанной таблице и сразу выполнима его активацию с нового KMS-сервера
slmgr -ipk XC9B7-NBPP2-83J2H-RHMBY-92BT4
slmgr -ato
This is the second post in an ongoing series that discusses volume activation and management. This article shows the installation for installing KMS through server roles on a Windows Server 2012 or Windows 2012R2 Server. You can find all posts within this series on our Volume Activation for Windows channel.
With Microsoft Windows 2012 now having been out for a number of years, many IT administrators are updating their internal infrastructure and migrating to the newer Windows Server 2012 / 2012R2 operating systems. Although some of the roles can still be installed through the old methods, some of them now have more intuitive methods of installation by going directly through the server roles versus executing a command. This article shows a step-by-step of how to install a Key Management Service (KMS) host on a Windows Server 2012 / 2012R2 operating system by installing the correct server role.
Note: If you installed KMS on a 2012 or 2012R2 server via the command line described in this article, you can still run through this installation process to have your KMS server managed through Windows roles with minimal disruptions to your KMS services.
Configuring KMS with Windows 2012 Server Roles
Step-By-Step Installing the Volume Services Role for KMS
To begin the installation of the KMS host in the Windows Server 2012 / 2012R2 machine, begin by adding a role:

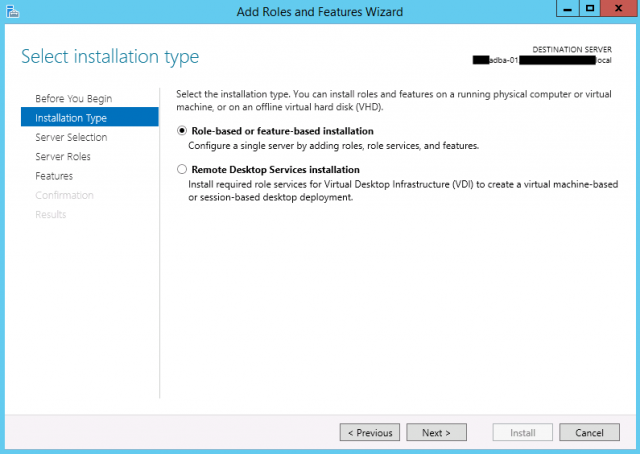
On the next screen, select Role-based or feature-based installation:
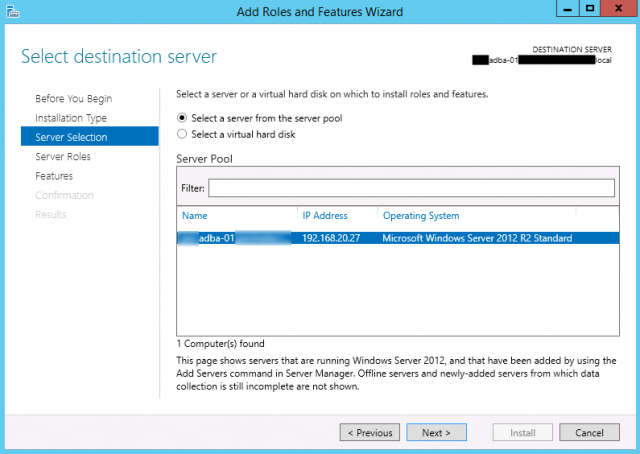
Select the server where the roles will be installed:
On the Add Roles and Features Wizard, select Volume Activation Services.
Note: The Volume Activation Services role is not required to configure a KMS Server. For management purposes, it is highly recommended that this role be utilized versus the traditional KMS Server model.
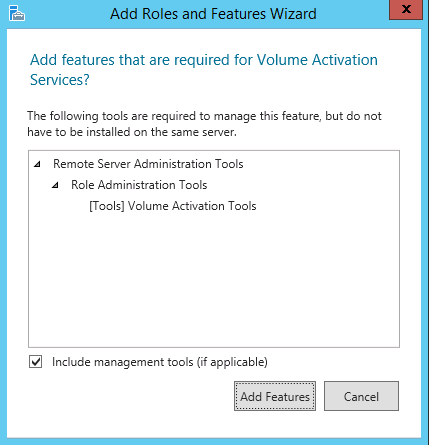
The server will prompt for any additional roles or features needing to be installed.
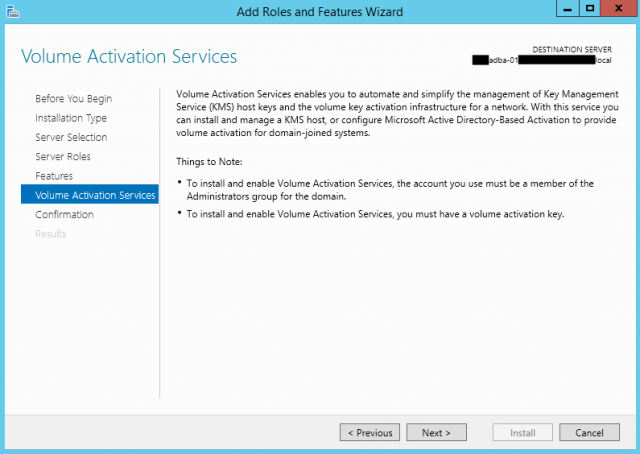
The Volume Activation Services screen will provide a quick description regarding what is provided by installing the Volume Activation Services role. This will allow the installation of a KMS host or configure an Active Directory-Based Activation server.
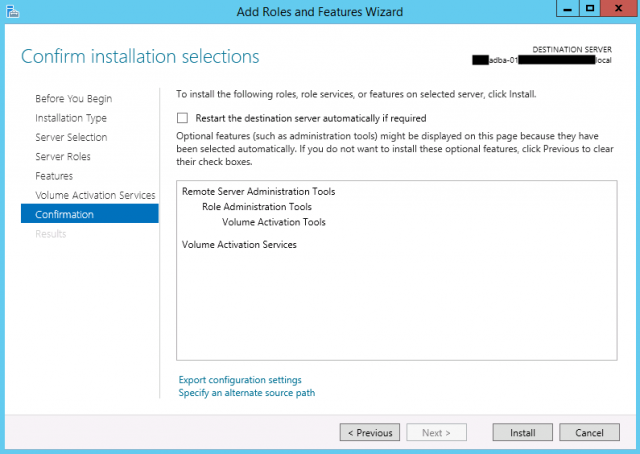
The next screen will provide a summary of what is to be installed on the system:
Utilizing Volume Activation Tools to Configure KMS
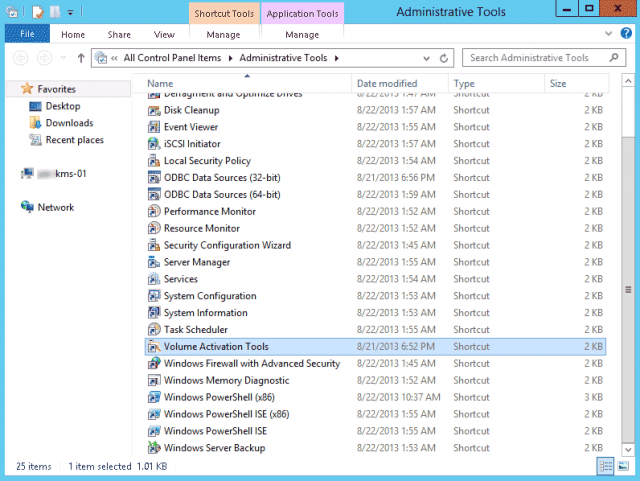
Once the installation of the Volume Activation Services role has been completed, Volume Activation Tools (found under Control Panel > Administrative Tools > Volume Activation Tools) will need to be opened:
If you previously installed KMS via the command line method found in this article, the Key Management Service (KMS) field will be highlighted. If you are logged onto an account that does not have permissions to install KMS, an alternative account can be used.
Once Next is selected, Windows will begin scanning for KMS information:
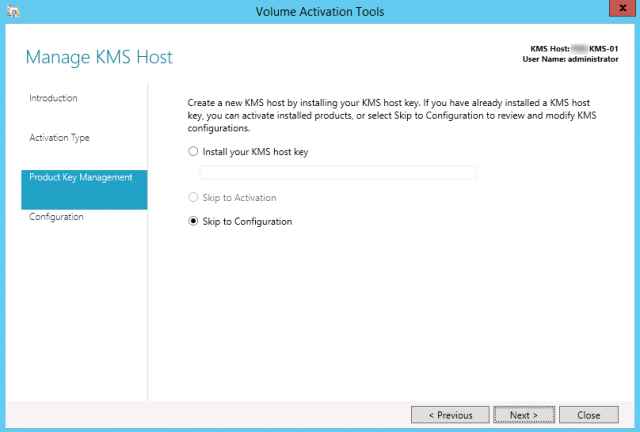
The next window will allow you to install the KMS host key. Since the OS being used in this case is a Windows Server 2012R2, I need to make sure I enter in a 2012R2 key. You will not be able to utilize a license for a different operating system. In my example below, since I already installed KMS through the command line method, Windows automatically detected that a KMS key was utilized and highlighted Skip to Configuration:
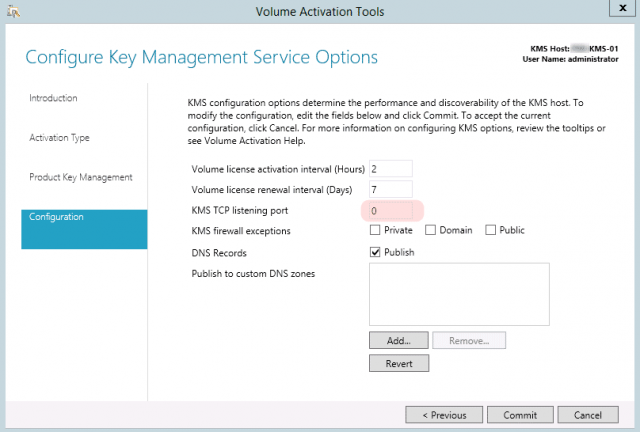
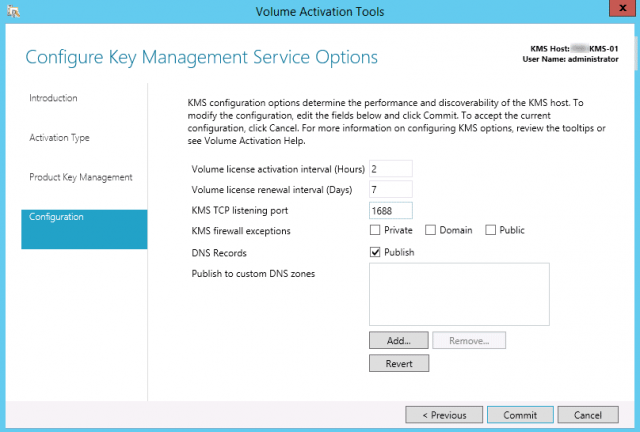
The Configuration window prompts to add for any KMS firewall exceptions and the KMS TCP port. In my example below, Windows Firewall was turned off so no exceptions were needed. Additionally, the default the KMS TCP listening port is set to 0 by default. The KMS TCP listening port should be configured to 1688.
Once Commit is selected, a prompt will appear stating that existing KMS configurations will be overwritten:
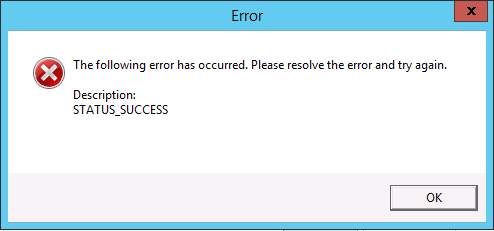
If the KMS TCP listening port was left on the default port, an error will appear below with description STATUS_SUCCESS. Fortunately, this is a quick fix.
Navigate back to the Configure Key Management Service Options window and adjust the KMS TCP listening port to 1688:
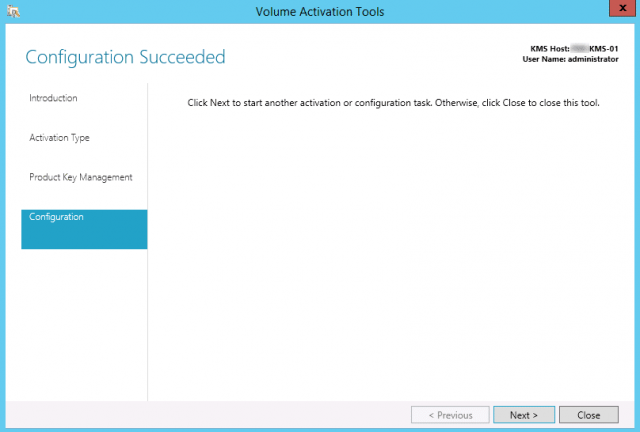
Once Commit is selected, Windows will restart the software licensing service. This is a fairly quick process for newer KMS servers and should cause minimal disruption in your environment.
The next window will display that the configuration has completed. Click Close to exit the KMS configuration. If KMS settings need to be changed, click Next and run through the process again.
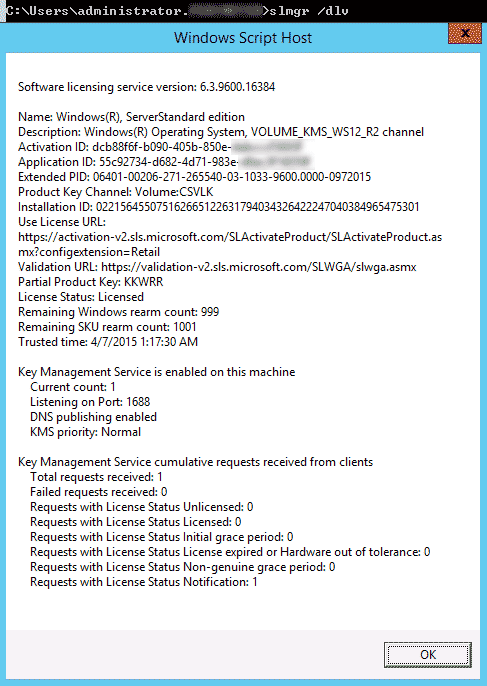
If this is a new KMS host, it is strongly recommended that the Windows activation command be executed in a command prompt to make sure that the Microsoft key has been registered with Windows. Run the command below to make sure that has been completed:
slmgr /ato
Additionally, it is a good idea to make sure that your KMS server is now checking for KMS keys. Run the following command:
slmgr /dlv
Resources Used:
Activate using Key Management Service, https://technet.microsoft.com/en-us/library/dn613832.aspx. Accessed April 08, 2015
Frequently Asked Questions About Volume License Keys, http://www.microsoft.com/licensing/existing-customers/product-activation-faq.aspx. Accessed April 08, 2015
KMS vs. MAC activation, https://social.technet.microsoft.com/Forums/windowsserver/en-US/a74c0e24-d97b-41ce-897c-18afa2284b6f/kms-vs-mac-activation. Accessed April 08, 2015
Windows Server 2012 R2 KMS – STATUS_SUCCESS, https://social.technet.microsoft.com/Forums/windowsserver/en-US/22673e96-e22d-4996-8d67-f038923f4995/windows-server-2012-r2-kms-statussuccess?forum=winservergen. Accessed April 13, 2015.
Own KMS server allows to make Microsoft products activation in a corporate network easier and in contrast to a usual activation process doesn’t require granting each computer access to the Internet to Microsoft activation servers. KMS infrastructure is rather simple, reliable and easily scalable (a single KMS server can maintain thousands of clients).
In this article, we describe how to install and activate the KMS server on Windows Server 2012 R2 on the corporate network.
Installation and Configuration the Volume Activation Services Role
KMS requires installation and configuration of a separate role – Volume Activation Services. You can do it in Server Manage console or PowerShell:
1 |
Install-WindowsFeature -Name VolumeActivation -IncludeAllSubFeature |

After the installation is over, start Volume Activation Tools console. An activation service installation wizard will start. Specify that you are going to install Key Management Service (KMS) server.
Note. If all Windows OSs activated on this KMS server belong to one and the same Active Directory domain, you can use a special KMS extension — Active Directory Based Activation.

Note. The account must have Enterprise Admin rights.
Next you need to get your corporate KMS key (GVLK – Generic Volume License Key) on Microsoft website (https://www.microsoft.com/Licensing/servicecenter/home.aspx). You can find it in the sectionDownloads and Keys –> Windows Server –> Windows Server 2012 R2.

Find the key with type KMS (not MAK) and copy it to the clipboard.
Paste the GVLK key in the corresponding field of the wizard (Install your KMS host key).

If the system accepts the key, you will immediately be suggested to activate it. The system will define a product by the key you entered and suggest two ways of activation (by phone or online).

After the key is activated, you have to configure Key Management Service options: activation and renewal intervals, port (by default, KMS listens on port 1688) and Windows Firewall exceptions. To automatically create a DNS record necessary to automatically search a KMS server in the domain (SRV record _vlmcs._tcp), check the option DNS Records – Publish.

Now the configuration is over. Make sure that a special DNS record pointing to your KMS server was created:
1 |
nslookup -type=srv _vlmcs._tcp.corp.woshub.com |
Then get the information on the KMS server status:

Pay attention to the following fields:
- Partial Product Key – the last 5 symbols of the key are shown
- License status – license activation status (it should be Licensed)
- Total requests received – the number of activation requests (0 yet)
Attention. Remember that a KMS server has so called activation threshold. It means that an activated KMS server starts to activate clients only when the number of clients that addressed it in the last 30 days exceeds the certain limit (activation count):
- The activation threshold for client OS Vista / Windows 7 / Win 8 is 25 clients
- In case of server OSs Windows Server 2008/ 2008 R2 / 2012 / 2012 R2 it is 5 clients
Now the KMS server can activate its clients.
Some tips.
Public KMS keys for Windows 8.1 / Server 2012 R2 here.
Introduction
here’s some brief note’s for setting up KMS for activating Windows 10.
Step 1. Setup Server 2012 R2
First things first, you need to setup up a new 2012 R2 KMS server, because it won’t work with Windows 2008 R2. Windows 2008 R2 is (currently) not supported for activating Windows 10 using KMS.
Step 2. Install a hotfix to add support for activating later versions of Windows
Install the following hotfix:
https://support.microsoft.com/en-us/kb/3058168
which is an Update that enables Windows 8.1 and Windows 8 KMS hosts to activate a later version of Windows. More info > https://technet.micr…s/dn502537.aspx
Step 3. Login to the Volume License site
You need to get a new KMS Host key from the Volume License Service Center that has this string:
“Windows® Operating System, VOLUME_KMS_2012-R2_WIN10 channel”
Save this key somewhere safe, you’ll need it later.
Step 4. Add the Volume Activation Services role
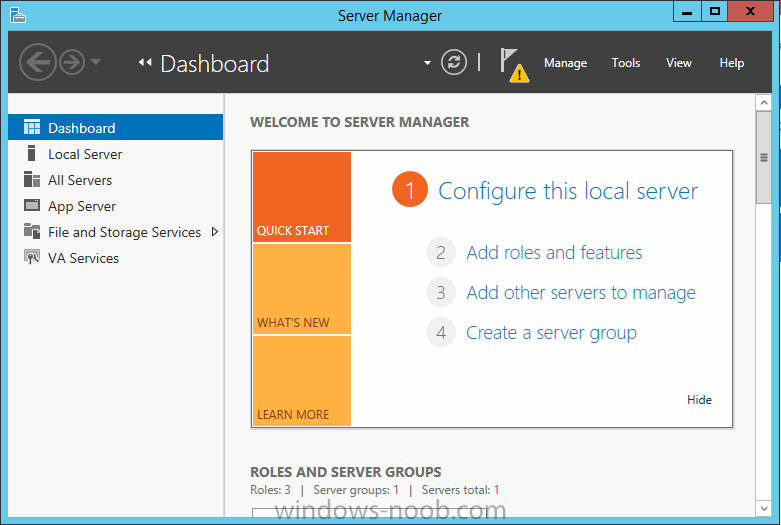
After installing Windows Server 2012 open Server Manager and choose Add roles and features, choose Role-Based or Feature-Based installation. Choose your local Windows Server 2012 Server from the Server Pool.
Choose the Volume Activation Services role. You may be prompted to add features that are required for Volume Activation Services such as Remote Server Administration Tools, if so, click on Add features and continue through that wizard until completion.
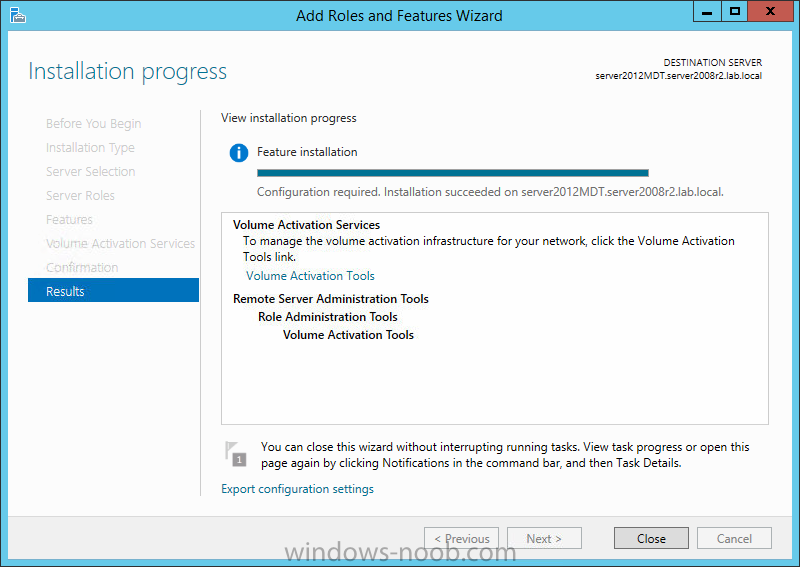
Click Close when done, you will see a Yellow Triangle in Server manager which means that the role is installed but there is additional post deployment configuration required.
Step 5. Configure the Volume Activation Services role
To configure it, click VA Services in the left pane.
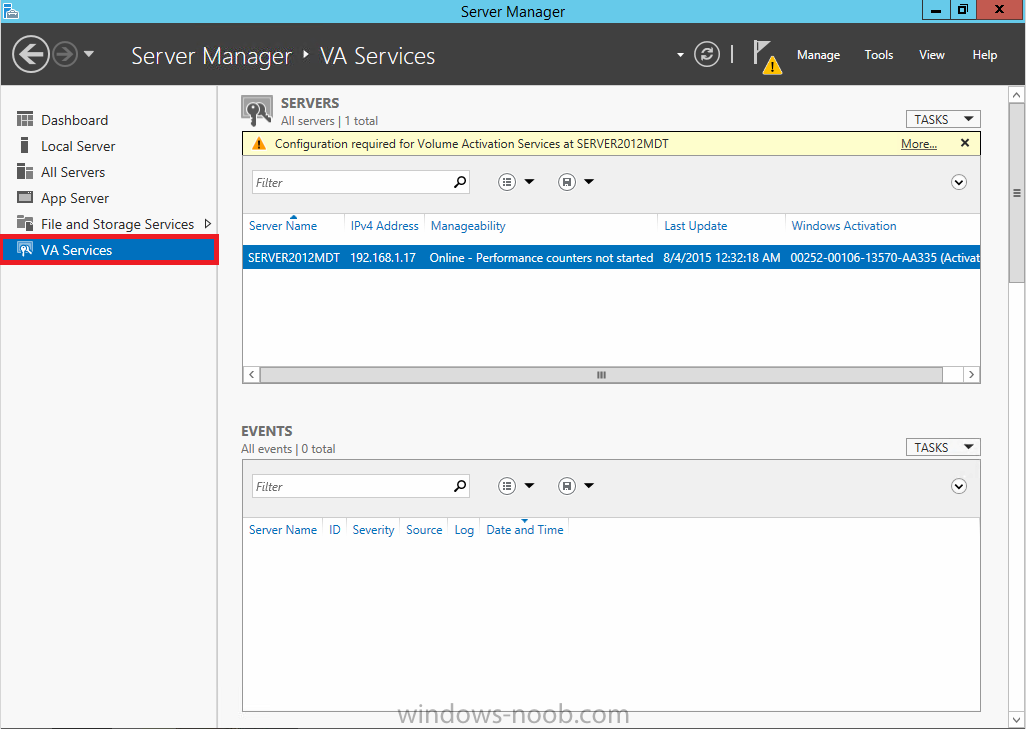
Next click on the More text to the right of Configuration required for Volume Activation Services at SERVERNAME. This will popup All Servers Task Details and Notifications.
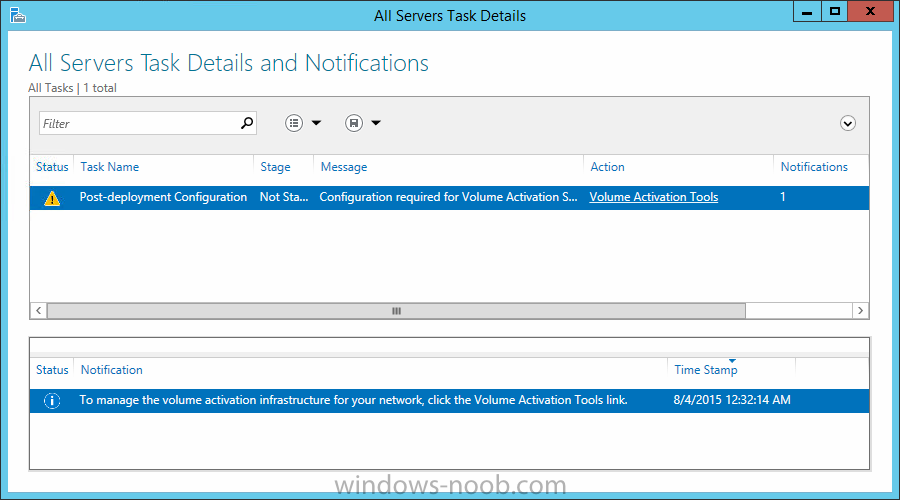
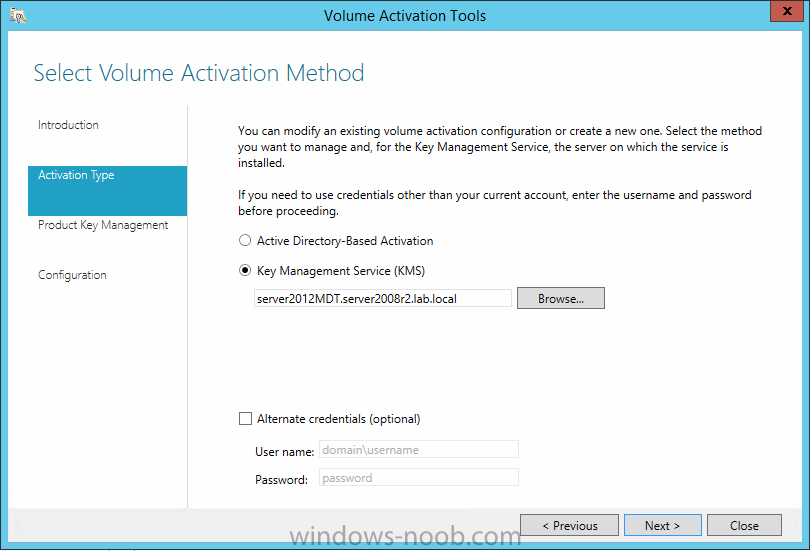
click on the Volume activation tools link and then decide what Volume Activation Method you want to use in the Select Volume Activation Method screen, use the default (Key Management Service (KMS))
on the Product Key Management screen enter your KMS host key retrieved above from the VLSC site.
After entering your Windows 10 KMS Host Key, click on the drop down menu and select it, click on the Commit button and then continue through that wizard until completion.
Step 6.Test the KMS server configuration
To test the KMS server configuration, follow the rest of the KMS guide located here
cheers
niall
This entry was posted in Windows 10. Bookmark the permalink.