
Продолжаем знакомиться с новыми возможностями ОС Windows Server 2012 R2. Ранее мы рассказывали о корпоративном аналоге DropBox в Windows Server 2012 R2 под названием Work Folders. Сегодня речь пойдет о еще одном новшестве новой серверной платформы – функции Web Application Proxy. Web Application Proxy – это новая функция роли Remote Access в Windows 2012 R2, позволяющая публиковать HTTP/ HTTPS приложения, расположенные в периметре корпоративной сети на клиентских устройствах (в первую очередь подразумеваются мобильные устройства) за ее периметром. Благодаря возможности интеграции c AD FS (служба может выступать в качестве ADFS-прокси), возможно обеспечить аутентификацию внешних пользователей, пытающихся получить доступ к опубликованным приложениям.
Web Application Proxy предоставляет такие же возможности публикации приложений, как и Forefront Unified Access Gateway (UAG), однако данная служба также позволяет взаимодействовать с другими серверами и сервисами, обеспечивая тем самым более гибкую и рациональную конфигурацию.
Web Application Proxy по сути выполняет функцию обратного прокси сервера (HTTP reverse proxy), организуя ретрансляцию запросов клиентов из внешней сети на внутренний сервер, и является межсетевым экраном на прикладном уровне.
Сервер со службой Web Application Proxy получает внешний HTTP/HTTPS трафик и терминирует его, после чего от своего имени инициирует новое подключение ко внутреннему приложению (веб-серверу). Т.е. внешние пользователи прямого доступа к внутреннему приложению реально не получают. Любой другой трафик, получаемый Web Application Proxy, отклоняется (в том числе отклоняются HTTP/HTTPS запросы, которые могут быть использованы при DoS, SSL и 0-day атаках).
Требования к организации Web Application Proxy и ключевые особенности:
- Систему можно развернуть на серверах с ОС Windows Server 2012 R2, включенных в домен Active Directory, с ролями AD FS и Web Application Proxy. Эти роли должны быть установлены на разных серверах.
- Необходимо обновить схему Active Directory до Windows Server 2012 R2 (обновлять контроллеры домена до Windows Server 2012 R2 не нужно)
- В качестве клиентских устройств поддерживаются устройства с ОС Windows, IOS (iPad и iPhone). Работы над клиентами для Android и Windows Phone пока еще не окончены
- Аутентификация клиентов осуществляется службой Active Directory Federation Services (ADFS), которая также выполняет функции ADFS – проксирования.
- Типовая схема размещения сервера с ролью Web Application Proxy представлена на рисунке. Данный сервер располагается в выделенной DMZ зоне и отделен от внешней (Интернет) и внутренней сети (Интранет) межсетевыми экранами. В этой конфигурации для работы Web Application Proxy требует наличия двух интерфейсов – внутреннего (Intranet) и внешнего (DMZ)

Установка роли ADFS в Windows Server 2012 R2
Для обеспечения дополнительной безопасности преаутентифкация внешних клиентов выполняется на сервере ADFS, в противном случае используется pass-through аутентификация на конечном сервере приложения (что менее секьюрно). Поэтому первый шаг при настройке Web Application Proxy – установка на отдельном сервере роли Active Directory Federation Services.

При установке ADFS нужно выбрать SSL сертификат, который будет использоваться для шифрования, а также DNS имена, которые будут использоваться клиентами при подключении (соответствующие записи в DNS зоне придется создать самостоятельно).

Затем нужно указать сервисную учетную запись для службы ADFS. Необходимо учесть, что имя ADFS должно быть указано в атрибут Service Principal Name аккаунта. Сделать это можно командой:
setspn –F –S host/adfs.winitpro.ru adfssvc

И, наконец, указать базу данных, в которой будет хранится информация: это может быть встроенная база на этом же сервере (WID — Windows Internal Database) или отдельная база на выделенном SQL-сервере.

Установка службы Web Application Proxy
Следующий этап, настройка самой службы Web Application Proxy. Напомним, что служба Web Application Proxy в Windows Server 2012 R2 является частью роли “Remote Access”. Установите службу Web Application Proxy и запустите мастер ее настройки.

На первом этапе мастер предложит Вам указать имя ADFS сервера и параметры учетной записи, имеющей доступ к данной службе.

Далее нужно указать сертификат (убедитесь, что в альтернативных именах сертификата содержится имя сервера ADFS).

Совет. Проверьте, что ваши DNSзоны настроены корректно: сервер с ролью WAP должен иметь возможность отрезолвить имя сервера ADFS, а он в свою очередь может разрешить имя прокси сервера. Сертификаты на обоих серверах должны включать имя службы федерации.
Публикация приложения через Web Application Proxy
После того, как установлены роли ADFS и Web Application Proxy (которая работает еще и как ADFS Proxy), можно перейти непосредственно к публикации наружу конкретного приложения. Сделать это можно с помощью консоли Remote Access Management Console.

Запустите мастер публикации и укажите, хотите ли вы использовать для преаутентификации службу ADFS (это именно наш вариант).

Затем нужно задать имя публикуемого приложения, используемый сертификат, внешний URL (имеенно его для подключения будут использовать внешние пользователи) и внутрений URL-адрес сервера, на который будут пересылаться запросы.
Совет. Если необходимо перенаправить внешнее приложение на альтернативный порт, необходимо задать его в URL, указаывающем на внутренний сервер. Например, если необходимо перенаправить внешние https запросы (443 порт) на 4443 порт, нужно указать:
Backend server URL: lync.winitpro.local:4443

Завершите работу мастера, и на этом публикация приложений окончена. Теперь, если попытаться с помощью браузера зайти на опубликованный внешний URL-адрес, то браузер сначала будет перенаправлен на службу аутентификации (ADFS Proxy), а после успешной аутентификации пользователь будет отправлен непосредственно на внутренний сайт (веб приложение).

Благодаря новой службе Web Application Proxy в Windows Server 2012 R2 возможно реализовать функционал обратного прокси сервера с целью публикации внутренних служб предприятия наружу без необходимости использования задействовать сторонние файерволы и продукты, в том числе такие, как Forefront и пр.
В этой статье я покажу процесс установки и настройки Служб федерации Active Directory (AD FS), которые становятся все более востребованы в самых различных сценариях.
Что важно сказать про AD FS, так это то, что коль уж этот сервис обеспечивает аутентификацию через “публичные” сети (что может быть использовано для организации Single Sign-on), то используется не привычный Kerberos, а новомодные Claims (CBA). Разумеется, передаваемые данные зашифрованы (используется SSL 3.0).
В качестве Claims Provider Trust, я буду использовать AD DS, хотя теоретически, это может быть и другой LDAP-каталог. В качестве Relying Party Trusts я буду использовать Azure, Office 365, Exchange, SharePoint, Lync, а также другие приложения – в новых статьях будут отсылки к этой.
Что касается системных требований, они предельно скромны: 1GHz vCPU, 1Gb vRAM, 20Gb vHDD (slow SATA storage) вполне достаточно. Дополнительных лицензий клиентского доступа не требуется, и если на хосте установлен Windows Server, то лицензирование вполне может обойтись в $0.
Устанавливать AD FS теоретически можно на сервера с другими ролями, но лучше выделить отдельный сервер, учитывая что и ресурсы, и лицензии минимальны.
Пример, почему плохо совмещать: есть сервер, на нем установлен IIS, сайты IIS подписан сертификатом server.local.domain, устанавливается AD FS, подписывается сертификатом adfs.internet.domain , после этого при попытке доступа AD FS предсказуемо будет подписываться сертификатом server.local.domain , что неправильно. Также, не поддерживается совмещение с ролями Remote Access.
На сервере AD FS соблазнительно отключить GUI, но этого делать не стоит: консоль AD FS Management отсутствует в RSAT, так что управление будет осуществляться только через сеанс на сервере AD FS. Если Вы найдете способ удаленного управления AD FS, сообщите об этом в комментариях.
Итак, начнем с установки роли:
Add-WindowsFeature ADFS-Federation
Перед тем как приступать к настройке, нужно получить сертификат, которым будут подписаны как службы AD FS, так и публикуемые с помощью Web Application Proxy сервисы. Отсюда очевидно, что сертификат либо должен содержать полный перечень публикуемых сервисов (что правильнее), либо быть wildcard (что проще).
Разумеется, лучше использовать коммерческий сертификат, но работать будет и сертификат, выданный корпоративным ЦС. Что касается самоподписанных сертификатов, то создать можно как обычно – с помощью IIS, работать с внешними сервисами (например, Office 365) будет – проверенно.
Вот пример запроса который я оправлял своему корпоративному ЦС, обратите внимание, я использовал “муху” в имени исключительно с целью демо, в продуктивной среде такое не всегда допустимо:

Отнеситесь к сертификату серьезно – на работающей с-ме замена сложна, вплоть до переустановки ролей AD FS и WAP, что влечет за собой повторную публикацию сервисов.
Теперь можем запустить мастер настройки, который предельно прост, укажем полученный ранее сертификат:

Установка должна проводится с правами администратора домена, также будет создана учетная запись с правами пользователя домена (я использовал созданную заранее учетку adfs_svc):

Укажем параметры внешней БД (достаточно Database Engine):

В итоге:

Если Вы решили использовать WID можно заглянуть в Windows Internal Database:
После того, как настройка окончена, нужно позаботится чтобы клиенты внутри сети могли обнаруживать “внешнее” имя сервиса:
Внешние клиенты, разумеется, должны доступаться по внешнему адресу:
Теперь, можно проверить сервис по ссылке https://sso.mars.biz.ua/adfs/ls/IdpInitiatedSignon.aspx

Для внешних пользователей будет выдано окно входа:
Для того, чтобы пользователи на доменных ПК не вводили пароль вручную (но нажать кнопку “Вход” все-таки придется), https://sso.mars.biz.ua нужно добавить в Trusted Sites, например с помощью групповой политики:

На этом, базовую установку и настройку AD FS можно считать оконченной.
Надеюсь озвученная информация будет полезной, а если нужна будет помощь — используйте форму на главной странице моего сайта.
Important
This is not a setup-guide for a production environment. This is mostly a guide for my self for testing/development. This is a guide for setting up a standalone AD FS.
For Windows Server 2012 R2 look here:
- Set up the lab environment for AD FS in Windows Server 2012 R2
For Windows Server 2016 look here:
- Obtain and Configure an SSL Certificate for AD FS (Google: create certificate for adfs)
- Then it is rather intuitive (or do I not have the time to write anything)
Prerequisite
- Windows Server 2012 (in this case Windows Server 2012 Standard)
- Active Directory Domain Services – installed
- DNS Server – installed
- Active Directory Certificate Services – installed
1. Add role – Active Directory Federation Services
Use default settings. This will also add the required IIS role.
2. Configure AD FS
Create a Stand-Alone Federation Server: When you select the Stand-alone federation server option in the AD FS Federation Server Configuration Wizard, the service account associated with this Federation Service will automatically be assigned to the NETWORK SERVICE account. Using NETWORK SERVICE as the service account is only recommended in situations where you are evaluating AD FS in a test lab environment.
- Server Manager – Dashboard – you will se a yellow warning up to the right by the Notifications flag – click Run the AD FS Management snap-in
- AD FS Management – click AD FS Federation Server Configuration Wizard
- Welcome – select Create a new Federation Service – click Next
- Select Deployment Type – select Stand-alone federation server – click Next
- Federation Service Name – select the default certificate machinename.domain created by AD CS – click Next
- Summary – click Next
- Results – click Close
3. Verify
Verify That a Federation Server Is Operational
Browse to https://machinename.domain/adfs/fs/federationserverservice.asmx, if the page returns xml it is OK.
Information
AD FS Deployment Guide in Windows Server 2012
Deploying Federation Servers
Create a Stand-Alone Federation Server
AD FS 2.0: How to Change the Local Authentication Type (look for WAUTH, in the comments, for a way to have multiple choices for howto authenticate)
Windows Identity Foundation (WIF): How to Utilize the WS-Federation WAUTH Parameter to Specify an Authentication Type
WAUTH parameters
4. Notes 2017-03-08
Notes to put in later.
SPN
ADFS-machine: XX-ADFS-01 (XX-ADFS-01.local.net), IP=10.0.0.20
Make sure to create an “adfs”-entry (adfs.local.net, or some other preferred name) in DNS pointing to 10.0.0.20 so you can use it when setting the service-principal-names for LOCAL\adfs-service.
- setspn -s HOST/adfs LOCAL\adfs-service
- setspn -s HOST/adfs.local.net LOCAL\adfs-service
It is important to use the “HOST” service-class. If you do not use the “adfs” entry but use the machine-name “XX-ADFS-01” instead, you get problems. There will be conflicts with the spn’s for the “XX-ADFS-01” machine. When it is added to the domain it gets the following spn’s automatically:
Registered ServicePrincipalNames for CN=XX01-ADFS-01,CN=Computers,DC=local,DC=net:
- HOST/XX-ADFS-01
- HOST/XX-ADFS-01.local.net
- RestrictedKrbHost/XX-ADFS-01
- RestrictedKrbHost/XX-ADFS-01.local.net
- TERMSRV/XX-ADFS-01
- TERMSRV/XX-ADFS-01.local.net
- WSMAN/XX-ADFS-01
- WSMAN/XX-ADFS-01.local.net
You can not solve it by removing:
- HOST/XX-ADFS-01
- HOST/XX-ADFS-01.local.net
Then you will get problems with the XX-ADFS-01 machine in the domain, it will not be trusted in the domain.
Certificate
Obtain and Configure an SSL Certificate for AD FS
You do this on the ADFS server. In the following part: Request and enroll a new SSL certificate for AD FS -> Request New Certificate…
Common name: adfs.local.net
DNS:
- adfs.local.net
- certauth.adfs.local.net
- enterpriseregistration.local.net
Active Directory Federation Services (AD S) in the Windows Server 2012 R2 OS provides flexibility for organizations that want to enable their users to log on to applications that are located on a local network, at a partner company, or in an online service.
With ADFS, your company can manage its own user accounts, and users only have to remember one set of credentials.
However, those credentials can provide access to a variety of applications, which typically are located in different locations.
ADFS is compliant with common Web services standards, thus enabling interoperability with identity federation solutions that other vendors provide.
AD FS addresses a variety of business scenarios where the typical authentication mechanisms used in an organization do not work.
More info & reading : http://technet.microsoft.com/en-us/windowsserver/dd448613.aspx
For this basic ADFS demo, i’m using my previous VM which is my domain controller (DC1), member server (SVR1) and 1 windows 8.1 client PC…
1st – Create a DNS record for AD FS
1 – On Domain controller (DC1) server, open DNS console and add new host…
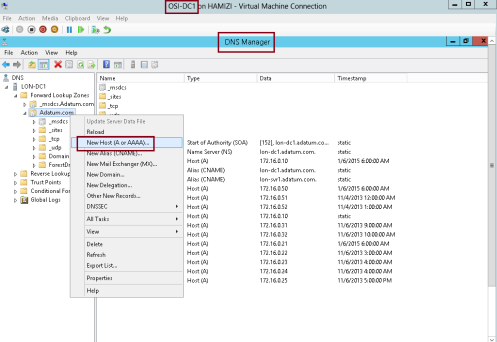
2 – In the New Host box, type adfs, in the IP address box, type 172.16.0.10, and then click Add Host…
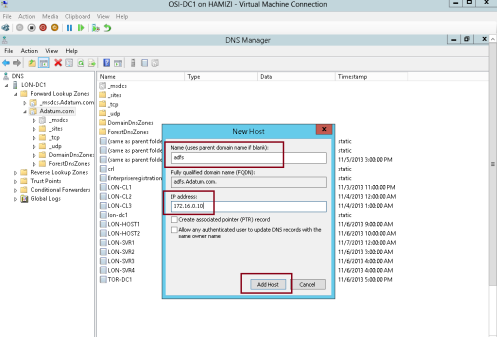
3 – Then click OK…

** before we proceed, make sure you create a new AD user called adfsService…
2nd – Install AD FS
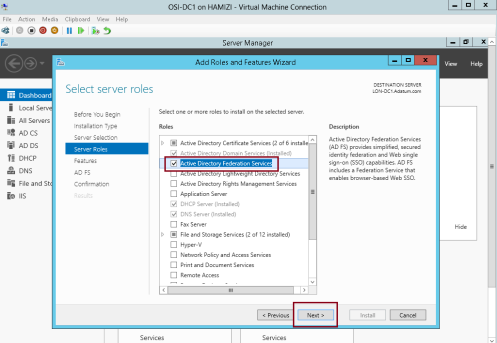
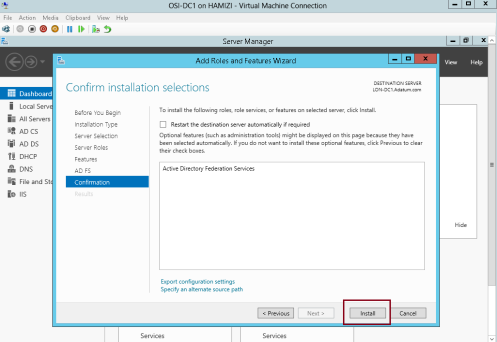
1 – Still on the DC1 domain server, open server manager, click Add Roles and Features, proceed the step until you get Select server roles interface, and then click Active Directory Federation Services, then proceed with next…
2 – On the Select features interface, click Next…

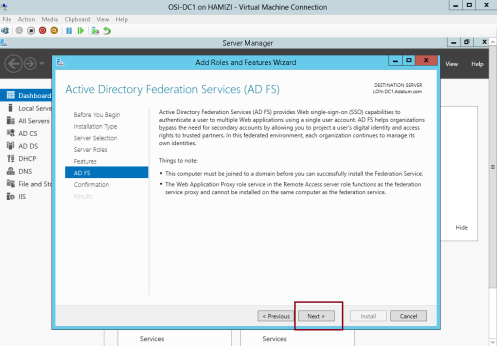
3 – On the Active Directory Federation Services (AD FS) interface, click Next…
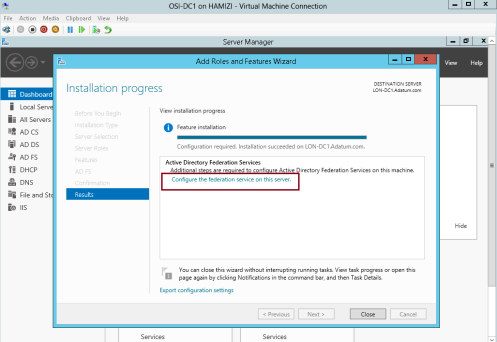
4 – then click Install…
5 – Once the installation completed, click Configure the federation service on this server…
3rd – Configure AD FS
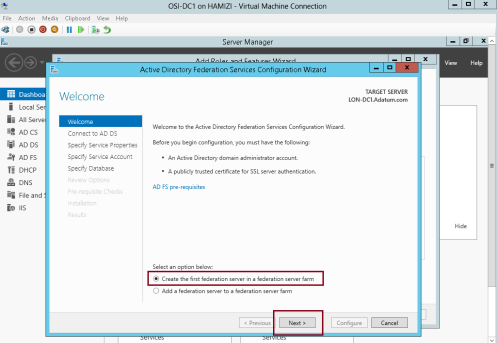
1 – on the Welcome interface, click Create the first federation server in a federation server farm, and then click Next…
2 – On the Connect to Active Directory Domain Services interface, proceed with Next…

3 – On the Specify Service Properties interface, in the SSL Certificate box, select adfs.adatum.com…
** In the Federation Service Display box, type Adatum Organization, and then click Next…

4 – On the Specify Service Account interface, click Use an existing domain user account or group Managed Service Account and then choose adfs user that you created previously, and then click next…

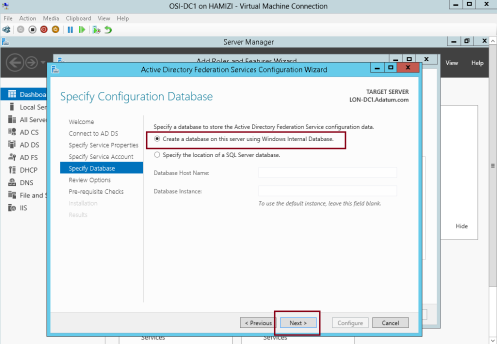
5 – On the Specify Configuration Database interface, click Create a database on this server using Windows Internal Database, and then click Next…
6 – On the Review Options interface, click Next…
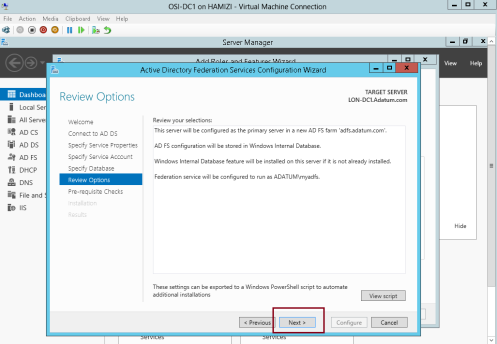
7 – On the Pre-requisite Checks interface, verify that all prerequisite passed and then click Configure…

8 – On the Results interface, click Close…
** Please take note that adfs.adatum.com certificate was preconfigured for this task. In your own environment, you need to obtain this certificate.

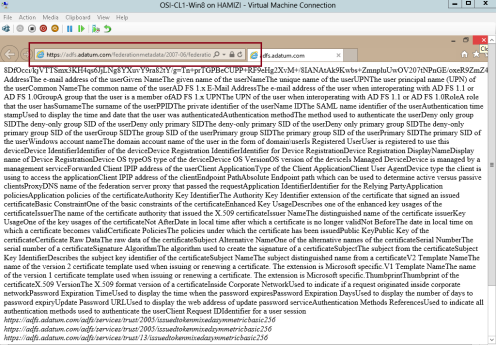
9 – to verify the ADFS functionality, log in to Windows 8.1 client PC as a AD user, and the open IE and type : https://adfs.adatum.com/federationmetadata/2007-06/federationmetadata.xml, and then verify that the file loads successfully…
4th – Configure a certificate for the application
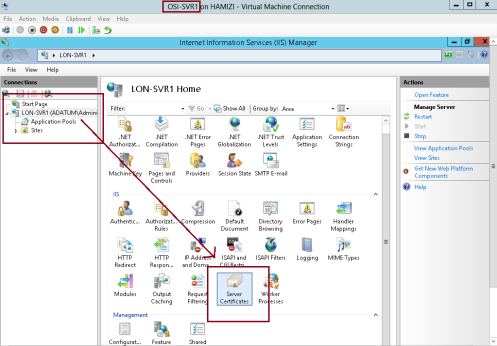
1 – Now switch to SVR1 server and open Internet Information Services (IIS) Manager and then open Server
Certificates…
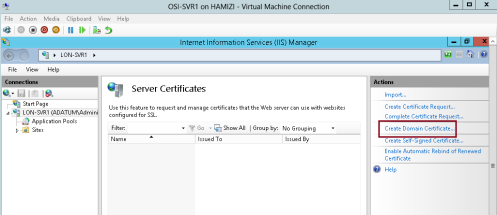
2 – then click Create Domain Certificate…
3 – In the Create Certificate interface on the Distinguished Name Properties, enter the following information (please refer to snapshot), and then click Next…

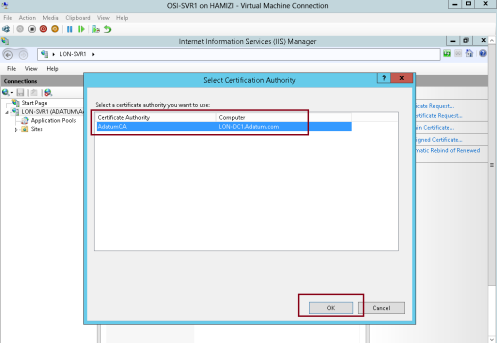
4 – On the Online Certification Authority interface, click Select…

5 – click AdatumCA, and then click OK…
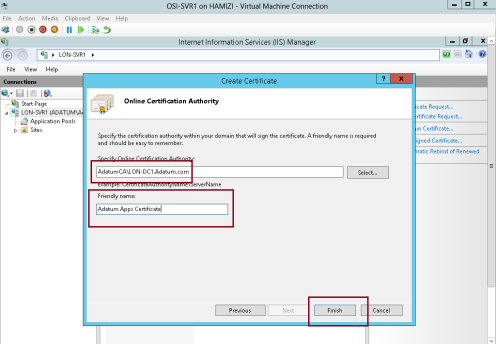
6 – On the Online Certification Authority interface, in the Friendly name box, type Adatum Apps Certificate, and then click Finish…
7 – In IIS Manager, expand Sites, click Default Web Site, and then click Bindings…

8 – In the Site Bindings interface, click Add…

9 – In the Add Site Binding interface, in the Type box, select https, then in the SSL certificate box, select Adatum Apps Certificate, and then click OK…

5th – Configure the Active Directory claims-provider trust
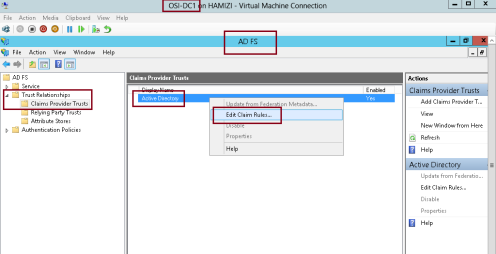
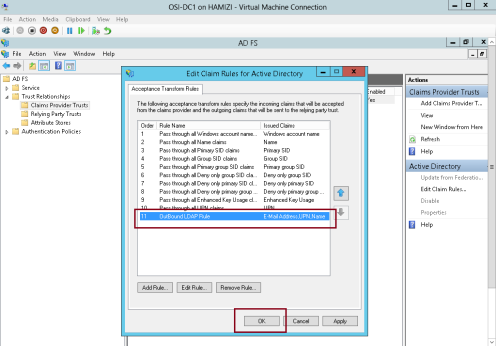
1 – Switch to DC1 server, and open AD FS Management, expand Trust Relationships, and then click Claims Provider
Trusts, in the middle pane, right-click Active Directory, and then click Edit Claim Rules…
2 – In the Edit Claims Rules for Active Directory interface, on the Acceptance Transform Rules tab, click Add Rule…
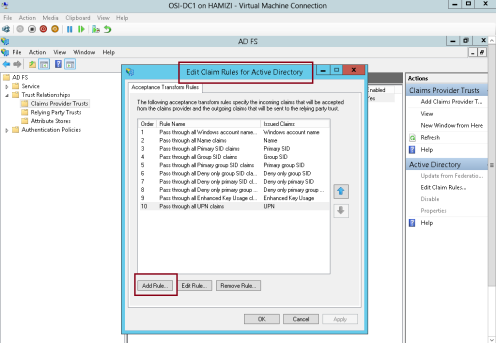
3 – In the Claim rule template box, select Send LDAP Attributes as Claims, and then click Next…

4 – On the Configure Rule interface, in the Claim rule name box, type Outbound LDAP Rule, then in the Attribute Store drop-down list, select Active Directory.
** In the Mapping of LDAP attributes to outgoing claim types section, select the following values and then click Finish:

5 – Then click OK…
6th – Configure the application to trust incoming claims
1 -Switch to SVR1 server, and then open Windows Identity Foundation Federation Utility console….
2 – On the Welcome to the Federation Utility Wizard interface, in the Application configuration location box, type C:inetpubwwwrootAdatumTestAppweb.config for the location of the sample web.config file…
** In the Application URI box, type https://lon-svr1.adatum.com/AdatumTestApp/ to indicate the path to the sample application that will trust the incoming claims from the federation server, and then click Next to continue…

3 – On the Security Token Service page, click Use an existing STS, in the STS WS-Federation metadata document location box, type https://adfs.adatum.com/federationmetadata/2007-06/federationmetadata.xml, and then click Next to continue…

4 – On the STS signing certificate chain validation error interface, click Disable certificate chain validation, and then click Next…

5 – On the Security token encryption interface, click No encryption, and then click Next…

6 – On the Offered claims interface, click Next…

7 – and then click Finish and OK…

7th – Configure a relying-party trust for the claims-aware application
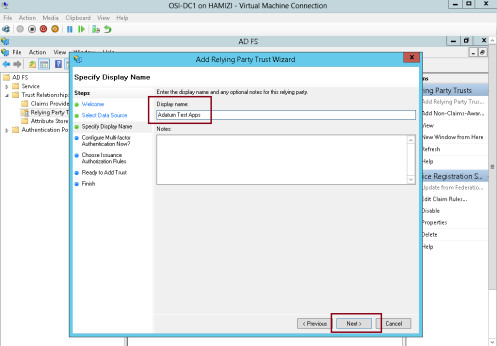
1 – Now switch to DC1 domain server, in the ADFS console, right-click Relying Party Trusts, and then click Add Relying Party Trust…

2 – on the Welcome interface, click Start…

3 – On the Select Data Source interface, click Import data about the relying party published online or on a local network…
** In the Federation Metadata address (host name or URL) box, type https://lonsvr1.adatum.com/adatumtestapp/, and then click Next. This downloads the metadata configured in the previous task…

4 – Next in the Display name box, type Adatum Test Apps, and then click Next…
5 – On the Configure Multi-factor Authentication Now interface, click I do not want to configure multifactor
authentication settings for this relying party trust at this time, and then click Next…
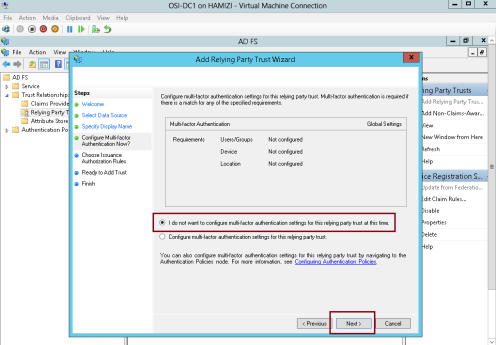
6 – On the Choose Issuance Authorization Rules interface, click Permit all users to access this relying party, and then click Next…

7 – On the Ready to Add Trust interface, click Next…

8 – On the Finish interface, click Close…

8th – Configure claim rules for the relying-party trust
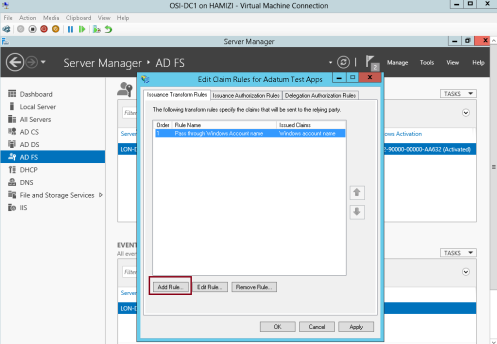
1 – still in DC1 domain server, in the Edit Claim Rules for Adatum Test Apps interface, on the Issuance Transform Rules tab, click Add Rule…

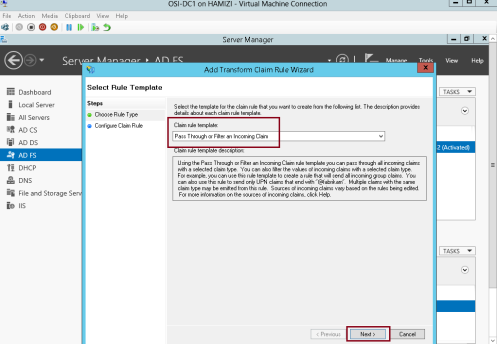
2 – In the Claim rule template box, select Pass Through or Filter an Incoming Claim, and then click Next…
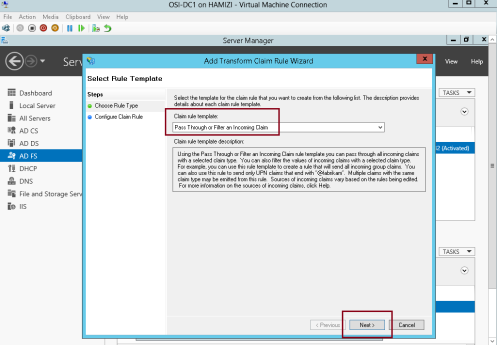
3 – In the Claim rule name box, type Pass through Windows account name…
** In the Incoming claim type drop-down list, click Windows account name, and then click Finish…

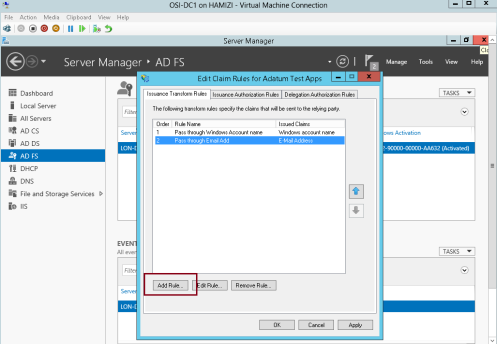
4 – On the Issuance Transform Rules tab, click Add Rule…
5 – In the Claim rule template box, select Pass Through or Filter an Incoming Claim, and then click Next…

6 – In the Claim rule name box, type Pass through E-Mail Address…
** In the Incoming claim type drop-down list, click E-Mail Address, and then click Finish…

7 – On the Issuance Transform Rules tab, click Add Rule…
8 – In the Claim rule template box, select Pass Through or Filter an Incoming Claim, and then click Next…

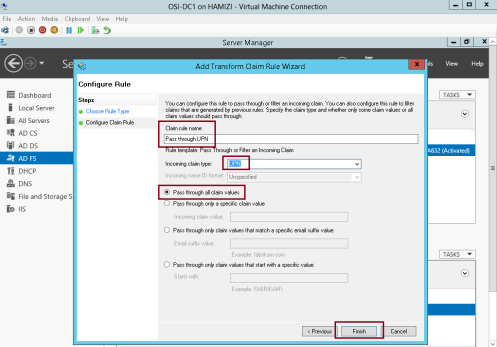
9 – In the Claim rule name box, type Pass through UPN…
** In the Incoming claim type drop-down list, click UPN, and then click Finish…
10 – On the Issuance Transform Rules tab, click Add Rule…

11 – In the Claim rule template box, select Pass Through or Filter an Incoming Claim, and then click Next…
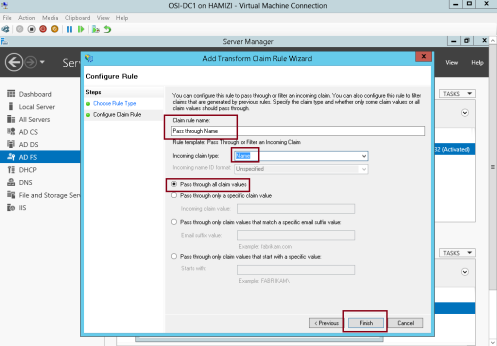
12 – In the Claim rule name box, type Pass through Name…
** In the Incoming claim type drop-down list, click Name, and then click Finish…
13 – Then click OK…

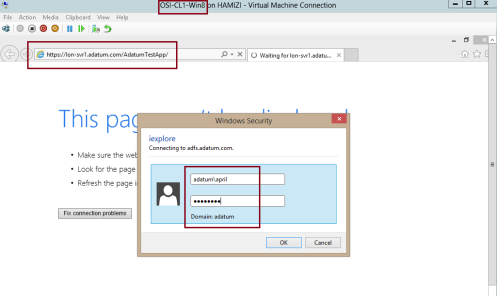
14 – Now switch to Windows 8.1 Client PC, log in as domain user and then open IE, then type https://lon- svr1.adatum.com/AdatumTestApp/…
** Notice that Windows Security window will pop out, then sign in as domain user…
15 – verify that the claim information is displays….

9th – Configure IE to pass local credentials to the application automatically
1 – Still in Windows 8.1 client PC IE, then open Internet Options…
** In the Internet Options Properties interface, click Security tab, click Local intranet, and then click Sites…

2 – In the Local intranet interface, click Advanced…

3 – In the Local intranet interface, in the Add this website to the zone box, insert https://adfs.adatum.com and https://lon-svr1.adatum.com, and then click Close, and click OK twice…

4 – Then in the IE, type https://lon-svr1.adatum.com/AdatumTestApp/, notice that you were not prompted for credentials…
That’s all for now, we have successfully installed and configured ADFS, and verified that it is functioning by viewing the FederationMetaData.xml file contents. We also have successfully configured ADFS to support authentication for an application.
DON’T FORGET TO SUBSCRIBE, COMMENT, AND REPOST!
Active Directory Federation Services (AD S) in the Windows Server 2012 R2 OS provides flexibility for organizations that want to enable their users to log on to applications that are located on a local network, at a partner company, or in an online service.
With ADFS, your company can manage its own user accounts, and users only have to remember one set of credentials.
However, those credentials can provide access to a variety of applications, which typically are located in different locations.
ADFS is compliant with common Web services standards, thus enabling interoperability with identity federation solutions that other vendors provide.
AD FS addresses a variety of business scenarios where the typical authentication mechanisms used in an organization do not work.
More info & reading : http://technet.microsoft.com/en-us/windowsserver/dd448613.aspx
For this basic ADFS demo, i’m using my previous VM which is my domain controller (DC1), member server (SVR1) and 1 windows 8.1 client PC…
1st – Create a DNS record for AD FS
1 – On Domain controller (DC1) server, open DNS console and add new host…
2 – In the New Host box, type adfs, in the IP address box, type 172.16.0.10, and then click Add Host…
3 – Then click OK…
** before we proceed, make sure you create a new AD user called adfsService…
2nd – Install AD FS
1 – Still on the DC1 domain server, open server manager, click Add Roles and Features, proceed the step until you get Select server roles interface, and then click Active Directory Federation Services, then proceed with next…
2 – On the Select features interface, click Next…
3 – On the Active Directory Federation Services (AD FS) interface, click Next…
4 – then click Install…
5 – Once the installation completed, click Configure the federation service on this server…
3rd – Configure AD FS
1 – on the Welcome interface, click Create the first federation server in a federation server farm, and then click Next…
2 – On the Connect to Active Directory Domain Services interface, proceed with Next…
3 – On the Specify Service Properties interface, in the SSL Certificate box, select adfs.adatum.com…
** In the Federation Service Display box, type Adatum Organization, and then click Next…
4 – On the Specify Service Account interface, click Use an existing domain user account or group Managed Service Account and then choose adfs user that you created previously, and then click next…
5 – On the Specify Configuration Database interface, click Create a database on this server using Windows Internal Database, and then click Next…
6 – On the Review Options interface, click Next…
7 – On the Pre-requisite Checks interface, verify that all prerequisite passed and then click Configure…
8 – On the Results interface, click Close…
** Please take note that adfs.adatum.com certificate was preconfigured for this task. In your own environment, you need to obtain this certificate.
9 – to verify the ADFS functionality, log in to Windows 8.1 client PC as a AD user, and the open IE and type : https://adfs.adatum.com/federationmetadata/2007-06/federationmetadata.xml,  and then verify that the file loads successfully…
4th – Configure a certificate for the application
1 – Now switch to SVR1 server and open Internet Information Services (IIS) Manager and then open Server
Certificates…
2 – then click Create Domain Certificate…
3 – In the Create Certificate interface on the Distinguished Name Properties, enter the following information (please refer to snapshot), and then click Next…
4 – On the Online Certification Authority interface, click Select…
5 – click AdatumCA, and then click OK…
6 – On the Online Certification Authority interface, in the Friendly name box, type Adatum Apps Certificate, and then click Finish…
7 – In IIS Manager, expand Sites, click Default Web Site, and then click Bindings…
8 – In the Site Bindings interface, click Add…
9 – In the Add Site Binding interface, in the Type box, select https, then in the SSL certificate box, select Adatum Apps Certificate, and then click OK…
5th – Configure the Active Directory claims-provider trust
1 – Switch to DC1 server, and open AD FS Management, expand Trust Relationships, and then click Claims Provider
Trusts, in the middle pane, right-click Active Directory, and then click Edit Claim Rules…
2 – In the Edit Claims Rules for Active Directory interface, on the Acceptance Transform Rules tab, click Add Rule…
3 – In the Claim rule template box, select Send LDAP Attributes as Claims, and then click Next…
4 – On the Configure Rule interface, in the Claim rule name box, type Outbound LDAP Rule, then in the Attribute Store drop-down list, select Active Directory.
** In the Mapping of LDAP attributes to outgoing claim types section, select the following values and then click Finish:
5 – Then click OK…
6th – Configure the application to trust incoming claims
1 -Switch to SVR1 server, and then open Windows Identity Foundation Federation Utility console….
2 – On the Welcome to the Federation Utility Wizard interface, in the Application configuration location box, type C:\inetpub\wwwroot\AdatumTestApp\web.config for the location of the sample web.config file…
** In the Application URI box, type https://lon-svr1.adatum.com/AdatumTestApp/to indicate the path to the sample application that will trust the incoming claims from the federation server, and then click Next to continue…
3 – On the Security Token Service page, click Use an existing STS, in the STS WS-Federation metadata document location box, typehttps://adfs.adatum.com/federationmetadata/2007-06/federationmetadata.xml, and then click Next to continue…
4 – On the STS signing certificate chain validation error interface, click Disable certificate chain validation, and then click Next…
5 – On the Security token encryption interface, click No encryption, and then click Next…
6 – On the Offered claims interface, click Next…
7 – and then click Finish and OK…
7th – Configure a relying-party trust for the claims-aware application
1 – Now switch to DC1 domain server, in the ADFS console, right-click Relying Party Trusts, and then click Add Relying Party Trust…
2 – on the Welcome interface, click Start…
3 – On the Select Data Source interface, click Import data about the relying party published online or on a local network…
** In the Federation Metadata address (host name or URL) box, typehttps://lonsvr1.adatum.com/adatumtestapp/, and then click Next. This downloads the metadata configured in the previous task…
4 – Next in the Display name box, type Adatum Test Apps, and then click Next…
5 – On the Configure Multi-factor Authentication Now interface, click I do not want to configure multifactor
authentication settings for this relying party trust at this time, and then click Next…
6 – On the Choose Issuance Authorization Rules interface, click Permit all users to access this relying party, and then click Next…
7 – On the Ready to Add Trust interface, click Next…
8 – On the Finish interface, click Close…
8th – Configure claim rules for the relying-party trust
1 – still in DC1 domain server, in the Edit Claim Rules for Adatum Test Apps interface, on the Issuance Transform Rules tab, click Add Rule…
2 – In the Claim rule template box, select Pass Through or Filter an Incoming Claim, and then click Next…
3 – In the Claim rule name box, type Pass through Windows account name…
** In the Incoming claim type drop-down list, click Windows account name, and then click Finish…
4 – On the Issuance Transform Rules tab, click Add Rule…
5 – In the Claim rule template box, select Pass Through or Filter an Incoming Claim, and then click Next…
6 – In the Claim rule name box, type Pass through E-Mail Address…
** In the Incoming claim type drop-down list, click E-Mail Address, and then click Finish…
7 – On the Issuance Transform Rules tab, click Add Rule…
8 – In the Claim rule template box, select Pass Through or Filter an Incoming Claim, and then click Next…
9 – In the Claim rule name box, type Pass through UPN…
** In the Incoming claim type drop-down list, click UPN, and then click Finish…
10 – On the Issuance Transform Rules tab, click Add Rule…
11 – In the Claim rule template box, select Pass Through or Filter an Incoming Claim, and then click Next…
12 – In the Claim rule name box, type Pass through Name…
** In the Incoming claim type drop-down list, click Name, and then click Finish…
13 – Then click OK…
14 – Now switch to Windows 8.1 Client PC, log in as domain user and then open IE, then type https://lon- svr1.adatum.com/AdatumTestApp/…
** Notice that Windows Security window will pop out, then sign in as domain user…
15 – verify that the claim information is displays….
9th – Configure IE to pass local credentials to the application automatically
1 – Still in Windows 8.1 client PC IE, then open Internet Options…
** In the Internet Options Properties interface, click Security tab, click Local intranet, and then click Sites…
2 – In the Local intranet interface, click Advanced…
3 – In the Local intranet interface, in the Add this website to the zone box, insert https://adfs.adatum.com and https://lon-svr1.adatum.com, and then click Close, and click OK twice…
4 – Then in the IE, type https://lon-svr1.adatum.com/AdatumTestApp/, notice that you were not prompted for credentials…
That’s all for now, we have successfully installed and configured ADFS, and verified that it is functioning by
viewing the FederationMetaData.xml file contents. We also have successfully configured ADFS to support authentication for an application…
Source: https://mizitechinfo.wordpress.com/2015/01/08/simple-step-install-configure-adfs-in-windows-server-2012-r2/