

Need a more powerful search software for your Windows Server? Learn more here…
Windows Search Server vs. Search Service
The Windows Search Protocol allows communication with a server that hosts a Windows Search Service. The Windows Search Service can issue queries and it also allows an administrator to manage an indexing server. The indexing process runs within the LocalSystem account and constantly runs for all users. This allows Windows Search to:
- Maintain an index that can be shared among all of the users.
- Maintain security restrictions and access to content.
- Process remote queries from computers on the network.
Don’t confuse the Windows Search Service with Microsoft Search Server Express. Microsoft Search Server Express is a free enterprise-class search server, which enables high performance searches of corporate data across multiple systems. Search Server Express has a similar appearance to a Windows SharePoint Services site. The main difference between Windows Search and Search Server Express is that Windows Search can search on a desktop and a server, where Search Server Express can only search on the server.
Windows Search Service on Windows Server 2008
If you are already using a Windows Server based computer, and are currently using Windows Server 2008 then you should know that the Windows Search Service might not be installed by default. You can install and configure the Windows Search Service manually, but it takes some time, patience, and a bit of knowledge to get it done. Here are the steps that you will need to follow:
- Click Start > All Programs > Administrative Tools and then Server Manager
- You will see a console tree in Server Manager, right click on Roles and then choose Add Roles.
- When the Add Roles Wizard opens, click Next.
- Add the Windows Search Service.
- You will need to choose the Volumes with shared folders to be indexed.
- Now you can finish & close the wizard. This should have the search service up and running.
Enable Windows Search Service on Windows Server 2012
While the steps are similar to enabling the search service on previous server versions, there are enough differences to write up the steps you need to follow to enable the Windows search service on Windows Server 2012. Here’s what you need to do:
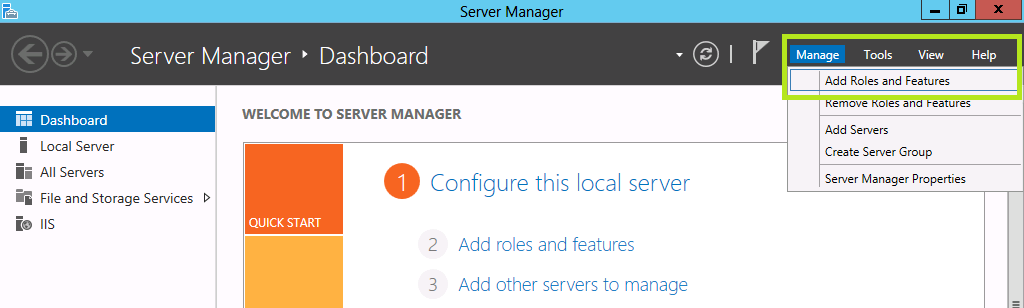
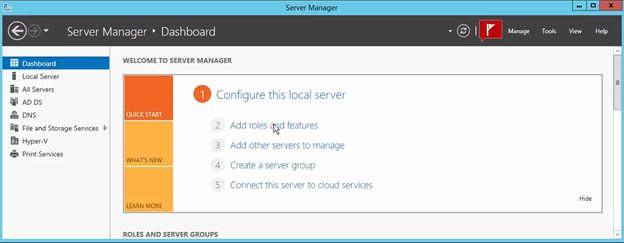
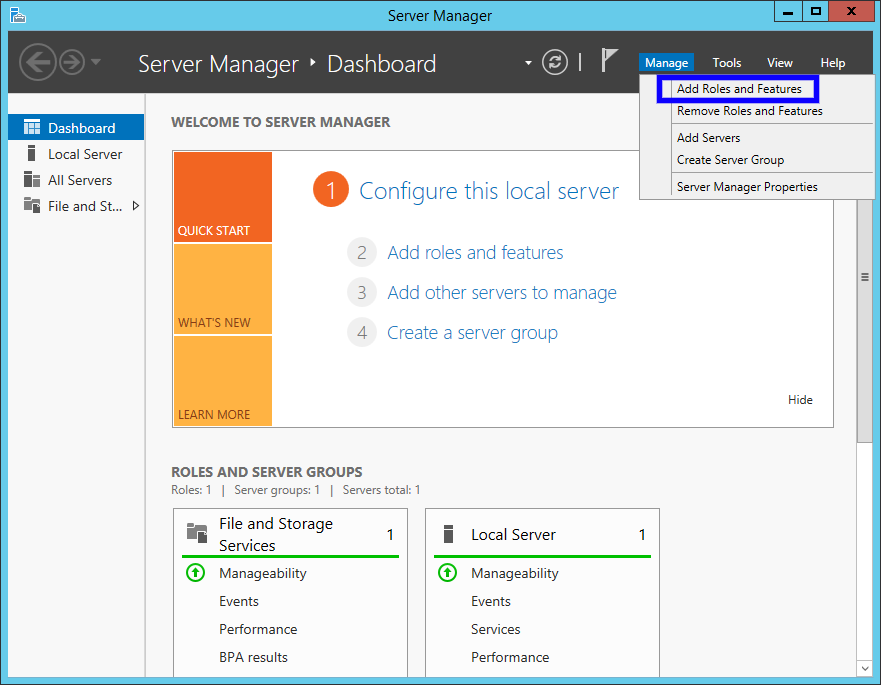
Open the Server Manager tool, then click Manage.
Go to Add Roles and Features to open the Add Roles and Features Wizard window.
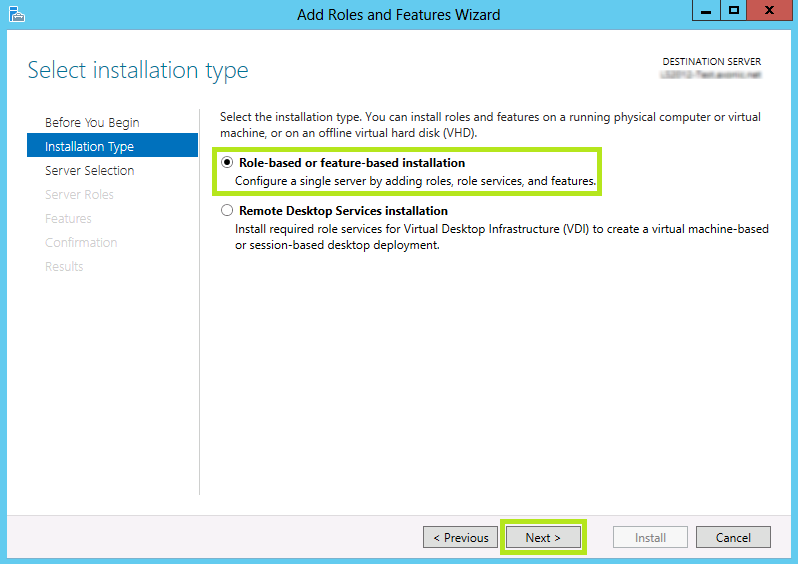
Click Next to open the wizard to the Installation type page.
Select Role based or feature based installation option, and click Next.
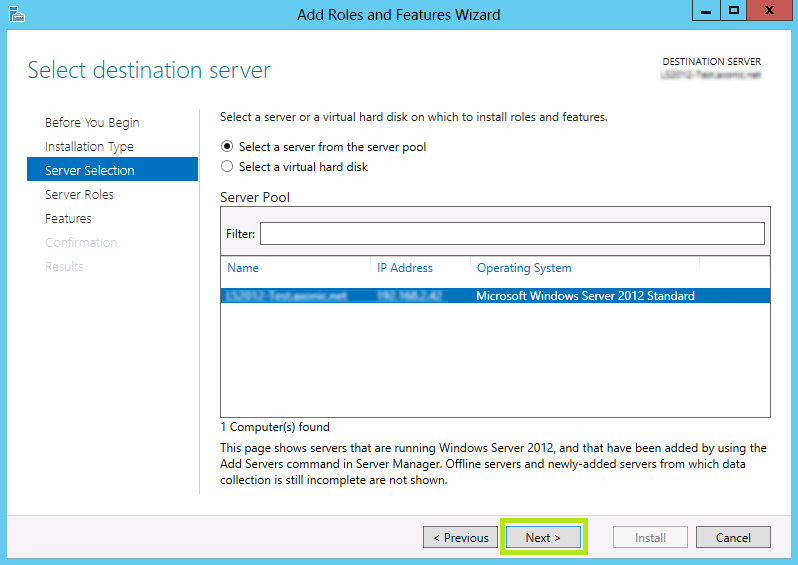
Now you are on the server selection page. Select the server you want the service installed on. If you only have one server, it will automatically select it. Click Next.
Now you are in the Server Roles page. Just click Next, because you are installing a feature, not a role.
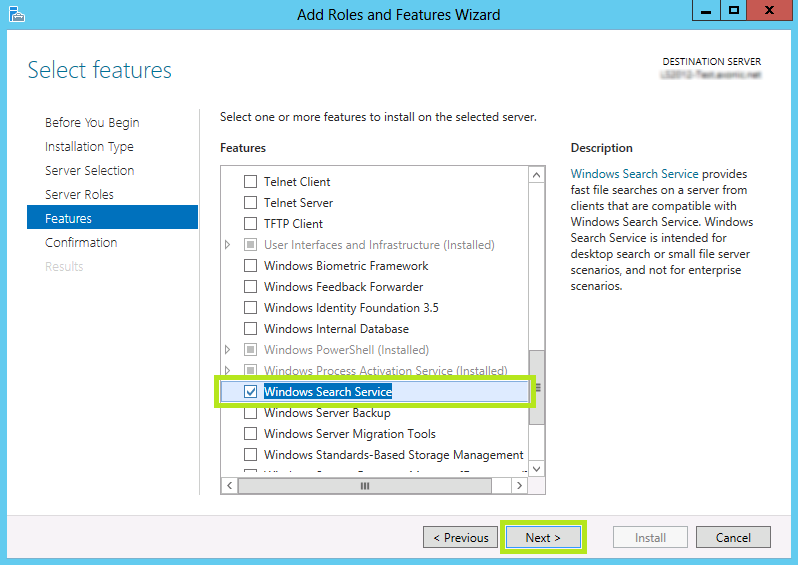
This will open the Features page, here is where you can choose Windows Search Service (make sure the check box is checked) click Next.
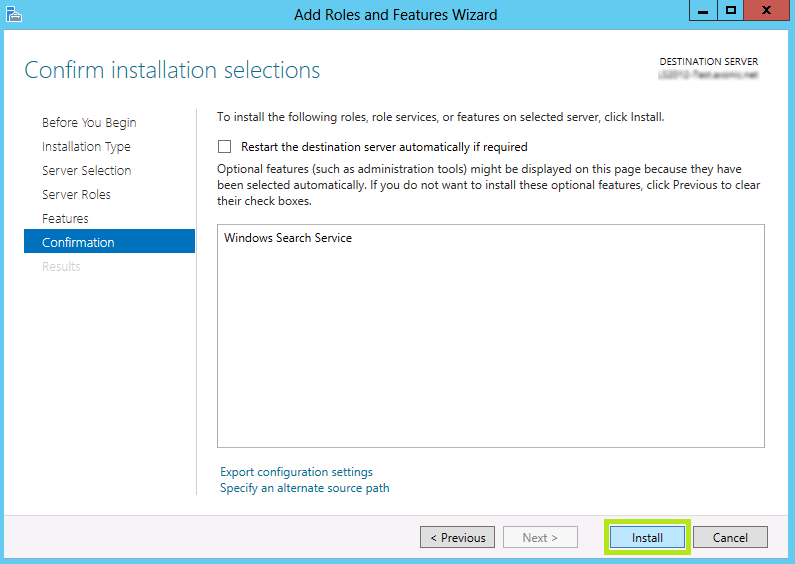
You are now in the confirmation page. To confirm the selection, just click Install. Please note that it will take some time to install the Windows Search Service.
The installation should now be complete.
Adding a New Location to be Indexed
A common problem that users on a network face is that when they try to add a network drive to their Library, an error message suddenly pops up that says “this network location can’t be included because it is not indexed”. There’s no need to worry though, this problem is easy to solve. The following steps require Windows Server 2008 or higher, and will work directly with Windows 7, 8, and 10 Libraries.
When the Windows Search Server is enabled, the server generates an index which is then stored on a Network Share. The clients that have this share mounted can use the search index to find the files they need.
The first step is to create a Shared Folder to host the search index. This can easily be done by going to the Server Manager > File and Storage Services > Shares and setting the appropriate User and File permissions.
Next you should enable Windows Search Service from your server. See the steps outlined above to do so on Windows Server 2008 and 2012.
With Windows Search Service installed and the shared folder created, you will then need to add that shared folder to the index. On the server, go to Control Panel > Indexing Options then click Modify to add the folder or even an entire drive to the index.
Now you will be able to add the network share to the library without the error message appearing.
Introduction
This will be a tutorial on how to improve our search for our windows
file servers, using the Windows Search Service. What we will be working
with is Windows Server 2012 R2, however, this will also work for both
2016, 2019, etc.
Getting Into the Server
The first thing we are going to do is go to our server dashboard and add
a role. To do this we are going to select the button that says, “Add
roles and features”. Click “Next”, leave it on the option that says
“Role-based or feature-based installation”, and click “Next” again.
Then, choose your server and select “Next”. While in Server Roles, we
are going to select “Next” at the bottom once again as what we are
searching for is a feature. Under “Features”, we are going to search for
a feature called “Windows Search Service”. Once found, click on the
checkbox next to it and select “Next”. We will then click “Install” to
get this installed.
Filter Pack
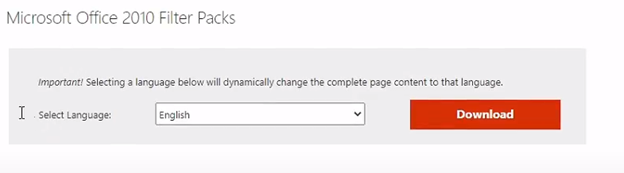
Our next item we are going to add is the filter pack. The filter pack
will allow us the ability to search inside of documents. To download
this, we are going to open a web browser, and navigate to this link:
- https://www.microsoft.com/en-us/download/details.aspx?id=17062
Once there, you will notice it says, “Microsoft Office 2010 Filter
Packs”. That is okay as this will provide us with what we need. Make
sure to get the 64-bit version when installing. We will then run the
download. Click “Next”, accept the checkbox and click “Next”, and click
“Ok” and it should be installed.
Turning on the Windows Search Services
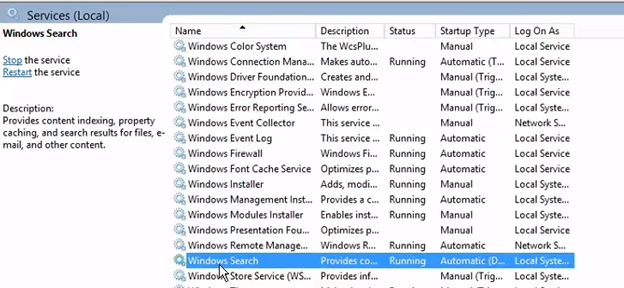
Our next step is to turn on the Windows Search Service. To get to that,
go to your Server Manager Dashboard and you should see “Tools” at the
top right. Click on that and select “Services”. We will then need to
find “Windows Search” which may be very far down as it is alphabetical.
If it is not already started, click on it and start it up as well as
make sure “Automatic (Delayed Start)” is selected for startup type.
Control Panel
To Launch the control panel, you can right click on the Windows Icon at
the bottom left of your screen and select “Control Panel”. Whilst in
there, you will search at the top for “Index” and select “Indexing
Options”. Now we are going to add the share drive location. We will
click on “Modify” and navigate to the drive we want and select “Ok”.
Index Location
While in the Indexing options from the previous part, we will select
“Advanced”. We can then change the location that we are storing the
indexing files. This is very important as this file could grow large
depending on how often this is used. Some good options are to create a
separate drive to put this in, or make sure your C: Drive has plenty of
space on it. You can also change the file types that are being indexed
by going to the tab “File Types” if you would like. We can then click
“Ok”.
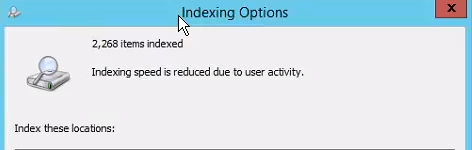
Indexing Speed
While back in the Indexing Options, you may see that “Indexing speed is
reduced due to user activity”. This is caused by a user being logged in
as it slows down to not use up the PC nearly as much. It is best
practice to leave this running overnight. When it finishes, the file
search will now be much faster and more efficient. All devices connected
will also have much quicker search speeds as well.
Full Video
SUPPORT MY WORK
Hire US
TECH I USE AND RECOMMEND
Tech Kits
Domain Registrar
Digital Ocean CloudServer
- Kevin Stevenson
- Thursday, Oct 14, 2021
Oct
01
By Default Help Server get installed to server machine if you install the complete server installation of Microsoft Dynamics NAV 2013 or Microsoft Dynamics NAV 2013 R2, However in some cases during the help server installation, setup find that “Microsoft Search Service” is not available in the server and this result a error in the Microsoft Dynamics NAV Help Server installation.
What is the reason for this problem?
Microsoft Dynamics NAV Help Server use Microsoft Windows Search Service and on Windows Server 2012 R2, Windows Search Service is not installed as a default feature. Therefore if you need to use this feature you need to install this manually.
Lets see how to install Windows Search Service and fix this problem.
How to install Windows Search Service on Windows Server 2012 R2
First open the Server Manager tool of Microsoft Windows Server 2012 R2 and then click on the Manage and go to “Add Roles and Features”. (Refer below image)
And it will open a “Add Roles and Features Wizard” window. (Refer following image)
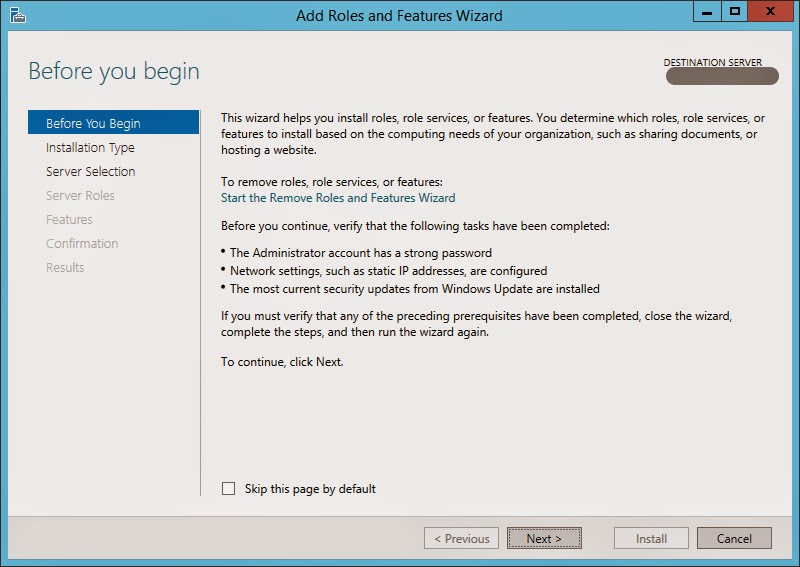
This is the default screen unless if you didn’t tick the “Skip this page by default“. However just go through this page content or simply click “Next” button.
Now we are in the “Installation Type” Page. (Refer the below image)
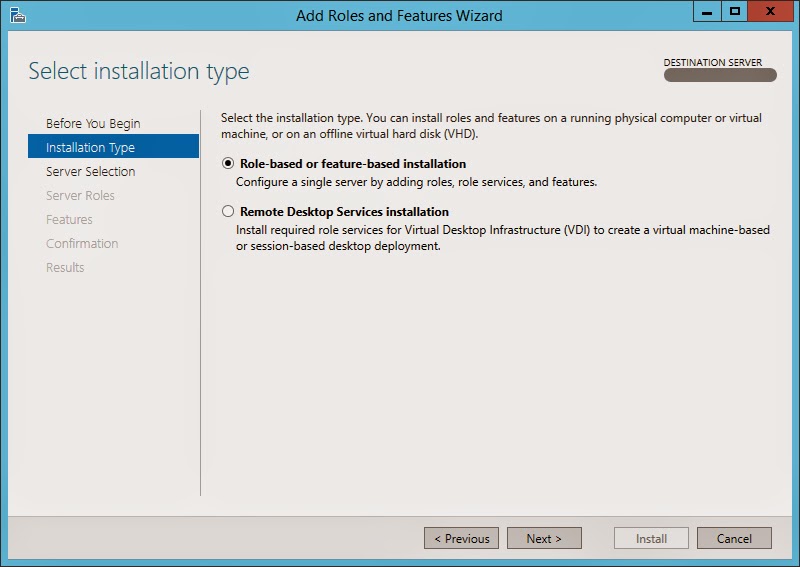
In this window select “Role-based or feature-based installation” option. As the name implies this will allow us to add the roles, role services and features.
After selecting the option press “Next” button and it will navigate to the “Server Selection” page in the wizard. (Refer the below image)

In this page select the server that you want to install “Windows Search Service” feature. In my case I only have one server in the server pool and by default it was automatically get selected.
After selecting the server from the server pool, click the “Next” button and it will navigate to “Server Roles” page. (Refer the below image)

We just have to skip this window because we are not going to install a server role and we want to install a server feature. Therefore press “Next” button in the bottom of the wizard and it will navigate the page to “Features” page. (Refer the below image) Finally we are there!!

In this window you can select the features that you want to install to the selected server. In this case we only want to install Windows Search Service. To install Windows Search Service, click on the related check box as shown in the above picture.
After selecting the check box click “Next” button in the wizard to go to Confirmation page.

In this page you need to confirm your selection to proceed with the installation.To confirm the Installation click “Install” button in the page and it will take few seconds to install the Windows Search Service.
After the installation is completed following window will appear and if it does not have any error messages then you have completed the installation properly. (Refer the below image)

Thank you and Regards,
Tharanga Chandrasekara.
Comments have been disabled.
The Windows search feature provides the fastest way to search for apps, files and settings. This article describes how to use Windows search in Windows 8 and Windows Server 2012 R2.
Step-by-step guide
The steps are as follows:
- Press the Windows key on your keyboard or hover the mouse pointer to the top right hand side of the screen to see the Charms bar.
- If you are using the Windows key,
- Type a few characters of your search and the best matches will be displayed.
- If you are using the Charms bar,
-
Click on the Search button and type a few characters of your search and the best matches will be displayed.
OR
You can also click on the Windows button below the Search button, open the Start menu and type a few characters of your search. The best matches will be displayed.
-
На чтение4 мин
Опубликовано
Обновлено
Windows Server 2012 — операционная система, разработанная компанией Microsoft специально для работы на серверах. Вместе с этой операционной системой поставляется множество инструментов и функций, которые позволяют повысить эффективность работы сервера и упростить его настройку и управление. Один из таких инструментов – поиск, который позволяет быстро находить файлы, папки, программы и другие объекты на сервере. В этой статье мы расскажем, как использовать поиск в Windows Server 2012 и предоставим несколько полезных советов.
Основной целью поиска в Windows Server 2012 является обеспечение быстрого доступа к нужным данным на сервере. Поиск выполняется на основе ключевых слов, которые нужно указать в поисковом запросе. По умолчанию, поиск ищет во всех доступных местах на сервере, но пользователь может настроить параметры поиска и указать конкретные папки или диски для сканирования. Это позволяет сократить время поиска и сосредоточиться на нужных объектах.
Помимо поиска файлов и папок, Windows Server 2012 также предоставляет возможность поиска программ, настроек, плагинов, аддонов и других ресурсов на сервере. Также, пользователь может задать дополнительные параметры поиска, такие как дата создания файла, его размер, тип файла и т.д. За счет всех этих функций, поиск в Windows Server 2012 становится мощным инструментом для эффективного управления сервером и нахождения нужной информации в многообразии данных и приложений.
Управление поиском в Windows Server 2012
Windows Server 2012 предлагает различные инструменты и настройки для управления процессом поиска данных в операционной системе. Эти инструменты позволяют улучшить эффективность и качество поиска, а также настроить его специально под нужды сервера.
Вот несколько советов, как управлять поиском в Windows Server 2012:
- Индексация файлов и папок: Для того чтобы поиск работал быстро и эффективно, необходимо сначала проиндексировать файлы и папки, которые нужно искать. Для этого можно воспользоваться инструментом «Управление поиском» в меню «Панель управления».
- Настройка параметров поиска: Windows Server 2012 позволяет настроить параметры поиска, чтобы учесть особенности сервера и его использование. Например, можно настроить, какие типы файлов нужно индексировать или исключить из индексации, а также какие папки должны быть включены или исключены из поиска.
- Использование операторов поиска: Windows Server 2012 поддерживает использование операторов поиска, чтобы уточнить поиск и найти нужные файлы или папки. Например, можно использовать операторы «AND», «OR» и «NOT» для создания сложных запросов. Также можно использовать операторы сравнения, такие как «>», «<» и «=».
- Фильтрация результатов поиска: Windows Server 2012 позволяет фильтровать результаты поиска по различным критериям, таким как тип файла, размер, дата изменения и другие параметры. Это позволяет быстро находить нужные файлы и исключать ненужные из результатов поиска.
- Планирование индексации: Windows Server 2012 позволяет планировать индексацию файлов и папок, чтобы обновлять индекс регулярно и всегда иметь актуальные данные для поиска. Это особенно полезно для серверов с большим количеством данных, которые постоянно обновляются.
С помощью этих советов и инструментов управления поиском в Windows Server 2012 вы сможете улучшить процесс поиска, сделать его более эффективным и настроить под свои потребности.
Настройка параметров поиска в Windows Server 2012
Windows Server 2012 предоставляет широкий набор возможностей для настройки параметров поиска, позволяющих улучшить эффективность и результативность процесса поиска файлов и папок. В этом разделе мы рассмотрим основные настройки параметров поиска в Windows Server 2012.
1. Изменение области поиска:
- Выберите папку или диск, в котором нужно выполнить поиск.
- Нажмите правой кнопкой мыши на выбранной папке или диске и выберите «Свойства».
- Перейдите на вкладку «Поиск» и выберите «Поиск в папке».
- Выберите опцию «Обозначенную папку» или «Текущую папку» в зависимости от ваших потребностей.
- Нажмите «Применить» и «ОК», чтобы сохранить изменения.
2. Настройка расширенных параметров поиска:
- Откройте Проводник.
- Нажмите на поле поиска в верхней правой части окна.
- Выберите «Дополнительные параметры».
- Выберите нужные опции, такие как «Дата изменения», «Размер» и «Тип файлов».
- Введите значения параметров поиска в соответствующие поля.
- Нажмите «Поиск», чтобы выполнить поиск с заданными параметрами.
3. Использование поиска по содержимому файлов:
- Откройте Проводник.
- Нажмите на поле поиска в верхней правой части окна.
- Выберите «Дополнительные параметры».
- Перейдите на вкладку «Содержимое».
- Установите флажок «Искать в содержимом файлов».
- Введите ключевое слово или фразу для поиска в поле «Содержит слово (-а)».
- Нажмите «Поиск», чтобы выполнить поиск с заданными параметрами.
Это только некоторые из возможностей по настройке параметров поиска в Windows Server 2012. Пользователи могут дополнительно настраивать параметры поиска в соответствии с своими потребностями и предпочтениями.
Оптимизация поиска в Windows Server 2012
Windows Server 2012 предлагает множество функций для оптимизации поиска, что позволяет улучшить производительность системы и сэкономить время при поиске нужных файлов и папок. В этом разделе мы рассмотрим несколько советов по оптимизации поиска в Windows Server 2012.
1. Используйте индексацию файловой системы
Индексация файловой системы позволяет Windows Server 2012 создавать индекс файлов и папок на диске, благодаря чему поиск становится более быстрым и эффективным. Убедитесь, что индексация включена для нужных дисков и папок, чтобы оптимизировать процесс поиска.
2. Уточните параметры поиска
При поиске файлов и папок в Windows Server 2012 можно задать различные параметры, например, имя файла, тип файла, дата создания и многое другое. Если вы знаете конкретные характеристики и параметры искомого файла, укажите их при поиске, чтобы сузить диапазон и ускорить процесс.
3. Используйте маски поиска
Маски поиска позволяют задать шаблон поиска для файлов и папок. Например, вы можете искать все файлы с определенным расширением (*.docx, *.xlsx и т.д.) или файлы, содержащие определенное слово в имени. Использование масок позволяет уточнить поиск и получить более точные результаты.
4. Ограничьте область поиска
Если вы знаете, что нужный файл находится в определенном месте, ограничьте область поиска только этой папкой или диском. Таким образом, вы сможете ускорить процесс поиска, и Windows Server 2012 будет сканировать только указанные места.
5. Используйте инструменты диагностики и мониторинга
Windows Server 2012 предлагает инструменты диагностики и мониторинга, которые помогают оптимизировать и контролировать процессы поиска. Воспользуйтесь этими инструментами, чтобы получить информацию о производительности, задачах поиска и других параметрах.
С помощью этих советов вы сможете оптимизировать поиск в Windows Server 2012, сэкономить время и повысить эффективность работы с системой.