
Не секрет, что в Windows 8 / Windows Server 2012 / R2 .Net Framework 3.5 не идет в комплекте поставки ОС (в рамках концепции Features on Demand), и для его установки требует дистрибутив ОС или прямой доступ к сайту обновлений Microsoft. В одной из предыдущих статей мы уже показывали, как установить .NET Framework 3.5 в Windows Server 2012 R2 / Windows 8. На днях сразу на нескольких системах столкнулись с ошибкой установки .Net Framework 3.5. Проблема наблюдалась при установке компонента как на серверной Windows Server 2012, так и на клиентской Windows 8.1.
Что самое интересное, победить проблему получилось разными методами : ).
Содержание:
- Невозможно установить .NET Framework 3.5 в Windows 8 / Windows Server 2012
- Некорректные обновления, препятствующие установке .NET 3.5
- Конфликт Language Pack и .NET Framework 3.5
Невозможно установить .NET Framework 3.5 в Windows 8 / Windows Server 2012
При онлайн установке .NET Framework 3.5 в Windows 8 через Панель управления (Control Panel -> Programs and Features -> Turn Windows features on or off) появляется ошибка 0x800F0906:
Error: 0x800F0906
Windows couldn’t connect to the Internet to download necessary files. Make sure that you’re connected to the Internet and click «Retry» to try again.

Примечание. Каких либо проблем с доступом в Интернет на проблемных машинах не было.
При попытке офлайн установки .NET 3.5 со смонтированного диска с дистрибутивом ОС (использовался именно тот установочный диск, с которого разворачивалась система) командой:
dism /online /enable-feature /featurename:NetFX3 /All /Source:e:\sources\sxs /LimitAccess
Выполнение команды DISM завершается с ошибкой 0x800F081F:
Deployment Image Servicing and Management tool Version: 6.2.9200.16384
Image Version: 6.2.9200.16384
Enabling feature(s) [===========================66.5%====== ]
Error: 0x800f081f
The source files could not be found.
Use the «Source» option to specify the location of the files that are required to restore the feature. For more informat
ion on specifying a source location, see http://go.microsoft.com/fwlink/?LinkId=243077.
The DISM log file can be found at C:\Windows\Logs\DISM\dism.log

В локализованной версии Windows 8 ошибка, соответственно:
Включение функций
[===========================66.5%====== ]
Ошибка: 0x800f081f
Не удалось найти исходные файлы.
Лог C:\Windows\Logs\DISM\dism.log содержит такие ошибки:
2014-10-24 10:11:22, Info                  DISM   DISM Package Manager: PID=776 TID=4024  Error in operation: source for package or file not found, ResolveSource() unsuccessful. (CBS HRESULT=0x800f081f) - CCbsConUIHandler::Error
2014-10-24 10:11:22, Error                 DISM   DISM Package Manager: PID=776 TID=2856 Failed finalizing changes. - CDISMPackageManager::Internal_Finalize(hr:0x800f081f)
2014-10-24 10:11:22, Error                 DISM   DISM Package Manager: PID=776 TID=2856 The source files could not be found; their location must be specified using the /source option to restore the feature. - GetCbsErrorMsg
2014-10-24 10:11:22, Error                 DISM   DISM Package Manager: PID=776 TID=2856 Failed processing package changes with session options - CDISMPackageManager::ProcessChangesWithOptions(hr:0x800f081f)
2014-10-24 10:11:22, Error                 DISM   DISM Package Manager: PID=776 TID=2856 Failed ProcessChanges. - CPackageManagerCLIHandler::Private_ProcessFeatureChange(hr:0x800f081f)
2014-10-24 10:11:23, Error DISM DISM Package Manager: PID=776 TID=2856 Failed while processing command enable-feature. - CPackageManagerCLIHandler::ExecuteCmdLine(hr:0x800f081f)
Некорректные обновления, препятствующие установке .NET 3.5
В одной из свежей статей базы знаний Microsoft http://support.microsoft.com/kb/3005628 описывается проблема с августовскими обновлениями безопасности Windows, установка которых приводит к ситуации, когда невозможно установить компонент .NET Framework 3.5. Речь идет о двух обновлениях:
- KB2966828 — MS14-046: Security update for the .NET Framework 3.5 on Windows 8.1 and Windows Server 2012 R2: August 12, 2014
- KB2966827 — MS14-046: Security update for the .NET Framework 3.5 on Windows 8 and Windows Server 2012: August 12, 2014
Как мы видим из описаний, указанные обновления безопасности предназначены для .NET Framework 3.5 в Windows 8.1 и Windows Server 2012 R2, причем устанавливаются эти обновления не зависимо от того, установлен ли компонент .NET Framework 3.5 в системе или нет.
Понять установлены ли данные обновления в системе можно так или с помощью такой команды Powershell:
Get-HotFix |? {$ _. Hotfixid -like "*2966828*"}
Если любое из этих обновление установлено в системе, его нужно удалить (процедура подробно описана в статье Как правильно удалить обновление в Windows ). После этого можно установить .Net Framework 3.5 как обычно (он установится без ошибки), а затем еще раз установить удаленные обновления (дабы не оставлять дыру в системе).
Совет. Альтернативно на портале Microsoft вместо удаления/установки обновлений рекомендуют установить хотфикс 3005628. Данный фикс удалит обновления 2966827 2966828 в системах, где не установлен.NET Framework 3.5. Какой способ удобнее – решать вам.
Конфликт Language Pack и .NET Framework 3.5
На машине с Windows 8.1, на которой также присутствовала рассматриваемая проблема, указанные выше обновлений отсутствовали. В попытках решить проблему перебрали множество вариантов, начиная от последовательного удаления всех обновлений и заканчивая восстановлением хранилища компонентов. Но эффекта так и не достигли…
Как не странно, помогло удаление дополнительного (русского) языкового пакета (команда lpksetup).

После удаления языкового пакета, .NET Framework устанавливается корректно. Затем можно заново установить нужный Language Pack.
you have just installed a fresh new Windows Server 2012R2 on premise or in Azure and you need to install .Net Framework 3.5 Features
But it fails with an error 0x800f081f
a quick search says you need this command to do this well eh why ? but any way it is on the web so it must be right .
dism.exe /Online /Enable-Feature /FeatureName:NetFx3 /All /LimitAccess /Source:E:\sources\sxs <> Will not Work
But why everybody says thanks! let me that you to the real problem. Reminder this is for all Servers even in Azure !

We checked the .Net Framework 3.5 Features and failed

Next attempt Give the Source to the installation. not very handy in Azure first download a ISO then mount this to the OS.
But it is on the Web so it must be true and the installation says he I need a Source I do not have these files and the OS is not lying or does it ?

So we put in the Source and give it a try.


Same error and with the source, maybe my source is not right , yeh right.
Test tis one more time form the Command
Then there is this line, this should work eh yes is did not.
dism.exe /Online /Enable-Feature /FeatureName:NetFx3 /All /LimitAccess /Source:E:\sources\sxs

See it did not work, I told you so in the first line So what is really going on in this system.
The Real fix for installing .NET Framework 3.5 Feature and Error 0x800f081f
If you open a PowerShell window and query the roles and features Get-WindowsFeature take a look at .NET Framework 3.5.

In the last column the Install state is different, it says Removed ?
- Removed means that you can install the feature but the source files for that are not available for this OS (not always)
- Installed means that the role or feature is already enabled and in use
- Available means that you can install the feature and the source files are on the machine and the OS can use them
But Removed, If the @Azure Team has removed this feature could this be the problem ?
Let me check if there are Updates for my system.


What there is an update for me and I do not have the .NET 3.5 Framework features installed.
then there must be an update there for me that is nagging me. Let me search the updates for .NET 3.5 Framework and compare them to the Installed updates.
KB2966828 http://support2.microsoft.com/kb/2966828
This is an .NET 3.5 Framework update ad must be installed when the .NET 3.5 Framework was installed and patched

I uninstalled this update
Reinstalled .NET 3.5 Framework feature and see now it is working.
So all the time a Windows Update is keeping me from installing the .NET 3.5 Framework Feature.
Sometimes Windows can be a pain, But you are in control !
Happy Clustering!
Robert Smit
Http://robertsmit.wordpress.com
@clustermvp
Technorati Tags: Framework,Feature,Windows,Server,Azure,Error,Solution
WordPress Tags: Framework,Feature,Windows,Server,Azure,Error,Solution
Robert Smit is Senior Technical Evangelist and is a current Microsoft MVP in Clustering as of 2009.
Robert has over 20 years experience in IT with experience in the educational, health-care and finance industries.
Robert’s past IT experience in the trenches of IT gives him the knowledge and insight that allows him to communicate effectively with IT professionals
who are trying to address real concerns around business continuity, disaster recovery and regulatory compliance issues. Robert holds the following certifications:
MCT — Microsoft Certified Trainer, MCTS — Windows Server Virtualization, MCSE, MCSA and MCPS. He is an active participant in the Microsoft newsgroup community and is currently focused on Hyper-V, Failover Clustering, SQL Server, Azure and all things related to Cloud Computing and Infrastructure Optimalization.
Follow Robert on Twitter @ClusterMVP
Or follow his blog https://robertsmit.wordpress.com
Linkedin Profile Http://nl.linkedin.com/in/robertsmit
Robert is also capable of transferring his knowledge to others which is a rare feature in the field of IT. He makes a point of not only solving issues but also of giving on the job training of his colleagues.
A customer says » Robert has been a big influence on our technical staff and I have to come to know him as a brilliant specialist concerning Microsoft Products. He was Capable with his in-depth knowledge of Microsoft products to troubleshoot problems and develop our infrastructure to a higher level. I would certainly hire him again in the future. »
Details of the Recommendation: «I have been coordinating with Robert implementing a very complex system. Although he was primarily a Microsoft infrastructure specialist; he was able to understand and debug .Net based complext Windows applications and websites. His input to improve performance of applications proved very helpful for the success of our project
View all posts by Robert Smit [MVP]
Table of contents
- What can be the Error Code 0x800f081f caused by?
- Solution 1: Configuring your Group Policy
- To begin, follow these steps:
- Solution 2: Using a DISM Command to Enable the .NET Framework
- Reinstalling Microsoft .NET Framework 3.5
Microsoft has been working hard to bring improvements to Windows over the past couple of years. However, one cannot deny that the operating system is still prone to errors. Some of these issues prevent users from performing their typical computing tasks. It can be frustrating if you encounter one of these error codes while you’re in the middle of completing your work.
In previous articles, we shared tips on how to get rid of some of these error codes. However, in this post, we are going to teach you how to resolve the error 0x800f081f on Windows 10. We will also share some of the possible reasons why this issue occurs. Once you know the root cause of the problem, you can prevent it from happening again.
What can be the Error Code 0x800f081f caused by?
In most cases, the error code 0x800f081f appears because of Microsoft .NET Framework 3.5 incompatibilities. Users reported that the issue had occurred after they had enabled the .NET Framework through the Deployment Image Servicing and Management (DISM) tool, installation wizard, or Windows PowerShell commands.
The error code 0x800f081f usually appears on Windows 10, Windows 8.1, Windows 8, Windows Server version 1709, Windows Server 2016, Windows Server 2012 R2, and Windows Server 2012. It is worth noting that Microsoft .NET Framework 3.5 is a ‘Feature on Demand’ on the operating systems we mentioned. That is why, the feature is not enabled by default.
Aside from the error code 0x800F081F, there are four other codes that show up due to the same underlying problem. These error codes are 0x800F0906, 0x800F0907, and 0x800F0922. So, if you happen to encounter one of these error codes, you can use the solutions we’ve listed below to get rid of the issue. We’re not only teaching you how to resolve the error 0x800f081f on Windows 10, we’re also helping you fix three other error codes!
Solution 1: Configuring your Group Policy
One of the methods for fixing the error code 800f081f is configuring your group policy. After all, some issues with it may affect your operating system’s ability to activate the installation. It is worth noting that the Group Policy Editor is natively available on Enterprise, Pro, and Education versions of Windows 10. So, if you have a different version of the OS, you won’t be able to see the feature. That said, you can still get rid of the error code by following the instructions in the next solution.
To begin, follow these steps:
- Launch the Run dialog box by pressing Windows Key+R on your keyboard.
- Now, type “gpedit.msc” (no quotes) inside the box, then click OK. Doing this should let you open the Group Policy Editor.
- Once the Group Policy Editor is up, go to the left-pane menu and navigate to this path:
Computer Configuration ->Administrative Templates ->System
- Go to the right panel, then scroll down until you find the ‘Specify settings for optional component installation and component repair’ entry.
- Double-click the entry, then go to the top left-hand corner to select the box beside Enabled.
- Click OK.
Solution 2: Using a DISM Command to Enable the .NET Framework
This solution best applies to the error code 0x800F0922, but it can also fix the error 0x800F081F. In this method, you need to run a DISM command in order to activate the .NET Framework. The process is not complicated as long as you follow the instructions to a tee.
Before you proceed with the steps, you need to get an ISO image of Windows 10. Keep in mind that the version you’ll acquire must match your current OS. You can use the Media Creation Tool to make an ISO image. You can download this tool from Microsoft’s site.
Once you’ve downloaded the Media Creation Tool, run it, then click the ‘Create installation media for another PC’ option. A new screen will open, and you need to select your language and system architecture. Choose ISO file to commence the creation process. Save the ISO file on a USB flash drive or burn it onto a DVD. Once you’ve done that, you can begin to resolve the error code, using these steps:
- Insert the DVD or plug the USB flash drive with the ISO file to your computer.
- Double-click the ISO file to mount it automatically. You can also mount the file by right-clicking it and selecting Mount from the options. Take a look at the left-hand panel of the window. You should be able to see the ISO in a virtual drive here if the process was successful. Take note of the letter of the drive. If you wish to unmount the image, right-click the virtual drive in This PC, then select Eject from the context menu.
- Once you’ve mounted the image, click the Search icon on your taskbar.
- Type “cmd” (no quotes) inside the search box.
- Right-click Command Prompt from the results, then choose Run as Administrator.
- Once Command Prompt is up, paste this text:
Dism /online /enable-feature /featurename:NetFx3 /All /Source:[Drive]:\sources\sxs /LimitAccess
Note: Remember to replace [Drive] with the letter you took note from Step 2.
- Press Enter to run the command.
Reinstalling Microsoft .NET Framework 3.5
After following the instructions we shared, you can now proceed to installing .NET Framework 3.5 to see if the error code 0x800F081F is gone. To do that, follow the instructions below:
- Go to your taskbar and right-click the Windows icon.
- Select Settings from the options.
- Inside the Settings app, click Apps, then select Apps and Features.
- Scroll down until you find the Related Settings section. Click Programs and Features below it.
- Go to the left-pane menu, then click the ‘Turn Windows features on or off’ link.
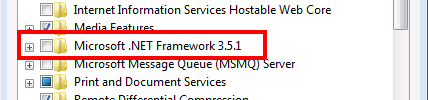
- Look for the ‘.NET Framework 3.5 (includes .NET 2.0 and 3.0)’ entry and select the box beside it.
- Click OK to start the installation process.
If you are able to install Microsoft .NET Framework 3.5 without any problem, then it means that you have eliminated the error code 0x800F081F. Many issues have been associated with this feature. Some people using the Windows 10 Technical Preview version reported that the file went missing, causing a host of issues in their system.
This is a legitimate problem that we have addressed in one of our blog posts. However, you need to be wary of malicious messages that tell you that the .Net Framework file went missing because of a harmful virus. In most cases, this is caused by adware that can trick you into calling a fake contact center. If you’re not careful, you might end up giving your credit card details and other sensitive information to scammers.
As such, we recommend protecting your computer, using a powerful security tool like Auslogics Anti-Malware. This reliable software program will clean your system and get rid of adware and other suspicious items. It even has a friendly interface which allows you to easily set up and run the scan.
Which error code would you like us to solve next?
Ask your questions in the comments section below!
The error 0x800f081f is a common error that shows up on Windows 10 and other windows versions. It’s popular on DISM and .NET Framework 3.5, and we’re going to outline how to fix the error on these two instances.
How To Fix Error 0x800f081f On DISM
DISM is one of the leading tools installed on Windows 10 because it can troubleshoot most of your PC problems. It’s capable of repairing and updating any corrupt file or image on Windows. When it starts showing errors, things get messy, the DISM tool runs an in-depth scan than the SFC scan.
The error normally shows up when you run the command “DISM/restore health”, or “DISM /Online /Cleanup-Image /RestoreHealth”. There are other DISM commands though that show this error code, the error message, in this case, will be displayed as:
"Error: 0x800f081f, The source files could not be found."
Use the "Source" option to specify the location of the files that are required to restore the feature.
For more information on specifying a source location,
see http://go.microsoft.com/fwlink/?LinkId=243077.”
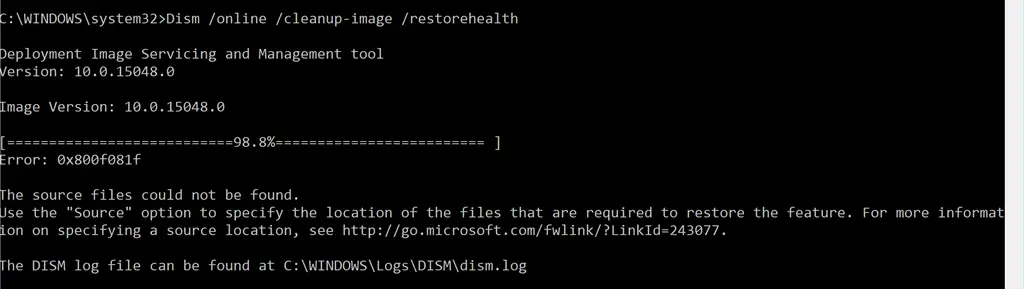
Error 0x800f081f on DISM
Or in some cases you’ll see the message:
"The DISM source files could not be found."
What Causes Error 0x800f081f On DISM?
The error 0x800f081f on DISM shows that the built-in tool cannot find the files needed to fix the Windows image from the default location.
Fix 1: DISM Cleanup Command
This is the first and easiest fix to the error 0x800f081f on DISM on your computer, this simple fix requires running the DISM Cleanup Command in your command prompt. Here the steps to follow in order to execute this troubleshoot:
- Open the command prompt and Run as Administrator. You can find Command Prompt by searching “Command Prompt” in Windows search or using any other shortcut you might have.
- Once the Command Prompt Window opens you should type the command “sfc /scannow” and hit enter to run it.
- Then you run the second command: “dism.exe /Online /Cleanup-image /Restorehealth”(without the quotes) and hit enter to run the command
- If you don’t receive an error after successfully running this command, then you’ve taken care of the problem, and if error 0x800f081f is still showing up, then you need to apply another troubleshoot.
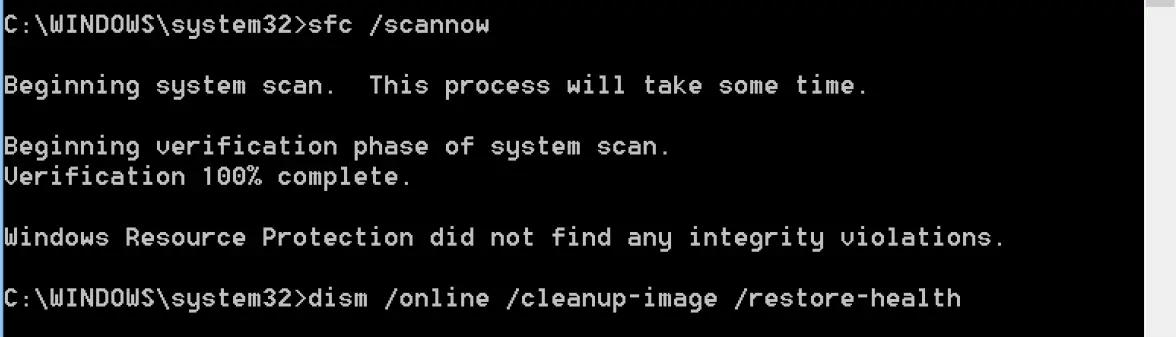
DISM Cleanup Command
Fix 2: Edit Group Policy
This fix is only applicable for Win 10 Pro, Enterprise, and education versions. You shouldn’t try this troubleshoot if you don’t have these versions, please. It requires configuring group policy, here are steps to follow:
- Open the Run dialog by pressing Windows + R keys.
- In the dialog box, you should type “msc” and click Ok, or hit the enter key.
- The Local Group Policy Editor will open, and you need to select “Computer Configuration”.
- Next, you choose “Administrative Templates”.
- Look for “System” and click on it.
- Locate the option that says “Specify settings for optional component installation and component repair”, it’s located by the right panel of the Local Group Policy Editor, you need to double click.
- You should now mark it “Enabled”.
- Click Ok and exit.
- You can now check if the error 0x800f081f on DISM is gone or not.
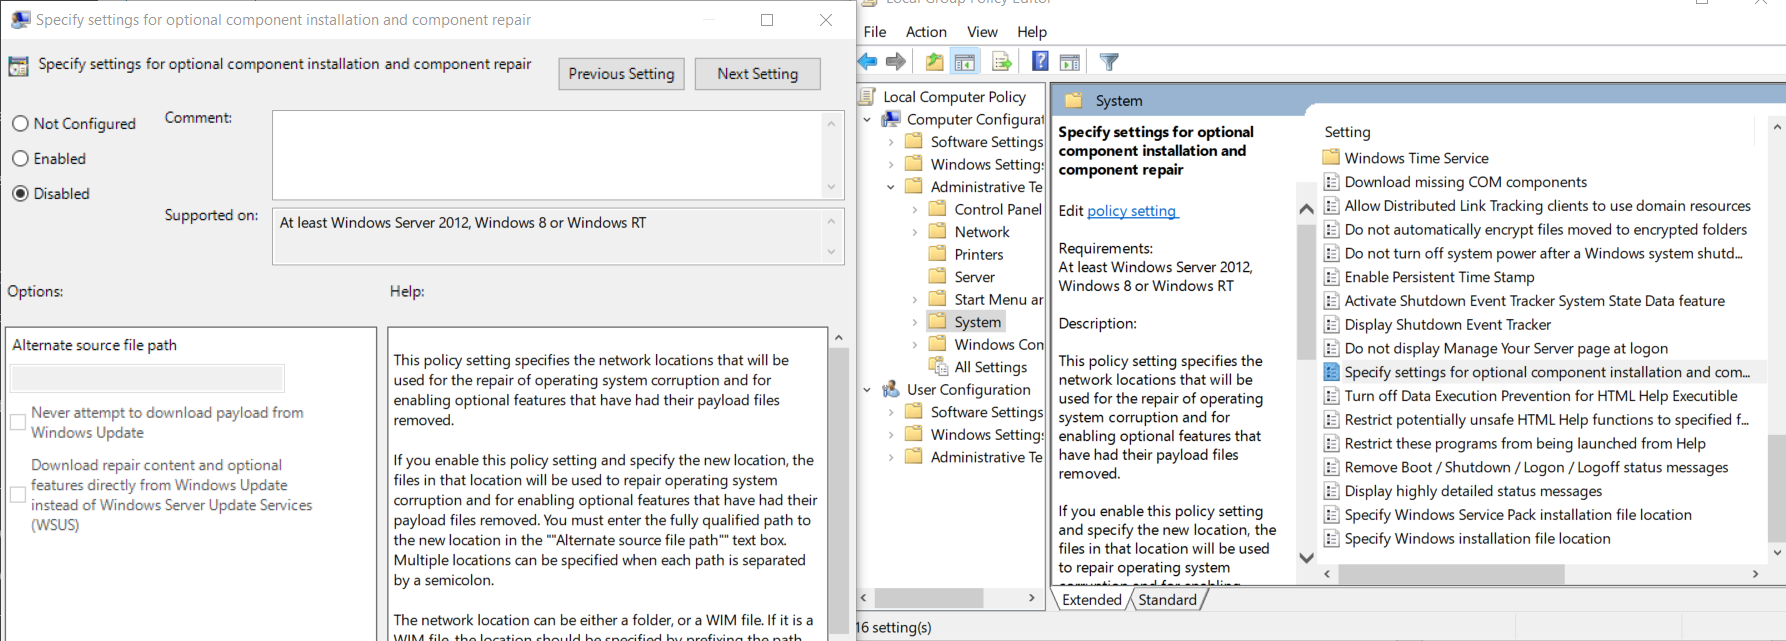
Edit Group Policy to fix Error 0x800f081f
Fix 3: Use Windows Image to get Source Files
The error can show up when Windows is not able to find the source files. This fix is a lengthy one because it requires using the Media Creation Tool to create a Windows image before changing the DISM source. Here is how to do it:
- Download the Media Creation Tool from Microsoft websites. Just search for the tool by using the search box on the site or you can trace it by searching on Google.
- After installing the Media Creation Tool, you then launch.
- Accept the terms and continue.
- Mark the option “Create installation media (USB flash drive, DVD, or ISO file) for another PC” and hit the “Next” button.
- Disable the option “Use the recommended options fort his PC”.
- Then you select your preferences such as language, edition, and architecture.
- Click Next to continue.
- Select the ISO option and click Next.
- Choose the location and save the ISO file.
- After downloading the ISO file, you should now locate it and Right-click on it.
- Click on “Mount” from the menu.
- Locate esd and right-click on it, select “Copy” from the menu.
- Paste it on your Windows drive.
- Open Command prompt, make sure to run as administrator.
- Type cd/ and hit “Enter”, this will open the drive C: root folder.
- Then you add this command:
dism /Get-WimInfo /WimFile:install.esd
- Different versions of Windows will be displayed with their index numbers and you need to enter your current Windows version.
- Next you run this command:
dism /export-image /SourceImageFile:install.esd
/SourceIndex:IndexNumber /DestinationImageFile:install.wim
/Compress:max /CheckIntegrity
(replace Indexnumber in the command with the actual index number of your Windows version).
- Let the process finish and close the command prompt.
- Go back to Drive C: and you can see the Wim file.
- Run the Command prompt again as Administrator just like you did previously.
- Run the following commands separately, copy one command and then hit enter, then the second one also:
DISM /Online /Cleanup-Image /StartComponentCleanup
DISM /Online /Cleanup-Image /AnalyzeComponentStore
- And then run the third command: DISM /Online /Cleanup-Image /RestoreHealth /Source:WIM:c:\install.wim:1 /LimitAccess
- And finally, you run the system file checker command:
sfc /scannow.
It can take some time before it finished, but if it’s taking too long, you should restart your PC and run the command again.
- You’re now done, it’s quite a long process, but it’s effective.
These are the best fixes for error 0x800f081f on DISM, let’s now look at how to fix the error 0x800f081f on .NET Framework 3.5.
How To Fix Error 0x800f081f On .NET Framework 3.5
What’s Error 0x800f081f On .NET Framework 3.5
The error 0x800f081f on .NET Framework 3.5 mostly shows up when installing .NET Framework 3.5, but it can still show up when in use. This error shows up only on Windows 10, Windows 8.1 & 8, Windows Server 2012 R2, and Windows server 2012. The three popular error messages received are:
-
"Error: 0x800F081F - The source files could not be found."
-
"Error: 0x800F0906 - The source files could not be downloaded."
-
"Windows couldn’t connect to the Internet to download necessary files.
-
Make sure that you’re connected to the Internet and click “Retry” to try again."
Error 0x800f081f On .NET Framework 3.5
What’s The Cause?
Incompatibilities of .NET Framework 3.5 is the major cause of the error 0x800f081f. All Windows versions that experience this error problem run the .NET Framework 3.5 using the feature called “Feature on demand”. Meaning that you’ll have to enable it because it’s not the default .Net Framework on the device.
As you might already know, new Windows versions namely Win 10 and 8 come with .NET Framework 4.6 and 4.5 respectively. If you install programs on your PC that work on .NET Framework 3.5, you’ll have to install or enable 3.5 if it’s already installed. So when you try to enable it, Windows update will look for .NET binaries and other important files. When there is a problem in this process, then you end up with error 0x800f081f displayed.
Fix 1: Install .NET Framework 3.5 using DISM
If .NET Framework is showing the error 0x800f081f during installation or when enabling it manually, you should consider using the DISM tool to enable it. For this, you need to have the ISO image or the installation media before you begin executing this fix. Once you have your installation media, you then follow the steps below:
- Open the command prompt by typing “cmd” in the Windows search from the start menu.
- The command prompt will show up and you should right-click on it and Run as Administrator.
- In the command prompt window, you should type this command and hit enter; Dism /online /enable-feature/featurename:NetFx3 /All /Source:<DRIVE>:\sources\sxsLimitAccess”, remove the quotes and also replace “DRIVE” with your drive name where your installation media is located. It should be something like “D:”.
- If the command still failed and is showing the error 0x800f081f, you need to recheck the source path of your drive and ensure that it’s correct.

Install .NET Framework 3.5 using DISM
Fix 2: configure Group Policy
Follow the same steps on Fix No.2 from the previous section for solving error 0x800f081f on DISM.
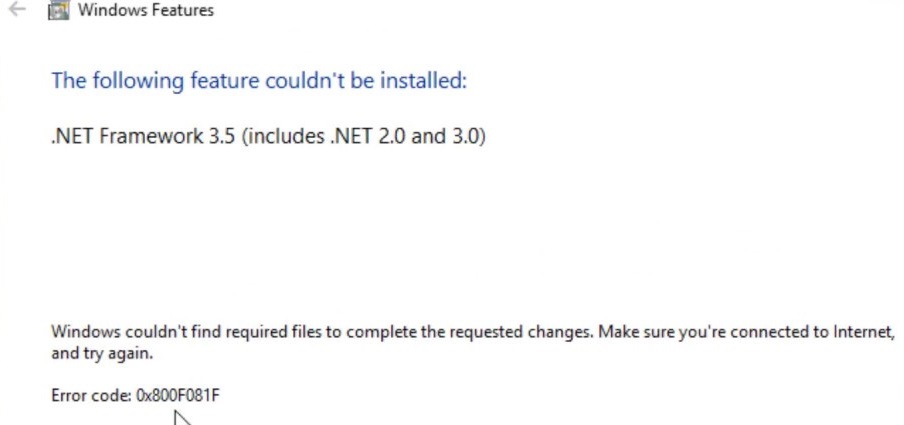
Fix 3: Reinstall .NET Framework 3.5
It can be possible that .NET Framework 3.5 is corrupt, in this case, you need to reinstall it, here is how to do it:
- Press the Win + I keys to open Windows Settings.
- Click on Apps and when you scroll down, you’ll see the Tab “Related Settings”, you should then click on “Programs and Features”.
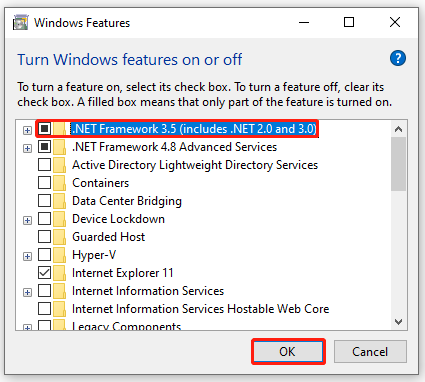
- Next, you click on ‘Turn Windows Features On or Off’.
- From the Windows Features, you’ll see .NET Framework 3.5 (which includes both 2.0 and 3.0), check on that option, and click ok.
- Windows will now attempt to make new installations.
Reinstall .NET Framework 3.5
These are the ways to solve the error 0x800f081f on .NET Framework 3.5. We hope you’re able to fix the error 0x800f081f on your PC fast and don’t forget to let us know in the comments how things worked for you.
DISM /Online /Cleanup-Image /RestoreHealth is one of the most commonly used command lines that can repair a damaged Windows system image. However, some of you may receive DISM error 0x800f081f while running it. If you are struggling with the same error, this guide on MiniTool Website might be helpful to you.
Deployment Image Servicing and Management (DISM) is a useful way to repair corrupted system images. Usually, it works together with System File Checker to scan and repair your computer and return it to a healthy work state.
However, like other inbuilt Windows tools, it goes wrong sometimes. Quite a few users complain that they encounter DISM error 0x800f081f when running the DISM /Online /Cleanup-Image /RestoreHealth command and receiving the following error messages.
- Error: 0x800f081f. The source files could not be found.
- Windows couldn’t find the required files to complete the requested changes. Make sure you’re connected to Internet, and try again. Error: 0x800f081f.
This error indicates that DISM cannot find the files required to fix the online Windows image in the default location. DISM error 0x800f081f can lead to other errors on your computer and prevents other processes from functioning properly, so you must take some measures to get rid of it as soon as it crops up.
# Suggestion: Back up Your Computer in Advance
As you can see, it is not easy to troubleshoot manually because you don’t know the exact reason for DISM failed error 0x800f081f. What’s more, you may make some mistakes during the troubleshooting process below if you are not proficient in computers. Any small changes may make huge differences or even cause severe consequences to your computer.
As a result, we sincerely advise you to back up your computer in advance. With a backup copy in hand, you can easily restore your system to a normal state. Some of you may assume that creating a backup of your system seems difficult. Don’t worry! With a piece of professional backup software – MiniTool ShadowMaker, everything will be easier.
This free tool is compatible with almost all Windows systems and allows you to create a file, folder, partition, disk, or system backup on your Windows PC. What’s more, it is very popular among the Windows community because of its one-click system backup solution. Without further ado, let’s see how it works!
Step 1. Download, install and launch this program.
MiniTool ShadowMaker TrialClick to Download100%Clean & Safe
Step 2. After launching it, hit Keep Trial to get a 30-day free trial and then go to the Backup page.
Step 3. On this page and you can see the system-required partitions are selected by default in SOURCE and you only need to choose a storage path for your backup in DESTINATION.
Tips:
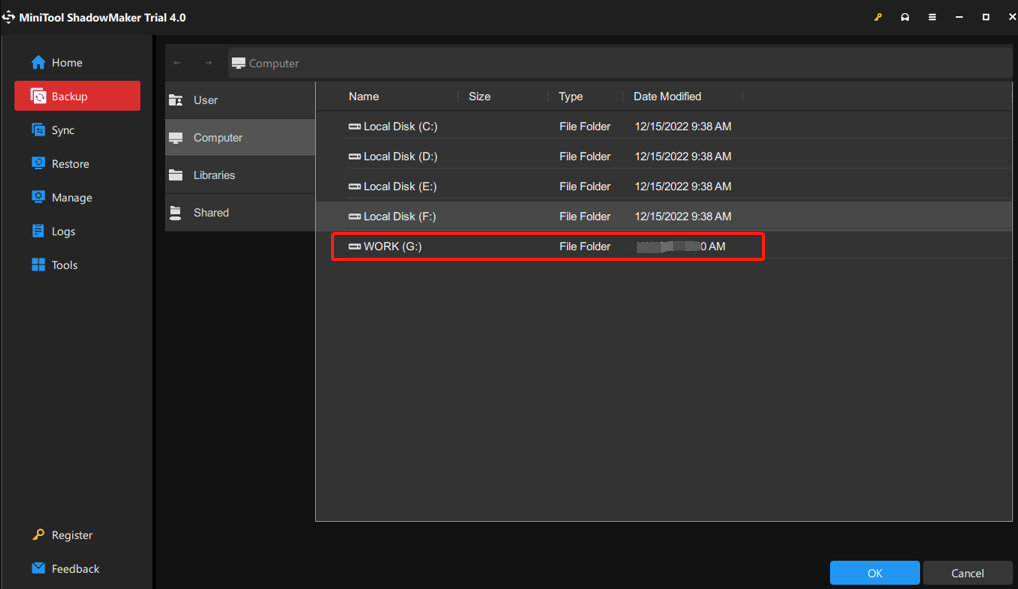
Here, we recommend you to back up your system to a USB flash drive or an external drive.
Step 4. After making your decision, you can either hit Back Up Now to start the backup process or delay the backup task by hitting Back Up Later.
Then, go to Tools > Media Builder > WinPE-based media with MiniTool plug-in > USB Flash Disk to create a bootable drive. If your computer encounters some other radical changes such as black screen, Blue Screen of Death, or system crashes in the future, you can boot your computer from this USB flash drive and perform a system recovery with the system image that you backed up.
Tips:
As for backing up files, see this tutorial to get detailed instructions — How to Backup Files on Windows 10? Try These Top 4 Ways.
How to Fix DISM Error 0x800f081f on Windows 10/11?
Fix 1: Perform a Component Cleanup
You can clean up the image files and make everything run properly with the DISM component cleanup switch. Follow the steps below:
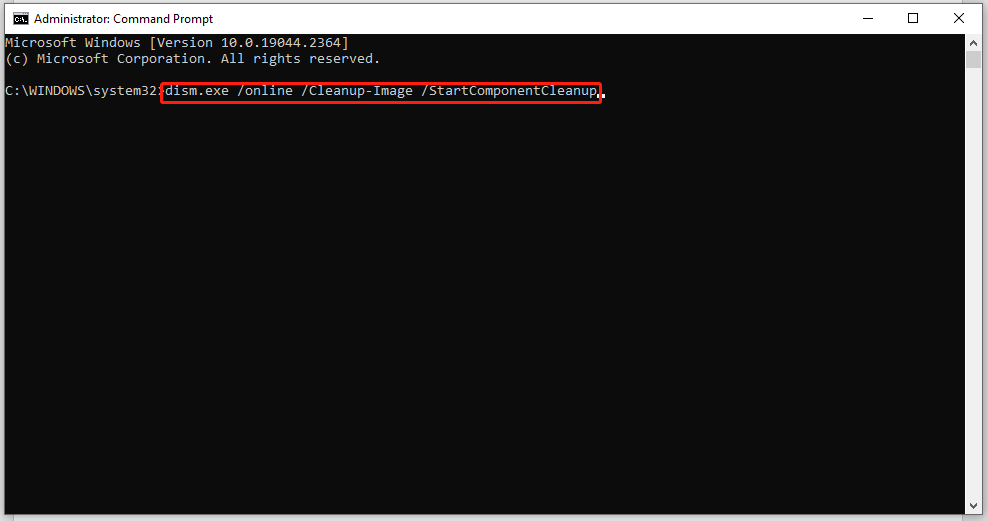
Step 1. Type cmd in the search bar to locate Command Prompt and right-click on it to choose Run as administrator.
Step 2. In the command window, run the following commands one by one and don’t forget to hit Enter after each command.
dism.exe /online /Cleanup-Image /StartComponentCleanup
sfc /scannow
Step 3. When the two commands are complete, run Dism /Online /Cleanup-Image /RestoreHealth again to see if it works properly.
Fix 2: Run Windows Update Troubleshooter
As is known to all, Microsoft Windows Update Center triggers problems regularly and these problems can prevent you from implementing upgrades or improvements by downloading or installing new updates. In this case, Microsoft offers you a troubleshooting tool called Windows Update troubleshooter which can fix most errors including DISM Online Cleanup Image RestoreHealth error 0x800f081f.
Step 1. Press Win + I to open Windows Settings.
Step 2. In the settings menu, scroll down to find Update & Security and click on it.
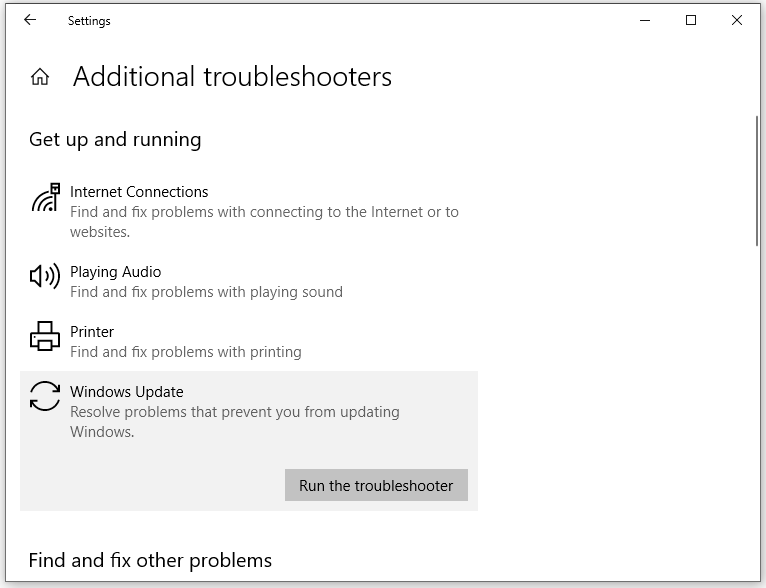
Step 3. Under the Troubleshoot tab, hit Additional troubleshooters.
Step 4. Under Get up and running, hit Windows Update and then press Run the troubleshooter. Once the troubleshooting process is done, it will show a message to inform you of the result.
Fix 3: Reinstall Microsoft .NET Framework 3.5
Since DISM error 0x800f081f is related to Microsoft .NET Framework 3.5, it is a good option to reinstall it.
Step 1. Click Start and go to Control Panel.
Step 2. Hit Programs and Features > Turn Windows features on or off.
Step 3. Check .NET Framework 3.5 (includes .NET 2.0 and 3.0) and hit OK.
Fix 4: Get Source from Windows Image
Usually, the DISM /Online /Cleanup-Image /RestoreHealth command is used to fix problems by searching in Windows Update or WUSU to replace the corrupted files. If DISM cannot repair a file required by the Windows image, it will result in DISM error 0x800f081f the source files could not be found.
To address this error, you need to specify a valid Windows image file (install.wim) which contains all the files required during the repairing process. The install.wim file should be included in the source folder of Windows 10 Installation media.
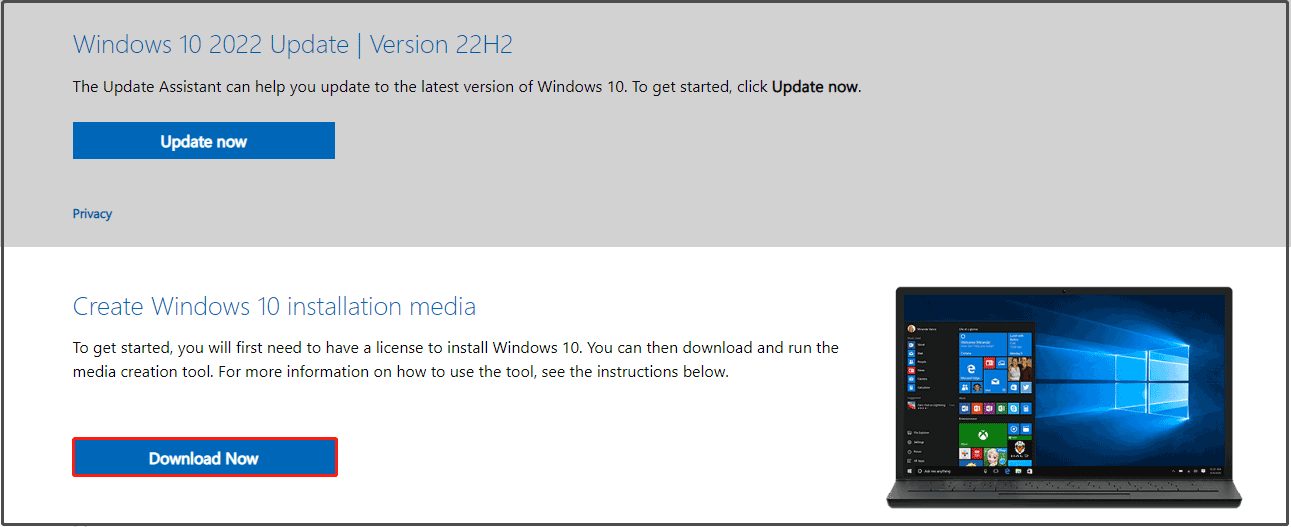
Move 1: Download and mount the ISO file
Step 1. Go to the Microsoft Software Download website and hit Download Now under Create Windows 10 installation media.
Step 2. Hit Accept to accept the license terms > tick Create installation media (USB flash drive, DVD, or ISO file) for another PC > hit Next > select Language, Architecture, and Edition > hit Next > tick ISO file > hit Next > choose a download location for Windows 10 ISO file > hit Save.

Step 3. Press Win + E to evoke File Explorer and then locate the Windows 10 ISO image file.
Step 4. Right-click on the ISO file and select Mount in the drop-down menu.
Step 5. After the mounting process is finished, go to This PC and you can see a virtual drive in the right-hand pane.
Move 2: Extract the install.wim file from the install.esd file
Step 1. From the mounted Windows ISO file, right-click on the install.esd file from the source folder to copy it to the root folder of drive C:.
Step 2. Launch Command Prompt as an administrator.
Step 3. Type cd\ to go to the root folder of drive C:.
Step 4. Type the following command and hit Enter to find which images are in the install.esd file.
dism /Get-WimInfo /WimFile:install.esd

Note down the index number according to the Windows 10 installed version.
Step 5. Run the following command to extract the install.wim file according to your Windows version. Don’t forget to replace the IndexNumber with the corresponding index number you noted down just now.
dism /export-image /SourceImageFile:install.esd /SourceIndex:IndexNumber /DestinationImageFile:install.wim /Compress:max /CheckIntegrity
Step 6. Now, you can find the exported install.win file on the drive C:.
Tips:
What if Windows Media Creation Tool is not working? Take it easy! Every problem has a fix. Follow this guide — Best Fixes for Windows 10/11 Media Creation Tool Not Working, and you will work it out.
Move 3: Run DISM Tools
Step 1. Launch Command Prompt as an administrator.
Step 2. Run the two commands below and hit Enter.
DISM /Online /Cleanup-Image /StartComponentCleanup
DISM /Online /Cleanup-Image /AnalyzeComponentStore.
Step 3. Run the following command to specify the C:\install.wim as the source of the known good files.
DISM /Online /Cleanup-Image /RestoreHealth /Source:WIM:c:\install.wim:1 /LimitAccess
Step 4. When this process is done, type sfc /scannow and hit Enter.
Fix 5: Perform an In-place Upgrade
The last method is performing an in-place upgrade. This process will reinstall the entire Windows core with the latest image from Microsoft. It may take a long time, please wait patiently.
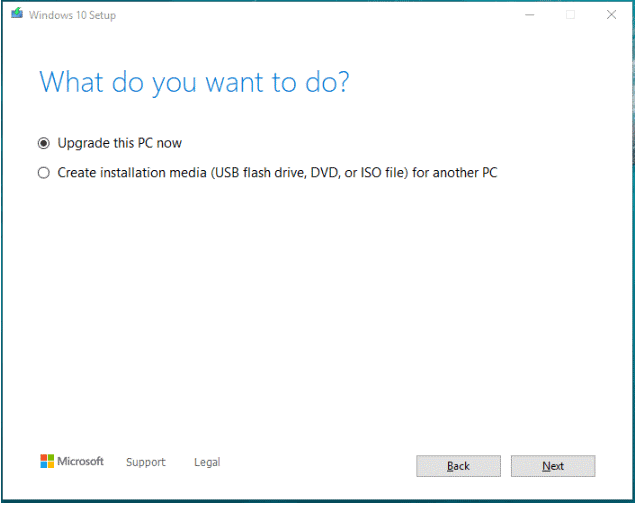
Step 1. Download & Install Windows 10 Media Creation Tool on your computer and run it with administrative rights.
Step 2. Accept the license terms and tick Upgrade this PC now.
Step 3. Then, follow the prompts on the screen to complete the upgrade. After the completion, run Dism /Online /Cleanup-Image /RestoreHealth to see if DISM error 0x800f081f is gone.
Tips:
If you fail to run the DISM /Online /Cleanup-Image /RestoreHealth command without error code 0x800f081f, this guide might provide you with some feasible solutions — Best Fixes: DISM /online /cleanup-image /restorehealth Is Stuck.
What’s your opinion about the solutions mentioned in this guide? Which method do you prefer? Click here to share your ideas with your friends on Twitter.Click to Tweet
We Need Your Voice
That’s all about the causes and solutions to DISM error 0x800f081f. By now, we believe that you may manage to get rid of this error from your computer. Also, it is highly recommended to back up your system in advance with MiniTool ShadowMaker as a remedy in case that you encounter any severe changes on your system the next time.
Welcome to leave your joy and tell us which solution works for you in the comment zone. For more queries about our software, please feel free to contact us via [email protected].
DISM Error 0x800f081f FAQ
How do I fix error 0x800f081f?
Fix 1: Perform a Component Cleanup
Fix 2: Run Windows Update Troubleshooter
Fix 3: Reinstall Microsoft .NET Framework 3.5
Fix 4: Get Source from Windows Image
Fix 5: Perform an In-place Upgrade
How to fix DISM 0x800f081f error in Windows Server 2016?
To fix DISM 0x800f081f error in Windows Server 2016, you can:
- Run a component cleanup and then perform an SFC scan.
- Offer DISM a location that contains the files it needs to perform the image repair.
- Perform an in-place upgrade.
How do I fix corrupted DISM?
Fix 1: Check Antivirus or Security Programs
Fix 2: Run DISM Command in Clean Boot
Fix 3: Specify the Correct Location of the install.wim File
Fix 4: Uncheck install.wim Read-Only
Fix 5: Clean up System Image Components
Fix 6: Reset Windows Update Service
Fix 7: Run Windows Update Troubleshooter
Fix 8: Disable Proxy on Your Computer