
This guide should give you a good example of how to setup Tomcat on a Windows environment for anyone that is not interested in using Linux.
This guide was setup with taking into consideration that you have a single server for your “tomcat”, also this guide is my view how to install Tomcat on a Windows machine and I therefore use IIS as a reverse proxy towards Tomcat since I personally do not like running Tomcat directly towards the internet.
This guide was tested on:
Windows Server 2012 R2 Standard
In this guide I will show that it is also possible to run Tomcat on a Windows machine and use IIS as web server.
So lets start!
Before we can use Tomcat we have to install a JDK (Java) version so let’s do this first:
Step 1: Download the JDK version of Java and install it.
Go to the java website: https://www.oracle.com/technetwork/java/javase/downloads/jdk8-downloads-2133151.html
Accept the license and then download: “Windows x64 (jdk-8u60-windows-x64.exe)” package.
Now install it!
(Since Oracle updates Java frequently please download the latest and ignore if my version above is slightly older)
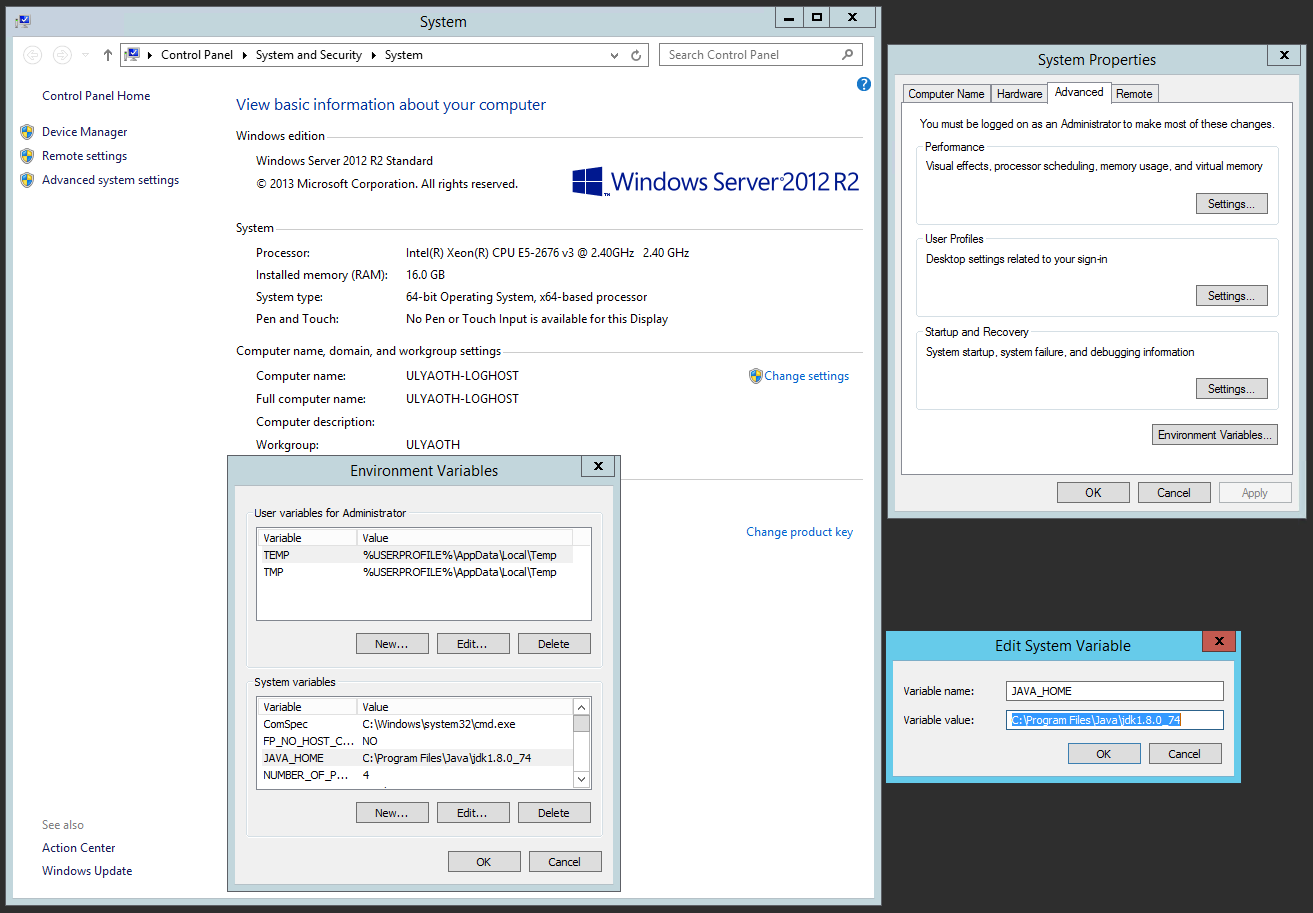
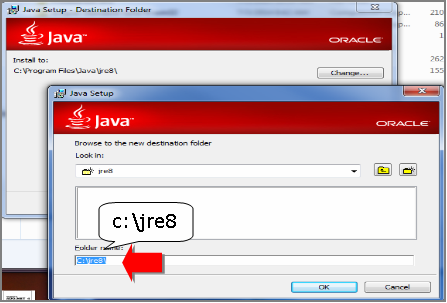
Step 2: Add the JAVA_HOME variable to the server
Now right click on “This PC” and choose “Properties” on the right bottom site next to your computer and full computer name click on Change settings. On the window that opens go to the Advanced tab and click on “Environment Variables” at the bottom box called “System Variables” click on new and add the following:
Variable Name: JAVA_HOME
Variable value: C:\Program Files\Java\jdk1.8.0_66
Should look like this:
(Same as I wrote with Step 1 if your Java version is newer please update the JAVA_HOME entry accordingly)
Step 3: Download Tomcat.
Simply go to “https://tomcat.apache.org/”

File name you are looking for is:
Tomcat 8: apache-tomcat-8.0.30.exe
You will find it at the download section, a newer minor version than 8.0.30 will probably work fine but for a newer major version the installation might be very different.
Step 4: Install Tomcat.
Now you should have the exe file you downloaded above called “apache-tomcat-8.0.30.exe” so simply double click it to start the installer, you should see the following window appear:
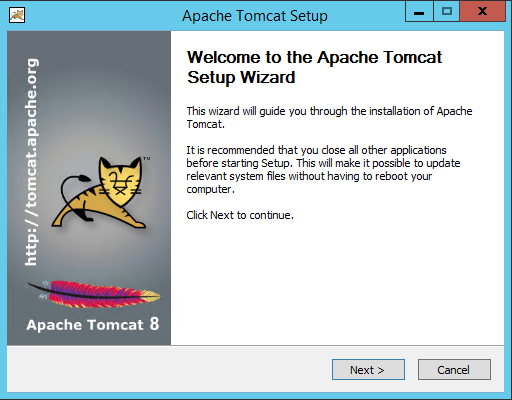
On this window simply press the “Next” button and a new window appears like this:
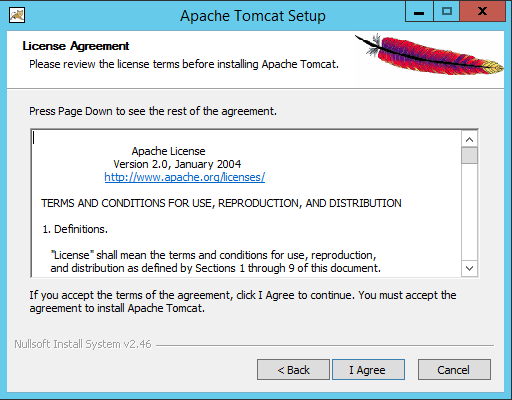
On this window make sure to read the license agreement and if you agree then press the “I Agree” button to get to the following window:
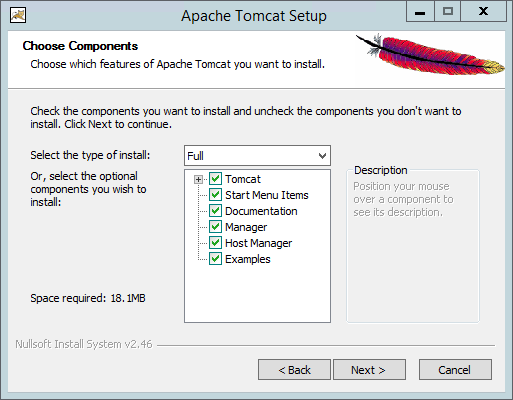
On this window you can select what parts of tomcat you wish to install for the sake of this guide I changed the drop down menu to “Full” and then you can press on “Next” to see the following window:
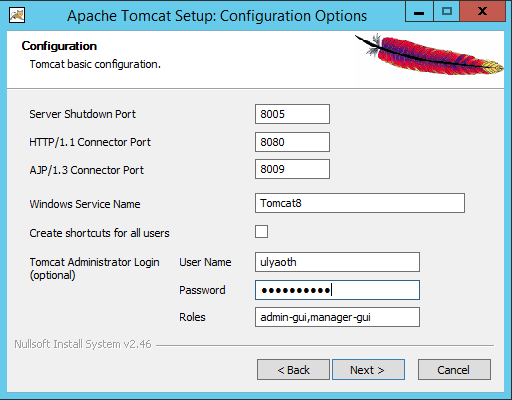
On this window you can choose the ports tomcat will run on and the name of the windows service, for this guide all settings are fine default.
You should however add a “User Name” and “Password” for the admin section, as you can see I called my user for the sake of this guide “Ulyaoth” however you can choose something else and the press the “Next” button to see the following window:
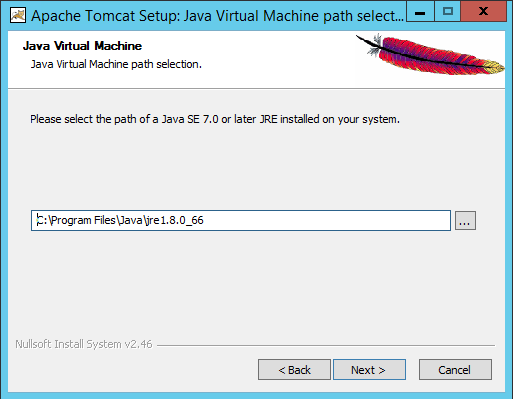
On this window you can select your Java version if you followed Step 1 and Step 2, then this should be filled in automatically however if you wish to use a Java version from a different location then simply add this here and then press “Next” to see the following window:
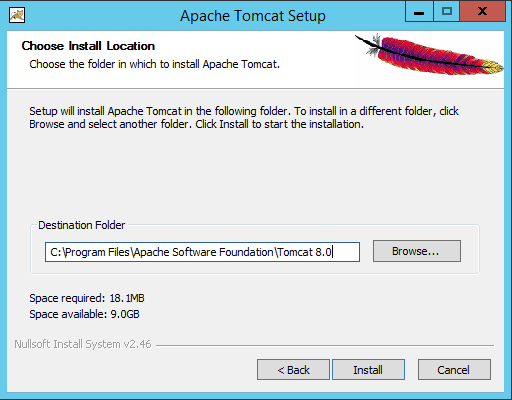
On this window you can choose where to install Tomcat, on a real system you probably would want to put tomcat on a separate disk as the main OS but for this guide it should be fine on the default location so now press the “Install” button to start the installation you should see this:
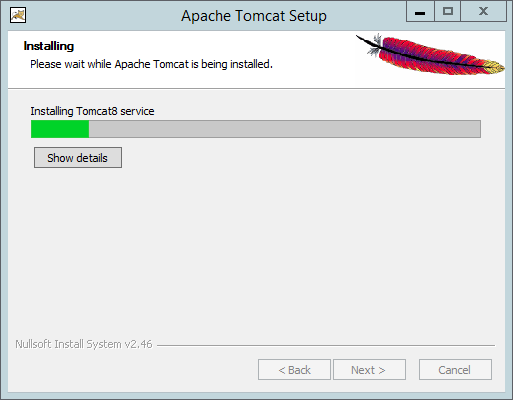
As you can see it is installing and after a very quick moment you should come to the final window:
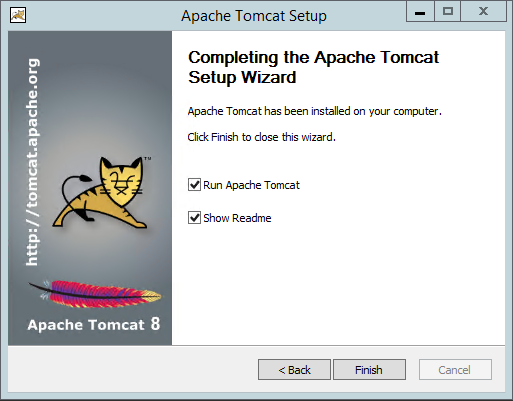
Congratulations you have done it! Tomcat is installed on Windows! easy or not?, so just as you can see the option to run tomcat is already marked so leave that and choose to show readme or not and then press on the “Finish” button.
You should see that it automatically now will start Tomcat:
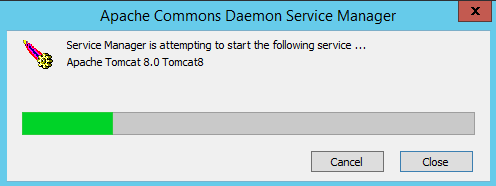
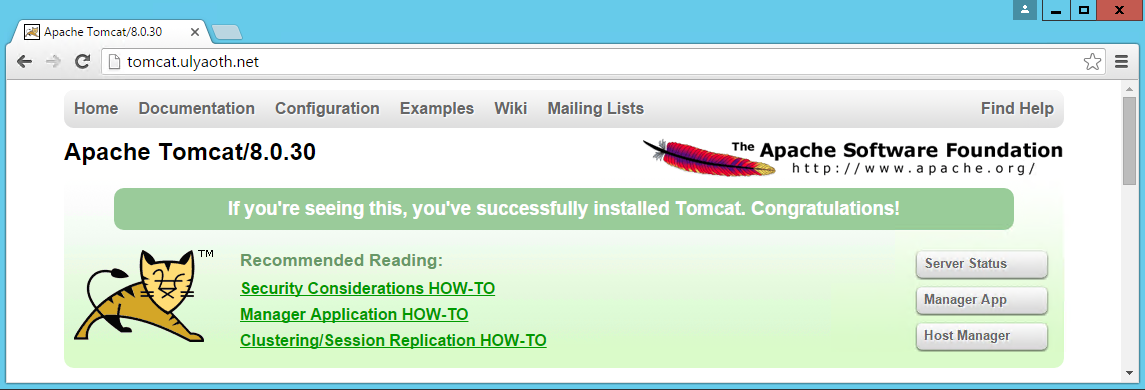
When this is finished let’s test to see if Tomcat works by opening a browser and go to “127.0.0.1:8080” in your browser.
You should see something like this:
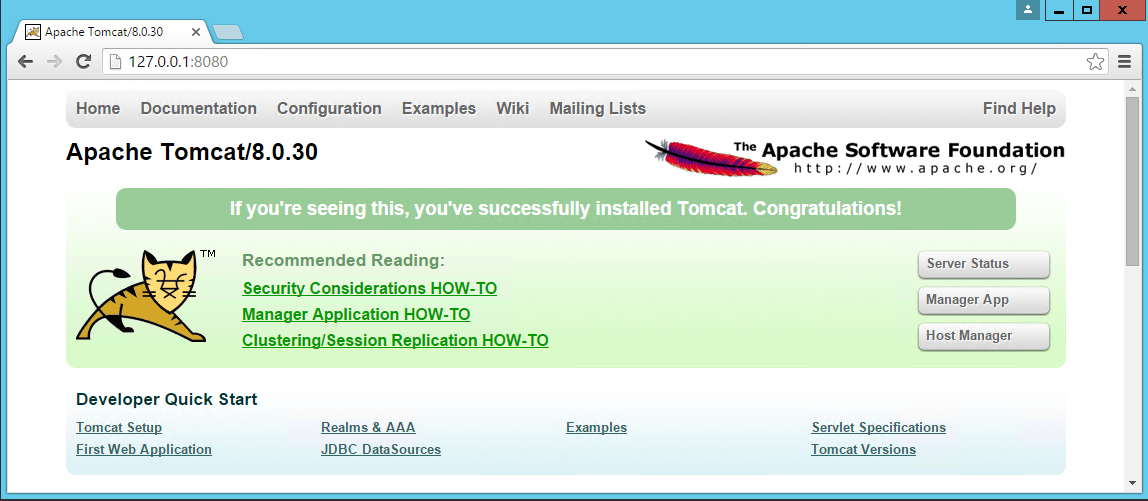
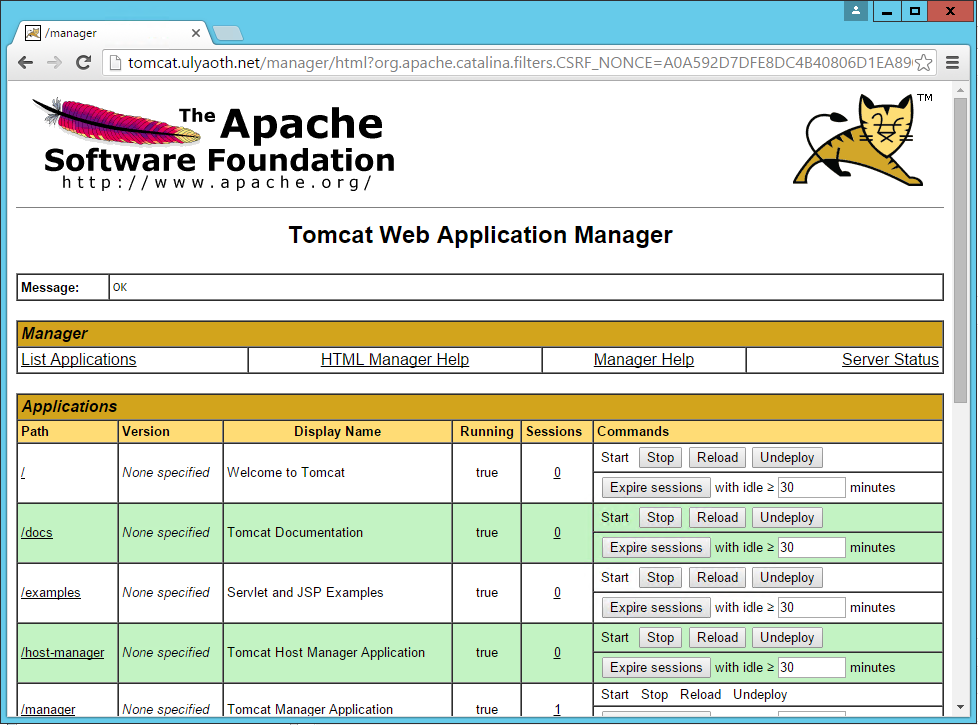
This means your Tomcat installation was successful! congratulations, now to see the server status just click on the button that shows on the website above “Server Status” or go directly to “127.0.0.1:8080/manager/status” and fill in the “User Name” and “Password” you did choose a few images up.
You should now see something like this:
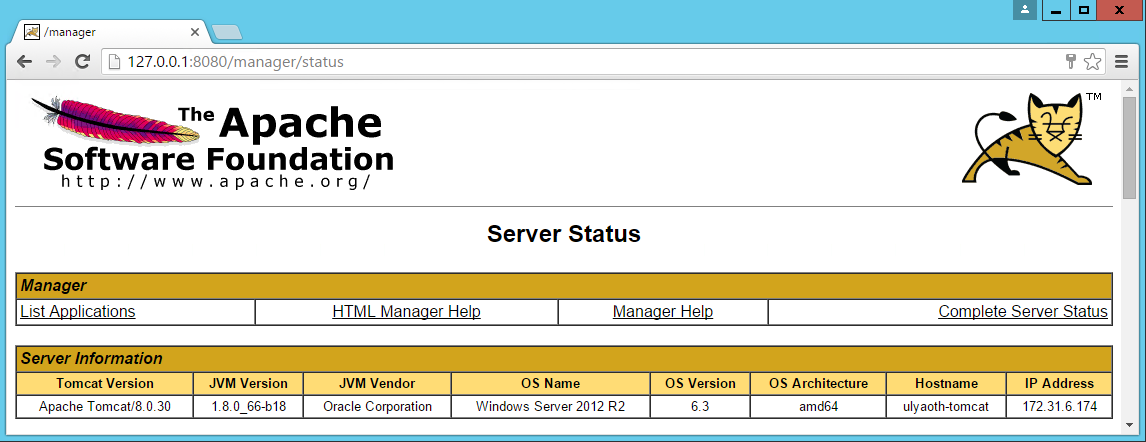
As you can see it runs correctly on Windows!
Now let’s continue and add IIS in front of this on port 80 so we can reach this Tomcat from the internet.
For the purpose of this guide I use the domain name “https://tomcat.ulyaoth.net” you should or change this to a name you own or add it for the guides purpose to you hosts file.
To edit your hosts file simply open a cmd prompt and go to: C:\Windows\System32\drivers\etc”
and type notepad hosts
It should open notepad and in the bottom just add this:
127.0.0.1 tomcat.ulyaoth.net
You might need administrator rights to do this.
Step 5: Install IIS
Windows Server:
Go to “Server Manager” and choose “Add Roles and Features Wizard” from the list here choose “Web Server (IIS)” now go further and let it install.
Windows 10:
On Windows 10 you should go to your “Control Panel” then go to “Program and Features” and then click on “Turn Windows features on or off” here you will find “Internet Information Service” which is IIS.
Step 6: Install Microsoft Web Platform Installer 5.0
Now we also have to install Microsoft Web Platform Installer 5.0 so go to the following website and download it: https://www.microsoft.com/web/downloads/platform.aspx
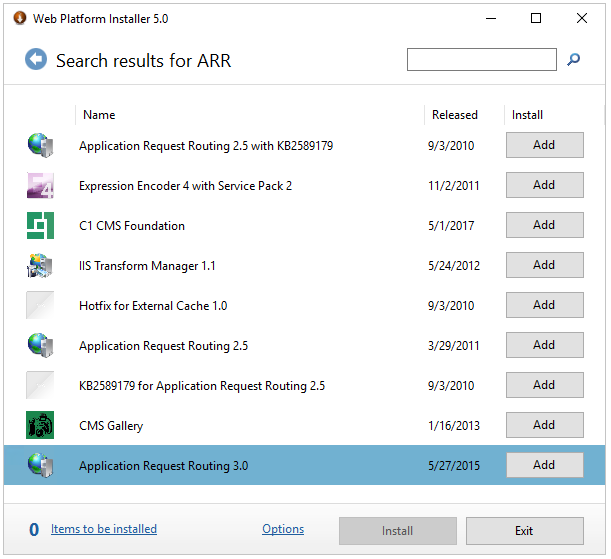
Once you have downloaded the file called “wpilauncher.exe” simply click it and after a while the app opens and in the right top corner you have a search box.
In the search box type ARR and press the enter key, you will see a list of applications that matches your search. The one we are interested in is “Application Request Routing 3.0” so find it in the list and press the “Add” button behind it:
Then use the search box again in the top but this time search for “URL Rewrite” you will see then the application “URL Rewrite 2.0” now press again the “Add” button behind it:
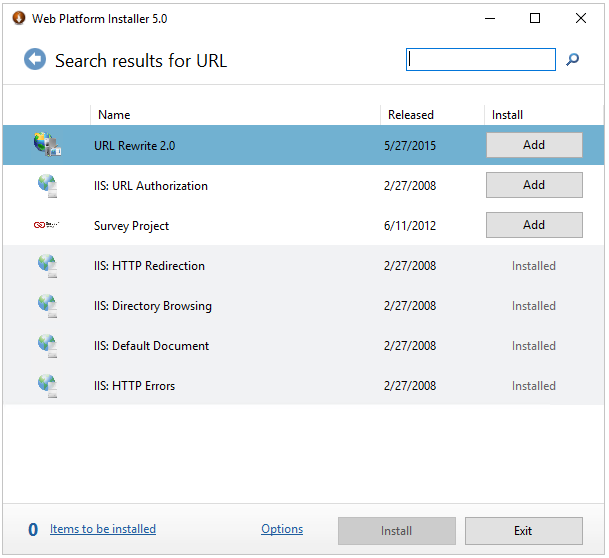
Now you have added the two additional applications we need you can go ahead and press the “Install” button and the following popup will appear:
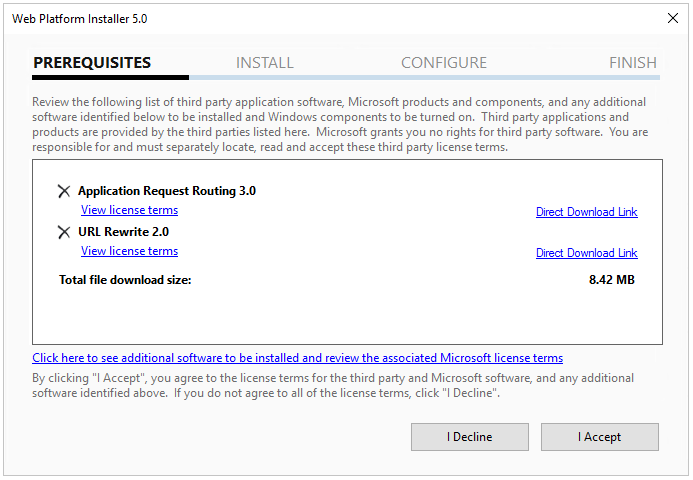
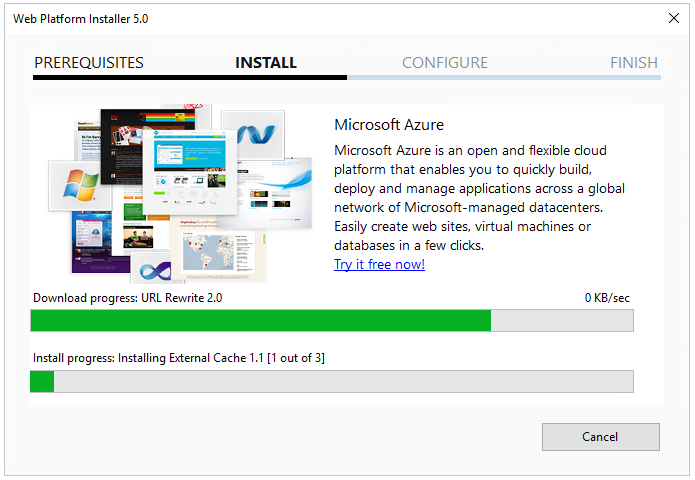
If everything looks fine as you selected press the “I Accept” button to start the installation it should look like this by now:
Once this window is finished it should show a new window confirming that everything is installed:
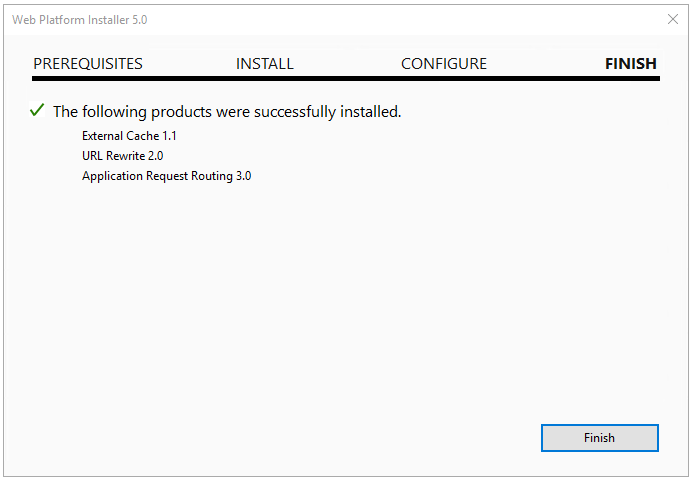
Just press on “Finish” to complete the installation and then on “Exit” to close the whole app.
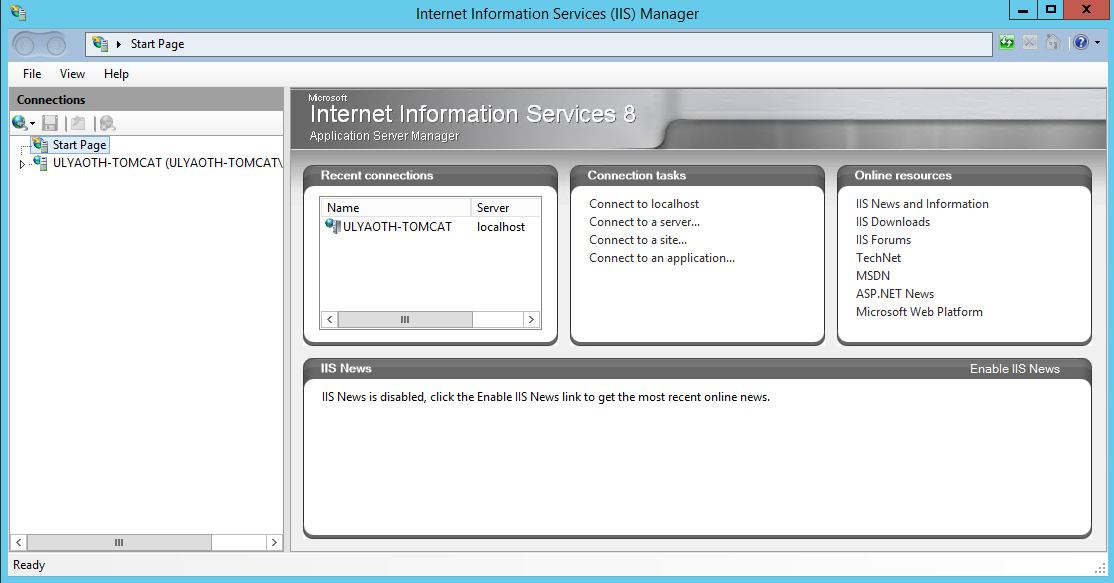
Step 7: Open IIS Manager and you should see a window as below.
Step 8: Create a new website for Tomcat as shown below
Right click on “sites” in the left part of IIS Manager and click “Add Website”.
Fill it in something like this:

It should automatically start, if you use a certificate then choose “https” at the Binding part and select your certificate at the box that appears.
Remember what I wrote before the “Site name” and “Host name” is something you should choose yourself if you use my example don’t forget to add it to your hosts file.
Now all that is left is to create the reverse proxy and this can be done in two ways, we could simply reverse proxy all traffic to tomcat or we can use a combination of IIS and Tomcat, in this case you only let certain sub folder go to tomcat.
I will show both way, in Step “9a” I show how to move “all” traffic to Tomcat and in Step “9b” I will show how to only do specific subfolders.
Step 9a: Create a reverse proxy in IIS to Tomcat for all traffic.
Click on your newly created name in the left window mine is called “tomcat.ulyaoth.net” and then in the left window allot of icons will appear:
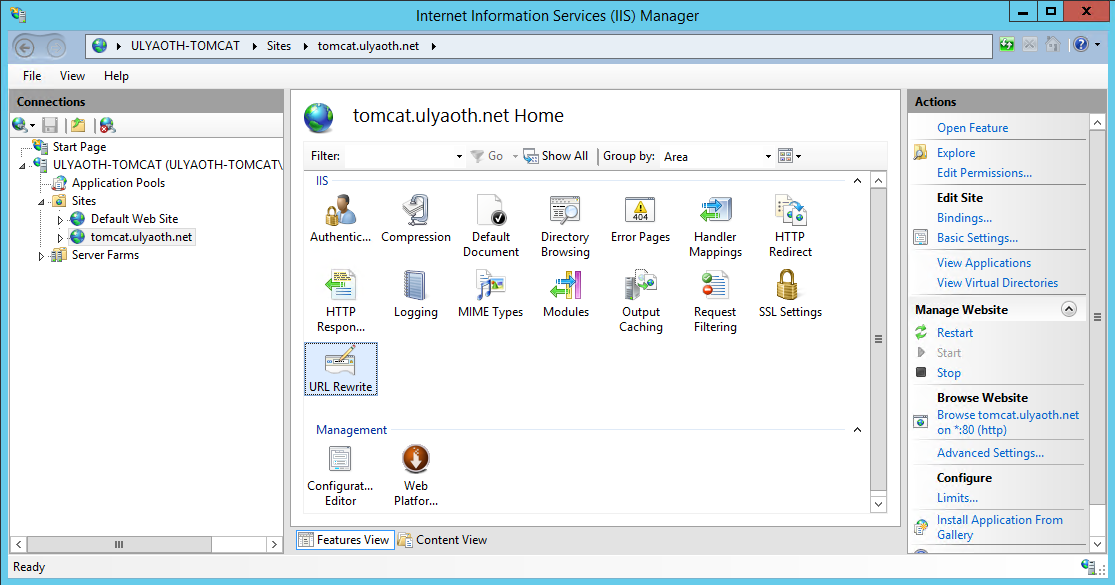
Now double click on the icon “Rewrite URL” and then in the right window click on “Add Rules(s)…”, and a window should popup that looks like this:
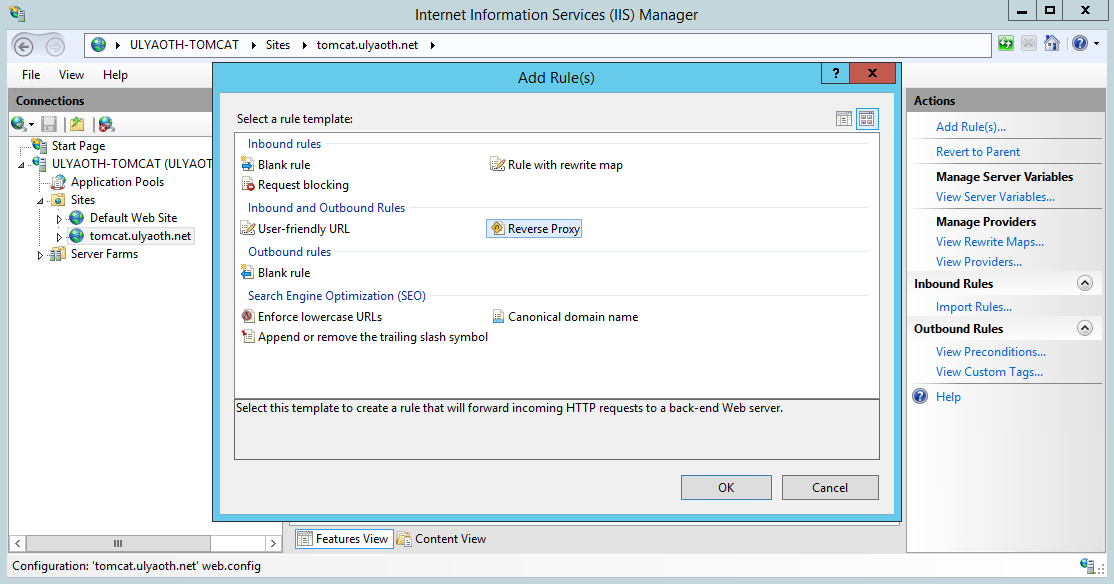
Now click on “Reverse Proxy” and you probably get a Warning message about ARR (if you ever done this before you won’t see it):
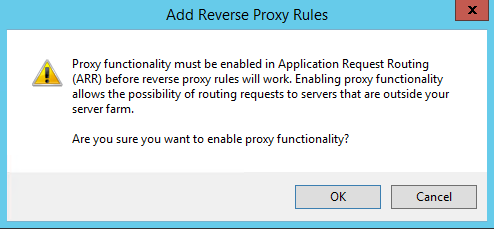
So press the button “OK” and you will see the “Reverse Proxy” window as below:
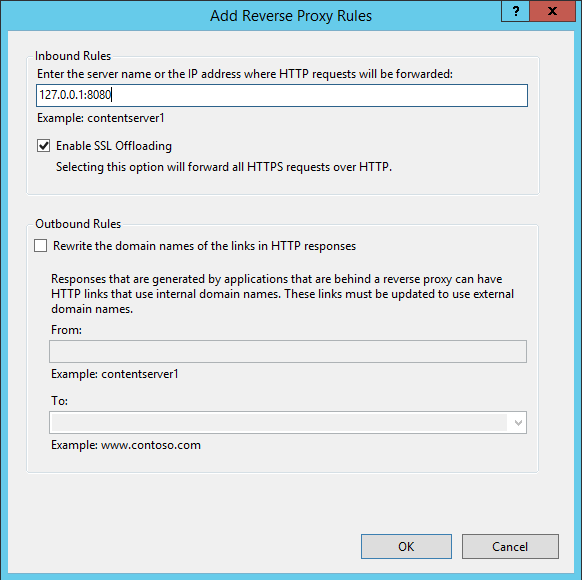
Now make sure you fill everything in exactly as I did above:
Inbound Rules: 127.0.01:8080
And if you did choose “https” for your website then also enable the option: Enable SSL Offloading
Now you should have everything as I did so go ahead and press on the “OK” button.
To explain it in short the ip you entered “127.0.0.1” and port “8080” this is where Tomcat will run under and you are basically making tunnel to get data from that internal program to people that will connect to your domain. If you change Tomcat’s port then you of-course have to update the above reverse proxy rule.
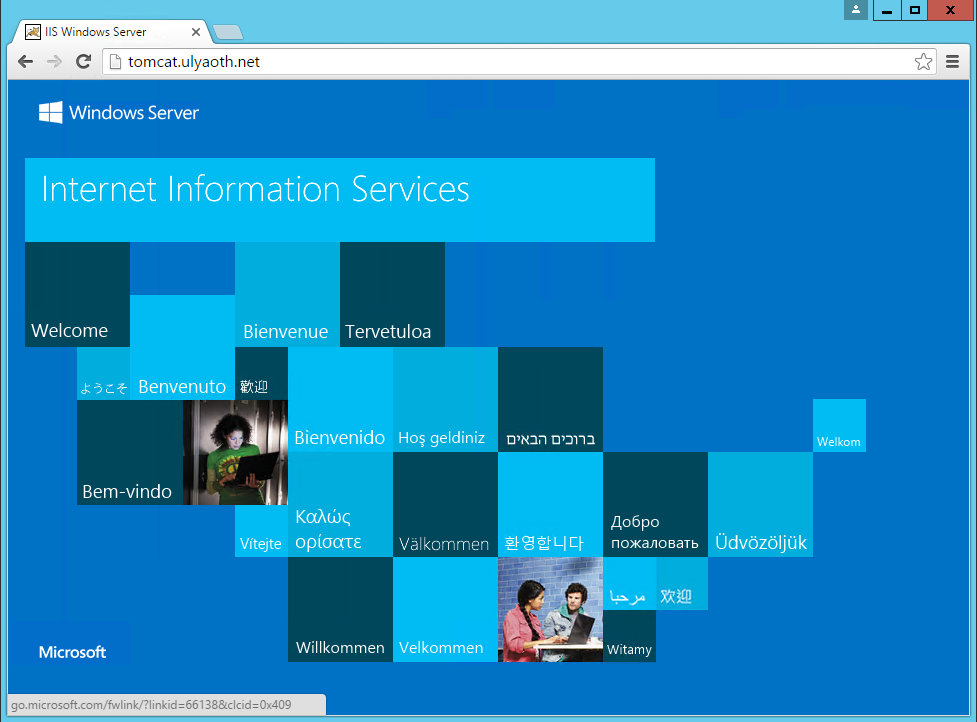
So now let’s test in the browser by going to “tomcat.ulyaoth.net” (or the domain you choose):
And as you see all traffic is now going to Tomcat and since it is going trough IIS you can use all options available from IIS in front of Tomcat.
However as I wrote Step “9a” is where all traffic goes to Tomcat, now lets set it up slightly more advanced and only point certain parts to Tomcat.
Step 9b: Create a reverse proxy in IIS to Tomcat for certain parts only.
In order to do this you simply first do all steps of “9a” this is the base required, once you have done this you go back to the “Rewrite” tab and you should see the “Reverse Proxy” rule like this:
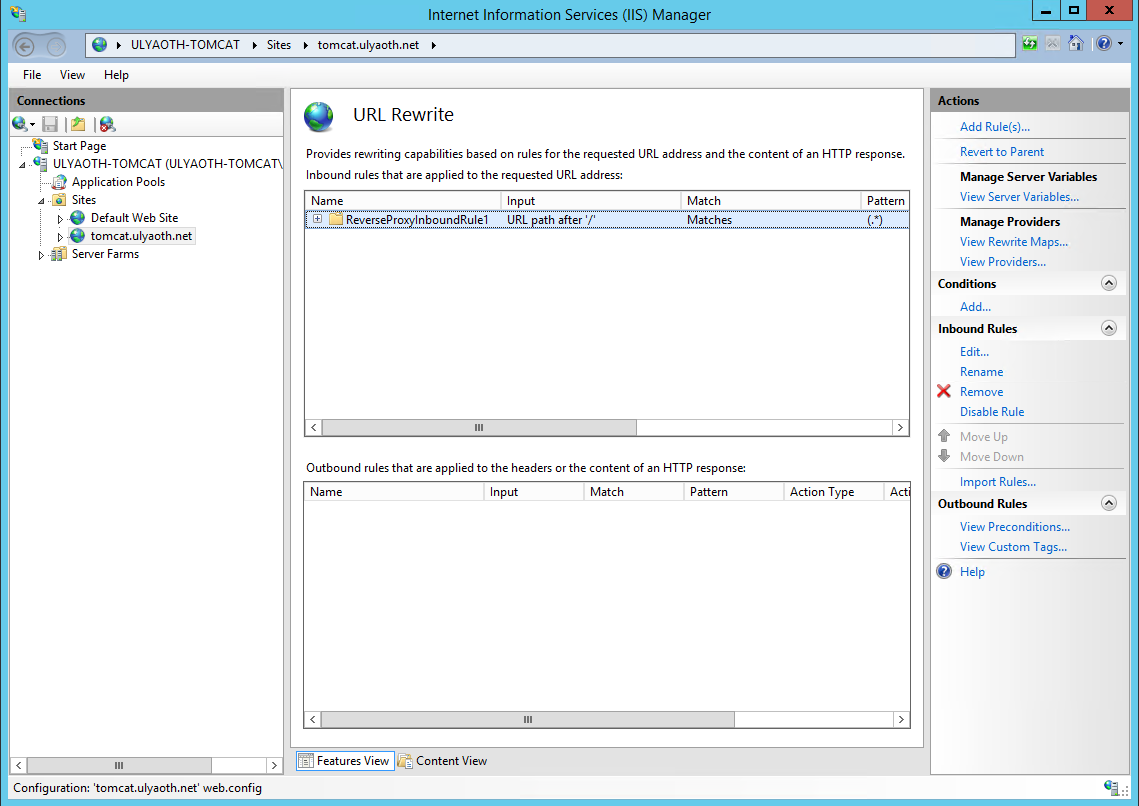
Now double click the reverse proxy rule called “ReverseProxyInboundRule1” and you should see the following:
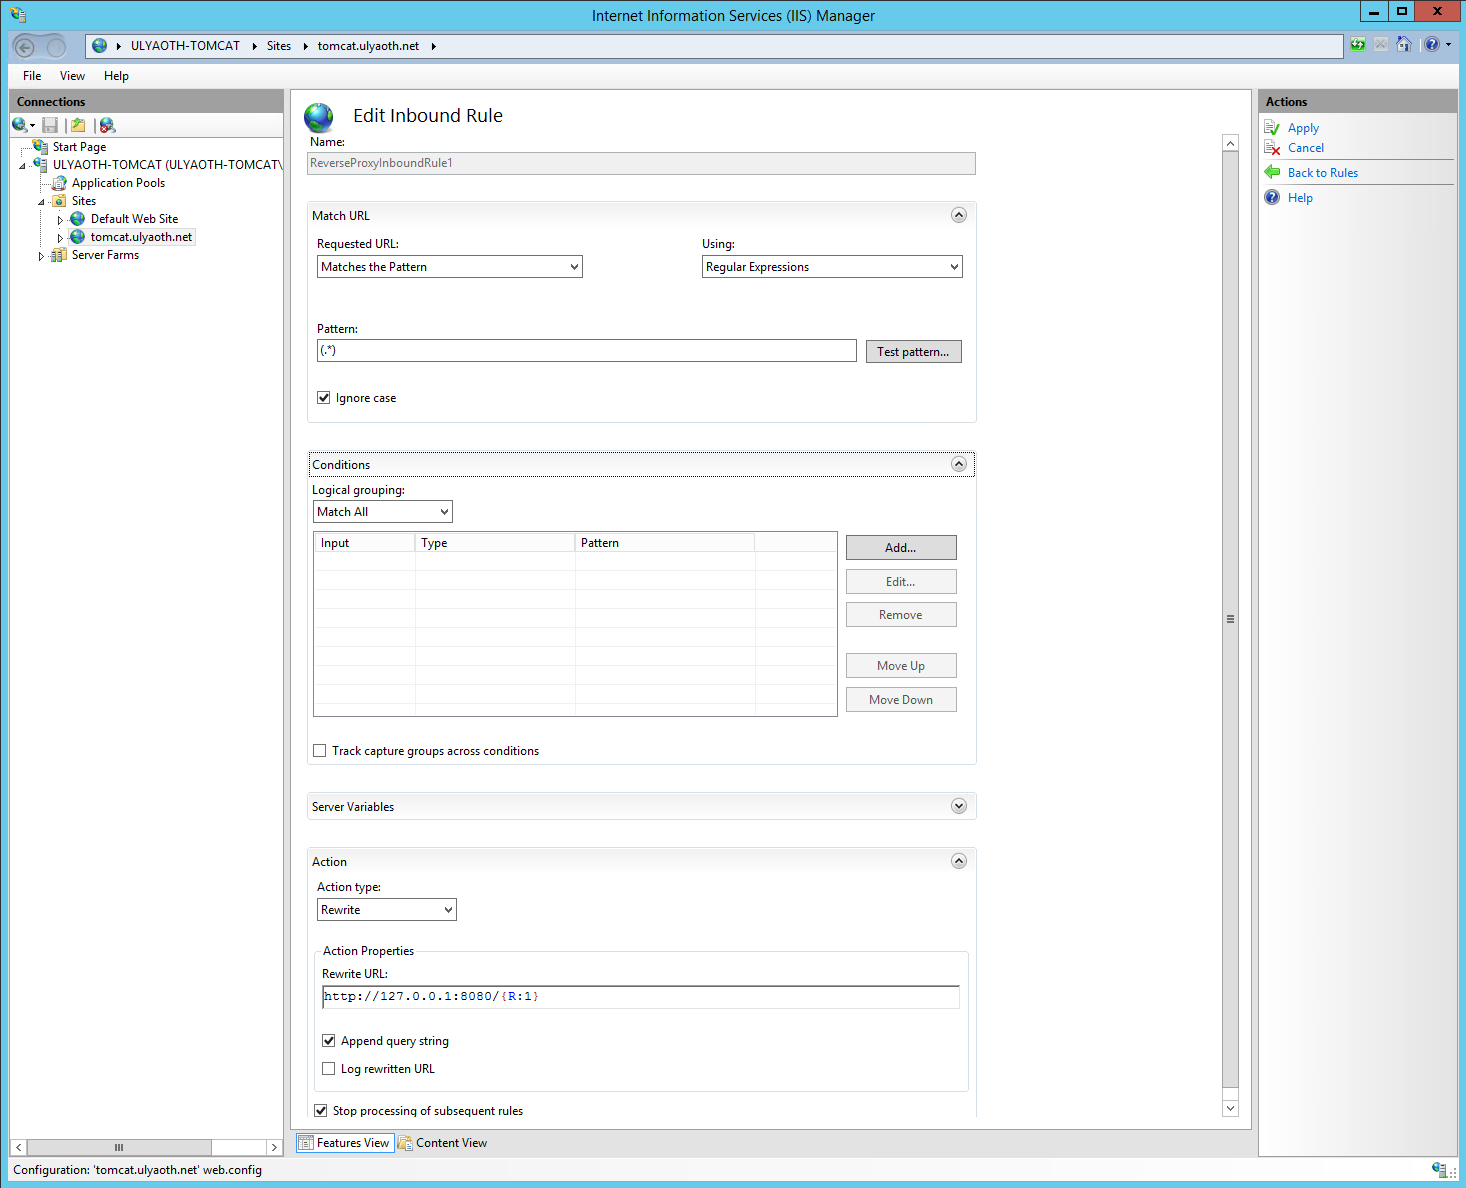
It might be your “Conditions” part is closed but just click the text and it opens, so as we discussed before in Step 9a this rule simply sents all traffic to Tomcat but we not want this.
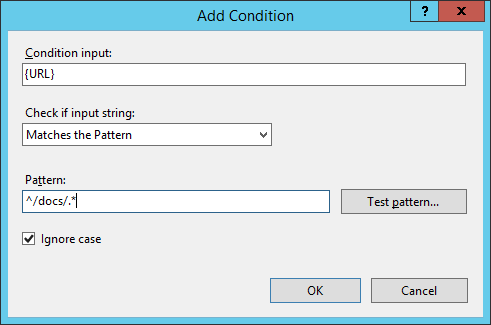
So in the “Conditions” box click right on the “Add..” button it should show a window called “Add Condition” fill this window in like this:
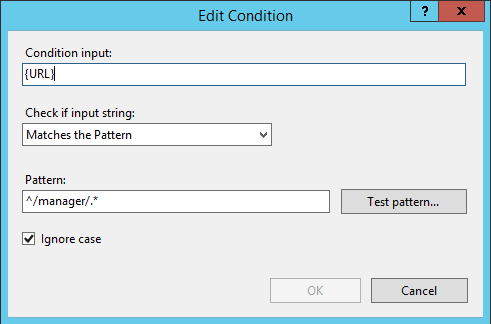
And once done press on the “OK” Button and you should see the Condition has been added like this:
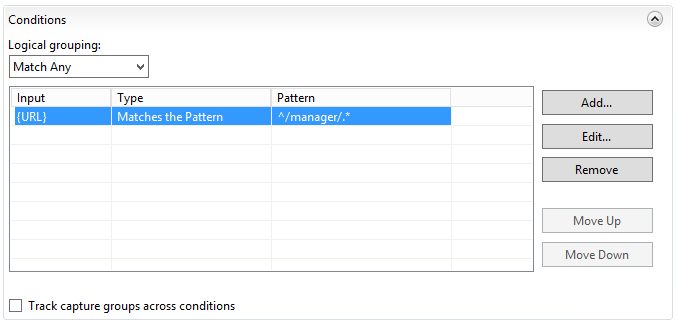
If it looks like above on your “Edit Inbound Rule” page then in the right top corner press on “Apply” to save your rule.
So if you now browse to your website “tomcat.ulyaoth.net” (or what you choose) you see this time the IIS website:
But if we now go to the Tomcat management page at “tomcat.ulyaoth.net/manager/” (or what you choose) you see it does the reverse proxy bit for “/manager/” correctly towards your Tomcat installation:
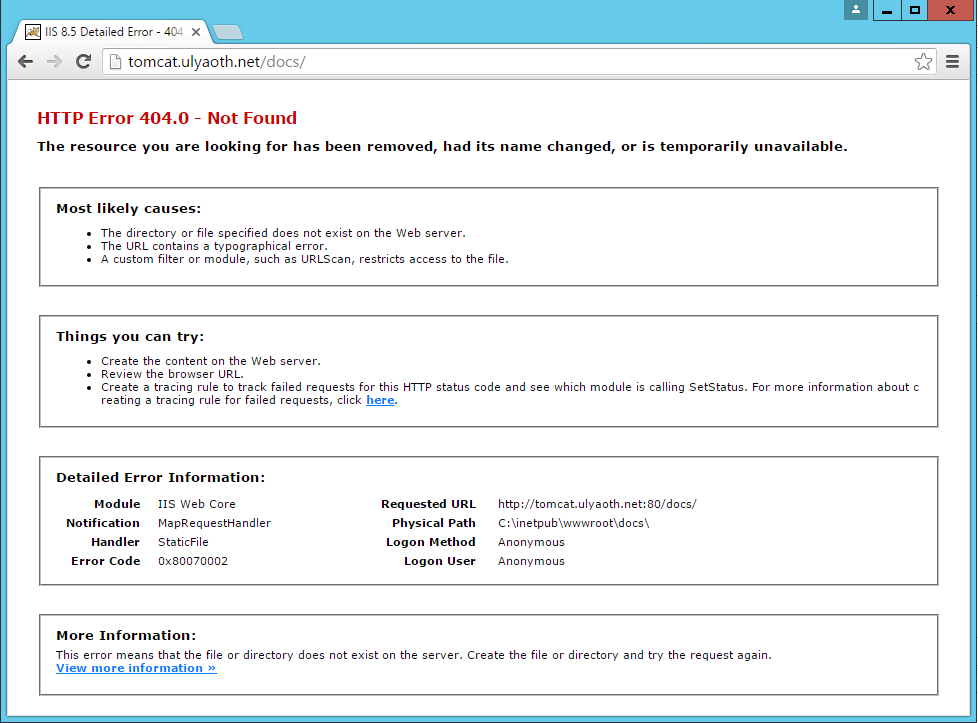
So if you want to have different things go to tomcat you simply add “Conditions” to you rewrite rule another example is /docs/ for the Tomcat documentation if you would try this now it won’t work and you just see this: (tomcat.ulyaoth.net/docs/)
So all you do is add another condition to your reverse proxy rule like this:
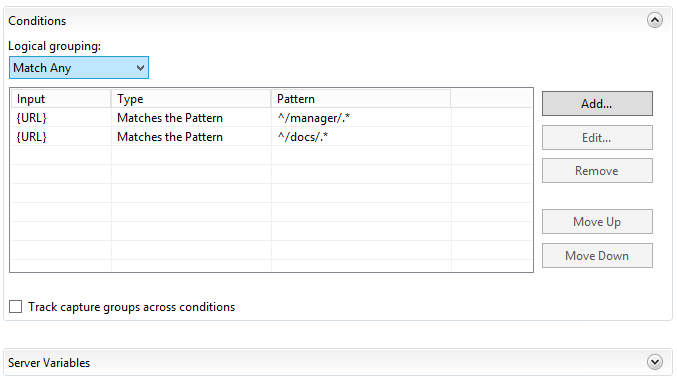
And if we now go again to “tomcat.ulyaoth.net/docs/” we this time see:
Well that is all, I hope this will help someone please!
В одной из своих предыдущих заметок я описал процесс конфигурации сервера приложений GlassFish в качестве службы в ОС Windows Server 2012. В продолжение начатой темы, в этой заметке приведён краткий howto по аналогичной операции с сервером приложений Apache Tomcat (на примере версии 7.0).
Как и в случае GlassFish, в состав бандла Tomcat для Windows входит набор утилит для конфигурации служб в ОС. Если вы скачали Tomcat в виде обычного (кросс-платформенного) zip-архива, то нужных нам утилит в этом архиве не будет, но это не проблема — можно скачать Windows-бандл и «подложить» утилиты оттуда к уже установленному серверу приложений (главное, чтобы версии совпадали).
Инструментарий
Собственно, сам набор состоит из трёх утилит — консольной tomcat7.exe, графической tomcat7w.exe и исполняемого сценария service.bat. Наиболее важная из них — первая утилита, она позволяет создавать, модифицировать и удалять службы ОС. Остальные две утилиты, по сути, просто реализуют упрощённые интерфейсы к tomcat7.exe, позволяя сделать некоторые типовые действия более быстро и удобно. Поэтому сначала поговорим про интерфейс tomcat7.exe.
Утилита tomcat7.exe
Основная утилита Apache Tomcat для конфигурации служб Windows. Синтаксис команды, в общем случае, выглядит примерно так:
C:\\tomcat7\bin\tomcat7.exe \\CMD\\ServiceName [arguments]
Здесь CMD — имя команды (например, «IS»), ServiceName — имя службы (например, «MyWebapp» — мы сами задаём его при создании службы), а arguments — опциональные аргументы. Три наиболее важные команды — IS (Install Service — создать службу), US (Update Service parameters — изменить параметры службы) и DS (Delete Service — удалить службу); полный список команд можно посмотреть в официальном руководстве.
Сценарий service.bat
Типичная команда создания службы с помощью tomcat7.exe обычно выглядит как-то так (пример взят с оф. мануала):
C:\> tomcat7 //IS//Tomcat7 --DisplayName="Apache Tomcat 7" \
C:\> --Install="C:\Program Files\Tomcat\bin\tomcat7.exe" --Jvm=auto \
C:\> --StartMode=jvm --StopMode=jvm \
C:\> --StartClass=org.apache.catalina.startup.Bootstrap --StartParams=start \
C:\> --StopClass=org.apache.catalina.startup.Bootstrap --StopParams=stop
Видим, что 99% этого конфига будет совпадать для всех возможных конфигураций служб. Собственно, чтобы не вбивать этот конфиг каждый раз вручную, разработчики Tomcat любезно предоставляют в наше распоряжение сценарий service.bat, в котором все эти аргументы уже прописаны. К примеру, для создания приведённого выше сервиса с теми же аргументами достаточно просто вызвать service.bat с аргументом install:
C:\> service.bat install
Все остальные аргументы уже прописаны в самом сценарии. Единственный недостаток service.bat — если нам нужно задать какие-либо недефолтные параметры службы (например, лимиты памяти для JVM), сделать это через него не получится — придётся после создания службы вызывать «tomcat7.exe //US//», либо доконфигурировать службу с помощью tomcat7w.exe.
Утилита tomcat7w.exe
Удобная графическая утилита для мониторинга службы и задания параметров её конфигурации. Интерфейс выглядит примерно так:
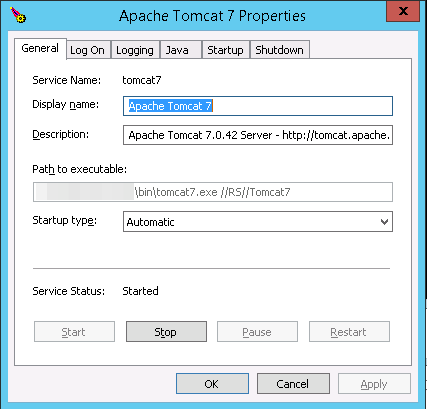
Можно задать все основные параметры конфигурации, если не хочется связываться с консолью и запускать / останавливать службу, если не хочется связываться со стандартной админкой Windows.
Пример конфигурации службы
Для примера рассмотрим практический пример конфигурации службы на реальной системе. Предположим, что нам нужно создать службу Windows для Tomcat 7, установленного в каталог C:\\MyWebapp, причём работающее под управлением Tomcat приложение достаточно «тяжёлое» — требует 1 Гб хипа и 256 Мб PermGen.
Для начала, запускаем service.bat:
c:\MyWebapp\tomcat\bin>service.bat install MyWebapp
Installing the service 'MyWebapp' ...
Using CATALINA_HOME:    "c:\MyWebapp\tomcat"
Using CATALINA_BASE:    "c:\MyWebapp\tomcat"
Using JAVA_HOME:        "C:\Program Files\Java\jdk1.7.0_45"
Using JRE_HOME:         "C:\Program Files\Java\jdk1.7.0_45\jre"
Using JVM:              "C:\Program Files\Java\jdk1.7.0_45\jre\bin\server\jvm.dl
l"
The service 'MyWebapp' has been installed.
Помним о том, что служба создалась с дефолтными параметрами JVM. Для того, чтобы изменить их на нужные нам, вызываем команду //US утилиты tomcat7.exe:
c:\MyWebapp\tomcat\bin>tomcat7.exe //US//MyWebapp ++JvmOptions=-Xmx1024m;-XX:MaxPermSize=256m
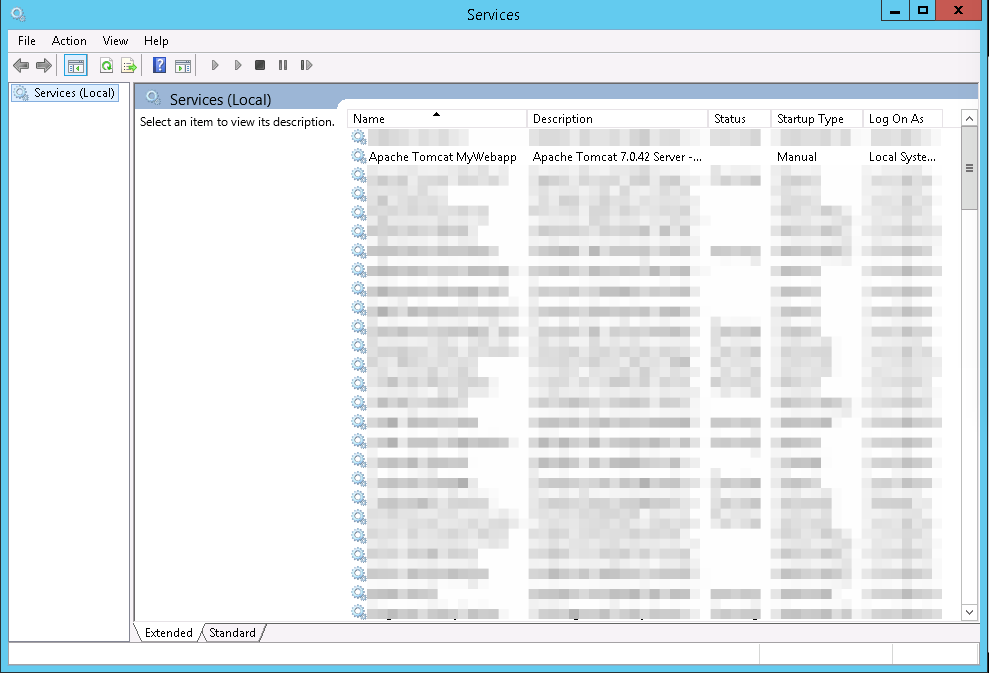
Проверяем, появилаясь ли служба в панели управления:
Пытаемся запустить:
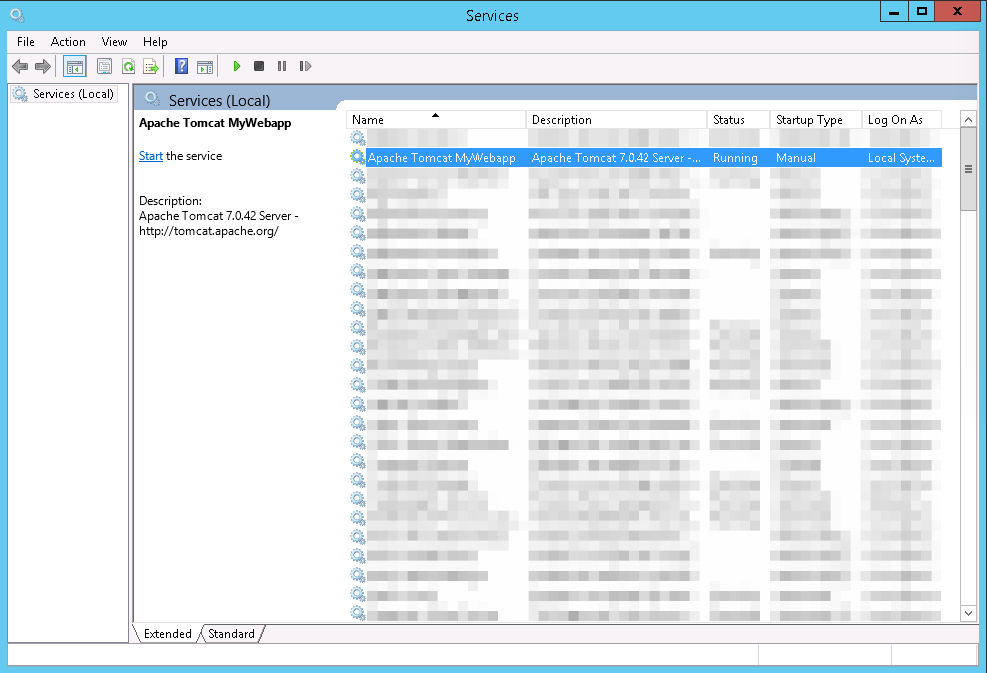
Работает!
I’ve had a task at my work place to install Multiple Tomcat servers on Windows 2012 Server R2 the task seems trivial however I’ve faced few minor issues and the few searches in Google returned very few articles discussing the topic and this give me the idea that it might be helpful to others to come up with my own article as this might save time for those Linux guys who need to install Multiple Tomcat instances on the same Windows server without spending too much time to dig into the arcane winblows.
I stumbled on some issues during installation thus took the time to systemize below shortly how I managed to run 2 Tomcat servers on One Windows 2012 R2 machine.
First thing to do is to obtain latest compiled Tomcat server archive from Tomcat’s official download page here.
Latest Tomcat stable release as of time of writting this article is 7.0.69, so I’ve downloaded 64 Bit archive (as the server is running X64 Operating system) and unarchived it twice on the Install server under 2 separate directory locations under:
D:TomcatTomcat_Instance-1
and
D:TomcatTomcat_Instance-2
Copy of the 7.0.69 X86 tomcat zip archive is here and X64 bit tomcat 7.0.69 is here
Once the files are properly untarred I also needed to download also Java as the WAR application supposed to run on the Windows machine had as requirement Java JDK 8.
Downloading Java is a trivial task, however in my case the server used to be in DMZ (Demiliterized Zone) / Firewalled network and hence instead of using the default Java installer provided from Oracle website which is trying to download from Internet, I had instead to download and use the Offline current JAVA 8u91 version.
Just for sake of some convenience I’ve made a mirrored version of X86 JAVA 8 (8u91) is here and JAVA 8u91 X64 version here
JAVA JDK install is a trivial task just run the isntaller set the proper locations initially for JDK base folder in my case this was:
D:Javajdk
and later throughout during install, I was asked also to fill in full path location for JRE, in my case this was
D:Javajre
It was a little bit surprising for me that JRE install path had to be entered and because I was not careful enough I had twice entered the same path for both JRE and JDK, i.e. entered on both prompts:
D:Java
This caused issues and a messed Java install but I realized that after the 3rd re-install of Java when I decided to also read instead of by habit click Next / Next and Complete the install as used to be in the good old days of Windows XP and Windows 98 🙂
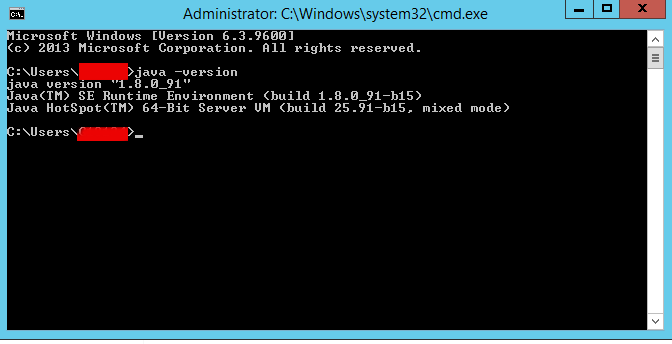
Once Java set up correctly I’ve tested it with:
C:Usersgeorgi> java -version
It is also necessery to set properly following 2 JAVA command line environment variables:
JAVA_HOME
JRE_HOME
On the logged in user Environment Variables with which Tomcat will be running on how to do that check my previous article how to add Environment Variables on Windows
Make sure you have the following 2 environment variables set upped:
JAVA_HOME=D:Javajdk
JRE_HOME=D:Javajre
For one time set (assuming Java is installed) under D:Javajre and D:Javajdk, you will need to type in command prompt:
set JAVA_HOME=D:Javajdk
set JRE_HOME=D:Javajre
Once assured Java is running fine I proceeded to run the Tomcat serevrs, in order to make them working it was necessery to change all coinciding Port names under:
conf/server.xml
because if there are coinciding ports (assuming that like me you’re trying to run both Tomcat under the same IP address), the servers will fail to run because they’re trying to bind under the same Port TCP addresses.
Assuming that the tomcat archive files are copied from .zip into D:TomcatTomcat_Instance-1 and D:TomcatTomcat_Instance-2 folders and you have in each of the 2 the following directory structure:
/bin : This directory contains the startup and shutdown scripts for both Windows and Linux.
/conf : This directory contains the main configuration files for Tomcat. The two most important are the server.xml and the global web.xml .
/server : This directory contains the Tomcat Java Archive files.
/lib : This directory contains Java Archive files that Tomcat is dependent upon.
/logs : This directory contains Tomcat’s log files.
/src : This directory contains the source code used by the Tomcat server. Once Tomcat is released, it will probably contain interfaces and abstract classes only.
/webapps : All web applications are deployed in this directory; it contains the WAR file.
/work : This is the directory in which Tomcat will place all servlets that are generated from JSPs. If you want to see exactly how a particular JSP is interpreted, look in this directory.
You will need to edit server.xml in both of the Tomcats and make sure the configuration for ports is not coinciding, i.e., I’ve changed the following configurations for Tomcat_Instance-2 installation:
Connector Port : This is the port where Apache Tomcat listen for the HTTP requests. Default port is 8080, I’ve changed this to 8089 for second Tomcat server
Shutdown Port : This port is used when we try to shutdown the Apache Tomcat Server. Default port is 8005 so changed that to 8006 in Tomcat_Instance-2
AJP (Apache JServ Protocol) Connector Port : The Apache JServ Protocol (AJP) is a binary protocol that can conduct inbound requests from a web server through to an application server that sits behind the web server.
I’ve commented out the configuration for AJP completely and used for my custom needs the following server.xml configuration:<Connector port=»11111″ address=»10.251.27.24″ protocol=»AJP/1.3″ enableLookups=»false»/>
Redirect Port : Any redirection happening inside Apache Tomcat will happen through this port. In Apache TOMCAT there are two instance where redirect Port is mentioned. First one is for the Apache TOMCAT server and other one is for the AJP port. Default here is port 8443 so changed that one to to listen to 8444 instead.
Another thing necessery to do is to create setenv.bat file under both D:TomcatTomcat_Instance-1bin and D:TomcatTomcat_Instance-2bin with following content:
set JRE_HOME=D:javajre
set JAVA_HOME=d:javajdk
exit /b 0
The quickest way to do it without bothering with Notepad text editor is by issuing:
cd tomcatTomcat_Instance1bin
echo set JRE_HOME=D:javajre > setenv.bat
echo set JAVA_HOME=D:javajdk >> setenv.bat
cd tomcatTomcat_Instance2bin
echo set JRE_HOME=D:javajre > setenv.bat
echo set JAVA_HOME=D:javajdk >> setenv.bat
The setenv.sh is a standard variables file read by Tomcat on Instance start up time
Next part of Tomcat installation is to install each of the 2 instances after defining CATALINA_BASE to point to first and second Tomcat instance directories, e.g open a Command Prompt (cmd.exe) and run there:
set CATALINA_BASE=D:TomcatTomcat_Instance-1
C:|> d:
D:|> cd TomcatTomcat_Instance-1bin
D:TomcatTomcat_Instance-1bin> service install Tomcat_Instance-1
You will get output like:
Using CATALINA_BASE: » D:TomcatTomcat_Instance-1″
Using CATALINA_HOME: » D:TomcatTomcat_Instance-1″
Using CATALINA_TMPDIR: » D:TomcatTomcat_Instance-1temp»
Using JRE_HOME: «D:javajre»
Using CLASSPATH: «D:TomcatTomcat_Instance-1binbootstrap.jar; D:TomcatTomcat_Instance-1bintomcat-juli.jar»
Then for the second Tomcat server instance run in command prompt:
set CATALINA_BASE=D:TomcatTomcat_Instance-2
d:
cd TomcatTomcat_Instance-2bin
service install Tomcat_Instance-2
Using CATALINA_BASE: » D:TomcatTomcat_Instance-2″
Using CATALINA_HOME: » D:TomcatTomcat_Instance-2″
Using CATALINA_TMPDIR: » D:TomcatTomcat_Instance-2temp»
Using JRE_HOME: «D:javajre»
Using CLASSPATH: «D:TomcatTomcat_Instance-1binbootstrap.jar; D:TomcatTomcat_Instance-2bintomcat-juli.jar»
Here is all the service.bat batch file parameters:
D:TomcatTomcat_Instance-11bin>service.bat /
?
Unknown parameter «/?»
Usage: service.bat install/remove [service_name] [/user username]
To test both Tomcat servers where they run simultaneously without issues, I run in 2 separate command prompts – opened (cmd.exe) two times and run in each of them:
What this little command does is uses Tomcat7.exe command to Add / Remove / Modify the Tomcat instance into Windows Services, the same can be happily done also with the good old
sc (service configure) windows command.
D:
cd TomcatTomcat_Instance-1binstartup.bat
D:
cd TomcatTomcat_Instance-2binstartup.bat
Both executed without errors in command line and to stop them I’ve pressed the usual CTRL+C.
To make sure once again both server instances ran wihtout errors, I’ve checked in D:TomcatTomcat_Instance-{1,2}logs/catalina*.log and in both of them all looked fine.
Another good check if you want to be 10000% sure Tomcat is running is to look up for Tomcat listening on above configured ports, for example run below in cmd:
D:Tomcat> netstat -a|findstr «8080»
I’ve also used the 2 following command to set up proper Services description for both of services:
D:TomcatTomcat_Instance-1tomcat7 //US//Tomcat_Instance1 –Description=»Apache Tomcat Server – Tomcat-Instance1.my-site.com»
D:TomcatInstance_Instance-2tomcat7 //US//Tomcat_Instance2 –Description=»Apache Tomcat Server – Tomcat-Instance2.my-site.com »
A very helpful resource during the Apache (Windows Service) instance install / setup /modification that helped me is on Tomcat’s official site here
N! B! Very important note to make here for anyone experiencing strange issues when trying to add multiple issues is below:
I’ve experienced some issues while trying to add the 2 Tomcat servers into Windows services initially with tomcat7.exe command like so:
Trying installing Tomcat71 service with cmd:
tomcat7 //IS//Tomcat71 –DisplayName=»Apache Tomcat 7″ ^
–Install=»D:TomcatTomcat_Instance-1bintomcat7.exe» –Jvm=auto ^
–StartMode=jvm –StopMode=jvm ^
–StartClass=org.apache.catalina.startup.Bootstrap –StartParams=start ^
–StopClass=org.apache.catalina.startup.Bootstrap –StopParams=stop
And Tomcat72 instance with cmd:
tomcat7 //IS//Tomcat71 –DisplayName=»Apache Tomcat 7″ ^
–Install=»D:TomcatTomcat_Instance-2bintomcat7.exe» –Jvm=auto ^
–StartMode=jvm –StopMode=jvm ^
–StartClass=org.apache.catalina.startup.Bootstrap –StartParams=start ^
–StopClass=org.apache.catalina.startup.Bootstrap –StopParams=stop
I’ve tried multiplet imes to Add and remove the Tomcat71 and Tomcat72 Windows service names (with) Tomcat DS (Delete Service)
tomcat7 //DS/Tomcat71
tomcat7 //DS/Tomcat72
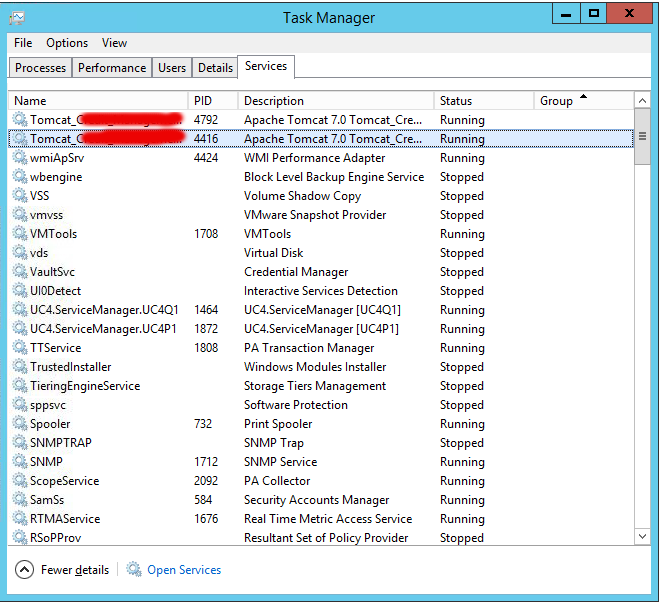
And strangely the two instances were continuously crashing when I tried to start them (with Properties button and Start instruction) from Windows Task Manager (taskmgr.exe) -> Services
Finally I realized the issue is caused by some problems that somehow occured with Windows Service Names Tomcat71 and Tomcat72 by simply readding the two instances under another name the instances stopped crashing and all worked thanks to help of colleague Anatoliy who pointed me tot he problem by trying to install his own instances under a different service name).
Thanks God finally the 2 instances run fine !
Download PDF
Tags: Apache Tomcat Server, archive files, Connector Port, Environment Variables, installation, one time, Redirect Port, Shutdown Port, startup, windows command
This entry was posted on Friday, June 17th, 2016 at 7:50 pm and is filed under Everyday Life, Java, System Administration, Tomcat, Various, Web and CMS, Windows. You can follow any responses to this entry through the RSS 2.0 feed. You can leave a response, or trackback from your own site.
Windows Server Set up Tomcat Server and Java project application
This article mainly introduces the use of Ali Cloud Windows Server to build Tomcat Server and Java project application, after writing the article you can also have a look in time.
Tools and Software
- Server: Aliyun Windows Server 2012 R2 Datacenter 64-bit Chinese version
- Remote Desktop connection tool: Microsoft Remote Desktop for Mac
- The JDK: jdk1.8.0 _131
- MYSQL: MYSQL – 5.6.36 – winx64
- Application server: Apache-tomcat-7.0.79
- PS: the owner of the building uses Mac development, if there is any difference, please understand
Visualizing Windows Server tools
I bought a Window server on Ali Cloud, so I directly use Ali Cloud server to demonstrate, as follows:

The next step is the detailed server interface:

It is recommended that you use Remote Desktop connection tools, here the main use of Mac OS X Microsoft Remote Desktop for Mac, here will not be detailed, specific download way Baidu many.

Microsoft Remote Desktop Connection properties are attached here as follows:

After filling in the information, you can enter the Windows Server. The interface is the same as the common Windows interface.
Win2012_64, so the first step into the server configuration is completed.
JDK & MYSQL
C: Program Files\Java\jdk1.8.0_131 C:\server\mysql-5.6.36-winx64, configure mysql environment variables, create localhost database, add admin user and grant database permissions; At this point the JDK and mysql are ready.
Tomcat structures,
Apache-tomcat-7.0.79, apache-tomcat-7.0.79, apache-tomcat-7.0.79 1: Install Tomcat
Install tomcat server directly, all the way down, install to the end is OK (too many online resources); Note: If you want to directly access the tomcat server Files or add Files and folders to the Tomcat project code, the tomcat folder should not be placed under Program Files. The recommended path is C:\ tomcat 7.0 or C:\soft\ tomcat 7.0.
2: Configure the database and automatic deployment code
To configure the database, go to the tomcat/conf/context. XML file and add the following code to the context tag:
<Resource name="jdbc/db" auth="Container"
factory="com.alibaba.druid.pool.DruidDataSourceFactory"
	   type="javax.sql.DataSource"
	   driverClassName="com.mysql.jdbc.Driver"
	   url="jdbc:mysql://localhost:3306/test? useUnicode=true& characterEncoding=utf-8"
	   username="admin"
	   password="123456"
	   maxActive="500"
	   initialSize="15"
	   maxIdle="15"
	   minIdle="15"
	   maxWait="30000"
	   removeAbandoned="true"
	   removeAbandonedTimeout="60"
	   logAbandoned="false"
	   timeBetweenEvictionRunsMillis="900000"
	   minEvictableIdleTimeMillis="1800000"
	   numTestsPerEvictionRun="10"
	   poolPreparedStatements="true"
	   maxOpenPreparedStatements="500"
	   validationQuery="SELECT 1"
	   validationInterval="60000"
	   testOnBorrow="true"/>
Copy the code
To configure automatic decompression deployment, go to the tomcat/conf/server. XML file and add the following code to the Host tag:
<Context docBase="C: \ Tomcat 7.0 \ webapps \ ROOT war" path="/" reloadable="true"/>
Copy the code
The default server access project is ROOT. For convenience, we can directly change the name of the war package to root. war. If you want to use a custom name, change ROOT to custom XXX in docBase. When accessing the project, you need to add/XXX/after the domain name to access the project.
At this point our Tomcat has been set up successfully.
Project access
Go to tomcat/webapps/, rename the old ROOT folder to ROOT_old, click tomcat/bin/ tomcat7w.exe, click Start to start tomcat. The ROOT folder is automatically decompressed, and the browser can access localhost:8080.
PS:
If you use domain names to access websites, you need to set additional port security rules as follows: Cloud Server ECS > Network and Security > Security Group Configuration Rules > Quick Creation Rules


The above common ports need to be configured, and then OK
This article is over, if you have any questions, please leave a message, welcome to exchange!
Scan the qr code below and follow my official account!!
Prepare the software:
jdk-7u25-windows-x64.exe
apache-tomcat-7.0.42-windows-x64.zip
One, install java
1) Install jdk-7u25-windows-x64.exe, all the way to next, which is installed by default
C:\Program Files\Java\jdk1.7.0_25 path.
2) Set environment variables
My Computer (right click) «Properties» Advanced System Settings «Advanced» Environment Variables
Create 3 variables under the system variables (path variable already exists, just add the path afterwards)
JAVA_HOME= C:\Program Files\Java\jdk1.7.0_25


 CLASSPATH= .;%JAVA_HOME%\lib\dt.jar;%JAVA_HOME%\lib\tools.jar; (note.; must have)


Path= %SystemRoot%\system32;%SystemRoot%;%SystemRoot%\System32\Wbem;%SYSTEMROOT%\System32\WindowsPowerShell\v1.0\;C:\Program Files\SlikSvn\bin\;C:\Program Files\TortoiseSVN\bin;%JAVA_HOME%/bin
The Path variable already exists, so we only need to add %JAVA_HOME%/bin.
Two, install tomcat
1) Unzip apache-tomcat-7.0.42-windows-x64.zip to c:\ and change the directory name to tomcat
2) Set environment variables
My Computer (right click) «Properties» Advanced System Settings «Advanced» Environment Variables
Add 2 variables
CATALINA_HOME= c:\tomcat


CATALINA_BASE= c:\tomcat


Modify the CLASSPATH variable


CLASSPATH=.;%JAVA_HOME%\lib\dt.jar;%JAVA_HOME%\lib\tools.jar;%TALINA_HOME%\common\lib\servlet.jar
Just add %TALINA_HOME%\common\lib\servlet.jar after the variable.
Open setclasspath.bat in the bin directory of tomcat
set JAVA_HOME = C:\JDK
set JRE_HOME = C:\JRE
3) Start tomcat
Double-click C:\tomcat\bin\startup.bat to start it, port 8080 will be opened by default, and you can see a java window.
You can enter http://127.0.0.1:8080/ in IE