
You are here: Home / Articles / Operating Systems / Windows Server 2012: Installing Active Directory Users and Computers and Group Policy Management Console
Managing Active Directory and Group Policy can be a little obscure due to the prerequisite of installing the Remote Server Administration Tools on Windows 7 and 8. In Server 2012, there is no separate install of the RSAT tools, you just have to know where to look. Fortunately, it proves consistent by being part of the Add/Remove Roles and Features part of the Windows Server operating system. I like the role-based installations because it greatly simplifies the install process, provides you a list of Server’s native capabilities, and keeps the installation minimal by allowing you to manually choose what you want installed after the fact.
To get the Active Directory Users and Computers, you want to be sure to install just the tools you need, not the entire domain services on your server. That is, unless you wish to make your server a domain controller.
Open up Server Manager by clicking the icon pinned to the Taskbar or right-clicking Computer and going to Manage. In the top-right corner of the window, go up to the Manage menu and click ‘Add Roles and Features’.

From here, you will go through a dialog wizard. Follow the on-screen instructions to get to the install on the server you want configured. Choose Role-based or feature-based installation and select your server.
Unless there are other roles you would like installed, skip Server Roles and hit Next to get to the Features.
On the Features page, check Group Policy Management Tools.
The description reads: Group Policy Management is a scriptable Microsoft Management Console (MMC) snap-in, providing a single administrative tool for managing Group Policy across the Enterprise. Group Policy Management is the standard tool for managing Group Policy.

Scroll down a little bit to get to and Remote Server Administration Tools -> Role Administration Tools -> AD DS and AD LDS Tools and check those boxes, particularly AD DS Snap-Ins and Command-Line Tools.
The description reads: Active Directory Domain Services Snap-Ins and Command-Line tools includes Active Directory Users and Computers, Active Directory Domains and Trusts, Active Directory Sites and Services, and other snap-ins and command-line tools for remotely managing Active Directory domain controllers.

You can also select other tools you want like the Active Directory Administrative Center but to specifically get just Active Directory Users and Computers, check the box in front of AD DS Snap-Ins and Command-Line Tools.
Confirm your selections and let the install do its work.

Once the installation completes, you will see ‘Active Directory Users and Computers’ and ‘Group Policy Management Console’ on the Start Screen. You can also find them under the Administrative Tools folder should you want to copy a shortcut to your desktop. Note: using the GPMC from Server 2012 gives you access to New Windows 8 and Server 2012 Group Policies.
Here’s how to install Active Directory Users and Computers in Windows Server 2012 R2: Click with Windows Icon at the Bottom Right Corner of your Screen, and click “Server Manager” when the menu opens. When the Server Manager Dashboard displays, click the “Add Roles and Features” link to open the Wizard.
To do this, select Start | Administrative Tools | Active Directory Users and Computers and right-click the domain or OU for which you need to set Group Policy. (To open Active Directory Users and Computers utility, select Start | Control Panel | Administrative Tools | Active Directory Users and Computers.).
Does Windows Server 2012 have Active Directory?
This topic explains the new Windows Server 2012 Active Directory Domain Services domain controller promotion feature at an introductory level. In Windows Server 2012, AD DS replaces the Dcpromo tool with a Server Manager and Windows PowerShell-based deployment system.
How do I view ads on Server 2012?
Install Active Directory on Windows Server 2012 with Server Start Server Manager from the Start screen or desktop Task Bar. On the Server Manager Dashboard, select Manage in the top right corner and then Add Roles and Features from the menu. Click Next in the Add Roles and Features Wizard.
What is Active Directory Users and Computers?
Active Directory Users and Computers (ADUC) is a Microsoft Management Console snap-in that you use to administer Active Directory (AD). You can manage objects (users, computers), Organizational Units (OU), and attributes of each. Read on to see how to run and use ADUC to manage AD.
How do I pull up Active Directory?
Find Your Active Directory Search Base Select Start > Administrative Tools > Active Directory Users and Computers. In the Active Directory Users and Computers tree, find and select your domain name. Expand the tree to find the path through your Active Directory hierarchy.
How do I enable Active Directory?
Right-click the Start button and choose “Settings” > “Apps” > “Manage optional features” > “Add feature“. Select “RSAT: Active Directory Domain Services and Lightweight Directory Tools“. Select “Install“, then wait while Windows installs the feature.
Is Microsoft an Active Directory?
Is Active Directory software? Yes, Active Directory is software developed by Microsoft that is installed, maintained, and updated on Windows-based server hardware.
Is LDAP a server?
TL;DR: LDAP is a protocol, and Active Directory is a server. LDAP authenticates Active Directory – it’s a set of guidelines to send and receive information (like usernames and passwords) to Active Directory. Want to learn more?Mar 29, 2020.
How do I install Active Directory on Windows Server 2012?
Install Active Directory Open the Server Manager from the task bar. From the Server Manager dashboard, select Add roles and features. On the Installation Type screen, select Role-based or features-based and click Next. By default, the current server is selected.
How do I setup an ad server?
To Configure Windows Active Directory and Domain Controller Log in as an administrator to the Windows 2000 or 2003 server host. From the Start menu, go to Administrative Tools > Manage Your Server. Install the Active Directory Domain Controller. Install Windows Support Tools. Create a new user account.
How do I install ad server?
Step 1: Install Active Directory Domain Services (ADDS) Log into your Active Directory Server with administrative credentials. Open Server Manager → Roles Summary → Add roles and features. The “Before you begin” screen, which pops up next, is purely for an informational purpose. Select the installation type.
What is Active Directory Domain Services?
Active Directory Domain Services (AD DS) are the core functions in Active Directory that manage users and computers and allow sysadmins to organize the data into logical hierarchies. AD DS provides for security certificates, Single Sign-On (SSO), LDAP, and rights management.
What is command for Active Directory?
Find a domain controller Click Start, and then click Run. In the Open box, type cmd. At the command prompt, type the command dsquery server parameter . The parameter specifies the parameter to use. There are several attributes of a server that you can search by using this command.
How do I manage Active Directory?
21 Effective Active Directory Management Tips Get Your Active Directory Organized. Use a Standardize Naming Convention. Monitor Active Directory with Premium Tools. Use Core Servers (When possible) Know How to Check AD Health. Use Security Groups to Apply Permissions to Resources.
What are the benefits of Active Directory?
Benefits of Active Directory. Active Directory simplifies life for administrators and end users while enhancing security for organizations. Administrators enjoy centralized user and rights management, as well as centralized control over computer and user configurations through the AD Group Policy feature.
What is Active Directory basics?
Active Directory is a directory service that centralizes the management of users, computers and other objects within a network. Its primary function is to authenticate and authorize users and computers in a windows domain. If it is a valid username and password the user is authenticated and logged into the computer.
Is there an Active Directory certification?
Active Directory Certification Though there isn’t a role-based certification specifically for Active Directory, it is found in Microsoft Certified: Azure Administrator Associate and Microsoft Certified: Azure Security Engineer Associate certifications. Or you can view all Microsoft Technical Certifications with ONLC.
Is there a free version of Active Directory?
Azure Active Directory comes in four editions—Free, Office 365 apps, Premium P1, and Premium P2. The Free edition is included with a subscription of a commercial online service, e.g. Azure, Dynamics 365, Intune, and Power Platform.
How do I add a user to Active Directory?
To create a new user, follow these steps: Click Start, point to Administrative Tools, and then click Active Directory Users and Computers to start the Active Directory Users and Computers console. Click the domain name that you created, and then expand the contents. Right-click Users, point to New, and then click User.
Can I install Active Directory on Windows 10?
Active Directory does not come with Windows 10 by default so you’ll have to download it from Microsoft. If you’re not using Windows 10 Professional or Enterprise, the installation will not work.
How do I create a desktop shortcut for Active Directory?
How to Create the Shortcut (Quick Method) Right click on your desktop, select New, and select Shortcut. Type in dsa.msc. Click Next. Rename your shortcut. I generally name my Active Directory Users and Computers. Click Finish. Done! You should have an Active Directory shortcut on your desktop.
В этой статье я хотел бы рассказать об установке и настройке роли ActiveDirectory на компьютере под управлением Windows Server 2012. После установки роли Active Directory на нём настраивается контроллер домена, после чего с помощью этого сервера можно будет централизованно управлять сетевой инфраструктурой. С помощью групповых политик домена, вы сможете управлять пользователями вашей сети (открывать или блокировать им доступ к определённым ресурсам сети, хранить данные о каждом пользователе, такие как Ф.И.О, адреса, телефоны, почту и многое другое). Так же вы сможете развёртывать приложения на всех или только на группе компьютеров входящих в ваш домен. Подготовка Для начала давайте подготовим Windows Server 2012 к установке роли Active Directory (далее AD). Нам необходимо сделать две вещи:
- Задать осмысленное имя компьютеру.
Для этого откроем “свойства системы”, нажимаем (Пуск -> Панель управления –> Система) после чего жмём “Изменить параметры”. Далее в “свойствах системы” на вкладке “Имя компьютера” нажимаем кнопку “Изменить” после чего в поле “Имя компьютера” задаём компьютеру имя и нажимаем “OK”. Нам покажут предупреждение, что компьютер необходимо перезагрузить, жмём “OK”. В “Свойствах системы” нажимаем “Закрыть” после чего нам предлагают перезагрузить компьютер прямо сейчас или сделать это позже, выбираем первый вариант и компьютер перезагружается. В этом примере я задал компьютеру имя Server.

- Задать статический IP адрес и маску подсети сетевому адаптеру конечно если ваш сетевой адаптер не получает настройки по DHCP.
Открываем “свойства сетевого подключения” (Пуск -> Панель управления -> Центр управления сетями и общим доступом -> Изменить параметры адаптера), далее вызываем контекстное меню сетевого подключения и нажимаем “свойства”. Далее на вкладке “Сеть” выделяем “Протокол интернета версии 4 (TCP/IPv4)” и нажимаем “свойства”. Задаём IP адрес и маску подсети, после чего нажимаем “OK” а затем “Закрыть”. На этом подготовку компьютера к установке роли AD можно считать законченной. В этом примере я задал следующие параметры, IP адрес: 192.168.0.1 маска подсети: 255.255.255.0

Установка роли После того как компьютер будет подготовлен приступаем к установке роли AD на компьютер. Для этого откроем “Диспетчер сервера” (Пуск -> Диспетчер сервера). Выберем “Добавить роли и компоненты” тем самым запустив “Мастер добавления ролей и компонентов”, в этот статье я кратко опишу добавление роли AD на сервер, т.к. роли добавляются одинаково, подробную установку вы можете прочитать в моих прошлых статьях про установку роли NAT и DHCP. 1. На первом этапе мастер напоминает, что необходимо сделать перед началом добавления роли на сервер, нажимаем ”Далее”. 2. На втором шаге выбираем “Установка ролей и компонентов” и нажимаем “Далее”. 3. Выбираем сервер, на который мы установим роль AD и снова нажимаем ” Далее ”. 4. На этом шаге нам нужно выбрать роль, которую мы хотим добавить на компьютер, отмечаем галочкой “Доменные службы Active Directory”, после чего нам предлагают добавить «службы ролей или компоненты» необходимые для установки роли AD, нажимаем кнопку “Добавить компоненты” после чего жмём “Далее”. 5. На следующем шаге нам предлагают выбрать компоненты, просто жмём “Далее” 6. Попадаем на описание роли “Доменных служб Active Directory”. Читаем описание роли и пункт “на что обратить внимание” после чего нажимаем “Далее” 7. На этом шаге нам показывают, что будет добавлено на сервер, проверяем, если всё верно нажимаем “Установить”. 8. После того как установка будет завершена нажимает “Закрыть” Настройка доменных служб Active Directory После того как роль была добавлена на сервер, необходимо настроить доменную службу, для этого запустим “Мастер настройки доменных служб Active Directory” (нажмите на иконку “уведомления” в “диспетчере сервера” после чего нажмите “Повысить роль этого сервера до уровня контроллера домена”) 1. Выберете пункт “Добавить новый лес”, после этого впишите имя домена в поле “Имя корневого домена” и нажмите “Далее” 2. На этом шаге мы можем изменить совместимость режима работы леса и корневого домена. В моём примере я оставляю эти настройки по умолчанию (в режиме работы “Windows Server 2012 RC”). Так же мы может отключить возможность DNS-сервера, я оставил эту настройку включенной. В низу нам необходимо задать пароль для DSRM (Directory Service Restore Mode — режим восстановления службы каталога), задаём пароль и нажимаем “Далее” 3. На этом шаге мастер предупреждает нас о том, что делегирование для этого DNS-сервера создано не было, нажимаем “Далее”. 4. Здесь мы можем изменить NetBIOS имя, которое было присвоено нашему домену, изменяем, если требуется и нажимаем “Далее”. 5. Теперь мы можем изменить пути к каталогам базы данных AD DS (Active Directory Domain Services – доменная служба Active Directory), файлам журнала, а так же папке SYSVOL. Если требуется, измените, пути расположения каталогов и нажимайте «Далее». 6. В этом шаге, можно проверить какие параметры мы выбрали, так же мы можем посмотреть “Сценарий Windows PowerShell для развертывания AD DS ”. Нажимаем “Далее”. 7. Мастер проверит, соблюдены ли предварительные требования, после чего покажет нам отчёт. Одно из обязательных требований, это установленный пароль на профиль локального администратора. В самом низу мы может прочитать предупреждение мастера о том что после того как будет нажата кнопка “Установить” уровень сервера будет повышен до контроллера домена, после чего произойдёт автоматическая перезагрузка. Нажимаем “Установить”. 8. После того как установка будет закончена, компьютер перезагрузится, вы совершите первый ввод компьютера в ваш домен. Для этого введите логин и пароль администратора домена и нажмите “Войти”. Добавление нового пользователя Теперь нам нужно добавить новых пользователей в наш домен, ниже я покажу, как создать новое подразделение и добавить в него пользователя, после чего можно присоединить компьютер к домену и войти в домен под новым пользователем. 1. Для начала работы запустите оснастку “Пользователи и компьютеры Active Directory” (Пуск -> Панель управления -> Администрирование -> Пользователи и компьютеры Active Directory) 2. Выделите название домена и вызовите контекстное меню, в котором выбираете (Создать -> Подразделение). После чего вводим имя для подразделения, а так же можем снять защиту контейнера от случайного удаления, эту опцию я оставил включённой. Нажимаем “OK”. Подразделения служат для того что бы удобно управлять группами компьютеров пользователей и т.д. Например: можно разбить пользователей по группам с именами подразделений соответствующих именам отделов компании, в которой они работают (Бухгалтерия, отдел кадров, менеджеры и т.д.) 3. Теперь создадим нового пользователя в контейнере. Выделяем контейнер “Пользователи”, вызываем контекстное меню и выбираем в нём (Создать -> Пользователь). Заполняем поля имя и фамилия, в полях имя входа пользователя указываем логин пользователя, под которым он будет заходить в домен. Логин может содержать точки, например: Ivan.Ivanov Нажмите кнопку “Далее”, задайте пароль для пользователя (пароль должен соответствовать политике безопасности Windows), так же доступны четыре опции для изменения
- Требовать смены пароля пользователя при следующем входе в систему – при входе пользователя в ваш домен ему будет предложено сменить пароль.
- Запретить смену пароля пользователем – отключает возможность смены пароля пользователем
- Срок действия пароля не ограничен – пароль можно не менять сколь угодно долго
- Отключить учётную запись – делает учётную запись пользователя не активной
Нажмите “Далее”, затем нажмите “Готово”. 4. Выделите созданного пользователя и в контекстном меню выберите “Свойства”. Перейдите на вкладку “Учётная запись” и поставьте галку напротив “Разблокировать учётную запись”, после чего нажмите “Применить”, затем «OK». Ввод компьютера в домен После проделанных манипуляций мы создали новое подразделение “Пользователи” и добавили в него нового пользователя “Иван Иванов” с логином “Ivan.Ivanov”.Давайте теперь введём компьютер в наш домен и попробуем залогиниться под новым пользователем. Для этого на компьютере пользователя делаем следующие: 1. Укажем на клиентском компьютере DNS-адрес. Для этого открывает “Свойства сетевого подключения” (Пуск –> Панель управления –> Центр управления сетями и общим доступом -> Изменить параметры адаптера), вызываем контекстное меню подключения и нажимаем «Свойства». После чего выделяем “Протокол Интернета версии 4 (TCP/IPv4)”, нажимаем “Свойства”, выбираем “Использовать следующие адреса DNS-серверов” и в поле “Предпочитаемый DNS -сервер” указываем адрес вашего DNS-сервера. 2. Открываем “Свойства системы” (Пуск -> Панель управления -> Система -> Изменить параметры), нажимаем кнопку “Изменить»
")
3. Выберете “Компьютер является членом домена” и введите имя домена. Нажмите “OK”, после чего введите имя пользователя и пароль созданного вами пользователя, нажмите “OK” после чего выскочит приветствие “Добро пожаловать в домен”. Подтверждаем “OK” и видим предупреждение, что компьютер необходимо перезагрузить, жмём “OK” потом “Закрыть” затем “Перезагрузить сейчас”.
4. После того как клиентская машина будет перезагружена, вводим в поле «Пользователь» имя домена/Ivan.Ivanov в поле пароль указываем пароль от учётной записи пользователя. Нажимаем “Войти”.

Заключение В этой статье была описана установка роли доменных служб Active Directory, развёртка домена, создание подразделения и добавление нового пользователя. А так же ввод компьютера в домен.
↑Как установить такие кнопки?↑
Friend me:
Active Directory Users and Computers is a Microsoft Management Console (MMC) which get’s installed when a server is promoted as a Domain Controller. However, you can use this console on members servers and clients by installing additional tools. Active Directory Users and Computers is a Microsoft Management console, through which we can do centralized management of objects like computers, users, and groups in Active Directory. Active Directory also contains information like security identifier and rights of these objects.
There are various operations that can be performed using AD Users and Computers. We can create, manage, edit and delete users, groups and computer accounts through Active Directory Users and Computers. AD Users and Computers console, also shows the information regarding Domain Controllers and computers added in the domain. It automatically gets installed while installing the role of Active Directory Domain Services. AD Users and Computers allow us to create a tree similar to our organization’s structure using Organizational Units (OU). OU is similar to a container, in which we can place users, computers, groups and other Organizational Unit. You can create OUs but you can’t create containers.
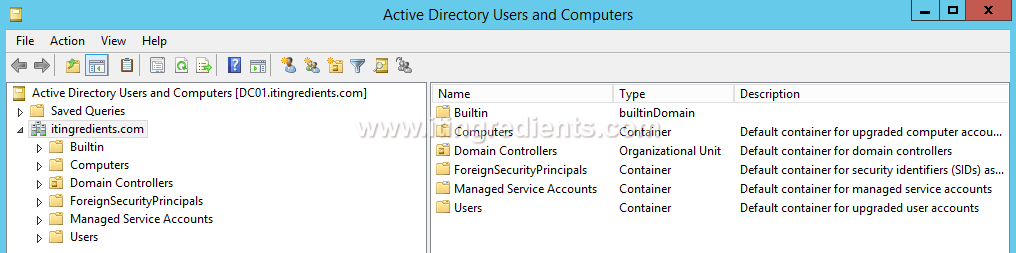
After the successful installation of the Active Directory Domain Services role and promoting a server to Domain Controller, we can open the console of Active Directory Users and Computers by typing “DSA.MSC” in the run console or by clicking on start button and then select Active Directory Uses and Computers. In the ADUC, we can see existing OUs and Containers. These containers and OUs are automatically created and contains information about the default Users, Groups and Computers. The first folder we see is “Saved Queries” under Active Directory Users and Computers. In saved queries, administrators can create new queries to search users, computers, OUs and others objects and save that searches for future use.
Let’s understand some of the default Containers and OUs created in Active Directory Users and Computers. Expand the name of domain i.e itingredients.com in this case. This information is critical not only from Administration purpose but also for interview prospective.
1. Builtin Container: It contains all the default groups of the domain like Administrators, Account operators, Backup operators, Network configuration operators and many other groups. These groups are helpful in providing administrative rights in different functional areas.
2. Computers Container: This container is the default container of all the computer objects in the domain, either member server or client computers. All the Computers that are added in the Domain create their account in this container.
3. Domain Controllers OU: By default all the domain controllers are listed here. Any new Domain Controller that is promoted in the environment would create the Computer account in this OU.
4. ForeignSecurityPrincipals: It is the default container of the SIDs (Security Identifiers) of the objects that belong to the trusted external domain.
5. Managed Service Accounts: It is the default container for managed service accounts.
6. Users: It is a default container of all the domain users and security groups like Cert Publishers, DHCP Administrators, DHCP Users, DNS Admins, Domain Admins and other security groups. All the domain users are created here by default.
In addition to that, you can create your own Organizational Units in which you can further create nested OUs, users, groups and Computers. It is very useful for efficient management of your environment.
7. The installation process will begin. If prompted, specify the installation source path or download from Windows Update as required.
8. After the installation is complete, promote the server to a domain controller by executing the following command in PowerShell:
«`
Install-ADDSForest -DomainName yourdomain.com -DomainMode WinThreshold -ForestMode WinThreshold
«`
Replace «yourdomain.com» with your desired domain name and adjust the DomainMode and ForestMode parameters if needed.
9. During the promotion process, you will be prompted to specify the Directory Services Restore Mode (DSRM) password. Set a secure password and remember it for future use.
10. Proceed with the prompts to finalize the Active Directory installation and configuration.
11. Once the domain controller promotion is complete, you can exit PowerShell by typing «exit» and pressing Enter.
That’s it! You have successfully installed Active Directory in Windows Server 2012 R2 Core. Remember to configure additional settings, such as creating organizational units (OUs), users, and group policies, to meet your specific requirements.
To connect a Windows Server to Active Directory, follow these steps:
1. Install Windows Server: Before connecting to Active Directory, ensure that you have installed Windows Server on your machine. Choose the appropriate version depending on your requirements.
2. Configure the network settings: Set up the network settings on the Windows Server by assigning it a static IP address, subnet mask, default gateway, and DNS server. These settings will allow the server to communicate with Active Directory.
3. Join the server to the domain: Open the System Properties dialog by right-clicking on the «This PC» or «My Computer» icon, selecting «Properties,» and then clicking on the «Change settings» option. In the System Properties window, click on the «Change» button next to «To rename this computer or change its domain or workgroup.» Select the «Domain» option, enter the domain name, and provide credentials for an account that has permission to join the server to the domain.
4. Authenticate the connection: After entering the domain name and credentials, click the «OK» button. Windows Server will attempt to authenticate the connection with the domain and verify the credentials. If successful, the server will join the domain and prompt you to restart.
5. Restart the server: After the server has joined the domain, restart it as prompted. This step ensures that all configurations and group policy settings associated with the Active Directory connection take effect.
6. Log in with domain credentials: Once the server restarts, you can log in using domain credentials. This allows you to access resources and apply domain policies to the server.
By following these steps, you can connect a Windows Server to Active Directory and benefit from centralized user and resource management, increased security, and simplified administration.
How do I find Active Directory on Windows Server?
To find Active Directory on a Windows Server, you can follow these steps:
1. Open the Server Manager: Click on the Start button, type «Server Manager» in the search bar, and click on the Server Manager application.
2. Once the Server Manager is open, locate the «Tools» menu option on the top right corner of the window and click on it.
3. In the Tools menu, scroll down and find the «Active Directory Users and Computers» option. Click on it to open the Active Directory Users and Computers MMC (Microsoft Management Console) snap-in.
4. The Active Directory Users and Computers window will now open. Here, you will find the Active Directory structure for your Windows Server.
Alternatively, you can use the Run dialog box to directly open the Active Directory Users and Computers window. Follow these steps:
1. Press the Win + R keys on your keyboard to open the Run dialog box.
2. In the Run dialog box, type «dsa.msc» and press Enter or click on the OK button.
3. The Active Directory Users and Computers window will now open.
By following these steps, you will be able to find and access Active Directory on your Windows Server. This will allow you to manage and perform various tasks related to users, groups, and other objects within the Active Directory domain structure.
How to install RSAT on Windows Server 2012 R2?
To install RSAT (Remote Server Administration Tools) on Windows Server 2012 R2, follow these steps:
1. Open the Server Manager: Click on the «Server Manager» icon located on the taskbar, or you can open it from the Start screen by typing «Server Manager.«
2. Within the Server Manager window, click on «Add Roles and Features» from the dashboard or the «Manage» menu.
3. The «Add Roles and Features Wizard» will appear. Click «Next» to proceed.
4. Select the installation type: Choose «Role-based or feature-based installation» and click «Next.«
5. Select your desired server: Ensure that the local server is selected and click «Next.«
6. Choose the server roles: Scroll down and expand «Remote Server Administration Tools.» Within it, expand «Role Administration Tools.«
7. Locate and select the specific tools you want to install, such as «AD DS and AD LDS Tools» or «DNS Server Tools.» Once you’ve made your selection, click «Next.«
8. Confirm the installation: Review your selections and click «Install» to begin the installation process.
9. Wait for the installation to complete: The progress of the installation will be displayed. Allow the installation process to finish.
10. Close the wizard: Once the installation is complete, click «Close» to exit the wizard.
11. Launch the Remote Administration tools: To access the RSAT tools, go to the Start screen and type the name of the desired tool, such as «Active Directory Users and Computers.» It should appear in the search results, and you can click on it to launch the tool.
Note: Make sure you have administrative privileges on the server before attempting to install RSAT. Additionally, ensure compatibility between RSAT and the version of Windows Server you are using.
Remember, it’s always a good idea to refer to official documentation or consult more detailed resources if needed for specific scenarios or troubleshooting.
How do I add an Active Directory to my server?
To add an Active Directory to your server, you can follow these steps:
1. Install Windows Server: Ensure that you have a Windows Server operating system installed on your server machine. The specific version will depend on your requirements, but it should be a version that supports Active Directory, such as Windows Server 2016 or Windows Server 2019.
2. Configure Network Settings: Set up your server with a static IP address, subnet mask, default gateway, and DNS server addresses. It is essential to have stable network connectivity for the Active Directory configuration.
3. Install Active Directory Domain Services (AD DS): AD DS is the Windows Server role that enables your server to function as a domain controller. To install it, follow these steps:
– Open the «Server Manager» on your Windows Server.
– Click on «Add Roles and Features» to launch the wizard.
– Select «Role-based or feature-based installation» and choose your server.
– From the server roles list, select «Active Directory Domain Services.«
– Follow the on-screen instructions to complete the installation.
4. Promote the Server to a Domain Controller: After installing AD DS, you need to promote your server to a domain controller. This process involves creating a new forest or joining an existing one. Here’s how you can promote the server:
– Open «Server Manager» and click on «Notifications» or navigate to «Tools» > «Active Directory Domain Services.«
– In the AD DS configuration wizard, select «Promote this server to a domain controller.«
– Choose «Add a new forest» or «Add a domain controller to an existing domain,» depending on your requirements.
– Configure the appropriate options like forest/domain name, domain controller capabilities, etc.
– Set the Directory Services Restore Mode (DSRM) password.
– Complete the wizard, and the server will be promoted to a domain controller.
5. Configure Active Directory: Once the promotion process is complete, you can further configure your Active Directory settings based on your specific needs. This includes creating and managing organizational units (OUs), groups, users, and defining Group Policies.
It’s worth noting that the actual process might vary slightly depending on the version of Windows Server you are using, but the above steps provide a general outline for adding Active Directory to your server. It is recommended to refer to official documentation or consult relevant resources for detailed guidance specific to your environment and server OS version.