
Windows Server 2008 R2 is a popular operating system amongst businesses and organizations due to its stability and robustness. However, there may be instances where you need to boot the server in Safe Mode to troubleshoot issues or perform maintenance tasks. Safe Mode allows you to start Windows with a limited set of drivers and services, which can help isolate and resolve problems that may arise during normal operation.
In this blog post, we will explore the different methods to boot Windows Server 2008 R2 in Safe Mode. We will provide step-by-step instructions for each method along with detailed explanations. Whether you are an IT professional or a server administrator, knowing how to boot Windows Server 2008 R2 in Safe Mode can be a valuable skill to have in your repertoire.
Video Tutorial:
Why You Need to Boot Windows Server 2008 R2 in Safe Mode
Booting Windows Server 2008 R2 in Safe Mode can be beneficial for several reasons. Here are a few instances where you may need to use Safe Mode:
1. Troubleshooting: Safe Mode allows you to start Windows with minimal drivers and services, making it easier to identify and fix issues that may be causing system instability or crashes.
2. Removing Problematic Software: If you are experiencing problems with certain applications or drivers, booting in Safe Mode can help isolate the issue. You can then uninstall or update the problematic software to resolve the problem.
3. System Maintenance: Safe Mode provides a clean environment without unnecessary services and startup items, making it ideal for performing system maintenance tasks such as disk cleanup, malware scans, or driver updates.
4. Data Recovery: In some cases, you may encounter a situation where you are unable to boot Windows normally. Safe Mode can provide a means to access your files and data, allowing you to back them up or perform necessary recovery procedures.
Now that we understand the importance of booting Windows Server 2008 R2 in Safe Mode, let’s explore the different methods to achieve this.
Method 1: Using F8 during Startup
Using the F8 key during startup is the most common and straightforward method to boot Windows Server 2008 R2 in Safe Mode. Follow the steps below to access Safe Mode using this method:
1. Power on or restart your Windows Server 2008 R2 machine.
2. As the server boots up, press the F8 key repeatedly before the Windows logo appears. This will bring up the Advanced Boot Options menu.
3. In the Advanced Boot Options menu, use the arrow keys to select «Safe Mode,» and press Enter.
| Pros | Cons |
|---|---|
| 1. Easy and quick access to Safe Mode. | 1. May not work on some hardware configurations or virtual environments. |
| 2. Does not require any additional tools or software. | 2. Limited control over boot options compared to other methods. |
| 3. Suitable for one-time use or when immediate access to Safe Mode is required. | 3. No confirmation prompt, which may lead to accidentally booting into Safe Mode. |
Method 2: Using System Configuration Tool (msconfig)
The System Configuration Tool, also known as msconfig, provides an alternative method to boot Windows Server 2008 R2 in Safe Mode. Here’s how you can utilize this tool to access Safe Mode:
1. Press the Windows key + R to open the Run dialog box.
2. Type «msconfig» and click OK to launch the System Configuration Tool.
3. In the System Configuration window, navigate to the «Boot» tab.
4. Under the «Boot options» section, check the «Safe boot» box.
Now, you have two options:
– If you want to boot into Safe Mode once: Select the «Minimal» option to load only essential drivers and services. Then click OK and restart your server when prompted.
– If you want to boot into Safe Mode every time: Select the «Minimal» option and check the «Make all boot settings permanent» box. Click OK and restart your server when prompted.
| Pros | Cons |
|---|---|
| 1. Offers more control over the Safe Mode boot process. | 1. Requires administrative privileges to access and modify system configuration. |
| 2. Provides the option to boot into Safe Mode every time or only once. | 2. May cause issues if misconfigured or if unable to boot into Safe Mode. |
| 3. Ideal for users who prefer a more permanent Safe Mode boot option. | 3. Requires a system restart to apply the changes. |
Method 3: Via Command Prompt
Another method to boot Windows Server 2008 R2 in Safe Mode involves using the Command Prompt. Follow the steps below to utilize this method:
1. Press the Windows key + R to open the Run dialog box.
2. Type «cmd» and press Ctrl + Shift + Enter to launch the Command Prompt with administrative privileges.
3. In the Command Prompt window, type the following command and press Enter:
bcdedit /set {current} safeboot minimal
4. You should see a message confirming that the operation was completed successfully.
5. Restart your server to boot into Safe Mode.
| Pros | Cons |
|---|---|
| 1. Allows you to enable Safe Mode using the built-in Command Prompt. | 1. Requires administrative privileges to access and modify boot settings. |
| 2. Provides a way to enable Safe Mode even if the F8 key method does not work. | 2. May cause issues if misconfigured or if unable to boot into Safe Mode. |
| 3. Suitable for users comfortable with using the Command Prompt interface. | 3. Requires a system restart to apply the changes. |
Method 4: Using Windows Recovery Environment (Windows RE)
If none of the previous methods work, you can utilize the Windows Recovery Environment (Windows RE) to boot Windows Server 2008 R2 in Safe Mode. Here’s how you can achieve this:
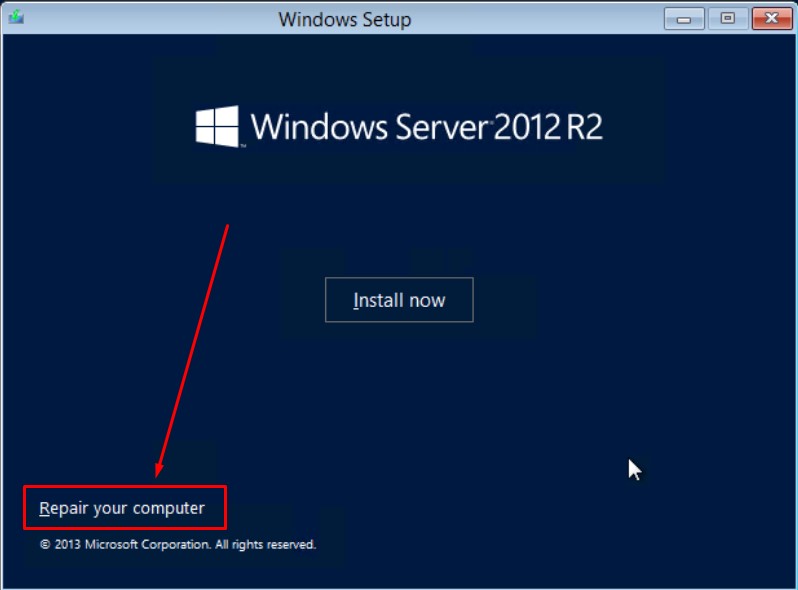
1. Boot your server from the Windows Server 2008 R2 installation DVD or ISO file.
2. Select your language preferences and click Next.
3. Click on the «Repair your computer» option located at the bottom left of the screen.
4. In the System Recovery Options window, select your operating system and click Next.
5. Choose the «Command Prompt» option.
6. In the Command Prompt window, type the following command and press Enter:
bcdedit /set {default} safeboot minimal
7. You should see a message confirming that the operation was completed successfully.
8. Restart your server, and it will boot into Safe Mode.
| Pros | Cons |
|---|---|
| 1. Provides a reliable alternative when other methods fail. | 1. Requires a Windows Server 2008 R2 installation DVD or ISO file. |
| 2. Allows you to enable Safe Mode from the Windows Recovery Environment. | 2. May cause issues if misconfigured or if unable to boot into Safe Mode. |
| 3. Suitable for users with advanced technical skills or facing severe boot issues. | 3. Requires a system restart to apply the changes. |
What to Do If You Can’t Boot Windows Server 2008 R2 in Safe Mode
If you encounter difficulties or issues while attempting to boot Windows Server 2008 R2 in Safe Mode, here are some additional fixes you can try:
– Check Hardware Compatibility: Ensure that your hardware configuration is compatible with Windows Server 2008 R2. Incompatible or outdated hardware may cause booting problems.
– Check for Software/Driver Conflicts: Identify any recently installed software or drivers and uninstall or update them if necessary. Incompatible or faulty software/driver installations can lead to booting issues.
– Scan for Malware: Perform a thorough malware scan using reputable antivirus software. Malicious software can interfere with the booting process, causing problems.
– Restore from System Restore Points: If you have previously created system restore points, try restoring your server to a point before the issue occurred.
Bonus Tips
Here are three bonus tips to enhance your experience with booting Windows Server 2008 R2 in Safe Mode:
1. Create a Bootable USB/DVD: To have a readily accessible Windows Server 2008 R2 installation media, create a bootable USB or DVD using the official Microsoft media creation tool. This can be handy in case of emergency situations where you need to boot into Safe Mode.
2. Enable VGA Mode: If you are troubleshooting display-related issues, consider enabling VGA Mode while in Safe Mode. This loading option ensures the use of a generic VGA driver, which can help if your regular display driver is causing trouble.
3. Update Drivers and Software Regularly: Keeping your hardware drivers and software up to date can prevent compatibility and booting issues. Make it a habit to check for updates regularly or utilize automatic update utilities provided by the respective manufacturers.
5 FAQs
Q1: How do I know if I have successfully booted into Safe Mode on Windows Server 2008 R2?
A: When in Safe Mode, Windows Server 2008 R2 displays the words «Safe Mode» in all four corners of the screen. Additionally, the desktop background may appear different and certain device drivers and services may be disabled.
Q2: Can I access the internet while in Safe Mode?
A: Yes, it is possible to access the internet in Safe Mode. Basic networking functionality is available, but certain network-related services and drivers may be disabled.
Q3: Can I perform regular tasks in Safe Mode, such as printing or accessing network shares?
A: Some functionality may be limited in Safe Mode. Depending on the specific drivers and services disabled, tasks like printing or accessing network shares may not be available or functioning correctly.
Q4: How do I exit Safe Mode and boot into normal mode?
A: To exit Safe Mode and boot into normal mode, simply restart your server without pressing any special keys or modifying boot settings. Windows will automatically boot into the normal mode.
Q5: Can I enable Safe Mode with Networking?
A: Yes, Safe Mode with Networking includes basic networking functionality, allowing you to access network resources and services. You can enable Safe Mode with Networking using the same methods mentioned earlier, but choose the appropriate option when available.
Final Thoughts
Booting Windows Server 2008 R2 in Safe Mode can be a useful troubleshooting tool for server administrators and IT professionals. Whether you need to isolate and fix issues, remove problematic software, or perform system maintenance, Safe Mode provides a controlled environment to address these concerns.
In this blog post, we explored four different methods to boot Windows Server 2008 R2 in Safe Mode. These include using the F8 key during startup, utilizing the System Configuration Tool (msconfig), leveraging the Command Prompt, and using the Windows Recovery Environment (Windows RE).
Remember to try the additional fixes if you encounter difficulty while attempting to boot in Safe Mode. And don’t forget the bonus tips to enhance your experience with Safe Mode on Windows Server 2008 R2.
By familiarizing yourself with these methods and tips, you will be well-equipped to tackle any issues that may arise and ensure the smooth operation of your Windows Server 2008 R2 environment.
Introduction to Boot Options for Windows Server 2003 / 2008
Windows Server 2003 has inherited the Windows 95 and XP’s ability to interrupt the boot sequence by pressing F8. This is a handy boot option for disaster recovery, for example, when you need to disable a driver or perform an Authoritative Restore.
Boot Topics for Windows Server 2003 / 2008
- F8 Startup Options
- System Recovery Console CMDCONS
- Tools to troubleshoot server crashes
‡
F8 Startup options for Windows Server 2003 / 2008
Suppose the Windows server will not boot up. You may get a stop error message, alternatively, it may get a black screen which says, cannot find xyz.com file. Under these dire circumstances, your best bet is to reboot and press F8. I urge you to run through these options when you are calm and can make rational decisions, because when disaster strikes, the heart races and you need the comfort of familiar menus and procedures. Therefore, practice boot options with F8.
- Safe Mode (Safe Mode with Networking, Safe Mode Command Prompt)
- VGA Mode
- Last Known good (LKG)
- Directory Services Restore
1. Safe mode
Those coming to Windows Server 2003 from NT 4.0, will be impressed with all the options revealed by pressing F8 on boot up; those who know Windows 98 will find old friends on the menu. There are variation like Safe Mode with Networking, however I find the plain Safe mode is the best option when you begin troubleshooting. The main use of Safe mode is to correct configuration errors so that you can try another normal boot. Remember the first question to ask in troubleshooting is ‘What was the last setting to change?’. Incidentally, never waste time asking who made that fatal change because I can tell you the answer from here – it’s always Mr Nobody.
A good point about safe mode is that you still preserve the option to try the Last Known Good.
2. VGA Mode
This is useful in two scenarios:
a) You inadvertently install an incompatible monitor driver
b) Some nutter (Mr Nobody?) tries a variation of black writing on a black background.
3. Last Known Good (LKG)
This option is used in one specialist situation, you have just installed a rogue driver which you are pretty sure is preventing the Windows Server 2003 machine from booting. If you did something that changed the registry, then you can revert to a spare control set. Beware, the moment you logon, Windows creates a new Last Known Good, as a result you would lose the previous LKG. The time to consider the LKG option is if you have just installed a new device and you see an error message ‘One or more services failed to start’. In this situation DO NOT LOGON, power off, restart, press F8 and select Last Known Good from the menu.
4. Directory Services Restore – NTDSUTIL
The scenario: Someone has just deleted a complete OU from your Windows Server 2003 Active Directory. The problem is that a normal restore will not work under these circumstances. What will happen is that other Windows 2003 domain controllers will have later Update System Number and over write the restore, and delete the OU, so you are back where you started. What you need in this situation is the Directory Restore option from the F8 menu.
To prepare for a Directory Service Restore, first complete a normal restore and take the Windows Server 2003 offline. Then reboot, select the special Directory Service Restore mode at the F8 menu. Next run NTDSUTIL to tell Active Directory not to over-write the OU that you wish to recover.
That last paragraph is easy for me to write, but in reality NTDSUTIL is a difficult utility to use. Time spent practicing with NTDSUTIL will repay many times when you have to make a disaster recovery. In addition you need to understand LDAP because you need to issue a command to only restore the faulty part of Active Directory, in this case the OU that was deleted.
See much more on NTDSUTIL here
Guy Recommends: A Free Trial of the Network Performance Monitor (NPM) v11.5
SolarWinds’ Orion performance monitor will help you discover what’s happening on your network. This utility will also guide you through troubleshooting; the dashboard will indicate whether the root cause is a broken link, faulty equipment or resource overload.
What I like best is the way NPM suggests solutions to network problems. Its also has the ability to monitor the health of individual VMware virtual machines. If you are interested in troubleshooting, and creating network maps, then I recommend that you try NPM now.
Download a free trial of Solarwinds’ Network Performance Monitor
System Recovery Console – CMDCONS
When you are trying to boot a reluctant Windows Server 2003 / 2008, CMDCONS is another string to your bow.
Highly organized administrators run Winnt32 /cmdcons which installs about 8MB of files that make up the System Recovery Console. Fortunately should you forget to run CMDCONS ahead of the boot problem, then you can still boot from Windows Server 2003 CD and access System Recover from that Server CD.
If the system will not start due to a corrupted file, CMDCONS gives you tools to copy replacement files from CD. When you select System Recovery, it drops you into a DOS like shell where you can also issue commands to enable or disable services that are preventing a clean boot.
Trap: The password for this account is stored in the SAM database. This is sometimes called the DSRM (Directory Services Restore Mode) accounts. My point this administrator account will almost certainly have a different password from the regular domain administrator account. This is how your reset that DSRM / special / other / SAM administrator’s password.
Challenge: Install and test CMDCONS. My point is that time spent practicing with CMDCONS will repay handsomely when it comes to using the Recovery Console in anger. In particular you may be surprised how difficult it is to logon as administrator.
▫
Tools to troubleshoot Windows Server 2003 crashes
- Event Viewer. If you are able to start in safe mode, then the first program to open is the event viewer to check the logs. There is also a little know script called EventQuery.vbs /auxsource which you run from the command prompt.
- System Configuration Utility – Msconfig.exe Sys.ini etc
- System Information. Programs, Accessories, System Tools
- Missing or corrupt file – System File Checker – sfc
- System Icon, Hardware, Device Manager, Device, Properties, Roll Back
- System Icon, Advanced, Startup and Recovery options
- Services (Administrative Tools)
- NTBTLog.txt
- Resource kit tools like Tasklist and Taskkill
- Performance Monitor Tool
If you like this page then please share it with your friends
More Topics for Disaster Recovery in Server 2008
- A plan for your disaster recovery tactics
- Boot – Troubleshooting.
- Backup – Which type?
- Log & Event Manager
- Restore – Horror stories
- RAID – Which number for your data?
- System State
- UPS – Neglect at your peril!
- Windows 8 Hyper-V
- EaseUs ToDo Backup Software
- Cluster Server – Deploy for fault tolerance
- NAS and SAN – Manage large databases
- Storage Server – Microsoft Product
- Volume Shadow Copy
- SUS – Software Update Services
Если на VPS сервере было установлено некорректное программное обеспечение или драйвера и удалить или внести изменения не получается, из-за того, что система работает не корректно, нужно запустить сервер в Безопасном режиме.
Рассмотрим проблему на примере удаления антивируса Avast с VPS сервера с системой Windows 2008 Standart R2
1. Запускаем в консоли конфигурацию системы командой msconfig

2. В разделе Загрузка отмечаем — Безопасный режим

3. В разделе Службы устанавливаем флажок: Не отображать службы Майкрософт и отключаем все службы связанные с Avast (так же можно отключить любые другие службы если не нужно их запускать при старте системы).
В разделе Автозагрузка аналогично можно настроить автоматический запуск приложений при старте Windows сервера.

4. Перегружаем систему, она будет загружена в безопасном режиме. Удаляем Avast (или любое другое ПО и драйвера которые работают не корректно). После открываем повторно Конфигуратор системы, снимаем флажок на вкладке Загрузка (флажок в разделе Параметры-Безопасный режим) и перегружаем систему.
После перезагрузки система будет запущена в обычном режиме.
Hello,
I’m having some troubles with getting a windows server 2008 r2 server into safe mode. After pressing F8, I choose «Safe Mode» and after a few seconds of loading files, the login screen appears. Then after another 2-3 seconds, the mouse freezes and the system automatically reboots [auto-reboot on failure/BSOD is disabled in the system; there isn’t any error message or BSOD when the system freezes and reboots].
It’s impossible to boot into safe mode. In normal mode, there are no issues.
I’m using a clean windows server 2008 r2 version. No third-party programs installed.
Code:
pveversion -v
pve-manager: 2.1-14 (pve-manager/2.1/f32f3f46)
running kernel: 2.6.32-14-pve
proxmox-ve-2.6.32: 2.1-74
pve-kernel-2.6.32-13-pve: 2.6.32-72
pve-kernel-2.6.32-14-pve: 2.6.32-74
pve-kernel-2.6.32-6-pve: 2.6.32-55+ovzfix-1
pve-kernel-2.6.32-10-pve: 2.6.32-63
pve-kernel-2.6.32-11-pve: 2.6.32-66
pve-kernel-2.6.32-12-pve: 2.6.32-68
pve-kernel-2.6.32-7-pve: 2.6.32-55+ovzfix-2
lvm2: 2.02.95-1pve2
clvm: 2.02.95-1pve2
corosync-pve: 1.4.3-1
openais-pve: 1.1.4-2
libqb: 0.10.1-2
redhat-cluster-pve: 3.1.92-3
resource-agents-pve: 3.9.2-3
fence-agents-pve: 3.1.8-1
pve-cluster: 1.0-27
qemu-server: 2.0-49
pve-firmware: 1.0-18
libpve-common-perl: 1.0-30
libpve-access-control: 1.0-24
libpve-storage-perl: 2.0-31
vncterm: 1.0-3
vzctl: 3.0.30-2pve5
vzprocps: 2.0.11-2
vzquota: 3.0.12-3
pve-qemu-kvm: 1.1-8
ksm-control-daemon: 1.1-1
Code:
uname -a
Linux proxmox 2.6.32-14-pve #1 SMP Mon Aug 6 06:47:11 CEST 2012 x86_64 GNU/Linux
I’ve already tried to remove the network device, changed the display mode, disabled hdd-cache and changed the processor type. But nothing helped.
Does anyone know how to solve this problem, so I can boot into safe mode?
Edit:
I’ve setup a completly new proxmox server and did a new install of windows server 2008 r2 there. But still the same problem. I’m using the evaluation version of windows server 2008 r2 + sp1. I’ve already tried to install the latest proxmox and windows updates (and rebooted the whole system several times). But safe mode is still not working
Edit 2:
Okay, I have found out that safe mode is working with the MSDN version of windows server 2008 r2, but not with the evaluation version, that can be found here: http://technet.microsoft.com/en-us/evalcenter/dd459137.aspx
I don’t know why, but there must be a significant difference between these versions.
Last edited:
Решил, почему у меня еще нет заметки, как если система Windows работает как виртуальная машина под виртуализацией на базе связки Debian 10 + Proxmox 6.4-13, что нужно сделать если система Windows Server 2012 R2 Std, а нужно срочно загрузится в Safe Mode режиме, какие действия предпринять. Просто, когда наступит такой момент будет не очень приятно, если обычные действия, как если бы не было виртуализации работали, а как быть тут.
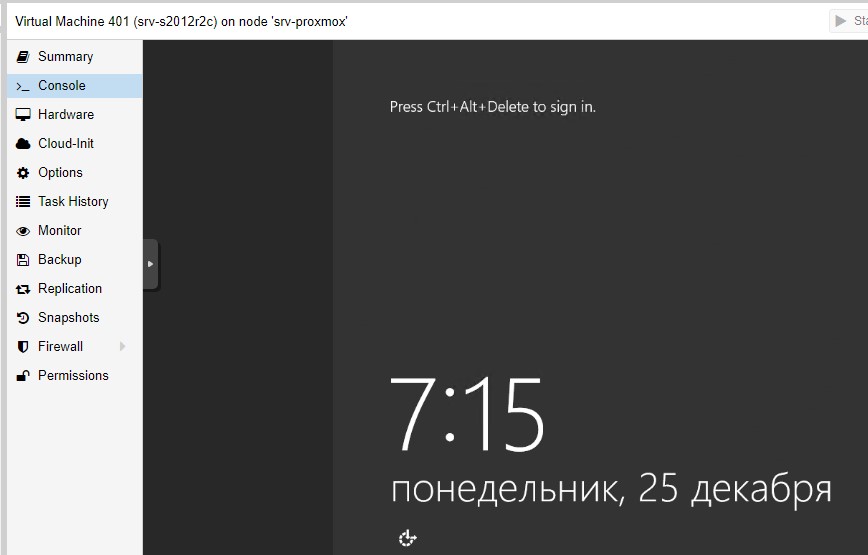
Шаг №1: Отправляем через Web-интерфейс систему в перезагрузку и нажимаем F8 надеясь, что попадем в безопасный режим (Safe Mode), но увы система просто загружается.
Шаг №2: Что, если нет возможности авторизоваться в системе, а нужно чтобы система загрузилась в безопасном режиме.
В этом случаем понадобится образ Windows Server 2012 R2 Std с которого устанавливалась система.
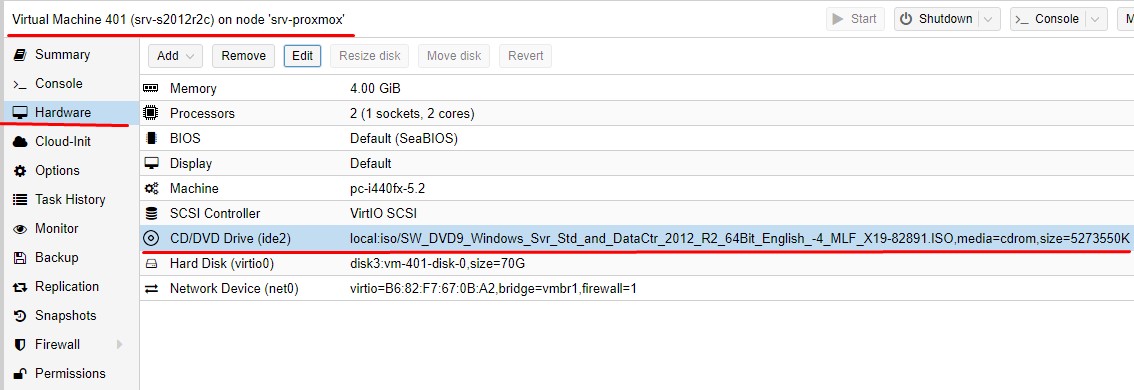
Закачиваем образ (SW_DVD9_Windows_Svr_Std_and_DataCtr_2012_R2_64Bit_English_-4_MLF_X19-82891.ISO) в Storage local
Подключаем образ в устройство CD/DVD Drive:
Изменяем порядок загрузки, сейчас стоит VM: Options - Boot Order: virtio0, ide2, net0 на ide2, virtio0, net
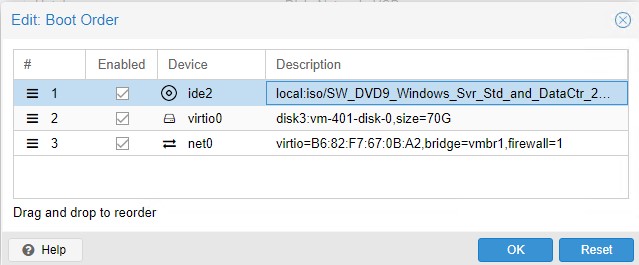
и нажимаем OK, отправляем систему не перезагрузку через Web-интерфейс Proxmox: VM: Shutdown - Reset, Yes, а выключаем дабы изменения, как и с чего грузится применились: Shutdown, Yes
Запускаем VM: Start
видим надпись белым цветом на черном фоне "Press any key to boot from a CD/DVD" нажимаем к примеру клавишу Enter
дожидаемся покуда загрузится меню
Language to install: English (United States)Time and currency format: English (United States)Keyboard or input method: US
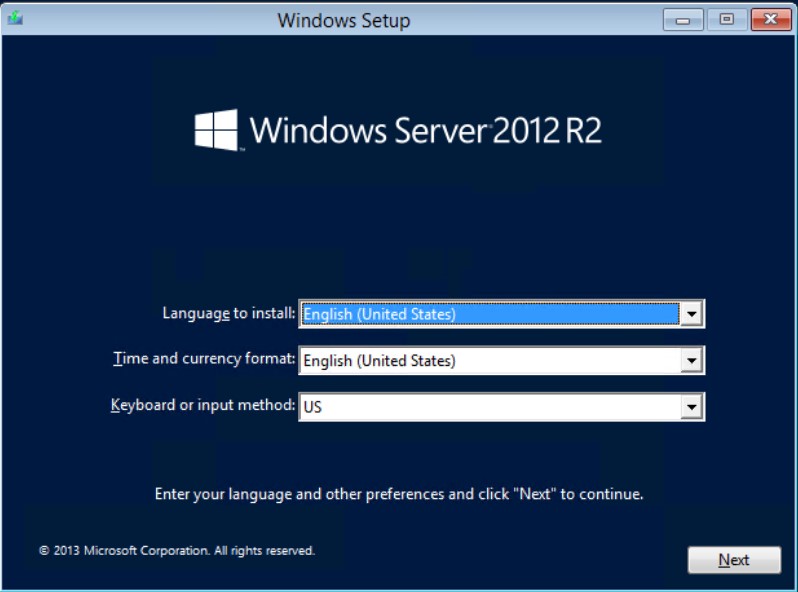
нажимаем Next — потом Repair your computer
затем переходим в Troubleshoot - Command Prompt
X:\Sources\bcdedit /set {bootmgr} displaybootmenu yes
X:\Sources\exit

после выключаем VM (Turn off your PC), включаем, опять, когда будет надпись на экране "Press any key to boot from a CD/DVD" уже просто начинаем нажимать клавишу F8, после чего мы оказываемся вот в таком вот меню:
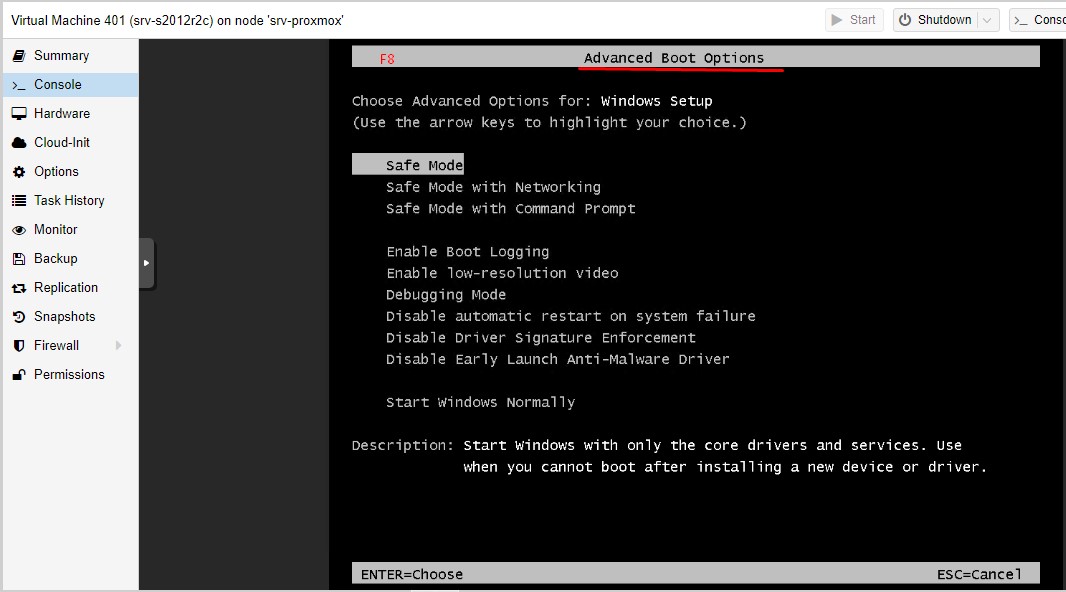
выбираем к примеру, Safe Mode и нажимаем клавишу Enter
На заметку: из действий выше подытог открытия меню Advanced Boot Options
Выключаем системуМонтируем установочный дискИзменяем порядок загрузкиВключаем системуКак только в Console видим надпись "Press any key to boot from a CD/DVD" нажимаем (не один раз, а нажимаем много-много раз) клавишу F8 покуда не отобразится Advanced Boot Options
После того, как Вы все действия выполнили в безопасном режиме выключаем VM и возвращаем все назад:
Отключаем монтирование установочного образаИзменяем порядок загрузкуВключаем VM
Шаг №3: Авторизуемся (с правами Администратора) в системе через >_ Console в виртуальной машине:
Win + R -> msconfig — вкладка Boot
Safe boot: отмечаем галочкой
и нажимаем Apply, OK и отправляем систему в перезагрузку
You may need to restart your computer to apply these changes. Before restarting, save any open files and close all programs.
Don’t show this message again.: галочку не ставлю

и нажимаю Restart, авторизуюсь и вот я в безопасном режиме

после того как сделали все что хотели в безопасном режиме, возвращаем настройку, т.е. отмечаем загрузку в безопасном режиме:
Win + R -> msconfig — вкладка Boot
Safe boot: снимаем галочку
и нажимаем Apply, OK и отправляем систему в перезагрузку, нажимаем Restart.
Итого, я сделал себе заметку, как можно на системе, которая развернута как виртуальная машина под Proxmox зайти в безопасный режим с целью которая Вам нужна, к примеру:
Как удалить ESET Endpoint Antivirus с Windows 10 Pro
и т.д. для чего Вам понадобилось использовать Safe Mode.
На заметку: от 25.12.2023
Можно просто когда система отправли в перезагрузку сразу же в Console нажимать клавишу F8 и вы получите режим/меню Advanced Boot Options и все выше с монтирование образа, изменением порядка загрузки не нужно. Вот к примеру как выглядит Advanced Boot Options если система Windows Server 2012 R2 Std с ролью Active Directory:
Repair Your ComputerSafe ModeSafe Mode with NetworkingSafe Mode with Command PromptEnable Boot LoggingEnable low-resolution videoLast Known Good Configuration (advanced)Directory Services Repair ModeDebugging ModeDisable automatic restart on system failureDisable Drive Signature EnforcementDisable Ealry Launch Anti-Malware DriverStart Windows Normally
На этом заметка завершена, с уважением автор блога Олло Александр aka ekzorchik.