
Windows Server 2008 R2 systems can use either the Windows Server Backup command-line tool, wbadmin.exe, or the PowerShell Windows Server Backup cmdlets. The command-line backup tool used for this example is named wbadmin.exe and can be accessed using a Command Prompt window. Wbadmin.exe is very functional and can be used to perform most of the functions available in the GUI.
Note
If
a full GUI edition of Windows Server 2008 R2 is deployed on the
network, the Windows Server Backup console can be used to remotely
manage a Server Core backup to keep management simple.
Understanding and becoming familiar and fluent with the command-line options of wbadmin.exe
is very useful for administrators who need to manage Windows Server
2008 R2 Server Core systems or who need advanced automation
capabilities. The following sections detail a few common tasks that can
be performed using wbadmin.exe.
Viewing Backup History
To view the backup history of a system, perform the following steps:
|
1. |
Log on to the Windows Server 2008 R2 system with an account with administrator privileges. |
|
2. |
Open a command prompt. |
|
3. |
Type in wbadmin.exe Get Versions and press Enter to list the backup history. |
To perform the same task using Windows PowerShell, perform the following steps:
|
1. |
Log on to the Windows Server 2008 R2 system with an account with administrator privileges. |
|
2. |
Click |
|
3. |
Type cd \ and press Enter. |
|
4. |
Type Add-PsSnapin Windows.ServerBackup and press Enter. |
|
5. |
To get the list of all of the available Windows Server Backup PowerShell cmdlets, type the command Get-Command *wb* -Commandtype cmdlet and press Enter. |
|
6. |
To get the history list, type Get-WbBackupSet and press Enter. |
Running a Manual Backup to Remote Storage Using wbadmin.exe
Using wbadmin.exe to
run backups can be tedious. To understand each of the options available
for a manual backup in a Command Prompt window, type wbadmin.exe Start Backup /?
and press Enter. To run a manual backup and store it on a remote server
share, a few options are required. The data will be stored on the
remote server share \\Server30\NetworkBackup,
the Bare Metal Recovery item, referred to as the AllCritical option
used in our example, will be selected for backup. This item includes all
volumes in use
by the system, including volumes that contain applications and shared
data folders, as well as the System State. For this example, the
companyabc\administrator account will be used to connect to the remote
share. To run the manual backup using the preceding criteria, perform
the following steps:
|
1. |
Log on to the Windows Server 2008 R2 system with an account with administrator privileges. |
|
2. |
Open a command prompt. |
|
3. |
Type wbadmin.exe Start Backup –backuptarget:\\Server2\NetworkBackup –AllCritical -user:companyabc\administrator –password:My$3cretPW! and press Enter to start the backup. |
|
4. |
The |
|
5. |
The backup progress will be detailed in the Command Prompt window. After the backup completes, type exit to close the Command Prompt window. |
To perform the previous
backup task using Windows PowerShell is a much more detailed task and
requires several steps to make this work. To perform a manual backup to a
network share capable of Bare Metal Recovery, perform the following
steps:
|
1. |
Log on to the Windows Server 2008 R2 system with an account with administrator privileges. |
|
2. |
Click |
|
3. |
Type cd \ and press Enter. |
|
4. |
Type Add-PsSnapin Windows.ServerBackup and press Enter. |
|
5. |
Type $BMRPolicy=New-WbPolicy and press Enter. |
|
6. |
Type $BMRCred=Get-Credential and press Enter. |
|
7. |
A |
|
8. |
Back in the PowerShell window, type $NetShareBackup=New-WbBackupTarget –NetworkPath \\Server30\NetworkBackup -Credential $BMRCred and press Enter. |
|
9. |
Type Add-WbBackupTarget –policy $BMRPolicy –Target $NetShareBackup and press Enter. |
|
10. |
Type Add-WbBareMetalRecovery –policy $BMRPolicy and press Enter. |
|
11. |
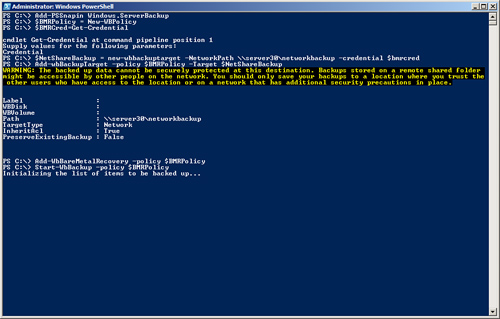
Type Start-WbBackup –policy $BMRPolicy and press Enter. The backup should start, as shown in Figure 1. Figure 1. Running a manual backup to a network share using PowerShell.
|
- Home
- »
- Operating System
- »
- Command line references
In this article I am going to explain about Wbadmin Command in Windows Server 2008 operating system and also explain it’s related syntax.
- 1627
Introduction
It enables us to restore and back up our operating system, files, folders, and applications from a cmd prompt. For configure a regularly scheduled backup, we must be a member of the Administrators group and to perform all other tasks with this command, we must be a member of the Backup Operators or the Administrators group, or we must have been delegated the appropriate permissions.
we can run it by following these steps:
- Click Start, click All Programs, and then click Accessories to open the Accessories menu.
- Start an elevated command prompt by right-clicking Command Prompt and then selecting Run As Administrator.
- In the Command Prompt window, enter the necessary command text or run a script that invokes Wbadmin.
Syntax
wbadmin get versions [-backupTarget:{VolumeName | NetworkSharePath}]
[-machine:BackupMachineName]
Ask Your Question Got a programming related question? You may want to post your question here Programming Answers here
- IT
- Cancel
Рассмотрим несколько особенностей использования Wbadmin и NETGEAR ReadyNAS Pro 2 в домене windows. Собственно резервное копирование в Windows server 2008 на сетевой ресурс можно выполнять только в ручную, резервное копирование по расписанию можно выполнять только на другой жесткий диск, чем они там в Microsoft думали неизвестно, облазил все форумы, но ничего умнее чем использовать утилиту Wbadmin не нашел, хотя говорят, что в Windows server 2008 R2 эту «особенность» исправили.
Итак приступим к описанию командной строки Wbadmin, в наших случаях используется следующая запись:
wbadmin start backup -quiet -include:c: -backuptarget:\\backupnas\backup\dc02
wbadmin start backup — запустить резервное копирование
-quiet — не спрашивать подтверждение (при запуске через планировщик без этой опции задача будет бесконечно ждать подтверждения которое никогда не будет получено)
-include:c: — Список дисков для которых выполняется резервное копирование (разделенные запятой)
-backuptarget:\\backupnas\backup\dc02 — Сетевой ресурс на который будет выполнено резервное копирование
В планировщике Windows это будет выглядеть следующим образом:
Задача резервного копирования выполняется от имени доменного пользователя backup. Сетевое хранилище ReadyNAS Pro 2 так-же введено в домен и вот тут-то и выползла некоторая особенность поведения этого хранилища в домене, казалось-бы права на доступ к сетевому ресурсу на хранилище для группы администраторы домены выдан, но папку для резервного копирования каждого сервера необходимо создавать именно от имени пользователя backup (чтобы пользователь backup становился владельцем этом папки) и ни один пользователь кроме backup этот ресурс не увидит 
You may choose to back up and recover your systems
with command-line tools. Specifically, in the case of a Windows Server
2008 R2 Server Core installation, two options are available to you; they
are the command-line tool wbadmin.exe (the command-line equivalent of the Windows Server Backup GUI) and PowerShell cmdlets.
Regardless of which tool you
use, the techniques, terminology. These tools provide the same capabilities as the GUI for Windows
Server Backup. Therefore, you do not need to relearn all the previously
mentioned information—the command-line versions are just an alternative
way to access the tools.
In this section, you will see how to back up and recover your systems with the command-line tools.
1. Use wbadmin.exe
Using the command-line tool wbadmin.exe
provides you with a method to create scripts for backup as well as a
method to back up servers like Server Core installations where there is
no GUI present. Table 1 describes some of the common switches for the wbadmin.exe backup. For more information on how to use wbadmin.exe, in a command prompt, type the following command and hit Enter:
wbadmin /?
Table 1. wbadmin.exe Common Switches
Switch
Explanation
enable backup
Allows you to modify or create a backup schedule
start backup
Performs a one-time backup
get disks
Lists the current disks available and online
start systemstatebackup
Allows you create a system state backup
start recovery
Begins the recovery process from an existing backup
1.1. wbadmin.exe Examples
Here are some examples on how you can use wbadmin.exe to perform the various tasks of backup and recovery.
Before you back up the systems,
you will need to see what drives are available on the system. When you
create a backup, you can use the drive letter if one exists, or you will
need the disk identifier. To see what drives are available, run the
following command:
wbadmin get disks
use, the techniques, terminology. These tools provide the same capabilities as the GUI for Windows
Server Backup. Therefore, you do not need to relearn all the previously
mentioned information—the command-line versions are just an alternative
way to access the tools.
provides you with a method to create scripts for backup as well as a
method to back up servers like Server Core installations where there is
no GUI present. Table 1 describes some of the common switches for the wbadmin.exe backup. For more information on how to use wbadmin.exe, in a command prompt, type the following command and hit Enter:
you will need to see what drives are available on the system. When you
create a backup, you can use the drive letter if one exists, or you will
need the disk identifier. To see what drives are available, run the
following command:
Your output will look similar to Figure 1.
Figure 1. Available online disks

The following command will
create a backup of the C and D drives and would occur daily at 4 a.m.
and 10 p.m. The backup would be stored on the disk {7caba166-0000-0000-0000-000000000000}.
wbadmin enable backup
-addtarget:{7caba166-0000-0000-0000-000000000000}
-schedule:04:00,22:00 -include:c:,d:
If you wanted the backup to occur just once, the command would look like this:
wbadmin start backup
-backuptarget:{7caba166-0000-0000-0000-000000000000}
-include:c:,d:
The following command would back up the system state to the disk {7caba166-0000-0000-0000-000000000000}:
wbadmin start systemstatebackup
-backuptarget:{7caba166-0000-0000-0000-000000000000}
To be able to restore items with wbadmin.exe, you need to know two things: the backup version identifier and what items are stored in the backup. You use wbadmin get versions
to find out what backups you currently have available. Specifically,
you are looking for the version identifier, which is formatted as a date
and timestamp. You would run the following command to see the items
backed up on June 30, 2009, at 2:05 p.m.
wbadmin get items -version:06/30/2009-14:05
The results would look similar to Figure 2.
Figure 2. wbadmin.exe get items

The following command would restore the C volume from the backup taken on June 30, 2009, at 2:05 p.m.:
wbadmin start recovery —version:06/30/2009-14:05
-itemType:Volume -items:c:
2. Use PowerShell
These cmdlets provide another tool to perform your server recovery. If
you choose to install the command-line tools for Windows Server Backup,
you will have access to the PowerShell backup and restore cmdlets as
well. Before you can run these tools, you have to verify the PowerShell
snap-in for backing up has been loaded.
To verify the tools have been loaded, run the following command from a PowerShell window. Then verify you see Windows.ServerBackup as the loaded snap-in.
Get-PSSnapin
If you do not see Windows Server Backup in your loaded snap-ins, you will need to run this command:
Add-PSSnapin windows.serverbackup
Working with the PowerShell is quite a bit more complex than working with wbadmin.exe
to perform backup tasks. You need to create a PowerShell script to
accomplish your tasks. Although PowerShell can be more complex, it does
offer some nice flexibility to performing backups. All the capabilities
of PowerShell are determined by what backup policy you set. The backup
policy for PowerShell is stored in an object called WBPolicy. The WBPolicy object contains all the settings for the backup, including the schedule, backup types, backup targets, and so on.
Working with PowerShell and backup, you need to understand how to set the values for the WBPolicy object. Table 2 describes some of the common PowerShell commands used for backup and recovery and how to set the parameters for WBPolicy. For a full listing of the PowerShell cmdlets for backing up the system, run the following cmdlet:
Get-Command *wb* -CommandType cmdlet
Table 2. PowerShell Backup Cmdlets
| cmdlets | Explanation |
|---|---|
| Get-WBPolicy | Displays the current settings for the WBPolicy object on the server |
| Set-WBPolicy | Allows you to set the parameters for the WBPolicy |
| Add-WBVolume | Adds a volume to the WBPolicy object to be backed up |
| Add-WBSystemState | Adds the system state to the WBPolicy object to be backed up |
| Set-WBSchedule | Sets the time for your daily backup schedule |
| Start-WBBackup | Starts a one-time backup |
| Get-WBJob | Shows the current status of a running backup job |
2.1. PowerShell Examples
As you can see in Table 8.5,
only a few of the commands are available to work with PowerShell in
Group Policy. This section gives a couple of examples to allow you to
get used to using PowerShell.
The following two lines will
back up your system with your current backup policy settings. You can
create a PowerShell script to run these commands, or you can run each
line separately by hitting Enter after each line:
$policy = Get-WBPolicy
Start-WBBackup -Policy $policy
This first line sets the $policy variable to the current settings in WBPolicy. The second line starts the backup process with settings currently in the WPObject object’s $policy variable.
The following script will
back up the C, D, and system state on your system to your Z drive.
Notice you will be using a variety of the Add cmdlets to modify the value of the variable $policy, as well as variables for target and paths:
$policy = New-WBPolicy
$volume = Get-WBVolume -VolumePath c:
Add-WBVolume -Policy $policy -volume $volume
$volume1 = Get-WBVolume -VolumePath d:
Add-WBVolume -Policy $policy -volume $volume1
Add-WBSystemState -Policy $policy
$target = New-WBBackupTarget -VolumePath Z:
Add-WBBackuptarget -Policy $policy -target $target
Start-WBBackup -Policy $policy
Reading Time: 3 minutes
I work in a shop where we are unable to roll out the latest version of Veritas’ NetBackUp (NBU) do to bugs. Although the version 6.5.3 now supports Windows 2008, it can’t provide a clean backup that can be trusted so we needed to find a way to roll out a backup product. So while we wait for Veritas to get its act together (One year and counting) we have chosen to backup our Windows 2008 physical machines using WBAdmin. Our virtual machines are all backed up via snapshotting technology so this is not a factor. So as we start to roll out physical machines I built this set of details (Which is still in flux). The nice thing about the details below is it will allow you to do a rebuild w/o having to preload anything. It even partitions the disk for you, this is really a slick technology.
What does this have to do with AD you might ask? Well we need to roll out 2008 and we have to have a reliable means to backup our DC’s, so this is it. I’m not sure if others are in the quandry we are but if so, I hope this helps out.
The info below is for backing up machines to an external disk using unc for the destination. Unfortunately you can’t schedule these through the backup gui. This option is only available for backing up a disk to another local disk, I’m not sure why WBAdmin won’t allow unc pathing but trust me that it won’t work. So you will have to build a scheduled task to run your nightly backup.
Hopefully the info below will be of assistance and please let me know of any issues you find with this article.
Backing up a Windows Server 2008 with snapshot enabled:
wbadmin start backup -backupTarget:\\servername\sharename -include:c:,e: -quiet –vssfull
wbadmin 1.0 – Backup command-line tool
(C) Copyright 2004 Microsoft Corp.
Retrieving volume information…
This would backup volume systems(C:) to \\servername\sharename.
Backup to \\servername\sharename is starting.
Creating the shadow copy of volumes requested for backup.
Running backup of volume systems(C:), copied (1%).
Running backup of volume systems(C:), copied (4%).
Running backup of volume systems(C:), copied (98%).
Backup of volume systems(C:) completed successfully.
Backup completed successfully.
Summary of backup:
——————
Backup of volume systems(C:) completed successfully.
Finding out the versions currently available to restore:
wbadmin get versions -backuptarget:\\servername\sharename
wbadmin 1.0 – Backup command-line tool
(C) Copyright 2004 Microsoft Corp.
Backup time: 11/25/2008 10:55 AM
Backup target: Network Share labeled \\servername\sharename
Version identifier: 11/25/2008-16:55
Can Recover: Volume(s), File(s), Application(s), Bare Metal Recovery, System State
Finding out what specifically is available within a version backup:
wbadmin get items -Version:11/25/2008-16:55
wbadmin 1.0 – Backup command-line tool
(C) Copyright 2004 Microsoft Corp.
Volume Id = {7896551d-751d-11dd-8929-806e6f6e6963}
Volume ‘systems’, mounted at C:
Application = Registry
Component = Registry (\Registry)
Recover a Failed System:
Boot up the machine with a W2K8 install disk
(Make sure to use the correct bit length x32 or x64)
… Windows is loading files…
Accept English
Next
Select Repair Your Computer
Click Load Drivers
Ok
Browse the media for the drivers (Make sure to use the correct bit length x32 or x64)
Click Add Drivers
Next
Would recommend you verify that you have a good network connection by checking the nic’s activity lights. I had issues with a nic on a couple of different occasions that boiled down to a bad network connection.
Select Windows Complete PC Restore
Cancel
Select Restore a Different Backup
Next
Select Advanced
Select Search for a backup on the network
Yes
\\ip address of server\sharename
Ok
Enter domain\domain user id and password
Select the backup to restore
Next
Select the drive(s) to restore
Next
Select Exclude Disks
Select any disk you may want to exclude from the restore
Select Advanced
Deselect Restart computer… (This is done for visual inspection to verify that the restore went correctly)
Next
Finish
Confirm reformatting
Ok