
Недавно я уже писал, как проверить SID на Windows 7 и Windows Server 2008 R2, сегодня я расскажу вам о том, как изменить SID на Windows Server 2008 R2 и Windows 7 с помощью Sysprep. Ранее для изменения SID применялась утилита NewSID, однако сейчас ее использование е поддерживается
Microsoft, кроме того, использовать ее в новых ОС, типа Windows Server 2008 R2, просто опасно. Поэтому для изменения SID вашего ПК лучше всего использовать sysprep, использовать эту утилиту достаточно просто, и далее я опишу всю последовательность шагов.
Работу Sysprep я протестировал в Windows Server 2008 R2, а также в Windows7.
Во-первых, нажмите кнопку Пуск->Run, наберите Sysprep и нажмите OK.

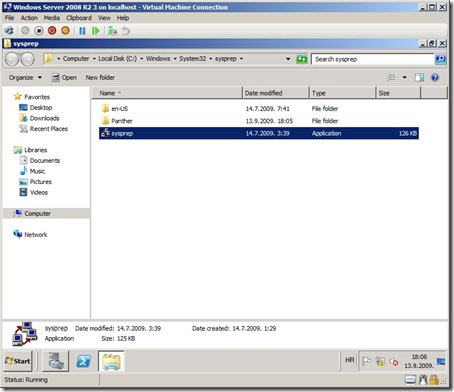
В результате откроется папка , расположенная в каталоге c:\Windows\System32. Запустите приложение sysprep.exe.
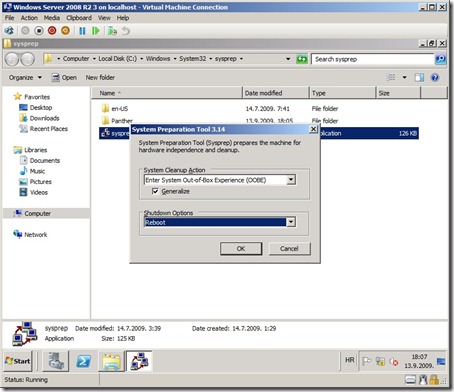
Перед вами появится окно System Preparation Tool 3.14. В качестве действия по очистке системы выберите Enter System Out-of-Box Experience (OOBE) . Если вы хотите изменить SID, то выберите опцию Generalize (внимание: она не выбрана по умолчанию). В качестве опции отключении (Shutdown Options) выберите Reboot
(перезагрузка).
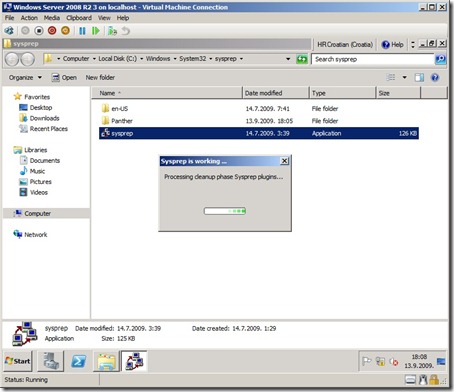
Выполнение процедуры sysprep займет некоторое время.
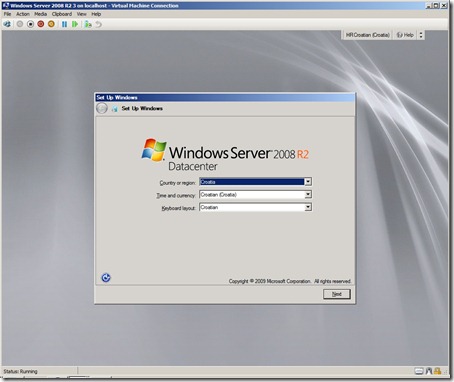
После перезагрузки вам придется указать ряд настроек, такие как страна, регион, время, дата и тип раскладки клавиатуры.
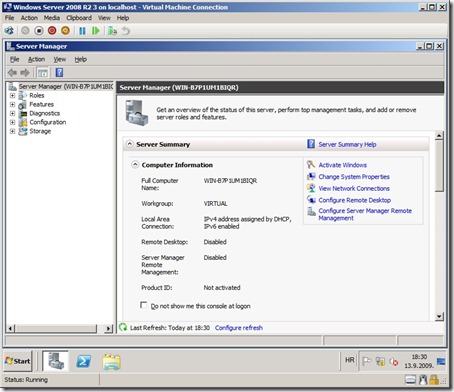
Кроме того, вам придется принять (ну или отклонить 🙂 ) лицензионное соглашение (EULA). Это все. После загрузки в консоли Server Manager вы можете убедиться, что все настройки изменились.
Теперь вы можете воспользоваться утилитой PsGetSid для того, чтобы узнать текущий новый SID вашей операционной системы.
About eighteen months ago, I blogged about how to run Sysprep for Windows Server 2008 and this has turned out to be the most popular article on this site by a long shot, so I figured I’d update it for Windows Server 2008 R2 (and Windows 7). If you never had the need to look at Sysprep in Windows Vista/2008, you’ll find that it’s nothing like what you’re used to on Windows Server 2003, XP, etc.
The first step is acquiring the Windows Automated Installation Kit (WAIK) and installing it on a machine. It will run fine on a Windows Vista or Windows Server 2008 machine. You can get it from Microsoft’s website at http://www.microsoft.com/downloads/details.aspx?displaylang=en&FamilyID=696dd665-9f76-4177-a811-39c26d3b3b34.
The tool of choice is the Windows System Image Manager (WSIM). When you start it you’ll get a blank screen like this:
The first step is to open the image file for the Windows SKU you want to build a sysprep file for by going to File>Select Windows Image:
Note: You may need to first create a catalog file before completing the preceding step. In order to do this, you’ll first need to copy the install.wim from your installation media DVD sources folder to the hard drive as the tool won’t work with it if it doesn’t have write access to the WIM file. You can then go to Tools>Create Catalog and create the catalog file.
All of the settings you will want to setup in your unattend.xml file are in the tree under Windows Image. The documentation for all the settings can be found in the Unattended Windows Setup Reference CHM file which ships with the WAIK. This link http://technet.microsoft.com/en-us/library/cc749272(WS.10).aspx shows a mapping table between the sysprep.inf file and the new unattend.xml format. This link is for Windows Vista but it still applies.
All of the various settings can be applied during different passes of the setup process which sysprep will trigger. You can read about these passes here. I built a simple unattend file just for sysprep’ing my base image which includes settings in the generalize, specialize, and oobeSystem passes. All of the settings I chose are outlined below.
My answer file tree:
Disabling the initial configuration dialog:
Disabling Server Manager from loading at first run:
Setting the Internet Explorer homepage to «about:blank», turning off the IE8 Accelerators, and disabling the first run wizard:
Setting Google as my default Search Provider in Internet Explorer:
Note: To do this, you should right click on SearchScopes and Insert New Scope.
There are two versions of Internet Explorer on a 64-bit machine – the 64-bit IE and the 32-bit one. You’ll need to set the settings for them independently. Duplicate the above IE configuration in the wow64_Microsoft-Windows-IE-InternetExplorer_neutral component:
Setting my product key, timezone settings, and my name:
Configuring localization settings – if you want something other than US English, look under Input Locales in the index of the Unattended Windows Setup Reference CHM file referenced earlier:
Configuring the screen resolution and color depth — 1280×960 is what works for me in VMWare full screen mode with the tabs across the top:
Configuring setup not to show me the EULA again:
Configuring setup to install a default local administrator account password:
One of the things that’s unlike Sysprep from Windows 2000 – Windows Server 2003 is that the unattend.xml file isn’t deleted at the conclusion of the Sysprep process. The down level Sysprep deletes the c:\sysprep folder when it finishes. In order to replicate this functionality, you can put a command in to delete the unattend.xml file in the SetupComplete.cmd batch file (which must be located in c:\windows\setup\scripts\) which gets called at the end of Sysprep.
I put a simple one line command in my SetupComplete.cmd file:
del /Q /F c:\windows\system32\sysprep\unattend.xml
In order to run Sysprep you’ll need a new command. The old Sysprep UI that was there in Windows 2000 — 2003 doesn’t really exist anymore. All of the Sysprep command line switches are documented at http://technet.microsoft.com/en-us/library/dd744330(WS.10).aspx.
sysprep /generalize /oobe /shutdown /unattend:unattend.xml
The way we use to Sysprep windows machine are changed in Windows Server 2008. I should admit that it’s lot simpler and less painful to Sysprep Windows Server 2008 than any of the previous versions of Windows.
The way we use to Sysprep windows machine are changed in Windows Server 2008. I should admit that it’s lot simpler and less painful to Sysprep Windows Server 2008 than any of the previous versions of Windows.
You can find complete detail about Sysprep on Sysprep for Windows Microsoft web site. In a nutshell, it allows us to re-use one of your virtual machine with new name i.e. to make cloned images on VPC or VMware etc. The Sysprep removes system specific information such as SID, reset Administrator password and reset the windows product activation.
Steps required to Sysprep Windows 2008 Servers:
- Run Sysprep.exe tool at the windows command prompt.
You can find Sysprer.exe at c:\Windows\System32\sysprep\sysprep.exe
- A System Preparation Tool 3.14 will be presented. Specify the following settings before clicking the OK button.
- Choose «Enter System Out-of-Box Experience (OOBE)» in the System Cleanup Action Setting.
- Check the «Generalize» check box to regenerates the computer security identifier (SID).
- Select «Shutdown» option for Shutdown configuration.
- Click «OK» to start Sysprep work.
- The Windows Server 2008 will be shutdown itself.
Note: If you have already copied VHD file (VPC) or VMDK file (VM Ware) for new virtual machine, then you can choose to select «Reboot» option in the Shutdown Options Settings in the Sysprep tool. Once you restart the Windows Server 2008 machine, you will see the following screen shot. After couple of minutes, you will be asked to specify Time Zone, Language and reset the admin password.
For more SharePoint article, please visit my blog site at www.mossgurus.com/adnan
With Windows Server 2008 the newSID tool can no longer be used in combination with imaged deployment of servers. A deployment method that becomes even more important in Server Virtualization and Provisioned Infrastructures. Microsoft has improved the sysprep tooling by using XML config files and introducing the Microsoft Windows Automated Installation Kit (WAIK) to create the unattended answer files. For Windows Vista SP1 and Windows Server 2008, the WAIK version 1.1 can be downloaded here.
For Windows Server 2008 R2 and Windows 7 a different WAIK is to be used, which can be found here.
This post offers step-by-step instructions for the use of the WAIK to setup sysprep.
Windows Server 2008 installation files.
Sysprep uses the Windows Server installation and configuration files (install.wim and *.clg files). These files need to be available during the initial boot of the preparated system, either locally or through a network share. For this article I’ve copied the installation files (located in the sources subfolder of the DVD) to a local folder on the Windows Server.
| Screens | Actions |
|---|---|
|
W2K8 Install Files |
|
The Windows System Image Manager (explained next) needs to have write access to the install.wim file, so make sure the folder and/or file are given enough access rights.
Windows System Image Manager.
The easiest way to create the XML answer file for the sysprep proces, is to use the Windows System Image Manager (WSIM), which is installed by the Microsoft WAIK.
| Screens | Actions |
|---|---|
|
Windows System Image Manager |
|
|
Windows System Image Manager (2) |
|
|
Windows System Image Manager (3) |
|
|
Catalog File Out of Date |
|
|
Create New Answer File |
|
… now you are ready to add the different pre-defined settings to your answer file.
Sysprep Answer File Settings
In order to understand the effect of the different settings in the answer file, you need to understand the different stages during the Windows Setup Configuration Passes.
The stages that are most important for our sysprep settings are:
- generalize: A setting in the generalize pass enables you to automate the behavior for all deployments of this reference image. In comparison, a setting associated with the specialize configuration pass enables you to override behavior for a single, specific deployment.
- oobeSystem: The oobeSystem pass configures settings that are applied during the first-boot experience for end users, also called Windows Welcome.
- specialize: During the specialize pass of Windows Setup, machine-specific information for the image is applied.
Assign the settings you want to include in your sysprep file to one of the above stages.
* Building the Answer File
To build your answer file, use the following instructions:
| Screens | Actions |
|---|---|
|
Add sysprep setting |
|
|
Config Answerfile Setting |
|
* Answer File Options
You can set the following options for your answer file:
| Windows Setting | Answer File Setting & Options | Config Pass |
|---|---|---|
| Disable Initial Configuration Dialog | amd64_Microsoft-Windows-OutOfBoxExperience__neutral
|
generalize |
| Disable Server Manager Popup | amd64_Microsoft-Windows-ServerManager-SvrMgrNc__neutral
|
generalize |
| Product Key, Timezone and Registration Info | amd64_Microsoft-Windows-Shell-Setup__neutral
|
specialize |
Timezone: For a complete list of supported time zone entries, check the values listed in the registry under
HKLM\SOFTWARE\Microsoft\Windows NT\CurrentVersion\Time Zones.
Or you can use the tzutil command-line tool which is installed by default on Windows 7.Examples are:
- GMT Standard Time for Greenwich Mean Time (GMT) which is also known as Coordinated Universal Time (UTC).
- W. Europe Standard Time for (UTC+01:00) Amsterdam, Berlin, Bern, Rome, Stockholm, Vienna)
| Windows Setting | Answer File Setting & Options | Config Pass |
|---|---|---|
| Screen Resolution & Color Depth | amd64_Microsoft-Windows-Shell-Setup__neutral * Display
|
oobeSystem |
| Do Not Show EULA again | amd64_Microsoft-Windows-Shell-Setup__neutral * OOBE
|
oobeSystem |
| Default Local Admin account password | amd64_Microsoft-Windows-Shell-Setup__neutral * UserAccounts – AdministratorPassword
|
oobeSystem |
| Input Locale & Language settings | amd64_Microsoft-Windows-International-Core__neutral
|
oobeSystem |
Input Locale: Input language and keyboard layout for a Windows installation.
You can either use the language identifier (en-US) or specify the locale ID and keyboard layout hexadecimal values (0409:00000409). The first value (0409) is the locale ID that represents the input language and the second value (00000409) is the keyboard layout value. Valid keyboard layout values are listed in the registry key:
HKLM\SYSTEM\ControlSet001\Control\Keyboard Layouts.
Multiple entries are seperated by semicolons.
For a list of the Default Input Locales, see Supported Language Packs and Default Settings.Examples are:
- United States – International = 0x00020409
- Dutch = 0x00000413
SystemLocale: Language used to display the text in menus and dialog boxes for programs that do not use Unicode.
UILanguage: Language of the user interface to use during Windows Setup or Windows Deployment Services (required for all unattended installations).
UserLocale: Language that is set for the (Default User Profile) Region and Language Options (Currency and Formats).
For a list of the Language Pack Default Values, see Available Language Packs.Examples are:
- Dutch (Netherlands) = nl-NL or 0x0413
- English (United States) = en-US or 0x0409
To add Internet Explorer Enhanced Security Configuration (IE-ESC) settings to you answer file, use the following options:
| Windows Setting | Answer File Setting & Options | Config Pass |
|---|---|---|
| Internet Explorer Security settings | amd64_Microsoft-Windows-IE-ESC__neutral
|
specialize |
Be aware that on 64-bits Windows Servers there can be two versions for the Application Settings. The application can have a 32-bits and a 64-bits version installed on the 64-bit machine (like Internet Explorer).
You’ll need to set the settings for both versions independently in the answer file. Duplicate the amd64 configuration settings in the wow64 component for the same settings.
In case you want to use the image for your Server virtualization environment (or TestLab) and you have a MAK for activating your Windows Server 2008, you can consider to have sysprep skip the rearm process:
| Windows Setting | Answer File Setting & Options | Config Pass |
|---|---|---|
| Internet Explorer Security settings | amd64_Microsoft-Windows-Security-Licensing-SLC__neutral
|
generalize |
Running Sysprep
After creating the answer file for the unattended installation, you are ready to run sysprep and use your answerfile.
* sysprep commandline options:
Use the following commandline options to start sysprep in unattended installation mode:
c:\windows\system32\sysprep\sysprep.exe /generalize /oobe /shutdown /unattend:[xml-answer-file]
Which uses the following additional syntax:
- xml-answer-file: The XML answer file build with the WSIM tool.
The sysprep proces will automatically run the Setupcomplete.cmd script if it is found at the following location c:\windows\setup\scripts. Use this file to delete the xml-answer-file or run other post-install commands.
Sysprep will not automatically delete the xml-answer-file itself.
Esther has been working in different roles and functions as an IT consultant ever since she finished her Masters degree in Computer Science in 1997. She has worked as a web developer, database administrator, and server administrator until she discovered how Server-Based Computing ( SBC ) combined servers, desktops, and user experience in one solution. Esther has been specializing in virtualization solutions such as SBC, VDI, application, and server virtualization for over eight years now and is currently working as a Senior Consultant at PepperByte, where she designs and implements Citrix® solutions for both small-business and large-enterprise infrastructures scaling from 100 to 15,000 users.
In january 2014 her first book Citrix XenApp 6.5 Expert Cookbook was published by Packt Publishing.
Esther is awarded as a Citrix Technology Professional (CTP) from 2015 — 2017.
Esther is awarded as a Microsoft Most Valuable Professional (MVP) in 2017.
Esther is a Citrix Certified Expert – Virtualization (CCE-V), Citrix Certified Professional – Mobility (CCP-M), Citrix Certified Professional – Networking (CCP-N) and RES Software Certified Professional (RCP).
7,795 Views
Creating a base image can save you a lot of time when deploying new servers in your network.
With a base image you for example can update your installation with the latest Windows Updates, install drivers or basic software.
Probably the best part is, that in Server 2008R2 sysprep is allready a part of the initial installation, so no need for a seperated download or copy .. it can be found in: C:\Windows\System32\Sysprep
When starting the utility you will get the following screen
The following options are available:
System Cleanup Action
- Enter System Out-of-Box Experience (OOBE)
(OOBE will start with the Windows Welcome screen) - Enter System Audit Mode
(Audit mode is used by OEMs and corporations to add customizations to their Windows images)
Generalize
- Checking this option will reset your SID
Shutdown Options
- Quit
- Reboot
- Shutdown
You will probably use the following settings:
- Enter System Out-of-Box Experience (OOBE)
- Generalize checked
- Shutdown
Check Also
Howto open your Internet Explorer window maximized
A little howto blogpost: Open your Internet Explorer window maximized Windows can remember how you …