
Windows 2008 сервер работал много лет, устройства хранения необходимо заменить или обновить на более крупные диски. Наиболее распространенной проблемой после обновления диска является то, что вы не можете использовать все дисковое пространство. Например, вы можете использовать только 2 ТБ на диске объемом 4 ТБ, оставшееся пространство нельзя использовать для создания нового тома или расширения на другой в Disk Management. В этом случае вам необходимо конвертировать MBR диск в GPT. На диске MBR вы можете создать максимум 4 основных раздела, если вы хотите создать больше, вам также нужно изменить диск с MBR на GPT. В этой статье рассказывается, как преобразовать MBR в GPT в Windows Server 2008 R2 без потери данных.
Содержание:
- Конвертировать MBR в GPT в Server 2008 R2 Управление дисками
- Метод одним щелчком мыши для изменения MBR на GPT для несистемного диска
- Конвертировать системный диск с MBR2GPT команду
Конвертировать MBR в GPT в Server 2008 R2 Управление дисками
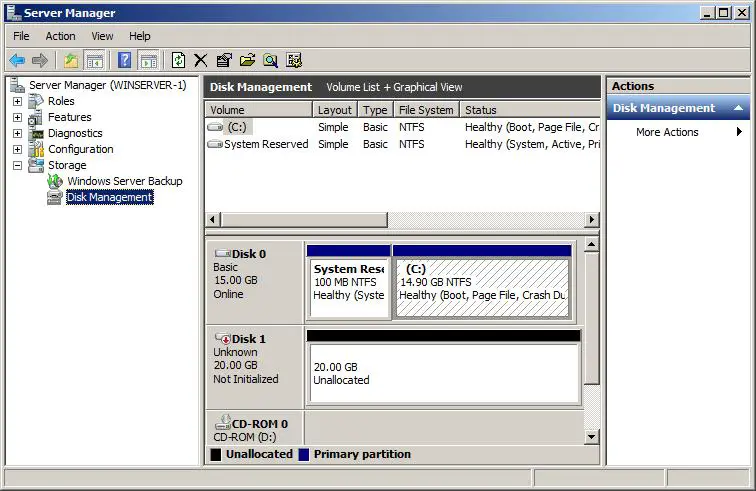
Windows Server 2008 Встроенное управление дисками позволяет преобразовывать диск между MBR и GPT, но вы должны удалить все разделы на этом диске заранее. В противном случае эти опции будут неактивны. Как вы видите на моем тестовом сервере, на диске 1 есть диски F: и H:.
Когда я щелкаю правой кнопкой мыши по этому диску, «Конвертировать в GPT-диск» опция неактивна и отключена.

После удаления этих двух разделов, «Преобразовать в GPT-диск«опция включена.

Очевидно, что удалять все разделы на диске — не очень хорошая идея. Вы не можете преобразовать системный диск из MBR в GPT в Server 2008 Управление дисками, потому что раздел C не может быть удален. Есть лучшие методы конвертации MBR в GPT в Windows Сервер 2008 без потери данных. Методы преобразования системного диска и несистемного диска различаются, следуйте соответствующему методу ниже.
Метод 1: Метод изменения MBR на GPT для несистемного диска в один клик
Если вы хотите преобразовать диск из MBR в GPT, когда на нем нет операционной системы, это можно сделать очень просто и быстро с помощью NIUBI Partition Editor.
Скачать эту программу, и вы увидите все разделы диска со структурой и другой информацией справа.
Как конвертировать MBR в GPT в Windows Server 2008 R2 NIUBI:
Щелкните правой кнопкой мыши по передней части MBR-диска (здесь — Диск 1) и выберите «Конвертировать в GPT-диск».

Затем в левом нижнем углу создается ожидающая операция, нажмите Применить выполнить.

Посмотрите видео как преобразовать диск из MBR в GPT в Windows Server 2008 R2:

Метод 2: Конвертировать системный диск с помощью MBR2GPT командовать в Server 2008 R2
Немного сложно конвертировать диск MBR в GPT с операционной системой. Помимо сохранения всех файлов в целости и сохранности, сервер должен успешно загрузиться. Любая небольшая ошибка приводит к повреждению системы или сбою загрузки. Некоторые сторонние программы имеют возможность конвертировать системный диск из MBR в GPT. Но всегда рекомендуется конвертировать с помощью MBR2GPT.exe, который предоставляется Microsoft.
MBR2GPT работает через командную строку, это встроенный инструмент из Windows 10 и Server 2019. Windows Server 2008 нет такого инструмента, вам нужно скачать Windows Server 2019/2022 ISO от Microsoft и создайте загрузочный DVD или USB-флешку. Если вы запустите Windows 2008 как гостевой сервер в VMware/Hyper-V, вам просто нужно выбрать этот ISO-файл и загрузиться с него.
① Предварительное условие для запуска mbr2gpt.exe в Server 2008 R2
Преобразовать MBR в GPT легко в Windows Server 2008 MBR2GPT командной строки, но конфигурация разделов вашего диска должна соответствовать следующим требованиям:
- На системном диске может быть максимум 3 основных раздела.
- Один из разделов установлен как «Активный» и является системным разделом.
- На системном диске нет логического диска.
- Все разделы на диске должны поддерживаться Windows. Это означает, что для Linux/Mac нет EXT2/EXT3 или других типов разделов.
Если какая-либо из этих проверок завершится неудачно, преобразование не будет продолжено и будет возвращена ошибка, поэтому не беспокойтесь о безопасности системы и данных.
Некоторые люди получают ошибку при преобразовании системного диска — «Проверка разметки, размер сектора диска: 512 байт. Проверка разметки диска не удалась для диска 0», «MBR2GPT: Конвертация не удалась». Это частая ошибка, связанная с ошибкой проверки структуры раздела. Если конфигурация раздела вашего диска не соответствует требованиям, выполните следующие действия, чтобы внести изменения.

② При необходимости измените тип и макет раздела.
Press Windows и R вместе на клавиатуре наберите diskmgmt.msc и нажмите Enter. Затем вы увидите диск с разметкой разделов и другой информацией в Server 2008 Управление диском. Проверьте структуру разделов диска, если ее нужно изменить.
❶ Преобразовать тип раздела:

На этом скриншоте D: — логический диск. В этой ситуации вам нужно преобразовать D в основной раздел NIUBI Partition Editor.
Примечание: перед конвертацией с помощью все разделы должны быть первичными. MBR2GPT команда.
❷ Перенести раздел на другой диск:

На этом снимке экрана видно 4 основных раздела на Диске 0. В этой ситуации вам необходимо переместить раздел на другой диск с NIUBI Partition Editor.
Примечание: на MBR-диске может быть максимум 3 основных раздела.
③ Шаги по преобразованию MBR в GPT в Windows Server 2008 R2 mbr2gpt команду
Шаг 1: Скачать Windows Server 2019 ISO и создайте загрузочный DVD или флешку.
В VMware/Hyper-V виртуальный сервер, вам просто нужно выбрать этот ISO-файл и загрузиться с него.

Шаг 2: Перезагрузите сервер и загрузитесь с загрузочного DVD или USB-накопителя, когда он попросит вас «Установить сейчас», не нажимайте на него, нажмите «Восстановление системы«внизу слева. Затем нажмите «Устранение неполадок» > «Командная строка» в следующем окне.

Шаг 3: Вам просто нужно ввести 2 команды для преобразования системного диска MBR в GPT:
- Тип CD .. и нажмите Enter.
- Тип mbr2gpt /конвертировать и нажмите Enter.
В течение короткого времени, MBR2GPT преобразование отчетов завершено успешно.

Посмотрите видео как конвертировать MBR диск в GPT в Windows Server 2008 R2 MBR2GPT команда:
В итоге
Требуется больше шагов для преобразования системного диска MBR в GPT в Server 2008 MBR2GPT команда, но это безопаснее, чем другие инструменты. Если на этом диске нет операционной системы, MBR2GPT команда не работает, но конвертировать MBR в GPT очень просто Server 2008 R2 NIUBI Partition Editor. Помимо преобразования MBR в GPT, этот инструмент поможет вам преобразовать раздел NTFS в FAT32, преобразовать между первичным и логическим. Он также поможет вам копировать, сжимать, расширять, объединять, перемещать, дефрагментировать, стирать, скрывать разделы, оптимизировать файловую систему и многое другое.
Скачать
| Previous | Table of Contents | Next |
| Configuring Windows Server 2008 R2 Remote Administration | Creating and Managing MBR Disk Partitions on Windows Server 2008 R2 Basic Disks |
<google>BUY_WINSERV_2008R2</google>
The purpose of this chapter of Windows Server 2008 R2 Essentials is to provide an overview of the decisions and steps necessary to add new disk drives to a Windows Server 2008 R2 system. Installing a new disk drive is not just about formatting the drive and creating volumes. With Windows Server 2008 R2 decisions need to be made about the partitioning style, since both Master Boot Record (MBR) and GUID (Globally Unique Identifier) Partition Table (GPT) disks are supported in this latest version of Windows.
Given this requirement, this chapter will also provide an explanation of the differences between MBR and GPT disks. The concepts described in this chapter relate primarily to basic disks. Dynamic disks will be covered in detail in a later chapter.
Contents
Contents
|
||
An Overview of MBR and GPT Partitions Styles
Before a Windows Server 2008 R2 disk can be used to store data it must first have partitions created on it. Once created, these partitions are subsequently formatted with a particular file system (FAT, FAT32 or NTFS) and used either as a basic disk or as dynamic disk. Obviously, the operating system needs some mechanism for organizing and managing these disk partitions and Windows Server 2008 R2 provides two such partitioning styles named Master Boot Record (MBR) and GUID Partition Table (GPT).
The MBR style was originally developed for x86-based computer systems and is by far the most common style in use at present. GPT, on the other hand, was originally developed for 64-bit Itanium based systems. With the arrival of Windows Server 2008 both x86 32-bit and 64-bit systems supported MBR and GPT partition styles. It is important to note, however, that 32-bit systems can only boot from MBR based disks and 64-bit systems can only boot from GPT disks. This, of course, is only relevant in the case of the original Windows Server 2008 release since the R2 release is only available in 64-bit.
Understanding MBR Disks
With MBR the first sector of the disk is reserved to store a partition table and the master boot record. The remainder of the disk is divided into partitions, information about which is stored in the partition table. MBR supports volume sizes up to 4TB.
MBR on a basic disk supports two partition types, primary and extended. The primary partition has a file system created directly on it and is then either assigned a drive letter or mount point by which it is referenced by the user. An extended partition is divided into one or more logical drives, each of which is then formatted and then assigned drive letter or mount point.
A basic disk with MBR partition style can support either four primary partitions or three primary partitions and one extended partition (which in turn can support multiple logical volumes).
Understanding GPT Disks
GPT disks differ quite considerably from MBR disks. In terms of capability, GPT supports disks up to 18 Exabytes in size with up 128 partitions. GPT also differs from MBR in terms of layout.
At the start of a GPT disk is an MBR. The MBR in this case, however, is provided purely so that the disk will be recognized by disk utilities that do not recognize GPT disks. To an MBR disk utility, the disk will appear to be an MBR disk with a single partition taking up the entire disk space.
Located immediately after the MBR is the primary GPT header. This header defines the blocks on the disk available for partitions and contains information about the number and respective sizes of any partitions on the disk. The GPT header also includes information about its own location on the disk drive and a pointer to a backup GPT header located in the final sectors of the drive. The backup GPT header is used in the event that the primary header becomes corrupted. Finally, the GPT header contains a CRC32 checksum of itself (including the partition table) so that the system firmware can verify the integrity of the header information before accessing the data on the disk. If the checksum fails, the firmware switches to the backup GPT header. If the checksum on backup GPT header also fails the disk is unusable.
In between the primary GPT header at the start of the disk and backup GPT in the final sectors of the disk are the primary partitions. In addition to any data, each partition on a GPT disk has a header containing information about the partition type, the start and end blocks of the partition and a unique partition GUID.
There are a number of additional partitions often required on a GPT disk. These are the EFI system partition (ESP) and the Microsoft Reserved Partition (MSR). The ESP must be present on the first disk in a system and is required to boot the operating system. The ESP is not mandatory on other disks. When Windows Server 2008 R2 is installed both the ESP and MSR are created by the setup process.
One important point of note regarding GPT is that it is not supported on removable disks such as USB connected storage devices or disks attached to storage clusters.
Initializing a New Disk
Once a new disk has been installed into a Windows Server 2008 R2 system it must first be initialized before any partitions can be created on it. This is performed using the Initialize Disk Wizard which can be accessed from the Disk Management snap-in or from the command prompt using the diskpart tool (covered in the next section). This can be accessed either from the Server Manager or Computer Management tools. To launch the Server Manager open the Start menu and click on the Server Manager option, or click on the Server Manager icon located in the task bar. Alternatively launch Computer Management from Start -> All Programs -> Administrative Tools -> Computer Management or run compmgmt.csc.
With either the Server Manager or Computer Management tools running, select the Storage option from the left hand panel followed by Disk Management. The Disk Manager will subsequently appear. Ensure that the top pane is displaying the Disk List so that the new drive is visible. This is configured by selecting the View->Top-Disk List option from the top menu bar. Any uninitialized disks will be listed in the disk view as Offline and with a red down arrow on the disk drive icon in both the list and graphical views. In addition, the disk space will be indicated as unallocated in the graphical view. The following image shows a newly installed and uninitialized disk drive shown in the Disk Manager:
Typically, if the disk management tool detects an uninitialized disk it will automatically display a dialog box providing the option to initialize the disk before proceeding:
<google>WIN28BOX</google>
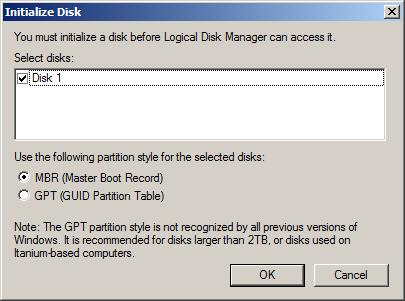
To initialize the disk at this point simply select the desired partition style and click on the OK button to begin the process. Should you decide to initialize the disk at a later time simply dismiss the dialog by selecting the Cancel button. To subsequently initialize the disk right click on the box to the left of the graphical depiction of the disk space (where the disk number, size and status are listed) and select Initialize Disk. In the resulting dialog ensure that the correct disk is selected for initialization and then choose whether to initialize the disk using the MBR or GPT partition styles. Click on OK to initialize the disk. Once completed, the disk will be listed with the chosen partition style with the space marked as Unallocated in the graphical view. In addition, the disk status will have changed from Not Initialized to Online. The next step is to create partitions on the disks or use them as dynamic disks. These topics are covered in subsequent chapters.
Converting Disks between MBR and GPT Partition Styles
Once a disk has been initialized as GPT or MBR it is quite possible that one day the disk partition style will need to be changed. There is good news and bad news regarding converting partition style in Windows Server 2008 R2. The good news is that this can be achieved either using the Disk Management tool or from the command line using diskpart. The bad news is that conversions can only be performed on empty disks. This means that any pre-existing volumes on the disk must be backed up and deleted before performing the conversion.
To perform a conversion from the Disk Management interface, right click on the icon for the empty drive in the graphical view. If the disk is currently using MBR then the menu will provide the option to Convert to GPT Disk. Alternatively, if the disk is currently using the GPT partition style the Convert Disk to MBR menu option will be presented. In either case, selecting the conversion option will immediately and silently change the partition style.
To perform the same task using diskpart, begin by opening a command prompt window with administrative privileges (right click on the Command Prompt icon in the start menu and select Run as administrator). At the command prompt enter diskpart to start the tool and begin by listing the available disks:
DISKPART> list disk
  Disk ###  Status      Size     Free     Dyn  Gpt
  --------  ----------  -------  -------  ---  ---
  Disk 0    Online        30 GB      0 B
  Disk 1    Online        10 GB    10 GB
Select the desired disk (in this case disk 1):
DISKPART> select disk 1
Disk 1 is now the selected disk.
Finally, convert the disk using the convert command followed by mbr or gpt depending on whether the disk is being converted to MBR or GPT partition style respectively:
DISKPART> convert mbr
DiskPart successfully converted the selected disk to MBR format.
DISKPART> convert gpt
DiskPart successfully converted the selected disk to GPT format.
Type exit to close the diskpart session and return to the command prompt.
<google>BUY_WINSERV_2008R2_BOTTOM</google>
-
Home
-
Partition Magic
- How Do I Convert MBR to GPT without Data Loss in Windows 2008
By Irene |
Last Updated
MBR and GPT are two partition styles. GPT disk has many advantages over MBR disk and many users change MBR to GPT. However, some users reported that they were unable to convert MBR to GPT without data loss Windows 2008. This article shows how to convert MBR disk to GPT disk without data loss Windows 2008.
Several months ago I bought a 3TB hard disk for my Windows Server 2008 desktop (only for data storage). I initialized it to MBR and partitioned to 3 drives with 1TB unallocated space left for future use. However, when I planned to create a new drive with the unallocated space, Disk Management refused my operation. Then I googled and found MBR just allows me to use the maximum space of 2TB, and I was suggested to convert it to GPT. How can I convert an MBR disk to GTP without any data loss in Windows Sever 2008?
Have you ever met the above problem like this user? If you use an MBR disk, you might encounter the issue as well due to MBR disks’ limit in disk capacity.
And there are other cases that you need to convert MBR disk to GPT disk, for example, you want to create more than 4 primary partitions (See: How to Create More Than 4 Partitions on MBR Disk in Windows 10). For a GPT disk, you can create up to 128 primary partitions while on an MBR disk, you are only allowed to create four primary partitions at most or 3 primary partitions and one extended partition.
How to convert MBR to GPT without data loss Windows 2008? Generally, there are 2 commonly used ways to convert MBR disk to GPT disk. One is to use system built-in disk management tool, and the other is to ask third-party server partition manager for help.
Convert MBR to GPT Windows 2008 with Disk Management
To choose the first way, users need to backup volumes that contain important data on the target disk at first, as this method requires you to delete all existing partitions on the disk. Now let’s see the detailed steps.
Step 1. Click Windows Start menu and choose Run. Then input diskmgmt.msc to open Disk Management.
Step 2. Select the target hard disk and delete all volumes in it with Delete Volume.
Step 3. Right-click on the target hard disk and select Convert to GPT Disk.
As you can see, you can convert MBR to GPT disk with Windows built-in Disk Management, but you have to delete all volumes on the disk, which will cause data loss. Here I sincerely recommend MiniTool Partition Wizard to you, as it not only can help you convert MBR to GPT without data loss Windows 2008 but also is a reliable server partition manager, resolving all kinds of partition problems for you.
Convert MBR to GPT in Windows 2008 via Server Partition Manager
By using MiniTool Partition Wizard Server Edition, Windows Server 2008 users do not need to delete any drive, and they can change MBR to GPT without any data loss.
Note: If you If you want to convert the system disk to GPT disk, you’d better do the followings on MiniTool Partition Wizard Bootable Edition in case of any accidents after the conversion. And it requires that your motherboard supports UEFI. After conversion, you need to change the firmware mode from BIOS to UEFI.
Step 1: Get a professional server partitioning program by clicking the following button, install it on your computer and launch it to get its main interface.
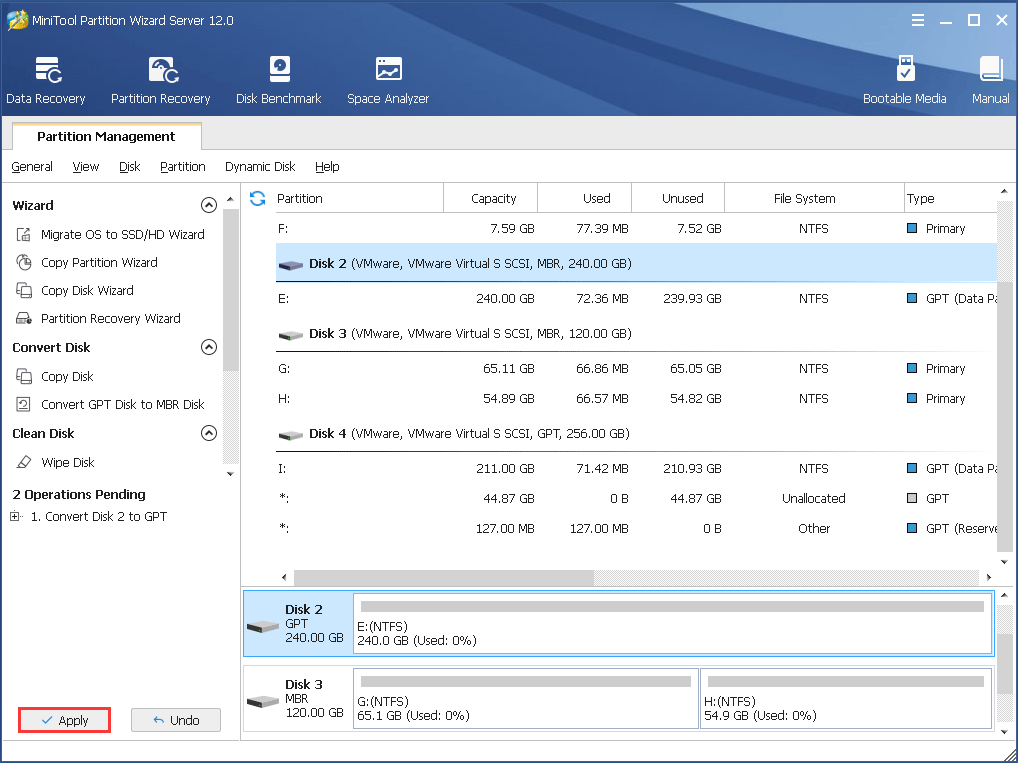
Step 2. Select the MBR disk which needs conversion and choose Convert MBR Disk to GPT Diskfrom the left.
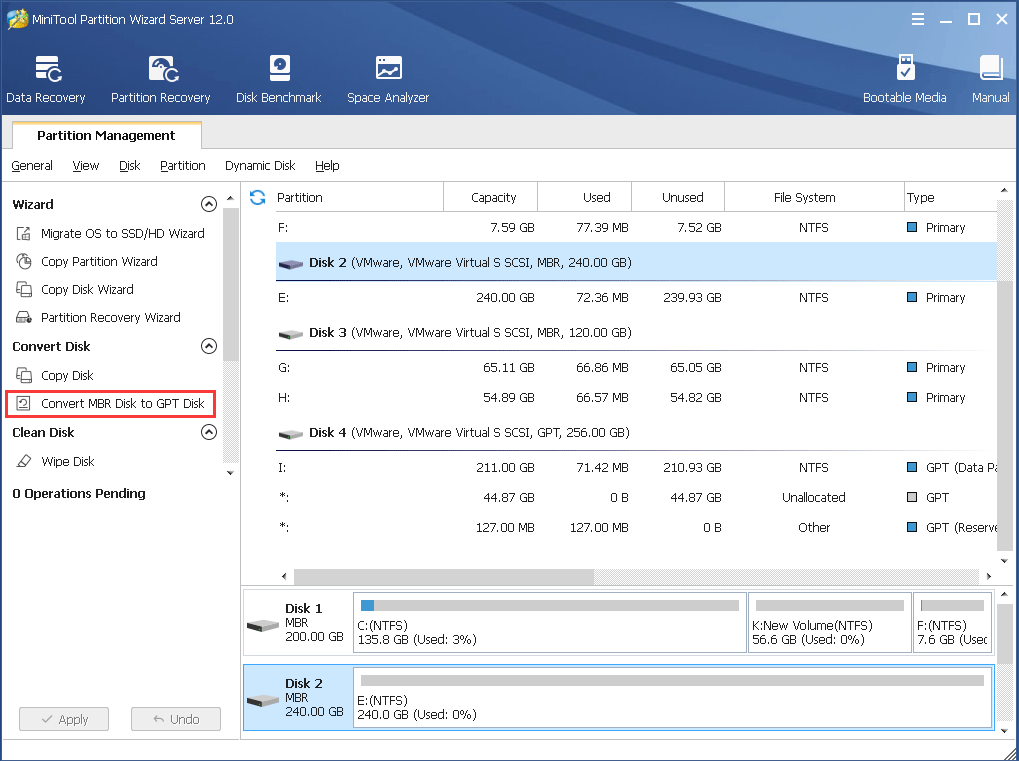
Step 3. Now you can see the selected disk namely disk 2 has become GPT. Click on the Applybutton on the left top to apply the change.
After doing these 4 steps, you can convert MBR to GPT without data loss Windows 2008 since the whole process does not require you to delete any drive or information. Now, get this server partition manager to have a try.
“MiniTool Partition Wizard is amazing! By using MiniTool Partition Wizard, I successfully converted my MBR disk to GPT disk without data loss Windows 2008! Hope this post helps more people who have trouble in converting to GPT disk.”Click to Tweet
Verdict
After reading this post, I am sure that you have learned how to change MBR to GPT without data loss. You may change MBR to GPT by following the above-detailed steps. If you have any question about how to convert MBR disk to GPT disk without data loss Windows 2008 or if you have other better solutions, you can leave a message on the following comment zone and we will reply as soon as possible. If you need any help when using MiniTool software, you may contact us via [email protected].
About The Author
Position: Columnist
Irene joined MiniTool in 2018 and has since become a professional in the areas of disk management and Windows tricks. Irene’s expertise allows her to assist clients with managing their hard drives, optimizing their Windows operating system, and troubleshooting any technical issues that arise.
Hi all.
I’ve run in the strange bug that occurs with x64 Windows on MBR disks and quiescing.
One of the solutions to the issue is to put the Windows on a GPT-formated disk.
So, i created another vmdk, in my windows vm, i made it as GPT disk and formatted the partition as NTFS.
Then i tested different ways to clone my windows to this new partition (by using clonezilla, or with the Backup/Restore feature of Windows Server).
One clone was done, i have shut down the VM, removed all disks and re-added the last create one as GPT. Then i changed the boot setting to use EFI instead of BIOS…
But it never boots on the disk. The disk seems to be well seen by EFI, but it says it can’t boot and then try a network boot :


Any idea where i can go from there ?