
| Previous | Table of Contents | Next |
| Extending and Shrinking Windows Server 2008 R2 Partitions and Volumes | Creating and Managing Windows Server 2008 R2 Striped (RAID 0) Volumes |
<google>BUY_WINSERV_2008R2</google>
So far in this book we have worked with basic disks. Simple and spanned volumes in Windows Server 2008 R2 take advantage of a concept known as dynamic disks. In this chapter of Windows Server 2008 R2 Essentials the topic of using dynamic disk support to create both simple and spanned volumes on Windows Server 2008 R2 system will be covered in detail.
Contents
Contents
|
||
An Overview of Dynamic Disks
As covered in the preceding chapters, basic disks allow partitions to be created on a physical disk which are subsequently formatted with a particular file system and then used to store data. Whilst the partitions on a basic disk can be increased in size this can be achieved only within the confines of the space available on the physical disk on which they reside.
Dynamic disks bring significantly more flexibility into the creation and management of volumes both in terms of space management, performance and redundancy. There are five types of dynamic volume which can be created through the use of dynamic disks:
- Simple Volume — The equivalent of a partition on a basic disk. A simple volume must reside on a single disk and cannot be extended beyond the space available on that disk.
- Spanned Volume — A spanned volume can span multiple physical disk drives or be comprised of multiple, non-contiguous volumes on a single disk drive. Spanned volumes avoid many of the limitations inherent in simple volumes.
- Striped Volume — Also referred to as RAID 0, disk striping involves splitting data into multiple parts and writing each part to a different disk drive (a process which is reversed when the data is read back). The disks involved in this process are referred to as a stripe set. The key purpose of striping is to increase disk performance since it removes the bottleneck of writing all data to a single disk controller.
- Mirrored Volume — Also referred to as RAID 1, disk mirroring involves writing the same data to two drives such that if one drive fails an exact copy of the data is available on the second disk. The primary purpose of disk mirroring is data redundancy and disaster recovery.
- RAID 5 Volume — RAID 5 is a variation of volume striping. With RAID 5 striping is used in conjunction with parity error checking such that the data can continue to be used in the event that one of the drives fails. The parity information can also be used to restore data in the event of a failure using a technique known as regeneration. RAID 5 requires 3 or more disks and is designed to provide fault tolerance.
Converting Basic Disks to Dynamic Disks with Disk Management
Windows Server 2008 R2 allows basic disks to be converted to dynamic disks using the Disk Management interface or via the command prompt using the diskpart tool. Before covering the steps to perform such a conversion there are a number of rules which need to be observed.
In the first instance, MBR disks must have at least 1MB of free space at the end of the disk where the dynamic disk database will be stored. Both Disk Management and diskpart allocate this space automatically so this will only be a problem if the disk was partitioned using a third party tool or an older version of Windows.
GPT disks can only be converted if they have contiguous, Windows compatible partitions. It is not, for example, possible to convert a basic GPT disk containing one or more Linux partitions to a dynamic disk. In addition, dynamic disks cannot be used as operating system boot disks.
Finally, basic disks with sector sizes in excess of 512 bytes cannot be converted to dynamic disks.
Assuming that the above requirements are met, the first step is to open the Disk Management interface. This can be achieved by running compmgmt.msc in command prompt window or Run dialog and selecting Storage -> Disk Management.
To perform the conversion simply right click on the icon for the drive in question and select Convert to Dynamic Disk… from the popup menu. This will invoke the Convert to Dynamic Disk dialog shown below:
As shown in the above figure all drives eligible for conversion are listed. Select the disk to be converted and click on OK. In the resulting dialog a list of drives scheduled for conversion is displayed. To view the volumes on a drive, select the drive in the list and click on details:
Click on Convert to initiate the conversion process. Once completed, the drive will appear as a dynamic drive in the Disk Management interface.
Converting Basic Disks to Dynamic Disks from the Command Line
Basic disks can also be converted to dynamic disks at the command prompt using the diskpart tool. To invoke this tool, type diskpart either at the command prompt or in a Run window. Once started a DISKPART> prompt will be displayed. As mentioned in previous chapters, if you are logged in as a user without administrative privileges it will be necessary to run the command prompt with elevated privileges in order to make any changes to the disk layout. To do so, right click the command prompt icon in the
Start menu and select Run as administrator from the resulting menu.
The first step is to identify the disks on the system. This information is obtained using the list disk command:
DISKPART> list disk
  Disk ###  Status      Size     Free     Dyn  Gpt
  --------  ----------  -------  -------  ---  ---
  Disk 0    Online        30 GB      0 B
  Disk 1    Online        10 GB      0 B
For the purposes of this tutorial we will be working on disk 1. To select the required disk use the select disk command:
DISKPART> select disk 1
Disk 1 is now the selected disk.
With the disk selected the conversion can be performed simply by using the convert command:
DISKPART> convert dynamic
DiskPart successfully converted the selected disk to dynamic format.
Creating a New Spanned Volume using Disk Management
<google>WIN28BOX</google>
A new spanned volume can easily be created using the Disk Management interface. For the purposes of this chapter we will be creating a spanned volume which spans two physical disk drives. In this example we will work with a system containing three disk drives. Disk 0 is the system drive containing the Windows Server 2008 R2 operating system. Disks 1 and 2 are both initialized using the MBR partition style, have been converted to dynamic disks but have yet to have any volumes created on them. The objective of this tutorial is to create a spanned volume which uses the entire capacity of disks 1 and 2.
Assuming that the Disk Management snap-in is currently running, right click on the first disk drive and select New Spanned Volume… from the popup menu. This will invoke the New Spanned Volume Wizard. Click Next on the welcome screen to proceed to the disk selection screen as illustrated in the following figure:
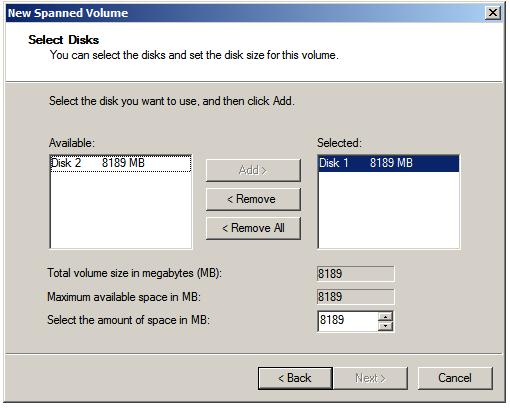
This screen provides the option to select disk drives from which the spanned volume is to be constructed. By default, only the drive on which the new volume is being created is listed. Consequently, the Maximum available space value reflects only the space available on the current disk. In this example, however, the volume is going to span both disks 1 and 2. To enable this we need to select disk 2 from the left hand list of available disks and click on Add> to add it to the selected disks. Having done so the amount of space from each drive may be selected up to the maximum combined space from both disks:
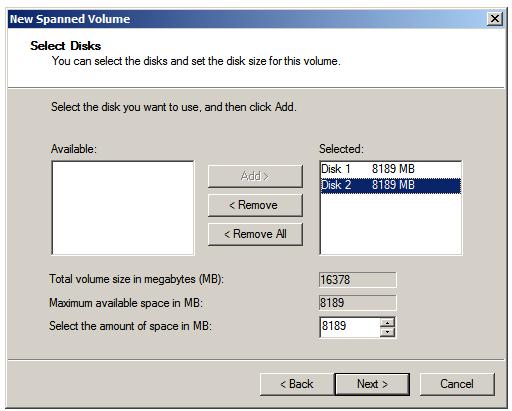
With the desired total volume size configured by selecting each drive and selecting the amount of space to be allocated the Next button may be pressed to move the drive letter or mount point allocation screen. Select either a suitable drive letter or mount point and click on Next to proceed. Finally, select the file system format and disk compression options and once again click Next to proceed to the summary screen. To initiate the creation of the volume, click on Finish. After a short delay the Disk Management graphical view will show the volume being formatted on both drives. When completed the spanned volume is ready for use.
Creating a New Spanned Volume from the Command Prompt
In addition to using the Disk Management interface, Windows Server 2008 allows spanned volumes to be created from the command prompt using the diskpart tool. Invoke this tool by typing diskpart at a command prompt or in a Run dialog box. The tool will start and display a DISKPART> prompt.
The first step is to identify the disks on the system. This information is obtained using the list disk command:
DISKPART> list disk
  Disk ###  Status      Size     Free     Dyn  Gpt
  --------  ----------  -------  -------  ---  ---
  Disk 0    Online        30 GB      0 B
  Disk 1    Online         8 GB  8189 MB
  Disk 2    Online         8 GB  8189 MB
For the purposes of this tutorial we will be creating a volume on disk 1 and then extending it such that it spans both disk 1 and disk 2. To select the required disk use the select disk command:
DISKPART> select disk 1
Disk 1 is now the selected disk.
With disk 1 selected the next step is to create a volume on the disk. This is achieved using the create volume command. Initially the volume is going to be a simple volume. We will later extend the volume onto disk 2 thereby creating a spanned volume:
DISKPART> create volume simple disk=1
DiskPart successfully created the volume.
Note that the size of the volume could have been specified in the above command with the size= directive. By not including a size the command will default to using all available space on the disk.
Having created the volume on the first disk, the next step is to select the volume and extend it onto disk 2. To obtain a list of volumes the list volume command is used:
DISKPART> list volume
  Volume ###  Ltr  Label        Fs     Type        Size     Status     Info
  ----------  ---  -----------  -----  ----------  -------  ---------  ------
  Volume 0                      RAW    Simple      8189 MB  Healthy
  Volume 1     D                       DVD-ROM         0 B  No Media
  Volume 2     C                NTFS   Partition     30 GB  Healthy    System
Clearly, Volume 2 is the system volume and volume 1 is the DVD drive so volume 0 must be the new raw (unformatted) volume just created. Since this is the volume we are going to convert into a spanned volume we need to select it using the select volume command:
DISKPART> select volume 0
Volume 0 is the selected volume.
With the appropriate disk and volume selected the next task is to extend the volume so that it encompasses the space on both disks. To decide on the amount by which the partition can be extended, the extend command be used in a number of different ways. For example, a partition may be extended by a specified number of MB by using the size= option. Alternatively the size option may be omitted such that the entire available space is used. Also, the number of the disk onto which the volume is to be extended must also be provided, in this case disk 2:
DISKPART> extend disk=2
DiskPart successfully extended the volume.
Having extended the volume across two disks the list volume command may be used to verify the new configuration:
DISKPART> list volume
  Volume ###  Ltr  Label        Fs     Type        Size     Status     Info
  ----------  ---  -----------  -----  ----------  -------  ---------  --------
* Volume 0                      RAW    Spanned       16 GB  Healthy
  Volume 1     D                       DVD-ROM         0 B  No Media
  Volume 2     C                NTFS   Partition     30 GB  Healthy    System
As shown above the volume is now 16GB in size which is equivalent to the combined available space on disks 1 and 2. The volume is also listed being Spanned. Next, the new spanned volume needs to be formatted for use:
DISKPART> format fs=ntfs label="My Spanned Vol"
  100 percent completed
DiskPart successfully formatted the volume.
Once formatted, the last task is to assign either a drive letter or mount point to the volume by which it will be accessed:
To assign a drive letter:
DISKPART> assign letter=E:
DiskPart successfully assigned the drive letter or mount point.
To assign a mount point:
DISKPART> assign mount=\bigvol
DiskPart successfully assigned the drive letter or mount point.
Once assigned a drive letter or mount point, the new spanned volume is ready for use.
<google>BUY_WINSERV_2008R2_BOTTOM</google>

Nov 9, 2012
We have all been there, you setup a new server and allocate space to the server and think all is well, but next thing you know space is running out and you have a disk you need to add space to but you can’t. Well with Linux you can add the disk and extend the volume, this is possible with Windows 2008 R2 and Dynamic Disks.
Dynamic disks can contain a large number of dynamic volumes (approximately 2000) that function like the primary partitions used on basic disks. In some versions of Windows, you can combine separate dynamic hard disks into a single dynamic volume (called spanning), split data among several hard disks (called striping) for increased performance, or duplicate data among several hard disks (called mirroring) for increased reliability.
So how do we do it? After we had added the disk to the system we need to change the source and destination disks to dynamic.
Open Disk Management and right click on the new drive and select Convert to Dynamic Disk.
The disk you need to convert will be checked. Click Ok to accept it and convert the disk.
Next you need to convert the disk you want add the space to and complete the same steps. Right click on the drive and select Convert to Dynamic Disk.
The difference in converting the existing disk is you will get a popup warning about converting the disk and not being able to start the operating system from any volume except the boot volume. This is ok, click yes and complete the conversion.
Now the disks are both dynamic we will proceed to extend the volume. Right click on the disk to expand and click Extend Volume. The Extend Volume Wizard will start. Click Next to start the process.
The select disks dialog appears and in the Available disks will show the new disk with the additional space. Click on the disk then click the add button to move it to the selected column, Click next to move to the next step.
Click Finish to complete the addition.
We see the two disks now acting as a single disk.
Now in the future if needed you can add additional disks by converting the new disk and just extending the volume. Nice and easy and adding space is not an issue!

Windows Server 2008 Dynamic Disk: Overview and Management
What is dynamic disk in Windows 2008? How to extend Windows 2008 dynamic disk volume? How to convert dynamic disk to basic in Server 2008? this post will give you a brief introduction.
By AOMEI / Last Updated May 20, 2022
Overview: what is Windows 2008 dynamic disk?
There are 2 types of disk storage type can be used in Windows 2008, dynamic disk and basic disk. A Windows 2008 dynamic disk is one of the two disk storage types. It does not use partitions or logical drive, instead, dynamic disks consist of dynamic volumes, including simple volumes, spanned volumes, striped volumes, mirrored volumes, and RAID-5 volumes.
Usually, a dynamic disk uses LDM (logical disk manager) to manage all its volumes. The LDM is where your dynamic disk holds all the information of its volumes, such as volume label, size, and file system.
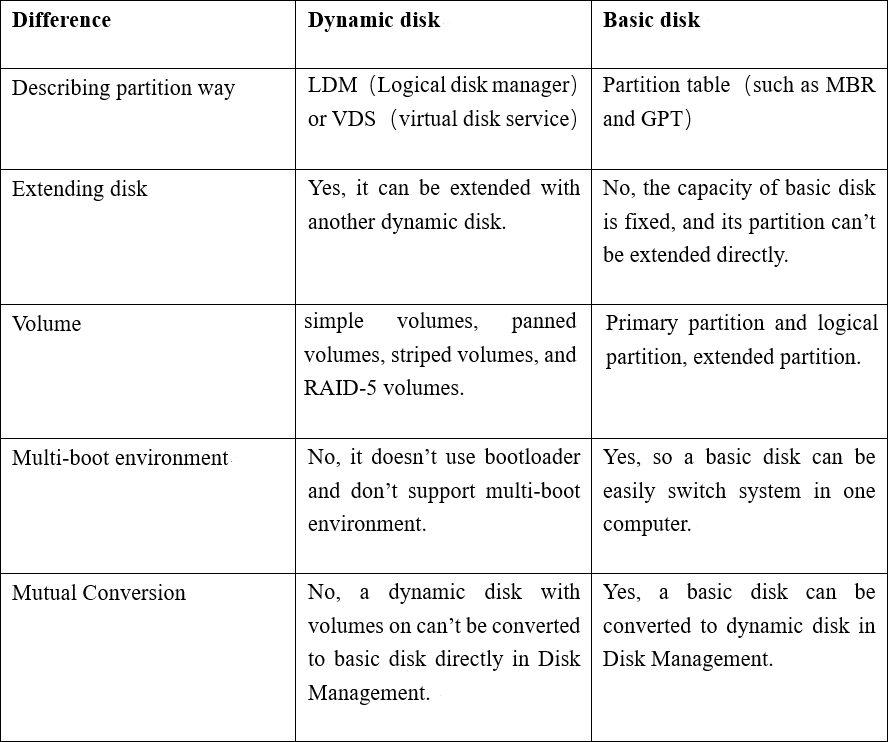
Dynamic disk vs basic disk
Basic disk is the other type of hard drive configuration. It has better compatibility to work well with all Windows systems, which led to the widespread adoption of Basic disk. But it does not support those features like a dynamic disk. For example, it can’t create so many different volumes but only basic partitions.
There are some differences between dynamic disk and basic disk listed in the following table, you can take a quick glimpse at it.
The next table makes a brief summary of the differences between dynamic disk and basic disk. You can take a quick glimpse at it.
Best tool to manage Windows 2008 dynamic disk
Like other Windows server 2008 users, you may be also amazed at all the features of dynamic disk. However, with all the features, it is kind of weary to manage a dynamic disk. Then you can turn to a powerful Windows 2008 dynamic disk manager-AOMEI Partition Assistant Server to manage your dynamic disk.
This manager is specialized for dynamic disks and volumes management in Windows Server and other Windows systems, including Server 2008 (R2), 2012, 2016, Windows 10, 8,7, XP . With its various features, you can easily get your volumes well-organized.
Main features:
It allows you to resize, extend, move, create dynamic volumes with ease.
This manager supports converting dynamic disk to basic disk.
It helps you to convert a dynamic to GPT partition style without deleting any partitions.
It comes with graphic and intuitive interface making all managing operation easily and safely.
It supports 5 types of dynamic disk volumes: Simple, Spanned, Striped, Mirrored and RAID-5.
Here, we take converting dynamic disk to basic and resizing volumes as examples to show you how it works. And you can download the demo version to follow the steps.
Convert dynamic disk to basic
Although dynamic disk provides various good features that have attracted lots of people change their basic disk to dynamic in Disk Managerment. However, like we said above, a dynamic disk also has its diasadvantages, for instance, it does not support multi-boot system environment. And you may want to convert your dynamic disk back to basic disk.
But the Disk Management can’t perform this operation. Fortunately, you can use AOMEI Partition Assistant to convert dynamic disk to basic in Windows Server 2008.
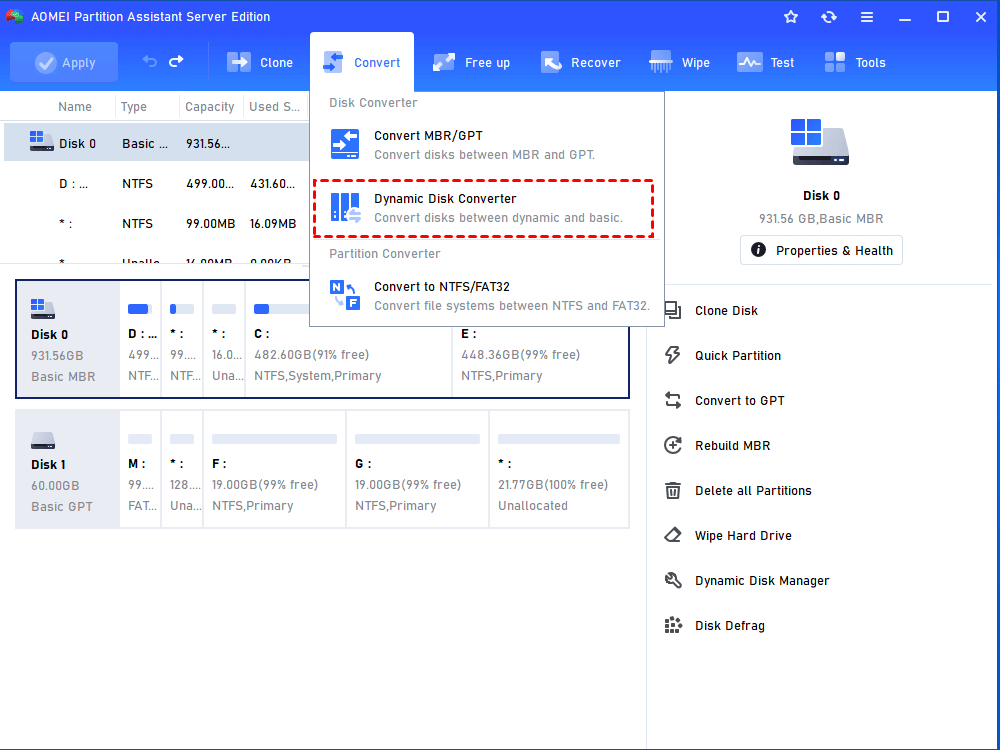
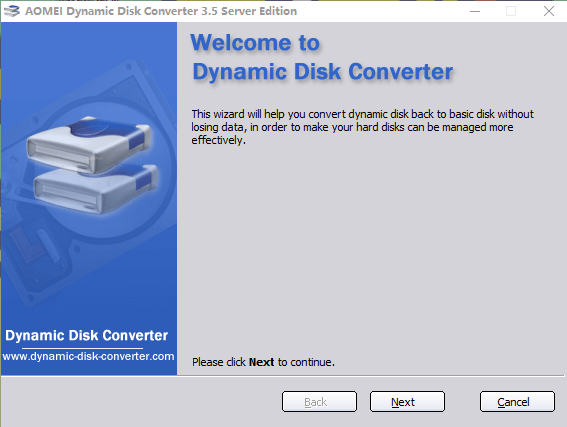
Step 1. Install and run AOMEI Partition Assistant Server. In the main interface, click «All Tools» > «Dynamic Disk Converter.
Step 2. In the small pop-up window, click “Next” to continue.
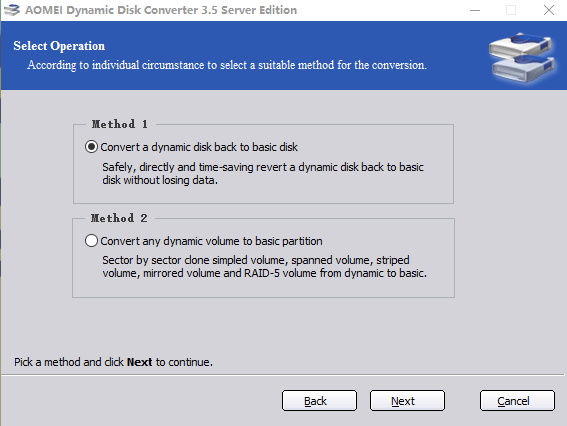
Step 3. There are 2 converting methods you can choose, Convert a dynamic disk back to basic disk and Convert any dynamic volume to basic partition. Here we choose the first option which is faster.
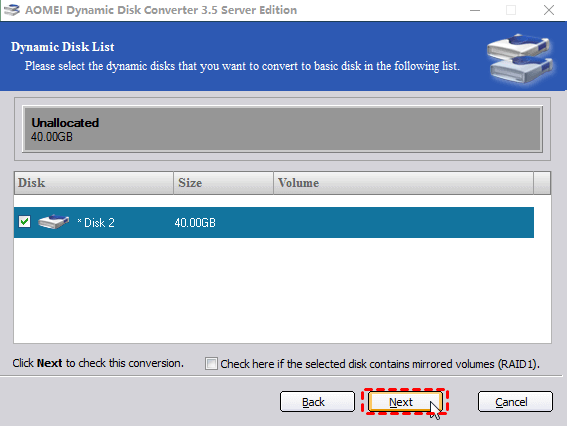
Step 4. Choose the dynamic disk you want to convert to basic, and click «Next».
Step 5. Then wait for the conversion to be finished, and click «OK».
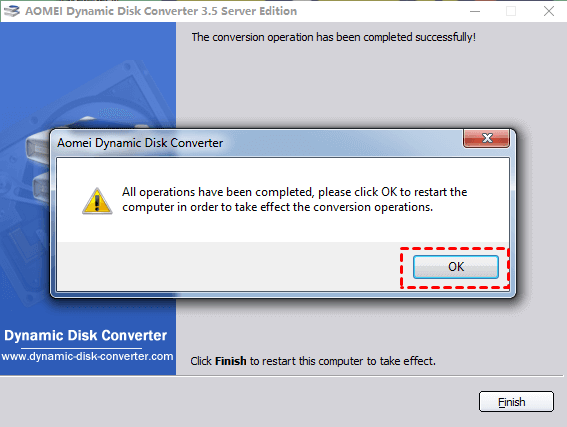
This is how to convert dynamic disk to basic in Windows 2008 (R2). In order to take effect the conversion operations, your PC will be restarted.
Extend and resize dynamic volume
AOMEI Partition Assistant also allows you to resize and extend your volumes in Windows 2008. Here, we demontrate the detailed steps of enlarge the volume C.
вњЌ Note: There has to be an unallocated space right after the volume you choose when you extend a volume. If there isn’t you can choose merge volume in Windows 2008, or shrink a adjucent volume to generate a unallocated space.
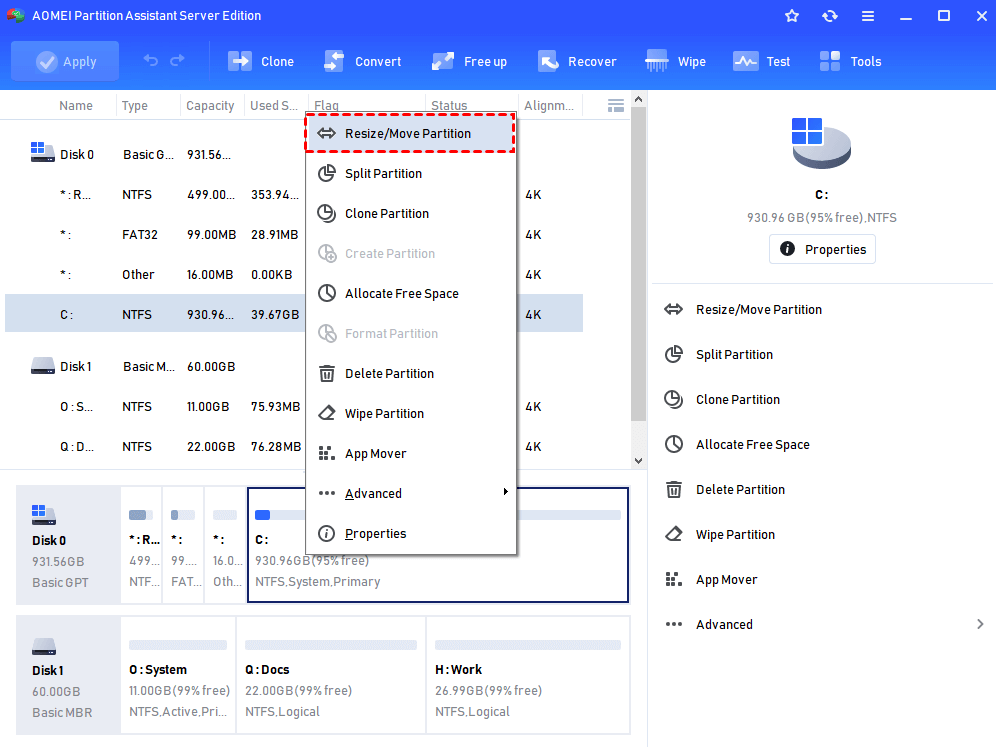
Step1. Open AOMEI Partition Assistant, and right-click on the volume you want to resize. and choose «Resize Partition».

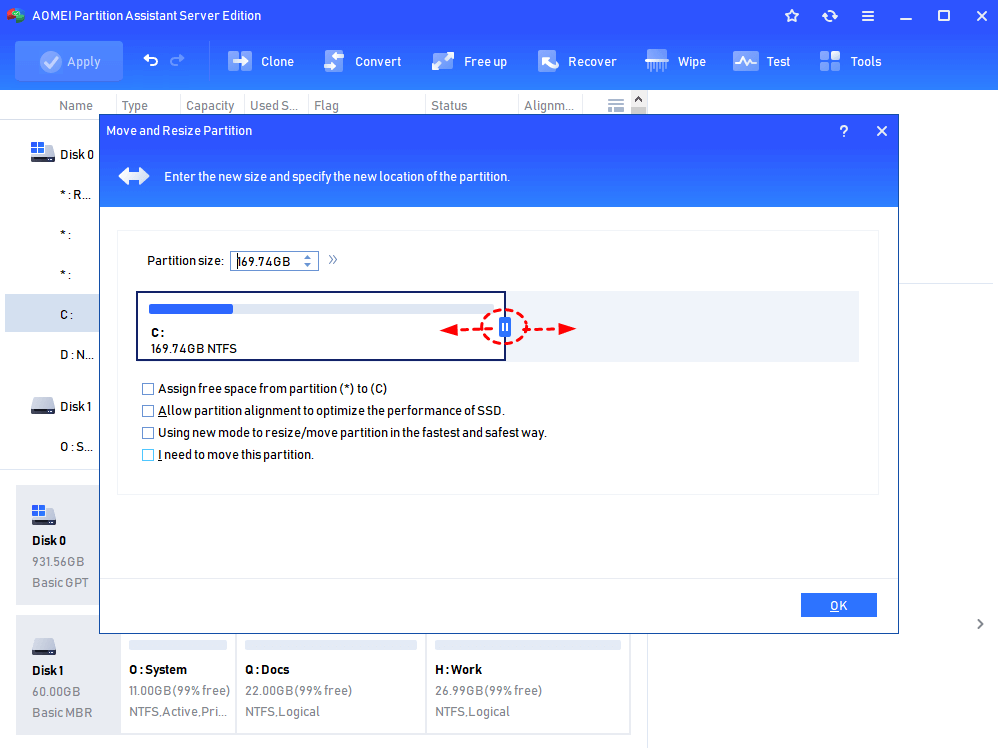
Step 2. In the pop-up window, shrink the volume by dragging the border of the slide bar leftward, and click «OK».
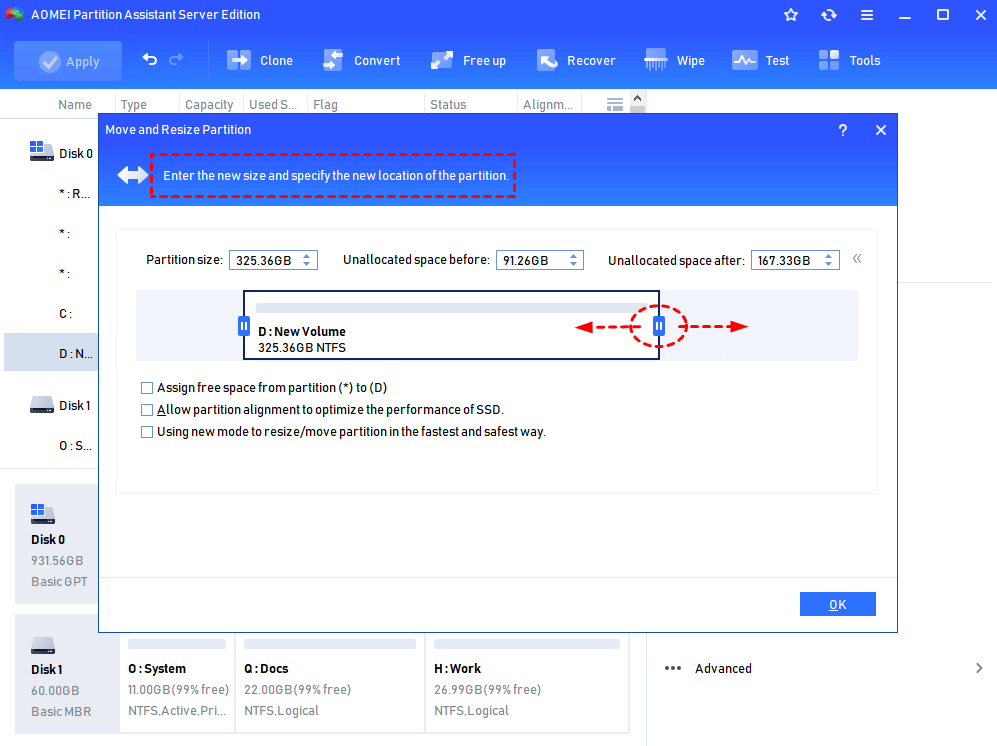
Step 3. The reduced space will generate an unallocated space, now we can extend the volume C. Right-click on the C volume and choose «Resize Partition».
Step 4. Then, drag the slider bar to the right side to merge the unallocated space to the C volume.
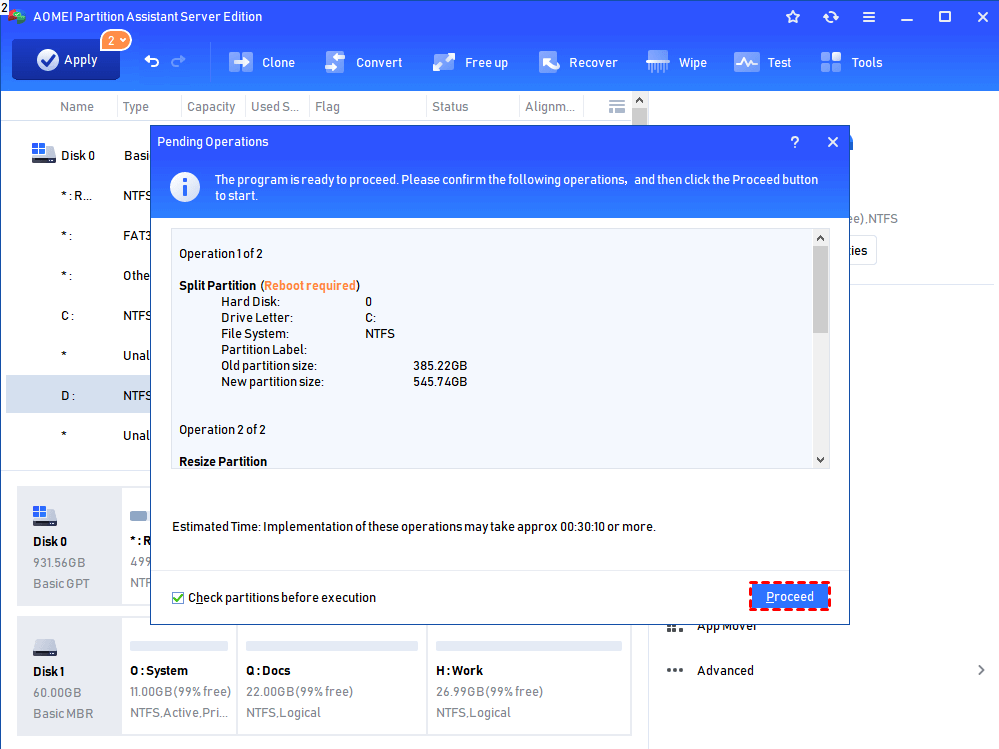
Step 5. Then, go back to the main console, and you can preview the volume be extend, and click «Apply» > «Proceed» to execute the operation.
Conclusion
Ok, I hope you have already know how to operate this Windows 2008 dynamic disk manager. Apart from the features mentioned above, AOMEI Partition Assistant is built in various functions to help you manage your disks and volumes, such as, allocate free space, wipe a disk or partition, clone Server system to SSD.
In addition, there is AOMEI Partition Assistant Unlimited Edition designed for company or organize. It allows unlimited usage within one company to save money.
Источник
Бесплатные и лучшие Windows Server 2008 Инструмент управления дисками R2
автор: Джон, Обновлено: 2 ноября 2021 г.
Запоминающее устройство является незаменимым компонентом сервера, независимо от того, используете ли вы SSD, механический диск или аппаратный RAID-массив. Для инициализации диска, создания, перемещения и изменения размеров разделов вам понадобится надежный инструмент управления дисками. Windows Server 2008 (R2) имеет собственный инструмент управления дисками. Он может выполнять некоторые основные операции, такие как создание, удаление и форматирование раздела. Лучше, чем предыдущая версия, она может сжимать и расширять разделы, но возможности ограничены. Программное обеспечение для создания разделов диска намного мощнее, но лучше использовать самое безопасное.
Содержание:
1. Как открыть Управление дисками в Server 2008 (R2)
Есть 2 простых способа открыть Управление дисками в Windows Server 2008 и R2:
- Нажмите Windows + R вместе на клавиатуре наберите diskmgmt.msc и нажмите Enter .
- Нажмите Диспетчер серверов в нижнем левом углу экрана позади Windows логотип, а затем переключитесь на Хранилище> Управление дисками.
2. Основные характеристики Windows Server 2008 (R2) Управление дисками
После открытия управления дисками щелкните правой кнопкой мыши раздел или переднюю часть диска, после чего вы увидите доступные операции:


На новый жесткий диск:
Жесткий диск должен быть подключен и инициализирован перед созданием нового тома.
В нераспределенное пространство:
Создавайте новые тома.
Для выделенного раздела:
- Откройте корневой каталог в проводнике
- Пометить раздел как активный
- Change drive letter и путь
- Формат раздела
- Удалить раздел
3. Расширенные возможности управления дисками в Server 2008
Управление динамическими томами:
Он может создавать и управлять динамическим томом Simple, Mirrored, Stripped, Spanned и RAID 5.
Тома динамических дисков потребляют много ресурсов и снижают производительность сервера. Поскольку сейчас цена на оборудование намного ниже, большинство серверов используют аппаратные RAID-массивы вместо динамических томов.
В «Управлении дисками» есть возможность конвертировать диск из MBR в GPT, но вы должны удалить все разделы на диске заранее.
Он может преобразовать только базовый диск в динамический без потери данных. Чтобы преобразовать динамический диск в базовый, вы должны удалить все разделы на диске тоже.
Изменить размер раздела:
Лучше, чем предыдущая версия, в Server 2008 Disk Management появилась новая функция сжатия и расширения тома, которая помогает изменить размер раздела без потери данных.
По сравнению с другими расширенными функциями, эти новые функции, вероятно, будут использоваться. Тем не менее, вы не может расширить раздел сжимая еще один.
Как уменьшить и увеличить раздел с помощью управления дисками Server 2008
Многие администраторы серверов должны изменить размер раздела после запуска сервера в течение определенного периода времени.
Чтобы сжать раздел с помощью управления дисками Server 2008:
- Выполните описанный выше способ, чтобы открыть средство управления дисками в Server 2008.
- Щелкните правой кнопкой мыши раздел NTFS и выберите Сжать том .
- Введите и количество места и нажмите Сжиматься .
Недостатки функции сокращения объема:
- Поддерживается только раздел NTFS.
- Нераспределенное пространство может быть сделано только на правильно при сокращении раздела.
- Он не может сжать раздел за пределами того места, где находятся неподвижные файлы.
Чтобы расширить раздел с помощью управления дисками Server 2008:
- Щелкните правой кнопкой мыши раздел с незанятым пространством справа, выберите Расширить том в списке.
- Просто нажмите Далее к Завершить во всплывающем окне мастера расширения тома.
Недостатки функции расширения объема:
- Поддерживается только раздел NTFS.
- Должно быть примыкающий Нераспределенное пространство на правильно раздела, который вы хотите расширить, в противном случае, Опция расширения отключена.
- Если раздел D логический , ты все еще невозможно продлить диск C: даже удалив D.
4. Лучший менеджер разделов дисков для Server 2008 и R2.
На рынке есть много программного обеспечения для разделов дисков, но оно лучше, чем другие инструменты, NIUBI Partition Editor намного безопаснее и быстрее благодаря своим инновационным технологиям:
- Виртуальный режим — все операции, которые вы делаете, будут перечислены как ожидающие предварительного просмотра, реальные разделы диска не будут изменены до щелчка Apply , чтобы подтвердить.
- Отменить-на-хорошо — если вы применили неправильные операции, это не имеет значения, вы можете отменить текущие нежелательные операции без потери данных.
- 1 второй откат — если при изменении размера раздела обнаружена какая-либо ошибка, сервер автоматически возвращается в исходное состояние в мгновение ока.
- Дополнительно алгоритм перемещения файлов — перемещать и расширять раздел на 30–300% быстрее, экономя много времени, особенно при большом количестве файлов.
Скачать этот инструмент управления дисками, и вы увидите главное окно с разметкой разделов диска и другой информацией справа. Доступные операции перечислены слева и после щелчка правой кнопкой мыши. Недоступные операции автоматически скрываются, чтобы интерфейс оставался чистым.

Доступные операции для раздела:
- Изменить размер тома (уменьшить и расширить)
- Переместить расположение раздела
- Объединить два смежных тома за 1 шаг
- Copy volume в нераспределенное пространство
- Преобразовать раздел между логическим и основным
- Конвертировать NTFS в FAT32
- Оптимизируйте файловую систему, чтобы исправить ошибки и повысить производительность
- Change drive letter (например, D 🙂
- Изменить метку (добавить или изменить имя раздела)
- Сделать активным
- Проверьте целостность файловой системы
- Дефрагментация для улучшения производительности
- Скрыть из проводника
- Удалить (файлы можно восстановить)
- Формат тома для использования в качестве нового
- Протрите (стереть данные навсегда)
- Тест поверхности (сканирование поврежденных секторов)
- Исследуйте (просмотр файлов / папок с каталогом)
- Посмотреть недвижимость

Доступные операции на весь диск:
- Инициализировать новый диск
- Изменить статус на оффлайн или онлайн
- Установить атрибут только для чтения
- Протрите диск (не может быть восстановлено)
- Тест поверхности
- Посмотреть недвижимость
- Clone disk перенести данные и ОС
- Конвертировать MBR диск в GPT
- Удалите все разделы
- Очистка диска
Узнать больше об этом менеджер разделов диска для Windows Server 2008/ 2012/2016/2019/2022, смотрите видео руководство как это использовать.
Источник
Problem Description:
You have a Windows Server 2003 or 2008 (R2) Server configured with mirrored dynamic disks. One of disks fails and you need to replace failed disk with a new one. You buy the new disk, connect it to the slot where the failed disk was and power on your server. You go to disk management convert the new disk to dynamic disk and remove old (missing mirror). Now you are ready to create the mirror again but suddenly you get the following error message “All disks holding extents for a given volume must have the same sector size”
As described here , what this message says is that your old disk in the mirrored array (500gb dell in my case) and the new disk (1 tb wd black in my case) have different sector sizes (512 bytes for 500gb disk and 4096 bytes for 1 tb disk).The new 1 tb disks was an Advanced Formatted Disk, as a result I cannot create a mirrored volume between them.I need to buy another 1 tb 4K formatted hdd , clone or create backup image & restore the old (500gb) disk to the new disk and finally create the mirrored array between 1 tb disks.
Ok, so I bought another 1 tb wd black and I was ready to clone the data from the old disk to the new one. The 1st problem that I faced is that most of Imaging programs cannot handle Dynamic Disks at all. For example Acronis, needs a special add-on called “Plus Pack” to be able to create an Image of dynamic disk (you must break the mirror first, because mirrored volumes are not supported) and then restore it to the new one.
Solution:
Personally I followed the steps below:
- Downloaded Hiren’s boot cd and used Norton Ghost to clone 500gb hdd -> 1tb hdd.
- After cloning I had a BASIC 1 tb with all the data inside. Removed 500gb disk and left only this 1tb disk on slot and booted the machine.
- Got “0xc000000e Info: The boot selection failed because a required device is inaccessible”.
- I put Windows Server 2008 R2 dvd on dvd-rw and booted from there. Fortunately boot cd found the bootloader problems and automatically fixed them. If that did’t worked for you, try this article.
- Rebooted again and voila, finally the system booted correctly!
- Powered off the server, put the 2nd 1tb hdd, powered on, converted both disks to dynamic disks and finally enabled mirroring between them.