
Windows 7 / Networking
Windows Server 2008 R2 provides many services that can be leveraged to deploy a highly reliable, manageable, and
fault-tolerant file system infrastructure. This section of the tutorial provides an overview of these services.
Windows Volume and Partition Formats
When a new disk is added to a Windows Server 2008 R2 system, it must be configured by
choosing what type of disk, type of volume, and volume format type will be used. To
introduce some of the file system services available in Windows Server 2008 R2, you must
understand a disk’s volume partition format types.
Windows Server 2008 R2 enables administrators to format Windows disk volumes by
choosing either the file allocation table (FAT) format, FAT32 format, or NT File System
(NTFS) format. FAT-formatted partitions are legacy-type partitions used by older operating
systems and floppy disk drives and are limited to 2GB in size. FAT32 is an enhanced
version of FAT that can accommodate partitions up to 2TB and is more resilient to disk
corruption. Data stored on FAT or FAT32 partitions is not secure and does not provide
many features. NTFS-formatted partitions have been available since Windows NT 3.51 and
provide administrators with the ability to secure files and folders, as well as the ability to
leverage many of the services provided with Windows Server 2008 R2.
NTFS-Formatted Partition Features
NTFS enables many features that can be leveraged to provide a highly reliable, scalable,
secure, and manageable file system. Base features of NTFS-formatted partitions include
support for large volumes, configuring permissions or restricting access to sets of data,
compressing or encrypting data, configuring per-user storage quotas on entire partitions
and/or specific folders, and file classification tagging, which is discussed later in this tutorial.
Several Windows services require NTFS volumes; as a best practice, we recommend that
all partitions created on Windows Server 2008 R2 systems are formatted using NT File System (NTFS).
File System Quotas
File system quotas enable administrators to configure storage thresholds on particular sets
of data stored on server NTFS volumes. This can be handy in preventing users from inadvertently
filling up a server drive or taking up more space than is designated for them.
Also, quotas can be used in hosting scenarios where a single storage system is shared
between departments or organizations and storage space is allocated based on subscription or company standards.
The Windows Server 2008 R2 file system quota service provides more functionality than
was included in versions older that Windows Server 2008. Introduced in Windows 2000
Server as an included service, quotas could be enabled and managed at the volume level
only. This did not provide granular control; furthermore, because it was at the volume
level, to deploy a functional quota-managed file system, administrators were required to
create several volumes with different quota settings. Windows Server 2003 also included
the volume-managed quota system, and some limitations or issues with this system
included the fact that data size was not calculated in real time. This resulted in users
exceeding their quota threshold after a large copy was completed.
Windows Server 2008 and Windows Server 2008 R2 include the volume-level quota
management feature but also can be configured to enable and/or enforce quotas at the
folder level on any particular NTFS volume using the File Server Resource Manager service.
Included with this service is the ability to screen out certain file types, as well as real-time
calculation of file copies to stop operations that would exceed quotas thresholds.
Reporting and notifications regarding quotas can also be configured to inform end users
and administrators during scheduled intervals, when nearing a quota threshold, or when the threshold is actually reached.
Data Compression
NTFS volumes support data compression, and administrators can enable this functionality
at the volume level, allowing users to compress data at the folder and file level. Data
compression reduces the required storage space for data. Data compression, however, does have some limitations, as follows:
- Additional load is placed on the system during read, write, and compression and decompression operations.
- Compressed data cannot be encrypted.
Data Encryption
NTFS volumes support the ability for users and administrators to encrypt the entire
volume, a folder, or a single file. This provides a higher level of security for data. If the
disk, workstation, or server the encrypted data is stored on is stolen or lost, the encrypted
data cannot be accessed. Enabling, supporting, and using data encryption on Windows
volumes and Active Directory domains needs to be considered carefully as there are
administrative functions and basic user issues that can cause the inability to access previously encrypted data.
File Screening
File screening enables administrators to define the types of files that can be saved within a
Windows volume and folder. With a file screen template enabled, all file write or save
operations are intercepted and screened and only files that pass the file screen policy are
allowed to be saved to that particular volume or folder. The one implication with the file
screening functionality is that if a new file screening template is applied to an existing
volume, files that would normally not be allowed on the volume would not be removed if
they are already stored on it. File screening is a function of the File Server Resource
Manager service, covered in the «File Server Resource Manager (FSRM)» section later in this tutorial.
Provide feedback
Saved searches
Use saved searches to filter your results more quickly
Sign up
| Previous | Table of Contents | Next |
| Using NET SHARE to Configure Windows Server 2008 R2 File Sharing | Auditing Windows Server 2008 R2 File and Folder Access |
<google>BUY_WINSERV_2008R2</google>
One of the key advantages offered by NTFS over the older FAT file system type is the concept of file and folder permissions and ownership. Through careful implementation and management, file and folder permissions on NTFS based file systems significantly increases the security of data stored on a Windows Server system. In addition, file and folder permissions augment the shared permissions discussed in previous chapters to provide finer grained control over access to shared files and folders.
This chapter of Windows Server 2008 R2 Essentials will provide a detailed overview of file and folder permissions and ownership in the context of Windows Server 2008 R2, including topics such as transfer of ownership and permission inheritance.
Contents
Contents
|
||
Ownership of Files and Folders
The owner of a file or folder is the user who has complete and full control over that file or folder in terms of being able to grant access to the resource, and also allow other users to take over the ownership of a file or folder. This is often, but not always, the creator of the file or folder and is governed by the location of where the file or folder is first created. Typically, the creator of the file or folder is, by default, initially designated as the owner. Ownership of a file or folder may be taken by an administrator, any user with Take ownership permission on the object in question or any user with the right to Restore Files and Directories which by default includes members of the Backup Operators group.
Taking and Transferring Windows Server 2008 R2 File and Folder Ownership
Ownership may be taken, when permitted, using the properties dialog of the file or folder in question. This can be accessed by right clicking on the file or folder in Windows Explorer, selecting Properties from the menu and then clicking on the Security tab. On the Security page of the properties dialog, click on the Advanced button to access the Advanced Security Settings dialog and then select the Ownership tab to display the following dialog:
<google>WIN28BOX</google>
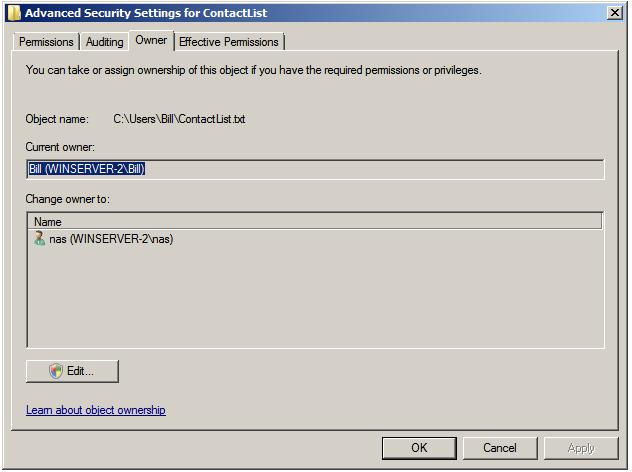
As illustrated in the preceding figure, the file’s current owner is bill and the option is available for user nas to take over ownership of the file. To take ownership, click on the Edit button to display the following dialog box where ownership may be changed:
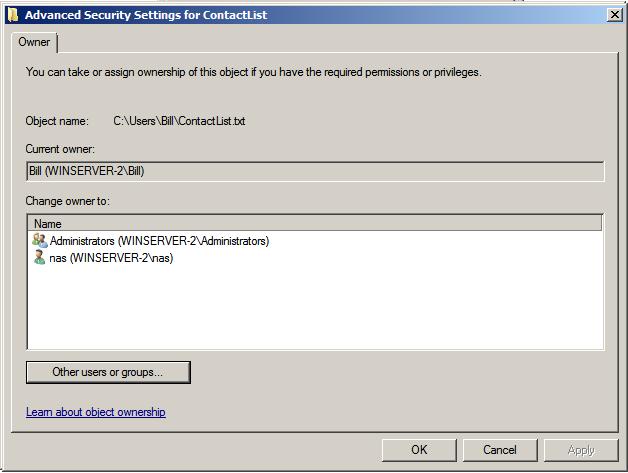
To take ownership, select your user name from the list and click on Apply. To transfer ownership to a different user, either select the name from the list, or search for the user by clicking on the Other users or groups… button. Select the required user and click on Apply to commit the transfer.
File and Folder Permission Inheritance
Another part of understanding file and folder permissions involves the concept of inheritance. When a file or sub-folder is created in an existing folder (referred to as the parent folder) it inherits, by default, all of the permissions of the parent folder. Similarly, when the permissions on a parent folder are changed, those changes are automatically inherited by all child files and folders contained within that parent folder.
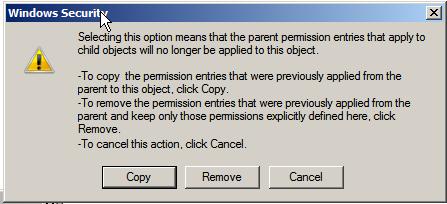
To turn off inheritance for a child file or folder, right click the object in Windows Explorer, select Properties and then click on the Security tab of the properties dialog. On the Security properties panel, click on the Advanced button to display the Advanced Security Settings dialog followed by Edit… to display the editable permission settings. In this dialog, unset the check box next to Include inheritable permissions from parent object. Once selected, a warning dialog will appear providing the choice to retain the current inherited permissions, or to remove any inherited permissions keeping only permissions which have been explicitly set on the selected object:
Occasionally, the converse situation exists, whereby a parent folder contains files and folders which have explicitly set permissions, rather than just the inherited permissions from the parent folder. In order to reset a folder and its children such that it only has inherited permissions, display the Security tab of the Properties dialog as outlined above, click on Advanced… and then Edit… and set the check box next to Replace all existing inheritable permissions on all descendants with inheritable permissions from this object. A dialog will subsequently appear warning that any explicitly defined permissions on all descendant files and folders will be removed and replaced by inheritable permissions. Click Yes to commit the change.
Basic File and Folder Permissions
NTFS provides two levels of file and folder permissions which can be used to control user and group access. These are basic permissions and special permissions. In essence, basic permissions are nothing more than pre-configured sets of special permissions. This section will look at basic permissions and the next will focus on special permissions and how they are used to create basic permissions.
The current basic permissions for a file or folder may be viewed by right clicking on the object in Windows Explorer, selecting Properties and then choosing the Security tab. At the top of the security properties panel is a list of users and groups for which permissions have been configured on the selected file or folder. Selecting a group or user from the list causes the basic permissions for that user to be displayed in the lower half of the dialog. Any permissions which are grayed out in the permission list are inherited from the parent folder.
The basic permission settings available differ slightly between files and folders. The following table lists the basic folder permissions supported by Windows Server 2008 R2 on NTFS volumes:
| Permission | Description |
|---|---|
| Full Control | Permission to read, write, change and delete files and sub-folders. |
| Modify | Permission to read and write to files in the folder, and to delete current folder. |
| List Folder Contents | Permission to obtain listing of files and folders and to execute files. |
| Read and Execute | Permission to list files and folders and to execute files. |
| Write | Permission to create new files and folders within selected folder. |
| Read | Permission to list files and folders. |
The following table outlines the basic file permissions:
| Permission | Description |
|---|---|
| Full Control | Permission to read, write, change and delete the file. |
| Modify | Permission to read and write to and delete the file. |
| Read and Execute | Permission to view file contents and execute file. |
| Write | Permission to write to the file. |
| Read | Permission to view the files contents. |
To change the basic permission on a file or folder access the security panel of the properties dialog as outlined above and click Edit to display an editable version of the current settings. To change permissions for users or groups already configured, simply select the desired user or group from the list and change the settings in the permissions list as required (keeping in mind that any grayed out permissions are inherited from the parent folder). Click Apply to commit the changes.
To configure permissions for users or groups not already listed, click on the Edit… button on the security properties panel and click on Add…. Enter the names of users or groups separated by semi-colons (;) in the Select Users or Groups dialog box and then click on Check names to verify the names exist. Click on OK to confirm the user or group and return to the editing dialog. With the new user or group selected, configure the desired permissions and then Apply the settings when completed.
Special File and Folder Permissions
As mentioned previously, basic file and folder permissions are really just pre-packaged collections of special permissions. Special permissions provide a much more fine grained approach to defining permissions on files and folders than is offered by basic permissions. The current special permissions configured on a file or folder can be viewed and modified by right clicking on the object in Windows Explorer, selecting Properties, clicking on the Security tab of the properties dialog and pressing the Advanced button. This will display the Permissions page of the Advanced Security Settings dialog which contains a list of users and groups for which permissions have been defined. Click on Edit to access the editable view of the permissions. Select a user or group from the list and click on the Edit… once again to display the Permission Entry for the selected user or group for this file or folder. This dialog will appear as illustrated in the following figure:
To change the special permissions simply make the appropriate selections in the list (keeping in mind that any grayed out permissions are inherited). To add special permissions for a user or group not currently listed in the Advanced Security Settings page, click on the Add… button and use the Select Users and Groups dialog to add new users or groups to the permission entries list.
Windows Server 2008 R2 (or to be more exact, NTFS) provides 14 special permission options, each of which may be allowed or denied. The following table lists each of these settings and describes the option in more detail:
| Permission | Description |
|---|---|
| Traverse folder / execute file | Allows access to folder regardless of whether access is provided to data in folder. Allows execution of a file. |
| List folder / read data | Traverse folder option provides permission to view file and folder names. Read data allows contents of files to be viewed. |
| Read attributes | Allows read-only access to the basic attributes of a file or folder. |
| Read extended attributes | Allows read-only access to extended attributes of a file. |
| Create files / write data | Create files option allows the creation or placement (via move or copy) of files in a folder. Write data allows data in a file to be overwritten (does not permit appending of data). |
| Create folders / append data | Create folders option allows creation of sub-folders in current folder. Append data allows data to be appended to an existing file (file may not be overwritten) |
| Write attributes | Allows the basic attributes of a file or folder to be changed. |
| Write extended attributes | Allows extended attributes of of a file to be changed. |
| Delete subfolders and files | Provides permission to delete any files or sub-folders contained in a folder. |
| Delete | Allows a file or folder to be deleted. When deleting a folder, the user or group must have permission to delete any sub-folders or files contained therein. |
| Read permissions | Provides read access to both basic and special permissions of files and folders. |
| Change permissions | Allows basic and special permissions of a file or folder to be changed. |
| Take ownership | Allows user to take ownership of a file or folder. |
Effective File and Folder Permissions
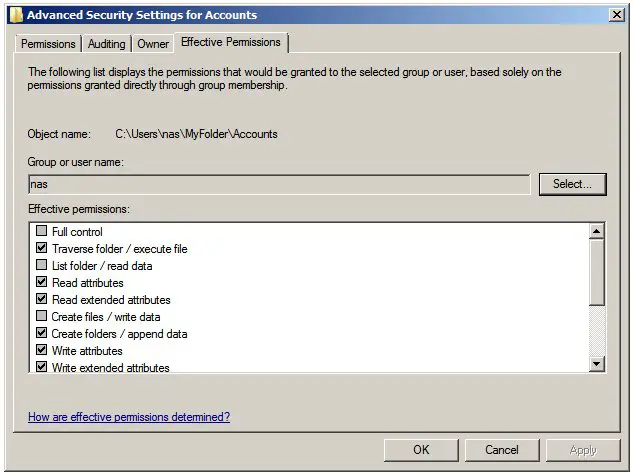
With all the different permission options provided by NTFS on Windows Server 2008 R2, it can be difficult to determine how permissions may accumulate to affect a particular user or group for any given file or folder. In order to make this task a little easier, Windows provides a feature known as Effective Permissions which will list the cumulative permissions for a user or group. To access this feature, right click on the required file or folder in Windows Explorer, select Properties and then select the Security tab in the resulting properties dialog. Within the security panel, click on Advanced and select the Effective Permissions tab in the Advanced Security Settings dialog. The next step is to specify the user or group for which the effective permissions are to be calculated. To achieve this, click on the Select button and use the Select User or Group dialog to specify or search for a particular user or group and then click on OK. The effective permissions for the chosen user or group will subsequently be displayed, as illustrated below:
<google>BUY_WINSERV_2008R2_BOTTOM</google>
Введение
Windows Server 2008 R2 NTFS является одной из основных функциональных возможностей серверных операционных систем Microsoft. Данная технология обеспечивает устойчивую и продуктивную работу сервера, обеспечивая безопасное хранение и доступ к данным.
Что такое Windows Server 2008 R2 NTFS?
Windows Server 2008 R2 NTFS является файловой системой, которая была разработана корпорацией Microsoft специально для серверных операционных систем. Она была создана для обеспечения удобства использования хранилищ данных и гибкости масштабируемости. Она содержит в себе множество важных функций: управление правами доступа, защита данных, контроль доступа, аудит доступа и т.д. При этом NTFS находит широкое применение в различных отраслях, начиная от финансовых и заканчивая медицинскими системами.
Как работает Windows Server 2008 R2 NTFS?
Основной ключевой функцией Windows Server 2008 R2 NTFS является эффективная организация и управление файлами и папками. Она способна разделять данные между пользователями и командами, создавая общие ресурсы, доступные для работы всей компании или отдела. NTFS поддерживает две различные категории прав доступа – чтение и запись. Она позволяет давать этим правам достаточно гибко управлять: при этом вы можете ограничивать количество пользователей, имеющих права доступа к данным, а также управлять безопасностью доступа в целом.
Преимущества Windows Server 2008 R2 NTFS
Windows Server 2008 R2 NTFS имеет множество преимуществ, которые делают ее незаменимым инструментом для эффективной работы и хранения данных на серверах. Несколько основных из них:
- Управление правами доступа – вы можете создавать различную степень доступа к данным и контролировать их использование, чтобы ограничить риск утечки данных и других угроз;
- Хранение множества различных файлов – NTFS позволяет сохранять большие объемы данных, включая фотографии, видео, музыку и документы;
- Повторное использование и переносимость – имеет возможность перенести файлы, хранящиеся на NTFS, на другие устройства и сохранять их целостность при переносе;
- Высокая скорость работы – система быстро открывает и сохраняет файлы без задержек в работе, ориентируясь на производительность серверов и максимальных объемах данных.
Как использовать Windows Server 2008 R2 NTFS
Windows Server 2008 R2 NTFS находит применение в столь различных предприятиях, как в малых организациях, так и в крупных, которые масштабируют свою работу. Вот несколько примеров, как можно применять NTFS:

В небольшой медицинской клинике, имеющей множество медицинских документов и фотографий пациентов. NTFS помогает клинике хранить, организовывать и управлять данными на всех уровнях – от панели администратора до конца пользователя.

В торговой организации с большим количеством сотрудников многие документы переходят с отдела в отдел. NTFS позволяет разделить права доступа и ограничить конфиденциальную информацию соответственно правам доступа.

Вывод
Windows Server 2008 R2 NTFS – это отличный инструмент для серверных операционных систем, обеспечивающий удобство, гибкость и безопасность для работы с данными. Он предлагает множество функций и преимуществ, которые делают его незаменимым для любых предприятий, включая большие корпорации из разных отраслей. В данном случае были рассмотрены лишь некоторые основные возможности NTFS, а в целом это технология оказывает огромное влияние на эффективность серверных операционных систем.
Windows Server 2008 R2 NTFS: Когда надежность данных имеет значение
Windows Server 2008 R2 NTFS – это один из наиболее распространенных файловых систем для серверов. Разработанная компанией Microsoft и оптимизированная для больших объемов данных, NTFS имеет ряд преимуществ перед другими файловыми системами. В этой статье мы рассмотрим возможности NTFS в Windows Server 2008 R2 и почему это стоит учитывать при выборе файловой системы для вашего сервера.
Что такое NTFS?
NTFS (New Technology File System) – файловая система, используемая в операционных системах Microsoft Windows. Она была введена в Windows NT 3.1 в 1993 году и с тех пор претерпела множество улучшений. NTFS обеспечивает высокую защиту данных и надежность, позволяет создавать большие разделы и файлы и поддерживает множество расширенных функций.
Преимущества NTFS в Windows Server 2008 R2
- Большие объемы данных: NTFS поддерживает разделы размером до 256 терабайт, что позволяет хранить достаточно большое количество данных.
- Безопасность данных: NTFS обеспечивает высокую степень защиты данных, позволяя устанавливать права доступа на уровне пользователя, группы или компьютера.
- Хранение файлов большого размера: NTFS может хранить файлы размером до 16 экзабайт. Это позволяет хранить большие мультимедийные файлы или базы данных.
- Журналирование файловой системы: NTFS записывает все изменения, сделанные в файловой системе, в журнал. Это позволяет быстро восстановить данные после сбоев в системе.
- Сжатие данных: NTFS поддерживает сжатие данных, что позволяет экономить дисковое пространство. Однако при этом работа с данными может замедляться из-за необходимости выполнения операций сжатия/разжатия.
- Шифрование файлов: NTFS поддерживает шифрование данных на уровне файлов и папок. Это позволяет защитить конфиденциальные данные от несанкционированного доступа.
Как работать с NTFS в Windows Server 2008 R2

NTFS – это файловая система по умолчанию для Windows Server 2008 R2. При установке операционной системы автоматически создается раздел NTFS на диске. Чтобы настроить режимы работы с NTFS, в Windows Server 2008 R2 используется утилита Disk Management.
Для работы с NTFS также используются команды командной строки, такие как chkdsk (проверка и восстановление целостности файловой системы) и defrag (дефрагментация дисков).
Выводы

NTFS – это надежная и безопасная файловая система для Windows Server 2008 R2. Она поддерживает большие объемы данных, хранение файлов большого размера, сжатие данных, шифрование файлов и другие расширенные функции.
Если вы хотите обеспечить надежность хранения данных на своих серверах, то выбор NTFS в Windows Server 2008 R2 – это правильное решение. Эта файловая система обеспечивает высокую защиту и надежность, что необходимо в предприятий с большими объемами данных.
Надеемся, что эта статья помогла вам лучше понять, что такое NTFS в Windows Server 2008 R2 и почему это важно для вашего сервера.
Windows Server 2008 R2 NTFS: Обзор и Описание
Windows Server 2008 R2 NTFS — это файловая система, предназначенная для управления данными в частных и общих серверных сетях. Этот формат файла разработан компанией Microsoft и используется на большинстве серверов, работающих под управлением Windows.
Что такое NTFS?
NTFS – это краткая терминология, которая расшифровывается как «New Technology File System». Разработана Фирмой Microsoft для замены старой файловой системы FAT. NTFS работает на большинстве устройств, таких как компьютеры, серверы, планшеты, смартфоны и многим другим.
Преимущества NTFS

Самая главная особенность NTFS заключается в том, что этот формат файла улучшает производительность сервера, так как уменьшает временную задержку при передаче данных. NTFS также более надежен, чем форматы файлов FAT и exFAT, который может пропустить важные части файла из-за ограниченного объема диска.
Другой важной особенностью NTFS является возможность установки разных уровней доступа к файлам и папкам. NTFS также поддерживает разные уровни шифрования данных для предотвращения несанкционированного доступа к файлам и папкам.
Особенности Windows Server 2008 R2 NTFS

Windows Server 2008 R2 NTFS представляет собой различные функции, многие из которых улучшают производительность серверов и обеспечивают безопасность данных.
- Протоколирование изменений
- Шифрование и аудит доступа к файлам и папкам
- Размер кластера до 256 ТБ
- Поддержка файлов больше 16 Тебайт
- Поддержка файловых атрибутов и файловых потоков
- Возможность исправления ошибок файловой системы
Как использовать Windows Server 2008 R2 NTFS на вашем сервере?
Если вы планируете использовать Windows Server 2008 R2 NTFS на своем сервере, то необходимо следить за всеми сроками обновления, выполняя регулярно обновление программного обеспечения. Ведь только такие меры помогут сохранить высокий уровень безопасности и обеспечить стабильность работы вашего сервера.
Важно отметить, что использование Windows Server 2008 R2 NTFS можно улучшить путем выбора оптимальных настроек.
- Использование международного FAT для каталогов с небольшим количеством файлов
- Выбор минимального размера NTFS-кластера
- Использование одного физического диска с несколькими разделами, например, обозначение раздела, в котором хранятся настройки операционной системы в NTFS, и таким образом отделение критических данных от данных обычного пользователя.
Заключение
Windows Server 2008 R2 NTFS — это надежная и высокопроизводительная файловая система, которая используется на многих серверах по всему миру. Ее уникальные особенности позволяют управлять данными на серверах более безопасно и эффективно.
|
2/26/2011 4:36:55 PM |
||||||||||||||||||||||||||||||||||||||
Files
improvements made, a complete understanding of file-level security is recommended to ensure that the file-level security of a server is not neglected. latest revision of the NT File System (NTFS) is used in Windows Server 2008 R2 to provide for file-level security in the operating system. Each object that is referenced in NTFS, which includes files and folders, is marked by an access control entry (ACE) that physically limits who can and cannot access a resource. NTFS permissions utilize this concept to strictly control read, write, and other types of access on files. judicious use of NTFS-level permissions, and all directories should have the file-level permissions audited to determine if there are any holes in the NTFS permission set. Changing NTFS permissions in Windows Server 2008 R2 is a straightforward process; simply follow these steps: used share-level permissions, which were independently set. A share is a file server entry point, such as \\sfofs01\marketing, that enables users to have access to a specific directory on a file server. Older file systems such as FAT, HPFS, and FAT32 did not include file-level security, so the security was set instead on the share level. Although share-level security can still be set on files, it is preferable to use NTFS-level security, where possible. Share-level security is not very secure because it cannot secure the contents of subdirectories easily. file-level security is to set up auditing on a particular server, directory, or file. Auditing on NTFS volumes enables administrators to be notified of who is accessing, or attempting to access, a particular directory. For example, it might be wise to audit access to a critical network share, such as a finance folder, to determine whether anyone is attempting to access restricted information. continues support for the Encrypting File System (EFS), a method of scrambling the contents of files to make them unintelligible to unauthorized users. EFS has proven to be valuable for organizations that desire to keep proprietary data, especially those stored on laptops, out of the wrong hands. A more comprehensive approach to client encryption is with Windows 7/Vista BitLocker Drive Encryption, which encrypts all files on the entire hard drive, with the exception of a few files required for startup. |
||||||||||||||||||||||||||||||||||||||
|
1. |
Right-click the folder or file onto which the security will be applied, and choose Properties. |
|||||||||||||||||||||||||||||||||||||
|
2. |
Select the Security tab. |
|||||||||||||||||||||||||||||||||||||
|
3. |
Click the Advanced button. |
|||||||||||||||||||||||||||||||||||||
|
4. |
Click the Change Permissions button. |
|||||||||||||||||||||||||||||||||||||
|
5. |
Uncheck the Include Inheritable Permissions from This Object’s Parent check box. |
|||||||||||||||||||||||||||||||||||||
|
6. |
Click Remove when prompted about the application of parent permissions. |
|||||||||||||||||||||||||||||||||||||
|
7. |
While |
|||||||||||||||||||||||||||||||||||||
|
8. |
Check the Replace All Child Object Permissions with Inheritable Permissions from This Object check box, as shown in Figure 1, and click OK. Figure 1. Setting NTFS permissions.

|
|||||||||||||||||||||||||||||||||||||
|
9. |
When prompted about replacing security on child objects, click Yes to replace child object security and continue. |
|||||||||||||||||||||||||||||||||||||
|
10. |
Click OK and then click OK again to close the property pages. |
|||||||||||||||||||||||||||||||||||||
|
1. |
Right-click the folder or file onto which the auditing will be applied, and choose Properties. |
|||||||||||||||||||||||||||||||||||||
|
2. |
Select the Security tab. |
|||||||||||||||||||||||||||||||||||||
|
3. |
Click the Advanced button. |
|||||||||||||||||||||||||||||||||||||
|
4. |
Select the Auditing tab. |
|||||||||||||||||||||||||||||||||||||
|
5. |
Click the Edit button. |
|||||||||||||||||||||||||||||||||||||
|
6. |
Using the Add button, enter all users and groups that will be audited. If you’re auditing all users, enter the Everyone group. |
|||||||||||||||||||||||||||||||||||||
|
7. |
On Figure 2. Selecting what to audit.
|
|||||||||||||||||||||||||||||||||||||
|
8. |
Click OK to apply the settings. |
|||||||||||||||||||||||||||||||||||||
|
9. |
Click OK twice to save the settings. |
|||||||||||||||||||||||||||||||||||||