
Советы по подготовке брандмауэра к фильтрации сетевого трафика
В состав версий Windows Server 2003 Service Pack 1 (SP1) и Windows XP SP2 входит размещаемый в системе брандмауэр Windows Firewall, гораздо более эффективный, чем его предшественник, Internet Connection Firewall (ICF). В отличие от ICF, который поставлялся с Windows 2003 и XP, Windows Firewall подходит для развертывания в масштабах предприятия благодаря возможности управлять политиками брандмауэра из единого центра, нескольким интерфейсам настройки и множеству новых функций безопасности. В этой статье я расскажу о том, как лучше подойти к планированию, настройке конфигурации и применению брандмауэра на предприятии.
Подготовительный этап
Важно помнить о выбираемом по умолчанию режиме Windows Firewall. В XP SP2 брандмауэр Windows Firewall активен по умолчанию, а в Windows 2003 SP1 его стандартное состояние — выключенное, если только SP1 не развертывается на системе с запущенным ICF. В этом случае режим брандмауэра не изменяется. Если пакет SP1 размещен на установочном компакт-диске с операционной системой, то Windows Firewall всегда активизируется в режиме включения по умолчанию, когда в процессе установки происходит соединение со службой Windows Update для получения последних обновлений. Поэтому, если развернуть XP SP2, не уделяя должного внимания настройке Windows Firewall, и опрометчиво принять стандартные параметры, можно лишиться доступа к инструментарию для дистанционного управления настольными компьютером. Если администратор не готов использовать Windows Firewall или работает с брандмауэром независимого поставщика, то можно спокойно отключить Windows Firewall и развернуть SP2 без него.
Если для аутентификации пользователей применяется Active Directory (AD), а настольные компьютеры являются членами домена с соответствующими учетными записями, то самый простой способ настроить Windows Firewall — задействовать объекты групповой политики Group Policy Object (GPO). После установки XP SP2 на настольных компьютерах параметры брандмауэра настраиваются при перезагрузке машин и каждый раз при обновлении политики. Если используется продукт управления каталогами независимого поставщика или на предприятии имеются не управляемые администратором компьютеры, которые не входят в состав домена AD, то для настройки Windows Firewall вместо объектов GPO можно использовать пакетные файлы или сценарии. Настроить конфигурацию брандмауэра можно и в ходе автоматизированных или интерактивных процедур установки XP SP2.
Настройка Windows Firewall
Приступая к настройке конфигурации Windows Firewall, следует помнить об основных характеристиках брандмауэра:
- Windows Firewall не выполняет фильтрации исходящего трафика, то есть не ограничивает его. Если предприятие нуждается в фильтрации исходящего трафика, следует использовать брандмауэр независимого поставщика.
- Возможности Windows Firewall шире, чем у ICF: в Windows Firewall можно настраивать исключения, чтобы разрешить входящий трафик с учетом не только транспортного протокола (TCP или UDP) и номера порта, но и приложения (например, одноранговой программы обмена файлами).
- Можно уточнить исключения по области действия, то есть разрешить соединения от всех компьютеров, от компьютеров в указанных подсетях, только из локальной подсети или от компьютеров с определенными IP-адресами.
- Windows Firewall активизируется по умолчанию для всех сетевых соединений, но для каждого сетевого интерфейса можно настроить разные правила брандмауэра.
- Настраивать Windows Firewall может только администратор. Если управление брандмауэром централизованное (через AD или GPO), то можно лишить локальных администраторов права изменять параметры.
- С помощью Windows Firewall можно ограничить трафик IPv4 и IPv6.
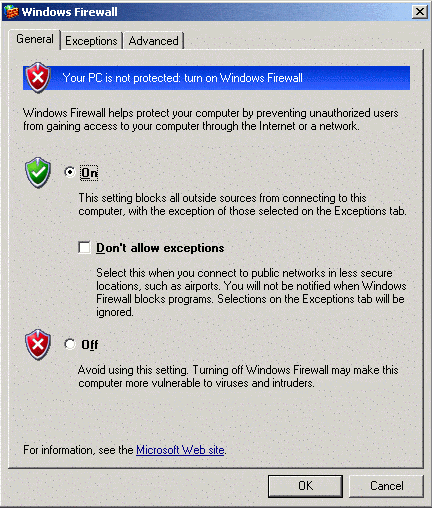
- Windows Firewall располагает двумя профилями, Domain и Standard. Профиль Domain активизируется, если компьютер подключен к сети с контроллерами домена (DC), членом которого он является. Профиль Standard применяется, если компьютер подключен к другой сети, например общедоступной беспроводной сети или скоростному соединению в номере отеля. Рекомендуется настроить профили Domain и Standard для серверов и настольных компьютеров, а также для ноутбуков.
Прежде чем настраивать конфигурацию Windows Firewall, следует провести инвентаризацию приложений на рабочих станциях и серверах, которые могут организовать оконечные точки соединений; портов, используемых приложениями и операционной системой; источников трафика для каждой хост-машины с Windows Firewall. Для мобильных систем, таких как ноутбуки, в ходе инвентаризации следует учитывать различную природу сетевого трафика при подключении системы к корпоративной сети с контроллерами домена и активным профилем Domain брандмауэра Windows Firewall, в отличие от системы, подключенной к общедоступной сети с активным профилем Standard. Нужно всегда выбирать профиль Standard и разрешать только необходимый входящий трафик через брандмауэр, чтобы свести к минимуму угрозу для подключенных к сети мобильных машин.
В Windows Firewall определены четыре встроенные административные службы, представляющие типовые исключения для любой политики брандмауэра: File and Print, Remote Administration, Remote Desktop и Universal Plug and Play (UpnP). Remote Administration обеспечивает управление системой через типовые административные интерфейсы и подсистемы, такие как Windows Management Instrumentation (WMI) и вызов удаленных процедур (remote procedure call — RPC). Remote Desktop позволяет подключиться к одной системе с другой через RDP и используется при запросе на поддержку Remote Assistance. Администраторы часто применяют Remote Desktop для подключения к удаленным серверам, которыми они управляют. Протокол UpnP обеспечивает корректную работу устройств, которые обнаруживают и динамически настраивают друг друга с учетом активных приложений и служб. Типовой пример использования UpnP — взаимодействие XP с UPnP-совместимым широкополосным маршрутизатором при запуске MSN Messenger, в результате которого аудио и видеосоединения устанавливаются через встроенный брандмауэр маршрутизатора.
При настройке профилей Domain и Standard брандмауэра Windows Firewall рекомендуется задать исключения для конкретных приложений. Благодаря исключению приложение сможет установить любые нужные оконечные точки и принимать через них трафик. Существуют две веские причины, чтобы назначать исключения для приложений. Во-первых, проще определить и описать приложения, нежели отдельные используемые ими порты, особенно потому, что порты, используемые многими приложениями, документированы не полностью или назначаются динамически. Во-вторых, многие приложения, в том числе несанкционированные, используют те же порты, что и легальные приложения; указав приложения вместо портов, можно лишить неутвержденные приложения возможности установить оконечные точки соединения. Всегда, когда возможно, рекомендуется не делать исключений для профиля Standard и отклонять все входящие соединения.
Windows Firewall для серверов
Microsoft не дает специальных рекомендаций по настройке Windows Firewall для серверов. По умолчанию брандмауэр блокирован, если только пакет Windows Server 2003 SP1 не устанавливается на системе с активным ICF, однако брандмауэром можно воспользоваться для укрепления безопасности сервера Windows 2003. Применяя брандмауэр на сервере, следует помнить, что серверы по своей природе служат для размещения приложений и служб, с которыми устанавливают соединения приложения и службы на других серверах, настольных компьютерах и ноутбуках. Прежде чем активизировать Windows Firewall на сервере, следует продумать его конфигурацию.
Для некоторых серверов настроить Windows Firewall не составляет труда. Например, неуправляемому автономному Web-серверу в демилитаризованной зоне (DMZ) требуется принимать только входящие соединения через порт 80/TCP (HTTP) или 443/TCP (HTTP Secure-HTTPS), если установлен сертификат и активизирована защита SSL (Secure Sockets Layer).
На сервере с двумя или несколькими интерфейсами, из которых один интерфейс подключен к Internet, а другие — к корпоративным сетям, можно активизировать Windows Firewall, а затем отключить его на всех интерфейсах, кроме Internet, и настроить брандмауэр, разрешив только необходимые входящие соединения на интерфейсе Internet.
В простых файл- и принт-серверах корпоративной сети, входящих в состав домена, можно активизировать Windows Firewall и задействовать встроенную службу File and Printer Sharing для подключения пользователей к этим серверам. Можно также использовать Windows Firewall для защиты сервера, службы которого прослушивают известные порты, например сервера базы данных Microsoft SQL Server 2000. Для этого следует разрешить в брандмауэре трафик через соответствующие порты.
Настроить Windows Firewall на сервере можно с помощью мастера Security Configuration Wizard (SCW). SCW, факультативный компонент Windows 2003 SP1, уменьшает поверхность атаки сервера, задавая роль или роли для сервера. SCW содержит ролевую информацию для DC и других серверов инфраструктуры; он блокирует необязательные службы и ограничивает входящий трафик через Windows Firewall.
Windows Firewall не следует размещать на некоторых серверах, в том числе контроллерах домена AD и некоторых серверах приложений, которые прослушивают большой диапазон портов или используют динамические порты, таких как серверы Exchange Server 2003. В последнем случае можно развернуть Windows Firewall, если серверы и клиенты, подключенные к серверам Exchange, входят в состав домена. Брандмауэр настраивается на передачу аутентифицированного трафика IPsec в обход Windows Firewall (этот прием будет рассмотрен ниже), а клиенты настраиваются на использование IPsec.
На многих серверах, в том числе таких, на которых выполняется множество приложений и служб, необходима выборочная настройка Windows Firewall. Требуется указать порты, прослушиваемые приложениями и службами, отбросить необязательные порты и настроить Windows Firewall для необходимых портов. Определить открытые порты и прослушивающие их приложения и службы можно с помощью команды Netstat (netstat.exe), усовершенствованной в последних пакетах обновлений. Указав в командной строке
netstat -a -b
можно увидеть все открытые порты TCP (независимо от состояния) и порты UDP в системе, идентификатор процесса (PID) для каждого активного соединения (образец выходной информации приведен на экране 1). Как уже упоминалось, Windows Firewall можно настроить на разрешение входящего трафика для поименованных приложений, независимо от прослушиваемых ими портов. Единственный недостаток Netstat заключается в том, что команда выдает лишь «моментальный снимок» системы. С ее помощью нельзя идентифицировать приложения, службы и их порты, если эти приложения неактивны в момент запуска Netstat. Чтобы получить достоверную картину, можно сделать несколько снимков в разное время.
Более простая альтернатива Netstat — инструмент Port Reporter, который можно получить по адресу http://support.microsoft.com/?kbid=837243. Программа устанавливается как служба и регистрирует сетевую активность, в том числе подробные сведения об активных программах и службах, и даже учетную запись пользователя, с которой работает приложение или служба. С помощью сопутствующего инструмента Port Reporter Parser (http://www.support.microsoft.com/?kbid=884289) можно извлечь данные из журналов, генерируемых Port Reporter. Правильно настроив и запуская Port Reporter в течение определенного промежутка времени, можно идентифицировать приложения, которые открывают порты сервера и должны быть настроены в Windows Firewall по приложениям или отдельным портам. Длительность применения Port Reporter зависит от приложений и особенностей работы пользователей. Предостережение: Port Reporter может слегка снизить производительность системы, а журналы очень велики. Файлы журналов следует записывать на быстрый диск с достаточным количеством свободного места.
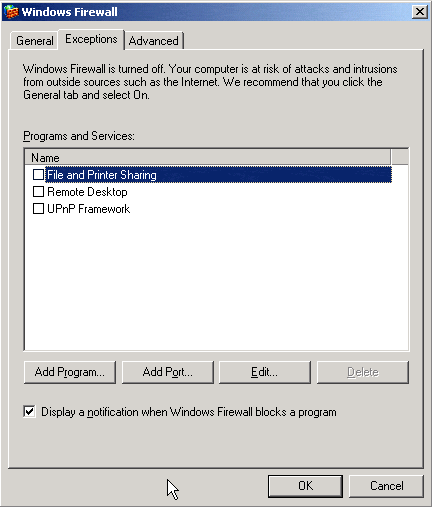
Рекомендуется активизировать функции протоколирования Windows Firewall после завершения настройки серверов. Можно записывать сведения об успешных и неудачных соединениях. Если после настройки и активизации Windows Firewall возникают проблемы при выполнении некоторых приложений, то с помощью информации из журналов можно определить дополнительные порты, которые следует открыть. Для настройки функций протоколирования следует открыть панель управления, запустить утилиту Windows Firewall, щелкнуть на вкладке Advanced, а затем на кнопке Settings в разделе Security Logging. Откроется диалоговое окно Log Settings (экран 2). Журнал Windows Firewall следует сохранять на быстром диске, а максимальный размер журнала должен быть достаточным для записи необходимой информации в течение длительного времени. Проверив корректность настройки Windows Firewall, можно отключить протоколирование.
Экран 2. Настройка протоколирования в Windows Firewall |
Windows Firewall можно настроить и таким образом, чтобы передавать аутентифицированный трафик IPsec от доверенных машин в обход брандмауэра. В этот режим можно перевести серверы и рабочие станции, чтобы они пропускали только необходимый клиентский трафик, одновременно обеспечивая неограниченный доступ для администрирования рабочих станций и серверов.
Полная готовность
После завершения подготовки к развертыванию Windows Firewall рекомендуется активизировать брандмауэр сначала для пилотной группы пользователей. Если в процессе пробного развертывания возникнут трудности, следует активизировать режим протоколирования; в журналах содержится информация, которая поможет определить причину проблем. После устранения неполадок и успешного развертывания Windows Firewall брандмауэр станет неоценимым компонентом системы безопасности предприятия.
Джон Хоуи — Менеджер по проведению практических занятий в центре Microsoft Security Center of Excellence. Имеет сертификаты CISSP, CISM и CISA. jhowie@microsoft.com
Дополнительные ресурсы
Более подробную информацию о Windows Firewall можно найти в следующих статьях на сайте Windows IT Pro/RE:
Азы Windows Firewall, http://www.osp.ru/win2000/safety/507_6.htm
Port Reporter, http://www.osp.ru/win2000/worknt/509_3.htm
Информацию о Windows Firewall можно найти на следующих Web-узлах:
Windows Server 2003 Service Pack 1 (SP1), http://www.microsoft.com/windowsserver2003/ downloads/servicepacks/sp1/default.mspx
Windows XP SP2, http://www.microsoft.com/windowsxp/sp2/default.mspx
Microsoft Help and Support, http://support.microsoft.com
There is a false sense of security when you envision your network as inside and outside, with a firewall protecting you from hostile users on the outside.
One particularly nasty problem is when users bring their laptops home, surf, read email, and then plug it right back in to the corporate LAN on Monday morning.
Windows Server 2003 has a fairly flexible host based firewall that you can install to protect your servers from those inside your main firewall.
Here is an Nmap scan of a fresh install of Windows Server 2003 with IIS, and the default client, printer, and file sharing for Microsoft Networks enabled:
[usr-1@srv-1 ~]$ nmap -sV 10.50.100.112
Starting nmap 3.70 ( http://www.insecure.org/nmap/ ) at 2005-08-03 17:09 EDT
Interesting ports on 10.50.100.112:
(The 1655 ports scanned but not shown below are in state: closed)
PORT     STATE SERVICE      VERSION
80/tcp   open  http         Microsoft IIS webserver 6.0
135/tcp  open  msrpc        Microsoft Windows msrpc
139/tcp  open  netbios-ssn
445/tcp  open  microsoft-ds Microsoft Windows 2003 microsoft-ds
1025/tcp open  msrpc        Microsoft Windows msrpc
Nmap run completed -- 1 IP address (1 host up) scanned in 42.176 seconds
Let’s block everything going to this server except port 80, the HTTP port that IIS uses by default, and the standard port for HTTP.
First, go into the Local Area Connection Properties and click the Advanced tab:
Click the settings button. Click the On radio button:
Click the Exceptions tab, and click Add Port:
Enter http (or whatevery you want to call the service), and type 80 in the Port number box:
Click OK until all of the dialog boxes are closed.
The service will be running correctly right away without a reboot.
Let’s run another scan and make sure everything is being blocked except for port 80:
[usr-1@srv-1 ~]$ nmap -sV 10.50.100.112
Starting nmap 3.70 ( http://www.insecure.org/nmap/ ) at 2005-08-03 17:19 EDT
Interesting ports on 10.50.100.112:
(The 1659 ports scanned but not shown below are in state: filtered)
PORT   STATE SERVICE VERSION
80/tcp open  http    Microsoft IIS webserver 6.0
Nmap run completed -- 1 IP address (1 host up) scanned in 37.085 seconds
[usr-1@srv-1 ~]$
We are good.
Now, this box is locked down so well that it will be difficult to authenticate users against a domain or share files, of course, but that may be desired in some cases.
Choose what ports you have to have open and specifically allow those ports if needed.
Disallow the rest by default.
If you don’t need full time access to file shares on your webserver, consider only allowing access when you prop the new site.
Enterprise Networking Planet content and product recommendations are editorially independent. We may make money when you click on links to our partners. Learn More.
As a Windows server administrator it is particularly important to secure your servers by any and all means at your disposal. We all know that Microsoft products are especially vulnerable to malware, due in part to their overwhelming prevalence in desktop computing. Hopefully most administrators are not going to be browsing the Web on their Windows file server, so chances are that malware is not going to get a hold of a server via user action on the desktop. The attack is going to come from the network, and the built-in Windows firewall can help.
Beginning with Windows Server 2003 SP1, the built-in firewall comes pre-installed. It is free, easy to setup, and can be configured using group policy. Lowering your attack surface by locking down remote desktop (RDP) is a prime example and a good place to start. Restricting the RDP port (3389) so that it is only available to subnets or IPs used by administrators takes only seconds.
To begin using the Windows firewall, open the control panel and double-click on the Windows Firewall icon. If you’re prompted with a message asking to start the necessary service, click yes. From this interface you can enable/disable the firewall as well as add exceptions. The Windows firewall allows the administrator to unlock individual ports or executables. When an executable is unlocked it will be able to listen on any port that it opens. When adding a new exception, be sure to click on the “Change scope…” button to set the appropriate trusted IP space. For any command line fanatics out there you can also use netsh:
netsh -c firewall
The most difficult piece of enabling the firewall on a server is figuring out what needs to be unlocked. The Windows firewall comes with some built-in exceptions that can be enabled, but if you go much beyond file services you will have to determine which ports or executables need to be unlocked. The easiest way to do this is by using the netstat command. Run the following from a command prompt:
netstat -a -b -n
This will return a list of all ports that are active or listening on your system. The -a switch ensures that all of the listening ports are displayed and -b shows the executables that opened each port. This can be very useful when trying to track down which executable(s) needs to be unlocked for a particular application. By default netstat will hide the actual port number from you if it “knows” what it is. The -n switch forces netstat to show the actual port number.
Group Policy Management
One of the key advantages of the Windows firewall is its ability to be configured through group policy. For large environments this feature is essential to administrator sanity.
Before doing any sort of group policy configuration you will want to make sure the Group Policy Management console is installed on your workstation. If you don’t see Group Policy Management in Control Panel -> Administrative Tools then you can download it here (search for “group policy management”).
Using the Group Policy Management interface, browse to the Active Directory organizational unit (OU) containing your servers. Right click on the OU and create or link an existing GPO. Open the GPO and navigate to the following folder:
Computer Configuration/Administrative Templates/Network/Network Connections/Windows Firewall
From here there are two sub-folders, Domain Profile and Standard Profile. It is extremely important to make sure that your firewall policy settings match in both of these folders. Under most circumstances the Domain Profile will be used, but if someone logs onto the server with a local user account then the server will switch to its Standard Profile settings. If the Standard Profile settings are not configured then the firewall will essentially turn itself off!
Browse through the list of available settings and configure the GPO for your server environment. There are a few things to keep in mind. First, once you choose a setting through group policy you will not be able to change the same setting on an individual server. For example, by unlocking RDP for a specific subnet via group policy you will not be able to add additional trusted subnets on a server-by-server basis. Second, don’t create a separate GPO for each server; try to group them together as much as possible. Creating a base firewall GPO that has exceptions for backup, anti-virus, etc. is optimal. Add server specific exceptions on the server itself, this way when you change anti-virus vendors (and someday you will) only one GPO has to be modified.
Adding exceptions for executables through group policy can be tricky. Use the “Windows Firewall: Define program exceptions” setting to unlock specific executables. Here are a few examples:
%programfiles%SymantecLiveUpdateLuComServer.EXE:192.168.1.1/24:enabled:GPO Policy for LuComServer.exe
%programfiles%Symantec AntiVirusRtvscan.exe:192.168.1.1/24:enabled:GPO Policy for Rtvscan.exe
%systemdrive%A286B00A-C3DE-414F-A96A-2BD238948D88MsMgmtAuxiliary.exe: 192.168.1.100:Enabled:MOM 2005 MsMgmtAuxiliary
The top two exceptions will allow Symantec Anti-Virus to communicate with its parent server, and the bottom exception allows the Microsoft Operations Manager (MOM) agent to function correctly. In fact, it even allows the MOM agent to be installed remotely. It is a good idea to store your list of program exceptions in a separate text file of some sort. This will save you a few keystrokes later on because they cannot be extracted from the GPO.
The built-in Windows firewall is a quick, easy, and cheap way to protect your servers and reduce your attack surface. Add in the ability to control settings via group policy and it’s really a no-brainer. With a few clicks you will be on your way to a more secure server environment.
The built-in Windows Firewall, first known
as the Internet Connection Firewall (ICF), is part of Windows XP and
Windows Server 2003. Service Pack 2 (SP2) for Windows XP and Service
Pack 1 (SP1) for Windows Server 2003 improved the firewall and renamed
it the Windows Firewall.
Do
not confuse the built-in Windows Firewall with Microsoft Internet
Security and Acceleration (ISA) Server. ISA is a software-based firewall
that can be installed on Windows Server 2003 or Windows 2000 Server.
Microsoft sells it separately. Unlike the host-based Windows Firewall,
ISA server is a full-featured firewall that provides stateful filtering,
application layer filtering, egress as well as ingress filtering, and
many other enterprise-level features. It can also be used as a web
proxy. Third-party add-ins are available to expand the services it
offers.
1. Internet Connection Firewall (ICF)
The Windows Server 2003 built-in firewall is not
enabled by default. Installation of SP1 will not change this. The
firewall can be enabled and configured to provide rudimentary protection
for the server. When enabled, logging is not turned on.
To enable and configure the ICF
, begin by clicking Start and selecting the Control Panel. Double-click
Network Connections. Right-click the network connection to be shared and
select Properties. Select the Advanced tab and click «Protect my
computer and network by limiting or preventing access to this computer
from the Internet,» as shown in Figure 1.
Figure 1. Enable the Internet Connection Firewall from the network connection using the Advanced tab on the Properties page
Click the Settings button. If you must provide
access to services on the private network or on this host, select the
service and enter the IP address of the server where the service
resides. Click OK. Click the Security Logging tab and select «Log
dropped packets» and/or «Log successful connections.» If required,
change log file options, as shown in Figure 2.
«Log file options» include the Name options (the name of the firewall
log file and the path to its location) and a «Size limit» in kilobytes.
If the log file reaches the limit set in the «Size limit» box, a new
firewall log file is created. Click OK.
Select the ICMP tab. Click to select ICMP options from those shown in Figure 3 if ICMP communications are permitted. Click OK twice to close network settings.
If you need to provide a service connection that is not listed by default on the Advance Settings Services page, as shown in Figure 4, you can configure a custom service definition.
Figure 2. Logging is not configured by default and should be enabled
Figure 3. Configure ICMP if required for troubleshooting
To do so, select the Services page. Click the Add
button and enter a description of the service. In the Service Settings
page shown in Figure 5, enter the computer name or IP address of the computer on which the service will run.
Enter a value in the «External port number for
this service» field and click TCP or UDP. Enter a value in the «Internal
port number for this service» field. When you have finished, click OK.
Figure 4. Some services are already configured as exceptions and can simply be selected
Figure 5. Configure custom services to allow access to programs
Now that you have enabled ICF and
customized some of the service settings, it is time to examine some of
the modifications that have been introduced with the service packs.
Windows · September 28, 2024
Windows Server 2003, while now considered outdated, is still in use in various environments. Proper security configuration is essential to protect sensitive data and maintain system integrity. This guide provides a comprehensive overview of security measures that can be implemented on a Windows 2003 Server.
1. Initial Setup and Configuration
Upon installation, the first step is to ensure that the server is updated with the latest service packs and patches. Microsoft has released Service Pack 2 (SP2) for Windows Server 2003, which includes numerous security enhancements.
- Install Service Pack 2: Download and install SP2 from the official Microsoft website.
- Enable Automatic Updates: Go to
Control Panel > System > Automatic Updatesand enable automatic updates to ensure the server receives the latest security patches.
2. User Account Management
Managing user accounts effectively is crucial for maintaining security. Follow these best practices:
- Use Strong Passwords: Enforce a password policy that requires complex passwords. This can be configured in
Control Panel > Administrative Tools > Local Security Policy > Account Policies > Password Policy. - Limit User Privileges: Assign the least amount of privilege necessary for users to perform their tasks. Use the principle of least privilege to minimize potential damage from compromised accounts.
- Regularly Review User Accounts: Periodically audit user accounts and remove any that are no longer needed.
3. Firewall Configuration
Windows Server 2003 includes a built-in firewall that should be configured to protect the server from unauthorized access.
- Enable Windows Firewall: Go to
Control Panel > Windows Firewalland enable the firewall. - Configure Exceptions: Only allow necessary services through the firewall. For example, if you are running a web server, allow HTTP (port 80) and HTTPS (port 443).
4. Security Policies
Implementing security policies can help enforce security measures across the server.
- Account Lockout Policy: Configure account lockout settings to prevent brute-force attacks. This can be set in
Local Security Policy > Account Policies > Account Lockout Policy. - Audit Policy: Enable auditing to track user activities. This can be configured in
Local Security Policy > Local Policies > Audit Policy.
5. Data Protection
Protecting sensitive data is paramount. Consider the following measures:
- File System Permissions: Set appropriate NTFS permissions on files and folders to restrict access to sensitive data.
- Backup Data Regularly: Implement a regular backup schedule to ensure data can be restored in case of loss or corruption.
6. Network Security
Securing the network environment is essential for protecting the server from external threats.
- Use VPNs: For remote access, consider using a Virtual Private Network (VPN) to encrypt data transmitted over the internet.
- Disable Unused Services: Review and disable any unnecessary services to reduce the attack surface. This can be done through
Control Panel > Administrative Tools > Services.
7. Regular Monitoring and Maintenance
Ongoing monitoring and maintenance are critical for maintaining security over time.
- Log Monitoring: Regularly review security logs for any suspicious activity. Use tools like Event Viewer to analyze logs.
- Vulnerability Scanning: Conduct regular vulnerability assessments to identify and remediate potential security weaknesses.
Summary
Securing a Windows 2003 Server requires a multi-faceted approach that includes initial setup, user account management, firewall configuration, and ongoing monitoring. By following these guidelines, administrators can significantly enhance the security posture of their servers. For those looking for reliable solutions, consider exploring USA VPS Hosting options that provide robust security features tailored to your needs.