
Прочитано: 6 219
Цель данной заметки, задокумментировать пошаговый процесс развертывания Active Directory на системе Windows Server 2003 R2 Enterprise Edition. Почему я это делаю, я думал, что данная ось уже более нигде не используется, прогресс администрирования убежал вперед Server 2008/R2 & Server 2012 – вот главные системы с которыми я работал в последнее время на предыдущих местах работы. А тут на тебе, компания и не думала идти в ногу со временем.
Но с приходом нарастающих требований и нового функционала, мне была поставлена задача, проработать процесс миграции с домена на базе Windows Server 2003 R2 x64 на домен с осью Windows Server 2008 R2. Но чтобы это сделать, мне нужно сперва разобрать все от и до. Поэтому данная заметка будет своего рода первой в небольшом цикле заметок по миграции.
И так у меня в наличии система со следующими характеристиками:
HDD – 40
CPU -1
RAM – 2
и дистрибутив.
В настройках сетевой карточки у меня прописаны следующие IP адреса:
Тестировать все моменты буду под Virtualbox (благо мой рабочий ноутбук обладает повышенными характеристиками и дает мне полную свободу прорабатывания действий перед их практическим применением в организации, потому как я не люблю быть просто болтуном, я практик и прежде чем советовать что либо, предпочитаю убедиться в этом сам, что это работает.)
Важное замечание: советуя и придерживаюсь сам, что Windows система должна быть только англоязычной, но не как не русской. Это лично мое мнение.
Все действия ниже выполняю под Административной учетной запись – Administrator
После того, как развернули систему следует поставить накопительный пакет обновления
Update for Windows Server 2003 (KB2570791) для отмены перехода на «зимнее» время. Скачать который можно по этой ссылке – http://support.microsoft.com/kb/2570791/ru
Ниже пошаговые шаги как развернуть «Контроллер домена»
Запускаем утилиту dcpromo:
Win + R → dcpromo – Next – Next – выбираем “Domain controller for a new domain” и нажимем Next – выбираем “Domain in a new forest” и нажимаем Next – указываем полное DNS имя для нового домена, в моем случаем это “polygon.local” и нажимаем Next
Мастер предлагает либо изменить NetBIOS имя либо оставить текущее, оставляем текущее и нажимаем Next

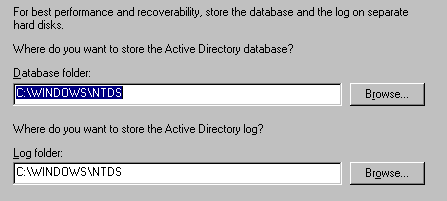
Каталоги с базой и логами оставляем по дефолту и нажимаем Next
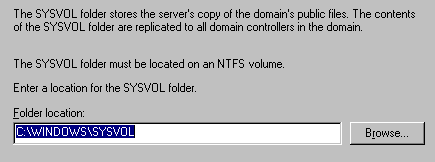
С каталогом SYSVOL поступаем точно также, по дефолту и нажимаем Next
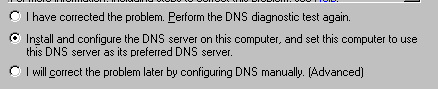
На следующем этапе как сконфигурировать DNS оставляем по умолчанию, убедившись что выбран пункт “Install and configure the DNS server on this computer, and set this computer to use this DNS server as its preferred DNS server” и нажимаем Next
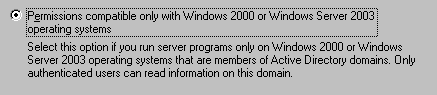
На следующем этапе — доступ к объектам для пользователей и группы разрешаем только аутентифицированным пользователям и нажимаем Next
Далее задаем пароль Администратора на случай аварийного восстановления — я указываю 712mbddr@ и нажимаем Next
На следующем этапе просматриваем результирующие данные, если со всем согласны то нажимаем Next и начнется процесс разворачивания
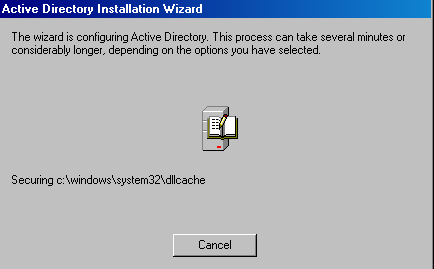
В процессе установки, мастер попросит подмонтировать дистрибутив второго диска (у меня дистрибутив состоит из двух iso образов)
После того, как процесс завершится (нажимаем Finish), потребуется проверить настройки сетевого адаптера на предмет корректного указания сетевых настроек и уже после только перезагрузить систему.
Стало:
а нужно привести к виду:
После того, как система перезагрузиться можно авторизоваться под учетной записью Administrator, открыть далее оснастку «Пользователи и компьютеры» и создать специализированного Административного пользователя под котором уже работать, но пока это не совсем полное развертывание.
Далее нужно добавить роль DHCP чтобы в контролируемой доменной сети выдача IP адресов производилась автоматически:
Start – Control Panel – Add or Remove Programs – Add/Remove Windows Components – Networking Services – Details – отмечаем пункт Dynamic Host Configuration Protocol (DHCP) и нажимаем OK – Next, после начнется доустановка необходимых компонентов в систему (понадобится подмонтированный установочный диск) — Finish.
Запускаем оснастку DHCP:
Start – Control Panel – Administrative Tools – DHCP, по умолчанию сервис DHCP не активен, об этом свидетельствует «красная стрелочка опущенная вниз»
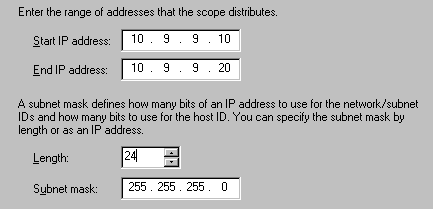
Первым делом создадим область IP адресов которую будет обслуживать DHCP сервер, для этого на выделенной надписи: dc1.polygon.local через правый клик вызываем меню «New Scope” – Next – именуем как удобно — Next – задаем стартовые и конечные значения в пределах которых будет инициализироваться выдача IP адресов клиентам в нашей сети обслуживающего домена, в моем случае это:
Start IP address: 10.9.9.10
End IP address: 10.9.9.20
Length: 24 – маска подсети
Subnet mask: 255.255.255.0
IP адреса на следующем шаге которые хотим исключить пропускаем, позже к данной настройке можно будет вернуться.
Далее указываем срок аренды DHCP адресов клиентским станциям или устройствам, по умолчанию обычно указывают 7 дней, но Вы можете опираясь на Ваш опыт предопределить другое значение.
Далее настраиваем чтобы предопределенные настройки в ступили в силу немедленно — Yes, I want to configure these options now
Далее, указываем IP адрес шлюза для локальной сети – в моем случае это 10.9.9.1 (потом можно изменить если что)
Далее, указываем имя DNS-сервера используемого в сети:
Parent domain: polygon.local
Server name: dc1.polygon.local
IP address: 10.9.9.1
Следующий шаг пропускаю, т. к. WINS не использую
Далее активирую созданную область сейчас — Yes, I want to activate this scope now
Теперь нужно авторизовать DHCP службу:
Start – Control Panel – Administration – оснастка DHCP – выделяем dc1.polygon.local [10.9.9.1], после чего через правый клик вызываем меню настроек и находим пункт «Authorize», как видно из скриншота ниже служба работает, «зеленая стрелочка смотрит вверх»
Проверяем, что домен отвечает на ICMP-запрос:
C:\Documents and Settings\Administrator>ping polygon.local
Pinging polygon.local [10.9.9.1] with 32 bytes of data:
Reply from 10.9.9.1: bytes=32 time<1ms TTL=128
Reply from 10.9.9.1: bytes=32 time<1ms TTL=128
Reply from 10.9.9.1: bytes=32 time<1ms TTL=128
Reply from 10.9.9.1: bytes=32 time<1ms TTL=128
Ping statistics for 10.9.9.1:
Packets: Sent = 4, Received = 4, Lost = 0 (0% loss),
Approximate round trip times in milli-seconds:
Minimum = 0ms, Maximum = 0ms, Average = 0ms
Теперь можно подключаться рабочие станции к домену и управлять, опубликовывать, писать групповые политики из одного места, а не бегая как раньше по местам. Этим мы добились централизованности и стабильности. Имея в сети домен пользователи не почувствуют особой разницы, разве только в упорядоченности предоставляемых сервисов и служб. Что еще можно сделать используя домен я покажу в последующих заметках. А пока я хочю закончить данную заметку, она работает и шаги рассмотренные выше на удивление очень просты и не требуют каких либо более подробных документирований, пока во всяком случаем. Напоследок замечу, ознакомтесь с документацией представленной на официальном сайте не пренебрегайте ею, многие интересные вещи там представлены. Все же в заметке описать не представляется возможным да и не зачем, я ведь расписываю только те задачи с которыми мне приходится сталкиваться. Поэтому на этом всё, с уважением автора блога ekzorchik.
Windows Server 2003 – Installing Active Directory
Part 2 – Installing Active Directory
With installations, 7 minutes of planning will save an hour for rework. The secret of troubleshooting Active Directory installs is mastering DNS. I find NSLookup invaluable, also Ipconfig’s new switches /registerdns and /flushdns are handy.
Topics for Installing Active Directory
- What’s new in Server 2003
- Procedure for Installing a Domain Controller
- Crucial Install DNS Stage (With Diagram)
- Post Installation Check list
‡
What’s new in Windows Server 2003?
- Check a new program ADPREP. It has /forestprep switches like Exchange.
- Install a brand new Domain Controller from a back up of an existing server.
ADPREP
Here is a built-in command line tool that will prepare the schema. It does not actually install the NDTS.dit files but it does prepare the forest or the individual domain for Active Directory.
ADPREP /forestprep
ADPREP /domainprep
DCPROMO /adv
If you already have a working domain controller, backup the system state, go to a member server, run DCPROMO /adv then point the wizard to the backup files
Procedure for creating a Domain Controller
The key to success is preparation:
Decide your DNS and enter the name in the Computer Name Tab in the System Icon (Windows Key + Pause). Whilst this section deals with the nuts and bolts of an installation, take care to design your Active Directory forest, for example, account naming strategy, top level OUs, group policies.
Now you are ready to run DCPROMO.
DCPROMO decisions
To call for the Active Directory Installation Wizard, Start, Run DCPROMO and answer these questions:
- New Domain – or Replica (another DC in the same domain)
- Domain Tree in existing forest – or New Domain Tree
- Domain in New Forest
Guy Recommends 3 Free Active Directory Tools
SolarWinds have produced three Active Directory add-ons. These free utilities have been approved by Microsoft, and will help to manage your domain by:
- Seeking and zapping unwanted user accounts.
- Finding inactive computers.
- Bulk-importing new users. Give this AD utility a try, it’s free!
Download your FREE Active Directory administration tools.
Crucial Install DNS Stage
There are many ways of installing DNS, but I favour doing as little as possible myself, and letting the DCPROMO Wizard do as much as possible. For Example, here is a crucial stage where DCPROMO needs DNS, I always select the middle option, ‘ Install and Configure DNS on this computer…’ To be crystal clear, I do NOT configure DNS myself, I let the Wizard create all those _msdcs records.
See much more on DNS here
▫
Best practice
Remember that the Active Directory can grow so make sure the partition has at least 300 MB of free space for NTDS.dit itself, and 100 MB for the log files. Talking of the logs, install the edbxxx.log files on a separate disk.
Post installation considerations
To verify that installation has run smoothly check the following:
- DNS _SRV record: _msdcs, _sites, _tcp, _udp. Also the GC, DC records are essential for users to find the global catalog and domain controller in order to logon. If these records do not appear, try stopping and starting the Netlogon service.
- Run %systemroot%\sysvol and look for domain folders.
- Check the System and Directory Service Event logs for error messages.
Demotion back to member server
If the worst comes to the worst, run DCPROMO to demote, then try again making different decisions.
Guy Recommends: Permissions Analyzer – Free Active Directory Tool
I like thePermissions Monitor because it enables me to see quickly WHO has permissions to do WHAT. When you launch this tool it analyzes a users effective NTFS permissions for a specific file or folder, takes into account network share access, then displays the results in a nifty desktop dashboard!
Think of all the frustration that this free utility saves when you are troubleshooting authorization problems for users access to a resource. Give this permissions monitor a try – it’s free!
Download Permissions Analyser – Free Active Directory Tool
See Also
- Install Clients with RIS
- Server 2003 Roles
- Upgrade or Migrate
About The Author
Guy Thomas
Planning Your Active Directory Installation
While
the processes for promoting a member server to the role of domain
controller are relatively straightforward, it is critical that you plan
your proposed Active Directory environment in advance. Examples of
environment-related information that should already be documented and
well understood prior to promoting any server to the role of domain
controller include:
-
The domain structure for the new or existing forest
-
The domain naming scheme to be used
-
How Domain Name System (DNS) will be configured to support Active Directory
-
Whether the Active Directory environment will need to support servers running previous versions of Windows
Similarly,
you will also need to ensure that the specific settings for the server
to be promoted have been correctly configured, and that the information
required during the promotion process has already been determined and
documented. Some issues that need to be considered prior to promoting a
domain controller include:
-
Domain controllers require static IP address and subnet mask values
-
The client DNS settings of the server must be configured correctly
-
The storage location of the database and log files should be defined
-
The location of the shared system volume folder should be defined
By
properly planning and documenting the domain controller promotion
process in advance, you greatly reduce the risk of misconfiguration or
encountering errors during the installation process.
Installing Active Directory
Four different methods can be used to promote a Windows Server 2003 system to a domain controller. These include:
-
Using the Active Directory Installation Wizard (to install Active Directory in most situations)
-
Using
an answer file to perform an unattended installation (to automate the
installation process or install Active Directory remotely)
-
Using
the network or backup media (to install Active Directory on additional
domain controllers in the network by using media rather than relying
upon replication)
-
Using the Configure Your Server Wizard (an additional way to install the first domain controller in a network only)
The
following sections outline the specific steps and considerations
associated with installing domain controllers using each of these four
methods.
Installing Active Directory Using the Active Directory Installation Wizard
The
Active Directory Installation Wizard (Dcpromo.exe) is the main tool
used to install Active Directory. Information that must be provided as
part of completing the wizard includes:
-
Domain
controller type, either the first domain controller for a new domain or
a new domain controller added to an existing domain
-
Domain type—a new domain in a new forest, a child domain in an existing domain tree, or a new domain tree in an existing forest
-
Domain name
-
NetBIOS name for the domain
-
Storage location for the Active Directory database
-
Storage location for the Active Directory transaction log files
-
Storage location for the shared system volume
-
Default Active Directory access permissions
-
Directory services restore mode administrator password
After
you input this information, the wizard installs Active Directory,
creating the database, configuring associated services, and modifying
security settings. If a DNS server is not available, you will be given
the option to install DNS as part of the Active Directory installation.
One
of the most fundamental choices presented by the wizard is whether you
want the server to become the first domain controller for an entirely
new domain, or to serve as an additional domain controller within an
existing domain. Ultimately, the choice you make affects the structure
of your Active Directory implementation.
Creating the First Domain Controller for a New Domain
If
you choose to create the first domain controller for a new domain, you
are actually defining both a new domain controller and a new domain.
You will therefore be asked whether you want to create the new domain
in a new forest, as a child domain in an existing domain tree, or as a
new domain tree in an existing forest. These choices are illustrated in
Figure 1.
Figure 1. Creating a new domain using the Active Directory Installation Wizard

the processes for promoting a member server to the role of domain
controller are relatively straightforward, it is critical that you plan
your proposed Active Directory environment in advance. Examples of
environment-related information that should already be documented and
well understood prior to promoting any server to the role of domain
controller include:
The domain structure for the new or existing forest
The domain naming scheme to be used
How Domain Name System (DNS) will be configured to support Active Directory
Whether the Active Directory environment will need to support servers running previous versions of Windows
you will also need to ensure that the specific settings for the server
to be promoted have been correctly configured, and that the information
required during the promotion process has already been determined and
documented. Some issues that need to be considered prior to promoting a
domain controller include:
Domain controllers require static IP address and subnet mask values
The client DNS settings of the server must be configured correctly
The storage location of the database and log files should be defined
The location of the shared system volume folder should be defined
properly planning and documenting the domain controller promotion
process in advance, you greatly reduce the risk of misconfiguration or
encountering errors during the installation process.
Using the Active Directory Installation Wizard (to install Active Directory in most situations)
Using
an answer file to perform an unattended installation (to automate the
installation process or install Active Directory remotely)
Using
the network or backup media (to install Active Directory on additional
domain controllers in the network by using media rather than relying
upon replication)
Using the Configure Your Server Wizard (an additional way to install the first domain controller in a network only)
following sections outline the specific steps and considerations
associated with installing domain controllers using each of these four
methods.
Active Directory Installation Wizard (Dcpromo.exe) is the main tool
used to install Active Directory. Information that must be provided as
part of completing the wizard includes:
Domain
controller type, either the first domain controller for a new domain or
a new domain controller added to an existing domain
Domain type—a new domain in a new forest, a child domain in an existing domain tree, or a new domain tree in an existing forest
Domain name
NetBIOS name for the domain
Storage location for the Active Directory database
Storage location for the Active Directory transaction log files
Storage location for the shared system volume
Default Active Directory access permissions
Directory services restore mode administrator password
you input this information, the wizard installs Active Directory,
creating the database, configuring associated services, and modifying
security settings. If a DNS server is not available, you will be given
the option to install DNS as part of the Active Directory installation.
of the most fundamental choices presented by the wizard is whether you
want the server to become the first domain controller for an entirely
new domain, or to serve as an additional domain controller within an
existing domain. Ultimately, the choice you make affects the structure
of your Active Directory implementation.
you choose to create the first domain controller for a new domain, you
are actually defining both a new domain controller and a new domain.
You will therefore be asked whether you want to create the new domain
in a new forest, as a child domain in an existing domain tree, or as a
new domain tree in an existing forest. These choices are illustrated in
Figure 1.

When
you create a new domain in a new forest, the new domain is either the
first domain in the organization or a new domain that you want to be
completely independent from an existing forest. When you create a new
child domain in an existing domain tree, the new domain becomes a
subdomain of an existing domain, within the DNS namespace of its parent
domain. If you choose to create a new domain tree in an existing
forest, the new domain becomes the root domain of a new tree, with a
DNS name that is not contiguous with any other existing domains in the
forest.
Adding a New Domain Controller to an Existing Domain
If
you use the Active Directory Installation Wizard to add an additional
domain controller to an existing domain, you are effectively adding
redundancy and authentication load-balancing to a domain in a forest
that has already been created. In all cases, an absolute minimum of two
domain controllers should be deployed per domain to provide redundancy.
In most Active Directory implementations, the number of domain
controllers that need to be deployed within a single domain is a
function of the number of users that need to be serviced, as well as
the number of physical sites that have been implemented.
Off the Record
When
implementing Active Directory, each domain should include an absolute
minimum of two domain controllers for the purpose of directory
redundancy.
Using the Active Directory Installation Wizard
Issuing
the Dcpromo.exe command from the Run dialog box or the command line
starts the Active Directory Installation Wizard. To install Active
Directory for a new domain in a new forest, complete the following
steps:
|
1. |
Click Start and then click Run. In the Run dialog box, type dcpromo in the Open box and click OK. |
|
2. |
At the Welcome To The Active Directory Installation Wizard page, click Next. |
|
3. |
At the Operating System Compatibility page, click Next. |
|
4. |
At the Domain Controller Type page, select Domain Controller For A New Domain, as shown in Figure 2. Click Next. Figure 2. Active Directory Installation Wizard, Domain Controller Type page

|
|
5. |
On the Create New Domain page, ensure that Domain In A New Forest is selected, and then click Next. |
|
6. |
If Note If |
|
7. |
On the New Domain Name page, type the name of your domain in the Full DNS Name For New Domain box, and click Next. |
|
8. |
On Note Clients |
|
9. |
On Figure 3. Active Directory Installation Wizard, Database And Log Folders page

|
|
10. |
On |
|
11. |
If |
|
12. |
On the Permissions page, read through the available options as shown in Figure 4. Click Next. Figure 4. Active Directory Installation Wizard, Permissions page

|
|
13. |
On |
|
14. |
The Summary page displays the options that you have selected during the wizard, as shown in Figure 5. Figure 5. Active Directory Installation Wizard, Summary page

|
|
15. |
When the Completing The Active Directory Installation Wizard page appears, click Finish, and then click Restart Now. |
Installing Active Directory Using an Answer File
The steps associated with the Active Directory Installation Wizard can also be automated through the use of an answer file. An answer file
is simply a text file that contains answers to the questions normally
asked when the wizard is completed manually. The answer file must
contain all the parameters that the Active Directory Installation
Wizard normally needs to complete the Active Directory installation
process. Some benefits of promoting domain controllers by using answer
files include:
-
The
ability to automate the domain controller installation process on
remote servers that might be accessible only via low-bandwidth
connections -
The
ability to define and control the exact parameters to be configured
during the promotion process, saving time and reducing the risk of
misconfiguration
Figure 6 displays a sample answer file that could be used to promote a Windows Server 2003 system to a domain controller.
Figure 6. A sample answer file used to install Active Directory
To install Active Directory on a Windows Server 2003 system using an answer file, issue the command dcpromo /answer:answer file, where answer file is the name of the text file that contains the necessary parameters to be passed to Dcpromo.exe.
Note
To
create an answer file for use with Dcpromo.exe, refer to the
instructions located in “Microsoft Windows Preinstallation Reference”
found in the Ref.chm file on the Windows Server 2003 CD. The Ref.chm
file is located in the Deploy.cab file in the \Support\Tools folder.
Use the Index tab to search for DCInstall, the help topic that explains
each of the entries that can be specified in the [DCInstall] section of
the file.
Installing Active Directory Using the Network or Backup Media
In
Windows 2000, promoting a member server to become an additional domain
controller in an existing domain required the entire directory database
to be replicated to the new domain controller. In cases where low
network bandwidth or exceptionally large directory databases were
factors, this replication could take hours or sometimes even days to
complete.
A new
feature in Windows Server 2003 helps to make the process of adding a
new domain controller to an existing domain more flexible in situations
like those described. A Windows Server 2003 member server can be
promoted to the role of domain controller using a backup of the
directory database taken from an existing domain controller. This
backup can be restored to the target server from different types of
backup media or from a shared network folder. Ultimately, this approach
helps to reduce much of the replication traffic associated with
deploying new domain controllers, which is especially useful for domain
controllers located in remote sites connected via WAN links. For
example, if a new domain controller needs to be installed in a branch
office connected over a low-speed WAN link, an administrator could back
up the Active Directory database of an existing domain controller to
removable media, and then ship that media to the branch office. The
media could then be used to promote the member server to a domain
controller locally, without the need for full replication of the
directory database to take place over the WAN link. Of course, some
replication will still be necessary to ensure that the remote domain
controller is fully synchronized with existing domain controllers, but
this typically amounts to much less traffic than full synchronization
would incur.
The
amount of replication that is ultimately required to fully synchronize
the remote domain controller depends on the age of the backup used and
the number of changes that have occurred since the backup was taken.
The backup cannot be older than the tombstone lifetime for the domain,
which is set to a default value of 60 days. To minimize the amount of
replication that needs to occur after promotion, a very recent backup
is always preferred.
Note
If
the domain controller from which the backup of Active Directory was
created contained an application directory partition, the partition
will not be restored to the new domain controller.
To install Active Directory using a network share or backup media, complete the following steps:
|
1. |
Click Start, click Run, type dcpromo /adv in the Open box, and then click OK. Tip To |
|
2. |
At the Operating System Compatibility page, click Next. |
|
3. |
At the Domain Controller Type page, select Additional Domain Controller For An Existing Domain, and then click Next. |
|
4. |
At the Copying Domain Information page shown in Figure 7, select one of the following options:
Figure 7. Active Directory Installation Wizard, Copying Domain Information page

|
|
5. |
On |
|
6. |
On the Additional Domain Controller page, specify the domain name and then click Next. |
|
7. |
On |
|
8. |
On |
|
9. |
On |
|
10. |
On |
Installing Active Directory Using the Configure Your Server Wizard
The
Configure Your Server Wizard provides a centralized location from which
you can install many server services, including Active Directory. The
Configure Your Server Wizard is available from the Manage Your Server
page, which opens automatically the first time you log on to a server. Figure 8
shows the Server Role page of the wizard. You can use the Configure
Your Server Wizard to install Active Directory only on the first domain
controller on a network. If you attempt to use the Configure Your
Server Wizard to install additional domain controllers, the wizard will
launch the Active Directory Installation Wizard to perform the
installation.
Figure 8. Configure Your Server Wizard, Server Role page

Although
the Configure Your Server Wizard provides a simplified method for
inexperienced users to install Active Directory, experienced users
should take advantage of the higher degree of flexibility provided by
the Active Directory Installation Wizard.
Configuring Global Catalog Servers
When
a new Active Directory forest is created, only the first domain
controller installed in the forest root domain will be configured as a global catalog server
by default—any additional global catalog servers need to be configured
manually. While a single global catalog server might suffice in very
small environments, at least two are recommended as a minimum for the
purposes of fault tolerance and load balancing. In environments that
include multiple sites connected by WAN links, it is generally
recommended that each remote location have at least one domain
controller configured as a global catalog server, or that the site
implement universal group membership caching.
Because
of the importance of the global catalog in providing universal group
membership information and authenticating logon requests that use user
principal names (UPNs), you will almost certainly need to configure
additional global catalog servers in any Active Directory environment.
As in Windows 2000, global catalog servers are configured via the NTDS
Settings object associated with a domain controller object in the
Active Directory Sites And Services tool.
To configure a Windows Server 2003 domain controller as a global catalog server, follow these steps:
|
1. |
Click Start, select Administrative Tools, and then click Active Directory Sites And Services. |
|
2. |
Click the plus sign (+) next to the Sites folder to expand it. |
|
3. |
Expand Default-First-Site-Name, the Servers folder, and then the server object. |
|
4. |
Right-click the NTDS Settings object, and click Properties. |
|
5. |
On the General tab, select the Global Catalog check box, as shown in Figure 9. Figure 9. Configuring a global catalog server from the NTDS Settings Properties General tab

|
|
6. |
Click OK, and then close Active Directory Sites And Services. |
Universal
group membership caching is not enabled within a site by default. To
enable universal group membership caching for domain controllers within
a site running Windows Server 2003, you must be a member of the Domain
Admins group in the forest root domain or a member of Enterprise
Admins, or you must have been delegated the appropriate authority.
Because universal group membership caching is site-specific, all
Windows Server 2003 domain controllers within a site use the feature
once it has been enabled.
Tip
Global
catalog settings are configured on individual domain controllers. In
contrast, universal group membership caching is configured at the site
level, and applies to all domain controllers within a specific site.
In
much the same way that you configure a domain controller to function as
a global catalog server, you configure universal group membership
caching using Active Directory Sites And Services. However, instead of
configuring the NTDS Settings object of a particular domain controller,
you configure universal group membership caching from the properties of
the NTDS Site Settings for a particular site. The following list shows
the steps to configure universal group membership caching within a site.
|
1. |
Click Start, select Administrative Tools, and then click Active Directory Sites and Services. |
|
2. |
Click the plus sign (+) next to the Sites folder to expand it. |
|
3. |
Click Default-First-Site-Name to view its contents. |
|
4. |
Right-click NTDS Site Settings, and click Properties. |
|
5. |
On the Site Settings tab, select the Enable Universal Group Membership Caching check box, as shown in Figure 10. Figure 10. Configuring universal group membership caching

|
|
6. |
In |
|
7. |
Click OK, and close Active Directory Sites And Services. |
Removing Active Directory from a Domain Controller
Running
Dcpromo.exe on an existing domain controller allows you to remove
Active Directory from a system, demoting it to either a stand-alone
server or a member server. If the system being demoted is the last
domain controller in the domain, it becomes a stand-alone server
because the domain will no longer exist. If other domain controllers
remain in the domain, a demoted server will become a member server
within the existing domain.
To
remove Active Directory from existing domain controllers, you must be a
member of certain groups, depending upon the specific situation that
surrounds the demotion process. The following list outlines the
requirements to remove Active Directory from domain controllers in
different situations.
-
To
remove Active Directory from a system that is the last domain
controller in any domain except the forest root, you must be a member
of the Enterprise Admins group. -
To remove Active Directory from the last domain controller in a forest, you must be a member of the Domain Admins group.
-
To
remove Active Directory from a system that is not the last domain
controller in the domain, you must be a member of either the Domain
Admins group in that domain or a member of the Enterprise Admins group.
To remove Active Directory from a domain controller, complete the following steps:
|
1. |
Log on as the appropriate administrator. |
|
2. |
Click Start, click Run, type dcpromo in the Open box, and then click OK. |
|
3. |
On the Welcome To The Active Directory Installation Wizard page, click Next. |
|
4. |
If |
|
5. |
On the Remove Active Directory page, select the check box if the server is the last domain controller in the domain. Click Next. |
|
6. |
If Note Because |
|
7. |
On the Administrator Password page, type and confirm the administrator password, and then click Next. |
|
8. |
On |
|
9. |
On |
Steps:
1. Log on as Administrator to the Server.
2. Check for the correct computer name and IP/Address.
Note: IP Address should be static. If you are planning to install DNS in the same machine then metion the server IP in the DNS IP field.
3. Click Start, and then click Run.
4. In the Run box, type “dcpromo” and then click OK.

6. On the Welcome to the Active Directory Installation Wizard page, click NEXT.
7. On Operating system compatibility Wizard page, click NEXT.
8. On the Domain Controller Type page, ensure that “Domain Controller
for a new Domain” is selected, and then click NEXT.

9. On the Domain Controller Type page, ensure that “Domain in new forest” is selected, and then click NEXT.

10. On the New Domain Name page, in the Full DNS Name for new domain text box, type the “Domain name” you want for your Organization and then click NEXT.

11. On the NetBIOS Domain name page, ensure that “Domain Name” appears and if Domain name doesn’t appear
Specify the NetBIOS name of the Domain name, and then click NEXT.
12. On the database and log locations page accept the default locations by clicking NEXT.
13. On shared system volume page accept the default locations by clicking NEXT.
14. If you want to install DNS in the same server then On DNS Registration Diagnostic Select “Install and configure the DNS server on this computer. ” and then click NEXT. This is called AD-Integrated DNS.

15. On Permissions page, select “Permissions compatible only with Windows 2000 or windows server 2003 operating system”, and then click NEXT.
16. On the Directory Services Restore Mode Administrator Password page, in the password and confirm password boxes, type “password and in confirm password boxes” and then click NEXT.
17. On the Summary page, review the Options you selected, and then click NEXT.
18. The Active Directory Installation begins.
19. When the completing the Active Directory Installation wizard page appears, clicks FINISH, and then Restart Your Computer.