
Если текущая скорость перемещения указателя мыши или, иначе — чувствительность мыши в Windows отличается от удобной для вас, её можно настроить, используя встроенные параметры системы, а для некоторых устройств — сторонние программы.
В этой пошаговой инструкции для начинающих подробно о том, как настроить чувствительность мыши в Windows 11 и Windows 10 в Параметрах и Панели управления, а также кратко о фирменных утилитах от производителей, которые также позволяют уменьшить или увеличить её.
Как изменить чувствительность мыши в Параметрах
Первый способ настройки чувствительности мыши — использования интерфейса «Параметры». В Windows 11 шаги будут следующими:
- Откройте Параметры (можно нажать клавиши Win+I), а в них — раздел «Bluetooth и устройства».
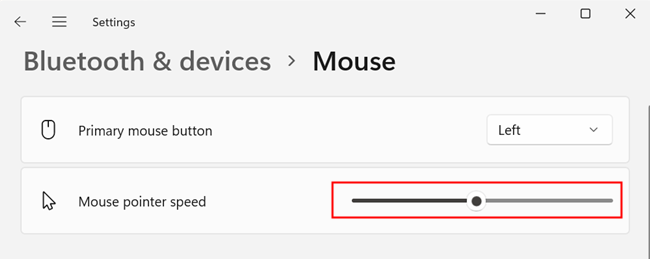
- Откройте пункт «Мышь».

- Измените «Скорость указателя мыши», передвигая ползунок мышью. При желании ниже вы также можете изменить скорость прокрутки страниц колесиком.


В Windows 10 действия очень похожи:
- Откройте «Параметры» и перейдите в раздел «Устройства».
- В списке слева выберите пункт «Мышь».
- Измените значение «Скорость курсора», передвигая его вправо для увеличения скорости или влево для её уменьшения.


Настройка скорости указателя мыши в Панели управления
Второй способ — настройка чувствительности мыши в Панели управления:
- Откройте Панель управления. Для этого можно использовать поиск на панели задач. Подробнее: Как открыть панель управления Windows 11, Как открыть панель управления Windows 10.
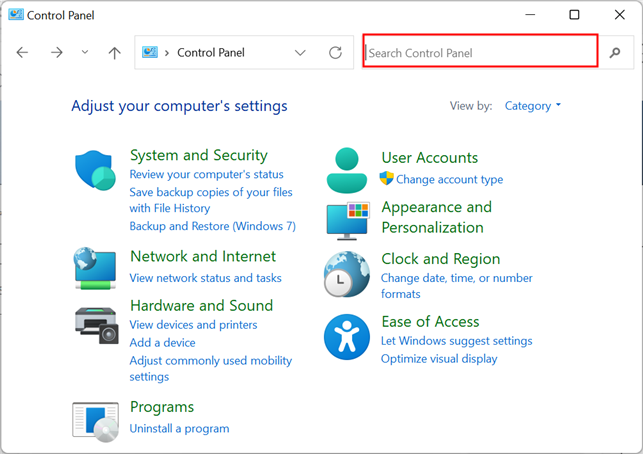
- Убедитесь, что в поле «Просмотр» панели управления установлено «Значки» и откройте пункт «Мышь».

- В следующем окне перейдите на вкладку «Параметры указателя» и задайте скорость движения указателя — ниже или выше.

- Примените настройки


Выполняемые изменения применяются сразу, то есть после каждого изменения чувствительности, ещё до их применения, вы можете проверить, подходят ли они вам.
Программы с возможностью изменения чувствительности мыши
Описанные выше методы изменения чувствительности мыши — это всё, что может предложить Windows 11 и Windows 10, если говорить о встроенных средствах системы.
Однако, для многих «продвинутых» мышей, особенно игровых, производители выпускают собственные бесплатные программы для настройки, позволяющие настраивать чувствительность и другие параметры мыши, например:
- Logitech G Hub для игровых мышей Logitech, или Logitech Options для «обычных» мышек
- Razer Synapse
- SteelSeries Engine
- Corsair iCUE
- Центр управления мышью и клавиатурой для устройств Microsoft
Обычно такое ПО доступно на официальном сайте производителя вашей мыши в разделе «Поддержка», а в некоторых случаях скачивается и устанавливается Windows автоматически.
If you’re looking to tweak your mouse sensitivity in Windows to achieve smoother navigation and better control, you’ve come to the right place. Adjusting the mouse sensitivity can significantly enhance your computing experience, whether you’re gaming, working on graphic design, or simply navigating through your daily tasks. Thankfully, it’s a straightforward process that allows you to fine-tune your settings to suit your preferences. In this article, we’ll walk you through the steps to change your mouse sensitivity in Windows 6 to 11, ensuring you get the most out of your device. So, let’s dive right in and empower you with the knowledge to make those adjustments in no time!
Adjusting your mouse sensitivity settings can significantly improve your computer experience. It can make navigating through applications and games smoother and more precise. This guide will help you understand how to change Windows mouse sensitivity specifically to 6 11 settings, which is often recommended for better performance in various applications. We’ll break down the steps in simple terms so that anyone can follow along.
Understanding Mouse Sensitivity
Mouse sensitivity refers to how far the cursor moves on your screen in relation to the movement of the mouse. A higher sensitivity means the cursor will move further with less physical mouse movement. Conversely, lower sensitivity means you need to move the mouse more for the cursor to cover the same distance.
Why Adjust Mouse Sensitivity?
Adjusting your mouse sensitivity can help you:
- Enhance accuracy in gaming
- Improve productivity while working
- Reduce strain on your wrist
Finding the right sensitivity setting depends on personal preference and the tasks you do most.
Accessing Mouse Settings in Windows
Before you can adjust the sensitivity settings, you need to access the mouse settings. Here’s how you can do that:
1. Click on the **Start Menu**.
2. Select **Settings** (the gear icon).
3. Choose **Devices**.
4. Click on **Mouse** from the left-hand menu.
This section allows you to tweak various mouse settings, including sensitivity.
Adjusting the Mouse Sensitivity
Within the Mouse settings page, you can find options to adjust your mouse sensitivity. Windows typically offers a slider to help you find the best fit.
To change to the 6 11 setting:
1. Look for the **Pointer speed** section.
2. Move the slider to achieve the desired sensitivity level.
3. Click **Apply** to save your changes.
Fine-tuning Your Sensitivity Settings
If the standard settings don’t feel right, you can adjust them further. Fine-tuning allows you to customize your mouse experience even more.
Using the Control Panel
For more advanced settings, utilize the Control Panel. Here’s how:
1. Type **Control Panel** in the Start Menu search bar.
2. Click on **Hardware and Sound**, then select **Mouse**.
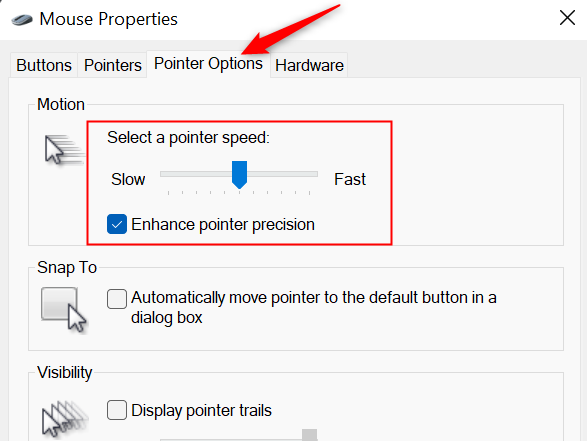
3. In the Mouse Properties dialog box, navigate to the **Pointer Options** tab.
Here, you can adjust the pointer speed for more precision.
Using the Registry Editor
For those who feel comfortable with advanced options, the Windows Registry Editor allows for specific customizations. Remember, be cautious when using the Registry Editor as it can affect your system.
1. Type **regedit** in the Start Menu search bar to open the Registry Editor.
2. Navigate to `HKEY_USERS\.DEFAULT\Control Panel\Mouse`.
3. Change the **MouseSensitivity** value to **6** to switch to a 6 11 setting.
Ensure you back up your registry before making changes.
Testing Your New Settings
After adjusting your mouse sensitivity, it’s crucial to test it out. Open a program or game that you frequently use and see how the new settings feel. It may take a bit of time to get used to the changes.
Tips for Testing
When testing your new mouse sensitivity, consider the following:
- Try out different applications
- Play a game that requires precision
- Take breaks to avoid fatigue
This will help you find the perfect sensitivity level for your needs.
Common Issues and Solutions
Sometimes adjusting mouse sensitivity can lead to some common problems. Let’s address a few of them.
Cursor Movement Issues
If your cursor feels jumpy or unresponsive, you may need to recalibrate your mouse settings or clean your mouse’s sensor. Dust and debris can impact its performance.
Returning to Default Settings
If you’re unhappy with your changes, it’s easy to revert back to default settings. Simply return to the mouse settings and reset the sensitivity to its original value.
Advanced Mouse Features
For users interested in more than just basic settings, many modern mice come with advanced features. These can improve your experience even further.
Using Mouse Software
Companies like Logitech and Razer offer software that allows you to customize mouse settings even more. With these applications, you can:
- Adjust DPI settings
- Program buttons for specific functions
- Create profiles for different games or applications
This can provide a tailored experience that aligns with your needs.
Consider Health and Ergonomics
While adjusting settings, remember to consider your posture and ergonomics. Proper alignment of your monitor and chair can prevent discomfort during long use.
Changing your Windows mouse sensitivity to 6 11 settings can significantly improve your computing experience. Whether you’re gaming or working, these adjustments allow for a customized and comfortable setup. With careful testing and adjustments, you can find the perfect sensitivity that meets your personal needs, making your time on the computer more enjoyable and efficient.
Make sure to revisit your settings periodically or when you change your usage patterns to ensure you maintain optimal performance. Happy adjusting!
How to Change Mouse Sensitivity – Windows 11
Frequently Asked Questions
How can I adjust mouse sensitivity in Windows settings?
To adjust mouse sensitivity in Windows, go to the Control Panel. Click on “Mouse,” then select the “Pointer Options” tab. Here, you can move the slider to change the pointer speed. Adjust it according to your preference, and click “Apply” to save the changes.
What is the impact of increasing mouse sensitivity?
Increasing mouse sensitivity allows the pointer to move faster across the screen. This can benefit gamers and users who require quick navigation. However, it may also reduce precision, making it challenging to perform detailed tasks like graphic design or fine editing.
Can I set different sensitivity levels for different applications?
Windows does not offer a built-in option to set different sensitivity levels for individual applications. However, some third-party mouse software allows you to customize sensitivity settings for different applications, providing the flexibility needed for various tasks.
Is it better to have a high or low mouse sensitivity?
The best mouse sensitivity depends on personal preference and the tasks you perform. High sensitivity can benefit fast-paced gaming, while lower sensitivity may be better for tasks requiring precision. Experiment with both settings to find what works best for you.
How do I reset mouse sensitivity to default settings?
To reset mouse sensitivity to default settings, navigate to the “Mouse” settings in the Control Panel. In the “Pointer Options” tab, you can usually find a “Reset” button or revert the slider back to the center. Click “Apply” to confirm the changes.
Final Thoughts
Adjusting mouse sensitivity can greatly enhance your computing experience. To change Windows mouse sensitivity 6 11, navigate to the Settings menu and locate the Mouse options.
From there, you can easily adjust the pointer speed to suit your preferences. Fine-tuning these settings will help you achieve the control and precision you need for various tasks.
-

It’s usually at the bottom-left corner of the Start menu.

Advertisement
-

You’ll see this icon near the top of the window.

-

It’s near the center of the left column.

Advertisement
-

It’s the blue link beneath the “Related settings” header. This opens the Mouse Properties panel to the Buttons tab.
- If you’re on another tab, click Buttons so you can find the options to adjust the sensitivity of the double-click feature.

-

If you want to increase or decrease the rate at which a double-click is registered, use the “Speed” slider.

Advertisement
-
You’ll see it at the top of the window.

-
A higher speed increases sensitivity, while a lower speed enhances precision.

Advertisement
-
Pointer precision lets the mouse movement match the speed of your hand on the mouse (or your finger on the trackpad). Check the box if you want to enable this feature, or remove the check to disable it.

-

Your mouse sensitivity is now adjusted.

Advertisement
Ask a Question
200 characters left
Include your email address to get a message when this question is answered.
Submit
Advertisement
Thanks for submitting a tip for review!
About This Article
Thanks to all authors for creating a page that has been read 48,862 times.
Is this article up to date?
Disclosure: Some of the links below are affiliate links. This means that, at zero cost to you, I will earn an affiliate commission if you click through the link and finalize a purchase.
It might seem weird, but your Windows sensitivity matters. In some cases, choosing the wrong value can make your cursor less precise. Weird, isn’t it? After researching the topic, I’ve found that many people are unaware of this which can harm their consistency overall. Let’s fix it together, shall we?
The Best Windows Sensitivity
Windows sensitivity should be set to the 6th notch, which is commonly referred to as 6/11. The reason is that choosing any other value can cause pixel skipping or inconsistencies in your cursor. But, more and more games are using raw input, which overrides this setting making this setting useless.
The problem with choosing anything other than 6/11 is that you won’t get 1-to-1 Windows mouse movement. For instance, let’s say you are using a lower value than 6/11. 3/11, for example. That means that your Windows sensitivity multiplier is 0.25. So if you move your mouse for 3 pixels, you will get 0.25*3=0.75, which basically means that you didn’t move at all.
Now, move again for another pixel, and it will move 1 pixel. Because 1*0.25+0.75=1. Do you see the problem? Inconsistency alert!
Now, let’s say you choose something higher than 6/11. For example, 11/11. Now, you move 3.5 pixels for every mouse count. That means you are skipping 2 pixels every time. This is not the best practice, to say the least. Imagine skipping an entire head in CS:GO. Just kidding, heads are a bit bigger than a pixel, but again, it is easy to see the problem here.
The problem with anything other than 6/11 for Windows sensitivity is inconsistency. Skipping pixels and cursor movement inconsistencies are all things we should avoid when playing in a competitive environment.
Is This Still A Problem Today?
But there’s a catch. There is a thing called Raw input.
Raw input means that your game engine gathers mouse input straight from your mouse’s driver and not from Windows. It reads the data before it reaches Windows, reducing input latency and giving you 1:1 consistent input without any Windows interpretation.
Most of today’s games are actually using Raw input. This basically means that Windows sensitivity doesn’t matter. Now, many old games are still not utilizing the power of raw input, so that’s why I still recommend using 6/11 for consistency across every game.
That’s why I wouldn’t stress too much about it. As most games are using raw input, you are basically safe with every setting you set. But there’s no harm to put it on 6/11, right?
What The Pros Are Using?
I’ve found the data on on-winning.com, the prosettings.net official blog. They’ve gathered 172 players’ information, including windows sensitivity in CS:GO.
After analyzing the data, I concluded that more than 90% of pro players analyzed use 6/11 windows sensitivity.
Not even one player is above 6/11. Again, not surprising as we’ve learned that more than that causes pixel skipping.
Another interesting finding is that I’ve found this information only about pro CS:GO players. I couldn’t find any data regarding Windows sensitivity in other esports games. And there’s a reason why.
As I’ve said, most of today’s games use raw input as default. Therefore, Windows sensitivity settings do not matter. But, CS:GO does not use raw input as default. That’s why mentioning pro players’ Windows sensitivity when talking about general sensitivity settings is a good idea.
You can find the data here.
How To Change Your Windows Sensitivity?
- Type “mouse settings” in the windows search bar and click on the first option.
- Click “Additional mouse options” in the right section.
- Click on the “pointer options” tab.
- Set your Windows sensitivity to the desired one and press OK.
6/11 or 10/20?
6/11 or 10/20 Windows sensitivity is the same thing on different interfaces. 10/20 is on the newer mouse settings panel while 6/11 is on the older one. You can get to 10/20 when you type “mouse settings” in the search bar and click on the first option.
As you can see, the cursor speed is set to 10/20 in this specific interface, but 6/11 on the other interface. But these are the same thing.
The default Windows sensitivity is 6/11 or 10/20 depending on which interface you are looking at.
So generally speaking, you don’t need to adjust anything if you didn’t touch the setting. But I would take a second glance and make sure it is set right.
Thank you for reading and I will see you next time!
Sign in to your How-To Geek account

Quick Links
-
Why Does Mouse Sensitivity Matter?
-
How to Change Mouse Sensitivity in Settings
-
How to Change Mouse Sensitivity in Control Panel
-
How to Adjust The Sensitivity of Gaming Mice
Summary
- Picking the right mouse sensitivity is important for a pleasant and efficient experience on Windows.
- You can change mouse sensitivity through both the Settings menu and Control Panel, allowing you to find the sensitivity that feels the best for you.
- Gaming mice often come with special software that can be used to configure their buttons and sensitivity, but it is recommended to keep the Windows mouse sensitivity slider in the middle when using this software.
Bad sensitivity settings can be frustrating — you’ll feel like you’re constantly fighting your computer. Luckily, here are a few quick ways to change your mouse settings on both Windows 10 and Windows 11 to get it just right.
Why Does Mouse Sensitivity Matter?
Your mouse sensitivity is what determines how much your cursor moves across the screen when you move your mouse around. When your mouse sensitivity is high, even small mouse movements will send your cursor all the way across your screen. When it is low, you may find yourself picking up your mouse repeatedly just to move half way across your monitor.
On a PC with a graphical user interface, your mouse is your primary means of interacting with your PC. A mouse sensitivity setting on either extreme will tend to annoy most people, but it is worth figuring out what «feels» the best for you, since you spend so much time using it.
How to Change Mouse Sensitivity in Settings
To change your mouse sensitivity, click the Start button. Type «Mouse settings» in the search bar and then hit Enter. The Mouse window will appear. Adjust the slider labeled «Mouse pointer speed» to the sensitivity that feels the best. You can now close the window.
How to Change Mouse Sensitivity in Control Panel
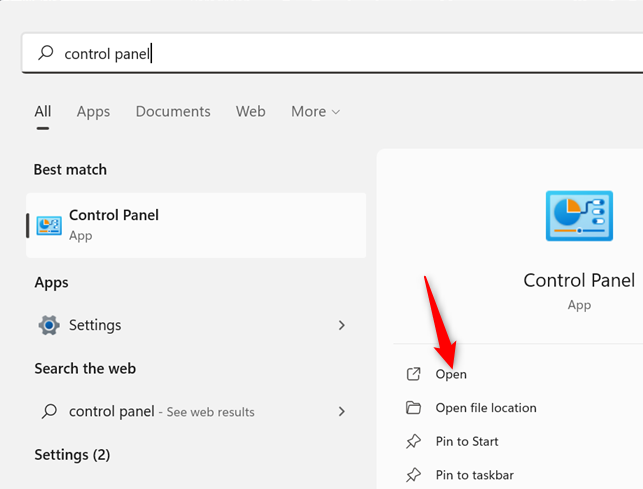
If you prefer, you can still change the mouse sensitivity through the Control Panel. To access the control panel, click the Start button and type «control panel» into the search box. Then hit Enter or click «Open.»
Click the search bar in the top right-hand corner of the Control Panel window and type «Mouse.»
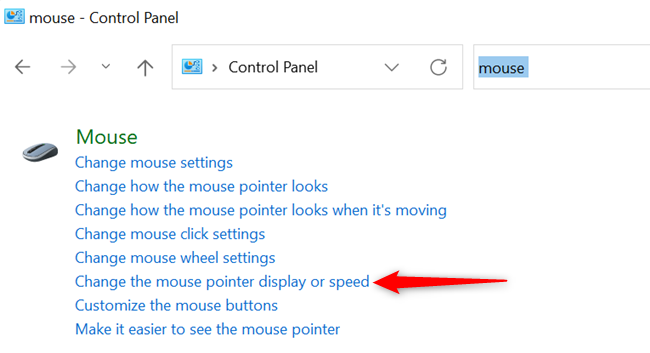
Once you’ve run the search, click «Change the mouse pointer display or speed.»
Click on the «Pointer Options» tab in the Mouse Properties window and adjust the slider labeled «Select a pointer speed» to your liking. You can now close the Mouse Properties window and the Control Panel.
There are other mouse settings you may be interested in, too. You can customize your pointer, configure the behaviour of buttons, enable visibility enhancements, among other things.
How to Adjust The Sensitivity of Gaming Mice
All mice can be controlled through the settings available in Windows 10 or Windows 11. However, many mice designed for gaming, enthusiasts, or professional use also offer special software that allows you to configure their buttons and sensitivity. If you’re going to use the software specific to your mouse, you should leave the Windows mouse sensitivity slider in the middle.
Here are links to the software for some of the most popular mice.
- Logitech
- Razer
- SteelSeries
- Microsoft
If you have a utility from your mouse manufacturer installed, you can probably find it by searching for the name of your mouse manufacturer in your Start menu.