
При нажатии правой кнопкой мыши по файлу или папке в открывшемся контекстном меню присутствует пункт «Отправить», позволяющий быстро создать ярлык на рабочем столе, скопировать файл на флешку, добавить данные в ZIP-архив. При желании, вы можете добавить свои пункты в меню «Отправить» или удалить уже имеющиеся, а также, если требуется — изменить иконки этих пунктов, о чем и пойдет речь в инструкции.
Описываемое возможно реализовать как вручную средствами Windows 10, 8 или Windows 7, так и с помощью сторонних бесплатных программ, оба варианта будут рассмотрены. Обратите внимание, что в Windows 10 в контекстном меню присутствует два пункта «Отправить», первый из них, служит для «отправки» с помощью приложений из магазина Windows 10 и при желании его можно удалить (см. Как удалить «Отправить» из контекстного меню Windows 10). Также может быть интересно: Как убрать пункты из контекстного меню Windows 10.
Как удалить или добавить пункт в контекстное меню «Отправить» в проводнике
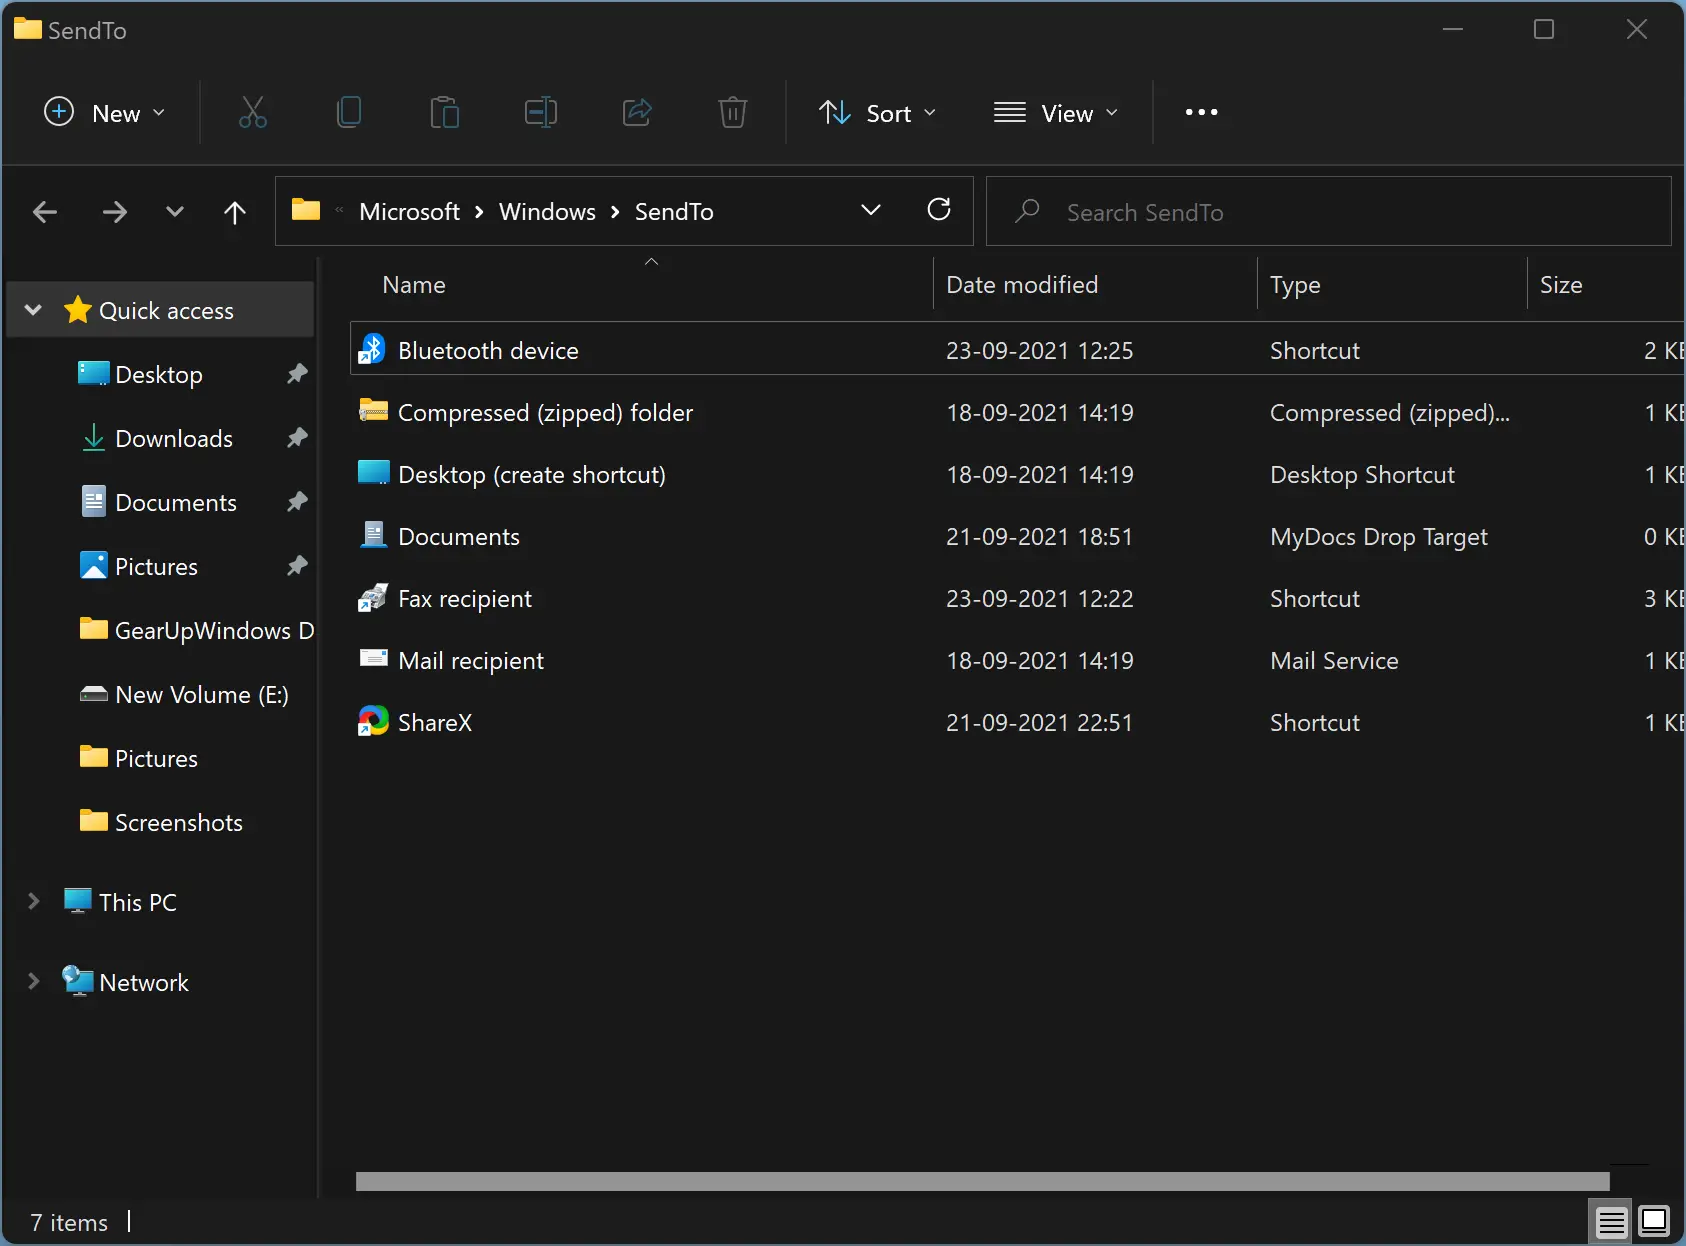
Основные пункты контекстного меню «Отправить» в Windows 10, 8 и 7 хранятся в специальной папке C:\Users\имя_пользователя\AppData\Roaming\Microsoft\Windows\SendTo
При желании, вы можете удалить отдельные пункты из этой папки или добавить собственные ярлыки, которые появятся в меню «Отправить». К примеру, если вы хотите добавить пункт для отправки файла в блокнот, шаги будут следующими:
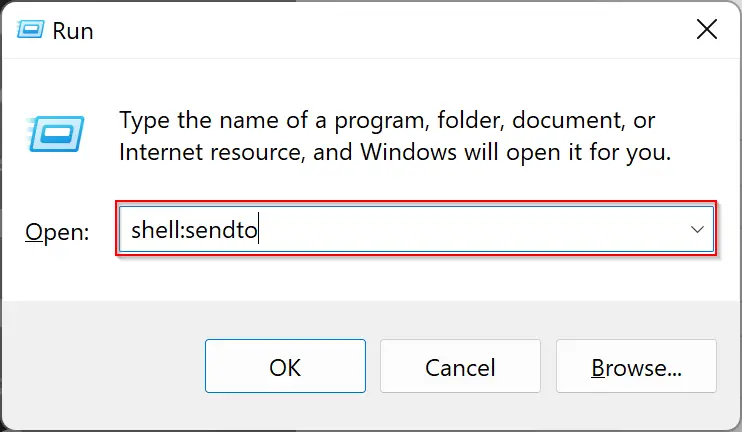
- В проводнике введите в адресную строку shell:sendto и нажмите Enter (это автоматически переведет вас в указанную выше папку).

- В пустом месте папки нажмите правой кнопкой мыши — создать — ярлык — notepad.exe и укажите имя «Блокнот». При необходимости вы можете создать ярлык на папку для быстрой отправки файлов в эту папку с помощью меню.
- Сохраните ярлык, соответствующий пункт в меню «Отправить» появится сразу, без перезагрузки компьютера.

При желании, вы можете изменить ярлыки имеющихся (но в данном случае — не всех, только для тех, которые являются ярлыками с соответствующей стрелочкой у значка) пунктов меню в свойствах ярлыков.
Для изменения иконок других пунктов меню вы можете использовать редактор реестра:
- Перейдите в раздел реестра
HKEY_CURRENT_USER\Software\Classes\CLSID
- Создайте подраздел, соответствующий нужном пункту контекстного меню (список будет далее), а в нем — подраздел DefaultIcon.
- Для значения «По умолчанию» укажите путь к иконке.

- Перезагрузите компьютер или выйдите из Windows и снова зайдите.
Список имен подразделов для пунктов контекстного меню «Отправить»:
- {9E56BE60-C50F-11CF-9A2C-00A0C90A90CE} — Адресат
- {888DCA60-FC0A-11CF-8F0F-00C04FD7D062} — Сжатая ZIP-папка
- {ECF03A32-103D-11d2-854D-006008059367} — Документы
- {9E56BE61-C50F-11CF-9A2C-00A0C90A90CE} — Рабочий стол (создать ярлык)
Редактирование меню «Отправить» с помощью сторонних программ
Существует достаточно большое количество бесплатных программ, позволяющих добавлять или удалять пункты из контекстного меню «Отправить». Среди тех, что можно рекомендовать — SendTo Menu Editor и Send To Toys, причем русский язык интерфейса поддерживается только в первой из них.
SendTo Menu Editor не требует установки на компьютер и очень проста в использовании (не забудьте переключить язык на русский в Options — Languages): в ней вы можете удалить или отключить имеющиеся пункты, добавить новые, а через контекстное меню — изменить иконки или переименовать ярлыки.
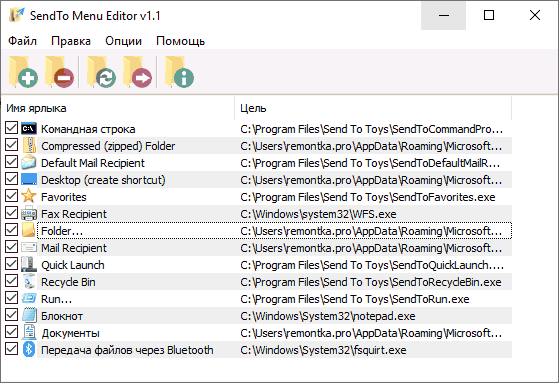
Скачать SenTo Menu Editor можно с официального сайта https://www.sordum.org/10830/sendto-menu-editor-v1-1/ (кнопка загрузки находится внизу страницы).
Дополнительная информация
Если вы хотите полностью удалить пункт «Отправить» в контекстном меню, используйте редактор реестра: перейдите к разделу
HKEY_CLASSES_ROOT\AllFilesystemObjects\shellex\ContextMenuHandlers\Send To
Очистите данные из значения «По умолчанию» и перезагрузите компьютер. И, наоборот, если пункт «Отправить» не отображается, убедитесь, что указанный раздел существует и значение по умолчанию установлено в {7BA4C740-9E81-11CF-99D3-00AA004AE837}
The Send to option in the file/folder context menu is a handy function available in the Windows operating system to quickly send files/folders to external drives, create desktop shortcuts of files/folders, create ZIP files, and share files via Bluetooth and email.
In Windows 10 and earlier versions, we can perform a right-click on a file/folder to access the Send to option. Selecting the Send to option shows Bluetooth file transfer, Compressed(zipped) folder, Desktop (create shortcut), Documents, Fax recipient, and Mail recipient options. We can also add custom locations to the Send to menu to take its functionality to the next level.

However, in Windows 11, the Send to option does not appear when you right-click on a file or folder. This is because Windows 11 ships with a modern context menu that does not show many options by default.
If you recently installed or upgraded from Windows 10 to Windows 11, you might be wondering about the Send to menu in Windows 11. Thankfully, the Send to menu is part of Windows 11.
Following are the three easy ways to access the Send to menu in Windows 11.
Method 1 of 3
Access the Send to menu in Windows 11
Step 1: Perform a right-click on a file or folder to see the modern context menu.
Step 2: Here, click/select Show more options to bring up the classic context menu.

Step 3: As you can see in the picture below, the classic context menu includes the Send to option, among many other options. Select/click Send to and choose the option you want. That’s it!

Method 2 of 3
Send to menu keyboard shortcut in Windows 11
Step 1: Select the file/folder for which you want to open the Send to menu.
Step 2: Use the Shift + F10 keys to open the classic context menu.
Step 3: Once the classic context menu is on the screen, press the “N” key once. If pressing the “N” once does not bring up the Send to menu, press it again. That’s it!
Method 3 of 3
Enable classic context menu to quickly access Send to menu in Windows 11
If you want to quickly access the Send to menu and do not like the new context menu, you can enable the classic context menu with a small registry tweak.

Refer to our how-to enable the classic context menu in Windows 11 guide for directions. Once the classic context menu is enabled, you can just right-click on a file or folder to access the Send to option.
How to fix the missing Mount option from context menu in Windows 11/10 guide might also interest you.
The “Send to” menu in Windows 10 and Windows 11 allows you to send files or folders to specific locations, applications, or devices. You can customize this menu by adding shortcuts to frequently used apps, drives, or folders. In Windows 11, hold down shift on your keyboard, then right click on a file or folder in File Explorer and you’ll find ‘send to’ in the popup menu.
Hold down the windows key on your keyboard, then press the R key.

Type the following into the run dialog box.
shell:sendto
A File Explorer window will open, displaying the contents of the “Send to” menu folder. Now all you need to do is create your shortcuts in this directory. You can create shortcuts to drives, folders or apps here. To do this, right click in the folder, go to ‘new’ then select ‘shortcut’ from the menu.

Adding an Application
To add an application, locate the executable file (.exe).
Below is a list of commonly used applications and their typical paths:
| Application | Path |
|---|---|
| Notepad | C:\Windows\System32\notepad.exe |
| Paint | C:\Windows\System32\mspaint.exe |
| WordPad | C:\Windows\System32\write.exe |
| VLC Media Player | C:\Program Files\VideoLAN\VLC\vlc.exe |
| 7-Zip File Manager | C:\Program Files\7-Zip\7zFM.exe |
| Google Chrome | C:\Program Files\Google\Chrome\Application\chrome.exe |
| Mozilla Firefox |
C:\Program Files\Mozilla Firefox\firefox.exe |
Adding a Folder
Enter the folder path manually or click Browse to locate it.
Adding a Drive
Enter the drive’s path (e.g., D:\ for a D: drive or a USB stick).

Further Reading
For more information on the topics discussed, have a look at the following book
The “Send To” menu is a feature of Windows that has been around for a very long time. It provides a quick way of copying virtually any file or folder to another location on your computer.
Both Windows 10 and Windows 11 still support the “send to” menu, but by default, it only includes a few options and some of those are practically redundant these days.
The good news is that you can easily add and remove destinations to the menu.
The “Send to” menu in Windows has been a useful feature for generations. You can use it to quickly send files to a specific location (destination).
Such as copying photos (or other files) to a new folder, partition or even a new device.
Send To works pretty much the same in both Windows 10 & Windows 11, with the caveat of the Windows 11 right click options menu. Let me show you how to use it.
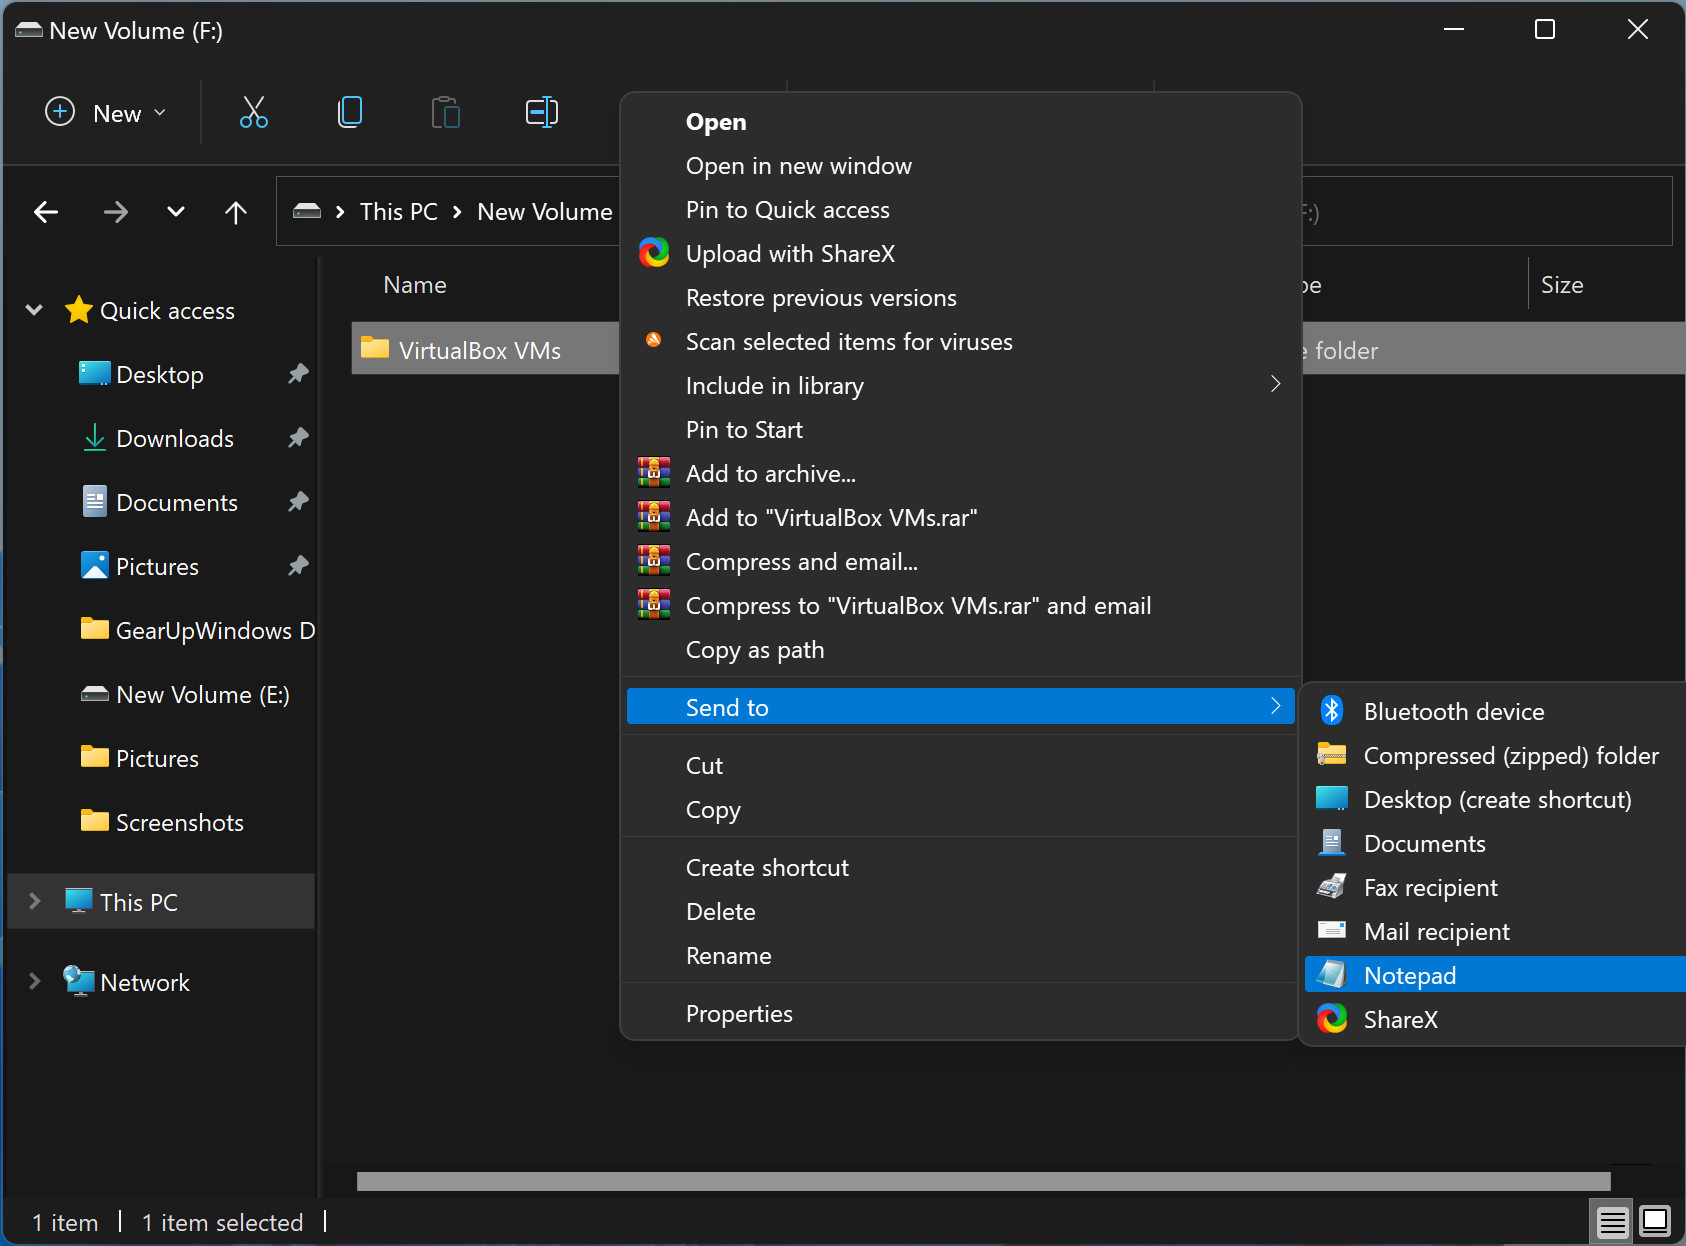
Right-click on an item (a file or folder). Hover your mouse pointer over Send To.
On the sub menu that opens, you can see all the destinations currently available for the Send to command.
In Windows 11, the Options menu has been changed or streamlined. When you right-click an item, You’ll see a much-reduced Options menu. Left-click SHOW MORE OPTIONS and that’ll open the exact same options menu as in Windows 10.
Then you simply left-click on one of the destination options in the menu.
For example, if you wanted to send a file to your Documents folder, you’d simply click Documents on the Send To menu.
Using Windows Send To is much quicker that using copy and paste, but you have to setup your destinations first.
In short, you need to add them to the menu before you can start sending files and folders to them.
The Windows Send To Folder.
The entries that appear on the Send To menu are just shortcuts to the locations. They’re all stored within a special folder, the Send To folder.
You can add extra entries (destinations) to the Send To folder to make it more relevant to you.
To add locations (destinations) to the Send To menu, you’ll need to create shortcuts inside the Send To folder.
The Send To folder is located at C:/Users/YourAccountName/AppData/Roaming/Microsoft/Windows/SendTo
The quickest and easiest way to open the Send To folder is to press the Windows key and the letter R on your keyboard at the same time.
That will open the RUN box. Type –
shell:SendTo
Into the box and then click the OK button.
Instead of typing it you could also Copy and Paste it from here.
Adding Entries To Send To Folder.
When you’re adding locations to the Send To folder, what you’re actually doing is adding a shortcut. A shortcut to the folder or drive that you want to appear on the Send To menu.
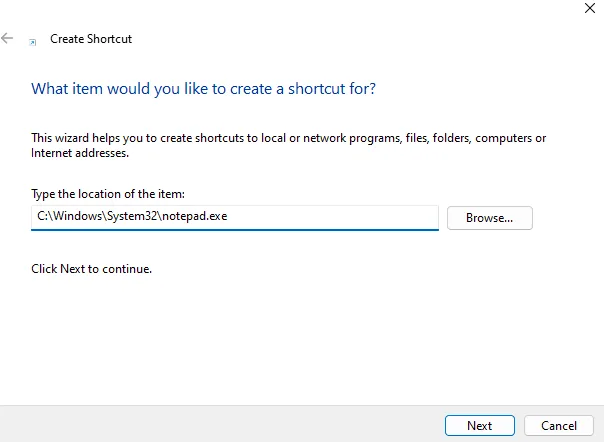
To add a new shortcut, right-click within the folder.
On the options menu, move your pointer onto the word NEW. Then on the second menu, left-click SHORTCUT.
Select a Send To Destination.
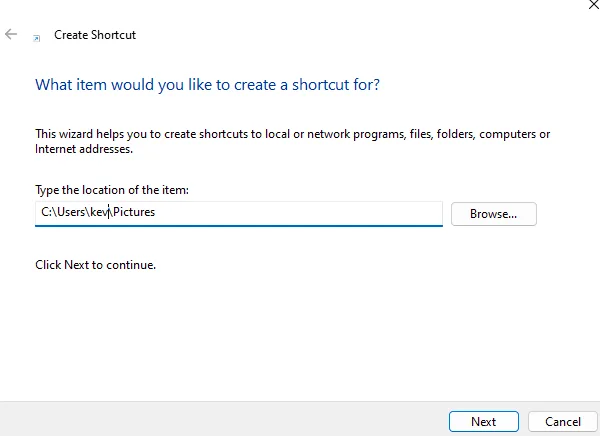
The Create Shortcut window will open. Click the BROWSE button to bring up the folder selection window.
Use the folder selection window to navigate to the folder you want to add, select it and then click the OK button.
In the example below, I’m going to add the Pictures folder.
After clicking the OK button, you’ll be returned to the Create Shortcut window.
The location of your chosen folder will be automatically entered into the Location box.
Click the NEXT button.
Name That Shortcut.
You can give your new shortcut any name you would like. Anything that makes sense to you.
It’s this name that’ll appear on the Send To menu.
Simply type whatever you want into the Name box or just leave it as is to accept the default name.
Click Finish when you’re ready.
After clicking the Finish button, you’ll see your new shortcut appear within the SendTo folder. Now all you need to do is to test it out.
Right-click on a file or folder, move to the Send To option and check that the new location is showing up.
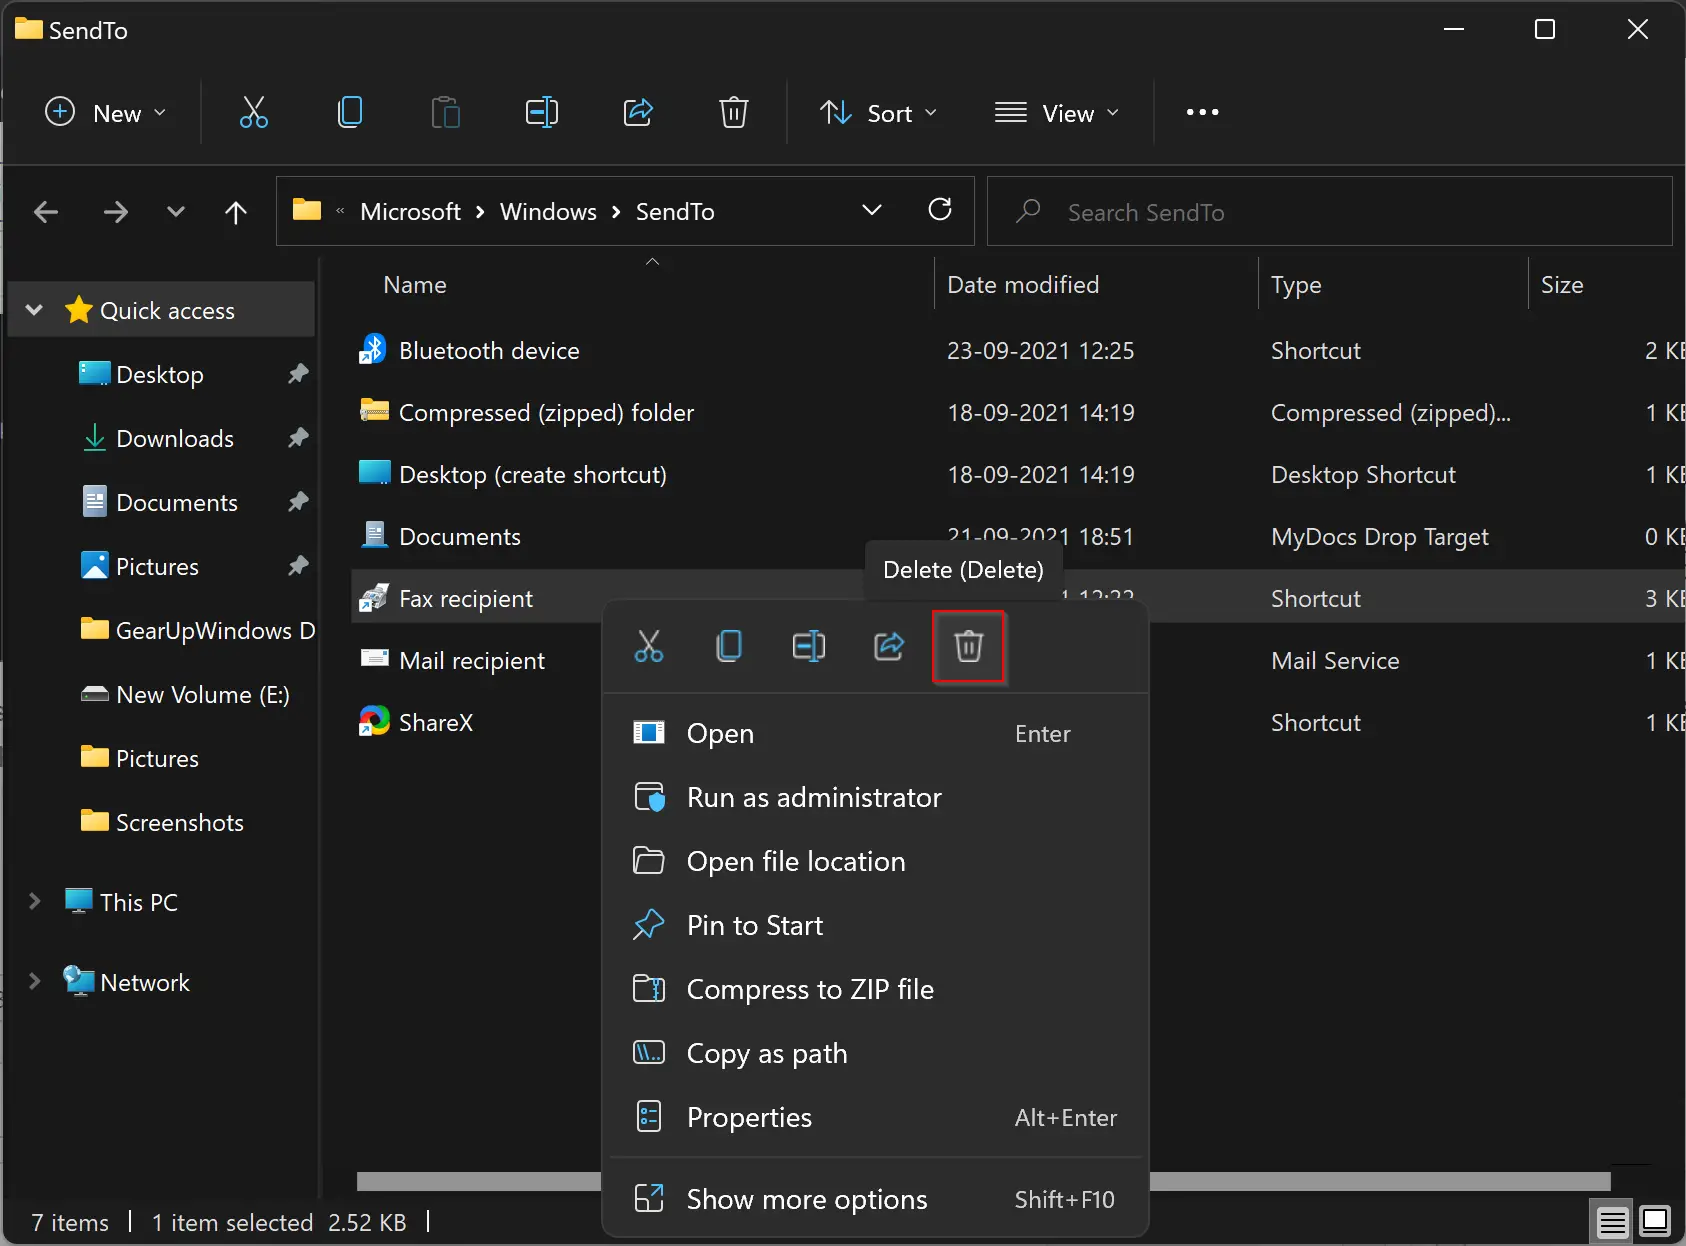
To make the Send To menu easier to use, it’s a good idea to remove any items that you’re not likely to need.
You can remove any or all of the default options as you see fit.
Inside the Send To folder, delete any items that you don’t want to appear on the Send To menu.
Note that you’re not deleting anything from your computer, these are only shortcuts and are safe to delete.
Summary.
The “send to” option on the right-click context menu is a great time saver. It’s worth taking a few minutes to get it set up with the folders and drives that you want to use.
Just bear in mind that when you send something to a location on the menu, you are copying and pasting it. So you will have duplicate files and folders.
Related Posts.
Stay Informed. Stay In Touch.
Now that you’ve found me, keep in touch. I publish new articles and update older ones constantly.
Let me send you a monthly email with all the latest guides for you to see if there’s anything you’re interested in.
At Home Computer
Signup for the At Home Computer Newsletter.
Support this website and keep up to date with all the new articles.
The “Send to” menu on Windows is a lesser-known feature. This “Send to” is a unique feature of Windows that allows you to quickly send a find to another location without navigating through File Explorer. In the earlier version of Windows, when you right-click a file/folder on the context menu, “Send To” appears. In the latest Windows 11, it is buried under “Show more options.”
When you right-click a file/folder and choose “Send to” from the menu, you should see something that looks like this:-
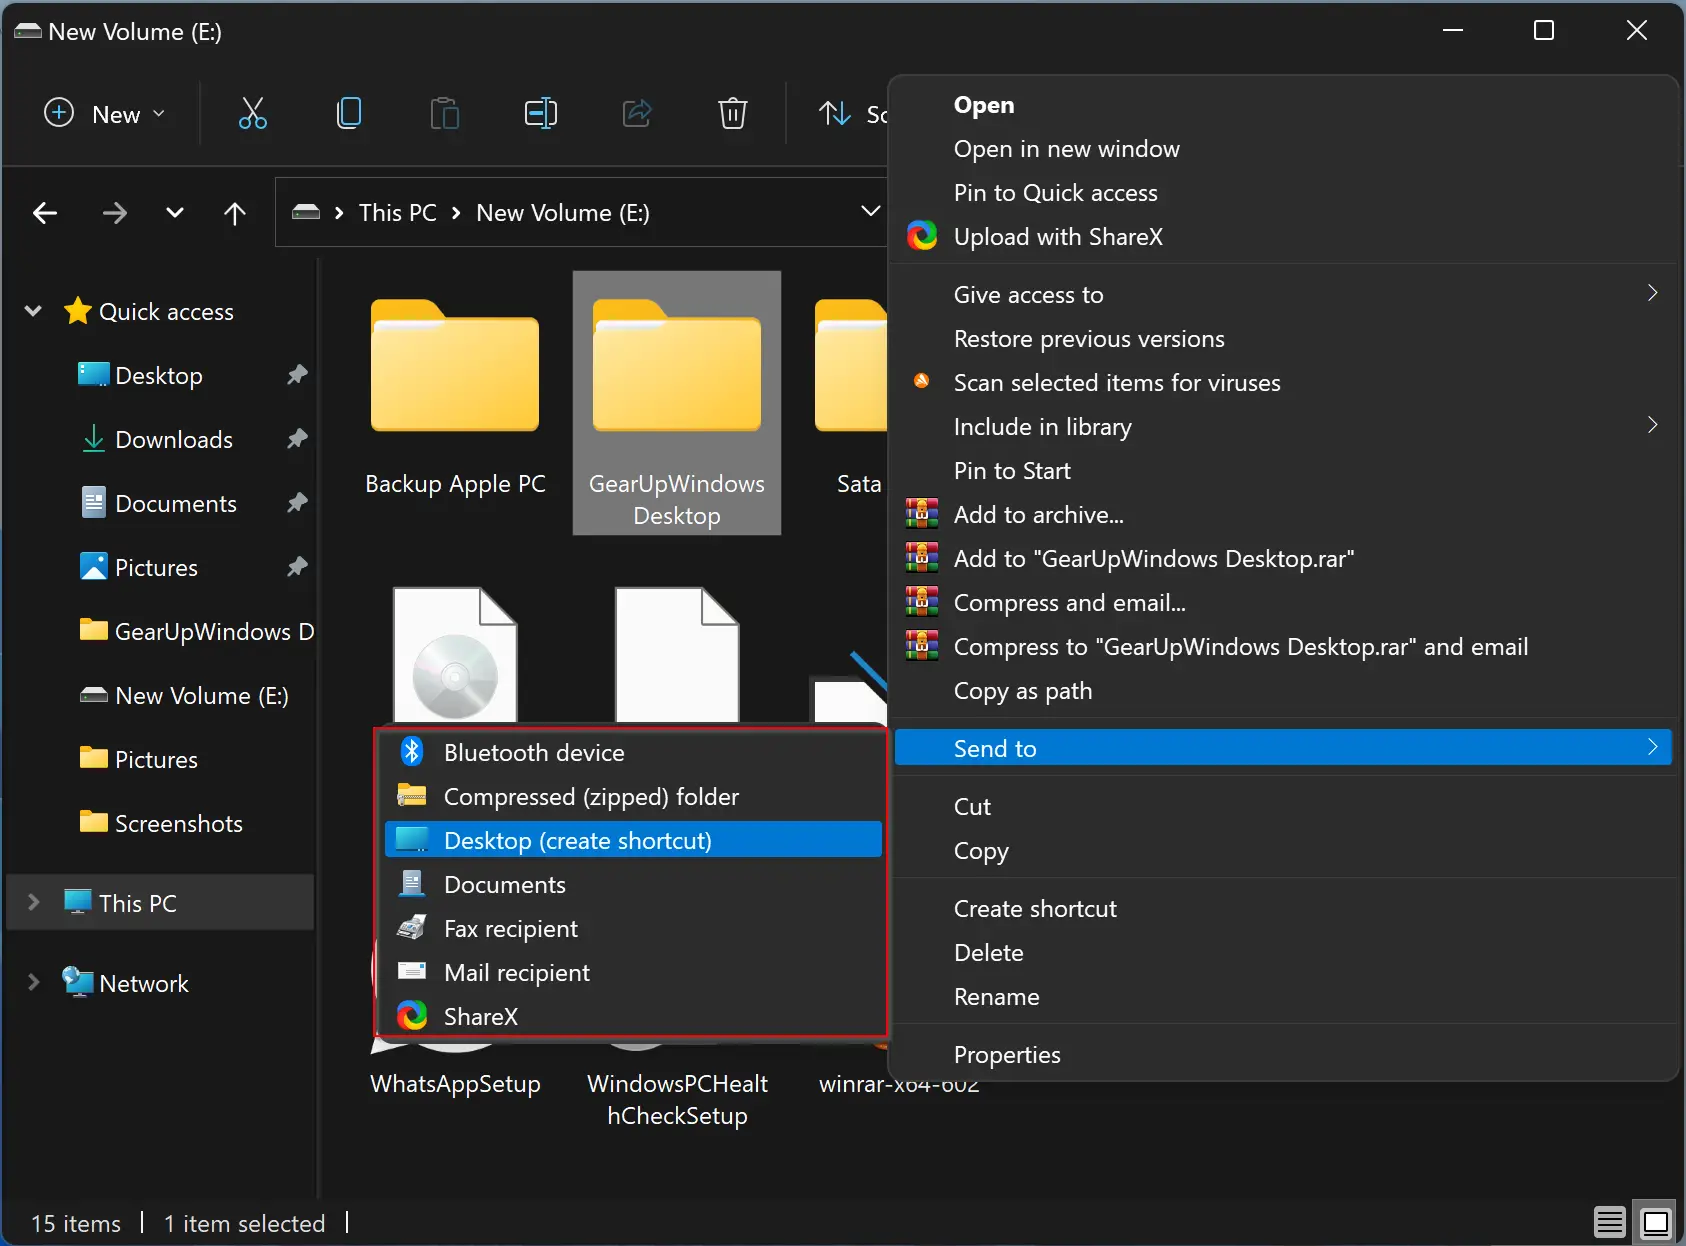
By default, in the “Send to” menu, you will find the following options:-
- Bluetooth device (if Bluetooth exists on your PC)
- Compressed (zipped) folder
- Desktop (create shortcut)
- Documents
- Fax recipient
- Mail recipient
Apart from the above list, a third-party app can add you, as seen in the above screenshot. Also, when you connect a USB drive to your PC, it will also appear here. That means you can quickly send a file or folder to any location without actually doing a copy-and-paste job.
Now that you have seen the importance of the “Send to” menu on Windows PCs. If you need, you can customize the shortcut options under the “Send to” menu. The below-mentioned method is applicable for all Windows OS, including Windows 11, 10, 8, 7, and Vista.
How to Add or Remove Items from the Send To Menu in Windows 11, 10, 8, 7, or Vista?
If you would like to add or remove any item from the Send to menu on your computer, do the following:-
Step 1. Press Windows + R keys from the keyboard to launch the Run dialog box.
Step 2. Type shell:sendto in the Run box and then hit Enter from the keyboard.
Step 3. When you’re done, it will open up the following folder where you can see a lot of shortcuts:-
C:\Users\<yourusername>\AppData\Roaming\Microsoft\Windows\SendTo
Step 4. Those applications you don’t need, you can safely delete from here. For example, if you don’t need the “Fax recipient” option under the “Send to” menu, right-click on it and select the Delete option from the context menu.
Step 5. Similarly, if you want to add any application to the “Send to” menu, drag the shortcut of that application to this folder. That application is added to the “Send to” menu. For example, if you want to add Notepad to the “Send to” menu, create a Notepad shortcut icon on the desktop. Then copy and paste that shortcut under the “Send to” folder. Now, when you right-click on File/Folder and select the “Send to” option, Notepad will appear in this app’s list.
Conclusion
In conclusion, the “Send to” menu on Windows is a useful and often overlooked feature that allows you to quickly send files and folders to various locations without navigating through File Explorer. While it may not be as prominent in Windows 11 as it was in earlier versions, it can still be accessed and customized to suit your needs. By following the simple steps outlined in this article, you can add or remove items from the “Send to” menu to make it more useful and convenient for you. So next time you need to send a file or folder to another location quickly, give the “Send to” menu a try!