
The virus and threat protection page of the Windows Security app is designed to help you safeguard your device against various threats such as viruses, malware, and ransomware. The page provides access to several features and settings to ensure comprehensive protection, and it’s divided in the following sections:
-
Current threats: This section displays any threats currently found on your device, the last time a scan was run, how long it took, and how many files were scanned. You can also start a new quick scan or choose from other scan options for a more extensive or custom scan
-
Virus & threat protection settings: In this section you can manage settings for Microsoft Defender Antivirus and third-party antivirus products
-
Virus & threat protection updates: This section is dedicated to ensuring that your device is protected with the latest security intelligence updates
-
Ransomware protection: In this section you can configure Controlled folder access, which prevents unknown apps from changing files in protected folders. It also offers options to configure OneDrive to help you recover from a ransomware attack
In the Windows Security app on your PC, select Virus & threat protection, or use the following shortcut:
Virus & threat protection
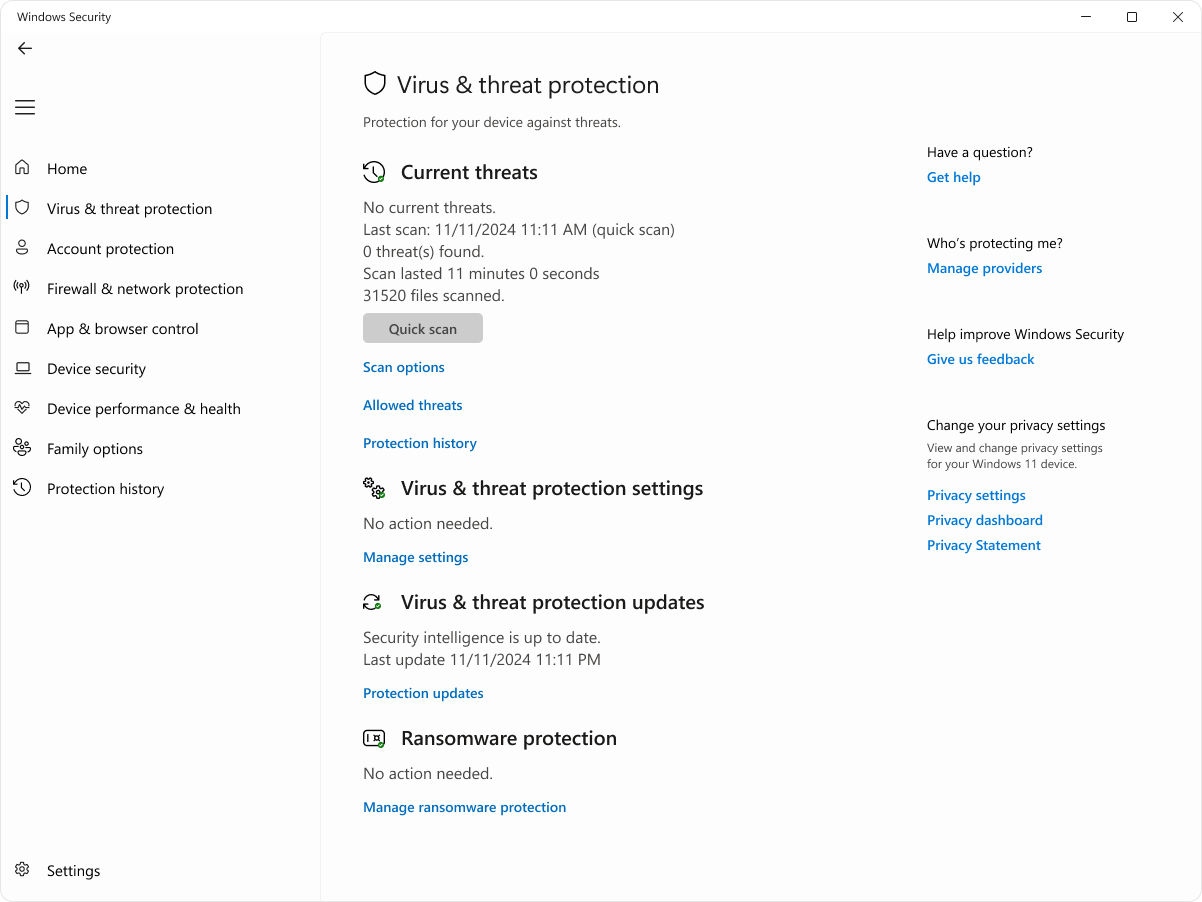
Current threats
Under Current threats you can:
-
See any threats currently found on your device
-
See the last time a scan was run on your device, how long it took, and how many files were scanned
-
Start a new quick scan or go open Scan options to run a more extensive or custom scan
-
See threats that have been quarantined before they can affect you and anything identified as a threat that you have allowed to run on your device
Even though Windows Security is turned on and scans your device automatically, you can perform an additional scan whenever you want.
-
Quick scan: This option is useful when you don’t want to spend the time running a full scan on all your files and folders. If Windows Security recommends that you run one of the other types of scans, you’ll be notified when the quick scan is done
Start a quick scan
-
Full scan: Scans every file and program on your device
Start a full scan
-
Custom scan: Scans only files and folders that you select
Start a custom scan
-
Microsoft Defender Antivirus (offline scan): Uses the latest definitions to scan your device for the latest threats. This happens after a restart, without loading Windows, so any persistent malware has a more difficult time hiding or defending itself. Run it when you are concerned that your device has been exposed to malware or a virus, or if you want to scan your device without being connected to the Internet. This will restart your device, so be sure to save files you may have open. Microsoft Defender Offline will load and perform a quick scan of your PC in the Windows Recovery Environment. When the scan completes, your PC automatically restarts
Start an offline scan
Note: To see the results of the offline scan, open the Windows Security app on your Windows device and select Protection history.
To see the results of the offline scan, open the Windows Security app on your Windows device and select Protection history
The Allowed threats page shows a list of items that Windows Security has identified as threats, but that you have chosen to allow. Windows Security won’t take any actions against threats you’ve allowed.
If you have accidentally allowed a threat and want to remove it, select it from the list, then select the Don’t allow button. The threat will be removed from the list and Windows Security will once again act on it the next time it sees this threat.
Virus & threat protection settings
Use Virus & threat protection settings when you want to customize your level of protection, send sample files to Microsoft, exclude trusted files and folders from repeated scanning, or temporarily turn off your protection.
In the Windows Security app on your PC, select Virus & threat protection > Manage settings or use the following shortcut:
Virus & threat protection settings
Real-time protection is a feature in the Windows Security app that continuously monitors your device for potential threats such as viruses, malware, and spyware. This feature ensures that your device is actively protected by scanning files and programs as they are accessed or executed. If any suspicious activity is detected, real-time protection will alert you and take appropriate action to prevent the threat from causing harm.
You can use the Real-time protection setting to turn it off temporarily; however, real-time protection will turn back on automatically after a short while to resume protecting your device. While real-time protection is off, files you open or download won’t be scanned for threats. Keep in mind that if you do, your device might be vulnerable to threats and that scheduled scans will continue to run. However, files that are downloaded or installed won’t be scanned until the next scheduled scan.
You can turn Real-time protection On or Off using the toggle button.
Notes:
-
If you just want to exclude a single file or folder from antivirus scanning, you can do that by adding an exclusion. This is safer than turning the entire antivirus protection off
-
If you install a compatible non-Microsoft antivirus program Microsoft Defender antivirus will automatically turn itself off
-
If tamper protection is turned on, you’ll need to turn it off before you can turn Real-time protection off
Note: Dev Drive protection is not available on Windows 10.
Dev Drive Protection provides a secure and isolated space for developers to store and work on their code, ensuring that their development environment is protected from potential threats and vulnerabilities.
Dev Drive Protection includes a performance mode that scans the Dev Drive asynchronously. This means that security scans are deferred until after the file operation has completed, rather than being performed synchronously while the file operation is being processed. This asynchronous scanning mode provides a balance between threat protection and performance, ensuring that developers can work efficiently without experiencing significant delays due to security scans.
-
You can turn Dev Drive protection On or Off using the toggle button
-
Select See volumes to review the list of volumes that have Dev Drive protection enabled
To learn more, see Protect Dev Drive using performance mode.
This setting allows Microsoft Defender to get constantly updated improvements from Microsoft while you’re connected to the internet. This will result in more accurately identifying, stopping, and fixing threats.
If you’re connected to the cloud with cloud-delivered protection, you can have Defender automatically send suspicious files to Microsoft to check them for potential threats. Microsoft will notify you if you need to send additional files, and alert you if a requested file contains personal information so you can decide whether or not you want to send that file or not.
If you’re concerned about a file and want to make sure it was submitted for evaluation you can select Submit a sample manually to send us any file you want.
Tamper protection is a feature that helps prevent malicious apps from changing important Microsoft Defender Antivirus settings. This includes settings such as real-time protection and cloud-delivered protection. By ensuring these settings remain unchanged, tamper protection helps maintain the integrity of your device’s security configuration and prevents malicious apps from disabling critical security features.
If tamper protection is turned on and you’re an administrator on your device, you can still change these settings in the Windows Security app. However, other apps can’t change these settings.
You can turn tamper protection On or Off using the toggle button.
Note: Tamper protection doesn’t affect how third-party antivirus apps work or how they register with Windows Security.
Use the Controlled folder access setting to manage which folders untrusted apps can make changes to. You can also add additional apps to the trusted list so they can make changes in those folders. This is a powerful tool to make your files safer from ransomware.
When you turn on Controlled folder access, many of the folders you use most often are protected by default. This means that content in any of these folders cannot be accessed or changed by any unknown or untrusted apps. If you add additional folders, they become protected as well.
Learn more about using Controlled folder access
By default, Microsoft Defender Antivirus runs in the background, scanning files and processes that you open or download looking for malware.
There might be instances when you have a particular file or process that you don’t want scanned in real-time. When that occurs, you can add an exclusion for that file, file type, folder or process.
Caution: Adding an exclusion to Windows Security means that Microsoft Defender Antivirus will no longer check those types of files for threats, which could leave your device and data vulnerable. Make sure you really want to do this before you proceed.
Exclusions only apply to real-time scanning with Microsoft Defender Antivirus. Any scheduled scans with Microsoft Defender Antivirus, or third-party antimalware products, might still scan these files or processes.
To add an exclusion
-
Select Add or remove exclusions
-
Choose one of the four options depending upon the type of exclusion you’re trying to add:
-
File: Excludes a specific file
-
Folder: Excludes a specific folder (and all of the files within that folder)
-
File type: Excludes all files of a specified type, such as .docx, or .pdf
-
Process: Adding an exclusion for a process means that any file opened by that process will be excluded from real-time scanning. These files will still be scanned by any on-demand or scheduled scans, unless a file or folder exclusion has also been created that exempts them
Tip: It’s recommended that you use the full path and file name to exclude a specific process. This makes it less likely that malware could use the same filename as a trusted and excluded process and evade detection.
To remove an exclusion
Caution: Excluding a file or process from antivirus scanning can make your device or data more vulnerable. Be certain you want to do this before you proceed.
-
Select Add or remove exclusions
-
Select the exclusion that you want to remove and select Remove
Using wildcards or environment variables
You can use a wildcard «*» to substitute for any number of characters.
-
In file type exclusions: If you use an asterisk in the file extension it acts as a wildcard for any number of characters. «*st» will exclude .test, .past, .invest, and any other file types where the extension ends in a st
-
In process exclusions:
-
C:\MyProcess\* will exclude files opened by all processes, located in C:\MyProcess, or any subfolders of C:\MyProcess
-
test.* will exclude files opened by all processes named test, regardless of the file extension
-
You can use environment variables in your process exclusions as well. For example:
-
%ALLUSERSPROFILE%\CustomLogFiles\test.exe
This will exclude any files opened by C:\ProgramData\CustomLogFiles\test.exe. For a complete list of Windows environment variables see: Recognized Environment Variables.
Virus & threat protection updates
Security intelligence (sometimes referred to as definitions) are files that contain information about the latest threats that could infect your device. Windows Security uses security intelligence every time a scan is run.
Windows automatically downloads the latest security intelligence as part of Windows Update, but you can also manually check for it.
In the Windows Security app on your PC, select Virus & threat protection> Protection updates > Check for updates or use the following shortcut:
Check for updates
Ransomware protection
The Ransomware protection page in Windows Security has settings for both protecting against ransomware, and recovering if you happen to get attacked.
In the Windows Security app on your PC, select Virus & threat protection> Manage ransomware protection or use the following shortcut:
Manage ransomware protection
Controlled folder access is designed to protect your valuable data from malicious apps and threats, such as ransomware. This feature works by checking apps against a list of known, trusted apps and blocking unauthorized or unsafe apps from accessing or changing files in protected folders.
When Controlled folder access is enabled, it helps safeguard your data by:
-
Blocking unauthorized changes: Only trusted apps are allowed to make changes to files in protected folders. If an app is determined to be malicious or suspicious, it will be blocked from making any changes
-
Protecting important folders: By default, Controlled Folder Access protects common folders such as Documents, Pictures, Videos, Music, and Desktop. You can also add additional folders to be protected
-
Providing notifications: If an app is blocked from making changes, you will receive a notification, allowing you to take appropriate action
To add or remove protected folders, select Protected folders or use the following shortcut:
Protected folders
To add or remove an app through Controlled folder access, select Allow an app through Controlled folder access or use the following shortcut:
Allow an app through Controlled folder access
Caution: Be thoughtful about which apps you add. Any added apps will be able to access the files in the protected folders and if that app gets compromised the data in those folders could be at risk.
If you receive the message App is blocked when you try to use a familiar app, you can unblock using the following steps:
-
Take note of the path of the blocked app
-
Select the message, and then select Add an allowed app
-
Browse for the program to which you want to allow access
Note: If you try to save a file to a folder and the folder is blocked, that means the app you’re using is blocked from saving to that location. If that happens, save the file to another location on your device. Then use the previous steps to unblock the app, and you’ll be able to save the files to your desired location.
For more details about controlled folder access see Protect important folders with controlled folder access.
The Ransomware Data Recovery section is designed to help you recover your files in case of a ransomware attack. It provides several key functionalities to ensure that your data remains safe and can be restored if it gets encrypted or blocked by ransomware.
The Ransomware Data Recovery section is integrated with Microsoft OneDrive. This allows you to back up your important files to OneDrive, ensuring that you have a secure copy of your data that can be restored in case of a ransomware attack. If your files are affected by ransomware, the Windows Security app will guide you through the process of restoring your files from OneDrive. This helps you quickly recover your data without having to pay the ransom.
You will receive notifications and alerts if ransomware is detected or if there are any issues with your OneDrive backup. This ensures that you are always aware of the status of your data protection.
Microsoft developed an application Windows Defender Security Center and included five different protection tools in it. The first tool of the app is Virus & threat protection and it includes settings for Windows Defender. In case, you don’t prefer Windows Defender Antivirus to safeguard the PC, you can disable it. For the best safety, you can Add Scan with Windows Defender to Windows 10’s Right-Click menu.
So, in these tips, we will present the directions to Disable / Enable Virus & Threat Protection in Windows 10. In short, disabling or enabling Virus & threat protection is nothing but turning off or on Windows Defender Antivirus. To Disable / Enable Virus & Threat Protection in Windows 10, you have to take help of the setting Real-time protection. This setting basically finds and stops the threats and malware from running or installing on your computer. Well, you cannot disable the setting permanently as it turns ON automatically after a certain time. Hence, experts suggest leaving this setting enabled to protect your PC.
Disable / Enable Virus & Threat Protection in Windows 10
- On the taskbar search box, Type – security.
- Press – Enter.
- Once Windows Security appears, click the – Virus & Threat Protection.
- Select the link – Manage settings.
Disable Virus & threat protection
- Click the toggle switch under the – Real-time protection.
- When the User account control dialog appears, select – Yes.
Enable Virus & threat protection
- Click the toggle switch under the – Real-time protection to enable Virus & threat protection.
Alternatively, open Control Panel => Security and Maintenance => Click View on Windows Security link under the option Virus protection. Now follow the above methods.
Windows 10 includes antivirus protection that periodically scans the PC and keeps it secure from any threats. This protection is commonly known as Windows Defender but in Creators Update things are a little different. All thanks to Microsoft that offered the application named Windows Security.
Conclusion
Finishing the above-mentioned directions will help you to temporarily Disable / Enable Virus & Threat Protection in Windows 10 pretty much easily. Well, if you don’t turn ON the setting after a short time, the OS will itself enable it again. Keeping it ON will continue scanning your device time and again for the presence of any malware and hence will protect it from the same.
1] For quick accessibility, Create Shortcut to Windows Defender Security Center on Windows 10.
2] How to Enable Limited Periodic Scanning in Windows Defender Windows 10
That’s all!!
This post mainly introduces the Virus & Threat Protection feature in Windows Security. Learn how to use Virus & Threat Protection to scan for threats on your device and run different types of scans. Some useful free computer software programs from MiniTool Software are also provided to help you with data recovery, data backup, and disk management.
Virus & Threat Protection in Windows Security
1. Access Virus & Threat Protection in Windows Security:
Windows Security includes a virus and threat protection feature and you can access this feature by following the operation below.
- Press Windows + S, type Windows security in the search box, and click Windows Security App to quickly open Windows Security on Windows 10/11.
- Click the Virus & threat protection option in the left panel or the right window to access the Virus & threat protection feature in Windows Security.
Related: Windows Defender Download, Install, Reinstall on Win 10/11.
2. What the Virus & Threat Protection Feature Can Do?
It mainly offers protection for your device against various threats. It helps scan your computer for threats, prevents malicious programs from being installed on your computer, etc. You can run different types of scans, see the results of the previous scans, get the latest protection of Microsoft Defender, etc.
Under Current Threats:
You can see any threats currently found on your device. If there are no threats found, it will show “No actions needed”. You can also see the time of the last scan on your device, how long it took, and how many files were scanned. Still, you can also start a quick scan or open the scan options to run a deep scan or custom scan.
Run a Scan for Your Device:
Although Windows Defender is turned on and automatically scans your Windows computer, you can manually perform a scan if you want.
Quick Scan: If you don’t want to spend much time performing a full scan for your device, you can select Quick Scan. This scan option scans various folders on your Windows computer including the Downloads folder, Windows folder, Startup folder, and more. It may help find out suspicious files or viruses on your device.
Full Scan: If a quick scan is not enough and Windows Security recommends that you should run other types of scans, you may continue to run a full scan for your computer. The Full Scan option will scan all files and running programs on your hard disk. However, it may take a long time, maybe a few hours.
Custom Scan: If you like, you can also run a custom scan with Windows Security. This scan option only scans your selected files and folders. It lets you choose a file, folder, or location and perform a quick scan.
Offline Scan: Some malicious files or viruses may be hard to remove from your computer. You may try the offline scan option to see if it can help you remove the tough malware or virus. Microsoft Defender Offline Scan uses the latest definitions to scan your device for the latest threats. It runs after a computer restart, without loading Windows. Save your open files before you run this type of scan.
Also read: 10 Tips to Fix Windows Defender Won’t Scan on Windows 10/11.
3. Manage the Virus & Threat Protection Settings
You can change the settings of virus & threat protection on your Windows 10/11 computer. You can customize the level of protection, exclude trusted files and folders from scanning, turn off the protection temporarily, and more.
If you want, you can freely turn on or turn off the real-time protection of your device. If you turn off the real-time protection, it won’t scan the files you open or download.
You can also exclude specific files, folders, file types, processes, etc. from being scanned if you want.
You can also use the Controlled folder access setting to manage which folders or apps can be changed. You can add apps to the trusted list. This feature protects your files from malware or ransomware. If you turn on the Controlled folder access feature, the folders you use most often will be protected by default, and content in these folders can’t be accessed or changed by unknown/trusted apps.
You can also manage the notification settings of Windows Security.
Related: Check Computer Performance and Health in Windows Security.
4. Update Your Computer to the Latest Version for Security
Windows Security uses Security Intelligence (files that contain information about the latest threats that may infect your device) each time a scan is run.
Microsoft delivers the latest Security Intelligence as a part of Windows Update. In general, Windows will automatically run updates for your device. If you like, you can also manually run a Windows Update to install the latest updates for your computer. To update the Windows 10 OS, you can click Start > Settings > Update & Security > Windows Update > Check for updates. Alternatively, you can also select Check for updates under Virus & threat protection updates in Windows Security to scan for the latest security intelligence.
Related: Best Free Antivirus Software for Windows 10/11.
Free Data Recovery Software for Windows 10/11
To help you recover deleted or lost data from Windows computers or other storage devices, here we introduce a free data recovery program to you.
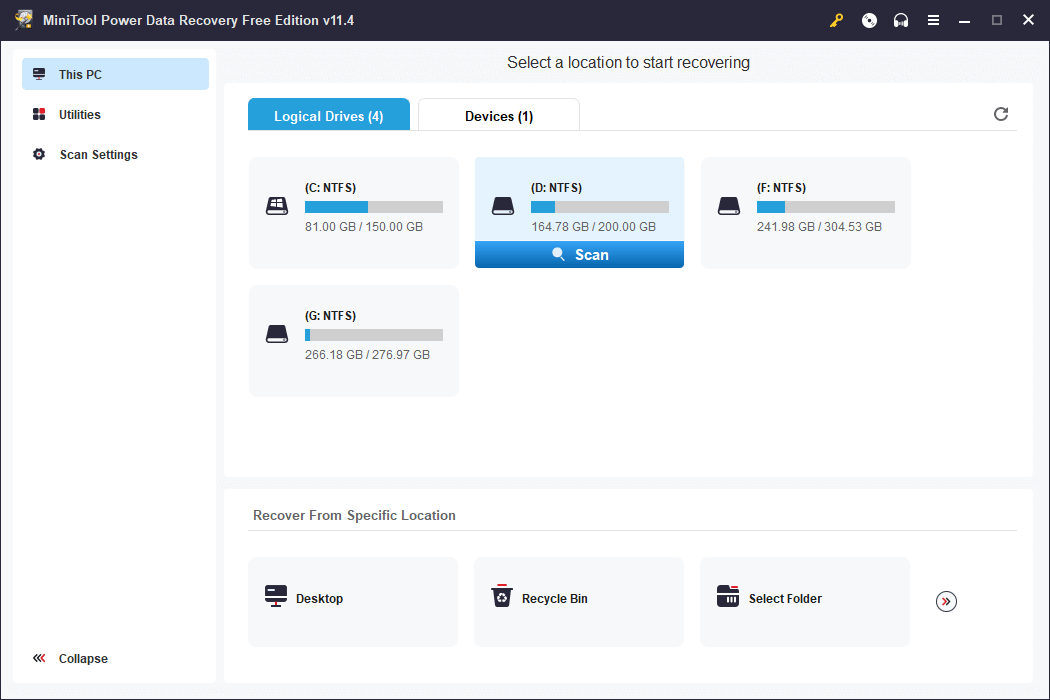
MiniTool Power Data Recovery is a top free data recovery program for Windows. You can use it to recover any deleted or lost files, photos, videos, emails, etc. from Windows PCs or laptops, USB flash drives, SD or memory cards, external hard drives, or SSDs.
This tool helps you deal with various data loss situations, e.g. mistaken file deletion, hard drive corruption or failure, malware or virus infection, system crashes, or other computer problems. It can even help you recover data when the PC won’t boot.
It has an intuitive interface and simple operation and even novice users can easily operate it.
Download and install MiniTool Power Data Recovery on your Windows PC or laptop, and learn how to use it to recover deleted or lost data from your device below.
MiniTool Power Data Recovery FreeClick to Download100%Clean & Safe
- Launch MiniTool Power Data Recovery.
- On the main UI, you can select the target drive and click Scan. You can also select a specific location like Desktop, Recycle Bin, or a specific folder under Recover from Specific Location to scan. If you don’t know the exact location, you can click the Devices tab and select the entire disk or device to scan. For an external device like USB, HDD, or SD card, you should connect it to your Windows computer beforehand.
- Let the software finish the scan. After that, you can check the scan result to find the wanted files, check them and click Save to choose a new location to store the recovered files.
Tip: If you only want to select a specific type of file to scan, you can click the Scan Settings icon in the left panel of the main UI.
Free Disk Partition Manager for Windows 10/11
If you want to extend the C drive or repartition the hard disk of your computer, you can turn to a free disk partition manager to easily realize the task.
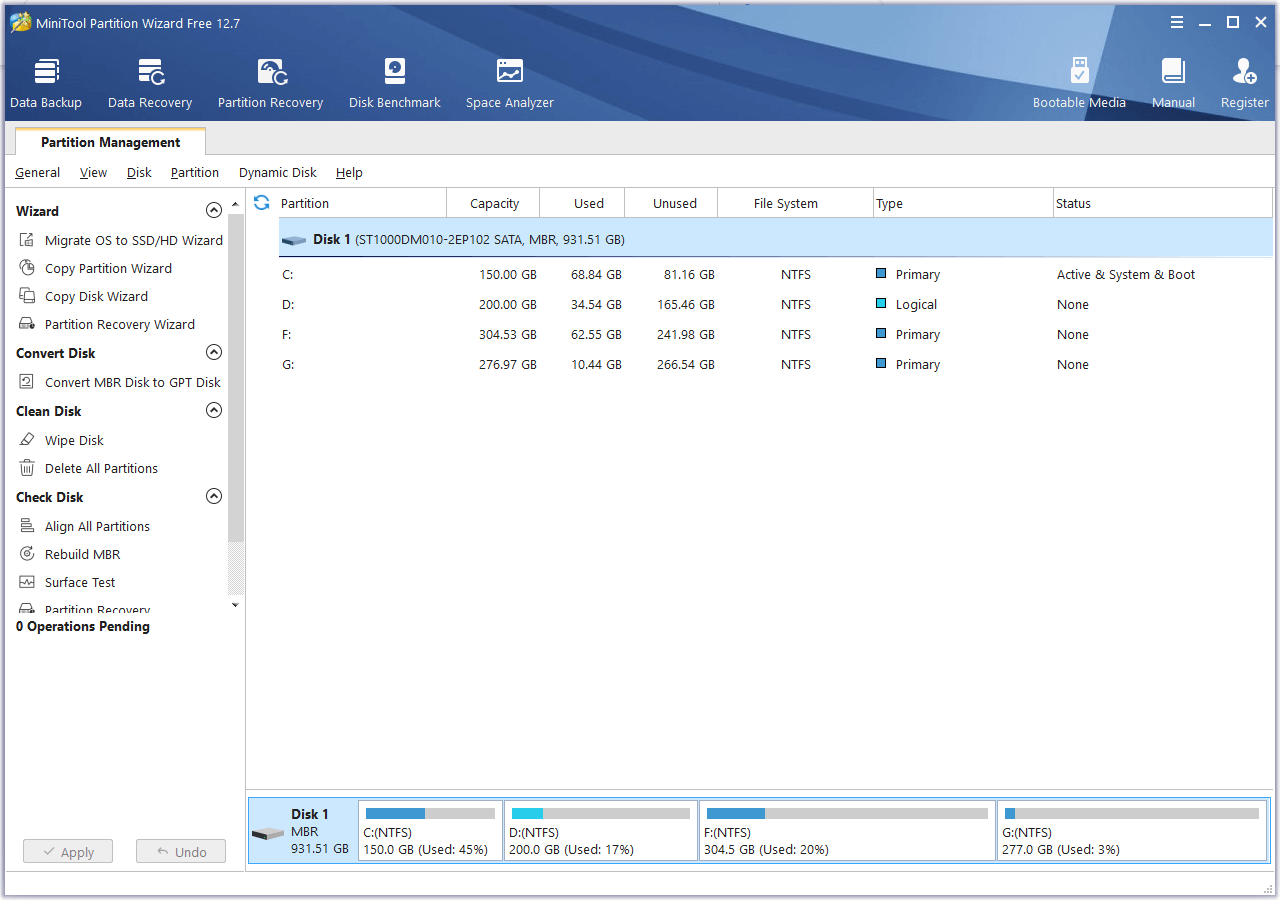
MiniTool Partition Wizard is a professional free disk partition manager for Windows. You can use it to easily manage hard drives from all aspects.
You can use it to create, delete, extend, resize, merge, split, format, wipe partitions, etc. Therefore, you can use it to easily create a new partition or extend your C drive on your Windows computer.
You can also use it to migrate OS to SSD or HD, test hard drive speed, analyze hard drive space, check and fix disk errors, clone disks, and more.
Download and install MiniTool Partition Wizard on your Windows PC or laptop and use it to manage your hard disks now.
MiniTool Partition Wizard FreeClick to Download100%Clean & Safe
Free PC Backup Software for Windows 10/11
For Windows users, you may want to back up data on your PC or make a backup of your system for fear of sudden data loss or system crashes.
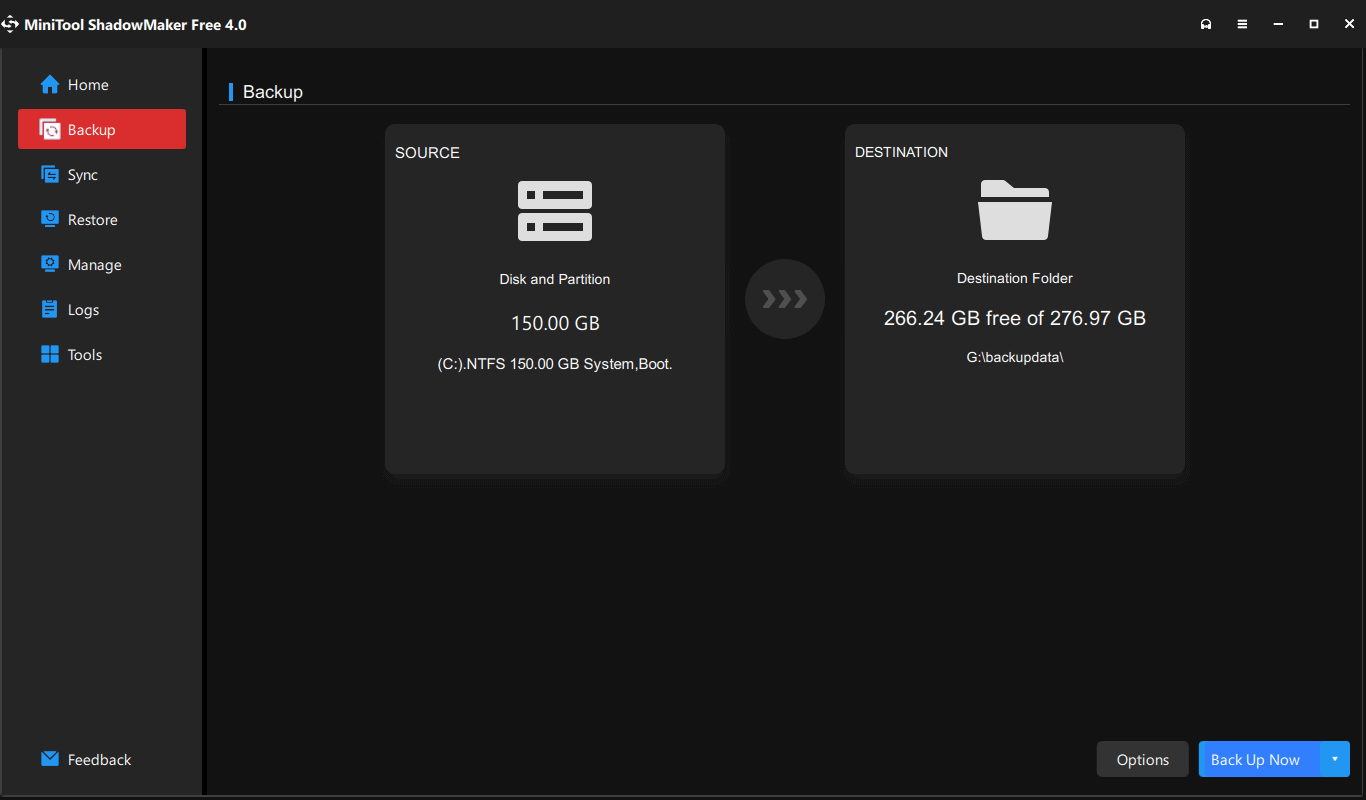
MiniTool ShadowMaker is a professional free PC backup software program that lets you easily back up your data and system on your Windows 11/10/8/7 PC.
It lets you freely select files, folders, partitions, or the whole disk content to back up them to an external hard drive, USB flash drive, or network drive.
You can also use this program to create a system backup image of your Windows computer and easily restore your system from the backup when needed.
Many other professional backup features like disk clone, file sync, schedule backup, incremental backup, etc. are also included.
Get this free PC backup tool and use it to back up your PC now.
MiniTool ShadowMaker TrialClick to Download100%Clean & Safe
Click to Tweet
Conclusion
This post introduces the Virus & Threat Protection feature in Windows Security in Windows 10/11. You can use this feature to scan your computer for threats to protect your computer from suspicious files, malware, or viruses.
Some useful computer software programs from MiniTool Software are also introduced to help you with data recovery, data backup, system backup & restore, and disk partition management. Hope it helps.
For other computer problems, you may find possible solutions from MiniTool News Center.
From MiniTool Software’s official website, you may also find and try free programs like MiniTool MovieMaker, MiniTool Video Converter, MiniTool Video Repair, and more.
MiniTool MovieMaker is a free video editor for Windows. You can use it to trim video, add effects/transitions/subtitles/music to video, create slow motion or time-lapse video, and more. You can export the video in MP4 or another preferred format.
MiniTool Video Converter is a free video converter for Windows. You can use it to convert any video or audio file to your preferred format, download YouTube videos for offline playback, or record your computer screen.
MiniTool Video Repair helps you repair corrupted MP4 or MOV video files for free.
If you have any issues with using MiniTool Software products, you may contact [email protected].
Also read: Discover expert tips and tricks for hard drive recovery service that could potentially save you from losing irreplaceable memories.
If you’re having trouble accessing the Virus and Threat Protection feature through your Windows Security application, you’re not alone. Recently, some users have reported issues with accessing this page. Some encountered an error stating, “Your IT Administrator has limited access to some areas of this app.“ If you’re facing a similar issue, this guide will help you resolve it and regain access to this important security feature.
Virus and Threat Protection is an essential part of the Windows Security application, designed to protect your system from harmful viruses, malware, and other security threats. This feature runs scans, detects threats and quarantines any suspicious files. It also alerts you of potential threats and it will automatically download updates to help identify new viruses and malware.
Possible Causes for Virus and Threat Protection missing:
Before diving into the solutions, it is important to understand the potential causes of this problem. The following factors may contribute to the issue:
- Outdated Windows Security application
- Conflicts with other security software installed on the system
- Corrupted or missing system files
- Malware infection affecting the functionality of Virus and Threat Protection
- Issues with Windows updates
Fix Virus and threat Protection is missing in Windows Security:
This article will guide you to fix the Virus and threat Protection is missing in Windows Security on Windows 11/10. Follow the below-mentioned resolution methods.
Solution 1: Using SecurityHealth
If you are unable to access the Virus and Threat Protection page, you can follow the below-mentioned resolution methods. Mostly this error is mainly reported by users of Windows 11. If you are receiving a similar error on your version of Windows 11, then try the following solution.
Open Windows Explorer by pressing Windows + I and navigate to the following path.
C:\WINDOWS\System32\SecurityHealth
Once you navigate to the SecurityHealth folder, you’ll find SecurityHealthSetup.exe file. Right-click on the exe file and choose Run as Administrator.
If you are unable to find SecurityHealthSetup.exe file, you can download the file from here, I’ve created a Zip file of SecurityHealthSetup.exe file, download the zip file and extract it and copy the SecurityHealthSetup.exe to the mentioned location.
Right-click on the SecurityHealthSetup.exe and choose Run as administrator.

Immediately a blank window will appear and close in few seconds, now try to open the Windows Security app and click on the Virus and Threat protection, it should work as expected, if not try the following resolution methods.
Solution 2: Check the Defender Services are running:
Open run command by pressing Windows + R and type services.msc and hit enter, this command will open the Services Management console.
Now check the following services are running.
- Windows Defender Firewall
- Microsoft Defender Antivirus Network Inspection Service
- Microsoft Defender Antivirus Service
- Security Center
If any of these services are not running then, click on start the service. And restart all the services once, mostly this will fix the issue.
Solution 3: Check Policy updates from your Organization’s end
Usually, numerous organizations or educational institutions enforce policies to hide the Virus and Threat Protection page in the Windows Security app. If you are utilizing a work or school account, verify that your system is not governed by organizational policies. In the event your system is subjected to company policy, consider implementing Solution 4 to override the organizational policy.
Note: This information is provided for educational purposes only, and modifying organizational policies is not recommended.
Solution 4: Enable Virus and threat protection page
First, we are going to use the Group Policy editor to Override the organizational policy, using this method we can disable a certain policy to enable Virus and threat protection page. If you are using Windows Home edition then use the registry editor method.
Open Run command by pressing Windows + R and type gpedit.msc and hit enter, this command will open the Group Policy Editor console.
Navigate to the following path.
Computer Configuration>Administrative Templates>Windows Components>Windows Security>Virus and Threat Protection.
From the left-hand side click on Virus and Threat Protection and from the right-hand side pane double click on Hide the Virus and Threat Protection Area policy and open the policy settings.
Choose Disabled or Not configured, click on Apply and OK.

Close the Group Policy Editor and restart the system once.
Using Registry Editor:
Open Run command by pressing Windows + R and type regedit and hit enter, this command will open the Registry Editor console.
Now navigate to the following registry path.
Computer\HKEY_LOCAL_MACHINE\SOFTWARE\Policies\Microsoft\Windows Defender Security Center\Virus and threat protection
From the left-hand side click on Virus and threat protection and from the right-hand side pane look for a DWORD named UILockdown.
Double click on UILockdown DWORD and set the value data to 0 and click on OK.

Close the Registry Editor and restart the system once. This will enable the Virus and threat protection page.
Solution 5: Check for Pending Windows updates:
Check if Windows is showing any notification for pending updates, if there are pending updates then restart the system to install the pending updates.
Follow the below-mentioned steps to check for updates.
Open Windows Settings by pressing Windows + I and from the left-hand side click on Windows updates.
Click on Check for updates. Windows will automatically download and install suitable updates.

Once the Windows updates are installed, restart the system once.
The Virus and threat Protection is missing in Windows Security can be frustrating, but with these troubleshooting methods mentioned in this article, you should be able to resolve the issue.
Read Also:
Fix Can’t access Virus and threat protection on Windows Security
How to Fix Windows Security Protection History empty in Windows 11/10?
How to Scan for Virus using Command prompt in Windows 11?
Post Views: 1,746

This tutorial will show you how to hide or show the Virus & threat protection page in Windows Security for all users in Windows 10 and Windows 11.
Windows Security is built-in to Windows 10/11 and includes an antivirus program called Microsoft Defender Antivirus. Your device will be actively protected from the moment you start Windows 10/11. Windows Security continually scans for malware (malicious software), viruses, and security threats. In addition to this real-time protection, updates are downloaded automatically to help keep your device safe and protect it from threats.
The Virus & threat protection section in Windows Security contains information and settings for antivirus protection from Microsoft Defender Antivirus and third-party AV products. This section also contains information and settings for ransomware protection and recovery. These settings include Controlled folder access settings to prevent unknown apps from changing files in protected folders, plus Microsoft OneDrive configuration to help you recover from a ransomware attack. This area also notifies users and provides recovery instructions if there’s a ransomware attack.
You can hide the Virus & threat protection section or the Ransomware data recovery area from users on the device. This option can be useful if you don’t want users to see or have access to user-configured options for these features.
If you hide the Virus & threat protection section in Windows Security and try to directly open it (ex: command), you will get the Page not available error below.

Reference:
You must be signed in as an administrator to hide or show the Virus & threat protection page in Windows Security.
Contents
- Option One: Hide or Show Virus and Threat Protection page in Windows Security in Local Group Policy Editor
- Option Two: Hide or Show Virus and Threat Protection page in Windows Security using REG file
EXAMPLE: «Virus & threat protection» page in Windows Security

Option One
Hide or Show Virus and Threat Protection page in Windows Security in Local Group Policy Editor
The Local Group Policy Editor is only available in the Windows 10/11 Pro, Enterprise, and Education editions.
All editions can use Option Two to configure the same policy.
1 Open the Local Group Policy Editor (gpedit.msc).
2 Navigate to the policy location below in the left pane of the Local Group Policy Editor. (see screenshot below)
Computer Configuration > Administrative Templates > Windows Components > Windows Security > Virus and threat protection

3 In the right pane of Virus and threat protection in the Local Group Policy Editor, double click/tap on the Hide the Virus and threat protection area policy to edit it. (see screenshot above)
4 Do step 5 (show) or step 6 (hide) below for what you want.
5 Show «Virus & threat protection» page in Windows Security
This is the default setting.
A) Select (dot) Not Configured. (see screenshot below)
B) Click/tap on OK, and go to step 7.

6 Hide «Virus & threat protection» page in Windows Security
A) Select (dot) Enabled. (see screenshot below)
B) Click/tap on OK, and go to step 7.
7 If Windows Security is currently open, then close and reopen Windows Security to apply.
8 Close the Local Group Policy Editor.
Option Two
Hide or Show Virus and Threat Protection page in Windows Security using REG file
1 Do step 2 (show) or step 3 (hide) below for what you would like to do.
2 Show «Virus & threat protection» page in Windows Security
This is the default setting.
A) Click/tap on the Download button below to download the file below, and go to step 4 below.
Show_Virus_and_threat_protection_page_in_Windows_Security.reg
(Contents of REG file for reference)
Code:
Windows Registry Editor Version 5.00

[HKEY_LOCAL_MACHINE\SOFTWARE\Policies\Microsoft\Windows Defender Security Center\Virus and threat protection]
"UILockdown"=-
3 Hide «Virus & threat protection» page in Windows Security
A) Click/tap on the Download button below to download the file below, and go to step 4 below.
Hide_Virus_and_threat_protection_page_in_Windows_Security.reg
(Contents of REG file for reference)
Code:
Windows Registry Editor Version 5.00

[HKEY_LOCAL_MACHINE\SOFTWARE\Policies\Microsoft\Windows Defender Security Center\Virus and threat protection]
"UILockdown"=dword:00000001
4 Save the REG file to your desktop.
5 Double click/tap on the downloaded REG file to merge it.
6 When prompted, click/tap on Run, Yes (UAC), Yes, and OK to approve the merge.
7 Restart the computer to apply.
8 You can now delete the downloaded REG file if you like.
That’s it,
Shawn Brink
Related Tutorials
- Open Windows Security in Windows 11
- Enable or Disable Windows Security Virus and Threat Protection Notifications
- Hide or Show Account Protection page in Windows Security
- Hide or Show App and Browser Control page in Windows Security
- Hide or Show Device Performance and Health page in Windows Security
- Hide or Show Device Security page in Windows Security
- Hide or Show Family Options page in Windows Security
- Hide or Show Firewall and Network Protection page in Windows Security
- Hide or Show Ransomware Data Recovery area in Windows Security
-
Hide_Virus_and_threat_protection_page_in_Windows_Security.reg
Hide_Virus_and_threat_protection_page_in_Windows_Security.reg
716 bytes
· Views: 249
-
Show_Virus_and_threat_protection_page_in_Windows_Security.reg
Show_Virus_and_threat_protection_page_in_Windows_Security.reg
690 bytes
· Views: 334