
При очередном включении ПК или ноутбука с Windows 11/10 или другой операционной системы, либо при попытке загрузки с загрузочной флешки, некоторые пользователи могут увидеть сообщение об ошибке с заголовком «Secure Boot Violation». Текст ошибки может отличаться: «The system found unauthorized changes on the firmware, operating system or drivers», «Invalid signature detected» и другие.
В этой инструкции подробно о возможных причинах ошибки и способах её исправить в разных ситуациях.
Причины ошибки и варианты решения

Ошибки Secure Boot Violation связаны с тем, что при включенной безопасной загрузке (Secure Boot) загрузка с данного накопителя невозможна, так как загрузчик не содержит необходимой подписи. В некоторых случаях ошибка может появляться даже если всего день назад всё исправно работало. Возможные примеры ситуаций, при которых можно столкнуться с рассматриваемой ошибкой:
- Пользователь хотел включить безопасную загрузку в БИОС, но установленная система её не поддерживает.
- В БИОС/UEFI включена опция Secure Boot, но вы используете загрузочную флешку, которая не может работать с этой опцией.
- Были сброшены параметры БИОС/UEFI, из-за чего был выбран другой накопитель для загрузки, изменились параметры режима загрузки (UEFI/Legacy), включилась ранее отключенная опция Secure Boot.
- Также после сброса или обновления БИОС могли обновиться ключи безопасности.
- Были подключены новые накопители: USB, SSD, HDD, компьютер «пробует» загрузиться с них.
- Редко — были изменены загрузочные файлы Windows или другой ОС, вручную или вредоносным ПО, повреждены данные на диске из-за ошибок файловой системы, были установлены неподписанные драйверы устройств.
Уже из списка возможных причин можно предположить план действий для решения проблемы. Он будет следующими:
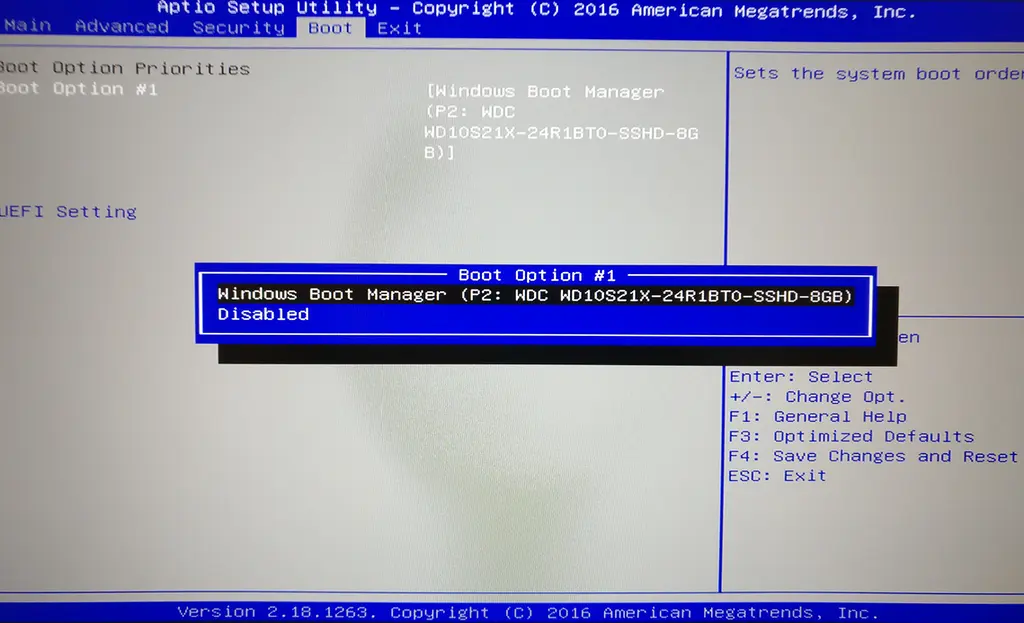
- Зайдите в БИОС/UEFI, обычно это клавиша F2 на ноутбуке или Del на ПК, но возможны и другие варианты.
- Убедитесь, что в параметрах загрузки (обычно — вкладка Boot) установлено верное устройство загрузки, если это не так — измените его. В случае Windows выберите «Windows Boot Manager» (при условии, что такой пункт присутствует), а не конкретный диск, сохраните настройки БИОС (обычно F10) и перезагрузитесь, проверьте, была ли решена проблема. Может иметь смысл отключить ненужные съемные накопители.
- Проверьте, решает ли проблему отключение Secure Boot в БИОС (установите значение параметра в Disabled, обычно где-то на вкладке «Security»). Подробнее в статье (только нужно будет сделать наоборот): Как включить безопасную загрузку Secure Boot.

- Если отключение Secure Boot помогло и речь идёт о загрузке уже установленной Windows, но требуется обратно включить эту функцию, возможно, сработает отключение проверки цифровой подписи драйверов.
- Проверьте, исчезает ли ошибка, если включить режим загрузки Legacy (CSM) вместо UEFI. Актуально в случае отсутствия пункта «Windows Boot Manager» при выборе вариантов загрузки. В некоторых случаях включение Legacy выглядит как выбор ОС между Windows и «Other OS» — следует выбрать Other OS.

- Можно попробовать удалить ключи защиты в разделе Key management или аналогичном в БИОС, а затем создать их заново. Пункты могут называться по-разному в различных версиях БИОС.


Если ваша ситуация с ошибкой Secure Boot Violation отличается от приведённых в статье, опишите её в деталях в комментариях ниже, я постараюсь помочь.
При включении компьютера или попытке загрузки с USB-носителя пользователи могут столкнуться с ошибкой Secure Boot Violation. Сообщение может варьироваться: «The system found unauthorized changes on the firmuare, operating system or UEFI drivers. Press [K] to run the next boot device, or enter directly to BIOS Setup if there are no other boot devices installed. Go to BIOS Setup > Advanced > Boot and change the current boot device into other secured boat devices.», «Invalid signature detected» или аналогичные предупреждения. В этом руководстве разберём все возможные причины и эффективные способы устранения проблемы.
Приобрести оригинальные ключи активации Windows 11 можно у нас в каталоге от 1690 ₽

Почему возникает ошибка Secure Boot Violation?
Ошибка появляется, когда Secure Boot (функция безопасности UEFI) блокирует загрузку из-за несоответствия цифровых подписей. Это может произойти в следующих ситуациях:
1. Попытка загрузки неподписанного носителя
— Загрузочная флешка или диск без поддержки UEFI Secure Boot.
— Установка неподписанных драйверов или ОС (например, Linux без правильной конфигурации).
2. Изменения в настройках BIOS/UEFI
— Сброс или обновление прошивки с заменой ключей безопасности.
— Переключение между режимами UEFI и Legacy (CSM).
— Автоматическое подключение новых накопителей как загрузочных устройств.
3. Повреждение системных файлов
— Модификация загрузчика Windows вирусами или вручную.
— Ошибки файловой системы на диске.
Пошаговые решения для Windows 10/11
1. Проверка порядка загрузки в BIOS/UEFI
— Перезагрузите ПК и войдите в BIOS/UEFI (клавиши F2, Del или другие, в зависимости от производителя).
— В разделе Boot убедитесь, что выбрано Windows Boot Manager, а не конкретный диск.
— Отключите все ненужные USB-устройства.
2. Отключение Secure Boot
— В BIOS перейдите в раздел Security или Boot.
— Найдите параметр Secure Boot и установите значение Disabled.
— Сохраните изменения (F10) и перезагрузитесь.

Важно: Если система загрузится после отключения Secure Boot, но вам нужна эта функция (например, для Windows 11), попробуйте отключить проверку подписи драйверов через bcdedit.

3. Переключение между UEFI и Legacy (CSM)
— В BIOS найдите параметр Boot Mode и выберите:
— UEFI (для современных систем с Secure Boot).
— Legacy/CSM (если загрузчик не поддерживает UEFI).
— Некоторые версии BIOS предлагают выбор между Windows и Other OS — в этом случае выберите второй вариант.

4. Сброс ключей безопасности
— В разделе BIOS Key Management (может называться иначе):
1. Удалите текущие ключи (Delete All Secure Boot Keys).
2. Восстановите значения по умолчанию (Restore Factory Keys).
3. Сохраните изменения и перезагрузите систему.


5. Восстановление загрузчика Windows
Если ошибка вызвана повреждением файлов:
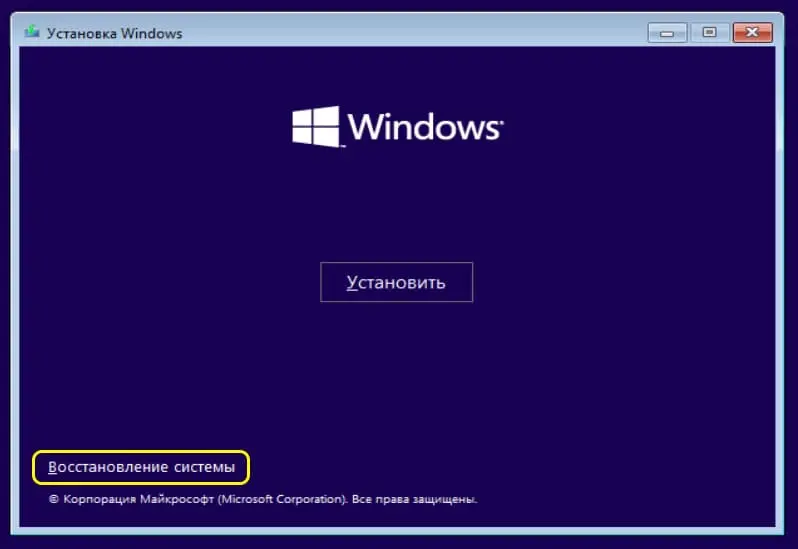
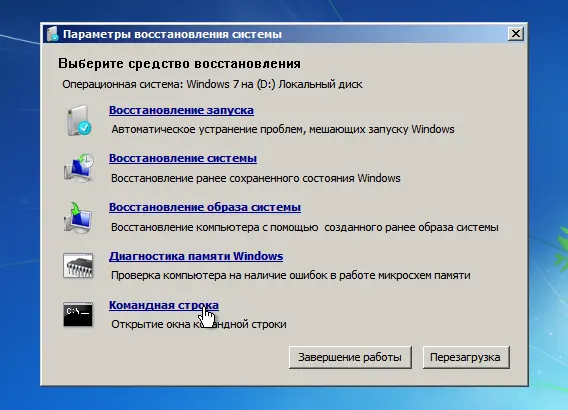
1. Загрузитесь с установочной флешки Windows.
2. Выберите Восстановление системы → Командная строка.
3. Выполните последовательно:
bootrec /fixmbr
bootrec /fixboot
bootrec /scanos
bootrec /rebuildbcd

Дополнительные меры
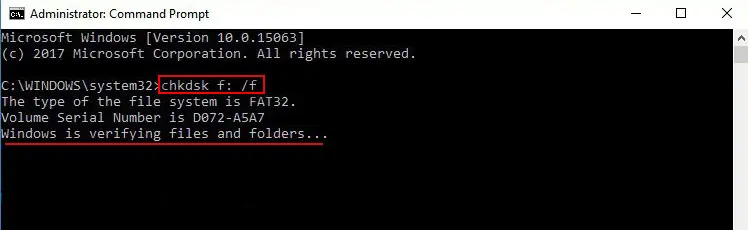
— Проверьте диск на ошибки:
chkdsk C: /f /r
— Обновите BIOS до последней версии.
— Убедитесь, что используете официальные загрузочные носители с поддержкой UEFI.
Лицензионный ключ активации Windows от
A lot of users complain that Secure Boot is unsupported/off/unavailable on Windows 10/11. What causes the Secure Boot state unsupported error? How to fix it? Now, let’s explore the answers together with MiniTool.
Secure Boot is a security feature available on most motherboards with UEFI firmware enabled. It is a part of Microsoft Windows 8 and higher operating systems. This feature was designed to ensure your device boot using only the software trusted by the Original Equipment Manufacturer (OEM).
If the software fails to pass the authentication set by the OEM, your motherboard will refuse to load it. That’s to say, the Secure Boot option can prevent malicious software or malware from attacking the boot sector.
However, many users find the Secure Boot is unsupported, off, or unavailable on Windows 11/10. What causes the error? Let’s keep reading.
Why Secure Boot Is Unsupported in Windows 11/10
What causes the Secure Boot unsupported/off/unavailable issue? On Windows 10/8/8.1, if you want to use the Secure Boot feature, it’s required to enable the UEFI mode which uses the GUID Partition Table (GPT).
Now, Microsoft makes the feature a prerequisite when you upgrade to Windows 11. So, if you encounter the “Secure Boot is unsupported” error, it may be caused by one of the following factors:
- Your PC is set to UEFI mode but the TPM and Secure Boot features are disabled.
- The BIOS mode is set to Legacy boot mode instead of UEFI mode.
- The partition table of your boot disk is set to MBR instead of GPT.
- The hardware of your computer is not UEFI and Secure Boot compatible.
How to Fix Secure Boot State Unsupported in Windows 11/10
After analyzing all possible causes, we summarize 6 feasible ways to fix the “Secure Boot is not available” issue. Let’s try them in order until you get the problem solved.
# 1. Enable the Secure Boot
First of all, you need to enable Secure Boot in BIOS settings if you want to upgrade to Windows 11. Here’s how to check the current state of the option and enable it.
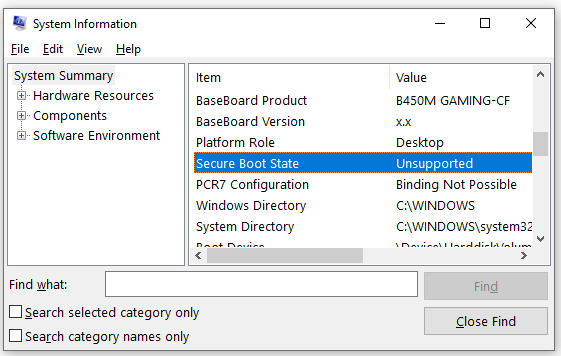
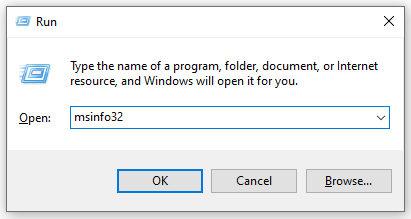
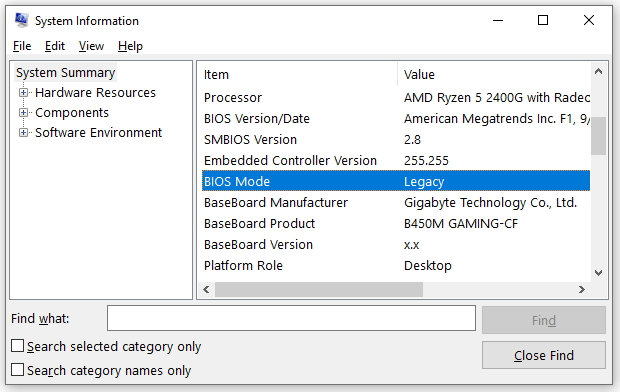
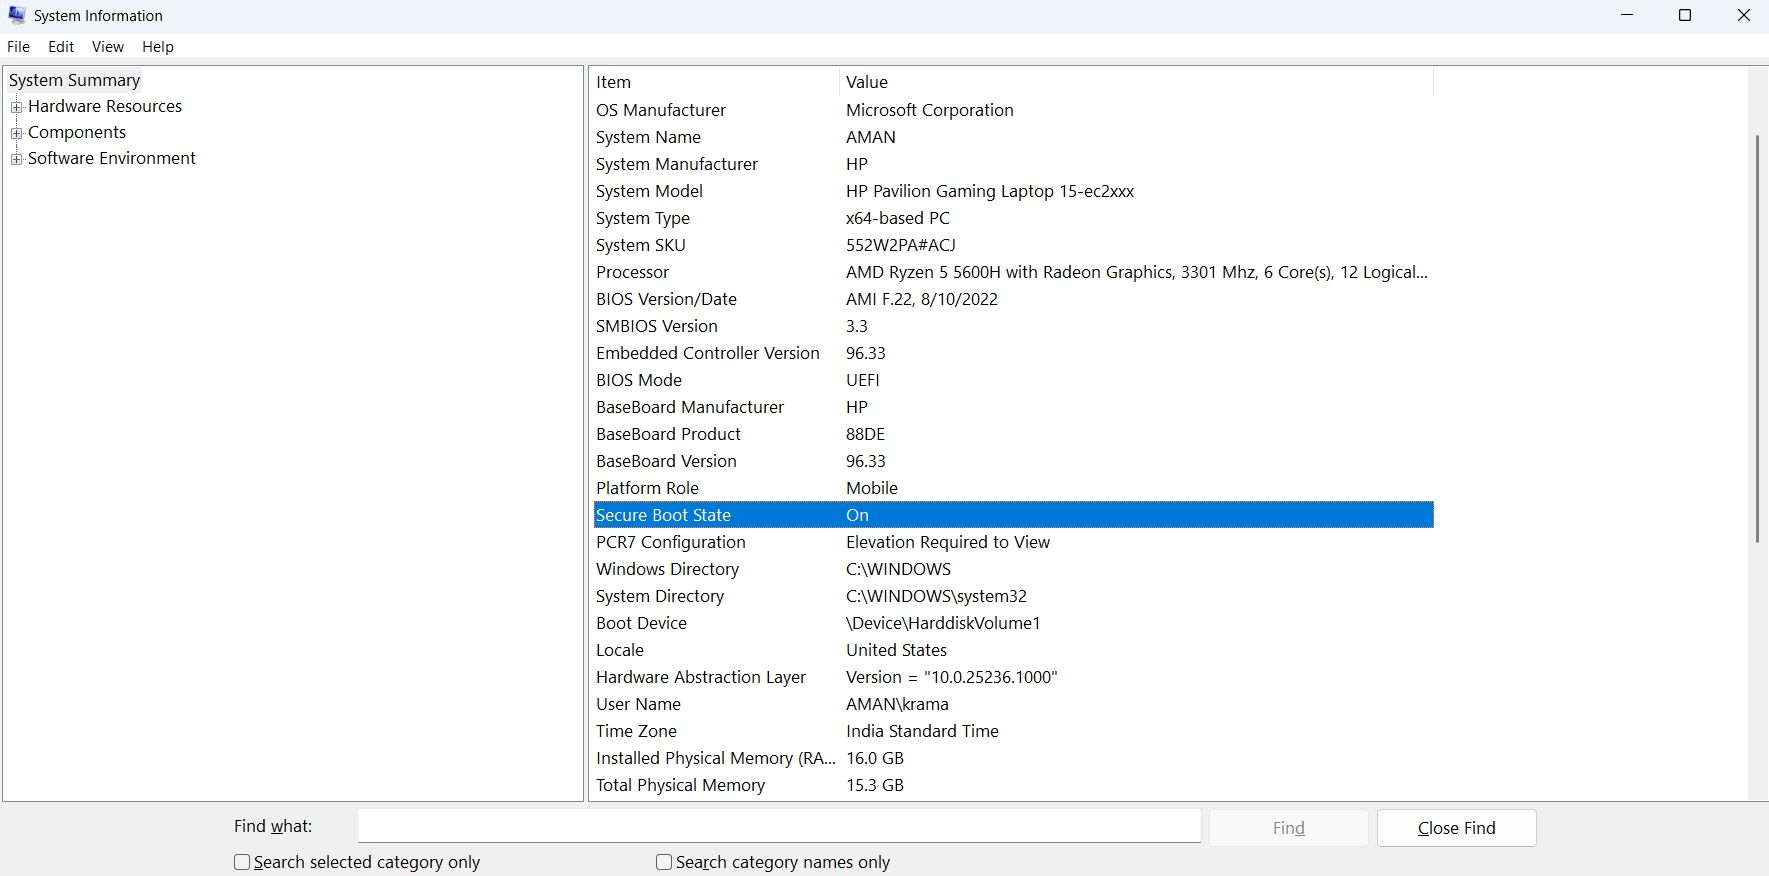
Step 1. Press the Win + R keys to open the Run dialog box, and then type msinfo32 in it and hit Enter to open the System Information window.
Step 2. Select System Summary from the left panel and check the Secure Boot State in the right panel. If it is Off or Unsupported, you need to enable it in BIOS. To do this work, proceed with the following steps.
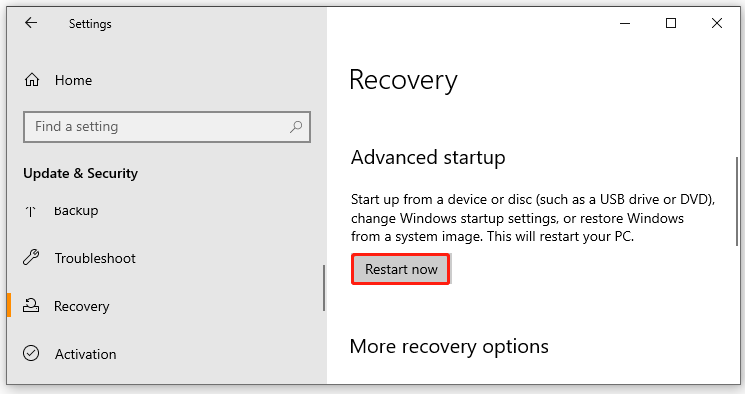
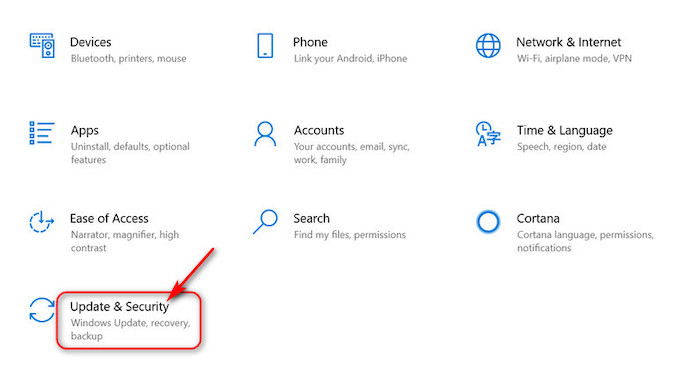
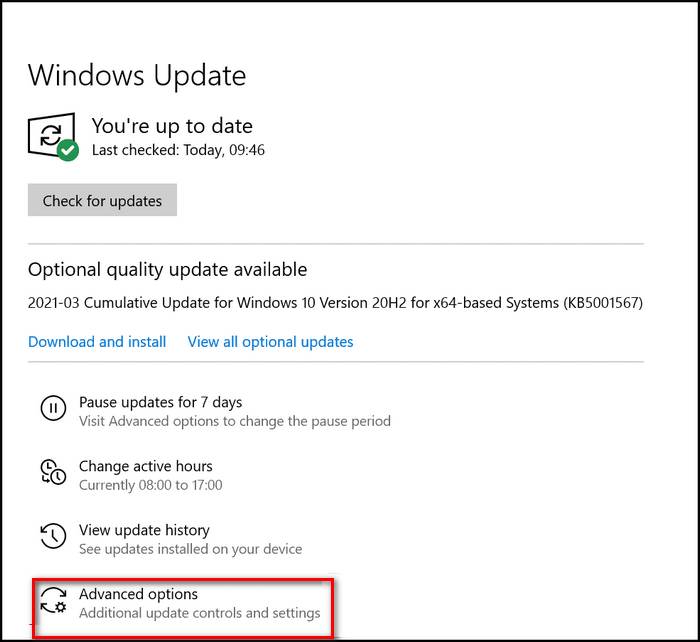
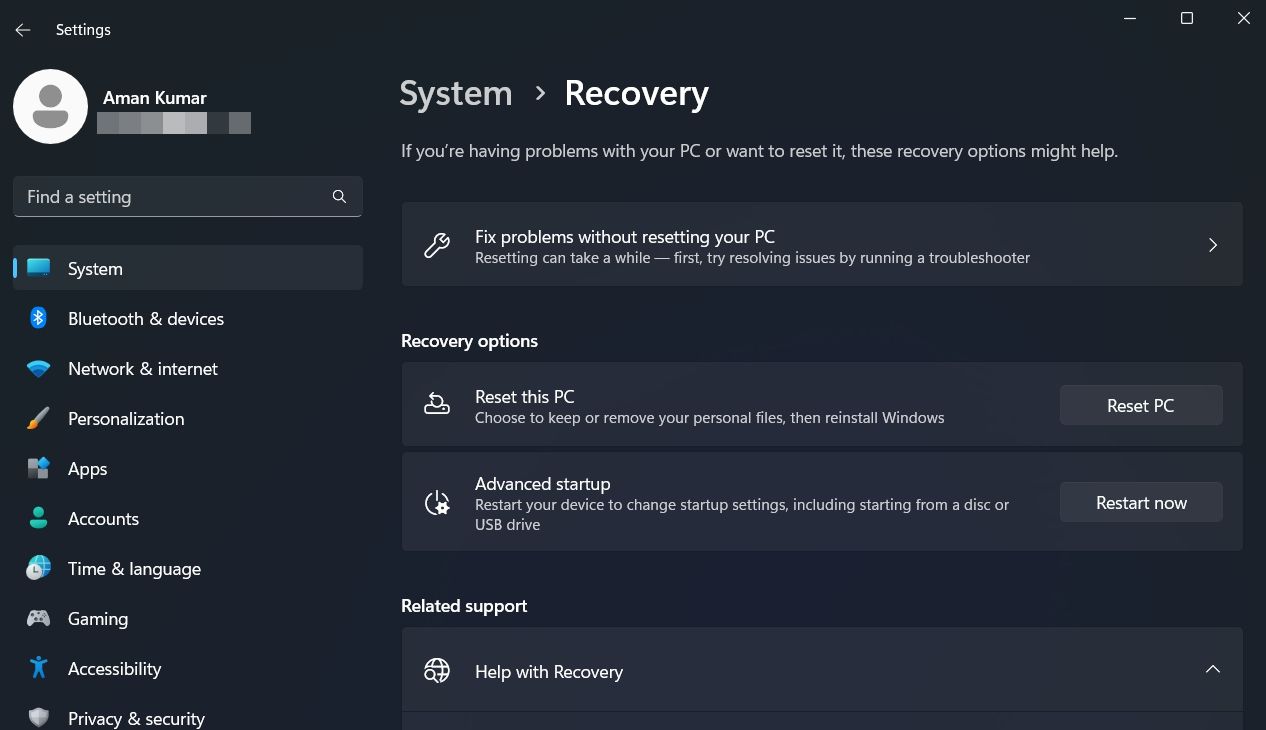
Step 3. Press Win + I keys to open the Settings window, and then select Update & Security > Recovery and click on Restart Now under the Advanced startup section. Then your PC will restart right now and enter into BIOS.
Tips:
On Windows 11, you need to open the Settings window and select System > Recovery from the left panel and click on Restart now next to Advanced startup from the right panel.
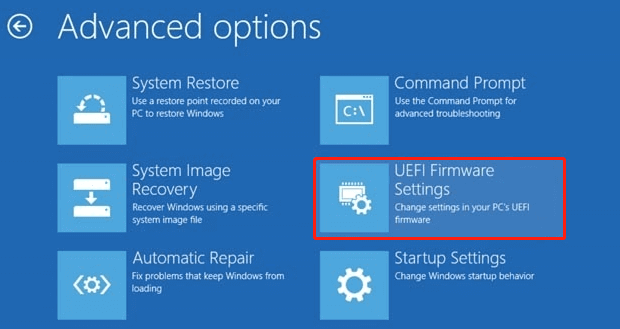
Step 4. Select Troubleshoot and then Advanced options in the Advanced startup menu.
Step 5. Select UEFI Firmware Settings and click Restart to boot your computer into UEFI BIOS.
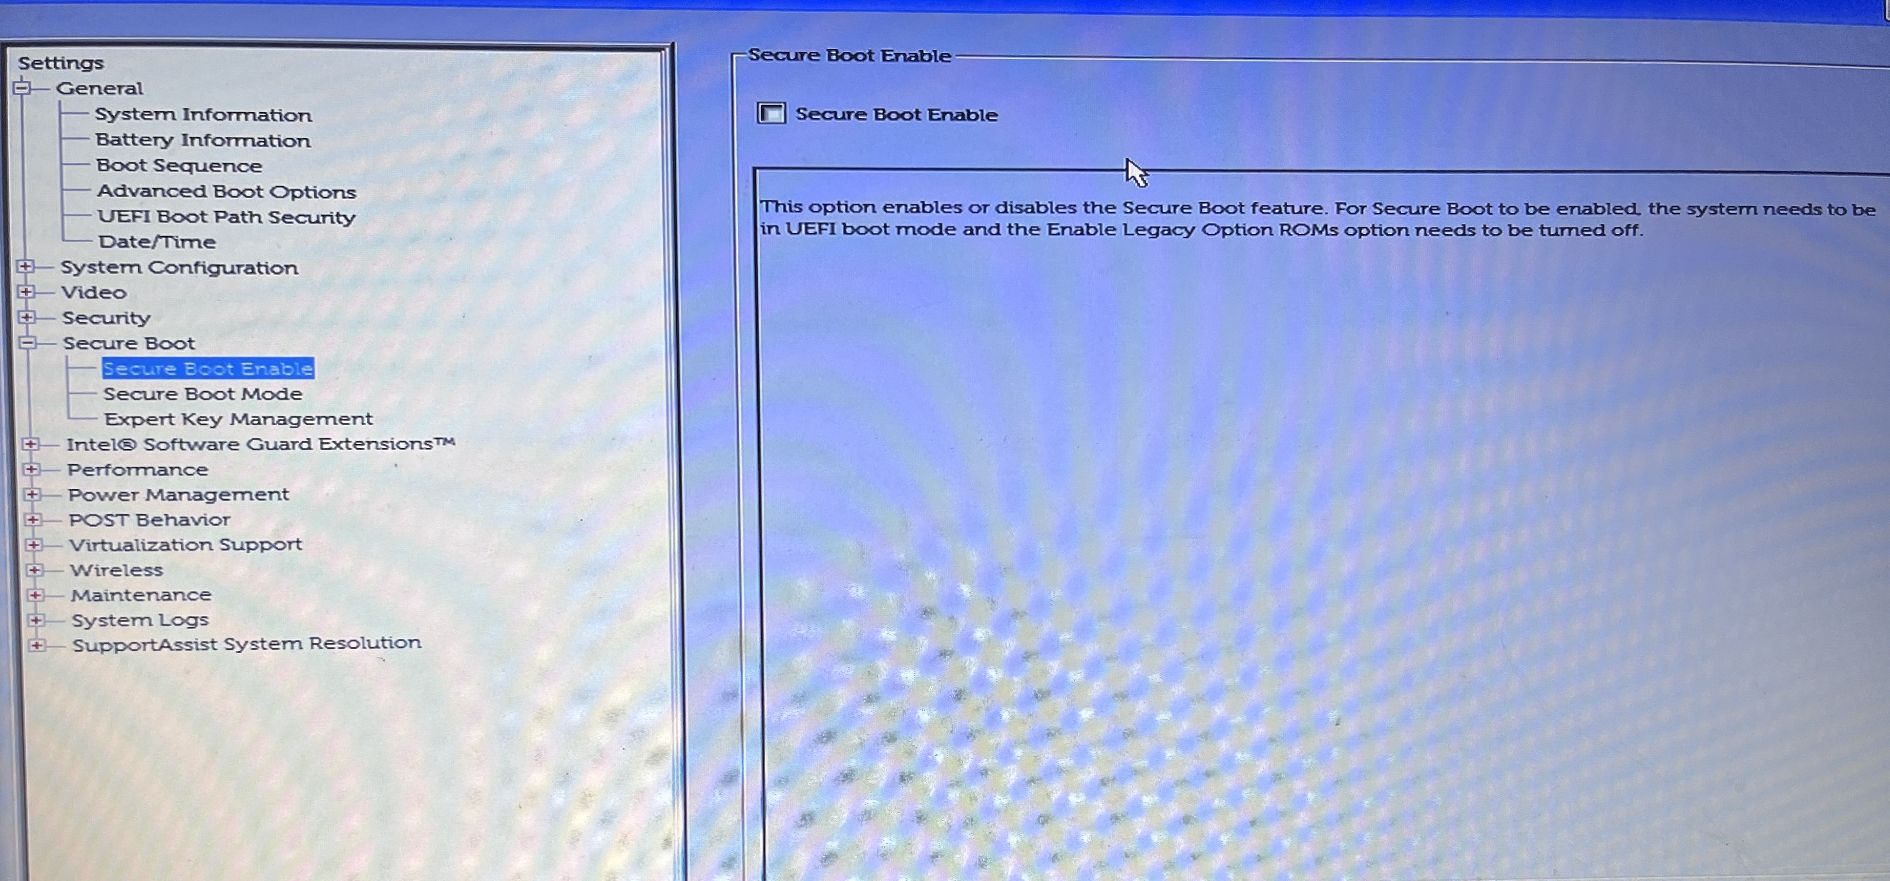
Step 6. Select BIOS Setup, navigate to the Secure Boot category from the left panel and select the Secure Boot Enable and confirm the option.
Note:
The steps to enable Secure Boot may vary for different motherboards. If you can’t find the option, check out the manual provided by your manufacturer.
Once enabled, restart your computer and check if the “Secure Boot is off/unsupported” issue is gone.
# 2. Enable the TPM Support
If the TPM is disabled on your computer, you will encounter the Secure Boot state unavailable/unsupported issue when installing or upgrading to Windows 11. In this case, you can follow the steps below to enable TPM.
Step 1. Open the Run box again, and then type tpm.msc and press Enter.
Step 2. In the pop-up window, navigate to the Action tab from the top toolbar and select Prepare the TPM.
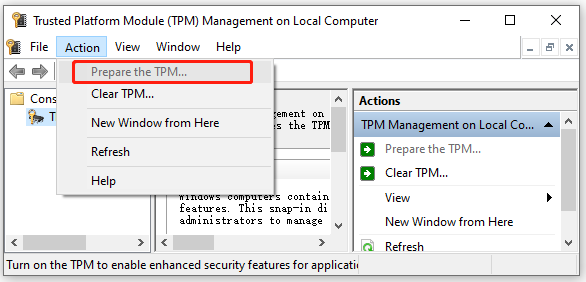
Step 3. Restart your computer and check if the unsupported Secure Boot issue disappears.
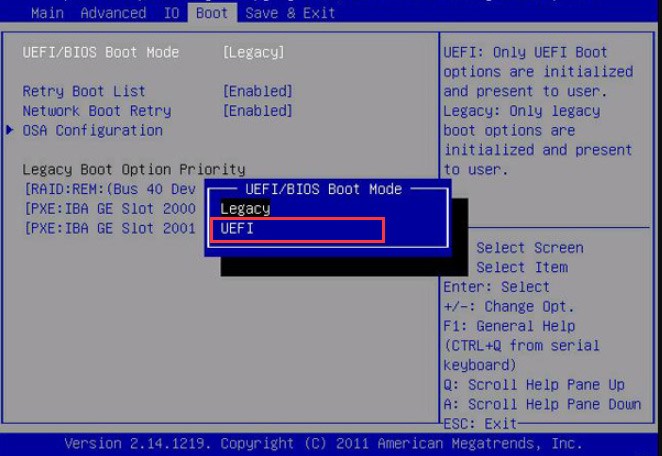
# 3. Change the BIOS Mode to UEFI
As you know, there are 2 different BIOS modes – UEFI and Legacy. If you want to make full use of the Secure Boot feature, you need to set the UEFI as the BIOS mode. Here’s how to do that:
Step 1. Open the System Information window by following Steps 1 to 2 in # 1 and check if the BIOS Mode is Legacy. If it is, you can continue the following steps to enable UEFI on Windows 10/11.
Step 2. Power on your computer, and then press the F2 keys or other function keys (F1, F3, F10, or F12) and the ESC or Delete keys to open the BIOS Setup utility window.
Step 3. Navigate to the Boot tab by pressing the right arrow key.
Step 4. Select the UEFI/BIOS Boot Mode, and press Enter.
Step 5. In the pop-up window, select the UEFI Boot Mode by pressing the up and down arrow keys. Then press the F10 key and Enter to save the change and exit the window.
Tips:
The process may differ depending on your motherboard manufacturer. If you can’t find the UEFI option, you can check your manufacturer’s website.
Once done, restart your computer and check if the “Secure Boot state is off/unsupported” issue gets fixed.
# 4. Convert Your Boot Disk to GPT
As discussed above, the UEFI BIOS mode uses the GPT partition style. If your computer is set to Legacy Boot mode and MBR partition style, you will encounter the “Secure Boot state unavailable/unsupported” issue as well. So, you need to convert your boot disk to GPT apart from enabling UEFI.
How to convert MBR to GPT on Windows 10/11? You can use the Windows built-in tool – MBR2GPT.exe or use a professional disk conversion tool – MiniTool Partition Wizard. If you are using an MBR disk, follow the guide below to convert it to GPT.
Way 1. Convert MBR to GPT Using MBR2GPT
MBR2GPT.exe is a command line tool that starts in Windows 10 version 1703 build 15063. It can be used to convert a system disk from MBR to GPT without modifying any data. Here’s how to use it on Windows 10/11.
Step 1. Type cmd in the Search box, and then right-click the Command Prompt app and select Run as administrator. Then click on Yes in the UAC window to confirm it.
Step 2. In the elevated Command Prompt window, type the following command and hit Enter to convert the partition type of the disk.
mbr2gpt /convert /disk: n /allowfullOS
Note:
N represents the disk that you want to convert to GPT. In addition, you need to make sure your computer supports UEFI boot mode before converting.
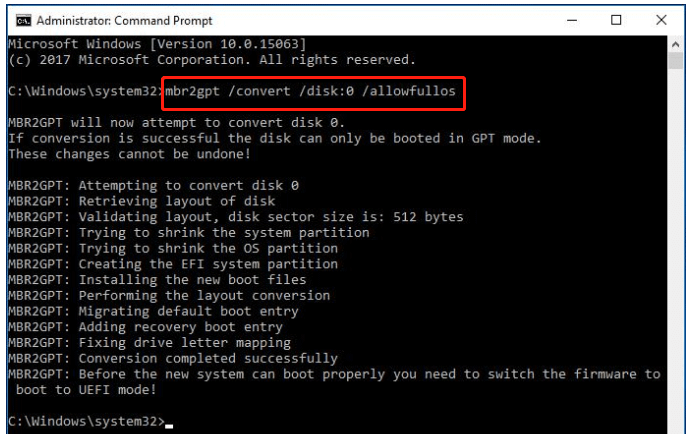
Step 3. This conversion may take some time to complete depending on the size of your system disk. Once converted, reboot your PC and check if the unsupported Secure Boot issue is resolved.
Way 2. Convert MBR to GPT Using MiniTool Partition Wizard
Sometimes, however, the MBR2GPT tool may fail to convert your disk and run into some errors like “MBR2GPT failed to update ReAgent.xml”. In this case, you may consider using a professional disk conversion tool – MiniTool Partition Wizard to convert MBR to GPT without data loss.
MiniTool Partition Wizard DemoClick to Download100%Clean & Safe
Step 1. Launch the MiniTool software to enter its main interface, and then select the disk that you want to convert and click on Convert MBR Disk to GPT Disk from the left action panel. Then click on OK to confirm this change.
Step 2. Click on Apply to execute the pending conversion.
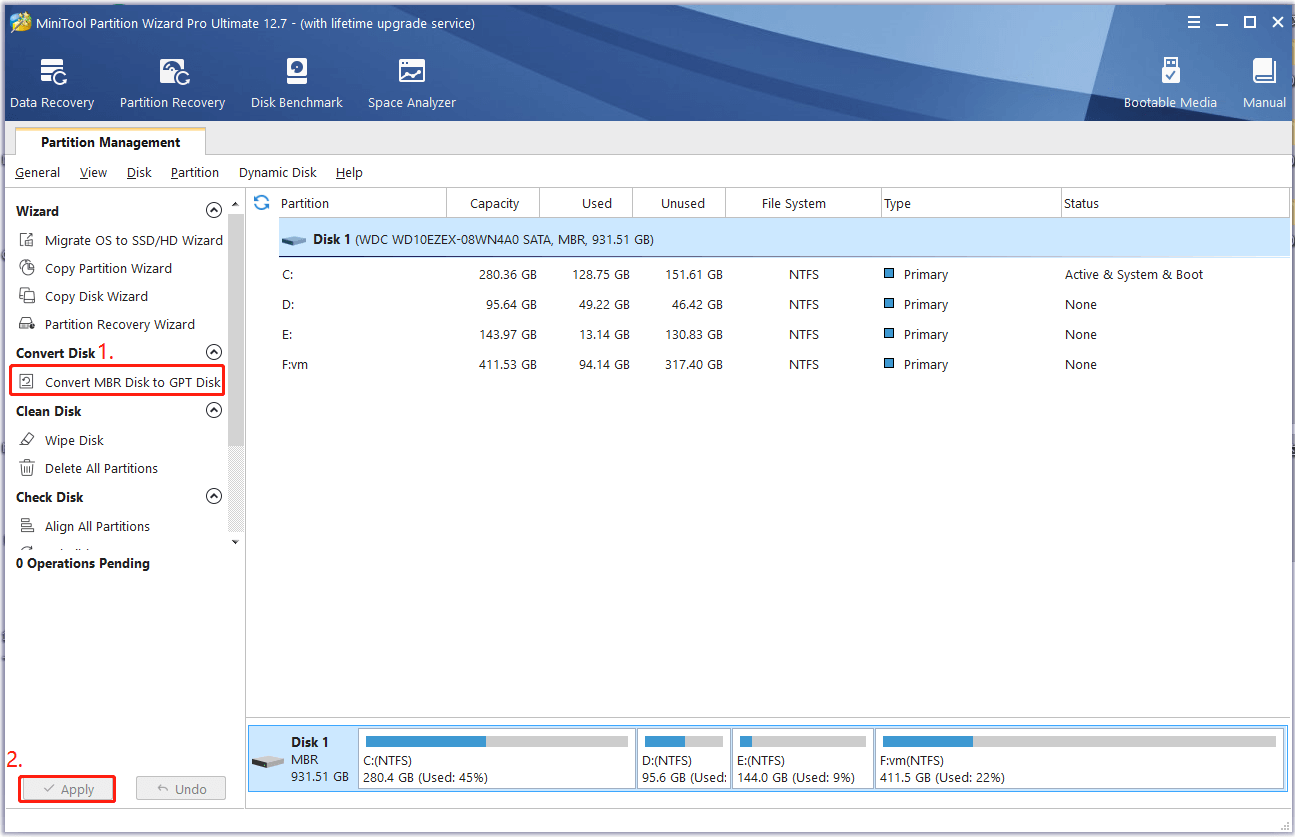
Now, restart your system and check if the “Secure Boot is not available” issue persists.
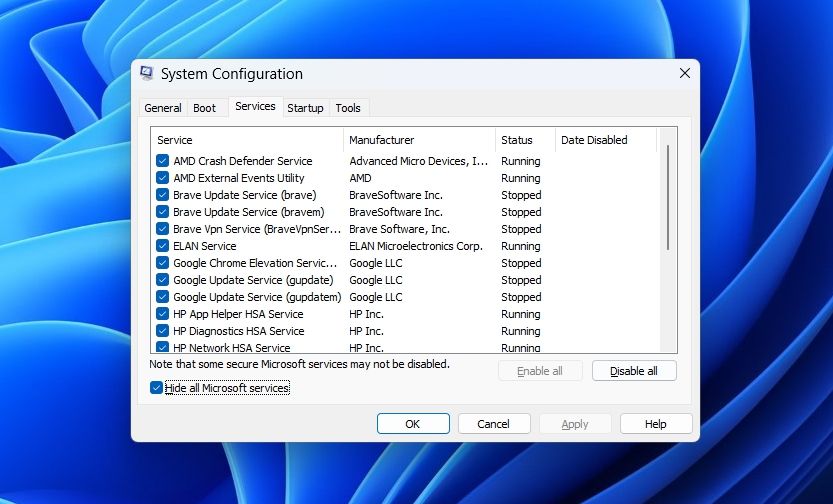
# 5. Perform a Clean Boot
Sometimes the Secure Boot is off/unsupported/unavailable just because of certain conflicting services or software. In this case, you can try performing a clean boot in which your computer will boot with a minimal set of drivers and startup programs. Then you can find out what is interfering with the Secure Boot option.
If the “Secure Boot state is off” issue disappears in the Clean Boot state, it may indicate that one of your programs or services was causing the error. To rule it out, you can repeat the clean boot process while re-enabling one of these services until the error occurs again. Once you determine the conflicting service/program, disable or uninstall it from Windows 10/11.
# 6. Clean Install Windows 10/11
If the unsupported Secure Boot issue persists after trying all the above methods, you may consider performing a clean install of Windows 10/11. This operation will delete all information on your system drive and install a fresh system without hidden corruption or problems.
Thus, it’s highly recommended you make a full backup of all important data before reinstalling Windows 10/11. If you don’t know to clean install your system, refer to this post “New SSD, Clean Install or Clone Disk or Migrate Windows OS”.
The Secure Boot is unsupported when I upgrade to Windows 11. Fortunately, the troubleshooting methods helped fix the error. Probably you are also looking for this post.Click to Tweet
What’s Your Opinion
How to fix Secure Boot unsupported/unavailable on Windows 10/11? The top 6 methods have been illustrated in this post. If you have other effective troubleshooting fixes to this problem, leave them down in the following comment zone to help more affected users.
In addition, you can send us an email to [email protected] if you have difficulty using MiniTool Partition Wizard and instant help will be for you.
Have you attempted to upgrade your Windows 10 to 11 but encountered an error message: This PC must support Secure Boot.
Do not worry. Your system’s Secure Boot feature may be disabled.
I have been in a similar situation as you, and I have been able to get out of this issue with proper tests and research. So, if you are looking for an ultimate solution to solve your secure boot error issue while trying to update to Windows 11, you are in the right place then.
This post will show you some of the best proven and effective methods to solve your secure boot error issue on your Windows computer.
Keep reading and precisely follow the instructions.
Let’s dive right in and see what solutions you have for resolving your secure boot error issue.

Why does Secure Boot Error Occur when Updating Windows 11?
The secure boot error occurs while updating your Windows 10 to 11 because your system doesn’t enable the secure boot feature. Another reason is your system hardware doesn’t support a secure boot feature. Windows 11 is not installed on your Windows system without the secure boot feature.
Microsoft announced some essential requirements to update or install Windows 11. Secure Boot is one of them.
Without enabling the Secure Boot feature, you can not upgrade or install Windows 11, and it is a primary requirement to update to Windows 11.
Another primary requirement is to enable the Trusted Platform Module (TPM) 2.0 to update Windows 11. These two features are mandatory and crucial for the Windows system and device security.
Secure Boot is one kind of safety measure that helps prevent any malware attacks when your system is turned on that may not be detected by Windows default security system or other third-party anti-malware software.
Check out our separate post: Download Boot Camp Drivers for Windows 11
Before any unwanted issue occurs, Secure Boot tries to identify the threat and block them immediately from preventing any attack.
However, you may consider it a vital component of your computer’s security, which is why enabling secure boot is suggested because it improves your security against various attacks and solves your Secure Boot error while trying to update to Windows 11.
You’ve seen the possible causes of Secure Boot error while trying to update to Windows 11 so far, and in the next part, I’ll show you several tested and proven solutions to solve the problem.
So, let’s get started to know the solutions to solve the Secure Boot error while updating to Windows 11.
Secure Boot error is one of the main errors when users try to update to Windows 11. The error occurs when your system has turned off the Secure Boot feature.
You can solve the Secure Boot error and protect your system against any threat by enabling the Secure Boot feature.
In the previous section, you’ve seen the possible potential reason for the Secure Boot error while trying to update to Windows 11.
This section will show you several tested and proven solutions to solve the Secure Boot error while updating Windows 11.
So, let’s dive into the main topic to know the Windows Secure Boot issue solution.
Here’s a complete guide on how to fix can’t install Windows 11 on SSD.
Here are the steps to fix the Secure Boot error to update to Windows 11:
1. Check Secure Boot Status
At the begging of the Secure Boot error solving process, you need to ensure the Secure Boot feature’s active status on your system.
To do this, you need to open the System Information window to check the Secure Boot active status. You can do it easily without entering the BIOS mode and wasting valuable time.
Follow the steps below to check the Secure Boot active status:
Also, check out our separate post on install active directory users and computers on Windows 11.
2. Enable Secure Boot Feature
After ensuring the Secure Boot Status, you need to turn on the Secure Boot feature to solve the Secure Boot error while updating Windows 10 to 11.
In the previous section, I already mentioned without enabling the Secure Boot feature; you can not update to Windows 11.
Note: If your system has a UEFI/BIOS boot system, you can follow this method to solve your Secure Boot error issue. You can not update Windows 11 on a Legacy BIOS.
UEFI settings vary by manufacturer. Go to your PC manufacturer’s help and support page for more information on how to discover the correct UEFI settings.
Follow these steps to enable the Secure Boot feature:
- Press the Win + I keys on your keyboard to open the Windows System Settings.
- Type settings on the windows search panel and hit the Enter button to open Windows Settings.
- Select the Update and Security at the bottom of the settings menu panel.
- Select the Recovery tab from the left side Update and Security settings menu panel.
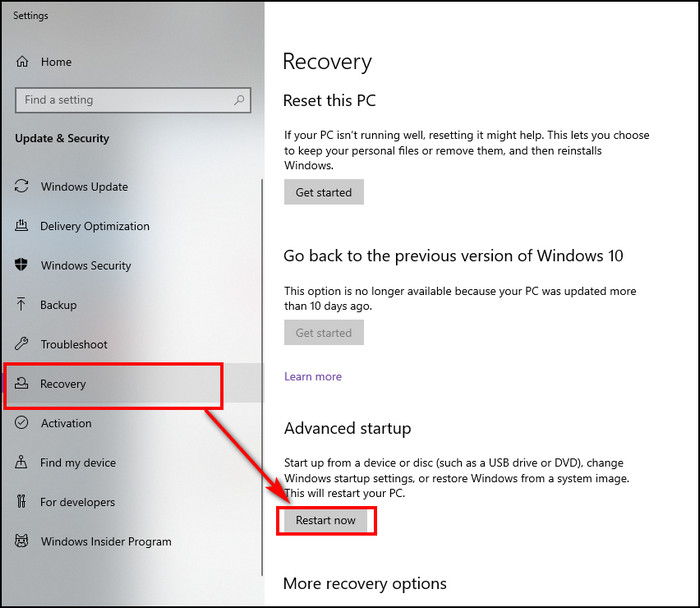
- Click on Restart now button on the right side of the screen to open the Advanced startup window under the Advanced startup section.
- Wait a few seconds to restart your computer and open the Advanced startup window.
- Select Troubleshoot from the list of available items on the Advanced Startup screen.
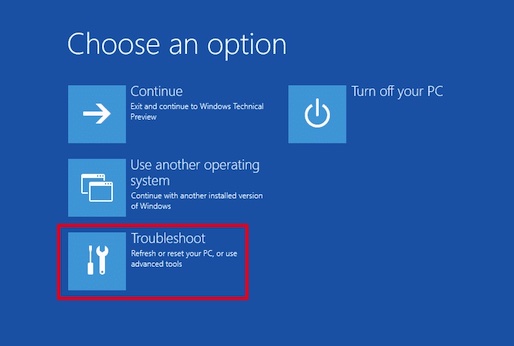
- Click on Advanced Options from the list of items.
- Select the UEFI Firmware Settings option to change settings in your PC’s UEFI firmware.
- After selecting the UEFI Firmware Settings option, it will reboot your BIOS.
- Find the Secure Boot feature under the Security tab window.
- Turn on the toggle switch to enable the Secure Boot feature at the hardware level.
- Press the F10 key or click on the Save button to apply the changes.
- Reboot your computer and retry to update or install your Windows 11 to see whether your problem is solved.
Check out the easiest way to fix blue screen on Windows 11.
How to Check TPM 2.0 State
In some motherboards, TPM 2.0 is turned off by default. However, there’s no reason to be concerned. Before attempting to install the Windows 11 OS, you can quickly check the TPM 2.0 status on your device.
If your motherboard supports the TPM 2.0 feature, there are some techniques to check the TPM 2.0 status on your system. Using the Windows Security app is one of the simplest ways to verify the status of TMP 2.0 on your PC.
Follow the steps below to check the TMP 2.0 status on your system using the Windows Security app:
- Press the Win + I keys on your keyboard to open the Windows System Settings.
- Type settings on the windows search panel and hit the Enter button to open Windows Settings.
- Select the Update and Security at the bottom of the settings menu panel.
- Select the Windows Security tab from the left side Update and Security settings menu panel.
- Click on the Open Windows Security button to open the Windows Security window.
- Select the Device security tab on the left-side Windows Security menu or right-side Windows Security screen.
- You can see the Security processor section at the top of the Device security window if your TPM 2.0 is enabled. Otherwise, the Security processor section is not showing if your TPM 2.0 is disabled.
- Click on the Security processor details under Security processor to check your TPM specification details.
- Here, you can see your TPM Specification version, Status, and other information. If your TPM Specification version is less than 2.0, your device isn’t compatible with Windows 11.
How to Enable TPM 2.0 in BIOS
You must go to the UEFI/BIOS to adjust the TPM settings to enable the TPM 2.0. After authorizing the TPM security feature, you can now install Windows 11 on your machine.
Here are the steps to enable the TPM 2.0 in BIOS for Windows 11:
Follow the steps below to enable the TPM 2.0 in BIOS on your system:
- Press the Win + I keys on your keyboard to open the Windows System Settings.
- Type settings on the windows search panel and hit the Enter button to open Windows Settings.
- Select the Update and Security at the bottom of the settings menu panel.
- Select the Recovery tab from the left side Update and Security settings menu panel.
- Click on Restart now button on the right side of the screen to open the Advanced startup window under the Advanced startup
- Wait a few seconds to restart your computer and open the Advanced startup window.
- After restarting, the system shows a screen to change your startup settings.
- Select Troubleshoot from the list of available items on the Advanced Startup
- Click on Advanced Options from the list of items.
- Select the UEFI Firmware Settings option to change settings in your PC’s UEFI firmware.
- After selecting the UEFI Firmware Settings option, it will reboot your BIOS.
- Go to the Advanced, Security, or Trusted Computing labeled menu to find the TPM options.
- Check the label Security Device, Security Device Support, TPM State, AMD fTPM switch, AMD PSP fTPM, Intel PTT, or Intel Platform Trust Technology to find the TPM options.
- Toggle On the TPM option button to enable the TPM security processor.
- Press the F10 key or click on the Save and Exit button to save and apply the changes.
- Reboot your computer and retry to update or install your Windows 11 to see whether your problem is solved.
Check out our latest post for fix M.2 SSD Not Showing Up In BIOS.
Final Thoughts
Many Windows users have claimed that while they try to upgrade Windows 11, they face an error message that shows Windows 11 needs the Secure Boot feature and sometimes appears that TPM 2.0 is required.
This post describes the possible causes of Secure Boot error while updating Windows 11.
Here, I demonstrate several tested and proven solutions to solve the Secure Boot error problem. You can successfully solve your Secure Boot error using these practical methods.
I hope you found this post to be informative. If you found your solution, please let me know which method works for you.
You may also look at other posts if you’re interested in learning more about similar topics.
Secure Boot is a security feature that helps to ensure that only trusted applications are installed on the computer. Although this feature is enabled by default on most computers, you will still likely see the «Secure Boot state unsupported» error while installing Windows 11.
The error mainly appears when TPM is disabled on your computer. As such, if you’re also facing the same problem, follow the fixes below to troubleshoot the problem for good.
What Causes the «Secure Boot State Unsupported» Error?
Secure Boot is a feature of modern computers that uses a digital signature to verify the authenticity of the system’s software, especially the operating system’s files. It is one of the minimum requirements to install Windows 11.
Although you can easily bypass Windows 11’s minimum requirements, doing so would adversely affect your computer. You could expect your device to slow down or even crash on a frequent basis.
Some of the common reasons behind the «Secure Boot state unsupported» error are:
- You’ll likely see the error message if TPM is disabled or not installed on your computer.
- The error message will appear if Secure Boot is disabled in the BIOS.
- You’ll also encounter the error if BIOS mode is set to Legacy instead of UEFI.
Now, let’s dive into fixes that will help you eliminate the problem.
1. Enable Secure Boot in BIOS
You must enable Secure Boot in BIOS if you want to install Windows 11 on your computer. But before doing that, view Secure Boot’s current state. Here’s how to do it:
- Press the Win + R hotkey to open the Run dialog box. Then, type msinfo32, and press Enter. It’ll open the System information window.
- Click System Summary in the left panel.
-
Check the Secure Boot State in the right pane.

If the Secure Boot status is Off, you’ll have to enable it through your BIOS. To do that, follow the instructions:
- Open the Settings menu by pressing the Win + I hotkey, and navigate to System > Recovery.
-
Click Restart now next to Advanced startup. It’ll restart your computer.

- In the Advanced startup mode, choose Troubleshoot and then Advanced options.
- Choose UEFI Firmware Settings and click Restart. I’ll boot you straight into Windows UEFI BIOS.
- Choose BIOS Setup.
- Switch to Secure Boot.
-
Check the box before Secure Boot Enable.

Note that the steps to enable Secure Boot will be different for different manufacturers. You can check out your manufacturer’s BIOS page to know how to do it on your computer.
Once you’ve enabled Secure Boot, try to install Windows and check if the problem continues. If yes, then try the next solution on the list.
2. Check and Enable TPM Support
You must have the TPM chip installed on your computer to download Windows 11. If the TPM chip is missing, you can still install Windows 11 by bypassing the minimum requirement, but then the «Secure Boot state unsupported» error will continue to bother you now and then.
The problem in the discussion can also appear if TPM is disabled on your computer. To enable TPM, follow the below instructions:
- Open the Run dialog box.
- In the search bar, type tpm.msc and press Enter.
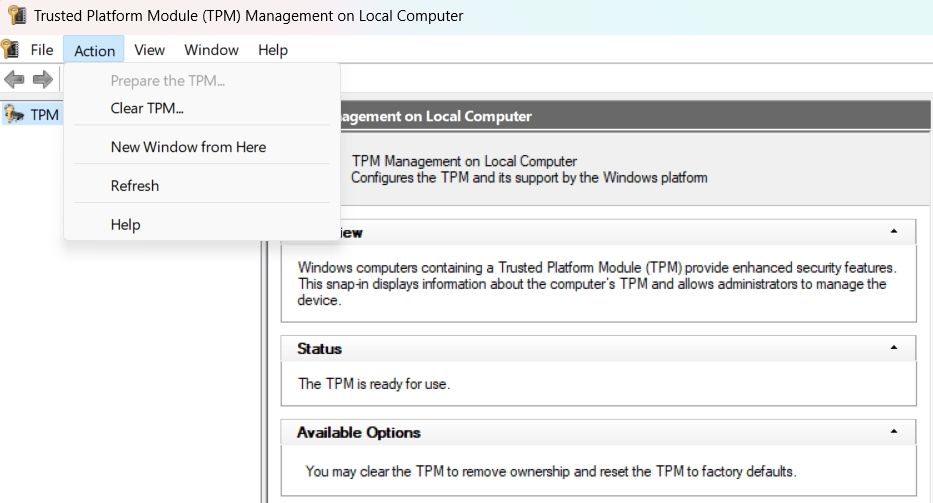
- In the TPM management window, click Actions in the top bar.
-
Choose Prepare the TPM from the context menu.

Restart your computer and check for the problem.
3. Choose UEFI as the BIOS’ Mode
Windows supports two BIOS modes–UEFI and Legacy. The difference between these two modes is in the process that the firmware uses to locate the boot target.
You must install Windows using the new UEFI mode as it offers more security features than the Legacy BIOS mode.
To choose UEFI as the BIOS mode, follow the below steps:
- Open the BIOS page on your computer.
- Choose Boot Sequence from the left panel.
-
Check the UEFI option under Boot List Options.

- Save the changes and restart your computer.
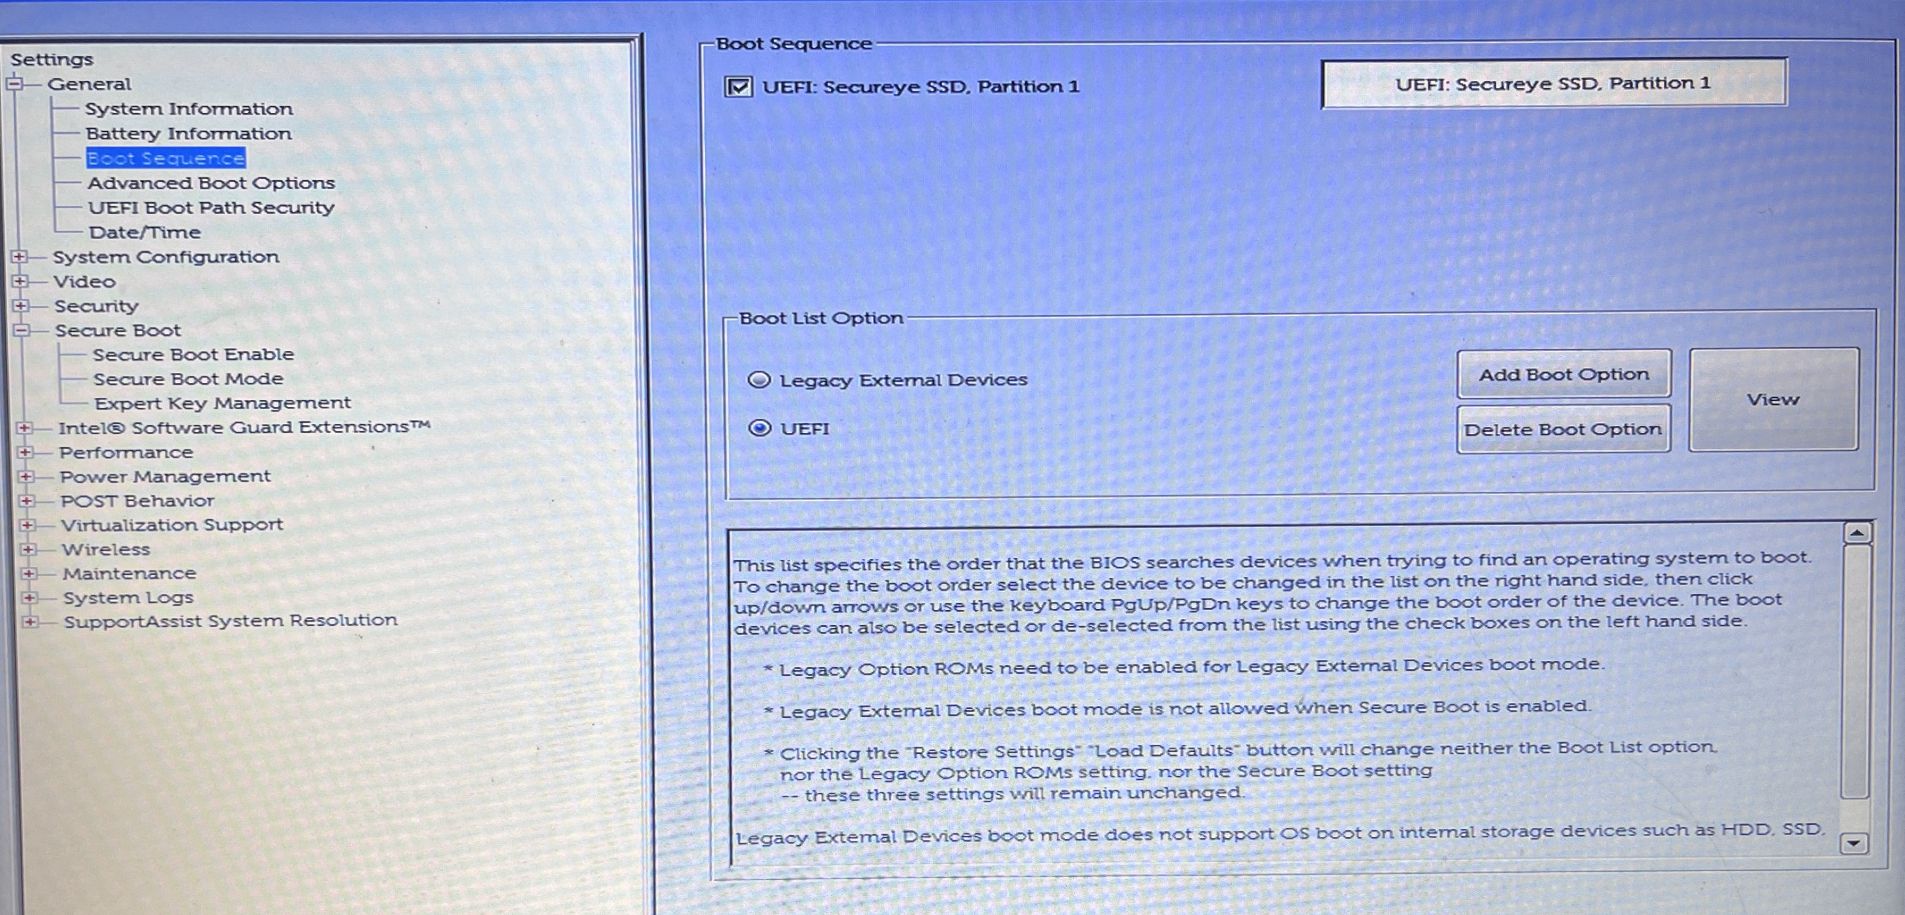
Again, the process will differ for different manufacturers; therefore, you must check your manufacturer’s BIOS page to know how to do it on your computer.
4. Convert the Partition Style From MBR to GPT
In modern computers, the boot mode is set to UEFI and has GPT (GUID Partition Style) partition style. However, if your computer is using Legacy Boot mode and MBR (Master Boot Record) partition style, then you will face the problem at hand.
The solution, in this case, is to convert the partition style from MBR to GPT. But before doing that, you must check your computer partition style. Here’s how:
- Press Win + X to open the Power menu.
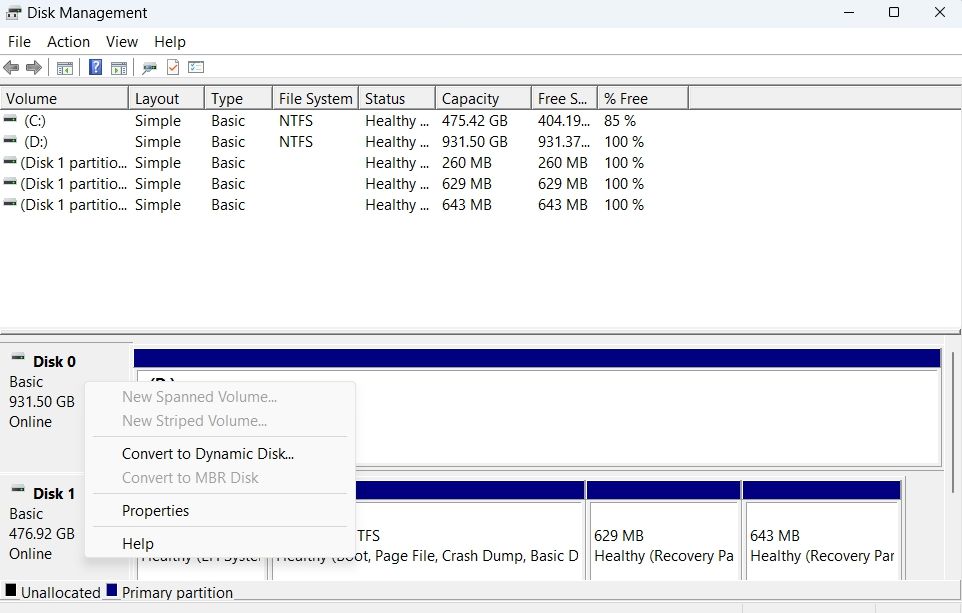
- Choose Disk Management.
-
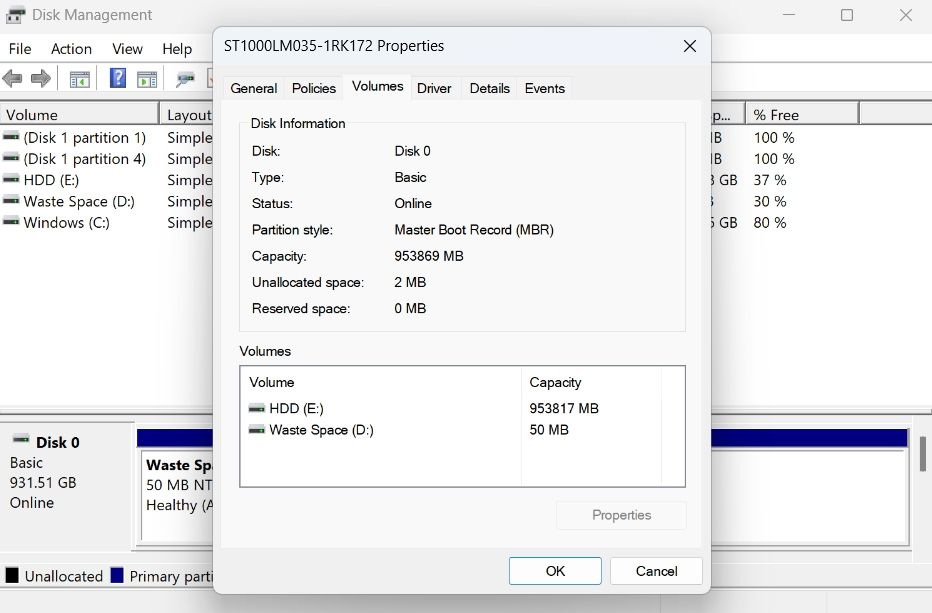
In the Disk Management window, right-click on the hard disk drive and choose Properties from the context menu.

- Switch to the Volumes tab.
-
Check the Partition style. If it shows Master Boot Record (MBR), then you will have to convert it to GPT.

To convert the MBR partition style to GPT, follow the below steps:
- Open the Start Menu by pressing the Windows key.
- Type Command Prompt in the search bar and click the Run as administrator option in right pane.
-
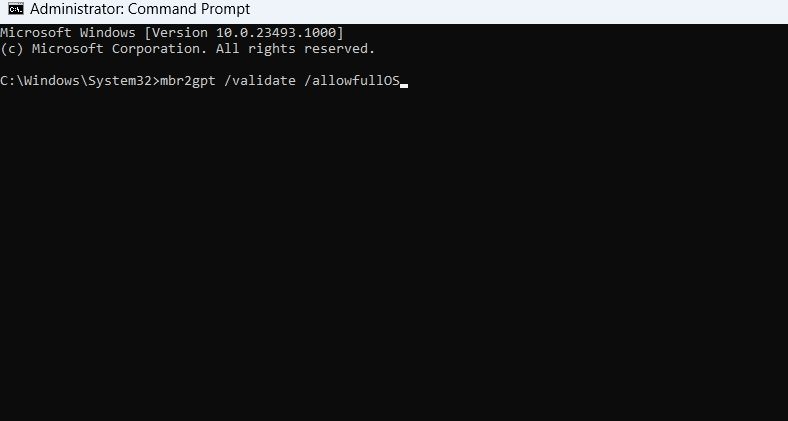
Type mbr2gpt /validate /allowfullOS and press Enter. This command will validate the partition.

- Once the validation is complete, type mbr2gpt /convert /allowfullOS and press Enter.
That’s it. Windows will start converting the partition style. The process may take some time, depending on the size of your drive.
5. Perform a Clean Boot
Are you still facing the «Secure Boot state unsupported» error? If yes, then you will have to perform a clean boot to troubleshoot the issue. Check out our guide on how to perform a clean boot on Windows for more information.
In the clean boot state, check if you’re facing the error message again or not.
If not, then it indicates that one of the services you disabled was causing the problem. To narrow it down, repeat the above process while slowly re-enabling the services until you see the error again.
Once you find out which service is the culprit, consider downloading its driver update or running an SFC scan if it’s a Windows-based service.
The «Secure Boot State Unsupported» Error, Fixed
The «Secure Boot state unsupported» error is a very common issue that appears when you try to install Windows 11. Fortunately, you can quickly troubleshoot this error by following the above fixes.
But in the worst-case scenario, if none of the above fixes were helpful, then you will have to clean install Windows.