
Windows Search is a vital feature for anyone who relies on Microsoft’s operating system for productivity, organization, and efficiency. It allows users to quickly locate files, applications, and settings without delving deep into folders or menus. However, when the Windows Search function ceases to work, it can lead to significant frustration. In this article, we will explore the reasons why the Windows Search function might not be working, alongside effective solutions to get it back on track.
Understanding the Importance of Windows Search
The Windows Search feature serves as the gateway to quickly accessing information stored on your computer. Imagine a situation where you need to find a critical document for a presentation that’s due in an hour. The thought of sifting through folders can be daunting, which is precisely where Windows Search shines.
Key Benefits of Using Windows Search:
- Speed: Instantly access files, emails, applications, and settings without manual navigation.
- Efficiency: Organize workflow better and save time by retrieving information rapidly.
Given these benefits, it’s crucial to address any issues that might impede the functionality of Windows Search. Below, we have detailed some common reasons for its malfunction along with effective solutions.
Common Reasons for Windows Search Malfunction
A myriad of reasons can contribute to the failure of the Windows Search function. Understanding these root causes can significantly help in troubleshooting. Here are some of the most prevalent reasons:
1. Indexing Issues
Indexing is the process that allows Windows to create a map of the files and data on your computer. If the indexing service malfunctions or becomes corrupted, the search results will be inaccurate or simply nonexistent.
2. Corrupted System Files
System files can become corrupted due to various reasons such as improper shutdowns, software conflicts, or malware attacks. When system files that are integral to the functionality of the Windows Search feature are compromised, errors may arise.
3. Disabled Search Services
Windows Search operates through several services that need to be running properly. If these services are manually disabled or have failed to start, Windows Search won’t work.
4. Conflicting Applications
Sometimes, other applications may interfere with Windows Search, leading to performance issues or complete unresponsiveness.
Step-by-Step Guides to Fix Windows Search Issues
Now that we have a clearer understanding of the potential problems, let us walk through troubleshooting methods to resolve Windows Search issues.
1. Rebuilding the Search Index
If indexing issues are at the root of the problem, rebuilding the index can often restore functionality:
- Open the Control Panel.
- Click on Indexing Options.
- Select Advanced and click on the Rebuild button in the Troubleshooting section.
Rebuilding the index may take some time, depending on the number of files on your system, but it is an effective way to solve the issue.
2. Running the System File Checker (SFC) Tool
When system files are corrupted, utilizing the SFC tool can repair them:
- Press Windows + X and select Windows Terminal (Admin) or Command Prompt (Admin).
- Type sfc /scannow and hit Enter.
This process may take some time, so be patient. The SFC tool will automatically fix any corrupted files it detects.
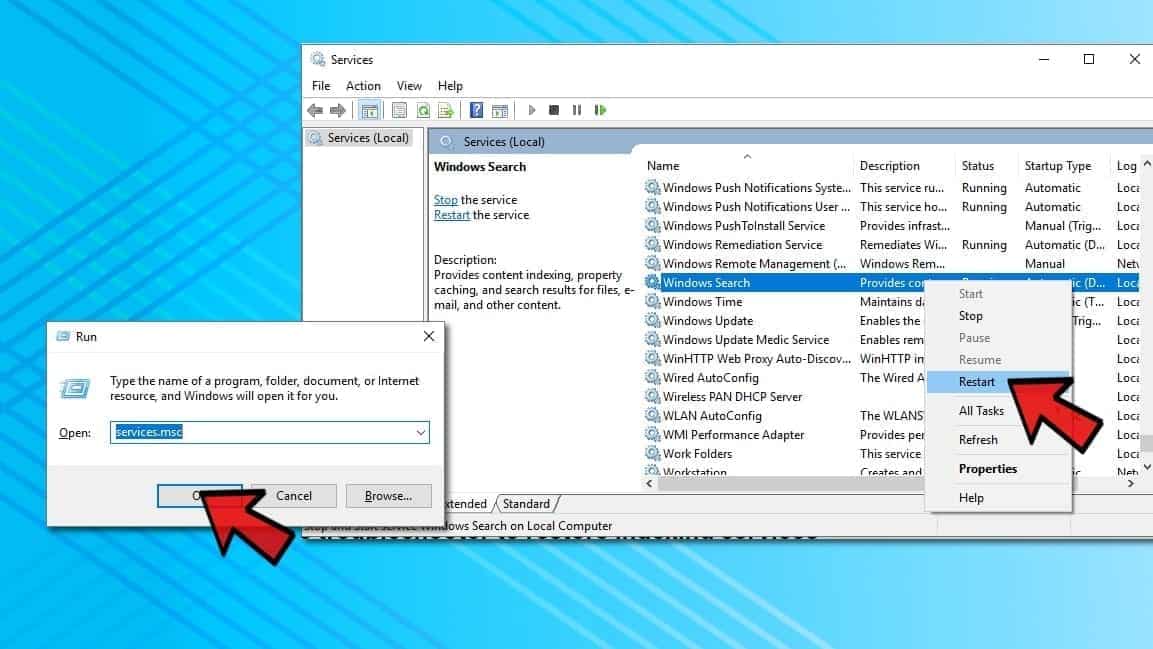
3. Ensuring Search Services are Running
Another critical step is to verify that the necessary services are enabled:
- Press Windows + R to open the Run dialog.
- Type services.msc and click OK.
- Locate Windows Search in the list. Ensure its status is Running. If not, right-click it and select Start.
If the service is disabled, you can right-click and choose Properties to set the startup type to Automatic.
4. Checking for Windows Updates
Often, updates provide fixes for known issues. Here’s how to check:
- Go to Settings.
- Select Update & Security.
- Click on Check for updates.
If any updates are available, make sure to install them as they may improve the functionality of Windows Search.
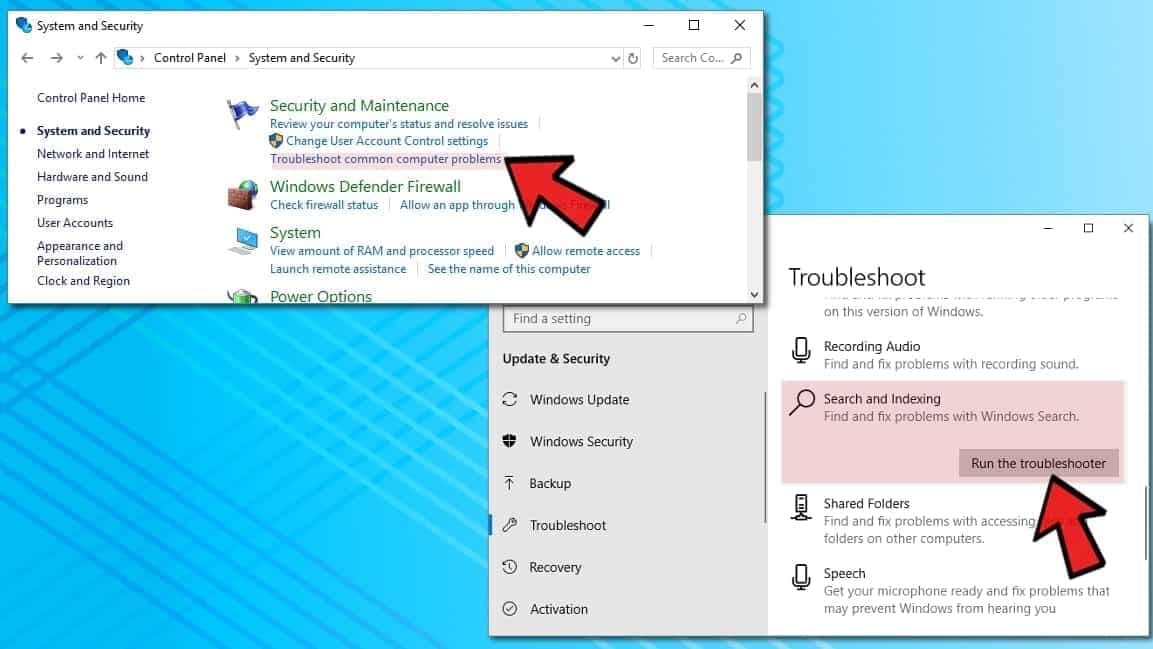
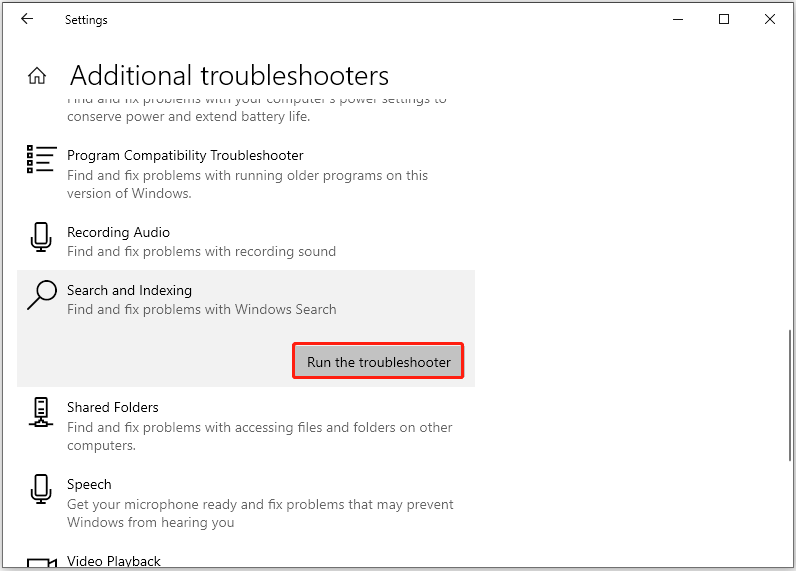
5. Performing a Troubleshooter
Windows 10 and later versions include a built-in troubleshooter specifically for search issues:
- Go to Settings > Update & Security.
- Click on Troubleshoot > Additional troubleshooters.
- Select Search and Indexing and click on Run the troubleshooter.
This tool can help identify and fix problems automatically, saving you time and effort.
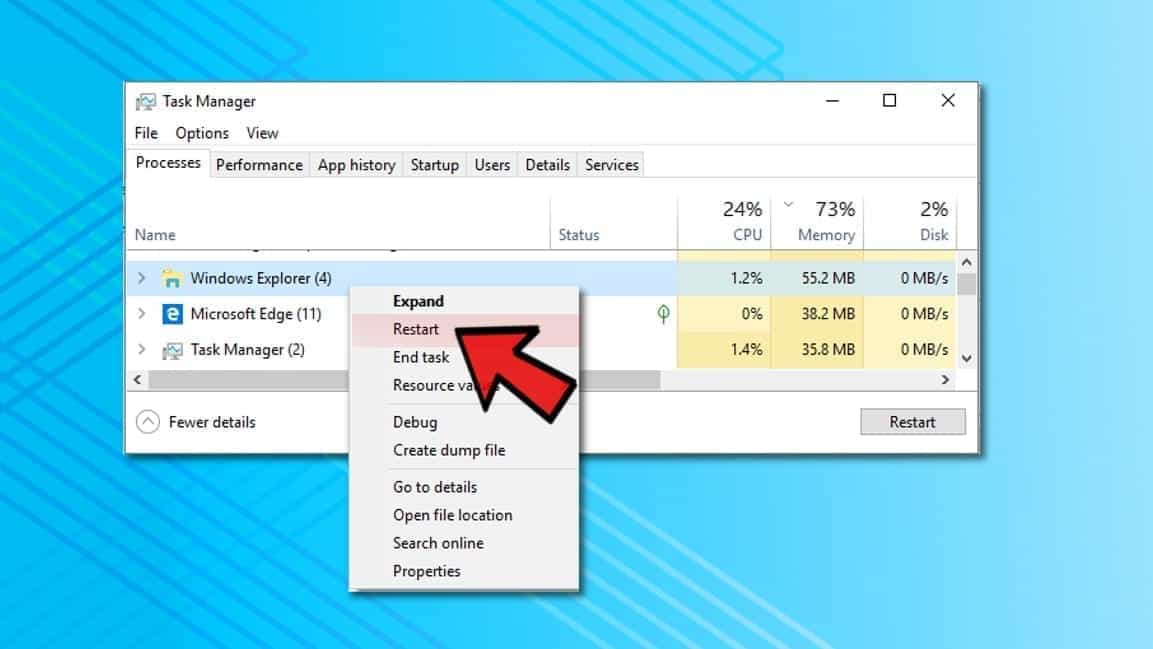
6. Restarting Windows Explorer
Sometimes, simply restarting Windows Explorer can solve the issue:
- Open Task Manager by pressing Ctrl + Shift + Esc.
- Locate Windows Explorer from the list and right-click it.
- Select Restart.
Restarting Windows Explorer refreshes its current state and can remedy search-related complications.
When to Seek Professional Help
While the above methods cover the majority of issues related to Windows Search malfunctions, there may be instances where problems persist despite trying various solutions. In such cases, it may be time to consider seeking professional assistance.
Signs You Should Seek Help:
- Multiple error messages that aren’t resolved by standard troubleshooting processes.
- Persistent performance issues or unexpected behavior of other applications.
Professional tech support can provide deeper insights, utilizing advanced diagnostic tools and extensive experience to resolve complex issues efficiently.
Preventing Future Windows Search Problems
Once you have restored functionality to the Windows Search, it’s essential to consider ways to prevent future occurrences of the same issues.
1. Regular Maintenance
Regularly maintaining your system will help ensure it runs smoothly:
- Schedule frequent disk cleanup and optimization processes.
- Keep your system updated with the latest patches and upgrades.
2. Malware Protection
Install a reliable antivirus or anti-malware tool to guard against threats that might corrupt system files.
3. Backup Important Data
Consistently backup your data to avoid loss when troubleshooting requires advanced or extensive refreshes.
Conclusion
The inability of the Windows Search function to perform effectively can hamper productivity and create a significant inconvenience. By understanding the possible causes and following systematic troubleshooting methods, you can often restore its functionality without too much hassle.
If you find that your Windows Search continues to be a nuisance, don’t hesitate to seek professional help, as sometimes deeper issues may require experienced intervention. Through regular maintenance and vigilance, you can avoid future complications, ensuring that Windows Search serves you well in your day-to-day operations.
What are the common reasons why Windows Search might not be working?
There are several common reasons why the Windows Search function may not operate correctly. One of the most prevalent causes is that the Windows Search service may be disabled. This service is essential for search functionality, and if it is not running, users may notice that searches yield no results or that the feature is completely unresponsive. Additionally, issues with the indexing service can hinder search performance, especially if the index is outdated or corrupted.
Another possible reason for malfunction could be related to Windows system files that have become corrupted or damaged. This can occur after a Windows update, software installation, or due to the presence of malware. Keeping your system files intact is crucial for the optimal performance of the Windows Search function. Regular checks and repairs with built-in tools like System File Checker (SFC) can help mitigate these problems.
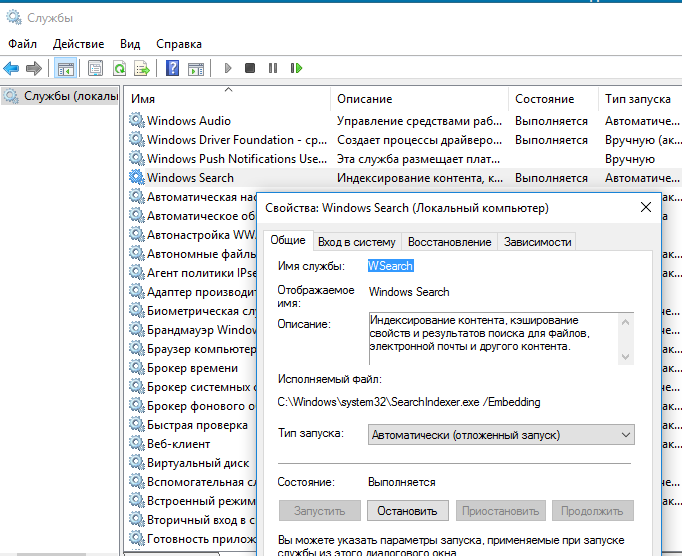
How can I restart the Windows Search service?
To restart the Windows Search service, you need to open the Services application. Type “services.msc” in the Windows search bar and hit Enter. In the Services window, scroll down to find “Windows Search.” Once located, right-click on it and select “Restart.” This action can resolve issues with the service if it has become unresponsive or is facing temporary glitches.
It’s also advisable to set the Windows Search service to start automatically. Right-click on the “Windows Search” entry again, select “Properties,” and ensure that the Startup type is set to “Automatic.” Click “Apply” and then “OK.” This adjustment ensures that the service starts automatically the next time your system boots up, reducing the likelihood of encountering search issues in the future.
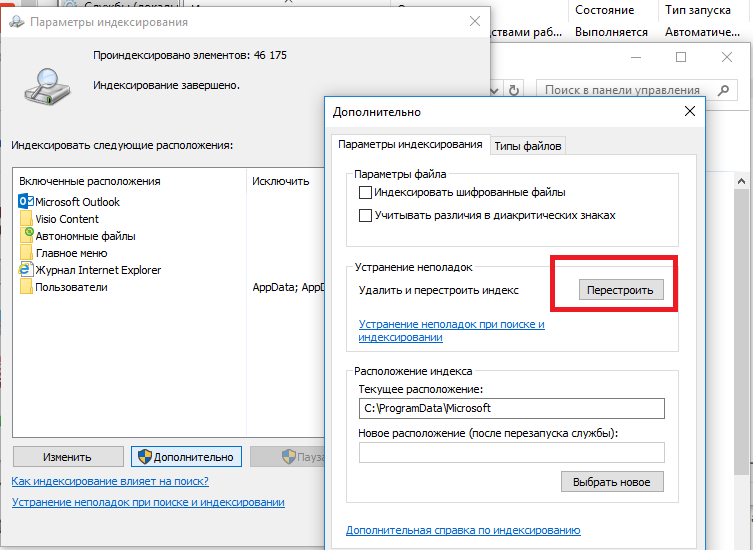
What should I do if the search index is not functioning properly?
If the search index is not functioning as intended, you can rebuild it to restore its operational capability. To do this, navigate to the Control Panel and select “Indexing Options.” In the Indexing Options window, click on “Advanced,” then under the “Index Settings” tab, click on “Rebuild.” This process can take some time, depending on the amount of data indexed, but it often resolves any existing issues with file searching.
After the rebuild is complete, it’s a good idea to try a test search to confirm that the issue has been resolved. Be patient, as the index may take some time to update, especially if you have a large number of files on your system. Regularly maintaining the index can prevent this problem from recurring in the future.
How do I run the Search and Indexing troubleshooter?
Windows includes built-in troubleshooting tools designed to diagnose and resolve issues automatically. To run the Search and Indexing troubleshooter, open the Settings app by pressing Windows + I. From there, navigate to “Update & Security,” then select “Troubleshoot” from the menu on the left. Under the “Additional troubleshooters” section, you will find the Search and Indexing troubleshooter.
Click on it and then select “Run the troubleshooter.” The tool will ask you specific questions about your issues with the search function. By answering these prompts, the troubleshooter can identify problems and suggest or apply fixes automatically. This tool is a quick way to resolve many common search-related issues in Windows.
What role do recent Windows updates play in search issues?
Recent Windows updates can sometimes lead to search functionality problems, especially if the update didn’t install correctly or if it introduced bugs into the system. Updates are meant to enhance system performance and security, but occasionally, they can have the opposite effect. Users might find that their search feature behaves erratically or is completely non-functional right after an update.
If you suspect that a Windows update is the cause of your search issues, consider uninstalling the latest update. Go to Settings > Update & Security > Windows Update > View update history, and then select “Uninstall updates.” From there, find the most recent updates, uninstall them, and see if the search function returns to normal. Updating to the latest patches may also solve any issues introduced by previous updates.
Can malware affect the Windows Search functionality?
Yes, malware can significantly impact the functionality of Windows Search. Some types of malicious software may interfere with built-in apps and services, including search capabilities. Malware may corrupt files vital to Windows Search, leading to issues such as unresponsive search features or incorrect search results. It’s critical to have reliable antivirus software installed and ensure regular system scans for any threats.
If you suspect that malware might be the cause of your search issues, boot your system in Safe Mode and run a full antivirus scan. This method allows your antivirus to identify and potentially remove threats that could be affecting system performance. It’s also advisable to keep your antivirus software and definitions updated to better protect against new threats.
How do I perform a System File Check (SFC) to fix search problems?
Performing a System File Check (SFC) is an effective way to fix problems caused by corrupted system files that might affect the Windows Search functionality. To do this, you need to open Command Prompt as an administrator. You can do this by searching for “cmd” in the Windows search bar, right-clicking on Command Prompt, and selecting “Run as administrator.” Once the Command Prompt window is open, type “sfc /scannow” and hit Enter.
The SFC tool will scan your system for corrupted files and attempt to repair them automatically. This process can take some time, so be patient. After the scan is complete, you will receive a message indicating whether any issues were found and if fixes were applied. If the tool found repairable issues, restart your computer and check if the Windows Search function is working properly again.
Windows search not working or down: An issue that can be easily fixed
Contents
- Windows search not working or down: An issue that can be easily fixed
- Ways to Fix Windows Search Not Working
- Method 1. Fix Windows search that shows blank results (2020 Update)
- Method 1. Restart Search services via Task Manager
- Method 2. Restart Windows search service
- Method 3. Restart Windows Explorer and Cortana
- Method 4. Employ Windows Troubleshooter
- Method 5. Configure the size of the paging file
- Method 6. Check Indexing Options
- Method 7. Use Powershell commands
- Method 8. Run CTFMON process
More and more users report about Windows search not working lately. The search in Start Menu is something that all Windows 7/8/10 users employ in daily tasks using the computer. A sudden disappearance of this useful tool can be a disaster. You can no longer find programs, files, or even worse, control panel to launch a troubleshooter. However, the issue can be fixed quite quickly, and there is no need to use expensive programs for that. The guide provided below also contains 2020 Update for broken Bing search after Windows update.
If Windows Start Menu Search returns no results and remains blank as you type in the search bar, then it is time to take actions immediately. Although in some cases restarting the computer might fix the problem, the issue can be more rooted in the system or be related to Windows Updates from Microsoft, such as integration with Bing search in 2020. In fact, search problems are as common as Windows sound problems, so there is no need to worry.
To enable search in Windows 10, you must check several services and settings on your computer. We have prepared a detailed guide on how to fix Windows 10 Search not working. The methods you can use are provided below.
Pro Advice. Use an award-winning Windows security & maintenance suite to leverage your PC’s performance to new heights. Remove malware, boost speed, and fix other computer problems in a few clicks.
FIX IT NOW
Fix PC errors, repair virus damage and identify hardware/stability issues using RESTORO – a unique PC Repair tool using a patented technology to replace damaged or missing Windows system files, which often are the real cause of annoying Windows errors. Try the FREE scan option to search for stability, security and hardware-related issues. To fix identified problems and receive hardware-related recommendations, you have to purchase the license key for the full software version.
Method 1. Fix Windows search that shows blank results (2020 Update)
On February 5th, many Windows 10 users around the globe discovered that Windows search shows blank results after entering a search query. Such issue arose from a Bing integration to Windows search bug. At the moment, there is nothing you can do to make the Bing service work properly as the issue lies on Microsoft’s end. However, you can disable it and continue using Windows search only. The safest way to do it is to edit the Registry yourself. We do not recommend downloading pre-made solutions as these can be recognized as dangerous by your antivirus.
How to Disable Bing Search integration
- Press Windows key + R on your keyboard at the same time. This launches the Run prompt.
- In Run prompt, type regedit and press OK.
- Now, you’re going to see User Account Control window on your screen, which asks whether you want to allow the program to make changes on your system. Click Yes.
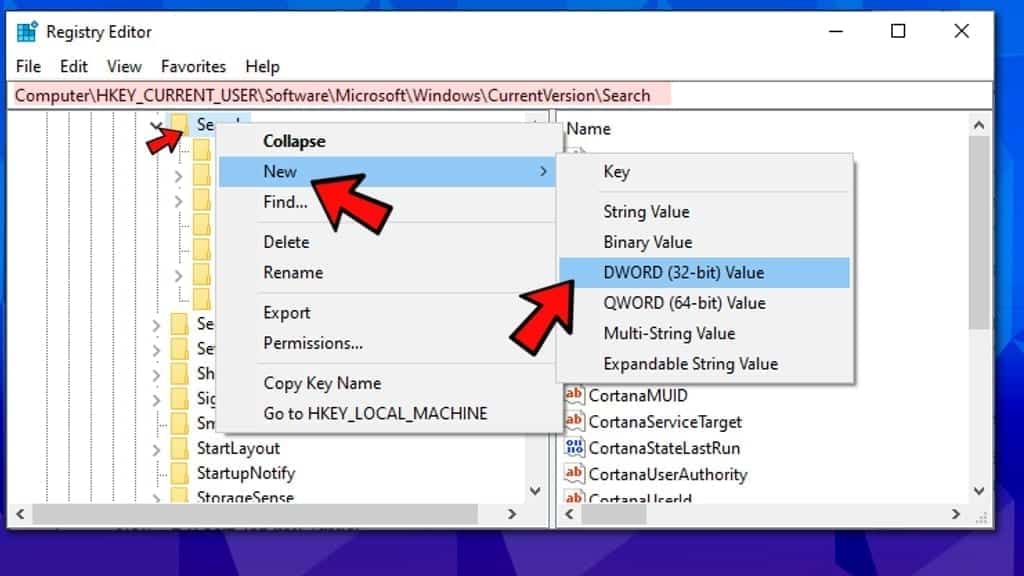
- Now, use the left navigation pane to launch folders in the following order:
HKEY_CURRENT_USER\Software\Microsoft\Windows\CurrentVersion\Search. Or, you could just copy and paste this line in the navigation bar in Windows Registry. - Now, right-click on Search folder, and select New > DWORD (32-bit) Value.

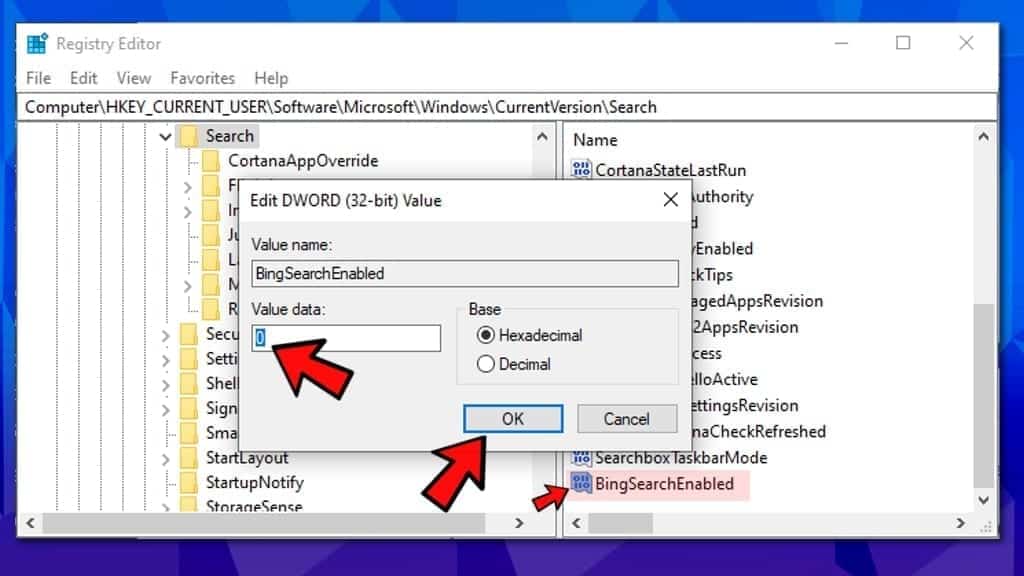
- Now, name the created DWORD Value as BingSearchEnabled.
- Double-click it to ensure it has a value of 0. If you’re not familiar with technical terms, 0 means negative (false) and 1 means positive (true) value in IT. This is why BingSearchEnabled with value 0 means it is actually disabled.
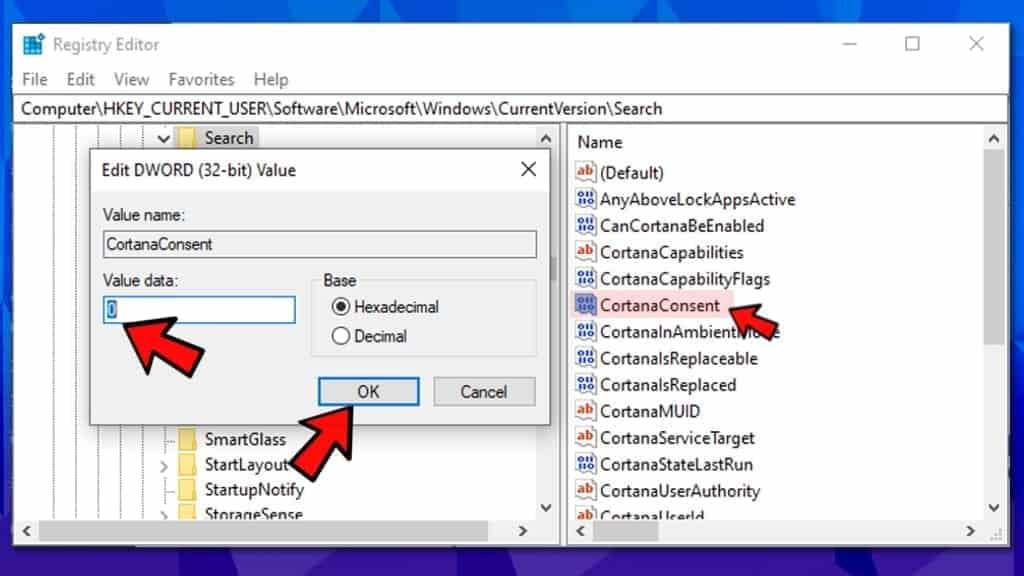
- Now, in the same Search folder, find a key named CortanaConsent. Double-click it and set its value to 0. Click OK to confirm.
- Close the Registry and restart your computer for changes to take effect. Your Windows search should be back to normal and no longer show blank results.
TIP. Sooner or later Microsoft will release a fix for the Windows Search blank results error. As soon as it becomes available, you can delete the EnableBingSearch key and set CortanaConsent key value to 1 again.
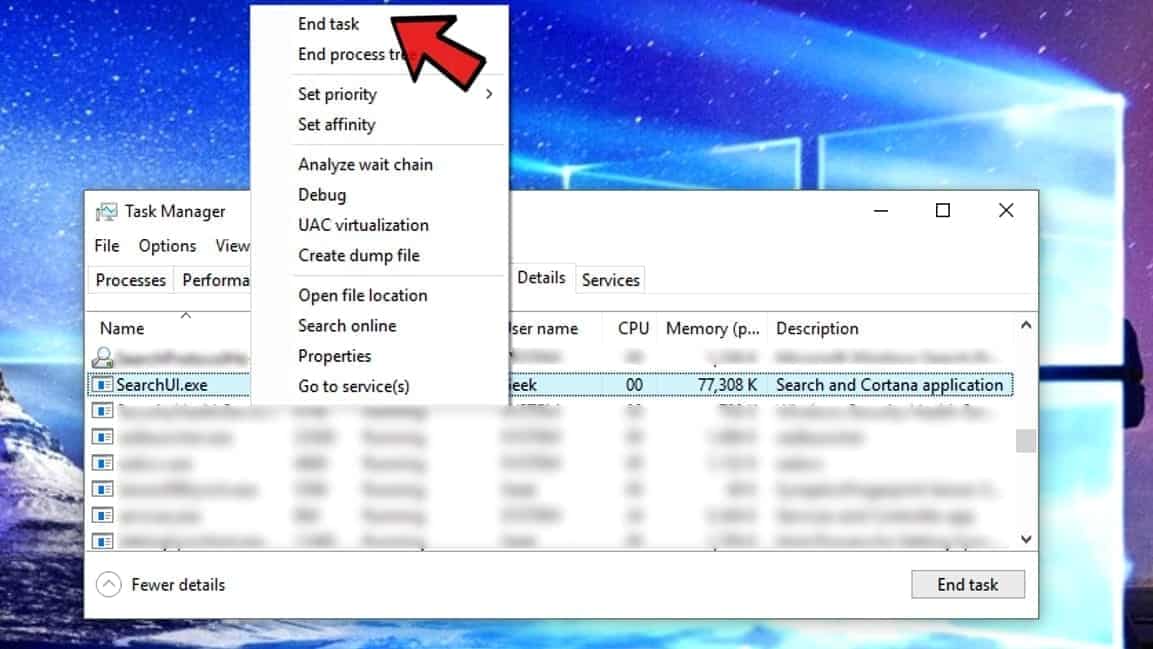
Method 1. Restart Search services via Task Manager
One of the easiest methods to enable search in Windows is to restart Search and Cortana services via Windows Task Manager.
- Open Windows Task Manager by pressing Ctrl+Alt+Del. If required, click Task Manager. Now, go to the Details tab.
- Here, find SearchUI.exe process. Right-click on it and select End Task. This will automatically restart the Search and Cortana application. Check if the problem was solved by typing something in Start Menu Search.
Method 2. Restart Windows search service
You can restart Windows search service via Services panel.
- Launch Run prompt by pressing Windows key + R. Type services.msc and hit Enter.
- Find a process called Windows Search. Right-click it and choose Restart. Try to use the search now.
- Optional. After you right-click on the process, you can also go to Properties and set Startup type to Automatic. Don’t forget to click Apply and OK after doing so.
Method 3. Restart Windows Explorer and Cortana
In case the previous methods didn’t solve the issue with Windows search, you should try to restart Windows Explorer and Cortana.
- Launch Windows Task Manager by pressing Ctrl + Alt + Del and select Task Manager. Or you can simply click Ctrl + Shift + Esc.
- In Processes tab, find one called Windows Explorer. Right-click it to launch quick menu and select Restart. Now find a process called Cortana and do the same thing with it. Check if the Windows search not working error is now fixed.
Method 4. Employ Windows Troubleshooter
Windows Troubleshooter can help you to restore indexing services. In addition, troubleshooters are good because they do the hard work for you – you just need to run them and wait for instructions.
- Since you cannot use Windows search and the results’ area remains blank as you type something in, you will need to launch Control Panel via Run prompt. Press Windows key + R, type control panel and hit Enter.
- Go to Troubleshooting > System and Security. Now, click Troubleshoot common computer problems. New window should appear. Here, find Search and Indexing option and click it, then hit Run the Troubleshooter button.
- The troubleshooter should itself suggest running it as Administrator during the process. Agree to do so.
- Apply the suggested fixes.
- Check if the “search bar doesn’t work Windows 10” problem persists.
Method 5. Configure the size of the paging file
- Press Windows key + R on your keyboard. Type sysdm.cpl and press Enter.
- Navigate to Advanced tab, then click on Settings… in the Performance section. Look for Virtual memory area and click on Change… button here.
- Put a tick in the checkbox that says Automatically manage paging file size for all drives.
- Choose Custom size and enter 16 for Initial size and 2000 for the Maximum size. Press OK to confirm.

Method 6. Check Indexing Options
Yet another method to fix Windows 10 search that keeps loading is to slightly alter Indexing Options.
- Press two buttons at the same time: Windows key + R. Now, type control panel and hit Enter.
- In Control Panel, set View by to Large icons. Now look for Indexing Options and open it.
- Click on Advanced and then Rebuild in Troubleshooting. Click OK to confirm. As you can see, you can also access Windows search troubleshooter here if you wish to try it.

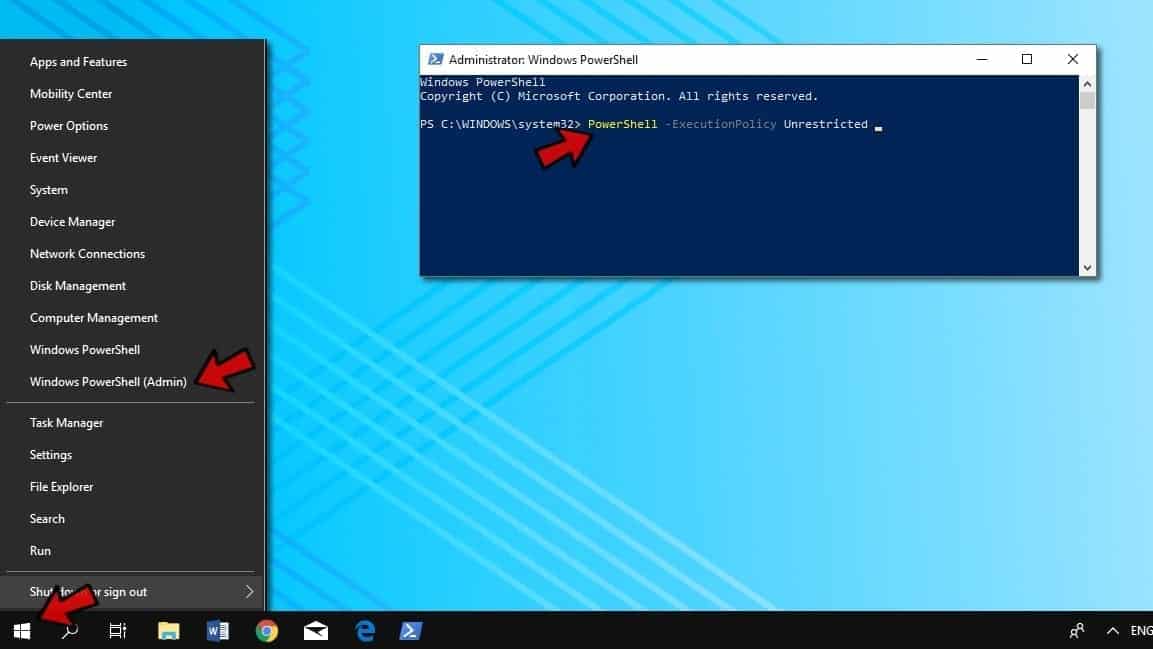
Method 7. Use Powershell commands
You can try running several commands via Powershell to fix the issue. Just copy and paste them.
- Right-click on Windows icon in the taskbar. Choose Windows Powershell (Admin). Click Yes in UAC window.
- Enter the given line and press Enter: PowerShell -ExecutionPolicy Unrestricted
- Then copy and paste then second command and press Enter:
$manifest = (Get-AppxPackage Microsoft.WindowsStore).InstallLocation + ‘\AppxManifest.xml’ ; Add-AppxPackage -DisableDevelopmentMode -Register $manifest - Restart your computer and check if the problem was solved.
Method 8. Run CTFMON process
Ctfmon.exe is a process that is responsible for Windows Alternative User Input and and Office language bar. Running this process might solve the search problem in Windows, so consider doing it:
- Press Windows + R to open Run.
- Paste the given line into it and press OK:
C:\Windows\System32\ctfmon.exe

If you have any other solutions for this problem, please share them with our community.
Norbert Webb is the head of Geek’s Advice team. He is the chief editor of the website who controls the quality of content published. The man also loves reading cybersecurity news, testing new software and sharing his insights on them. Norbert says that following his passion for information technology was one of the best decisions he has ever made. “I don’t feel like working while I’m doing something I love.” However, the geek has other interests, such as snowboarding and traveling.
Reader Interactions
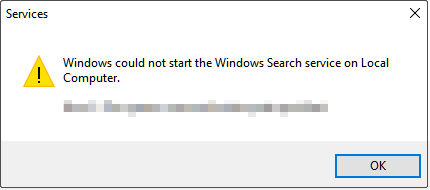
Encountering the error message “Windows could not start the Windows Search service on Local Computer”? Now read this post from MiniTool to know what should you do when the Windows Search service cannot be started in Windows 10/11.
Windows Could Not Start the Windows Search Service on Local Computer
The Windows search bar helps you quickly find videos, pictures, other files, or applications. However, the search bar sometimes exhibits some bugs. Recently, many users reported that they received the “Windows could not start the Windows Search service on Local Computer” error message when trying to search for something.
This error is generally caused by Windows search related services not being enabled, too many cache files, incorrect group policy settings, system file corruption, etc. Keep reading to see how to get rid of this problem.
How to Fix Windows Could Not Start the Windows Search Service
Fix 1. Restart Windows Search Related Services
If Windows search related services are disabled, you may receive the error message “Windows could not start the Windows Search service on Local Computer”. So, to fix it, you need to restart relevant services.
Step 1. Press Windows + R keyboard shortcut to open the Run window.
Step 2. In the text box, type services.msc and press Enter.
Step 3. In the services window, scroll down to select the Windows Search service. Then click the Restart button as shown in the figure below.
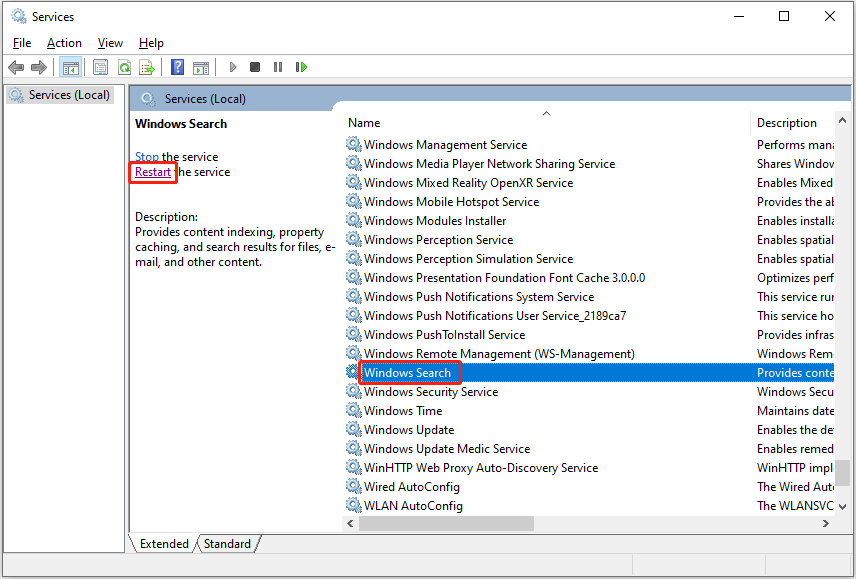
Step 4. Repeat the same steps to restart the Background Tasks Infrastructure Service.
After that, restart your computer to check if the issue has gone.
Fix 2. Enable Windows Search Related Policies
Misconfigured group policy settings can cause many issues such as background apps permissions missing and Windows Search service not starting Windows 10/11. Therefore, you need to follow the instructions below to edit relevant policies.
Step 1. Press Windows + R key combination to open the Run dialog box.
Step 2. Type gpedit.msc in the input box and press Enter.
Step 3. In the new window, navigate to Computer Configuration > Administrative Templates > Windows Components > Search.
Step 4. In the right panel, find and double-click Do not allow web search. Then select the Disabled or Not Configured option.
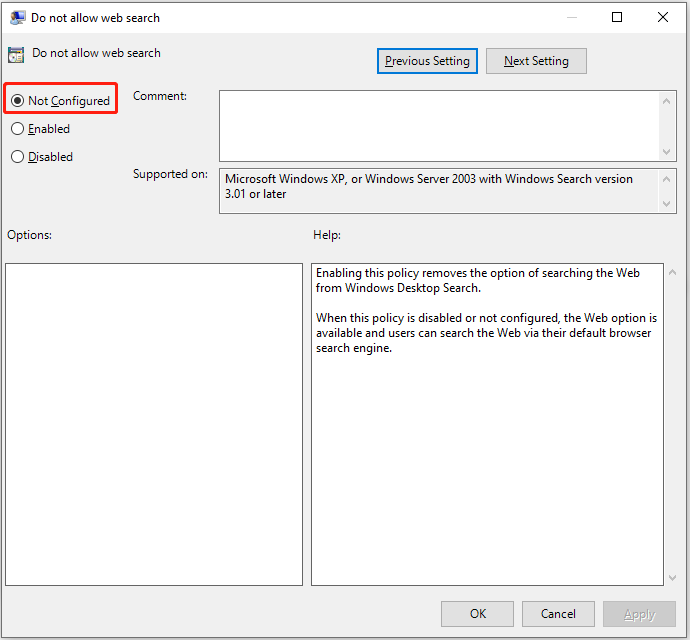
Step 5. Click Apply and OK sequentially to make this change take effect.
Step 6. Repeat the steps to disable the Don’t search the web or display web results in Search policy.
Fix 3. Run the Search and Indexing Troubleshooter
Windows built-in troubleshooters can help with various Windows issues. For instance, you can run the System Maintenance troubleshooter to fix the “apps and programs automatically minimize” issue. Here, since the Windows Search service cannot be started, you need to run the Search and Indexing troubleshooter.
Step 1. Press Windows + I key combination to open Settings.
Step 2. Click Update & Security, then move on to the Troubleshoot section and click Additional troubleshooters.
Step 3. In the new window, scroll down to click Search and Indexing > Run the troubleshooter.
Wait patiently until the error detection and repair process is complete. Then check if the “Windows could not start the Windows Search service on Local Computer” error persists.
Fix 4. Delete Temporary Files
Abandoned temporary files not only take up a lot of hard disk space, and reduce system performance, but may also cause Windows search to fail to start. In this case, you need to delete Windows temporary files.
Step 1. Press Windows + R key combination to open Run.
Step 2. Type %temp% in the text box and press Enter. This operation will lead you to the folder where temporary files are stored.
Step 3. Select all temporary files and right-click them to select Delete.
Top Recommendation
If your important files are deleted by mistake, you can use MiniTool Power Data Recovery, the best free data recovery software, to recover deleted files.
MiniTool Power Data Recovery supports disappeared USB copied files recovery, SD card data recovery, computer hard drive recovery, external hard drive file recovery, and so on.
Free download MiniTool Power Data Recovery and give it a try.
MiniTool Power Data Recovery FreeClick to Download100%Clean & Safe
Fix 5. Run System File Checker
As mentioned before, corrupted system files can also cause the “Windows could not start the Windows Search service on Local Computer” error. To scan and repair corrupted system files, you can run the System File Checker tool by referring to this page.
Final Words
Facing the Windows Search service not starting Windows 10/11 issue, you can try the solutions listed above.
Should you have found any other effective fixes for this error message, welcome to contact us via [email protected]. Thank you so much.
Функцией поиска в Windows 10 и 11 приходится пользоваться намного чаще, чем в предыдущих версиях ОС: с помочью поиска можно быстро найти нужное приложение, файл, элемент настройки в новом меню Settings (Параметры), функцию системы или даже выполнить поиск в Интернете через меню Пуск. Однако в некоторых случаях встроенные поиск Windows перестает работать. При попытке найти любое приложение или файл, поиск Windows возвращает пустой список. В этой статье мы собрали основные советы, которые должны помочь, если у вас в Windows 10 или 11 не работает поиск в меню Пуск, панели задач и других элементах интерфейса Windows.
Содержание:
- Перезапустите службы поиска в Windows
- Не работает поиск в стартовом меню Windows
- Проверьте состояние и настройки службы индексирования Windows
- Утилита устранения неполадок службы индексирования и поиска Windows
- Сброс универсальных приложений Microsoft Store
- Не работает поиск Windows при включенной интеграции с Bing
- Не работает поиск в Параметрах Windows
- PowerShell скрипт для сброса Windows Search
Перезапустите службы поиска в Windows
За поиск из панели задач отвечает один из исполняемых файлов Cortana — SearchUI.exe. Если у вас не работает поиск в панели задач Windows 10, попробуйте перезапустить этот процесс:
- Запустите Диспетчер задач (Ctrl+Alt+Del);
- Перейдите на вкладку Подробности;
- Найдите в списке процессов SearchUI.exe, щелкните по нему ПКМ и выберите Снять задачу;

- Аналогично завершите процесс SearchApp.exe и SerchIndexer.exe;
- Когда вы в следующий раз попробуете выполнить поиск в Windows 10, это процесс автоматически перезапуститься.

Не работает поиск в стартовом меню Windows
Если у вас в Windows 10/11 поиск не работает только в стартовом меню Пуск, попробуйте следующее решение:
- Завершите процесс Проводника (Explorer.exe) с помочью щелчка ПКМ по пустому месту в панели задач с зажатыми клавишами
правыми Ctrl+Shift
(выберите Выход из проводника), либо с помощью диспетчера задач (
Ctrl+Shift+Esc
);
- Запустите редактор реестра из Task Manager (Файл -> Запустить новую задачу -> regedit.exe);
- Удалите следующий ключ реестра
HKLM\SOFTWARE\Microsoft\Windows\CurrentVersion\Explorer\FolderTypes\{ef87b4cb-f2ce-4785-8658-4ca6c63e38c6}\TopView\{00000000-0000-0000-0000-000000000000}
. В 64 битной версии Windows 10 нужно удалить ключ реестра
HKLM\SOFTWARE\Wow6432Node\Microsoft\Windows\CurrentVersion\ Explorer\FolderTypes\ {ef87b4cb-f2ce-4785-8658-4ca6c63e38c6}\TopViews\{00000000-0000-0000-0000-000000000000}; - Запустите Explorer.exe через диспетчер задач (Файл -> Запустить новую задачу -> explorer.exe).


В Windows 10 Creator Update (1703) и более новых версиях есть еще одна частая проблема, из-за которой может не работать поиск. В разделе Параметры -> Конфиденциальность -> Фоновые приложения (Settings -> Privacy -> Background apps), включите опцию «Разрешить приложениям работать в фоновом режиме» (Let apps run in the background). При отключении данной опции может не работает поиск среди только что установленных приложений.

Если вы не нашли эту опцию, можно включить ее через реестр:
- Для этого перейдите в ветку реестра HKEY_CURRENT_USER\Software\Microsoft\ Windows\CurrentVersion\ BackgroundAccessApplications;
- Создайте новый параметр типа DWORD (32-бит) с именем GlobalUserDisabled и значением 0;
- Затем измените значение параметра BackgroundAppGlobalToggle на 1 в ветке реестра HKCU\Software\Microsoft\Windows\CurrentVersion\Search;
Либо вы можете изменить эти параметры из командой строки:
REG ADD HKCU\Software\Microsoft\Windows\CurrentVersion\BackgroundAccessApplications /v GlobalUserDisabled /t REG_DWORD /d 0 /f
REG ADD HKCU\Software\Microsoft\Windows\CurrentVersion\Search /v BackgroundAppGlobalToggle /t REG_DWORD /d 1 /f
- Перезагрузите компьютер.
Проверьте состояние и настройки службы индексирования Windows
Проверьте, запущена ли служба индексирования Windows. Для этого:
- Откройте консоль
services.msc
; - В списке служб найдите Windows Search;
- Проверьте, что служба запущена, а тип ее запуска – автоматический (Automatic — Delayed Start);

- Запустите / перезапустите службу WSearch;
- Теперь откройте классическую панель управления и откройте элемент Параметры индексирования (Control Panel\All Control Panel Items\Indexing Options);
- Убедитесь, что выбрано индексирование всех нужных расположений (как минимум должно быть включено индексирование Start Menu, Users, можете добавить ваши локальные диски и Outlook);

- Нажмите кнопку Дополнительно и в разделе Устранение неполадок нажмите кнопку Перестроить;

- Процесс переиндексации может занять довольно длительное время. Дождитесь его окончания.

Примечание. Проверьте, что на системном диске достаточно свободного места. В некоторых случаях размер индексного файла службы Windows Search (Windows.edb) может быть довольно большим.
Утилита устранения неполадок службы индексирования и поиска Windows
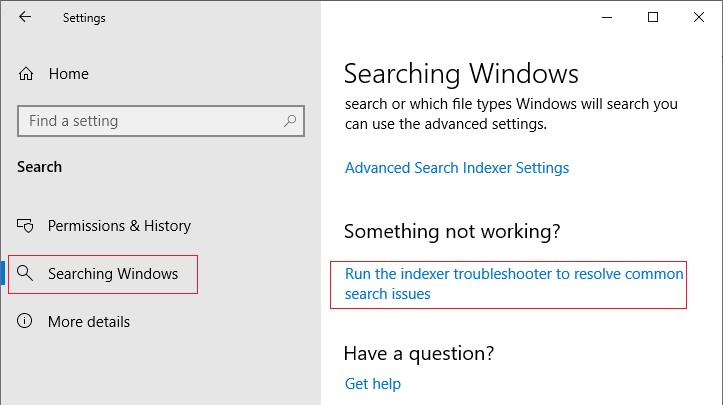
Попробуйте воспользоваться встроенной утилитой исправления неполадок Indexer Diagnostics (Troubleshooter) для исправления типовых проблем с поиском Windows. Для этого:
- Перейдите в меню Settings -> Search -> Searching Windows. Промотайте список вниз и нажмите на ссылку “Run the indexer troubleshooter to resolve common search issues”;
Можно запустить мастер исправления ошибок поиска из командой строки:
msdt.exe -ep WindowsHelp id SearchDiagnostic
- Запустится мастер исправления неполадок в службах поиска и индексирования;
- Выберите вашу проблему (скорее всего это будет “Файлы не отображаются в результатах поиска” / “Files don’t appear in search results”) и нажмите Next;
- Дождитесь, пока “Search and Indexing troubleshooter” просканирует ваш компьютер и попробует исправить ошибку, после этого перезагрузите компьютер и проверьте работу поиска.
Сброс универсальных приложений Microsoft Store
Если у вас на компьютере установлен голосовой помощник Cortana (напомню, что русской версии Cortana все еще нет), исправить проблему неработающего поиска Windows может перерегистрация в системе всех универсальных UWP приложений Windows Store. Для этого в командной строке PowerShell, запущенной с правами администратора, выполните команду:
Get-AppXPackage -AllUsers | Foreach {Add-AppxPackage -DisableDevelopmentMode -Register "$($_.InstallLocation)\AppXManifest.xml"}
После окончания выполнения команды, перезагрузите компьютер.
Если это не исправило проблема с поиском, нужно полностью удалить и переустановить универсальное приложение Microsoft.Windows.Search (
Microsoft.Windows.Search_cw5n1h2txyewy
).
- Запустите консоль PowerShell.exe с правами администратора;
- Остановите службу Windows Search. Сначала нужно изменить тип запуска на Disabled, а потом остановить ее:
Get-Service WSearch| Set-Service –startuptype disabled –passthru| Stop-Service –Force - Перезагрузите Windows;
- Удалите универсальное приложениеSearch:
Get-AppxPackage -Name *Search* | Remove-AppxPackage -Verbose -ErrorAction SilentlyContinue -WarningAction SilentlyContinue
Get-AppxPackage -AllUsers -Name *Search* | Remove-AppxPackage -Verbose -ErrorAction SilentlyContinue -WarningAction SilentlyContinue - Теперь нужно удалить папку приложения
%LOCALAPPDATA%\Packages\Microsoft.Windows.Search_cw5n1h2txyewy
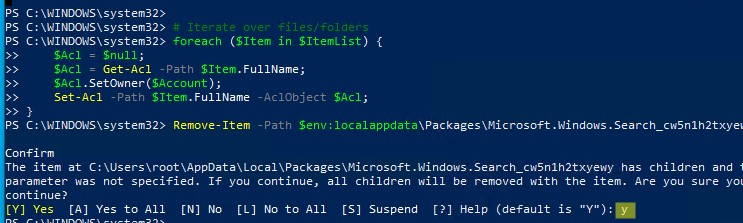
. Но для этого нужно сначала назначить локальную группу Administrators владельцем папки. Это можно сделать вручную в проводнике Windows (вкладка Безопасность в свойствах папки) или с помощью такого PowerShell скрипта:
$searchapp_path ="$env:localappdata\Packages\Microsoft.Windows.Search_cw5n1h2txyewy"
$Account = New-Object -TypeName System.Security.Principal.NTAccount -ArgumentList 'BUILTIN\Administrators';
$ItemList = Get-ChildItem -Path %searchapp_path -Recurse;
foreach ($Item in $ItemList) {
$Acl = $null;
$Acl = Get-Acl -Path $Item.FullName;
$Acl.SetOwner($Account);
Set-Acl -Path $Item.FullName -AclObject $Acl;
} - Теперь можно удалить папку Windows.Search_cw5n1h2txyewy:
Remove-Item -Path $env:localappdata\Packages\Microsoft.Windows.Search_cw5n1h2txyewy –force

- Сейчас поиск в Windows полностью отключен;
- Переустановите приложение Search App:
Get-AppxPackage -AllUsers -Name *Search* | % {Add-AppxPackage -Path ($_.InstallLocation + "\Appxmanifest.xml") -Register -DisableDevelopmentMode -ForceApplicationShutdown -Verbose}

- Включите автозапуск для службы WSearch:
Set-Service WSearch –startuptype automatic - Перезагрузите Windows, войдите под своей учетной записью и проверьте, что поиск теперь работает.

Не работает поиск Windows при включенной интеграции с Bing
5 февраля 2020 года у пользователей Windows 10 массового перестал работать поиск из панели задач. Окно поиска в панели задач открывается, но при вводе любого запроса поиск выдает пустые результаты.

Данная проблема была признана Microsoft и вызывалась недоступностью облачных сервисов поиска Bing. Дело в том, что по-умолчанию Windows 10 отправляет на свои сервера все, что вы вводите в поиске Start Menu, которыt возвращают вам результаты поиска из Bing.
Для исправления этой проблемы проще всего отключить интеграцию поиска Windows 10 с поисковой системой Microsoft Bing.
- Запустите редактор реестра (Win+R -> regedit.exe);
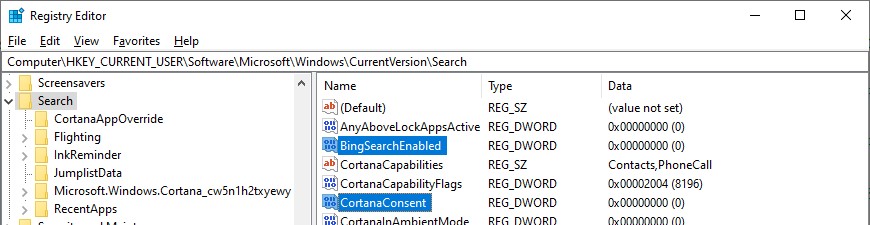
- Перейдите в раздел реестра HKEY_CURRENT_USER\SOFTWARE\Microsoft\Windows\CurrentVersion\Search\;
- Измените значение параметров BingSearchEnabled и CortanaConsent на 0;

Если эти параметры реестра отсутствуют, создайте их вручную (тип REG_DWORD 32 bit). Можно создать и изменить эти параметры следующими командами:
REG ADD HKCU\Software\Microsoft\Windows\CurrentVersion\Search /v BingSearchEnabled /t REG_DWORD /d 0 /f
REG ADD HKCU\Software\Microsoft\Windows\CurrentVersion\Search /v CortanaConsent /t REG_DWORD /d 0 /f
- Перезапустите Explorer.exe или перезагружайте компьютер.
Данное решение поможет, если у вас открывается окно поиска, но при вводе текста для поиска не ничего появляется. На момент написания статьи инженеры Microsoft уже исправили проблему с Bing, и службы поиска Windows стали работать нормально. Хотя на мой взгляд интеграцию поиска Windows с Bing нужно отключать сразу после установки операционной системы.
Не работает поиск в Параметрах Windows
В приложении “Параметры” (Settings) Windows 10/11 есть собственной окно поиска для быстрого перехода к элементам настройки системы. Если у вас перестал работать поиск в Параметрах:
- Запустите File Explorer и перейдите в каталог
%LocalAppData%\Packages\windows.immersivecontrolpanel_cw5n1h2txyewy\LocalState
; - Откройте свойства папки Indexed, нажмите кнопку “Другие”, и проверьте что включена опция включена опция “Разрешить индексировать содержимое файлов в этой папке в дополнении к свойствам файла”;

- Если опция уже включена, отключите ее, нажмите Ок, а затем включите снова.

PowerShell скрипт для сброса Windows Search
Если рассмотренные выше способы не помогли восстановить работу поиска в Windows 10, Microsoft рекомендует воспользоваться скриптом PowerShell для сброса всех настроек службы Windows Search (скрипт предназначен для Windows 10 1903 и выше).
Для запуска этого скрипта нужно
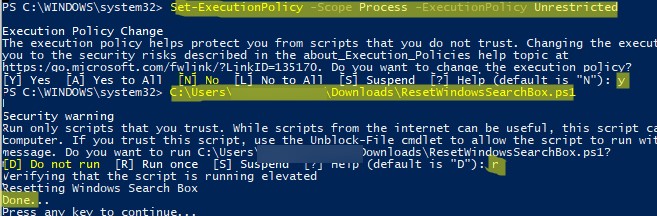
- Скачайте скрипт ResetWindowsSearchBox.ps1 по ссылке;
- Запустите консоль PowerShell с правами администратора;
- Измените настройки политики запуска скриптов PowerShell, выполнив команду (команда разрешает запуск скриптов в текущей сессии powershell.exe):
Set-ExecutionPolicy -Scope Process –ExecutionPolicy Unrestricted - Запустите скрипт;

- Скрипт сбросит настройки поиска Windows на значения по-умолчанию;
- Перезагрузите компьютер и проверьте, исправлена ли проблема поиска в Windows.
Другие варианты исправления проблем поиска в Windows, которые могут помочь, если предыдущие варианты не помогли вам:
Windows search function not working properly after windows 10 21H2 upgrade? A number of users report issue “Windows 10 search box on the taskbar was not working” Can’t type in Windows 10 search bar or Windows 10 Search function not working properly. This could be due to some issues with the “Windows Search” service on the computer and due to which Windows is not able to start this service. Or Windows system files get corrupted that results windows search function being unresponsive.
If you’re also having problems using taskbar Search on Windows 10, here we have some effective methods that are going to help you fix this problem.
Contents
- 1 Windows Search not working
- 1.1 Restart Windows search service
- 1.2 Search and Indexing troubleshooter
- 1.3 Rebuild Windows Search Indexer
- 1.4 Run DISM and SFC Utility
- 1.5 Re-Register Universal Apps in Windows 10
- 1.6 Create a new user account
First of all, temporarily disable or uninstall the antivirus and check if it helps.
Check for and install the latest windows update, which should contain the bug fix for the problem.
- Press Windows + X select settings,
- Click Update & security, then windows update,
- Now click on check for updates.
Also, perform a Windows clean boot that should help to determine if any startup service causing the problem.
Restart Windows search service
Try restarting the Windows search service by following the steps below and check if it helps.
- Press Windows + R key, type services.msc and press enter.
- Look for Windows search service, if its running state
- Right-click Windows Search and select restart.
- If the windows search service not started,
- Right-click and select Properties
- Change the startup type to automatic,
- start the service next to service status.
- Click apply and ok, Now check the windows search function properly.
Search and Indexing troubleshooter
Run the build-in “Search and Indexing” Troubleshooter, which helps to find and fix the problems that prevent to windows search from working properly.
- Press Windows + x select settings,
- click on Update & security, then Troubleshoot.
- Now on the right-hand side look for and select Search and Indexing
- Click run the troubleshooter.
This will start detecting for problems that prevent windows search function properly. Tick the box or boxes for the appropriate troubleshooting process you see. Then click Next to continue, Restart windows after completing the troubleshooting process and check if this helps.
Rebuild Windows Search Indexer
Rebuilding the Search Indexer may help in repairing the built-in search tool in Windows 10.
To rebuild all the index, kindly follow the below given steps:
- Open Control Panel,
- Look for Indexing options, double click on it
- In the Indexing Options window, click on the Advanced button.
- Click on the Rebuild button under the Troubleshooting section.
- There is a notification window pops up and click OK to start rebuilding the index.
The Rebuilding process will take some time, once it is done, close the window and restart your computer. Check Search function should work normally.
Run DISM and SFC Utility
System File Checker is a utility in Windows that allows users to scan for corruptions in Windows system files and restore corrupted files. Run DISM restore health command and Perform a System File Checker and check if it helps.
- Press Ctrl Key +Shift Key + Esc Key to open Task Manager.
- Click File > Run New Task.
- Make sure you have a checkmark beside “Create this task with administrative privileges”.
- Type “CMD” without the quotes and hit on Enter Key.
Run following DISM restore health command
DISM /Online /Cleanup-Image /RestoreHealth
After 100% complete the scanning process type the following command to run the system file checker utility
sfc /scannow
Restart windows after completing the scanning process and check this help to fix windows search problems.
Re-Register Universal Apps in Windows 10
If still, the problem exists there, search function not working properly then,
- Press Ctrl Key +Shift Key + Esc Key to open Task Manager.
- Click File > Run New Task.
- Make sure you have a checkmark beside “Create this task with administrative privileges”.
- Type “Powershell” without the quotes and hit on enter Key to run WindowsPowerShell as administrator.
- Now execute the following command below.
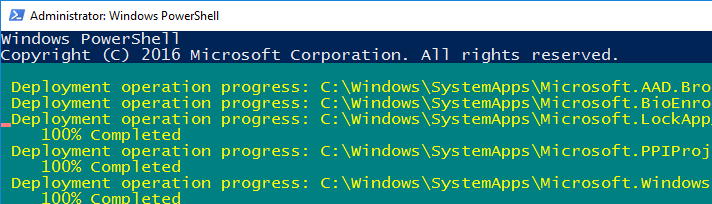
Get-AppXPackage -AllUsers |Where-Object {$_.InstallLocation -like “*SystemApps*”} | Foreach {Add-AppxPackage -DisableDevelopmentMode -Register “$($_.InstallLocation)\AppXManifest.xml”}
Restart windows after executing the command and check there is no more problems with the windows search function.
Create a new user account
This is another way to get rid of this problem. Create a new user account following the steps below. log off from the current user account and login with the newly created user account check this helps.
To create a user account,
- Press Windows + X select settings,
- Tap Accounts.
- Select Family & other users.
- Tap “Add someone else to this PC.”
- Select “I don’t have this person’s sign-in information.”
- Select “Add a user without a Microsoft account.”
- Enter a username, type the account’s password twice, enter a clue and select Next
Did these solutions help to fix windows 10 search problems? Let us know on comments below, Also read:
- Microsoft windows search indexer high CPU usage
- Windows 10 running slow after update? Here is how to fix it!
- Solved: Microsoft edge not working after windows 10 update
- How to Optimize SSD (Solid State Drive) performance on windows 10