
If Windows Search pops up randomly while you’re engaged in other activities, it’s possible that your touch pad settings may be the reason. Try the solutions provided in this article.
Note: Were you trying to save a file or something similar? Windows logo key + S will launch Windows Search and this may be the reason you’re randomly seeing the box appear.
Disable three-finger launch
It’s possible that your touchpad settings are causing you to launch Windows Search when you don’t intend to. There is a setting that launches Windows Search when you tap (or click) your touchpad with three or four fingers. If this setting is too sensitive for you or you don’t want this behavior, you can disable the setting.
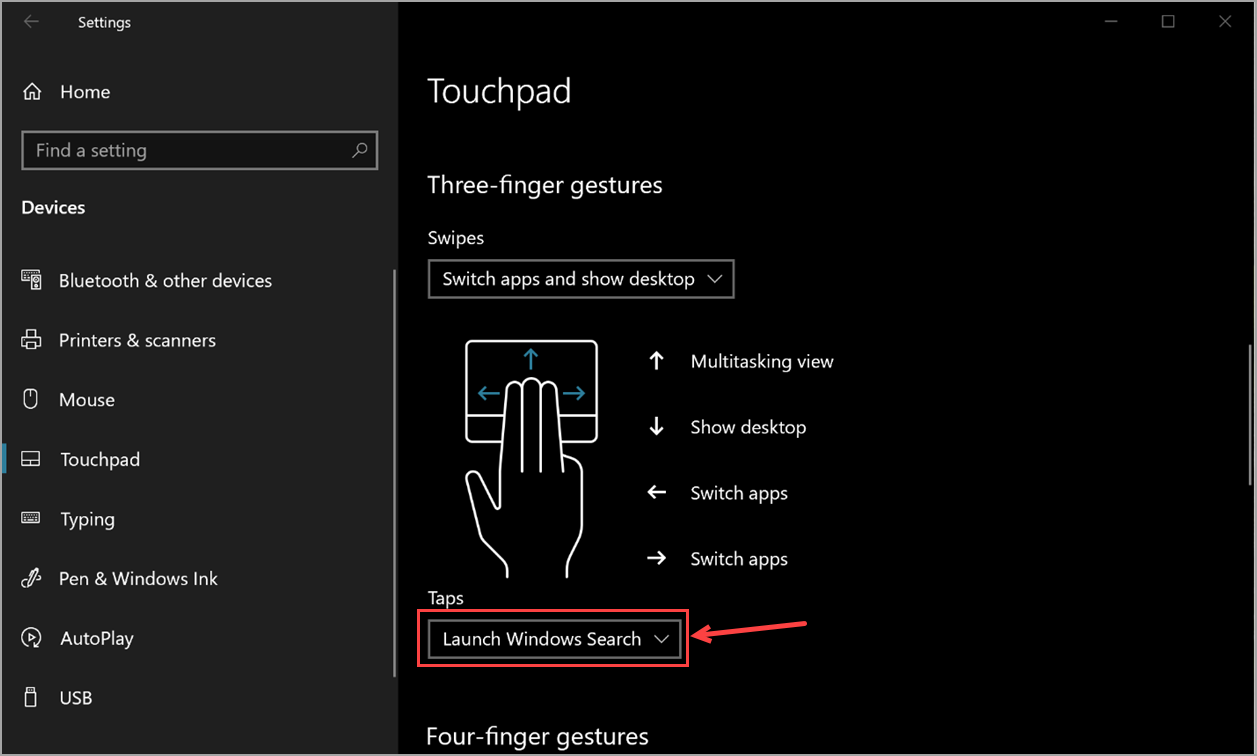
To do that, first select Start > Settings > Devices > Touchpad.
What you do next depends on what you see at the top of the touchpad settings page:
If you see Your PC has a precision touchpad at the top of the touchpad settings page
-
Scroll down to Three-finger gestures
-
Under Taps, change Launch Windows Search to Nothing (or a different option, if you prefer).

If you don’t see Your PC has a precision touchpad
It’s possible your touchpad may have its own software controlling its enhanced features. Manufacturers have different drivers, but you access these settings in mostly the same way, so try this:
-
Under Related Settings, select Additional Settings.
-
You may need to look for a tab referring to your touchpad and/or select a link to launch the touchpad software.

-
Inside the touchpad software, look for a section or tab named Click or Touchpad Gestures or something along those lines, locate the three-finger tap setting, and disable it.

-
If the above doesn’t help you get to the setting you need, you may need to contact your hardware manufacturer for more assistance.

Need more help?
Want more options?
Explore subscription benefits, browse training courses, learn how to secure your device, and more.
Windows 10 is a pretty nifty platform. However, it comes with its fair share of quirks and intrigues. You may encounter some bugs which just leave you outright dumbfounded. The good thing with Windows 10 however, is that most of these bugs can be easily dealt with without necessarily reaching out to Microsoft.
A frequent problem in Windows 10 is one whereby the search box just keeps on appearing when you are working on your machine. Some users have experienced a message box popping up incessantly on the left side of the screen providing information about Cortana. The obvious thing to do in this case would be to turn Cortana off completely; but no! You will realize that the box will keep on popping up; prompting you to start keying in for a web search or an app search.
The duration between consecutive pop-ups is intermittent as well. You may get a 20 to 30 – second pause before the next pop up or as much as 2 to 3 minutes. Quite annoyingly you cannot find the ‘X’ or ‘CLOSE’ feature.
Stopping the Search Box from Constantly Popping up on Windows 10
- Click on “Start” and then go to settings.
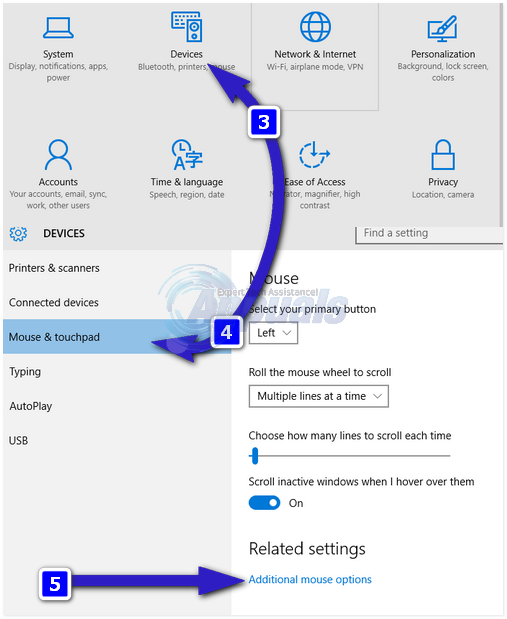
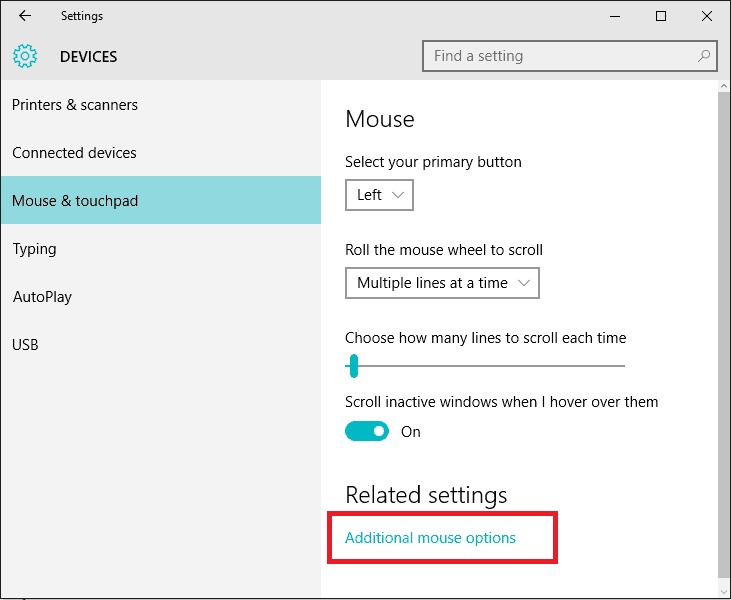
- On the resulting window, choose “Devices”. Select “Mouse and TouchPad”.
- Scroll downward until almost at the bottom of the screen/window. You will see the option “Additional Mouse Options.”

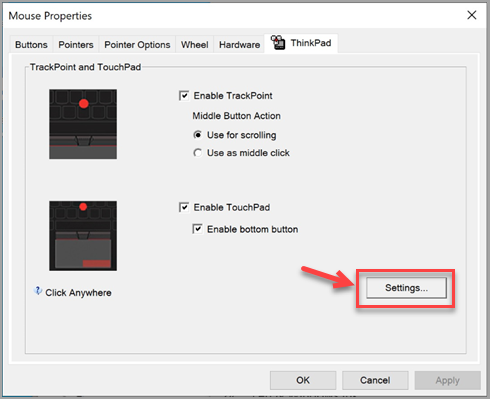
- When you select the additional options for mouse, a box appears containing the information of the touchpad that your device has. In most cases, you will see “Synaptics TouchPad”. Whatever yours reads, click on its settings and proceed.
- When you click on settings, a new box will appear. In it, there is a tab labeled “Tapping/Taps”. When you open this tab you will see “Three Finger Tap” and “Four Finger Tap”.
- Uncheck these boxes and then click on APPLY.
- Exit the settings, and if you so wish, restart the computer. The search box should no longer appear. The Search/Cortana box may have been detecting your tapping as an instruction to invoke it all along.
NOTE: If under “Settings” you cannot find information about your touchpad, you might need to update your touchpad drivers. Otherwise, you can also proceed to Control Panel -> Hardware and Sound -> Synaptics Touchpad. Here, all the gestures associated with the touchpad will be listed. The three-finger and four-finger tap will be under “Tapping”
Invoking Cortana
We have cut out the annoying Search or Cortana box. But that does not mean that we do not need it from now henceforth. Whenever you need to use Cortana the below key combinations on your keyboard will sort you out.
WINDOWS KEY + C – Calls Cortana and makes it ready to listen to voice instructions.
WINDOWS KEY + S – Invokes Cortana and makes it ready to receive typed input.
There you go; Cortana can now be only seen at your convenience.
Kevin Arrows
Kevin Arrows is a highly experienced and knowledgeable technology specialist with over a decade of industry experience. He holds a Microsoft Certified Technology Specialist (MCTS) certification and has a deep passion for staying up-to-date on the latest tech developments. Kevin has written extensively on a wide range of tech-related topics, showcasing his expertise and knowledge in areas such as software development, cybersecurity, and cloud computing. His contributions to the tech field have been widely recognized and respected by his peers, and he is highly regarded for his ability to explain complex technical concepts in a clear and concise manner.
We all know how important and convenient the search menu is when it comes to finding files, applications, or even just browsing the web. But what if you’re faced with a situation where the search menu starts opening by itself, seemingly out of nowhere? It can be frustrating, and disruptive, and make you wonder if your computer has developed a mind of its own.

Well, fret not! In this blog post, we’ve got you covered with some effective fixes to tackle the issue of Windows 11’s search menu opening spontaneously. We’ll explore various troubleshooting steps that can help you regain control of your search menu and restore peace to your computing experience.
Ready? Let’s get started!
Also Read: How To Reset Windows 11 Search Settings for a Fresh Start
How to Fix the “Search Menu Opening By Itself” Issue on Windows 11?
Whether you’re a tech-savvy enthusiast or a casual user, these solutions are designed to be user-friendly and accessible to everyone. So, let’s dive in and discover the potential causes behind this issue and the steps you can take to resolve it.
Solution 1: Check The Windows Key
Sometimes, the Search menu in Windows 11 may keep opening unexpectedly due to the default configuration that launches it when you press the Windows key. This can happen if you unintentionally press the key or if it becomes stuck, causing repeated triggering of the Search menu.
If everything is in place, you can proceed with the below-listed solutions.
Solution 2: Reboot Your Device

It may sound cliché, but a simple restart can work wonders in resolving many software-related issues. Close all your applications and restart your computer to see if the problem persists. Sometimes, a fresh start is all it takes to restore normal functionality.
Solution 3: Disconnect External Peripherals

Another possible reason for the Windows 11 search menu opening by itself could be a conflict with external peripherals connected to your computer. Sometimes, certain devices like keyboards, mice, or game controllers can send unintended signals or commands that trigger the search menu.
To troubleshoot this issue, try disconnecting all external peripherals from your computer one by one and observe if the problem persists after each removal.
Start with devices that are directly related to input, such as keyboards and mice. Once disconnected, use your computer for a while to see if the search menu continues to open unexpectedly.
If the issue resolves after disconnecting a specific peripheral, the device was likely causing the problem.
Solution 4: Review the Trackpad Gestures
If you’re using a laptop or a device with a trackpad as your primary input method, it’s worth checking the trackpad gestures settings. Windows 11 offers various gestures that can trigger different actions, including the search menu. Inadvertently triggering these gestures could be the reason behind the search menu opening by itself.
To review and adjust the trackpad gestures settings, follow these steps:
1. Press the Windows key + I on your keyboard to open the Settings app.
2. In the Settings window, click on “Bluetooth and Devices”. Scroll down and select “Touchpad”.

3. Select the “Three-finger gestures” and “Four-finger gestures” one by one.

4. Check if any gestures are assigned to open the search menu. If you find such a gesture-enabled setting, you can either disable it or change it to a different action.
5. Save any modifications you made to the gestures settings and close the Settings window.
Now, test your trackpad usage after making the changes to see if the issue persists.
Solution 5: Run the Search and Indexing Troubleshooter
If the Windows 11 search menu continues to open by itself, running the Search and Indexing troubleshooter can help identify and resolve any underlying issues related to search functionality.
Follow these steps to run the troubleshooter:
1. Click on the Start button and select the gear icon, or press the Windows key + I on your keyboard to open the Windows Settings:
2. In the Settings window, click on “System” and select “Troubleshoot”.

3. Scroll down and locate the “Other troubleshooters” section.

4. Find and select the “Search and Indexing” troubleshooter and then click on the “Run the troubleshooter” button placed next to it.

5. Wait for the troubleshooter to scan and analyze your system for search-related issues.
6. The troubleshooter will provide steps and recommendations to resolve any problems it detects. Follow the prompts and take the suggested actions.
7. Once the troubleshooter completes its process, restart your computer.
The troubleshooter’s diagnostic and repair capabilities can often address issues related to search indexing, settings, or conflicts, helping to restore the normal functioning of the search menu in Windows 11.
Also read: Windows 11 Search Bar not Working? Here’s the Fix!
Solution 6: Terminate the SearchHost.exe Process
If you’re still experiencing the issue of the Windows 11 search menu opening by itself, terminating the SearchHost.exe process can be an effective solution. This process is responsible for handling search-related functions in Windows, and restarting it can help resolve any glitches or abnormalities causing the search menu to open by itself.
To terminate the SearchHost.exe process, follow these steps:
1. Press the Ctrl + Shift + Esc keys simultaneously on your keyboard to open the Task Manager app.
2. In the Task Manager window, click on the “Processes” tab and look for the “Search” or “SearchHost.exe” process in the list.

3. Right-click on the “Search” or “SearchHost.exe” process and select “End Task” from the context menu.
4. A confirmation dialog may appear, asking if you want to terminate the process. Click “End Task” again to proceed.
After terminating the SearchHost.exe process, give it a few moments to restart automatically. Once it restarts, check if the search menu continues to open unexpectedly.
Also Read: Startup Programs That You Can Safely Disable To Speed Up Windows 11/10
Solution 7: Restart the Windows Search Service
The Search Service is responsible for indexing and providing search results on your system, and restarting it can refresh its processes and potentially resolve any glitches causing the search menu to open unexpectedly.
To restart the Windows Search Service, follow these steps:
1. Press the Windows key + R on your keyboard to open the Run dialog box. Type “services.msc” in the Run dialog box and press Enter.

2. In the Services window, scroll down and locate “Windows Search” in the list of services.

3. Right-click on “Windows Search” and select “Restart” from the context menu. This action will stop and then start the Windows Search Service.
4. Close the Services window.
Reboot your device and check if the search menu opening by itself issue was resolved.
Also Read: How To Fix “This App Will Not Work on Your Device” Error in Windows
Conclusion
With the troubleshooting solutions provided in this blog post, you can take proactive steps to regain control over the search menu and restore a smooth computing experience. If the issue persists despite attempting these solutions, it might be worth reaching out to Microsoft Support or seeking assistance from technical experts who can provide further guidance tailored to your specific situation.
Was this post helpful? Feel free to share your thoughts in the comments section!
Служба Windows Search отвечает за поиск файлов и папок на устройстве. Она способна искать данные не только по наименованию файлов, но и по содержанию этих файлов (метаданным, свойствам и т.д.). Например, поиск по содержанию файлов по умолчанию активирован для текстовых и офисных документов (txt, doc, docx, xls, xlsx, pdf).
На компьютере может быть очень много файлов и папок. Чтобы поиск по устройству не занимал много времени, служба Windows Search использует индексацию файлов. Процесс индексирования представляет собой чтение диска с данными и запись информации о просканированных файлах в базу данных. Индексирование осуществляется в фоновом режиме. Когда вы сохраните новый документ в индексированном расположении, служба Windows Search проиндексирует его и сохранит собранную информацию о нём в своей базе.
Индексатор службы Microsoft Windows Search грузит процессор?
Обычно индексатор службы Microsoft Windows Search не грузит процессор. В нашем случае, когда все файлы проиндексированы, нагрузка на центральный процессор составляет 0%, а объём используемой оперативной памяти составляет порядка 80МБ.
-

На скриншоте видно, что Индексатор службы Microsoft Windows Search в Windows 10 не нагружает процессор, так как все файлы проиндексированы. -


Поэтому, если на вашем устройстве индексатор службы Microsoft Windows Search грузит процессор, это означает, что в настоящее время идёт индексирование файлов. Если вы активно пользуетесь устройством, нажимаете на клавиши клавиатуры, водите мышкой, служба Windows Search замедляет скорость сканирования. В нашем случае при сниженной скорости индексирования нагрузка на процессор составляет 0,6-1,2%.
-

На скриншоте видно увеличение нагрузки на процессор, так как идёт индексирование новых файлов (при сниженной скорости сканирования) -


Конечно, нагрузка будет больше, если процессор относительно старый и имеет одно-два логических ядра. Поэтому приведённые значения нагрузки индексатора службы Microsoft Windows Search на процессор следует считать условными.
Как можно уменьшить нагрузку службы Microsoft Windows Search на процессор?
Определяем папки, которые служба поиска должна индексировать
- Найдите и запустите «Параметры индексирования» в классическом варианте Панели управления.
Как открыть классическую Панель управления?
Несколько простых способов в отдельной статье

- В открывшемся окне нажмите кнопку «Изменить».

- Отметьте галочками папки или диски, которые вы хотите индексировать в фоновом режиме. Оставьте пустым квадрат, чтобы не индексировать папку или диск. После выбора индексируемых расположений нажмите кнопку «ОК».

Уменьшив количество папок и дисков в окне «Индексируемые расположения», вы сможете сократить нагрузку индексатора службы Microsoft Windows Search на процессор. Но имейте в виду, что поиск в исключенных расположениях будет долгим. А в случае использования кнопки поиска в панели задач поиск в неиндексированных расположениях осуществляться не будет. Поэтому не старайтесь исключать все папки. Оставьте папки, в которых вы часто используете функцию поиска.
Устанавливаем классический режим поиска
В Windows 10 предусмотрено 2 режима поиска: классический и расширенный. При классическом режиме поиск осуществляется только в библиотеках пользователя и на рабочем столе. Расширенный режим позволяет искать файлы по всему компьютеру, за исключением системных папок. Расширенный режим, как предупреждает операционная система, может снизить уровень заряда и увеличить нагрузку на центральный процессор. Особенно это актуально для владельцев ноутбуков, которым важно, чтобы их устройство проработало в автономном режиме как можно дольше.
- Перейдите в новые «Параметры Windows» (нажмите на клавиатуре кнопку с логотипом Windows + I ).
- Нажмите на раздел «Поиск».

- В левом боковом меню нажмите на «Поиск в Windows».
- Прокрутите список настроек и выберите параметр «Классический стиль».

Активируем привязку производительности индексатора к параметрам питания устройства
Изменять режим производительности индексатора стало возможным с момента появления Windows 10 версии 2004 (майское обновление 2020 года). Если включить параметр «Использовать параметры режима питания устройства», служба Windows Search будет оценивать, запущен ли на компьютере режим энергосбережения, пониженного электропотребления или игровой процесс. Если да, то служба поиска приостановит индексацию в фоновом режиме.
Также при включении производительности индексатора служба поиска приостановит индексацию файлов в фоновом режиме, если загрузка центрального процессора превысит 80% или загрузка жесткого диска поднимется свыше 70%.
- Перейдите в новые «Параметры Windows» (нажмите на клавиатуре кнопку с логотипом Windows + I ).
- Нажмите на раздел «Поиск».
- В левом боковом меню нажмите на «Поиск в Windows».
- Прокрутите список настроек и включите параметр «Использовать параметры режима питания устройства».

Отключаем службу Windows Search
Отключая службу Windows Search, вы отключите индексирование папок и файлов в фоновом режиме.
Вы сможете осуществлять поиск по устройству, но он будет медленным.
- Запустите приложение «Выполнить» (нажмите на клавиатуре кнопку с логотипом Windows + R ).
- Наберите текст
services.mscи нажмите кнопку «ОК».

- В открывшемся окне найдите службу Windows Search.

- Дважды нажмите на строку службы «Windows Search». Откроется окно с настройками.
- Выберите тип запуска «Отключена».
- Нажмите кнопку «Остановить», чтобы завершить активный процесс выполнения службы Windows Search.
- Нажмите кнопку «ОК», чтобы сохранить настройки службы.

А как у вас работает служба поиска в Windows? Испытываете ли вы проблемы при ее работе в фоновом режиме?
Расскажите о своем опыте в комментариях 😉
Cortana’s search box keeps popping-up for no reason – what to do?
With the release of the still relatively new Windows 10 OS, Microsoft introduced us to quite a lot of neat new features. The clever personal assistant called Cortana is one of them. It helps you navigate through your computer and makes it easier for you to find the things you need. You can either type your request to her or speak it out through your mic – Cortana recognizes human speech.
However, as with most new products on the software market, Win 10 hardly comes out perfectly polished and deprived of some, for the most part, minor drawbacks. Such is the case with Cortana’s search box constantly popping-up for no apparent reason. So far this problem only occurs on devices that have a touch pad installed. This is being reported by an increasing number of users and can actually be quite of an annoyance, since the box may appear up to several time per minute if you are working on the machine. What makes it even more frustrating, is that even if you completely turn Cortana off, the search box might still continue to obstruct your working process. On the top of all that, there is no visible button. You can, however, use the “esc” key, in order to dismiss the pop-up, thought this is not readily apparent. You will need to press “Escape” twice if you have mistakenly written anything in the search field. Note that this “problem” is probably caused by how actually Cortana’s search box is supposed to work and frankly it’s not that bad – simply unintuitive. Your tapping on the touch-pad is likely recognized as a command and therefore the search box got evoked every time you tapped more than two consecutive times.
You will see why once we explain to you how it can be dealt with. The process is, in fact, quite simple. You won’t need to seek aid from Microsoft’s support department.
How to stop the Cortana search box from constantly appearing
- Click on the Start Menu (Windows button)->Settings
- From the list of items select Devices and click on it.

- A drop-down menu will be open. There you need to select Mouse and touch pad.
- Various setting will be displayed. Scroll downwards until you reach the bottom. You should be able see an option labeled Additional mouse settings – click on it.
A new window will open with information about your touch-pad device. Usually, it should read something among the lines of “Synaptics Touch Pad”, but it might also go under a slightly different name depending on your touch drive manufacturer. Doesn’t really matter – just click on it.
Another box will be displayed with your touch-pad’s settings. Select the tab named Tapping/Taps. There you should uncheck the boxes next to Three finger tap and Four finger tap. Remember to click apply, in order to save the new settings. You might want to restart you PC, so that the settings you altered may be applied.
- IMPORTANT If opening of the additional mouse settings doesn’t show your touch-pad device, your touch-pad driver is probably out of date.
Don’t worry – this can also be done from the Control Panel.
- Hit Windows Key-X->Control Panel.
- Go to Hardware and Sound and from there to Synaptics Touch pad.
- Here you can once again alter the touch pad gesture settings to your liking.
Now, that we have dealt with the constant popping-up of the Cortana search box, you may want to know the proper quick keys to summon the search box. Press the buttons WINDOWS KEY + S and the text box should pop-up.
There is another key combo for the voice search in case you want to directly speak to Cortana. Once again use WINDOWS KEY this time combining it with S and Cortana will start listening to your commands.
All done? Hope we helped!
Violet is an active writer with a passion for all things cyber security. She enjoys helping victims of computer virus infections remove them and successfully deal with the aftermath of the attacks. But most importantly, Violet makes it her priority to spend time educating people on privacy issues and maintaining the safety of their computers. It is her firm belief that by spreading this information, she can empower web users to effectively protect their personal data and their devices from hackers and cybercriminals.
Violet is an active writer with a passion for all things cyber security. She enjoys helping victims of computer virus infections remove them and successfully deal with the aftermath of the attacks. But most importantly, Violet makes it her priority to spend time educating people on privacy issues and maintaining the safety of their computers. It is her firm belief that by spreading this information, she can empower web users to effectively protect their personal data and their devices from hackers and cybercriminals.