
В данной статье показаны действия, с помощью которых можно отключить или включить индексирование поиска (службу поиска Windows Search) в операционной системе Windows.
По умолчанию Windows использует индекс при поиске, чтобы ускорить результаты поиска. Индекс поиска выполняет индексирование контента, кэширование свойств и результатов поиска для файлов, электронной почты и другого контента.
Индекс использует службу поиска Windows Search и выполняется в фоновом режиме как процесс SearchIndexer.exe. Индекс автоматически перестраивается и обновляется при изменении, внесенных с момента последнего перестроения индекса, чтобы повысить точность результатов поиска.
Если вы предпочитаете выполнять поиск без использования индекса, можно полностью отключить индексирование поиска (службу поиска Windows Search). Если отключить индексацию поиска, то поиск займет немного больше времени, но результаты поиска всегда будут актуальными и точными.
- Чтобы отключить или включить индексирование поиска (службу поиска Windows Search), необходимо войти в систему с правами администратора
- Если отключить индексирование поиска, пользователи больше не смогут выполнять поиск в библиотеках.
- Функция Временная шкала (Timeline) требует, чтобы служба поиска Windows была включена, запущена и настроена на автоматический (отложенный запуск).
Содержание
- Как отключить индексирование
- Включение индексирования поиска
- Управление через командную строку
Как отключить индексирование
Чтобы отключить индексирование поиска (службу поиска Windows Search), откройте консоль «Службы», для этого нажмите сочетание клавиш + R, в открывшемся окне Выполнить введите services.msc и нажмите клавишу Enter↵.

В окне Службы дважды щёлкните левой кнопкой мыши службу Windows Search.

В открывшемся окне Свойства: Windows Search (локальный компьютер) остановите службу нажав кнопку Остановить.

Затем в выпадающем списке Тип запуска: выберите пункт Отключена и нажмите кнопку OK.

Включение индексирования поиска
Чтобы включить индексирование поиска (службу поиска Windows Search), откройте консоль «Службы», для этого нажмите сочетание клавиш + R, в открывшемся окне Выполнить введите services.msc и нажмите клавишу Enter↵.

В окне Службы дважды щёлкните левой кнопкой мыши службу Windows Search.

В открывшемся окне Свойства: Windows Search (локальный компьютер) в выпадающем списке Тип запуска: выберите пункт Автоматически (отложенный запуск) и нажмите кнопку Применить.

Затем запустите службу нажав кнопку Запустить.

Управление через командную строку
Также отключить или включить индексирование поиска (службу поиска Windows Search) можно используя командную строку.
Чтобы отключить индексирование поиска (службу поиска Windows Search), запустите командную строку от имени администратора и выполните следующую команду:
sc stop «wsearch» && sc config «wsearch» start=disabled

Чтобы включить индексирование поиска (службу поиска Windows Search), запустите командную строку от имени администратора и выполните следующую команду:
sc config «wsearch» start=delayed-auto && sc start «wsearch»

on April 27, 2015
‘Windows Search’ helps to find files, programs and emails easily on the computer. To use this, we just need to click on start button and start typing the search words in the search box. This feature is enabled by Windows Search service, which indexes the files on the computer for a faster search experience.
If you are not going to use Windows search feature, then you can disable the service permanently. Open administrator command prompt and run the below command.
C:\WINDOWS\system32>sc config WSearch start= disabled
[SC] ChangeServiceConfig SUCCESS
C:\WINDOWS\system32>
To enable windows search, we can run the below command.
C:\WINDOWS\system32>sc config WSearch start= auto
[SC] ChangeServiceConfig SUCCESS

C:\WINDOWS\system32>
Disable windows search for specific items
Windows search can index files, emails in Outlook and items and also browsing history from Internet explorer. Search for these items can be configured separately.
- Click on start button
- Type ‘Indexing options’
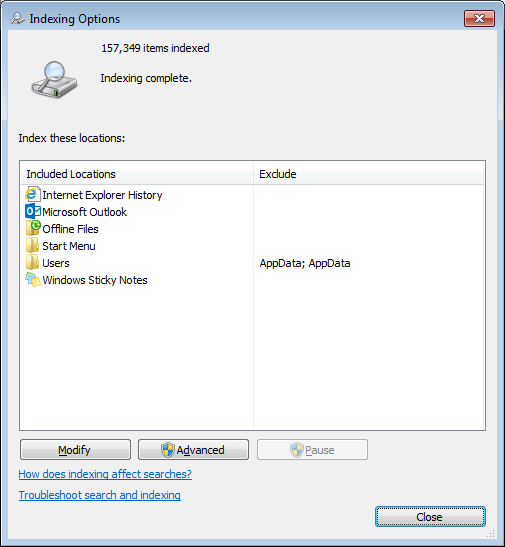
- Click on Modify.
Here you can select/deselect the folders/categories for enabling or disabling search.
If you are an advanced user of Windows, you might want to use the command line to find files on your system. You can use the command line to find files by date, content, size, and location, etc. In this article, I will show you how to use various methods and commands to find files using the command line in Windows 10/11.
Basic File Search Commands
One of the simplest ways to search for files using the command line is to use the dir and findstr commands. The dir command lists the files and folders in a directory, and you can use it with wildcards (*) to find file by name or extension from the Windows command line. For example, to use CMD to search for files with the extension TXT in the current directory, you can use the command:
dir *.txt

The Findstr command searches for a string of text in a file or files. You can use it with the /i option to ignore case sensitivity and with the /s option to search in all subdirectories. For example, to search for the word “hello” in all text files in the current directory and its subdirectories, you can use the command:
findstr /i /s "hello" *.txt
CMD Find File Name Containing a String
As mentioned, you can use the dir command to find a file name containing a specific string. For example, to find a file name containing the string “share” in the current directory and its subdirectories, you can type:
dir /s /b *share*
This will return a list of file names that match the pattern. The /s switch tells the command to search in all subdirectories, and the /b switch tells it to display only the bare file name.
You can also use wildcards to specify more complex patterns. For example, to find a file name that starts with “report” and with extension “.docx”, you can type:
dir /s /b report*.docx
Advanced File Search Commands
The find command searches for files that match certain criteria, such as name, size, date, and attributes. You can search words within files using the command prompt.
For example, to search for the word “hello” in all text files in the current directory, you can use the following command:
findstr /i /m "hello" *.txt
To search for all files larger than 1 MB in the C: drive, you can use the command:
forfiles /P C:\ /S /C "cmd /c if @fsize gtr 1048576 echo @path"
where Command for Executable Files
If you want to search for executable files, such as programs and applications, you can use the where command. It is mainly for locating executable files in a specified path or paths. You can use wildcards (*) with the where command to search for files with a specific name or extension. For example, to search for all executable files with the word “chrome” in their name in the C: drive, you can use the command:
where /r C:\ *chrome*.exe
Combine Dir and Find Commands
You can also use advanced filtering options with the dir command to search for files based on their attributes, such as size, date, and extension. You can use various switches with the dir command to filter your results. For example, to search for all readonly files in the current directory, you can use the command:
dir /a:r
To search for all files modified after January 1st, 2024 in the current directory, you can use the command:
dir /t:w /o:d | findstr /b "01/01/2024"
To search for all PDF files smaller than 100 KB in the current directory and its subdirectories, you can use the command:
dir /s *.pdf | findstr /v "<DIR>" | findstr /v "bytes" | findstr /r "[09][09][09] KB"
Windows CMD Find File Recursively
If you want to perform recursive searches using the dir command, you can use the /s switch. The /s switch searches for files in the current directory and all its subdirectories. For example, to search for all text files in the current directory and its subdirectories, you can use the command:
dir /s *.txt
Recursive searches are useful for locating files that are buried deep in your system’s folders.
You can also use the Where command to search recursively. For example, to list all files that start with “ffmp” in the c:\windows directory and its subdirectories, use the following command:
where /r c:\users ffmp*

PowerShell Commands for File Searches
PowerShell is a powerful command line tool that allows you to perform various tasks on your system. You can also use PowerShell commands to find files based on various criteria. For example, to search for all text files that contain the word “hello” in the current directory and its subdirectories, you can use the command:
Get-ChildItem -Path .\* -Include *.txt -Recurse | Select-String -Pattern "hello"
To search for all files larger than 1 MB in the C: drive, you can use the command:
Get-ChildItem -Recurse -Path C:\ | Where-Object {$_.Length gt 1MB}
To search for all PDF files created before January 1st 2024 in the current directory and its subdirectories, you can use the command:
Get-ChildItem -Path .\* -Include *.mp4 -Recurse | Where-Object { $_.CreationTime -lt '2024-01-01' }

Common CommandLine File Search Parameters
Here are some general tips for optimizing your command line file searches in Windows:
- Use wildcards (*) to search for files with a specific name or extension.
- Use the /s switch with the dir, find, and findstr commands to search in all subdirectories.
- Use the /r switch with the where command to search in a specified path or paths.
- Use the /a switch with the dir and find commands to filter files by attributes, such as hidden, readonly, system, etc.
- Use the /t switch with the dir command to filter files by date, such as creation, modification, or access.
- Use the /o switch with the dir command to sort files by name, size, date, or extension.
- Use PowerShell commands to perform more advanced file searches with various criteria.
Conclusion
In this article, I have shown you how to find files using the command line in Windows 11/10. Hopefully, you have learned to use advanced filtering and sorting options with these commands to get your results quickly.
Last Updated :
13 Mar, 2025
Ever lost a file on your computer and wished there was a quick way to find it without clicking through endless folders? Say hello to the Windows Command Prompt (CMD) a powerful little tool that can help you search for files fast. In this how-to blog, we will explore the steps to search for files using CMD simple commands, so you can find what you need in no time, no fancy software required.
So without further ado, let’s get into the process of finding files using CMD in Windows 10 and well in Windows 11.
How to Find Files Using CMD in Windows?
In this section we have mentioned some steps, so follow the few steps to get the lost file or file that you are looking for.
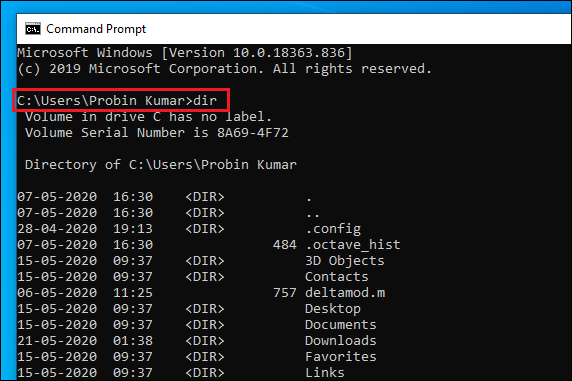
Step 1: Open CMD
To find your file first, open CMD or Windows Command Prompt, and to do this, click the Win+R button and type CMD, or you can click the Windows key and type CMD to open Windows Command Prompt.
Step 2: Use DIR Command
After successfully launching the Command Prompt, type the below command and press Enter to pull up a list of files and folders.
dir
Step 2: Use CD Folder Command
For moving down into a particular directory, use the below command followed by a folder name, until you reach the folder you want to search.
cd folder_name
Step 3: Use Aging DIR Command
Now type the dir command again but this time with your search term, follow dir with your search term in quotes with an asterisk term before closing the quotes (For example, type dir “Raveling*”) and press Enter. The command prompt will show you the file location along with the list of files name starting with a similar keyword.
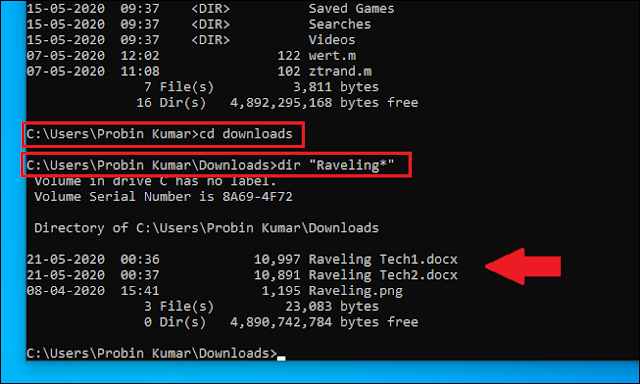
The asterisk is what’s known as a wildcard and, in our example, it stands for anything that follows the word ‘highlands’, such as ‘raveling.doc’, ‘raveling.xls’ or My Business plans.txt’.
If you don’t know the exact location of your file in your hard drive, then instead of manually navigating through your directories, start searching from the very top level of your hard drive and include every sub-folder.
Step 4: Use Raveling Command
The top level of the drive is represented by a backslash and, to include subdirectories, you add a forward slash and ‘s’ to the end of the query as shown below:
dir “\Raveling*” /s
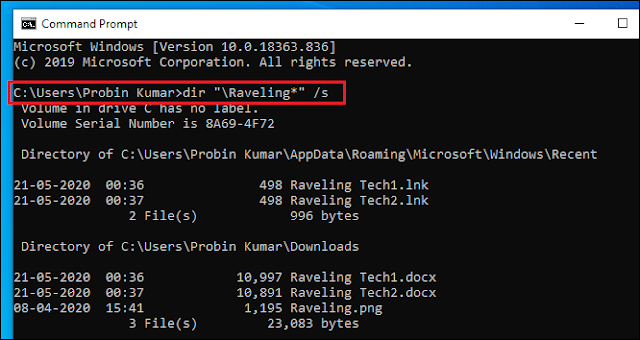
The above command is my all-time favorite because, with the help of this command, I don’t have to force my brain to remember the location of the files. This trick usually takes seconds to search the entire drive for the file.
You can also search for a particular file type by using a command dir \*.pdf /s and it will show you all files saved with the .pdf extension. You can try this for other files too (for example: .doxc, .png, .exe and more).
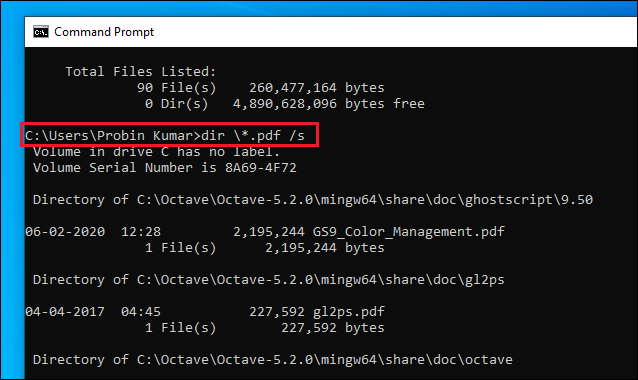
Note: The position asterisk symbol in the command matters a lot so type carefully and check once before executing the command.
How All The Commands Works?
Now you know enough to find any file on your entire hard drive within few seconds but if you are more curious to know how all these commands are working and what all these symbols stand for, then continue reading this post.
Let’s discuss each term one by one:
- dir command is for showing files on the current directory, but it can also show files from anywhere in the drive of the system.
- / tells dir to search from the top-level or root directory of the hard drive.
- /s is used for searching sub-directories.
- * asterisk is using before text (for example *.pdf) show all files ending with .pdf and * using at the end (for example raveling*) show you all file-names starting with that word.
Conclusion
Using the Command Prompt to search files in CMD is a valuable skill for anyone who frequently navigates through files and directories on a Windows system. By understanding the various commands available, you can easily find files with CMD and streamline your workflow. Whether you’re searching by name, location, or content, this method ensures that you can quickly locate the files you need with minimal effort.