
Applies ToPrivacy Windows 10 Windows 11 Microsoft account dashboard
Windows Search lets you search from your taskbar to find what you’re looking for, whether it’s on your device, in the cloud, or on the web. Windows Search can provide results for items from:
-
Your device (including apps, settings, and files)
-
Your personal Microsoft account (including OneDrive and Outlook)
-
Your work or school account (including OneDrive for Business, SharePoint, and other Microsoft services)
If you use Windows Search for searching the web or getting search suggestions, your results will be powered by Bing.
Manage Windows Search settings
SafeSearch
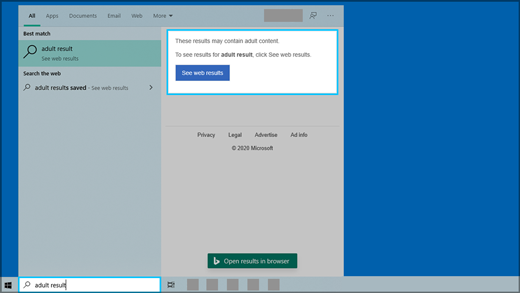
SafeSearch helps keep adult content out of your web previews. Windows Search relies on Bing technology to determine if search results include sensitive content before presenting them in web previews. If Bing determines results are deemed to include adult content, the preview pane will instead display a See web results button so you can open results in your web browser instead, as shown in the following screenshot:
To change your SafeSearch settings
-
Do one of the following:
-
In Windows 10, go to Start > Settings > Search > Permissions & History.
-
In Windows 11, go to Start > Settings > Privacy & security > Search permissions.
-
-
Under SafeSearch, select your preference:
-
If you select Strict, your setting will be shared with Bing in your browser. Bing will respect the Strict setting on the device regardless of your Bing SafeSearch setting on the Bing.com Settings page.
-
If you select Moderate or Off, Bing search will default to using your Bing SafeSearch setting on the Bing.com Settings page.
-
You can find more info about SafeSearch on Bing Help.
Cloud content search
Windows Search uses accounts you previously added for other Microsoft apps to personalize your search experiences.
To connect Windows Search with your accounts
-
Go to Start > Settings > Accounts > Email & accounts.
-
Under Accounts used by other apps, select an option:
-
To add your personal account, select Add a Microsoft account.
-
To add your organizational account, select Add a work or school account.
-
To see which accounts are connected to Windows Search
-
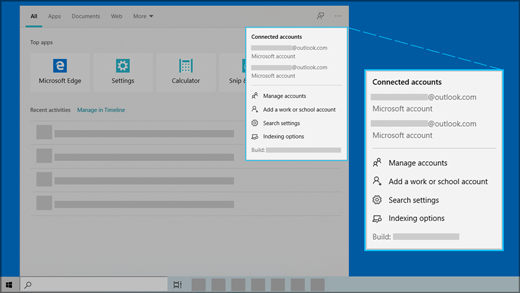
Select the search box on the taskbar in Windows 10 or the magnifying glass icon on the taskbar in Windows 11, and then, in the upper-right corner of the window that appears, select Options (). The account name and account type appear under Connected accounts.
If you turn on the Microsoft account setting for Cloud content search, Windows Search will show results from items in your personal OneDrive, Outlook, and other Microsoft services. If you search the web or get web search suggestions with Windows Search, Bing will personalize your results. You can also earn Microsoft Rewards points when you search with Bing in the Windows search box. Learn more about Microsoft Rewards points
If you turn on the Work or School account setting for Cloud content search, Windows Search will show results from OneDrive for Business, Outlook, SharePoint, and more from Microsoft Search.
Search history on this device
Windows Search saves your search history locally on your device to help you find things faster. For example, you might discover that an app is ranked higher in your results if you’ve searched for it before.
To clear the search history that’s saved on your device
-
Do one of the following:
-
In Windows 10, go to Start > Settings > Search > Permissions & History.
-
In Windows 11, go to Start > Settings > Privacy & security > Search permissions.
-
-
Under History, select the Clear device search history button.
Search history in the cloud
Windows Search can save and use your web search history with your Microsoft account so you can get more relevant web search results and suggestions.
To use your web search history with your Microsoft account
-
Make sure you’re signed in to Windows with your Microsoft account.
-
Do one of the following:
-
In Windows 10, go to Start > Settings > Search > Permissions & History.
-
In Windows 11, go to Start > Settings > Privacy & security > Search permissions.
-
-
Under Cloud content search, make sure Microsoft account is turned On.
To view and delete the search history associated with your Microsoft account, go to the Microsoft privacy dashboard.
To include or exclude your search history from search suggestions for your Microsoft account, go to the Bing Search History page and sign in using your Microsoft account.
Learn more about how Microsoft stores and maintains your search history.
Note that Windows Search saves your Microsoft Search history to your work or school account. To view the history associated with your work or school account go to the Bing Search History page and sign in using your work or school account.
Searching Windows
Indexing the contents of your PC helps you get faster results when you’re searching it for files and other things. Windows uses indexing by default. All data gathered from indexing is stored locally on your PC. None of it is sent to any other computer or to Microsoft.
You’ll find the settings that allow Windows to search your files and other content on the Searching Windows page in Windows Settings. To choose whether you want to search the contents of your Documents, Pictures, and Music folders, or if you want to search your entire PC, do one of the following:
-
In Windows 10, go to Start > Settings > Search > Searching Windows.
-
In Windows 11, go to Start > Settings > Privacy & security > Searching Windows.
Searching your entire PC may affect battery life and CPU consumption. You can also customize your search locations to include or exclude specific folders. To learn more about search indexing, see the Search indexing in Windows FAQ.
Improved Windows Search
To improve your search results, Copilot+ PCs perform semantic indexing along with traditional indexing. Supported file formats include .txt, .pdf, .docx, .doc, .rtf, .pptx, .ppt, .xls, .xlsx for documents and .jpg/.jpeg, .png, .gif, .bmp, .ico for images. Semantic indexing makes your searches more powerful since items that are close and related to your search terms would also be included in your search results. For instance, if you searched for pasta you might also get results for lasagna, including images that contain pasta or lasagna.
All data gathered from semantic indexing is stored locally on your PC. None of it is ever sent to Microsoft or used to train AI models. Semantic indexing is enabled by default on Copilot+ PCs. If you want to disable indexing and searching for specific locations or file types, you can do so by selecting the appropriate options under Settings > Privacy & Security > Searching Windows > Advanced indexing options.
Notes:
-
The improved Windows search is now available in preview to Copilot+ PCs through the Windows Insider Program. For more information, see Previewing Improved Windows Search on Copilot+ PCs with Windows Insiders in the Dev Channel.
-
For improved Windows Search on Copilot+ PCs, it is recommended that you plug in your Copilot+ PC for the initial search indexing to get completed. You can check your search indexing status under Settings > Privacy & security > Searching Windows.
Microsoft’s commitment to responsible AI
Microsoft has been working to advance AI responsibly since 2017, when we first defined our AI principles and later operationalized our approach through our Responsible AI Standard. Privacy and security are core principles as we develop and deploy AI systems. We work to help our customers use our AI products responsibly, sharing our learnings, and building trust-based partnerships. For more about our responsible AI efforts, the principles that guide us, and the tools and capabilities we’ve created to assure that we develop AI technology responsibly, see Responsible AI.
Need more help?
Want more options?
Explore subscription benefits, browse training courses, learn how to secure your device, and more.
Looking for a Windows Search Service replacement? Learn more here.
Where to find Windows Search
Over the years, Microsoft has made some changes to where the Windows Search Service is located, and has improved its functionality. In Windows XP and Windows Vista, the Windows Search Service, or desktop search, could be found by going through the Start button—so you would simply click on Start and then Search.
When Windows 7 became available, the Windows search service was slightly different. To get to the Windows Search Service you have to click the Start button and then select Documents. Once Documents opens up, you have to type the name of the file you are looking for into the search box at the top to search for it.
Major changes occurred when Windows 8 debuted. It was a completely new look for the Windows search service and instead of being able to reach the desktop search through the Start Menu, you have to swipe the screen to find it on the Charms Bar. Here’s how you find search on Windows 8:
- From the right edge of your screen, swipe in
- Now click on Search
- You can also access the search from the Start screen
- Type in what you are looking for and you should see search results and suggestions
In Windows 8 you can also use File Explorer. To get into File Explorer do this:
- Swipe in from the right edge again.
- Click search again, and type in File Explorer
- Click on File Explorer
- Now in the window type in the name of the file or folder you are searching for
Microsoft changed things up once again with Windows 10 Search Service. You can use the search box on this version of Windows Search Service as well to open up File Explorer. With 10, you use File Explorer search like you do in 8, but now you also have Cortana, which can search your computer and the Internet for items you need. Cortana is known more as a personal assistant, and you can turn off Cortana if you’re worried about the amount of data Cortana collects. To turn Cortana off, follow these steps:
- Click on the Ring icon to open Cortana
- Click on the Notebook icon on the left hand side.
- Select Settings
- Slide the little button to off, below where it says “Cortana can give you suggestions, reminders, alerts and more”
- To change Cortana’s data permissions, click the link that says “Manage what Cortana knows about me in the cloud”
What Happens if the Windows Search Service is Turned Off?
Like many programs and features, Windows Search is a default function that is enabled from the get go. You can always turn off the Windows Search Service, but what exactly happens when you do that?
For starters, it can be hard to tell exactly what programs will be affected by this decision, and what really relies on Windows Search Service. The obvious is that the search boxes will all disappear from your desktop. Any program that relies on the Windows Search Service might have functionality issues (eg. Internet Explorer), and indexing will be removed from the Control Panel. This may also affect any third party search apps that depend on Windows’ own search index
If this is something you would still like to try, then you should learn the proper way to disable the Windows Search Service:
Disabling Windows Search Service
To disable search in Windows 7:
- Go to Start and then Control Panel
- Find Programs and Features
- On the left hand side click where it says “Turn Windows features on or off”
- Uncheck the box next to Windows Search in the list of items
- A message will appear asking if you are sure that you want to continue. Click Yes
- Now in the Windows Features window click OK
- You will now see a progress bar. When it is complete, you will need to restart your computer
Once these steps are followed you will notice that the Search Box will be gone from the start menu.
With Windows 8 or Windows 10 it is more about disabling the indexing, and as such, requires a different set of steps. Here’s what to do to disable search indexing in Windows 8 and 10:
- Press Windows key+R on your keyboard, which opens the Run dialog box
- Enter services.msc and then click OK
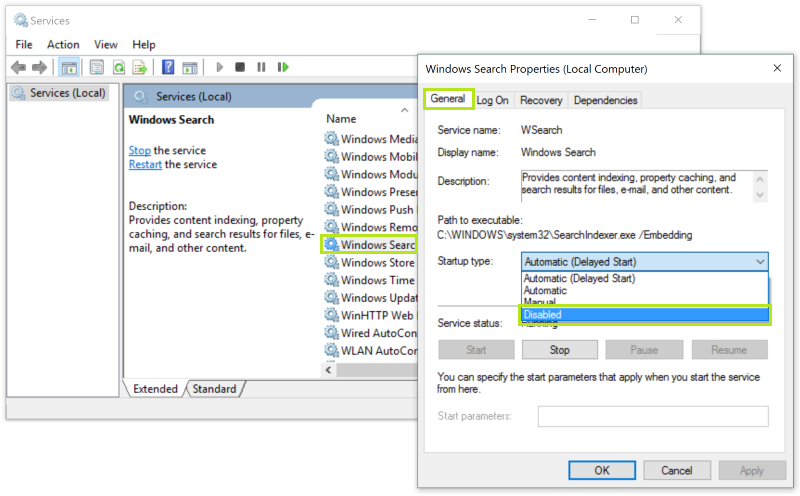
- This opens the Services window. Scroll down the list and then right click on Windows Search and choose Properties
- In the General tab within the properties window you will have to change the Startup type to disabled
- Click OK so that the changes are saved and you can exit.
The search function should now be disabled.
Now you know what exactly the Windows Search Service is, where you can find it, and how to disable it.
В персональном компьютере хранится много полезной информации. В нем также хранится не очень полезная и даже устаревшая информация.
Тоже самое можно сказать о программах, установленных на ПК, какие-то из них часто употребляются, какие-то редко от случая к случаю, а какими-то пользователь не пользуется с момента их установки на ПК.
Как во всем этом разобраться? Как найти нужные, действительно нужные и полезные программы, файлы, папки? Неужели надо создавать и вести какие-то специальные каталоги, как это делают в тех же библиотеках?
Конечно, нет. Современные компьютеры, современные операционные системы имеют встроенные системы поиска программ и данных. Надо только знать об их существовании и уметь ими правильно пользоваться. И тогда все, что накопилось в компьютере с момента его появления у пользователя, будет ему доступно. Любая информация может быть найдена и предоставлена. Для этого в операционной системе Windows используется так называемый поиск по заданным параметрам.
Поиск по заданным параметрам экономит большое количество времени, но не только при работе в Интернете. Так называемая Служба Windows Search предлагает полезную функцию поиска для быстрого запуска программ и документов, изменения системных настроек.
Вы можете осуществлять поиск сразу из меню «Пуск». Просто начните печатать в нижнем поле, содержащем надпись «Найти программы и файлы» и, когда увидите результаты, нажмите клавишу Enter или кликните на соответствующей позиции, чтобы запустить выбранный файл.
1 Поиск программ с помощью Службы Windows Search
Например, требуется открыть программу для сканирования документов. Начинаем вводить ее название (цифра 1 на рис. 1), и сразу же видим сверху в окне «Пуск» подходящий результат (цифра 2 на рис. 1):

Рис. 1 Поиск в Windows 7 программы для сканирования
Если необходимо быстро перейти к каким-либо настройкам, также вводим название соответствующего параметра в поле «Найти программы и файлы». Поиск выдаст различные параметры настройки, которыми мы можем воспользоваться.
Например, если ввести в окне кнопки «Пуск», в нижнем поле слово «брандмауэр» (цифра 1 на рис. 2), то Поиск Windows 7 быстро найдет программу Брандмауэр Windows(цифра 2 на рис. 2), а также ссылки на «Проверка состояния брандмауэра» и «Проверка состояния безопасности» (цифра 3 на рис. 2):

Рис. 2 Ищем брандмауэр с помощью Службы Windows Search
2 Запуск сайтов с помощью Windows Search
С помощью службы Windows Search Вы можете запускать веб-сайты. Для этого нужно ввести название сайта и нажать клавишу Enter, чтобы перейти на соответствующую страницу в браузере.

Рис. 3 Запускаем сайт через Поиск Windows Search
Например, вводим через кнопку Пуск в строку Поиска «http://gazeta.ru» (цифра 1 на рис. 3), жмем на Enter и переходим в браузер, где уже будет открыт сайт gazeta.ru.
3 Поиск файлов в Windows 7 с помощью Windows Search
Вы можете производить расширенный поиск файлов на компьютере. Для этого нужно
- открыть папку с документами (весь ПК, либо один из жестких дисков, либо конкретную папку с файлами), и
- задать параметры поиска в правом верхнем углу (цифра 1 на рис. 4):

Рис. 4 Поиск файлов в Windows 7
Можно задать не только имя файла, но и размер, дату его изменения.
Подробнее о службе MicrosoftWindowsSearch рассказывает представитель компании Microsoft, разрабатывающей все версии операционной системы Windows. Для просмотра видео «Поиск в Windows 7» щелкните ЗДЕСЬ.
4 Индексирование и контроль параметров поиска
Служба Windows Search находит файлы в считанные секунды, используя индексирование файлов и папок. Индексирование работает в фоновом режиме (независимо от того, чем занят пользователь на ПК, незаметно для него, полностью самостоятельно, не задавая никаких «лишних» вопросов), АВТОМАТИЧЕСКИ и ПОСТОЯННО отслеживая изменения и создавая базу данных на вашем компьютере.
Достаточно хоть немного что-то изменить в программном обеспечении компьютера, в файлах данных и т.п., как это сразу же найдет свое отражение в работе данной службы.
По умолчанию индексируются все файлы в личных папках:
- Документы,
- Изображения,
- Музыка и
- Видео, а также
- файлы электронной почты и
- автономные файлы (копии файлов из сетевых ресурсов, которые хранятся локально на ПК).
В индексе хранятся имена файлов, дата их изменения, имя автора, оценка и метки (это свойство файла можно добавлять, чтобы облегчить поиск файла). Подробно о свойствах файла я писала здесь.
По умолчанию НЕ индексируются файлы программ и системные файлы. Сделано это с целью экономии ресурсов компьютера. Ведь если индекс будет огромным (и включать программы с системными файлами), то это замедлит обычный поиск. Поэтому в индекс лучше добавлять только папки с личными файлами.
Если Вы хотите добавить в индекс другие папки и файлы, то легко можете изменить параметры индексирования. Для этого нажмите клавишу Windows (кнопку Пуск) и введите «индексирование» (цифра 1 на рис. 5):
Рис. 5 Ищем ссылку для настройки индексирования на своем компьютере
А затем кликните по появившейся ссылке «Изменение параметров службы Windows Search» (цифра 2 на рис. 5).
В окне «Параметры индексирования» щелкните по кнопке «Изменить» (цифра 1 на рис. 6):

Рис. 6 Смотрим, что же индексирует наш компьютер для ускорения Поиска
С помощью галочек можно выбрать, что индексировать, а что – не стоит. После этого операционная система будет выполнять индексирование файлов и соответственно их Поиск на основе этого выбора.
Автоматизированный поиск файлов на компьютере особенно актуален, когда Вы постоянно работаете с большим количеством документов или устанавливаете много программ.
5 Как отключить службу Windows Search
Пригодится такая функция и тем, кто собирает различные тематические подборки документов и изображений. Впрочем, если у Вашего компьютера низкая производительность, всегда можно отключить службу поиска без вреда для работы системы.
Для этого достаточно снять (убрать) все галочки, показанные на рис. 6, и индексация не будет производиться, ресурсы компьютера высвободятся для других дел. Но поиск на Вашем компьютере при этом будет работать намного дольше и гораздо менее эффективно.
6 Все ли может найти Windows Search?
Кто ищет, тот всегда найдет! Особенно, если искомая информация есть на компьютере. Конечно, не исключена ситуация «поиска черной кошки в темной комнате, особенно когда ее там нет». Тут уж никакая служба поиска не поможет.
Найти можно только то, что есть в компьютере.
Остальное нужно искать в Интернете. Как написано на главной странице Яндекса: «Найдется все».
P.S. Тише едешь, а с компьютерной грамотностью дальше будешь:
Настройка меню Пуск в Windows 7
Разбираем по косточкам cвойства файла в Windows 7
Где Панель управления Windows 8?
Информация найдена. Что дальше?
Получайте актуальные статьи по компьютерной грамотности прямо на ваш почтовый ящик.
Уже более 3.000 подписчиков
.
Важно: необходимо подтвердить свою подписку! В своей почте откройте письмо для активации и кликните по указанной там ссылке. Если письма нет, проверьте папку Спам.
Sign in to your MUO account

When it comes to finding files, programs, and folders within Windows, the Windows Search tool is a time saver. Can you imagine how long it would take to find all the stuff on your PC manually? Some of us don’t even know where half of the files on our PC are at any given time.
You might not be aware of this, but all Windows versions support quite a few ways of launching and using Windows Search. Below, we have listed the different methods of doing so in detail. All the methods are simple and work for both Windows 10 and 11.
1. How to Use Windows Search on the Taskbar
The easiest, and quickest way of using Windows search in both Windows 10 and 11 is via the search icon located on the taskbar. In Windows 10, you will find a search bar right next to the Windows icon on the left corner of the taskbar.
In Windows 11, the taskbar features a search icon next to the Windows icon that you can click on. Doing so launches a window, where you can type your query and hit Enter to perform the search.
In case you cannot find the search bar/icon on your taskbar, there is a chance that the feature is disabled in Windows settings. If this scenario is applicable, follow the steps below to enable the search feature in both Windows 10 and 11.
1. Windows 10
If you’re using Windows 10:
-
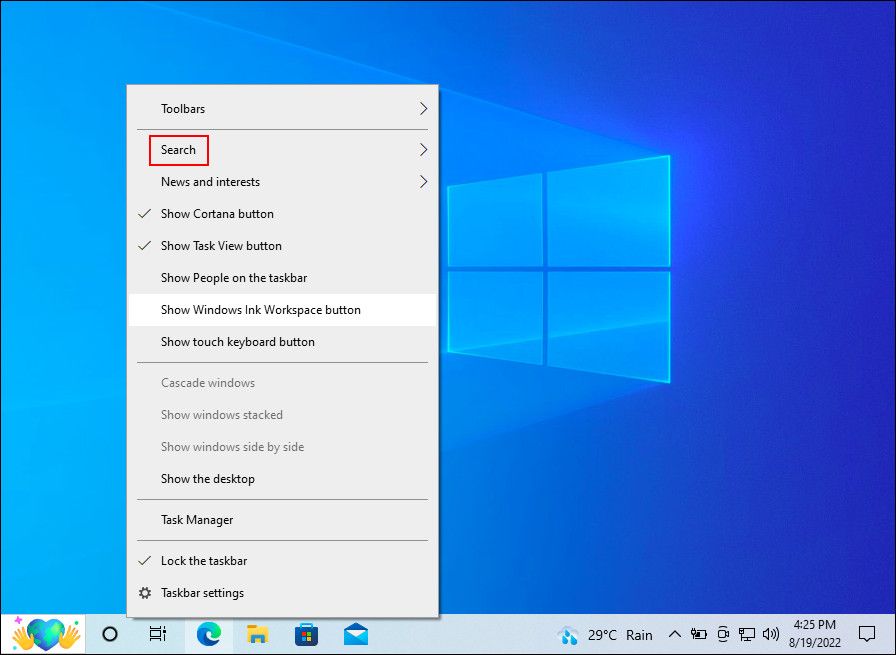
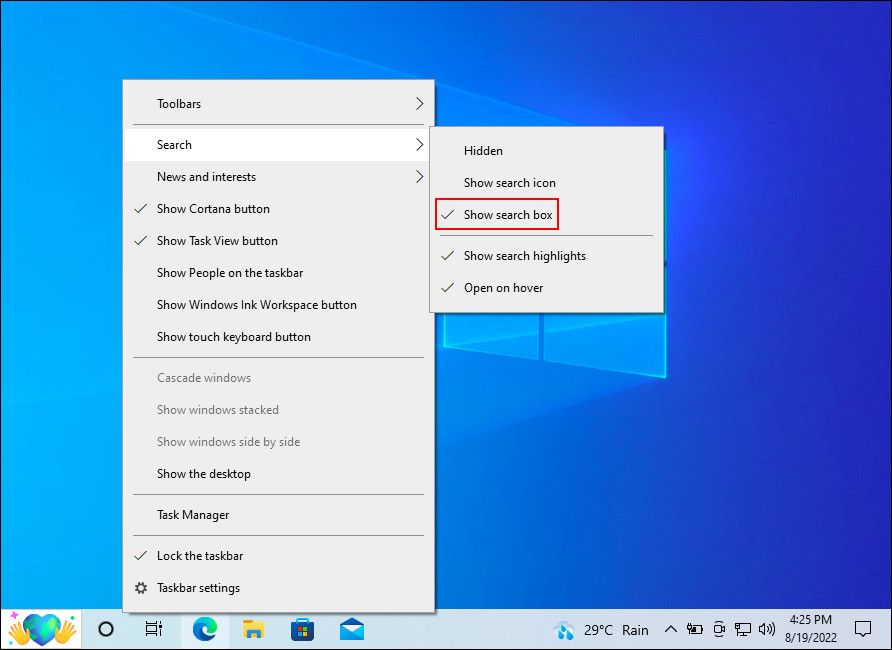
Right-click on the taskbar and choose Search.

-
Click on Show search box.

If this does not work, launch the Settings app by pressing Win + I keys together. Choose Personalization from the list of options available and then click on Taskbar. Turn the toggle off for Use small taskbar buttons. In case your taskbar is not displayed at the bottom, set the Taskbar location on-screen option to Bottom.
.
2. Windows 11
Alternatively, if you’re on Windows 11:
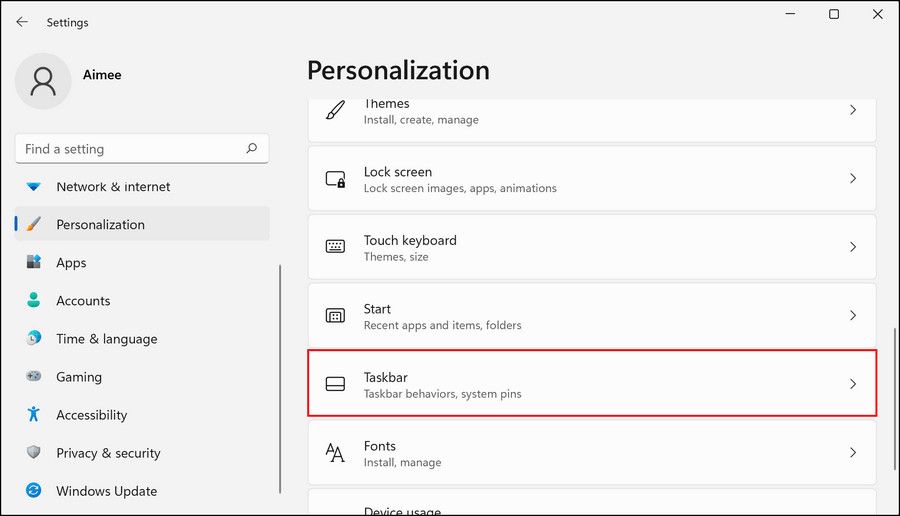
- Press the Win + I keys to open Windows Settings.
- Choose Personalization from the left pane.
-
Click on Taskbar.

-
In the following window, head over to the Taskbar items section and turn the toggle on for Search.


You should now be able to view the search icon and use it without any problems. If the error persists, head over to our dedicated guide on the fixes to try if the search bar won’t show on your taskbar.
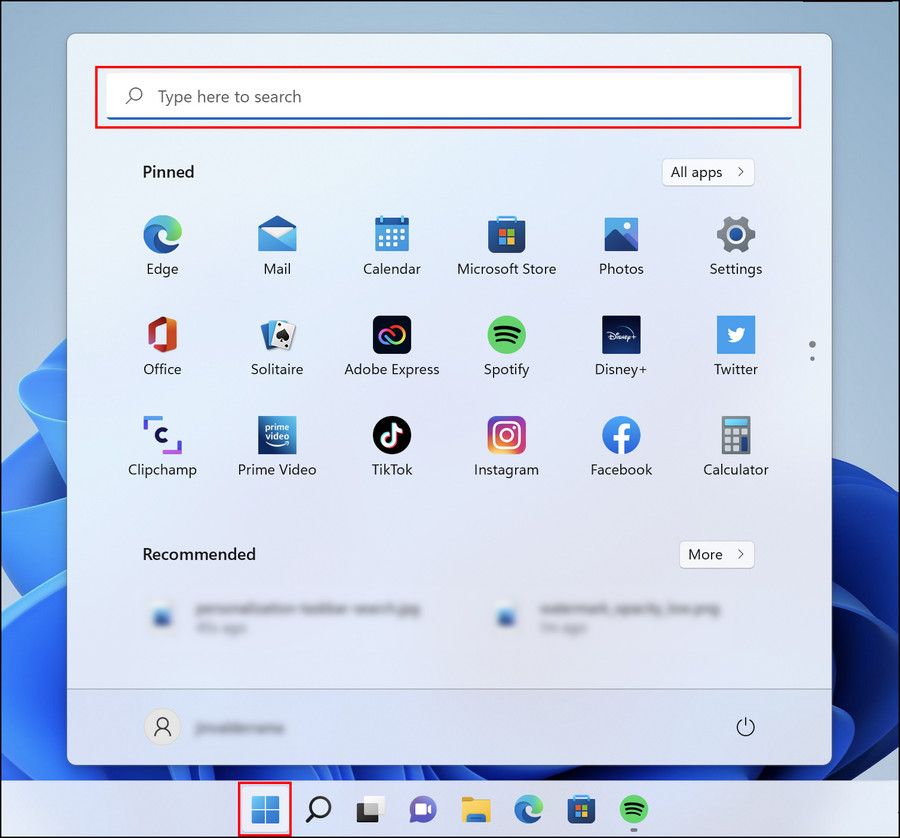
Another way of using the Windows search is via the Start menu. For this, simply click on the Windows icon on the taskbar, type the search query in the search field and click one of the options available. If you don’t see a search bar, start typing anyway; Windows should realize what you want to do and bring up a search bar to type in.
This works for both Windows 10 and 11 in the same way.
3. How to Open Windows Search With a Keyboard Shortcut
Using dedicated keyboard shortcuts on your Windows PC is the quickest way to perform desired actions. Did you know, you can assign a keyboard shortcut to every program installed on your Windows PC? And that you can even use a keyboard shortcut to enable and disable Windows dark mode?
Similarly, you can use the Win + S shortcut to launch the search dialog on both Windows 10 and 11.
Improve Your Windows Search Experience
Now you know the different ways of launching Windows search in both Windows 10 and 11. The next time you need to find something on your PC, don’t go digging by yourself; instead, let Windows do all the heavy lifting for you.
You can also try installing a similar third-party tool if you want more indexing tools and advanced-level functionality. Quick Search and Ultra Search by Tree Size are just two such options that you can consider getting.
Служба Windows Search отвечает за поиск файлов и папок на устройстве. Она способна искать данные не только по наименованию файлов, но и по содержанию этих файлов (метаданным, свойствам и т.д.). Например, поиск по содержанию файлов по умолчанию активирован для текстовых и офисных документов (txt, doc, docx, xls, xlsx, pdf).
На компьютере может быть очень много файлов и папок. Чтобы поиск по устройству не занимал много времени, служба Windows Search использует индексацию файлов. Процесс индексирования представляет собой чтение диска с данными и запись информации о просканированных файлах в базу данных. Индексирование осуществляется в фоновом режиме. Когда вы сохраните новый документ в индексированном расположении, служба Windows Search проиндексирует его и сохранит собранную информацию о нём в своей базе.
Индексатор службы Microsoft Windows Search грузит процессор?
Обычно индексатор службы Microsoft Windows Search не грузит процессор. В нашем случае, когда все файлы проиндексированы, нагрузка на центральный процессор составляет 0%, а объём используемой оперативной памяти составляет порядка 80МБ.
-

На скриншоте видно, что Индексатор службы Microsoft Windows Search в Windows 10 не нагружает процессор, так как все файлы проиндексированы. -


Поэтому, если на вашем устройстве индексатор службы Microsoft Windows Search грузит процессор, это означает, что в настоящее время идёт индексирование файлов. Если вы активно пользуетесь устройством, нажимаете на клавиши клавиатуры, водите мышкой, служба Windows Search замедляет скорость сканирования. В нашем случае при сниженной скорости индексирования нагрузка на процессор составляет 0,6-1,2%.
-

На скриншоте видно увеличение нагрузки на процессор, так как идёт индексирование новых файлов (при сниженной скорости сканирования) -


Конечно, нагрузка будет больше, если процессор относительно старый и имеет одно-два логических ядра. Поэтому приведённые значения нагрузки индексатора службы Microsoft Windows Search на процессор следует считать условными.
Как можно уменьшить нагрузку службы Microsoft Windows Search на процессор?
Определяем папки, которые служба поиска должна индексировать
- Найдите и запустите «Параметры индексирования» в классическом варианте Панели управления.
Как открыть классическую Панель управления?
Несколько простых способов в отдельной статье

- В открывшемся окне нажмите кнопку «Изменить».

- Отметьте галочками папки или диски, которые вы хотите индексировать в фоновом режиме. Оставьте пустым квадрат, чтобы не индексировать папку или диск. После выбора индексируемых расположений нажмите кнопку «ОК».

Уменьшив количество папок и дисков в окне «Индексируемые расположения», вы сможете сократить нагрузку индексатора службы Microsoft Windows Search на процессор. Но имейте в виду, что поиск в исключенных расположениях будет долгим. А в случае использования кнопки поиска в панели задач поиск в неиндексированных расположениях осуществляться не будет. Поэтому не старайтесь исключать все папки. Оставьте папки, в которых вы часто используете функцию поиска.
Устанавливаем классический режим поиска
В Windows 10 предусмотрено 2 режима поиска: классический и расширенный. При классическом режиме поиск осуществляется только в библиотеках пользователя и на рабочем столе. Расширенный режим позволяет искать файлы по всему компьютеру, за исключением системных папок. Расширенный режим, как предупреждает операционная система, может снизить уровень заряда и увеличить нагрузку на центральный процессор. Особенно это актуально для владельцев ноутбуков, которым важно, чтобы их устройство проработало в автономном режиме как можно дольше.
- Перейдите в новые «Параметры Windows» (нажмите на клавиатуре кнопку с логотипом Windows + I ).
- Нажмите на раздел «Поиск».

- В левом боковом меню нажмите на «Поиск в Windows».
- Прокрутите список настроек и выберите параметр «Классический стиль».

Активируем привязку производительности индексатора к параметрам питания устройства
Изменять режим производительности индексатора стало возможным с момента появления Windows 10 версии 2004 (майское обновление 2020 года). Если включить параметр «Использовать параметры режима питания устройства», служба Windows Search будет оценивать, запущен ли на компьютере режим энергосбережения, пониженного электропотребления или игровой процесс. Если да, то служба поиска приостановит индексацию в фоновом режиме.
Также при включении производительности индексатора служба поиска приостановит индексацию файлов в фоновом режиме, если загрузка центрального процессора превысит 80% или загрузка жесткого диска поднимется свыше 70%.
- Перейдите в новые «Параметры Windows» (нажмите на клавиатуре кнопку с логотипом Windows + I ).
- Нажмите на раздел «Поиск».
- В левом боковом меню нажмите на «Поиск в Windows».
- Прокрутите список настроек и включите параметр «Использовать параметры режима питания устройства».

Отключаем службу Windows Search
Отключая службу Windows Search, вы отключите индексирование папок и файлов в фоновом режиме.
Вы сможете осуществлять поиск по устройству, но он будет медленным.
- Запустите приложение «Выполнить» (нажмите на клавиатуре кнопку с логотипом Windows + R ).
- Наберите текст
services.mscи нажмите кнопку «ОК».

- В открывшемся окне найдите службу Windows Search.

- Дважды нажмите на строку службы «Windows Search». Откроется окно с настройками.
- Выберите тип запуска «Отключена».
- Нажмите кнопку «Остановить», чтобы завершить активный процесс выполнения службы Windows Search.
- Нажмите кнопку «ОК», чтобы сохранить настройки службы.

А как у вас работает служба поиска в Windows? Испытываете ли вы проблемы при ее работе в фоновом режиме?
Расскажите о своем опыте в комментариях 😉