Служба Windows Search отвечает за поиск файлов и папок на устройстве. Она способна искать данные не только по наименованию файлов, но и по содержанию этих файлов (метаданным, свойствам и т.д.). Например, поиск по содержанию файлов по умолчанию активирован для текстовых и офисных документов (txt, doc, docx, xls, xlsx, pdf).
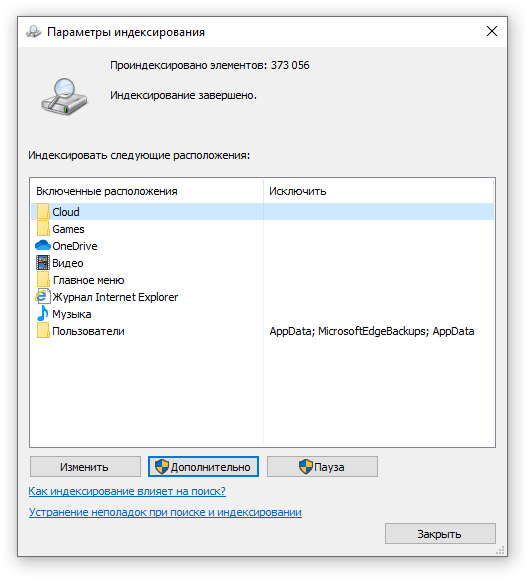
На компьютере может быть очень много файлов и папок. Чтобы поиск по устройству не занимал много времени, служба Windows Search использует индексацию файлов. Процесс индексирования представляет собой чтение диска с данными и запись информации о просканированных файлах в базу данных. Индексирование осуществляется в фоновом режиме. Когда вы сохраните новый документ в индексированном расположении, служба Windows Search проиндексирует его и сохранит собранную информацию о нём в своей базе.
Индексатор службы Microsoft Windows Search грузит процессор?
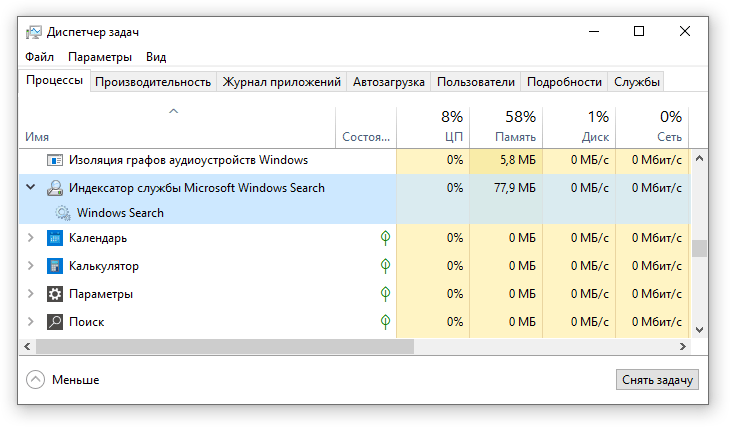
Обычно индексатор службы Microsoft Windows Search не грузит процессор. В нашем случае, когда все файлы проиндексированы, нагрузка на центральный процессор составляет 0%, а объём используемой оперативной памяти составляет порядка 80МБ.
-
На скриншоте видно, что Индексатор службы Microsoft Windows Search в Windows 10 не нагружает процессор, так как все файлы проиндексированы. -
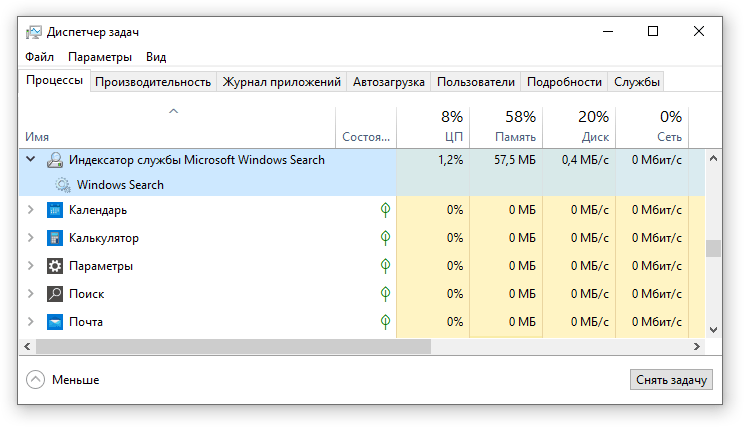
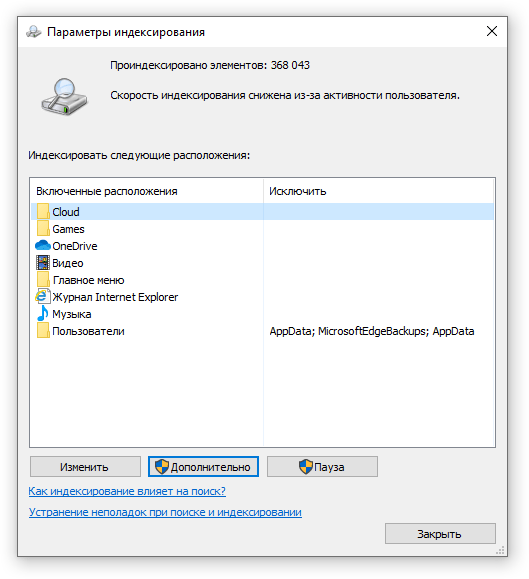
Поэтому, если на вашем устройстве индексатор службы Microsoft Windows Search грузит процессор, это означает, что в настоящее время идёт индексирование файлов. Если вы активно пользуетесь устройством, нажимаете на клавиши клавиатуры, водите мышкой, служба Windows Search замедляет скорость сканирования. В нашем случае при сниженной скорости индексирования нагрузка на процессор составляет 0,6-1,2%.
-
На скриншоте видно увеличение нагрузки на процессор, так как идёт индексирование новых файлов (при сниженной скорости сканирования) -
Конечно, нагрузка будет больше, если процессор относительно старый и имеет одно-два логических ядра. Поэтому приведённые значения нагрузки индексатора службы Microsoft Windows Search на процессор следует считать условными.
Как можно уменьшить нагрузку службы Microsoft Windows Search на процессор?
Определяем папки, которые служба поиска должна индексировать
- Найдите и запустите «Параметры индексирования» в классическом варианте Панели управления.
Как открыть классическую Панель управления?
Несколько простых способов в отдельной статье
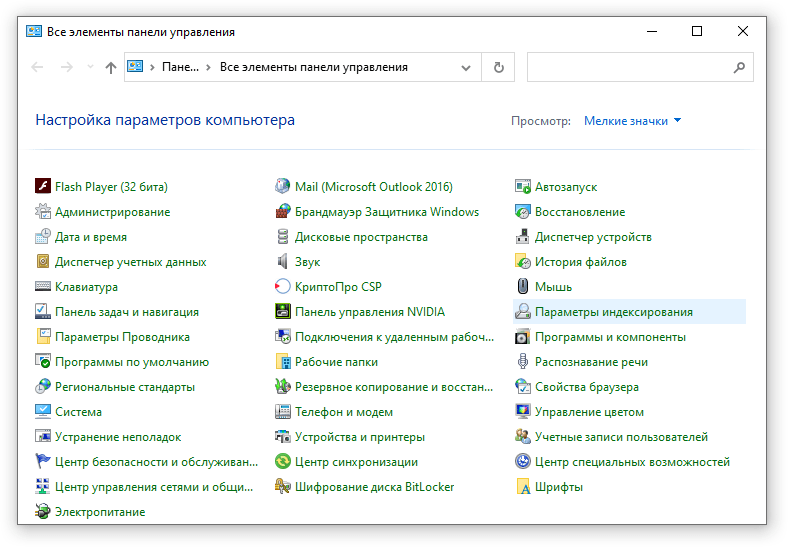
- В открывшемся окне нажмите кнопку «Изменить».
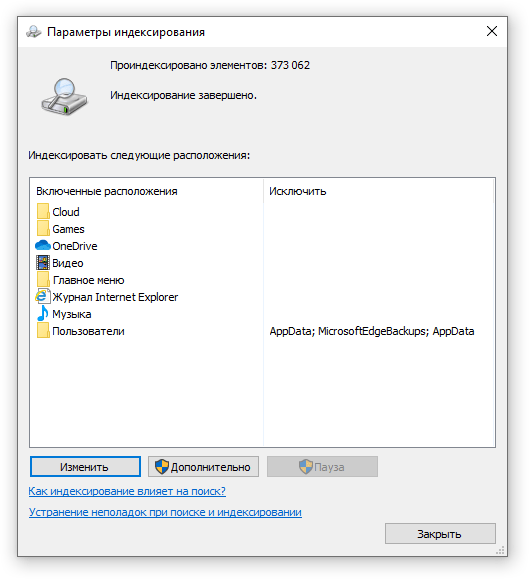
- Отметьте галочками папки или диски, которые вы хотите индексировать в фоновом режиме. Оставьте пустым квадрат, чтобы не индексировать папку или диск. После выбора индексируемых расположений нажмите кнопку «ОК».
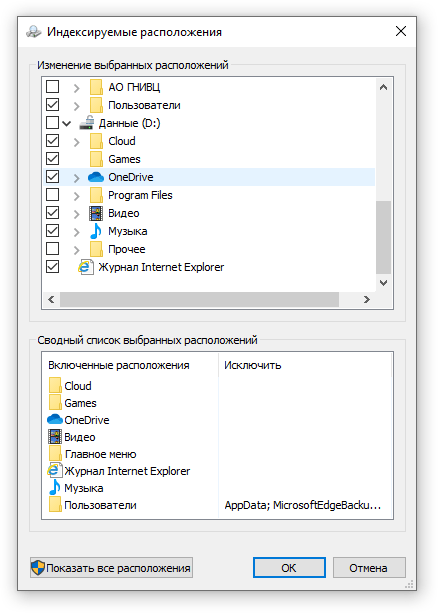
Уменьшив количество папок и дисков в окне «Индексируемые расположения», вы сможете сократить нагрузку индексатора службы Microsoft Windows Search на процессор. Но имейте в виду, что поиск в исключенных расположениях будет долгим. А в случае использования кнопки поиска в панели задач поиск в неиндексированных расположениях осуществляться не будет. Поэтому не старайтесь исключать все папки. Оставьте папки, в которых вы часто используете функцию поиска.
Устанавливаем классический режим поиска
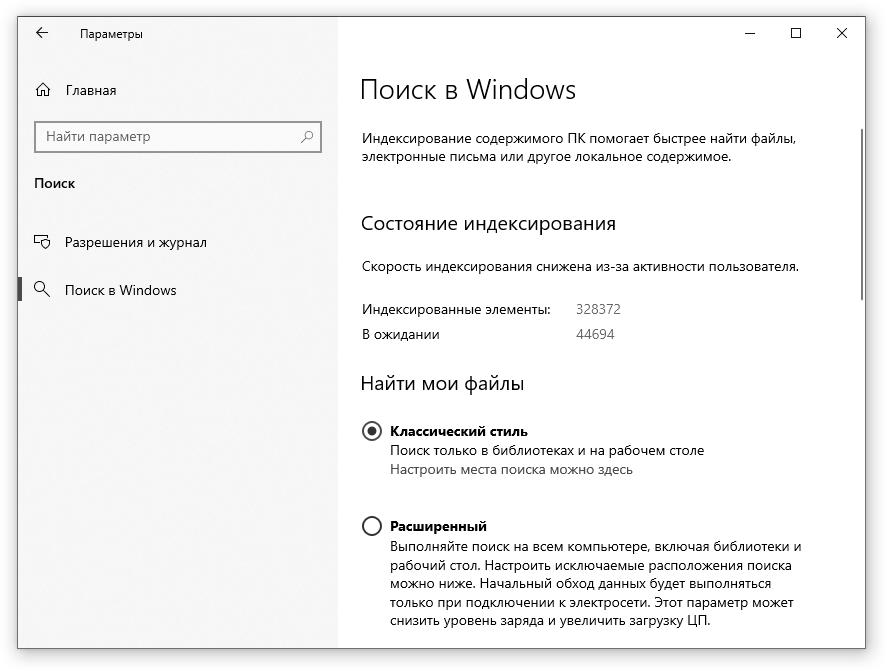
В Windows 10 предусмотрено 2 режима поиска: классический и расширенный. При классическом режиме поиск осуществляется только в библиотеках пользователя и на рабочем столе. Расширенный режим позволяет искать файлы по всему компьютеру, за исключением системных папок. Расширенный режим, как предупреждает операционная система, может снизить уровень заряда и увеличить нагрузку на центральный процессор. Особенно это актуально для владельцев ноутбуков, которым важно, чтобы их устройство проработало в автономном режиме как можно дольше.
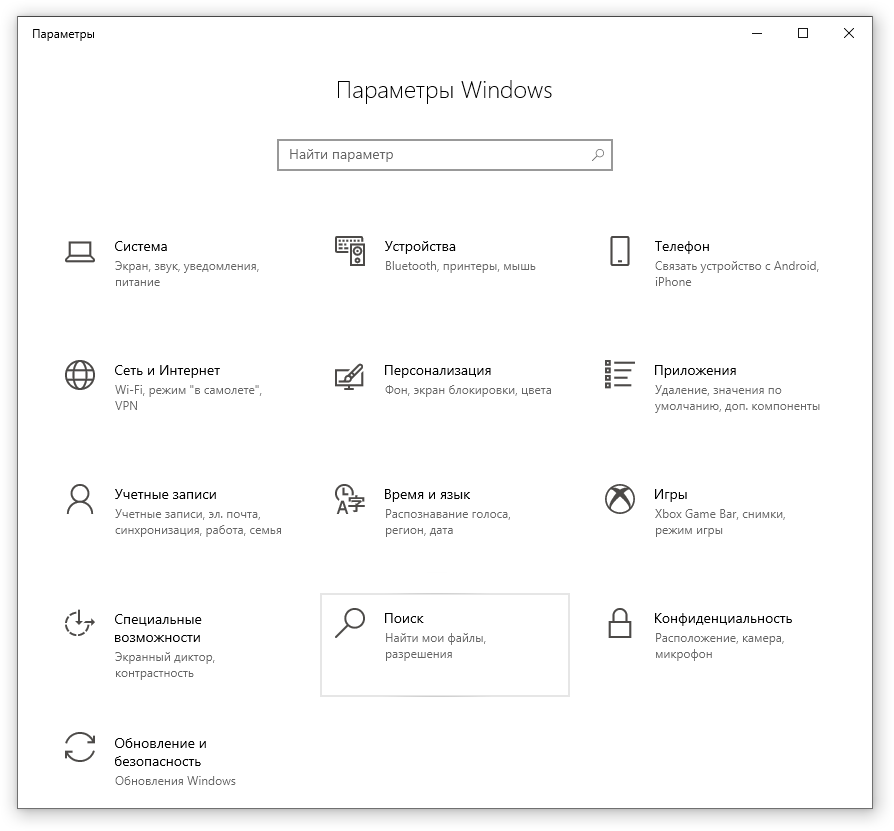
- Перейдите в новые «Параметры Windows» (нажмите на клавиатуре кнопку с логотипом Windows + I ).
- Нажмите на раздел «Поиск».
- В левом боковом меню нажмите на «Поиск в Windows».
- Прокрутите список настроек и выберите параметр «Классический стиль».
Активируем привязку производительности индексатора к параметрам питания устройства
Изменять режим производительности индексатора стало возможным с момента появления Windows 10 версии 2004 (майское обновление 2020 года). Если включить параметр «Использовать параметры режима питания устройства», служба Windows Search будет оценивать, запущен ли на компьютере режим энергосбережения, пониженного электропотребления или игровой процесс. Если да, то служба поиска приостановит индексацию в фоновом режиме.
Также при включении производительности индексатора служба поиска приостановит индексацию файлов в фоновом режиме, если загрузка центрального процессора превысит 80% или загрузка жесткого диска поднимется свыше 70%.
- Перейдите в новые «Параметры Windows» (нажмите на клавиатуре кнопку с логотипом Windows + I ).
- Нажмите на раздел «Поиск».

- В левом боковом меню нажмите на «Поиск в Windows».
- Прокрутите список настроек и включите параметр «Использовать параметры режима питания устройства».
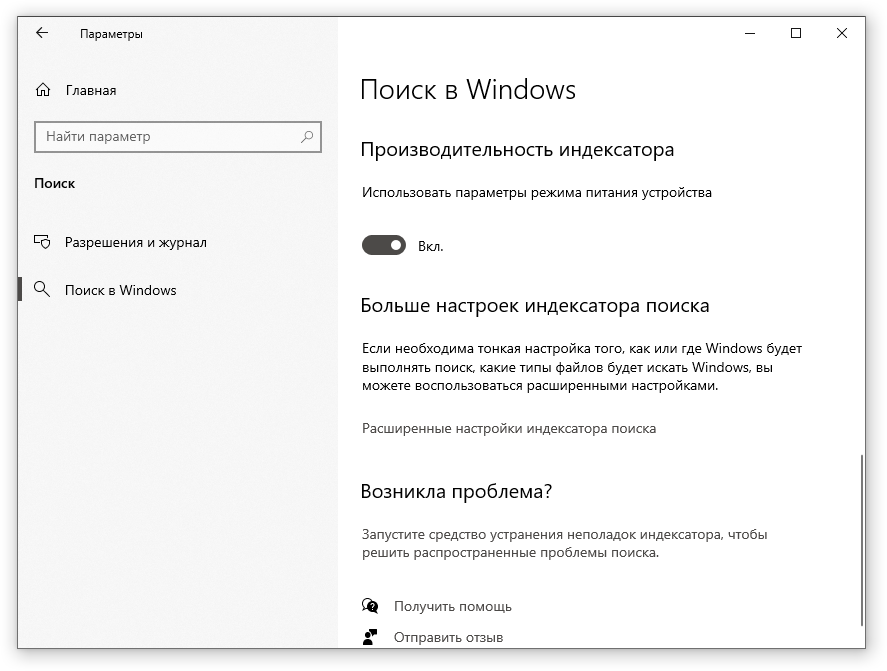
Отключаем службу Windows Search
Отключая службу Windows Search, вы отключите индексирование папок и файлов в фоновом режиме.
Вы сможете осуществлять поиск по устройству, но он будет медленным.
- Запустите приложение «Выполнить» (нажмите на клавиатуре кнопку с логотипом Windows + R ).
- Наберите текст
services.mscи нажмите кнопку «ОК».
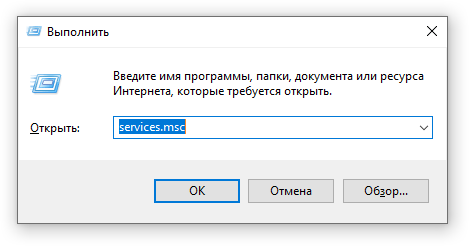
- В открывшемся окне найдите службу Windows Search.
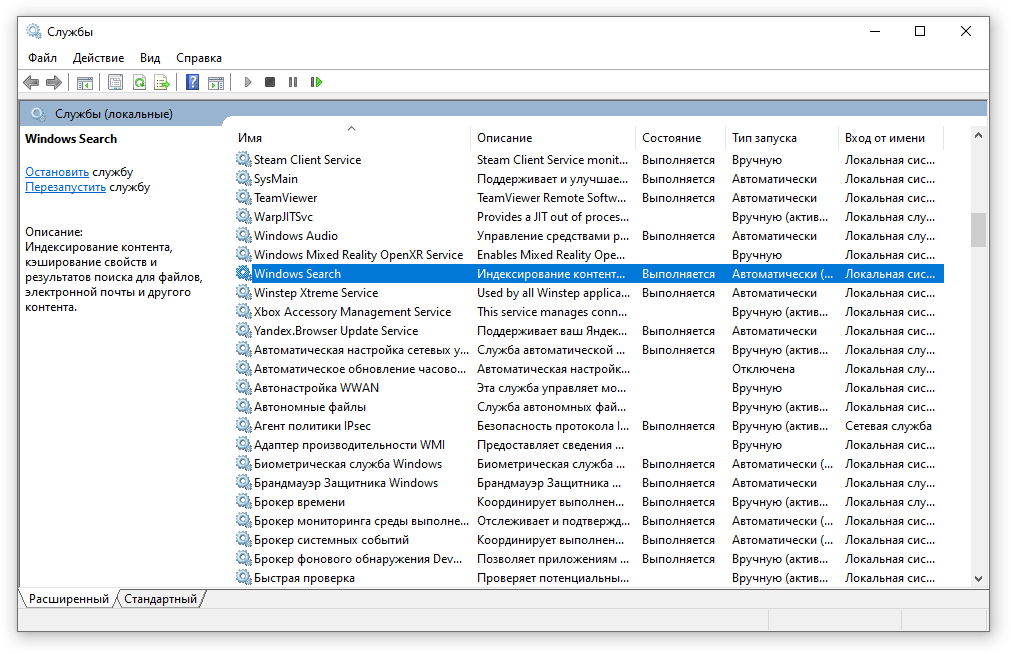
- Дважды нажмите на строку службы «Windows Search». Откроется окно с настройками.
- Выберите тип запуска «Отключена».
- Нажмите кнопку «Остановить», чтобы завершить активный процесс выполнения службы Windows Search.
- Нажмите кнопку «ОК», чтобы сохранить настройки службы.
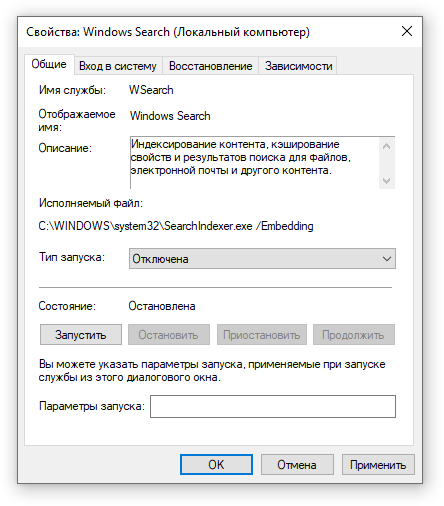
А как у вас работает служба поиска в Windows? Испытываете ли вы проблемы при ее работе в фоновом режиме?
Расскажите о своем опыте в комментариях 😉
Повышаем производительность системы и снижаем нагрузку на диск.
Одна из проблем, часто возникающая у пользователей Windows 10, — это 100-процентная загрузка диска. В Windows 10 есть неполадки, которые затрагивают как жёсткие диски, так и твердотельные накопители. При этом производительность системы резко падает. Вплоть до полного зависания.
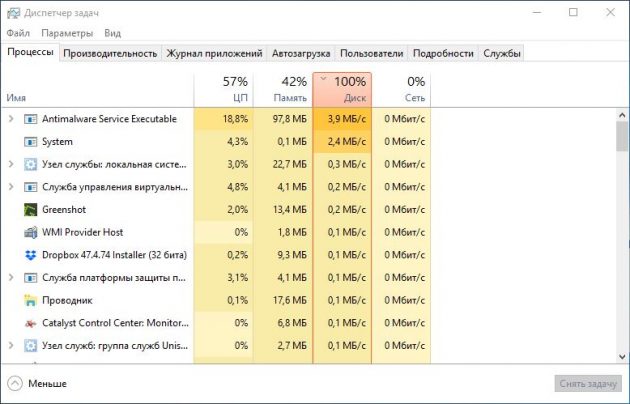
Есть несколько способов исправить это. Попробуйте их один за другим, пока не увидите положительных результатов.
Отключите Windows Search
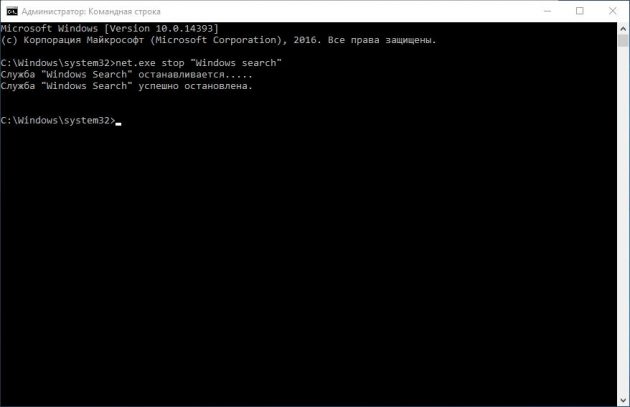
Служба индексирования Windows 10 позволяет быстро искать ваши файлы, но она же может создавать высокую нагрузку на жёсткий диск.
Чтобы остановить службу на время текущего сеанса (до перезагрузки), откройте командную строку. Для этого нажмите «Пуск» → «Все программы» → «Стандартные». Щёлкните пункт «Командная строка» правой кнопкой мыши и выберите «Запуск от имени администратора». Затем введите следующую команду:
net.exe stop “Windows search”
Чтобы окончательно выключить службу индексирования, нажмите Windows + R, введите services.msc и нажмите Enter. В открывшемся окне «Службы» найдите Windows Search и дважды щёлкните на неё. В разделе «Тип запуска» выберите «Отключено» и «Остановить», чтобы прервать работу службы. Нажмите «ОК», для сохрания изменений.
Через несколько секунд после отключения Windows Search производительность Windows 10 должна значительно улучшиться.
Отключите Windows Update
Обновление Windows тоже загружает диск на полную. Обычно это происходит при проблеме с загрузкой патчей. У вас есть несколько вариантов:
- Просто оставьте компьютер обновляться. Подождите, пока все файлы обновлений будут загружены, затем перезапустите Windows и позвольте ей установить их. Это может занять много времени.
- Перезапустите компьютер и дождитесь, пока Windows Update решит проблему.
- Отключите обновления Windows 10, чтобы убедиться, что именно Windows Update загружает диск на 100%.
Если после обновления диск всё ещё перегружен, попробуйте следующие способы.
Отключите телеметрию Windows
Отключить телеметрию можно не только для экономии системных ресурсов, но и для увеличения вашей приватности. Нажмите Windows + R и введите regedit, чтобы открыть «Редактор реестра». В реестре откройте HKEY_LOCAL_MACHINE/SOFTWARE/Policies/Microsoft/Windows/DataCollection.
Щёлкните на пункт DataCollection правой кнопкой и создайте новое значение DWORD (32-bit). Назовите его Allow Telemetry. Затем дважды щёлкните по нему и установите значение 0. Перезагрузите Windows.
Отключите диагностику
Ещё одна распространённая причина высокой загрузки диска — служба диагностики Windows 10. Вы можете отключить её.
Откройте командную строку с правами администратора и выполните:
sc config “DiagTrack” start= disabled
sc stop “DiagTrack”
Кроме того, вы также можете открыть «Параметры» → «Система» → «Уведомления и действия» и отключить функцию «Получить советы, рекомендации и предложения при использовании Windows». Это тоже может снизить нагрузку на диск.
Виртуальная память
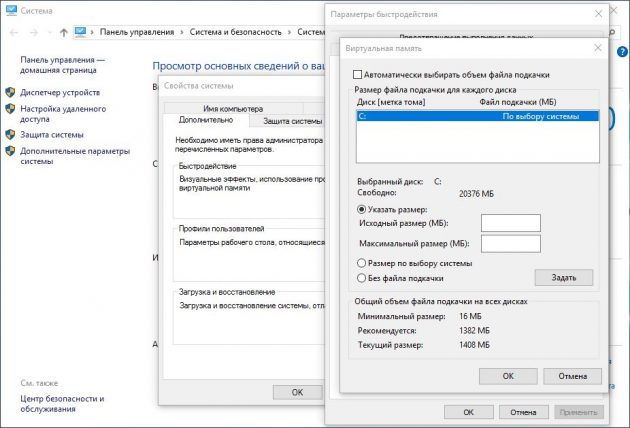
Windows записывает в виртуальную память часть данных из RAM, чтобы уменьшить расход оперативной памяти. Разрастание файла виртуальной памяти также увеличивает нагрузку на диск.
Откройте «Панель управления» → «Параметры системы» и выберите «Расширенные системные параметры». В появившемся окне выберите вкладку «Дополнительно». Затем в разделе «Производительность» нажмите «Настройки».
Здесь вы найдёте другую вкладку «Дополнительно», в которой есть раздел с надписью «Виртуальная память». Нажмите «Изменить» и снимите флажок «Автоматически управлять размером файла подкачки для всех дисков».
Выберите свой диск Windows (C:) и укажите «Пользовательский размер». Лучше всего ввести значение в 1,5 раза больше вашей оперативной памяти. Затем нажмите «Установить» и «ОК».
Теперь вам нужно очистить временные файлы в виртуальной памяти. Нажмите Windows + R и введите temp. Когда откроется каталог temp, выберите все файлы (Ctrl + A) и удалите их.
Отключите SuperFetch
Служба SuperFetch в Windows 10 должна повышать производительность системы, оптимизируя запуск наиболее часто используемых вами приложений. На практике же она может провоцировать высокую нагрузку на диск.
Вы можете её отключить и посмотреть, как это повлияет на загрузку диска. Откройте командную строку и введите:
net.exe stop superfetch
Подождите несколько секунд, чтобы проверить, улучшилась ли производительность вашего диска. Затем запустите его проверку командой:
chkdsk.exe / f / r
Для завершения проверки диска ваш компьютер должен быть перезагружен.
Проблема с PCI-Express
100-процентная загрузка диска может быть связана и с некорректной работой драйвера PCI-Express. Откройте «Диспетчер устройств» и разверните список «Контроллеры IDE ATA / ATAPI». Дважды щёлкните на контроллер AHCI, откройте вкладку «Драйвер» и выберите «Сведения о драйвере».
Если путь к драйверу имеет вид C:/Windows/system32/DRIVERS/storahci.sys, значит, проблема может быть в нём.
Откройте вкладку «Сведения» и выберите «Путь экземпляра устройства» в раскрывающемся меню. Щёлкните правой кнопкой мыши и выберите «Копировать». Скопируйте путь к устройству, например, в «Блокнот».
Затем нажмите Windows + R и введите regedit. В «Редакторе реестра» отыщите адрес HKEY_LOCAL_MACHINE/System/CurrentControlSet/Enum/PCI/ваш_путь_экземпляра_устройства. В нём разверните Device Parameters/Interrupt Management/MessageSignaledInterruptProperties.
Вы увидите параметр MSISupported в правой панели. Дважды щёлкните и задайте ему значение 0. Нажмите «ОК» для подтверждения и перезапустите Windows.
Учтите, что перед внесением изменений в реестр неплохо бы сделать его копию.
Высокая производительность
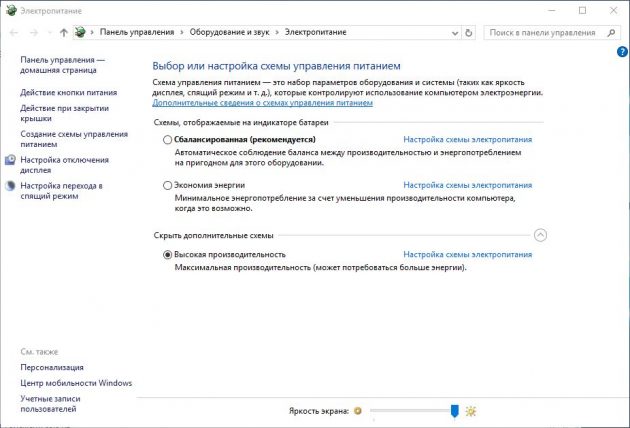
Последняя попытка. Попробуйте изменить настройки питания Windows 10. При стандартном режиме питания диск часто бывает загруженным на 100%. Переход в режим высокой производительности может решить эту проблему. При этом ваш компьютер будет использовать больше энергии, отчего может снизиться время работы ноутбука от батареи.
Нажмите Windows + X, и откройте «Дополнительные параметры питания». Выберите «Высокая производительность». Через пару минут нагрузка на диск должна уменьшиться.
Надеемся, что одна из этих рекомендаций вам поможет. Если знаете другие способы решения проблемы, делитесь в комментариях.
When you open the Task Manager in Windows 10 or Windows 11, you will usually see a process called Search Indexer or searchindexer.exe that’s using a lot of your CPU and Disk from time to time. This article will explain what Search Indexer is and what you can do about it when it’s using too much CPU or Disk.
Also see: High CPU Usage After Windows 11/10 Update (Fix)
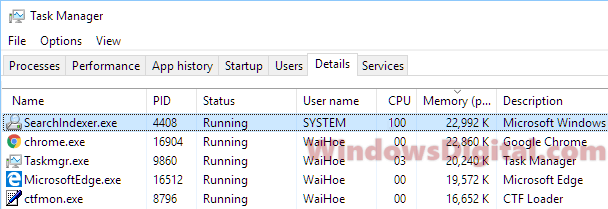
Why is Search Indexer causing high CPU and Disk usage?
When you search for files in the Windows 11 or Windows 10 start menu or File Explorer, you may have noticed the search results can sometimes appear almost instantly. This is because those files have been indexed by a feature called Search Indexer. It is a process that indexes selected files so that searching can be quick. But the indexing process can also cause high CPU and Disk usage in the background. It can sometimes reach as high as 100% (usually when your PC is idle).
The time and resources required to complete the indexing process depend on the number of files it needs to index, the speed of your hard drive (SSD is generally faster), and, of course, the power of your CPU. When the Search Indexer runs at full speed, it might slow down your computer in general.
How to disable Search Indexer in Windows 10/11
We don’t usually suggest turning off Search Indexer, but you can if it’s slowing your computer. Before you decide to turn it off, try the other fixes which we will mention later.
Disabling Search Indexer for a specific disk
To disallow Search Indexer from indexing a particular disk, follow these steps:
- Open File Explorer and go to This PC, where all your drives are listed.
- Right-click on the disk you want to disallow indexing for.
- Select Properties.
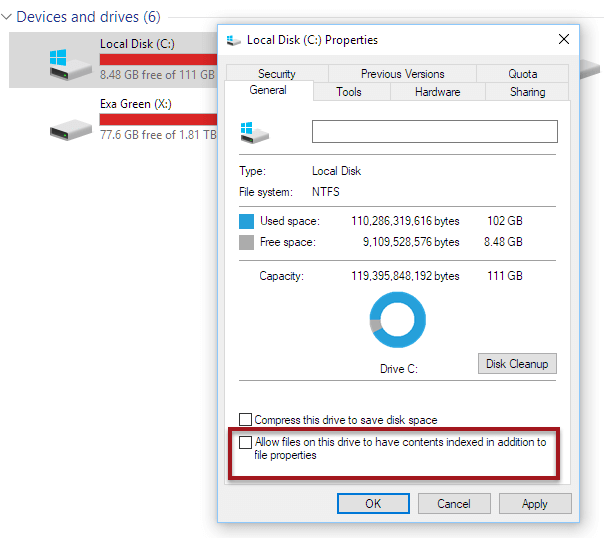
- At the bottom of the Properties window, uncheck the box that reads Allow files on this drive to have contents indexed in addition to file properties.
- Click Apply, then OK.
- Restart your computer.
Search Indexer should stop indexing contents on that particular drive. Use this method to stop indexing for drives with a large amount of data that you don’t need indexed.
Completely disabling search indexer
To completely disable the Search Indexer service, follow the steps below:
- Go to the start menu.
- Type services.msc and open it.
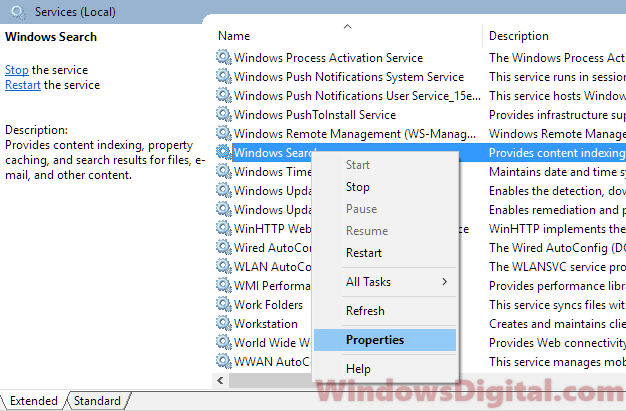
- In the Services window, look for Windows Search from the list of services on the right panel.
- Right-click on it and select Properties.
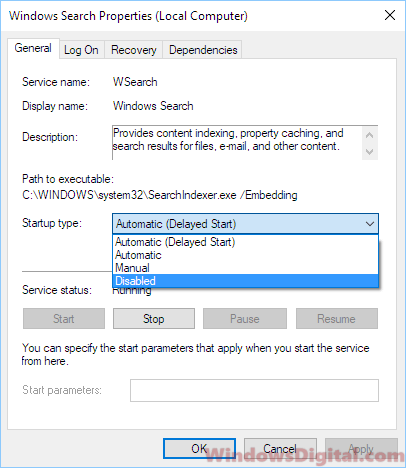
- Beside startup type, click on the drop-down menu and select Disabled.
- Click Apply, then OK.
- Restart your PC.
The Search Indexer service should now be disabled and won’t index any files or contents until you re-enable it. Note that searches for files and contents may take longer now.
Restart Search Indexer (searchindexer.exe) service
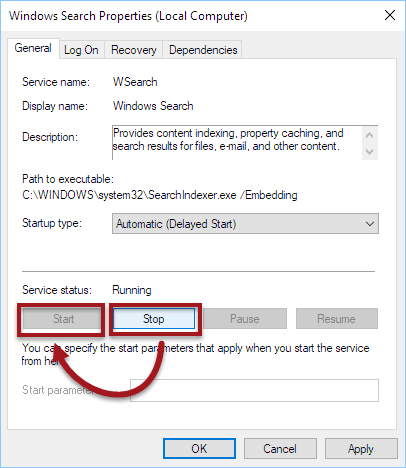
Restarting Search Indexer Service
Before completely disabling the Search Indexer service, you should try to restart the service and see if it resolves the high Disk or CPU usage problem.
Sometimes searchindexer.exe can get stuck when indexing files or folders that are too large or are frequently accessed. Restarting the Windows 10 or Windows 11 Search Indexer service can help fix the high Disk/CPU usage issue.
To restart the service, follow these steps:
- Press Windows key + R to open the Run window.
- Type services.msc and hit Enter.
- In the Services window, find Windows Search from the list of services.
- Right-click on it and select Properties.
- Click on the Stop button to stop the service immediately.
- Click on the Start button to restart it.
- Check your Task Manager again to see if Search Indexer is still using high CPU or Disk usage.
Manually selecting directories to index
When Search Indexer runs non-stop at high Disk/CPU usage, you may want to manually select the directories or folders you want to index. This allows Search Indexer to index only those directories, saving resources by not indexing other large folders you rarely access.
To do this, follow the steps below:
- Go to the start menu.
- Search for indexing, then open Indexing Options from the search results.
- Click on the Modify button.
- Optionally, click on Show all locations before modifying.
- Select or deselect folders or directories you want Search Indexer to index under Change selected locations.
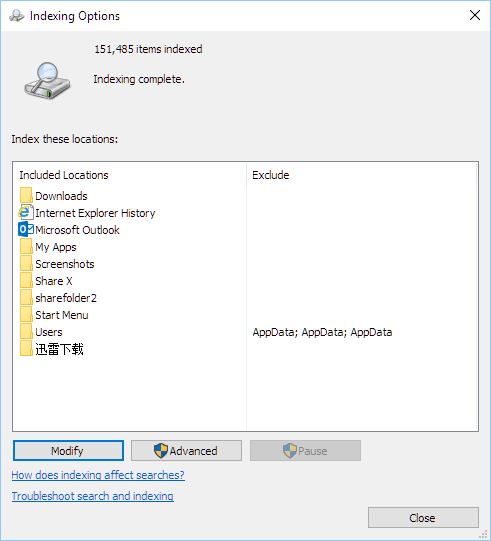
Search Indexer indexes each item only once, and will only index the same item again if changes are made to the file. By selecting only the folders you want it to index, you can immensely reduce the searchindexer.exe high CPU/Disk usage, especially if you have multiple disks with large amounts of data.
Troubleshooting and rebuilding the index to fix high CPU or disk usage
If none of the above solutions work to resolve the Search Indexer high Disk or CPU usage issue, try running the troubleshooter for search and indexing in Windows 10 or Windows 11.
To troubleshoot and rebuild the index, follow the steps below:
- Open Indexing Options as outlined above.
- In the Indexing Options window, click on the Advanced button.
- Under Troubleshooting in the Index Settings tab, click on the troubleshoot search and indexing link.
- The troubleshooter should start to automatically identify and resolve any problems.
If there is an issue with Search Indexer, rebuilding the search index can help resolve it. To rebuild the index, follow these steps:
- Open the Indexing Options window again.
- Click on Advanced.
- Under Troubleshooting, click on the Rebuild button to rebuild the entire search index.
- This may take some time as Search Indexer reindexes your contents.
- After the index is finished, Search Indexer should stop working until new files are added to your disk.
We hope that these solutions can somehow help resolve your Search Indexer high CPU or Disk usage problem in Windows 10 or Windows 11.
Microsoft Windows Search Indexer, or searchindexer.exe, is a crucial process that powers Windows Search. It indexes the files and folders on your computer and, given its nature, consumes lots of CPU at sporadic intervals. However, if CPU usage remains high for prolonged periods, it may indicate an underlying problem that needs to be addressed.
In this tutorial, we’ll show you how to tackle high CPU and disk usage caused by the Windows Search Indexer with various suggestions and solutions for Windows 10 and 11.

Restart Windows Search Service
It’s best to begin by restarting Windows Search on your computer. That should resolve minor technical issues and reduce high CPU usage caused by the searchindexer.exe process. To do that:
- Right-click the Start button and select Run. Or, press Windows + R.
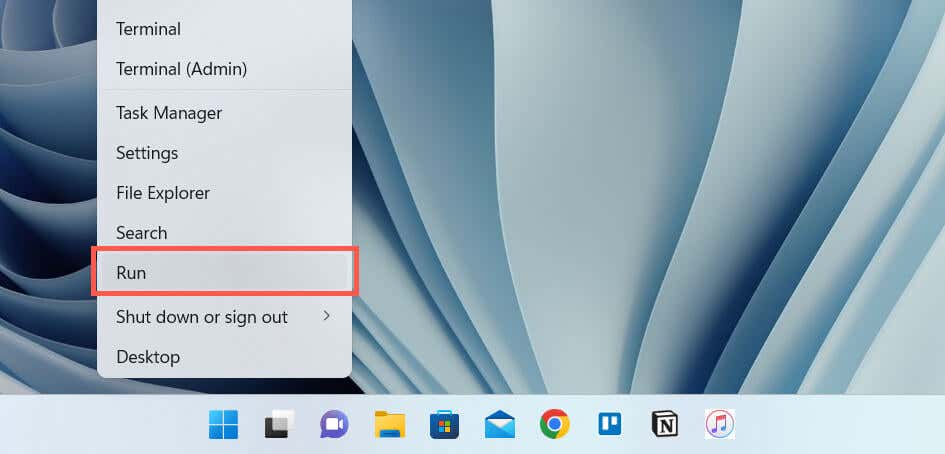
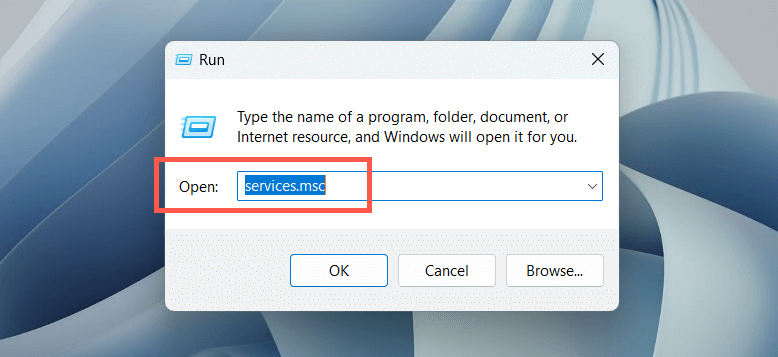
- Type services.msc into the Run Box’s Open field and select OK.
- Right-click the service labeled Windows Search and select Restart.
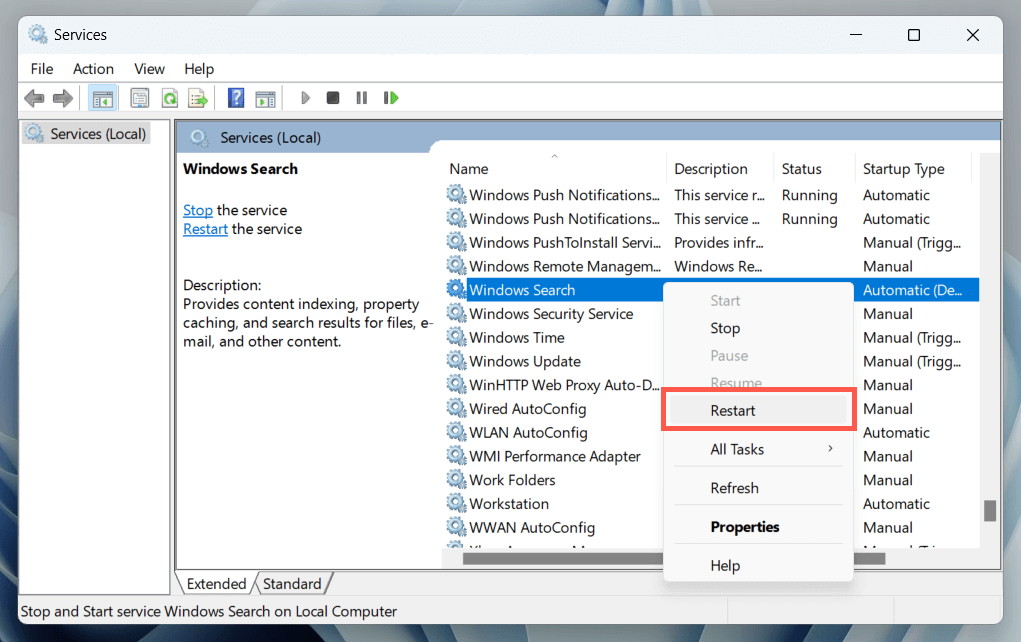
Optionally, double-click Windows Search and ensure that Startup type is set to Automatic (Delayed Start).
Restart Your PC
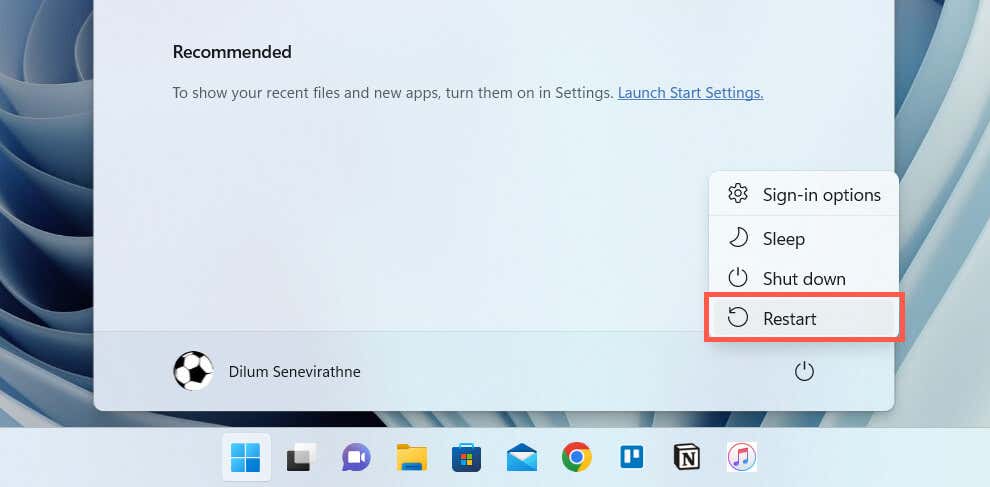
A PC reboot clears out additional software-related anomalies that interfere with system-related processes. Save your work, open the Start menu, and select Power > Restart. If that makes no difference, move on with the rest of the fixes.
Run Search and Indexing Troubleshooter
Windows 11 and 10 have a built-in troubleshooter that helps diagnose and fix issues related to Windows Search. To run it:
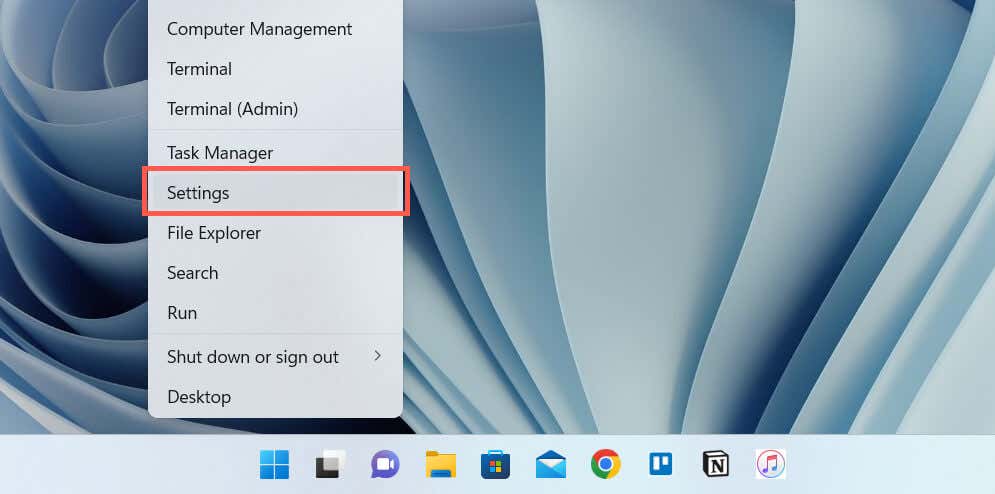
- Right-click the Start button and select Settings.
- Go to System > Troubleshoot.
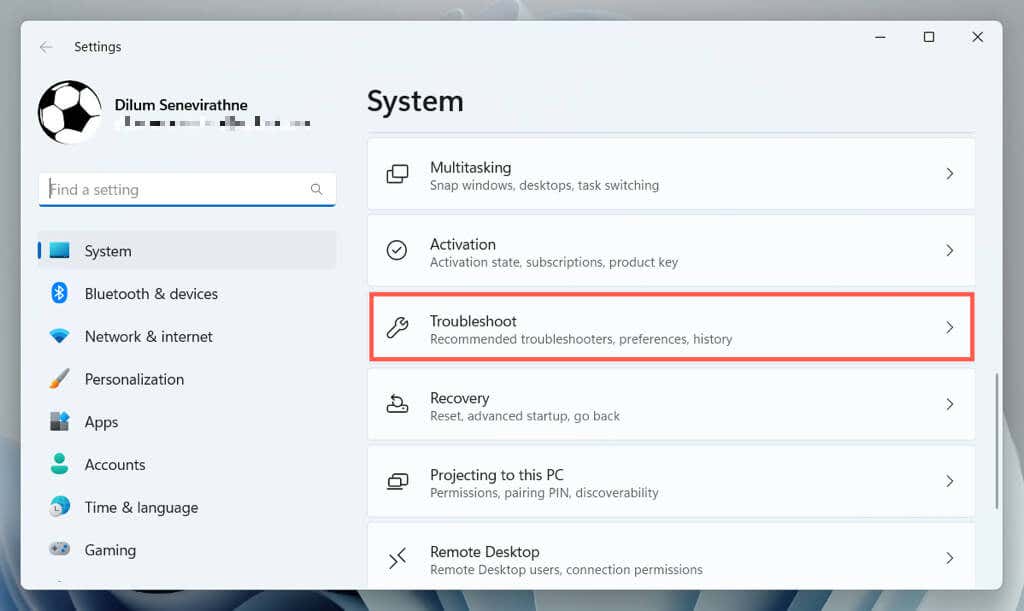
- Select Other troubleshooters/Additional troubleshooters.
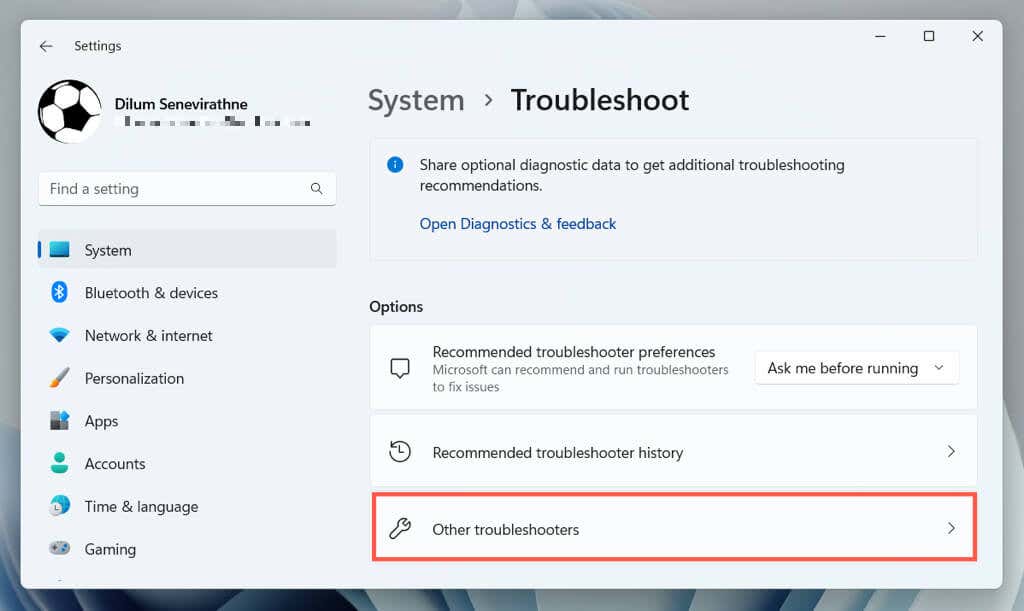
- Select Run next to Search and Indexing.
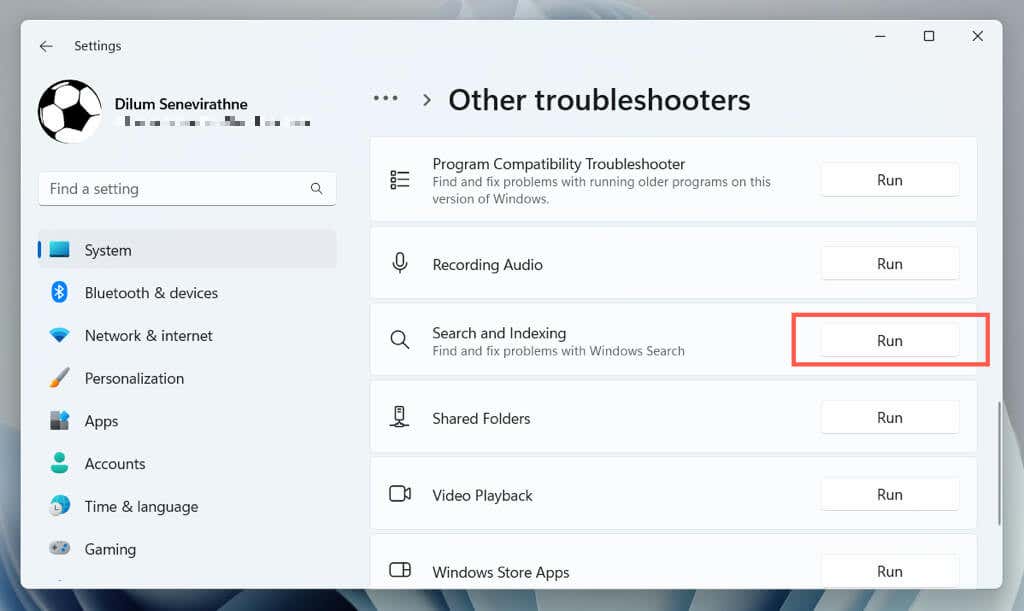
- Follow the onscreen prompts to fix issues with Windows Search.
Rebuild Index
Corruption issues within the Windows Search index often lead to erratic behavior with related processes. Use the Control Panel‘s Indexing Options console to rebuild the index from scratch.
Note: Rebuilding the search index takes time and causes high CPU and HDD/SSD usage for the duration of the procedure.
- Open a Run box, type control.exe srchadmin.dll, and select OK.
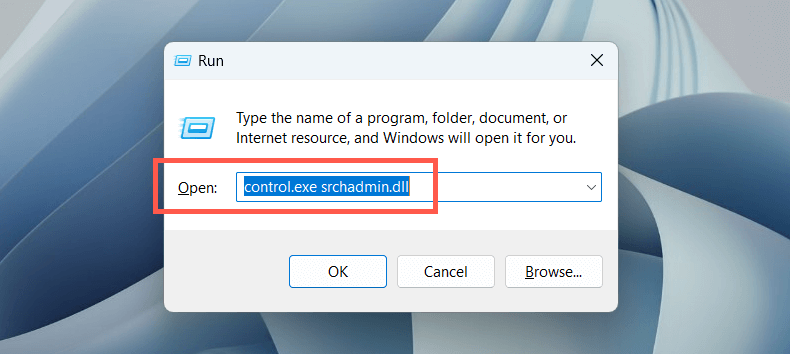
- Select the Advanced button at the bottom of the Indexing Options window.
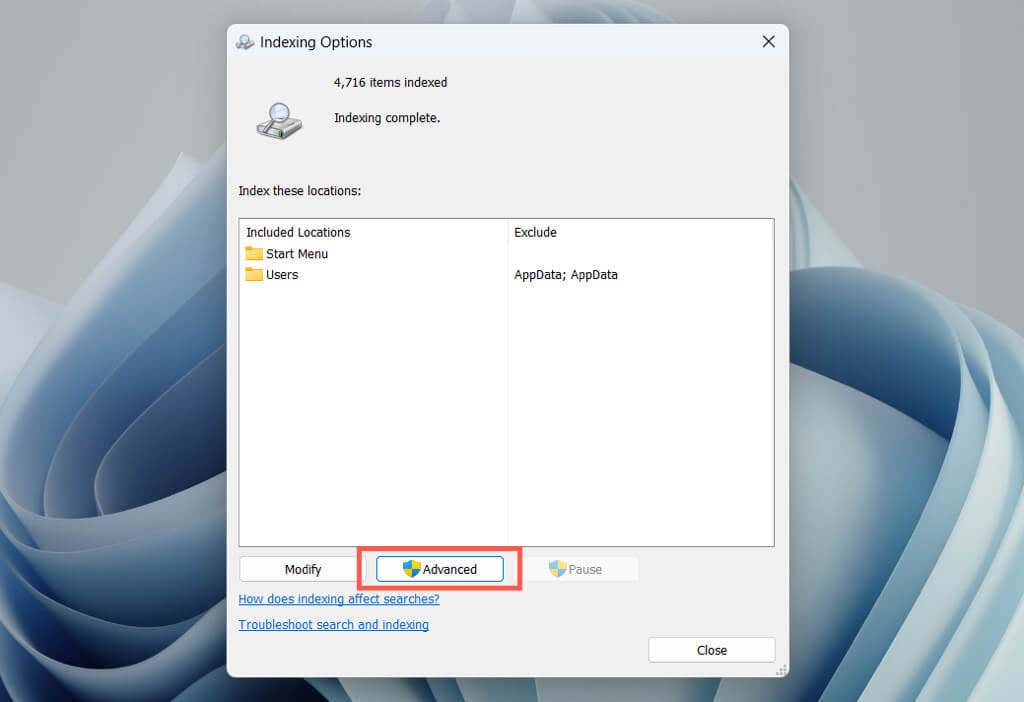
- Select Rebuild.
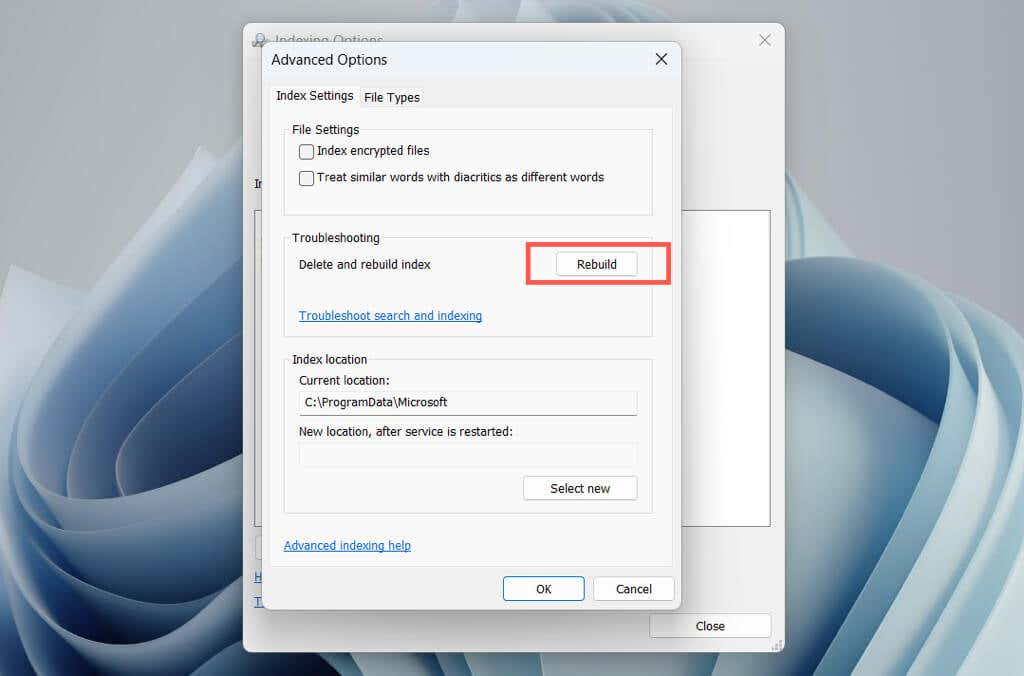
Note: Removing locations you don’t want to include within Windows Search can lessen the load on the searchindexer.exe process. Select the Modify button on the Indexing Options console and uncheck the indexed locations you wish to exclude.
Update Windows
Keeping your Windows operating system up to date with the latest patches and updates can help resolve high CPU usage issues with the Windows Search Indexer process. This also helps improve system performance, security, and stability.
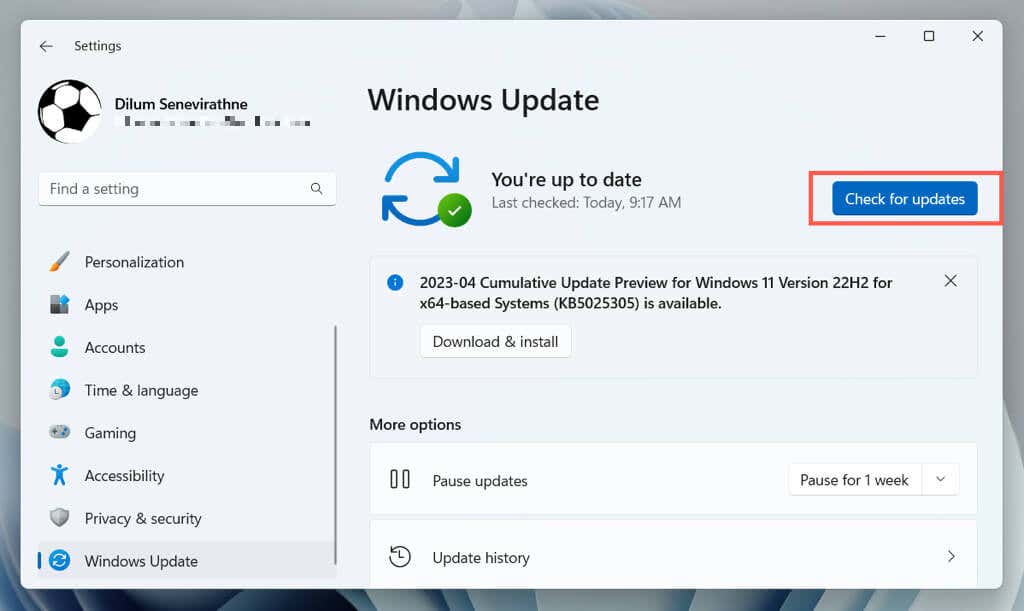
To update Windows, open the Settings app, select Windows Update, and select Check for updates. If there are pending updates, choose Download and install.
Run an SFC Scan
The System File Checker (SFC) is a command line tool that can help fix system file corruption issues causing the Windows Search Indexer to malfunction. You can run it via an elevated Windows PowerShell or Command Prompt console. Here’s how:
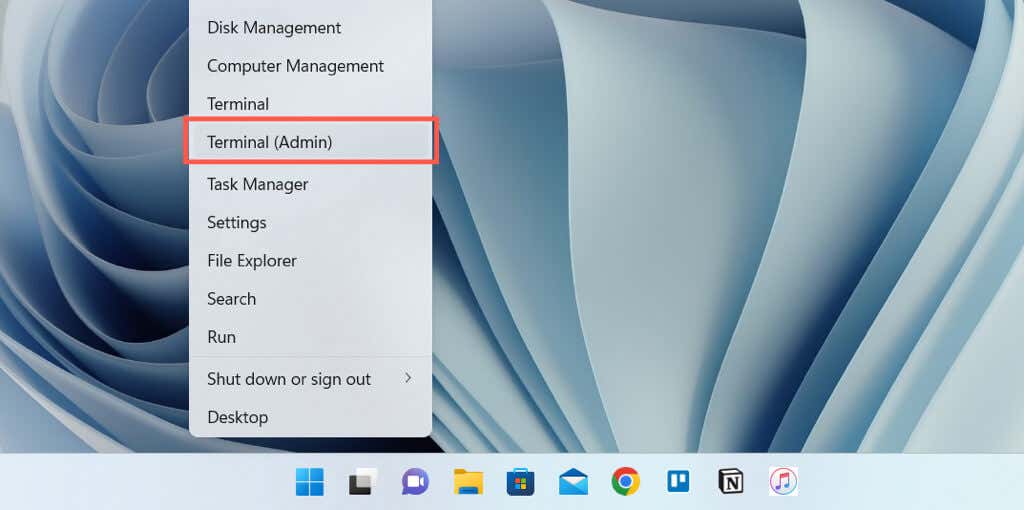
- Right-click the Start menu and select Windows PowerShell/Terminal (Admin). Or, type cmd into the Start menu and choose Run as administrator.
- Run the following command:
sfc /scannow
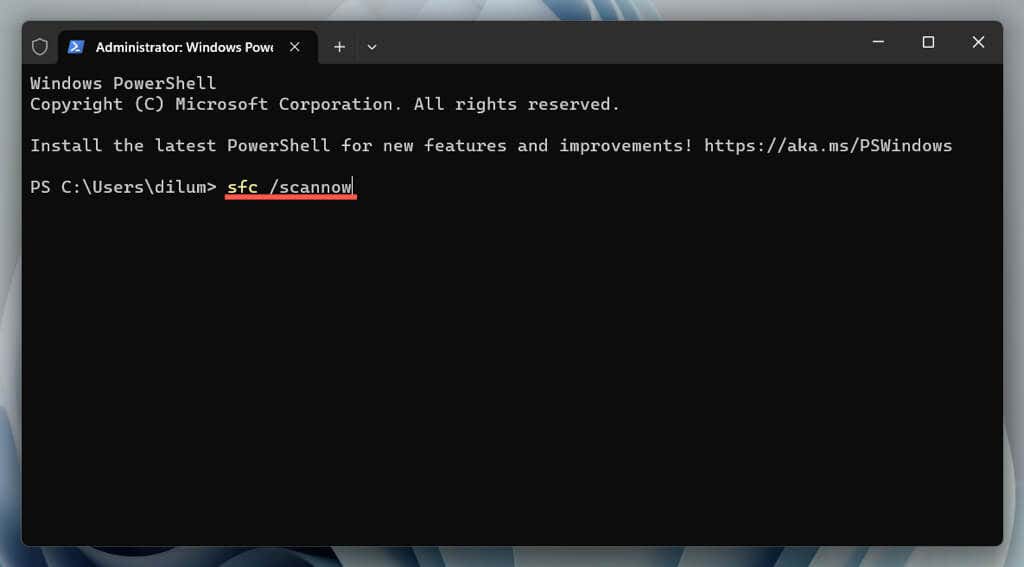
- Wait until the System File Checker scans for and fixes Windows.
Run DISM Tool to Fix Windows
Next, run the DISM (Deployment Image Servicing and Management) tool to resolve issues with operating system stability. Just re-open an elevated Windows PowerShell or Command Prompt console and execute the following command:
DISM.exe /Online /Cleanup-Image /Restorehealth
Perform a Clean Boot
Clean booting Windows helps you identify third-party applications or services causing conflicts with the Windows Search Indexer. To do that:
- Open a Run box, type msconfig, and select OK.
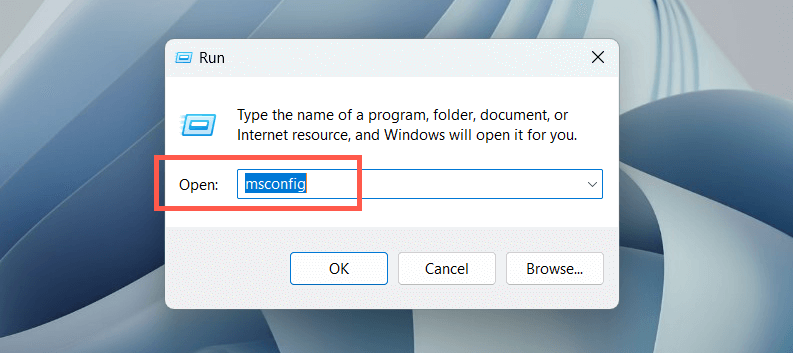
- Switch to the Services tab, select Hide all Microsoft services, and choose Disable all.
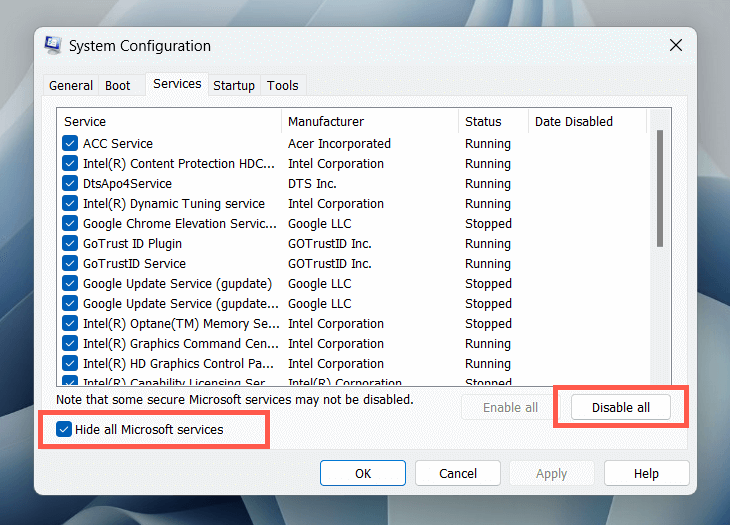
- Restart your computer. If the Microsoft Windows Search Indexer’s high CPU usage stops becoming an issue, re-enable the disabled services individually or in batches to identify the conflicting item.
Additionally, open the Task Manager, disable any non-Microsoft login items from the Startup tab, and check if that helps.
Check for Malware
Malware can hijack the Windows Search Indexer and result in high CPU usage. Run a full system scan to detect and remove malicious software from your system. To do that:
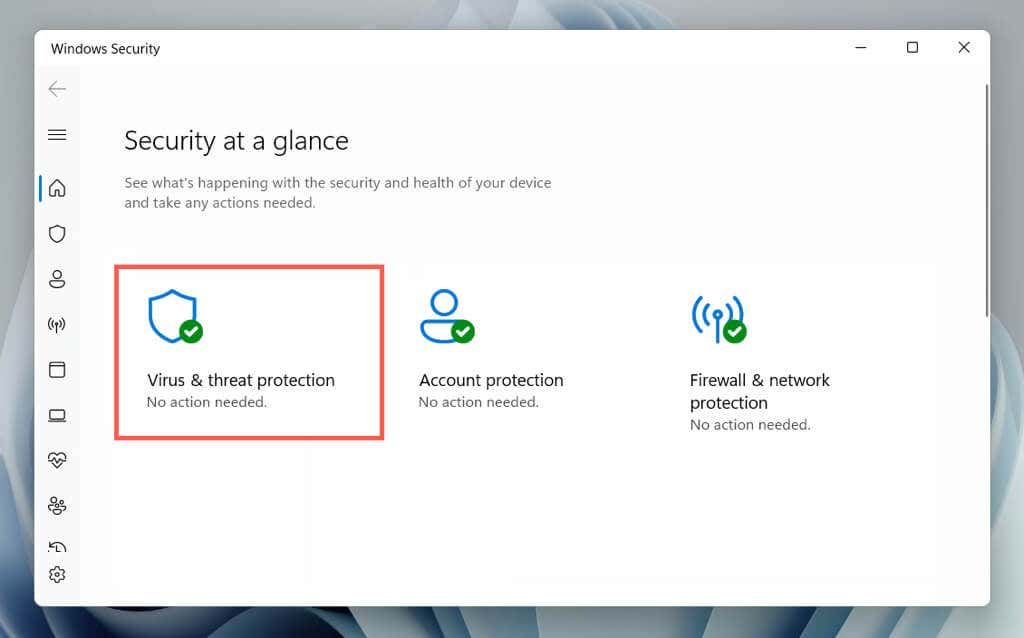
- Open the Start menu, type Windows Security into the search box, and press Enter.
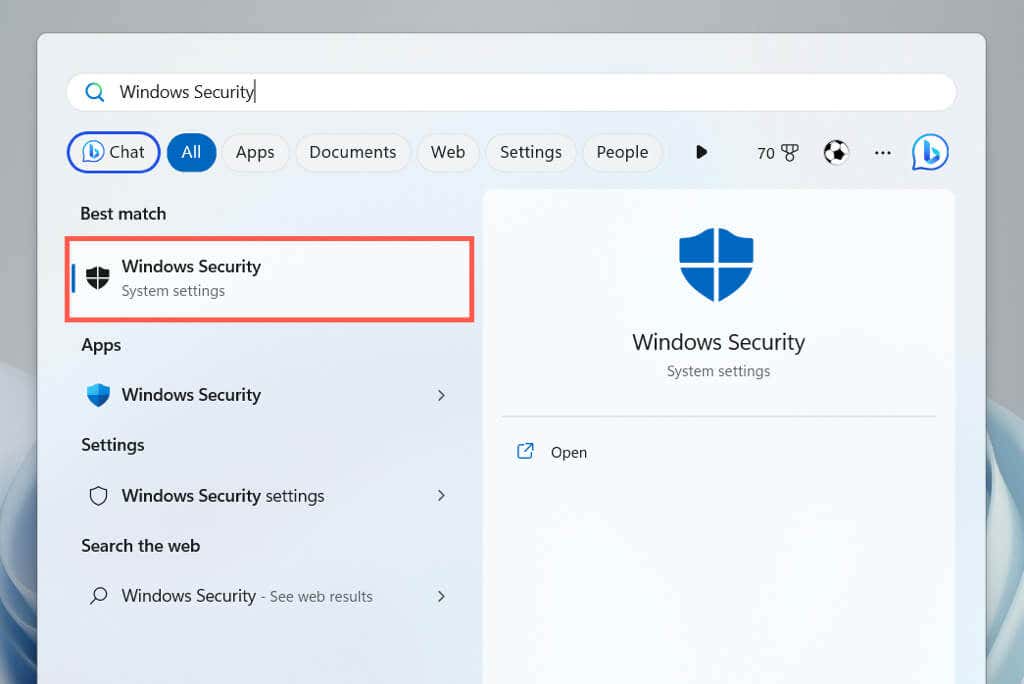
- Select Virus & threat protection.
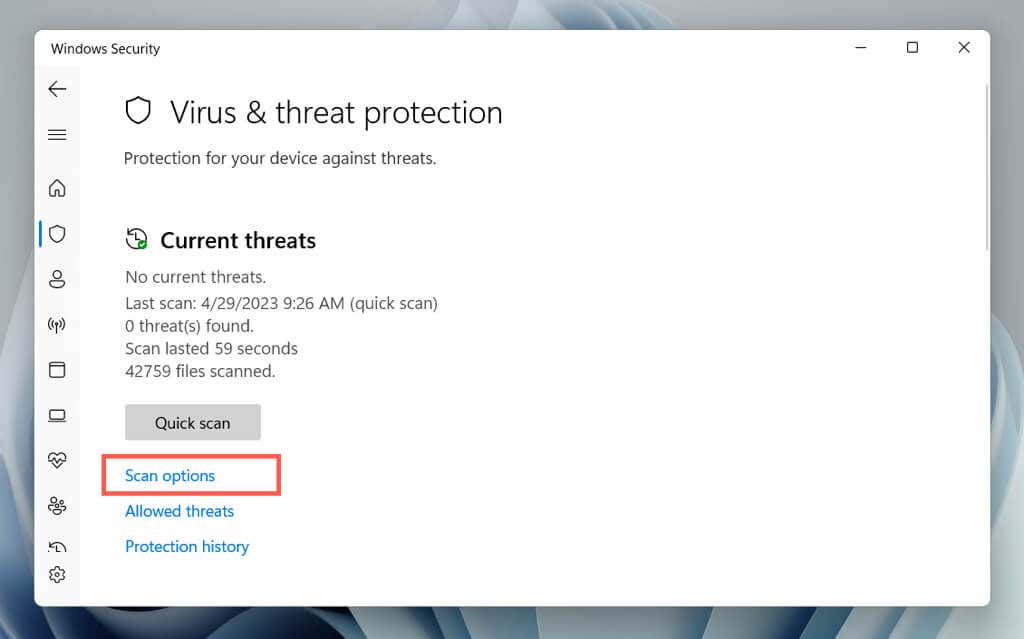
- Select Scan options.
- Select the radio button next to Full scan and choose Scan now.
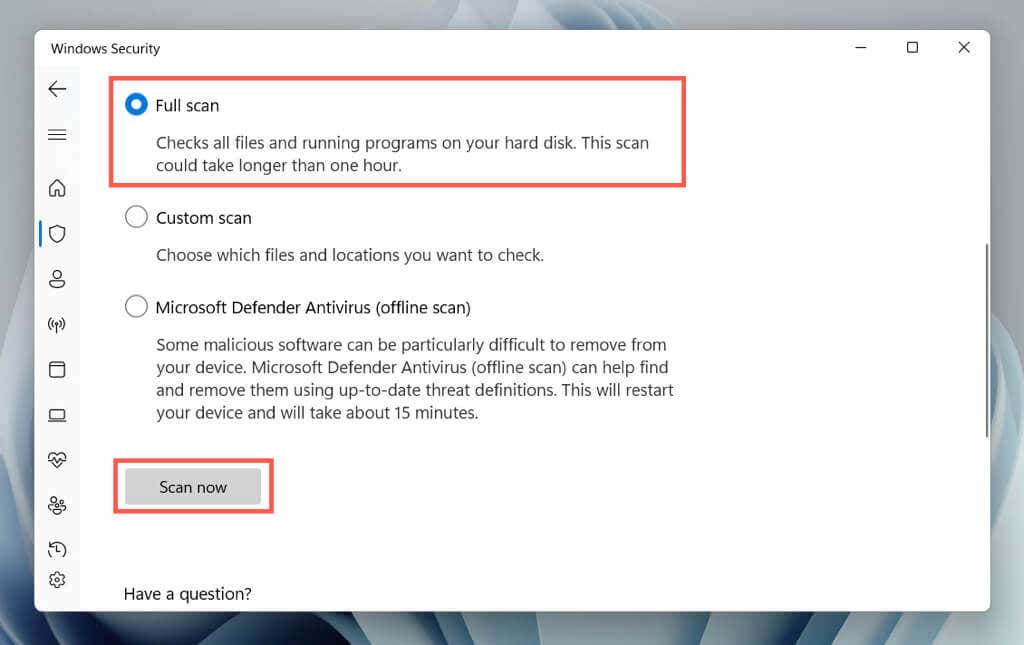
- Wait until Windows Security scans your computer for malware.
You can follow that up with a Microsoft Defender Antivirus (Offline scan), which scans your computer thoroughly for hidden threats. You can also use third-party anti-virus programs to deal with stubborn malware.
Factory Reset Windows
If none of the above methods work, consider factory resetting your PC. This will wipe all data from your computer, return the operating system to its original state, and resolve severe underlying issues with the Windows Search Indexer. Before proceeding, make sure to back up all important files and documents.
To initiate a factory reset, open the Settings app and go to System > Recovery > Reset PC. For comprehensive step-by-step instructions, check our guides to resetting Windows 11 and 10 to factory defaults.
Related Posts
- How to Fix a “This file does not have an app associated with it” Error on Windows
- How to Fix an Update Error 0x800705b4 on Windows
- How to Resolve “A JavaScript error occured in the main process” Error on Windows
- How to Fix the Network Discovery Is Turned Off Error on Windows
- How to Change Folder Icons in Windows
Windows 10 indexing high CPU usage can negatively impact the performance of your computer. If the process spikes up suddenly, you can try the solutions mentioned in this post from MiniTool Website.
Windows Search Indexer High CPU Usage
Windows search indexer can help to handle file indexing hence speeding up the search process on your computer. Sometimes, it might occupy many CPU, disk or memory resources, slowing down your drive and affecting the overall performance of your computer.
If you are also bothered by Window indexing high CPU, disk, or memory usage at the moment, the solutions below might help you out.
Tips:
Windows indexing high CPU usage might contribute to a system crash all of a sudden. A sudden system crash can cause unexpected data loss. Therefore, it is of necessity to back up your important files with the free backup software – MiniTool ShadowMaker to keep your data safe.
MiniTool ShadowMaker TrialClick to Download100%Clean & Safe
How to Fix Indexing High CPU/Disk/Memory Usage?
Fix 1: Restart the Search Index
If Windows Search is running for a very long time, it might open other tasks, leading to index high CPU usage. Therefore, restarting this service might help to reduce the load of the CPU usage.
Step 1. Press Win + R to open the Run box.
Step 2. Type services and hit Enter to open Services.
Step 3. Scroll down to locate Windows Search and right-click on it to choose Properties.
Step 4. Choose the Startup type to Automatic and hit Start.
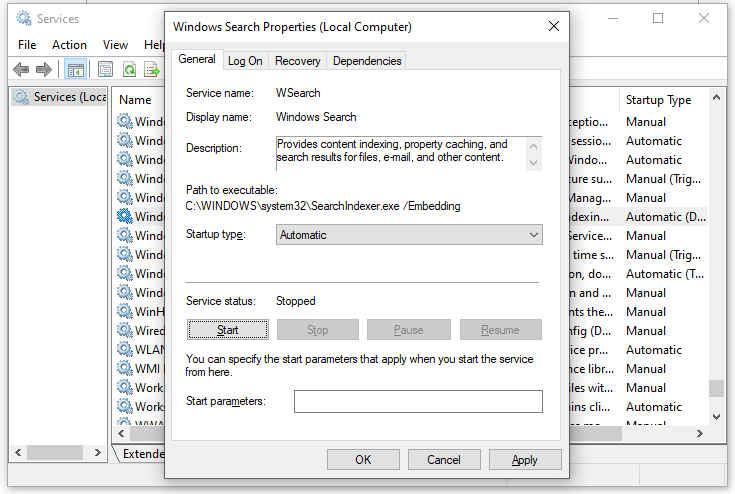
Step 5. Click on OK to save the changes.
Fix 2: Run Search and Indexing Troubleshooter
When Window encounters some errors with Windows search indexer, you can exploit the Search and Indexing troubleshooter to check and fix the problem itself.
Step 1. Press Win + I to open Windows Settings.
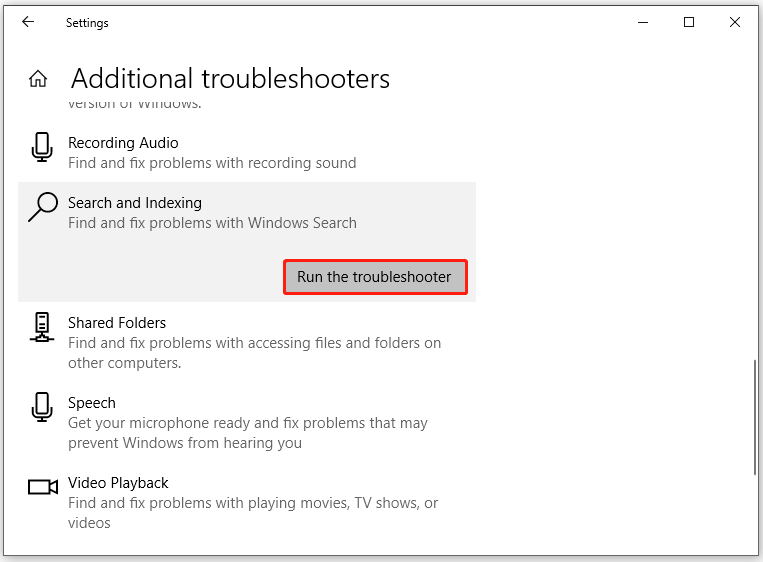
Step 2. Go to Update & Security > Troubleshoot > Additional troubleshooters.
Step 3. Scroll down to find Search and Indexing > hit it > hit Run the troubleshooter, and then the troubleshooter will start troubleshooting the errors in Windows Search for you.
Fix 3: Reduce Indexed Data/Locations
Reducing the amount of data the search indexer is indexing is one of the best ways to fix Windows search indexer high disk usage. To do so:
Step 1. Press Win + R to open the Run box.
Step 2. Type in Control Panel and hit Enter.
Step 3. Click on View by and select Small icons.
Step 4. Scroll down to find Indexing Options and hit it.
Step 5. Click on Modify > deselect all the locations except the C: drive > hit OK.
Fix 4: Rebuild the Index
If you don’t have any resource-intensive tasks planned for the new couple of hours, you can try rebuilding the search index. Here’s how to do it:
Step 1. Press Win + R to open the Run box.
Step 2. Type in Control Panel and hit Enter.
Step 3. Click on View by and select Small icons.
Step 4. Scroll down to find Indexing Options and hit it.
Step 5. Click on Modify > deselect all the locations except the C: drive > hit OK.
Step 6. Go back to the Advanced Options window > click on Advanced > Rebuild > OK.
Fix 5: Delete the Search Database
If the search database is corrupted or too big, Microsoft Windows search indexer high CPU usage will also appear. In this case, you can delete the Windows.ebd file to free up more resources.
Step 1. Press Win + E to open File Explorer.
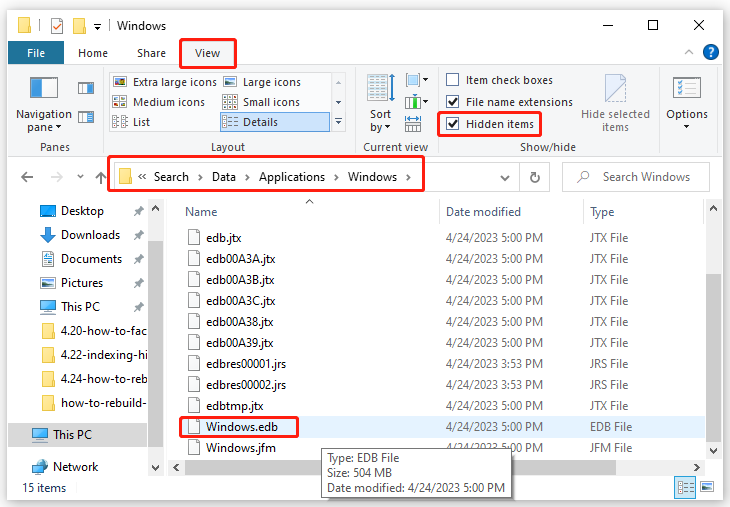
Step 2. In the View tab, tick Hidden items.
Step 3. Navigate to the following location:
C:\ProgramData\Microsoft\Search\Data\Applications\Windows
Step 4. Scroll down to find Windows.ebd and right-click on it to choose Delete.
Fix 6: Run SFC & DISM
System file Corruption is another possible culprit of Indexing high CPU usage. Here’s how to fix the faulty system files:
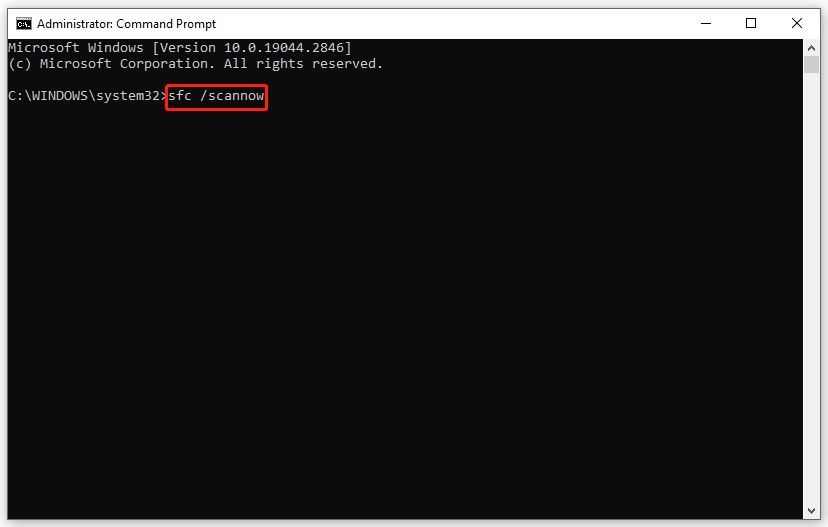
Step 1. Type cmd to locate Command Prompt and right-click on it to choose run it as an administrator.
Step 2. Type sfc /scannow and hit Enter.
Step 3. After the process is complete, reboot your computer and run CMD as an administrator.
Step 4. Run the following command one by one and remember to hit Enter after each command.
DISM /Online /Cleanup-Image /CheckHealth
DISM /Online /Cleanup-Image /ScanHealth
DISM /Online /Cleanup-Image /RestoreHealth
Step 5. Restart your system.

