
The simplest way to download files is to drag them from remote panel of WinSCP to local panel or Windows File Explorer. See section Using Drag&drop (Mouse).
For alternative ways, advanced options and automation see further sections.
- Using Drag&drop (Mouse)
- Using Keyboard
- Using Copy&paste
- Using File URL
- Download in Background
- Automating Downloads
- Downloading Found Files
Advertisement
Using Drag&drop (Mouse)
First select the remote files or directories you want to download. You can select the files in the remote panel, either in file list or in directory tree (one directory only).
Then drag your selection and drop it on local directory.
If you are using Commander interface you can drop the files on its local panel. If you drop the files on empty place on file list, the files will be downloaded to current local directory.1 If you drop the files on local directory icon (either in the file list or directory tree), the files will be downloaded to that directory.

Advertisement
You can also drop the files to Windows File Explorer or other application. Possible external transfer destinations and the way they are handled depend on configured drag&drop download mode.
Before the download actually starts, the transfer options dialog will show. There you will have a chance to change the transfer options or the target directory. You can avoid the dialog being shown in preferences. In such case you can change the transfer options by selecting preset on Transfer Settings toolbar.
If you hold Shift key while dragging the files, they will be moved to local directory (i.e. transferred and deleted from remote directory).
Using Keyboard
If you prefer controlling application using keyboard, you will probably find Commander interface useful.
First select the remote files or directories you want to download. With Commander interface make sure that remote panel is still active. Then use Files > Download or corresponding keyboard shortcut.
Before the upload actually starts, the transfer options dialog will show. There you will have a chance to change the transfer options or the target directory. The target directory is by default the current local directory with Commander interface and the last used local directory with Explorer interface. You can avoid the dialog being shown in preferences. In such case you can change the transfer options by selecting preset on Transfer Settings toolbar.
If you use Files > Download > Download and Delete (or corresponding keyboard shortcut), the files will be moved to local directory (i.e. transferred and deleted from remote directory).
Using Copy&paste
You can also download files using the Windows clipboard. First select the files you want to download in the remote panel and copy them to the clipboard.
Then use Paste command in the local panel (Commander interface only) or in Windows File Explorer.
Before the download actually starts, the transfer options dialog will show. There you will have a chance to change the transfer options. You can disable the dialog in preferences.
Using File URL
WinSCP can be registered to handle protocol URL Addresses. When it is, you can type in file URL to your favorite web browser or Window’s Start > Run box or even include the file URL to some web page. WinSCP will handle the URL and offers you to download the file.
Download in Background
By default the download starts in foreground, blocking the WinSCP window until it finishes. Learn how to schedule the background transfer.
Automating Downloads
To automate the file download, use the scripting command get or .NET assembly method Session.GetFiles.
Advertisement
Downloading Found Files
You can also initiate a download from find results.
Last modified: by martin
So, there are numerous tool that can help you login to your server. My personal preference over the past few years have been Bitvise SSH client and WinSCP. I still use them because they are very straight forward and highly configurable. But there are times where you just want to run a command or upload a single file without going through all the trouble of logging in and managing Private Keys.
Follow the below steps to configure SSH and SCP on your system.
Note: Below steps are also applicable with Windows 11.
The first thing you need to do is Enable OpenSSH in Windows optional features. Skip this step if it is already enabled. Search and open ‘optional feature’ from start menu and then click on ‘Add a feature’ and search for ‘OpenSSH Client’ and click on install.
Now that you’ve enabled OpenSSH run ssh in windows terminal to verify it has been installed correctly.
Now you can connect to remote server using ssh commands that you are used to in Linux systems.
ssh ubuntu@12.34.56.78

# you can also use private key file to login
ssh ubuntu@12.34.56.78 -i "C:\location\of\private\key"
TBH, every time we want to log in, we have to enter the host name or location of private key or password. And now suddenly things don’t seem direct and easy.
Fret not.
You can save your profiles inside a config file located in C:\Users\username\.ssh\config. Edit the code structure given below and save it in config file. Give it a friendly name, I’ve used ‘wt’ in the example, you will use this Host to login later. Update the HostName, User IdentityFile, and Port. You can use as many profiles as you want. Just put another profile in new line and make sure it is properly indented.
Host wt
HostName 10.21.43.231
User ubuntu
IdentityFile "D:\Users\Profiles\SSH Key\key"
IdentitiesOnly yes
Port 22
ServerAliveInterval 60
Now just enter ssh wt to login automatically.
If you are getting «Warning: Unprotected Private Key File!» warning then make sure you have set the right permission for private key file.
Open the advanced file setting in security tab and click on ‘Disable inheritance’ button. Now click on ‘Add’ button to add a user for file permission.
Click on ‘Select a principal’ link and type your username or linked account email.
Save all the settings and try again by running ssh wt in terminal.
So far everything working great? Well, we are not done yet. Let’s take it a step up further.
You can also use SCP commands to upload or download files to and from remote server.
# upload single file to remote server
scp filename.txt wt:/home/ubuntu/filename.txt
# download single file from remote server
scp wt:/home/ubuntu/filename.txt test.txt
Similarly, you can use -r flag to recursively download files from the server.
scp -r wt:/remote/folder/path local/folder
And to upload files to server use below command.
scp -r ./local/folder wt:/home/ubuntu/app
Pro-tip: You can add a npm script to package.json file to automatically upload the build folder to remote server. Just run
npm run publishand all the files and folder will be uploaded.
From here the sky is the limit. If you face any difficulties in setting up SSH or SCP then write to me on @vip_iny.
In this tutorial, you will learn how to use the scp command to securely copy files and directories between local and remote systems using SSH.
In This Tutorial
- System Requirements for SCP
- SCP Command Syntax
- Examples: Copying Files from Local to Remote
- Examples: Copying Files from Remote to Local
- Copying Directories
- Copying Between Two Remote Servers
- Using an Identity File (Private Key)
System Requirements for SCP
Local Computer:
- The
scpcommand relies on the SSH protocol. - On the local computer where you’re running the
scpcommand, only an SSH client is needed. - Linux, macOS, and Windows all come with the
scpcommand installed by default.
Remote Computer:
- However, on the remote server side you need
OpenSSH serverto accept incoming SSH connections. - So the OpenSSH server must be running on the remote computer.
If your Linux system doesn’t have an SSH server, click this link for instructions on how to install the OpenSSH Server.
You can install the OpenSSH Server on Windows as well.
SCP Command Syntax
The basic syntax of the scp command looks like this:
scp [options] source destination- The source is the file or folder you want to copy.
- The destination is where you want to copy it to.
Command Options:
-r: Recursively copy directories.-P port: Specifies the port number to connect to on the remote host (if it’s not the default port 22).-i identity_file: Specifies the private key file to use for authentication.
Remote Path Format
When specifying a remote source or destination, the format is as follows:
user_name@IP-Address:pathExample:
[email protected]:/var/www/The user@ portion is optional if your local username is the same as the remote username. If it’s missing, the scp command will use your local user account name.
Examples: Copying Files from Local to Remote
Copy file1.txt from the local computer to the /tmp directory on the remote server at 192.168.1.10:
scp file1.txt [email protected]:/tmp/Copy file1.txt and file2.txt to the remote server at the same time:
scp file1.txt file2.txt [email protected]:/tmp/Examples: Copying Files from Remote to Local
Download /etc/passwd from the remote computer and save it in the C:\data\ folder on your Windows computer:
scp [email protected]:/etc/passwd C:\data\Download multiple files at once from the remote server:
scp [email protected]:/tmp/file1.txt /tmp/file2.txt /backup/Note: The above syntax for downloading multiple remote files might not work as expected in the Windows version of the scp command. It works in a Linux Bash shell.
Copying Directories
When copying a directory, you must use the -r option to copy all files and sub-directories recursively.
Examples:
scp -r /var/www/ [email protected]:/tmp/
scp -r [email protected]:/var/www/ /backup
Copying Between Two Remote Servers
It’s also possible to copy files between two remote computers using scp, but the data is transferred through your local machine.
Example:
scp -r [email protected]:/var/www/ [email protected]:/backup/Using an Identity File (Private Key)
And the last example we’ll look at is how to copy files using an identity file or private key, if you’re using passwordless authentication.
The command option to specify the identity file is -i.
scp -r -i srv01.pem [email protected]:/var/www/ /backup/And that concludes this tutorial on the Linux scp command. If you found it helpful, subscribe to @RealClearComputing for more Linux tutorials.
WinSCP, a staple tool for secure file transfers, offers more than just a graphical user interface. The WinSCP command-line functionality allows IT professionals and sysadmins to manage and automate file transfers directly from the console, enhancing efficiency and flexibility in their workflow.
To learn the ins and outs of the WinSCP GUI, check out this post’s complementing post, The WinSCP GUI: The Ultimate Guide.
Discover every command-line feature WinSCP offers in this Ultimate Guide. You’ll learn, step-by-step, how to leverage the WinSCP command line to maximize your productivity and streamline your file transfer processes.
Let’s dive into the world of command-line file management with WinSCP!
Prerequisites for Using the WinSCP Command Line
- A Windows XP+ PC – This tutorial will use Windows 10 Enterprise.
- A remote Linux host – This tutorial will use an Ubuntu 18.04.5 LTS machine.
- A user account on the remote SSH host with sudo permissions.
Generating a Session URL with the WinSCP Command Line
While the WinSCP GUI offers a convenient Login window for setting up connections, the WinSCP command line requires a different approach. Instead of interactive windows, you must specify connection attributes in a more direct manner.
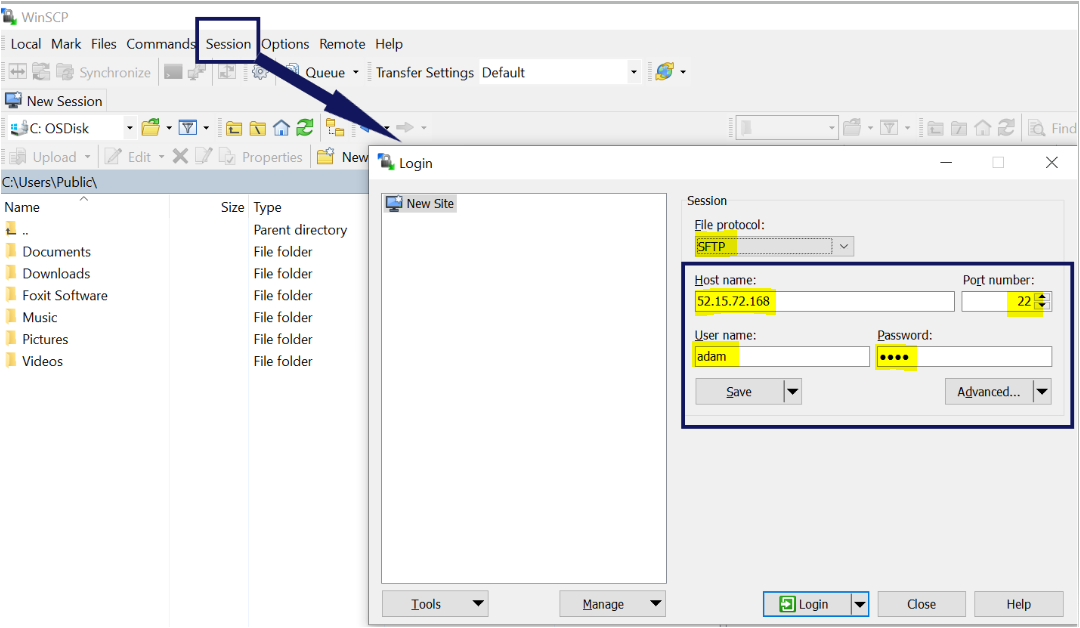
To instruct the WinSCP command line on where to connect, a session URL is used. This URL encapsulates the connection attributes defined in the GUI.
A basic session URL follows this structure:
<protocol>://<username>:<password>@<host name>/<folder path>For example, to connect to the 1.1.1.1 host with username adam and password pw using SFTP in WinSCP, the session URL would be:
If you’ve set up a WinSCP site, you can easily find the session URL. Open the WinSCP GUI, click on Session, right-click your site, and select Generate Session URL/Code.
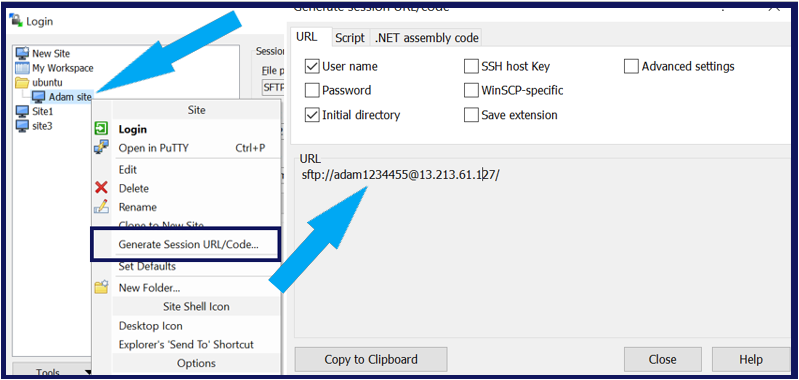
The Session URL dialog box provides various customization options for your connection, each influencing how WinSCP interacts with the remote host.
- Initial directory – Specifies the remote directory that WinSCP opens upon connection.
- SSH host key – Uses an existing SSH key for remote host authentication.
- WinSCP-specific URL – Generates a unique session URL, like
WinSCP-sftp://, specifically for WinSCP’s understanding, avoiding conflicts with default web browsers. - Save extension – Often paired with WinSCP-specific URLs to further minimize application conflicts.
When all options are enabled, the session URL format should resemble the following:
<protocol>://<username>:<password>@<host name>/<folder path><save extension>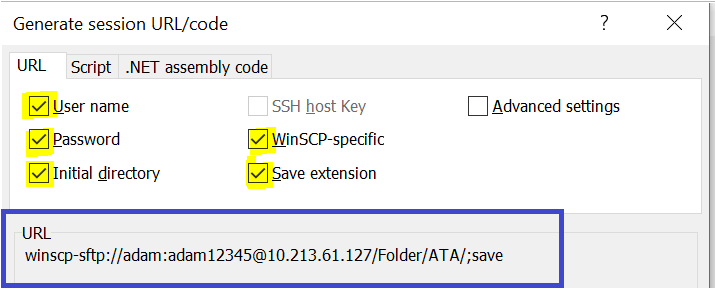
Mastering the WinSCP Command-Line: Generating Session Connection Code
With your session URL ready, WinSCP goes a step further by offering code examples in the Generate session URL/code window’s Script tab. Here, you can select from different script types:
- Script file
- Batch file
- Command-line
- PowerShell script
Choose your preferred script type, and WinSCP will generate the necessary syntax for connecting to a remote host using the WinSCP command line.
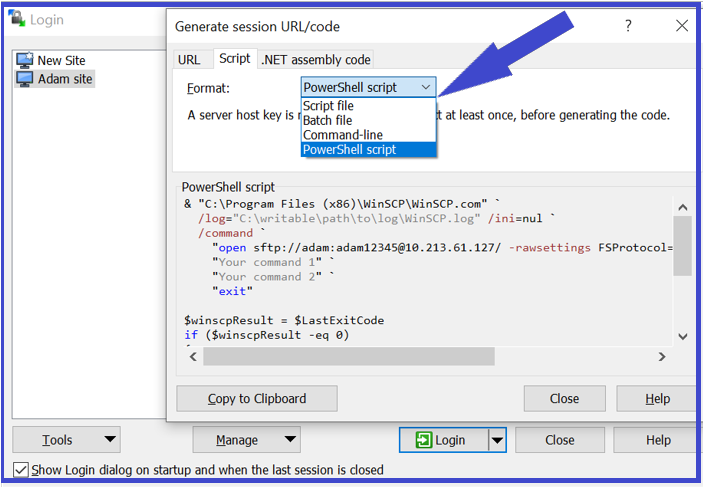
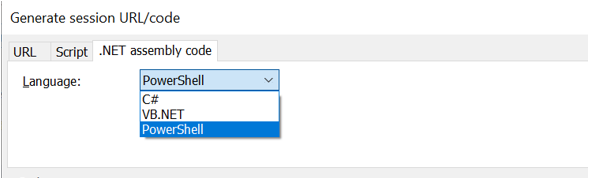
For coding in .NET, C#, or PowerShell, switch to the .NET assembly code tab, as depicted below.
Understanding WinSCP.exe vs. WinSCP.com in the WinSCP Command Line Context
Knowing how to generate a session URL is crucial for using WinSCP command line tools. Let’s explore how to connect to a host using these tools, starting with understanding the differences between winscp.exe and winscp.com.
Winscp.exe doubles as the GUI launcher and a command-line utility for simple tasks. You can use it for basic commands if you specify the right parameters.
Think of winscp.exe as a bridge between the GUI features and command-line interface of WinSCP.
For more complex tasks, especially in scripting, winscp.com is your go-to. This console-based tool is ideal for automation scripts and supports a range of SSH functions. It provides a true, non-interactive WinSCP command line experience.
Regardless of your choice, begin by opening a command prompt (either cmd.exe or PowerShell) and navigate to the WinSCP installation directory.
cd 'C:\Program Files (x86)\WinSCP'With the command prompt ready, let’s proceed to using WinSCP for remote connections.
Utilizing WinSCP.exe: Connecting to Remote Hosts with Session URLs
One of the simplest methods to connect to a remote host with WinSCP command line is by running winscp.exe with the session URL as a parameter. For instance, to connect to the 54.179.19.216 host with username automate and password automate using sftp, and then navigate to the /tmp directory, use the following command:
For enhanced security, instead of using a password, you can connect to a remote host using a private key with the /privatekey parameter. While this method is more secure, the intricacies of setting up a private key fall beyond the scope of this tutorial on the WinSCP command line.
Here’s an example of connecting to the 54.179.19.216 host using the username automate and a private key mykey.ppk over scp.
Efficiently Downloading Files with WinSCP.exe Without a Site
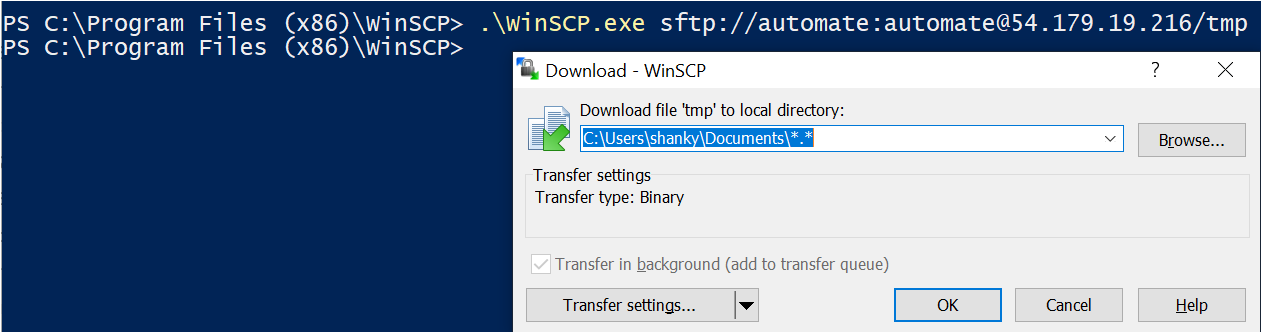
The WinSCP command line via winscp.exe allows you to swiftly transfer files using ad-hoc connections, even without a predefined WinSCP site. Let’s explore downloading files from a remote host without a site configuration. For example, downloading all files in the /tmp directory of the remote host 54.179.19.216 using SFTP.
1. Start by generating a session URL. Below is an example connecting to the remote host with the credentials automate and landing in the /tmp directory.
2. Run winscp.exe with the session URL to access the WinSCP transfer settings dialog box. The local directory defaults to ~\Documents, and WinSCP will target all files (\\*.*) in the remote directory.
# Command Syntax: winscp.exe [/path/[file]]
winscp.exe sftp://automate:[email protected]/tmp
3. Click OK to initiate the transfer. WinSCP will download all files from the remote /tmp directory to your chosen local directory over SFTP.
Uploading Files Using WinSCP.exe Without a Site
After mastering file downloads, let’s switch to uploading files to a remote host using the WinSCP command line with winscp.exe. The process is similar to downloading, but this time you’ll also need to use the /upload switch, specifying the file or folder you wish to upload.
# Uploading the file a.txt using winscp.exe to the remote server without a site.
.\WinSCP.exe sftp://automate:[email protected]/tmp/ /upload C:\Users\shanky\Desktop\a.txt
Executing the command above brings up the WinSCP upload dialog, indicating the files to be uploaded (*.*) to the remote host’s /tmp directory.

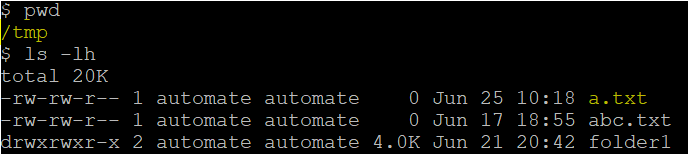
After uploading, log into the remote host with an SSH client and verify the upload success with commands like pwd and ls -lh, which will display the directory contents, confirming the successful transfer.
Leveraging WinSCP.exe for Downloading Files Using a Site
While session URLs are practical for ad-hoc connections, having a pre-configured WinSCP site simplifies the process. If you’ve been utilizing WinSCP for some time, you’re likely to have several sites already set up.
With winscp.exe, you can easily utilize these sites, created in the GUI, to connect to a remote host, bypassing the need to remember session URL details.
To locate saved sites in WinSCP, navigate to Session -> Sites -> Site Manager.
For instance, let’s explore downloading files using a pre-existing site with the WinSCP command line.
1. Connect to the remote host using a configured WinSCP site. The example below demonstrates a connection using a site named Adamsite.
# Connect with a WinSCP site
winscp.exe Adamsite
Once connected, WinSCP displays a status notification.

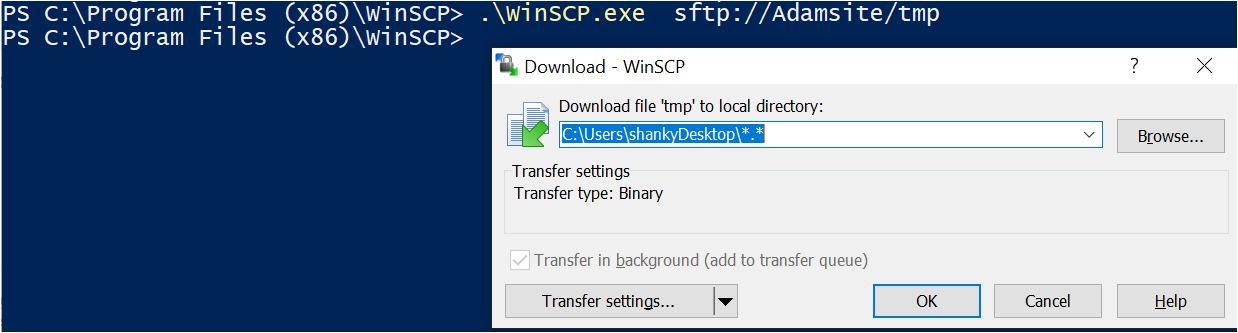
2. Next, execute winscp.exe with the protocol (sftp), site name (Adamsite), and target directory (/tmp). This approach brings up the WinSCP transfer settings dialog box, ready for file download actions.
# Initiate remote connection using a site
winscp.exe sftp://Adamsite/tmp
Click OK to start downloading all files from the /tmp directory of the remote host to your local directory via SFTP.
For uploading files from your local machine to a remote host, the process is analogous. Use the
/uploadswitch along with the file or directory path, likewinscp.exe Site3 /upload .\license.txt. Full URL specification (sftp://Adamsite/tmp) is not necessary.
Streamlining Remote File Editing with WinSCP.exe
Need to edit a text file on a remote host? Skip the manual download-edit-upload cycle. The WinSCP command line offers a more efficient method using the /edit parameter. Simply specify the site name, /edit, and the remote file path.
Example:
# Editing a file on a remote host
winscp.exe /edit /Adamsite/path/to/file.txt
# Using the WinSCP command line to edit a remote file
.\WinSCP.exe Adamsite /edit /tmp/a.txtExecuting the command above launches your default text editor, allowing you to modify the remote file as needed. This seamless integration is a key feature of the WinSCP command line capabilities.

After editing, simply save the file. WinSCP takes care of updating the file on the remote host, streamlining the edit-upload process.
Optimizing Workflow with WinSCP.exe Session Logging
For a comprehensive record of your actions, the WinSCP command line offers session logging. This feature is invaluable for tracking the commands executed during a session, aiding in troubleshooting and record-keeping.
To enable session logging, include up to three parameters when connecting to a session:
# Parameters for session logging
/log="<log file path>" /loglevel=<level> /logsize=<size>/log– Specifies the path for the log file./loglevel– Sets the verbosity of the logs, ranging from Reduced (1) to Debug (2)./logsize– Defines the size and rotation of the log file, in the format<total archived logs>*<max log file size>.
Below is an example of winscp.exe connecting to a host and logging activity to C:\winscp.log at a Debug level. The command maintains up to five 10MB log files (5*10MB).
# Example of WinSCP session logging
winscp.exe sftp://[email protected]/tmp/ /log="C:\\winscp.log" /loglevel=2 /logsize=5*10M
While winscp.exe provides a great introduction to remote connections, winscp.com elevates your command line experience, offering deeper interaction and control.
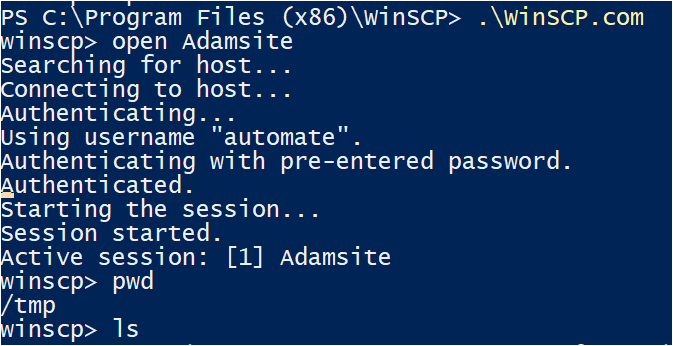
Begin by opening winscp.com in a command line environment. You’ll enter an interactive session reminiscent of SSH, indicated by the winscp> prompt.
Connect to a remote computer using the open command, followed by the desired site name.
After connecting to the remote host via WinSCP command line, as illustrated with Adamsite, you’ll find yourself in an environment akin to an SSH session. Here, you can execute commands and interact with the remote host efficiently.
Enhancing Security: Connecting with a New Key Pair (Host Key) in WinSCP
Public-key authentication enhances security when connecting to sessions. To use it, first obtain the host key fingerprint for your session. Use the ssh-keygen command in the WinSCP folder following the syntax below.
This command generates an SSH key pair, essential for secure authentication. Once executed, you’ll receive a fingerprint necessary for winscp.com session connections.
ssh-keygen -l -f /etc/ssh/ssh_host_rsa_key
To connect with the hostkey parameter, provide the generated fingerprint as shown in the example below.
Include the prefix
ssh-rsa 2048when using the fingerprint fromssh-keygen.
winscp.com open sftp://automate:[email protected]/ -hostkey="ssh-rsa 2048 x4DeZzv4jcWEk2zeeJgr5JeJ+z0xA+lGa3LC0q/B+88="While interactive sessions are great for certain tasks, non-interactive command execution is crucial for scripting and automation. winscp.com supports this through the /command parameter, enabling you to establish a session, execute a command, and disconnect in a single step.
For example, use the /command parameter to transfer a local file to a remote host. The example below demonstrates copying a file from C:\abc\abc.txt to the /tmp directory on the remote host 13.213.61.127.
The /command parameter takes two arguments as strings: one to establish the session and another for the actual command execution.
# Non-interactive file transfer using WinSCP
WinSCP.com /command "open sftp://adam:[email protected]/tmp" "put C:\\abc\\abc.txt"
For more complex automation needs, the /script parameter in winscp.com allows you to execute a series of commands from a script. This feature is invaluable when managing repetitive tasks or complex operations on remote hosts.
To utilize the /script parameter in WinSCP command line, start by creating a script file named upload_file_script.txt on your desktop with your preferred text editor.
Prepare a blank text file named a.txt in the /tmp directory of your remote computer.
Create a local directory at C:\abc.
Next, input the following contents into upload_file_script.txt and save it. This script downloads the a.txt file from the remote /tmp directory and re-uploads it as new_file.txt.
# WinSCP Script for File Transfer
 open sftp://automate:[email protected]/  -hostkey="ssh-rsa 2048 x4DeZzv4jcWEk2zeeJgr5JeJ+z0xA+lGa3LC0q/B+88="
 cd /tmp
 get a.txt C:\abc\
 close
 open sftp://automate:[email protected]/ -hostkey="ssh-rsa 2048 x4DeZzv4jcWEk2zeeJgr5JeJ+z0xA+lGa3LC0q/B+88="
 cd /tmp
 put C:\abc\new_file.txt
 close
 exit
Execute this script using the /script parameter in WinSCP with the following command:
Use the
/ini=nulswitch to prevent WinSCP from saving any session configurations upon exit.
winscp.com /ini=nul /script=upload_file_script.txt
   # Output
   Authenticating...
   Session started.
   /tmp
   a.txt                     |           10 B |    0.0 KB/s | binary | 100%
   Session closed.
   # New session for upload
   Session started.
   /tmp
   C:\abc\new_file.txt       |            0 B |    0.0 KB/s | binary |   0%
   Session closed.
WinSCP supports password and certificate-based or public-key authentication. To use public-key authentication, a compatible private key format is required. WinSCP assists in converting key formats for compatibility.
For instance, convert a PEM format private key (like those from AWS EC2) to a Putty-friendly format using WinSCP command line. The /keygen parameter in winscp.com facilitates this conversion.
- Apply the
/keygenparameter, followed by the key’s current path. - Include the
-oparameter to specify the output file path of the converted key. - Optionally, use the
-cparameter to add a comment to the converted key.
.\WinSCP.com /keygen C:\Users\shanky\Desktop\testing.pem -o C:\Users\shanky\Desktop\testing.ppk -c "Converted from OpenSSH format"Conclusion
With this comprehensive guide to the WinSCP command line, alongside the WinSCP GUI Guide, you’re now equipped to fully leverage WinSCP’s capabilities. Whether it’s file transfers, command execution, script running, or key conversions, WinSCP is a versatile tool for any IT professional.
How do you plan to integrate WinSCP into your workflow? Share your thoughts and experiences!
Графический интерфейс WinSCP используют для управления файлами на удалённых хостах через SFTP, SCP, FTP, WebDAV и Amazon S3. Это бесплатная программа, совместимая со всеми актуальными версиями ОС Windows. Пользователь может с её помощью безопасно подключаться к SSH-серверу с поддержкой SFTP или SCP, а также к FTP-серверу и WebDAV-серверу.
Программа WinSCP многофункциональна, так как позволяет:
- пользоваться встроенной командной строкой;
- создавать несколько соединений одновременно;
- редактировать скрытые файлы на сервере;
- сохранять настройки ПО в формате INI (.ini);
- работать с PuTTY-клиентом.
# Установка программы WinSCP
Вы можете скачать WinSCP с официального сайта — перейдите по этой ссылке (opens new window) и найдите пункт «Загрузка и установка WinSCP». Следуйте дальнейшим инструкциям. Выбирать русский язык при установке не придётся: у вас будет русскоязычная версия программы.
# Подключение к серверу
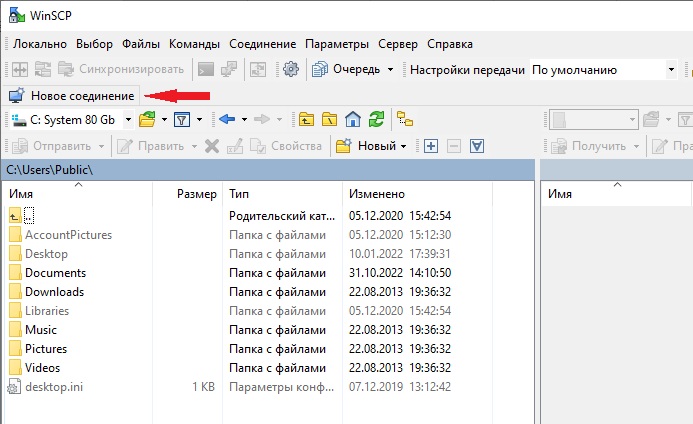
Запустите WinSCP и в открывшемся окне нажмите «Новое соединение»:
Теперь вам нужно ввести свои данные в следующие поля:
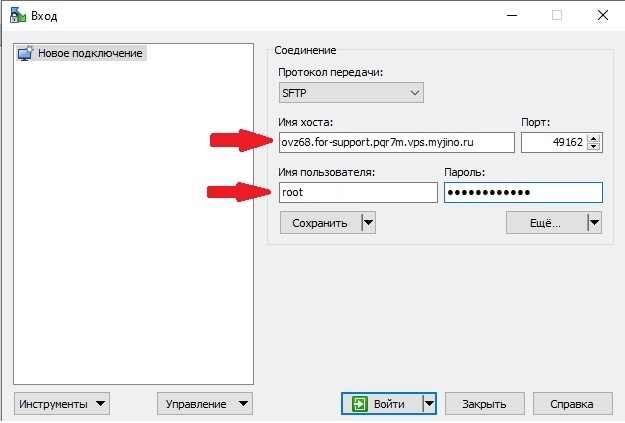
По умолчанию в программе указан SFTP-протокол, вы можете выбрать другой при необходимости.
Получить данные для входа вы можете в контрольной панели Джино (opens new window). Выберите нужный хостинг и перейдите в раздел УправлениеНастройки SSH. Здесь есть все данные — имя сервера (имя хоста), логин (имя пользователя) и пароль:
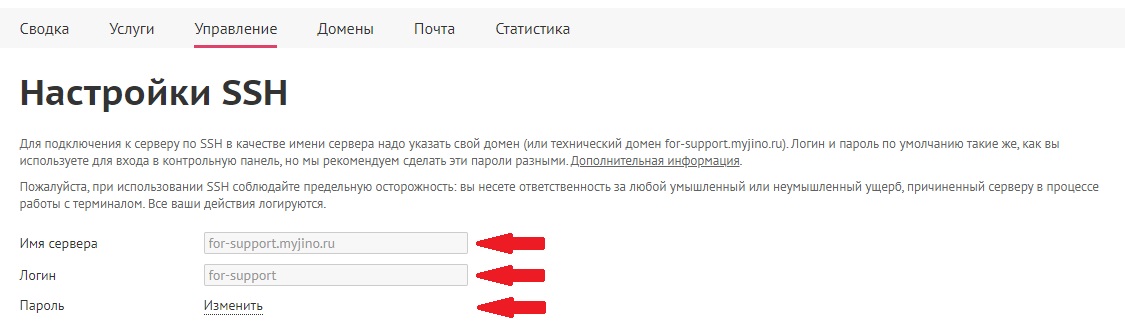
Если вы не помните пароль, вы можете здесь же его установить, а затем сразу ввести его в нужное поле в окне программы WinSCP. Через несколько секунд вы получите доступ к серверу.
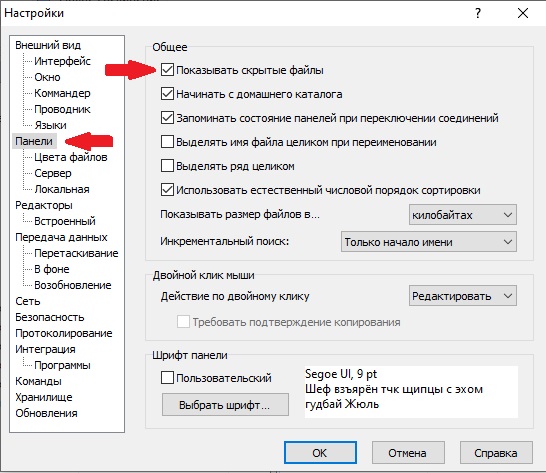
# Отображение скрытых файлов
Если вы видите не весь список файлов сервера, значит, программа не показывает вам скрытые файлы. Это легко исправить — перейдите в пункт меню «Параметры» и выберите «Настройки»:

Здесь перейдите в раздел «Панели» и отметьте галочкой окошко в верхнем пункте «Показывать скрытые файлы»:
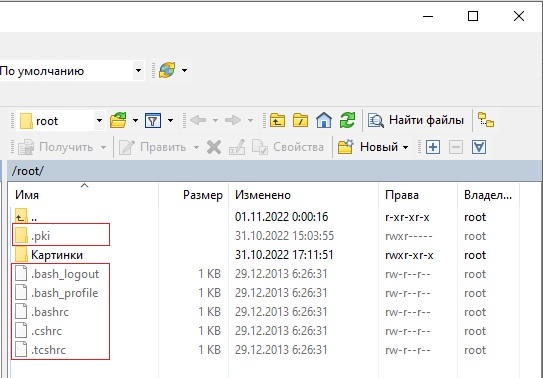
Теперь вы сможете увидеть все ваши файлы. Их легко отличить — цвет шрифта будет полупрозрачным:
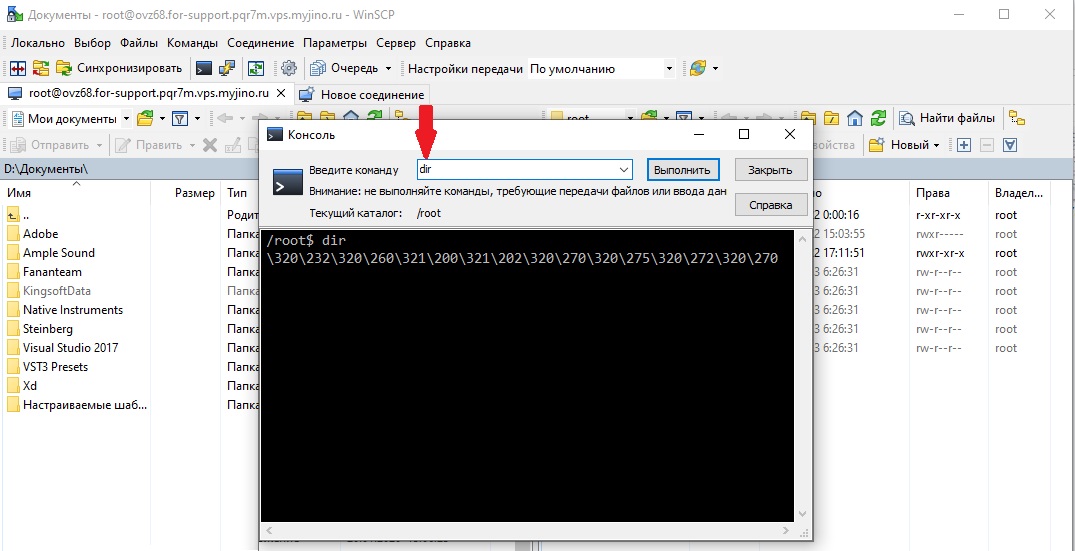
# Работа с командной строкой
Вы можете управлять сервером с любого устройства через консоль. Для этого вам нужно подключиться к нему, выбрать в меню «Команды» и нажать «Открыть терминал»:

На этом шаге WinSCP может запросить подтверждение, чтобы открыть отдельное соединение. Нажмите кнопку «ОК», и у вас откроется консоль. Теперь вы можете выполнять разные команды. Введите запрос в строку и нажмите «Выполнить»:
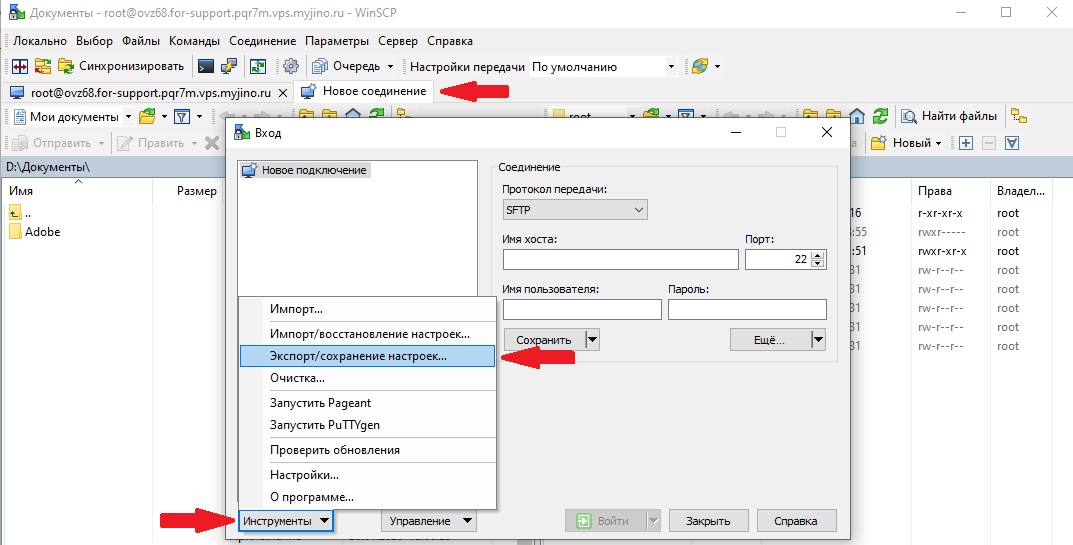
# Экспорт и импорт настроек WinSCP
Все настройки программы хранятся в закрытом INI-файле. Вы сможете в любой момент сохранить их и использовать их для запуска WinSCP на других устройствах.
Для экспорта настроек нажмите «Новое соединение», щёлкните на кнопку «Инструменты» и выберите «Экспорт/сохранение настроек»:
В открывшемся окне выберите папку, в которую хотите сохранить файл с настройками.
Импорт настроек проводится аналогично. После загрузки INI-файла вы сможете работать с сервером на новом устройстве.