
Imagine you’re playing your favorite online game, but you’re experiencing lag and connection issues. Or perhaps you’re concerned about the security of your Windows system and want to ensure no unauthorized access points exist. The culprit behind these scenarios could be open ports on your system.
Open ports act as virtual doorways that allow your computer to communicate with other devices or servers across a network. They play a crucial role in facilitating various online activities, from web browsing and email to file sharing and online gaming. However, open ports can also pose security risks if not properly managed, potentially allowing malicious actors to gain access to your system.
Understanding how to check open ports Windows is essential for both troubleshooting network problems and maintaining optimal system security. This process, known as port scanning, allows you to identify which ports are open, the services or applications associated with them, and potential vulnerabilities that may need addressing. The article will guide you on how you can check Windows open ports.
What are Open Ports?
Open ports are TCP (Transmission Control Protocol) or UDP (User Datagram Protocol) ports that are currently in use by a running process or service on your system. These ports are essential for network communication protocols, as they allow different applications and services to exchange data. For example, when you access a website, your web browser uses port 80 (HTTP) or port 443 (HTTPS) to communicate with the web server.
There are 65,535 available TCP and UDP ports, divided into three ranges:
- Well-known ports (0-1023): Assigned to common network services like FTP (21), SSH (22), and HTTP (80).
- Registered ports (1024-49151): Assigned to specific organizations or vendors for their products and services.
- Dynamic ports (49152-65535): Used for temporary or private connections, such as during a file transfer.
Explore the Blazing Fast Speed with Cheap Windows VPS!
With Ultahost, Hosting Windows VPS has never been easier or faster. Enjoy ultra-fast SSD NVME speeds with no dropouts and slowdowns.
Checking open ports is crucial for maintaining system security and preventing unauthorized access. Here are some reasons why:
- Malware and virus infections: Malware can use open ports to communicate with their command and control servers, stealing sensitive data or spreading further infections.
- Unauthorized access: Open ports can allow hackers to access your system remotely, potentially leading to data breaches or system compromise.
- Resource utilization: Unused open ports can consume system resources, slowing down your system’s performance.
Windows provides two built-in tools for port scanning: Netstat and PowerShell. Below we outline the basic guide on how to see open ports Windows.
Netstat
Netstat is a command-line utility that displays active network connections, routing tables, and interface statistics. To use netstat for port scanning, you need to open Command Prompt as an administrator use the following command and press Enter:
netstat -an
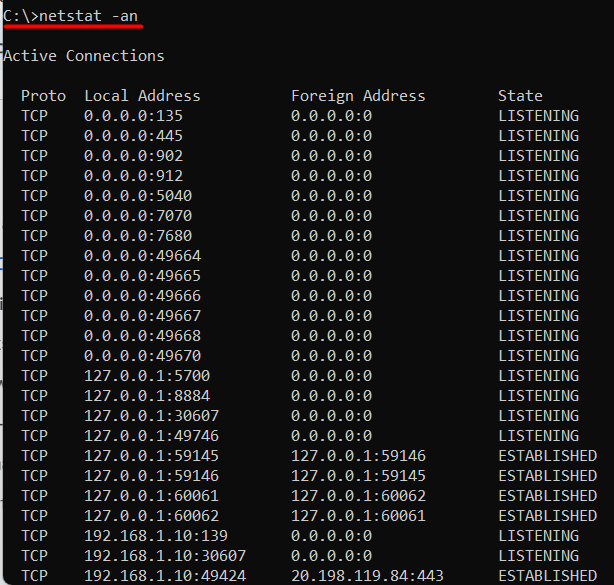
The -an option displays all active connections, including listening ports. Look for the “Local Address” column, which shows the IP address and port number of each connection.
PowerShell
PowerShell is a powerful task automation and configuration management framework from Microsoft. To use PowerShell for port scanning, you need to open it as an administrator and then execute the below command:
Get-NetTCPConnection
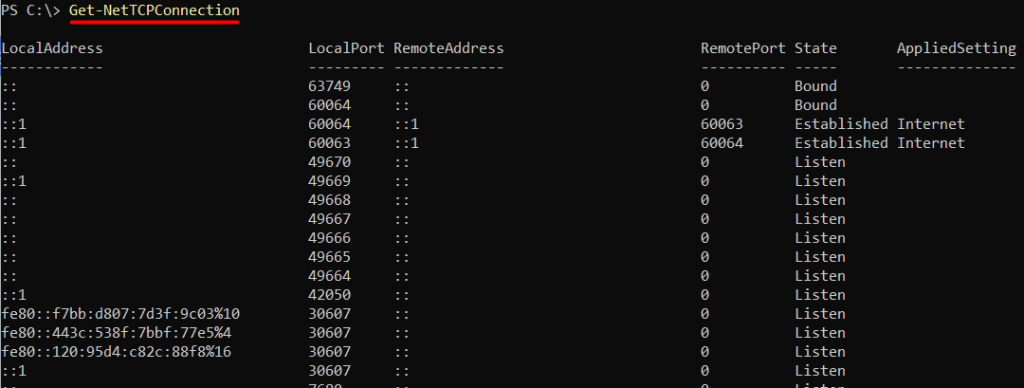
This cmdlet displays all list open ports Windows, including listening ports. Look for the “LocalAddress” property, which shows the IP address and port number of each connection.
Third-party software for Port Scanning
While built-in tools can provide basic port scanning capabilities, third-party software offers more advanced features and flexibility.
Nmap
Nmap is a popular, open-source port scanner that provides detailed information about network hosts and services. To use Nmap:
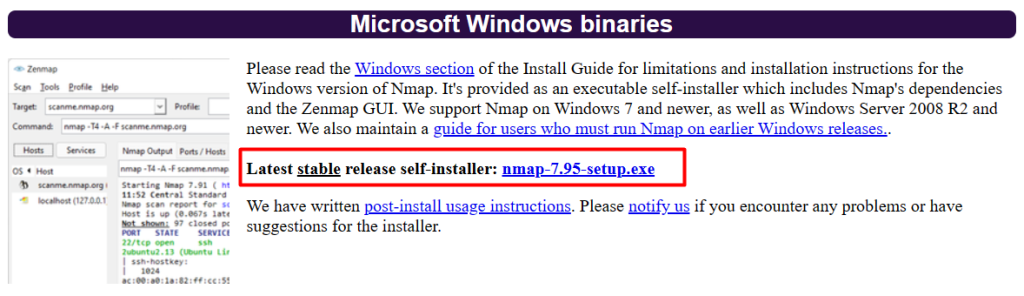
Download and install Nmap from the official website.
After installing it you need to open the open Command Prompt as an administrator and execute the below command:
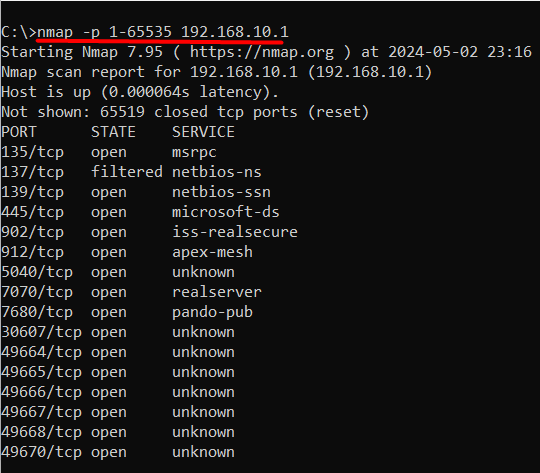
Type nmap -p 1-65535 <IP address>
Replace <IP address> with the IP address of your system or a specific host. Nmap will scan all 65,535 ports and display the results, including open ports and services:
nmap -p 1-65535 192.168.10.1
If you are unaware of your IP address then you can execute the ipconfig command on the command prompt to find it.
Conclusion
Open ports play a vital role in facilitating online activities, but they can also pose significant security risks if not properly managed. Understanding how to check open ports in Windows is essential for both troubleshooting network problems and maintaining optimal system security. By identifying open ports, users can determine which services or applications are associated with them and address potential vulnerabilities that may need attention.
By utilizing built-in tools like Netstat and PowerShell, or third-party software like Nmap, users can effectively scan for open ports and take necessary steps to ensure system security. Regular port scanning can help prevent malware infections, unauthorized access, and resource utilization, ultimately protecting sensitive data and system integrity. By grasping the importance of open ports and how to manage them, users can take a proactive approach to maintaining a secure and efficient Windows system.
While enabling open ports on your Windows machine can be useful for specific applications but it also introduces security risks. For a more secure and controlled environment rent a VPS from Ultahost. These VPS plans grant you root access and complete control over your server’s firewall configuration. This allows you to open ports with specific control ensuring only necessary ports are exposed.
FAQ
What are open ports in Windows?
Open ports are communication endpoints that allow data to be transmitted between a device and a network. In Windows, these ports can be in a listening state, waiting for incoming connections, or actively transmitting data.
Why is it important to check open ports in Windows?
Checking open ports can help you identify any potential security vulnerabilities on your Windows system. Unnecessary open ports could be exploited by malicious actors to gain unauthorized access to your system or to launch attacks.
How can I check open ports in Windows?
You can check open ports in Windows using various methods, including using built-in command-line tools like Netstat or PowerShell, third-party software, or online port scanning tools.
How do I use the netstat command to check open ports?
To use the netstat command, open Command Prompt, and type netstat -an. This will display a list of all open ports and their respective states (listening, established, etc.).
Can PowerShell be used to check open ports in Windows?
Yes, PowerShell provides cmdlets such as Get-NetTCPConnection and Get-NetUDPEndpoint that allow you to check open TCP and UDP ports, respectively.
Checking open TCP/IP ports on your Windows computer is crucial for managing network security and ensuring smooth connectivity. Certain apps and processes in Windows may face issues due to closed or misconfigured ports, often caused by firewalls or private IP addresses. This guide will walk you through step-by-step methods to check whether a TCP port is open or closed using built-in tools and third-party utilities.
Why You Should Check TCP/IP Ports?
Here are some common scenarios where checking ports is necessary:
- Troubleshooting connectivity issues for applications or services.
- Configuring firewalls to ensure necessary connections are allowed.
- Detecting suspicious activity that might indicate a security breach.
Methods to Check Open TCP/IP Ports
There are several ways to check open TCP/IP ports in Windows. Here are a few options:
Method 1. Using Telnet Client
Step 1: Check whether the telnet client feature is ON or not. In order to check, open the Turn Windows feature on or off settings from the search bar. OR press the ‘window’ key and type ‘windows’ features. Then press on “Turn Windows features on or off”.
-660.png)
Windows Features Option
A new prompt will be opened. Search for “Telnet Client” and check the box in front of ‘telnet Client’.

Windows Features
Step 2: Open the command prompt. Press the ‘windows’ key and type ‘cmd’. Press “Command Prompt”.
-660.png)
Command Prompt Option
Step 3: On the command prompt, type the command “telnet + IP address or hostname + port number” and check the status of the provided TCP port.
-660.png)
Telnet Command
Step 4: If only the blinking cursor is visible, then the port is open.
-660.png)
Port is Open
Step 5: If you get the message “connection failed” then the port is closed.
-660.png)
Port is close
Method 2: Using built-in netstat command-line utility:
Step 1: Open the command prompt.
Step 2: Run the following command:
netstat -an

Method 3. Using TcpView
Another option is to use the TcpView utility from Microsoft’s Sysinternals suite of tools. This utility provides a more user-friendly interface for viewing active TCP/IP connections, along with additional information such as the process ID and process name for each connection. Steps to be followed:
Step 1: Download the TcpView utility from the Microsoft Sysinternals website. You can find the download link on the TcpView page of the Sysinternals website.
-660.png)
Download Page
Step 2: Extract the downloaded file and run the TcpView.exe file to launch the TcpView utility. This will open the TcpView window, which shows a list of all active TCP/IP connections on your machine.

Extracted FIles
Step 3: Open the tcpview.exe (application).
By default, TcpView will display the following columns in the list of connections:
Protocol: Shows the protocol being used for the connection (TCP or UDP)
Local Address: Shows the local address and port being used for the connection
Remote Address: Shows the remote address and port being connected to
State: Shows the current state of the connection (e.g. Established, Listen, etc.)
You can use the “Local Address” and “Remote Address” columns to see which ports are being used by which applications. For example, if you see a connection with a local address of “127.0.0.1:80”, this means that the local application is using port 80 for outgoing connections.
Method 4. Using Windows PowerShell
You can also use Windows PowerShell to check open TCP/IP ports. To do this, use the Get-NetTCPConnection cmdlet, which allows you to view a list of active TCP/IP connections and the local and remote addresses and ports being used. For example, you can run the following command to view a list of all active TCP/IP connections:
Get-NetTCPConnection |
Select-Object LocalAddress,
LocalPort, RemoteAddress, RemotePort

Get-NetTCPConnection cmdlet
Method 5. Using Nmap
To install Nmap in the Windows command line, follow these steps:
Step 1: Download the latest version of Nmap from the Nmap website. You can find the download link on the Nmap download page:
https://nmap.org/download.html
Step 2: Extract the downloaded file to a location on your computer. This will create a new folder containing the Nmap files.
Step 3: Open a command prompt and navigate to the directory where you extracted the Nmap files. For example, if you extracted the files to the C:\nmap directory, you would run the following command:
cd C:\nmap
Step 4: Once you are in the Nmap directory, you can install Nmap by running the nmap.exe file. To do this, run the following command:
nmap.exe -V
This will display the version number of Nmap, indicating that it has been installed successfully.
Step 5: To use nmap to scan for open TCP/IP ports, run the “nmap -sT” command, followed by the IP address or hostname of the machine you want to scan.
nmap -sT localhost

This will scan the specified host or IP address and display the results. You can also use the -h option to view a list of available options and arguments for the nmap command. Overall, installing Nmap in the Windows command line is a straightforward process. You can download the latest version of Nmap from the Nmap website, extract the files, and then run the nmap.exe file to install it. Once it is installed, you can use the nmap command to scan hosts and IP addresses and view the results.
Common Issues That Close Ports
- Applications not functioning as expected.
- Misconfigured firewall rules blocking connections.
- IP addresses improperly set as private.
Troubleshooting Common Issues
Here are some common issues that may occur during opening TCP/IP Ports in Windows:
- Telnet Not Listed in Features: Ensure your system version supports Telnet or enable it via PowerShell.
- Firewall Blocking Ports: Temporarily disable the firewall to test port connectivity.
- Command Not Recognized: Verify tool installation and environment variables.
Conclusion
Checking open TCP/IP ports on your Windows computer is an important step for maintaining your system’s security and efficiency. By regularly monitoring these ports, you can identify any unwanted or suspicious connections that might put your computer at risk. Windows provides several simple tools, like Command Prompt and PowerShell, which make it easy to see which ports are open and what applications are using them. Taking the time to check your open ports helps ensure that your computer runs smoothly and stays protected from potential threats. Staying proactive about monitoring your network connections is a key part of keeping your digital environment safe and reliable.
Port scanning is essential for penetration testers and red teams to
identify potential vulnerabilities in networks and systems. It is the process of
scanning a range of ports on a target system to determine which ones are open
or closed. Attackers can exploit an open port to gain access
to a system or network, whereas a closed port is inaccessible to external
connections. This article will cover the basics of port scanning on Linux
and Windows operating systems and explore some of the commonly used tools and
techniques.
Linux is one of the most popular operating systems for server and networking
environments, making it a prime target for attackers. Here are some of the
commonly used tools for port scanning on Linux:
Nmap
Nmap is a free and open-source tool for scanning for open ports and discovering network services running on a target system.
It is a powerful and versatile tool that supports various scanning
techniques, including TCP, UDP, and ICMP scans.
To scan a target system using Nmap, you can use the following command:
Using the default TCP scan, this command will scan the target system for open ports. You can also specify the port range to be scanned using the -p option.
For example, to scan for ports 80 and 443 on a target system, you can use the
following command:
nmap -p 80,443 <target IP>
Netcat
Netcat is a versatile networking tool that can be used for various
tasks, including port scanning. It is a command-line tool that allows you to
send and receive data across network connections.
To perform a port scan using Netcat, you can use the following command:
nc -zv <target IP> <start port>-<end port>
This command will scan the target system for open ports between the specified
range. The -z option specifies no data should be sent, and the -v
option provides verbose output.
Masscan
Masscan is a high-speed port scanner that can scan entire networks in minutes.
It is designed to be faster and more efficient than other port scanners, making
it an ideal tool for large-scale scanning operations.
To scan a network using Masscan, you can use the following command:
masscan -p1-65535 <target IP>
This command will scan all 65535 ports on the target system. You can also
specify a port range to be scanned using the -p option.
Tool-less Scanning on Linux
These are some additional techniques for port scanning on Linux that use only
built-in functionality. These techniques include scanning with Telnet, Bash
Sockets, and Python.
Scanning with Telnet
Telnet is a command-line tool that allows you to connect to a remote system
using the Telnet protocol. It can also be used for port scanning by attempting
to connect to each port and checking if it is open or closed.
To perform a port scan using Telnet, you can use the following command:
for i in $(seq <start port> <end port>); do echo "" | telnet <target IP> $i 2>/dev/null | grep Connected; done
This command will attempt to connect to each port between the specified range on
the target system using Telnet. If the connection succeeds, the output will show “Connected”, indicating the port is open.
Scanning with Bash Sockets
Bash Sockets is a built-in feature in Bash that allows you to create network
connections using sockets. It can be used for port scanning by attempting to
connect to each port and checking if it is open or closed. To perform a port
scan using Bash Sockets, you can use the following command:
for i in $(seq <start port> <end port>); do (echo >/dev/tcp/<target IP>/$i) &>/dev/null && echo "Port $i is open"; done
This command will attempt to connect to each port between the specified range on
the target system using Bash Sockets. If the connection is successful, the
output will show “Port <port number> is open”, indicating that the port is
open.
Scanning with Python
Python is a powerful programming language that can be used for various
tasks, including port scanning. Its built-in socket library allows you
to create network connections and check for open ports. This Python example uses the socket library and includes a timeout to prevent hanging on unresponsive ports.
To perform a port scan using Python, you can use the following code:
import socket

target_ip = "<target IP>"
start_port = <start port>
end_port = <end port>

for port in range(start_port, end_port+1):
    sock = socket.socket(socket.AF_INET, socket.SOCK_STREAM)
    sock.settimeout(1)
    result = sock.connect_ex((target_ip, port))
    if result == 0:
        print("Port " + str(port) + " is open")
    sock.close()
This code will attempt to connect to each port between the specified range on
the target system using Python. If the connection is successful, the output will
show “Port <port number> is open”, indicating that the port is open.
Port Scanning on Windows
While many of the port scanning tools used on Windows are the same as those used
on Linux, some techniques and tools are unique to Windows. This section will cover some of these unique techniques and tools.
Windows Management Instrumentation (WMI)
WMI is a powerful framework that allows administrators to manage and monitor
Windows systems. While not a traditional port scanner, WMI can help gather information about running services which may correspond to listening ports. To perform a port scan
using WMI, you can use the following PowerShell command:
Get-WmiObject -Class Win32_Service -ComputerName <target IP> -Impersonation 3 -Credential (Get-Credential)
This command will query the target system for information about the running
services and their associated ports.
Windows Remote Management (WinRM)
WinRM is a service that allows remote management of Windows systems. Though not a full-featured scanner, it can be used to test individual ports on a remote system. To perform a port scan using WinRM, you can use the
following PowerShell command:
Invoke-Command -ComputerName <target IP> -ScriptBlock { Test-NetConnection -Port <port number> }
This command will test the specified port on the target system using the
Test-NetConnection cmdlet.
Microsoft Baseline Security Analyzer (MBSA)
MBSA is a free tool from Microsoft that can scan Windows systems for
security vulnerabilities, including open ports and services. To perform a port
scan using MBSA, you can use the following steps:
- Download and install MBSA from the official website.
- Launch the application and select the “Scan a computer” option.
- Enter the IP address of the target system and select the scan options.
- Click on the “Start Scan” button to begin the scan.
The application will scan the target system for open ports and services and
provide a report of any vulnerabilities found.
Common Port Scanning Techniques
Port scanning can be performed using various techniques, each with strengths and weaknesses. Here are some of the commonly used methods:
- TCP Connect Scan: TCP Connect Scan is the most basic and widely used scanning
technique. It involves establishing a TCP connection with each
port to determine whether it is open or closed. - SYN Scan: SYN Scan is a stealthier scanning technique that sends a SYN packet
to each port and waits for a response. If the port is open, it will respond
with a SYN-ACK packet; if it is closed, it will respond with a RST
packet. - UDP Scan: UDP Scan is used to scan for open UDP ports. It involves sending a
UDP packet to each port and waiting for a response. If the port is open, it
will respond with an ICMP packet; if it is closed, it will not. - Null Scan: Null Scan is a scanning technique that involves sending a packet
with no flags set to each port. If the port is open, it will not respond;
if it is closed, it will respond with a RST packet. - Xmas Scan: Xmas Scan is a scanning technique that involves sending a packet
with the FIN, URG, and PUSH flags set to each port. If the port is open, it
will not respond; if it is closed, it will respond with a RST packet.
Conclusion
Port scanning is essential for penetration testers and red teams to
identify potential vulnerabilities in networks and systems. This article covers the basics of port scanning on Linux and Windows operating systems and explores some commonly used tools and techniques. Port scanning can be used for both legitimate and malicious purposes, so it’s important to use these techniques responsibly and within legal boundaries.
33
33 people found this article helpful
You can use a Windows command or third-party utilities
What to Know
- Easiest: Open the Start menu > type command > right-click the Command Prompt app > Run as administrator.
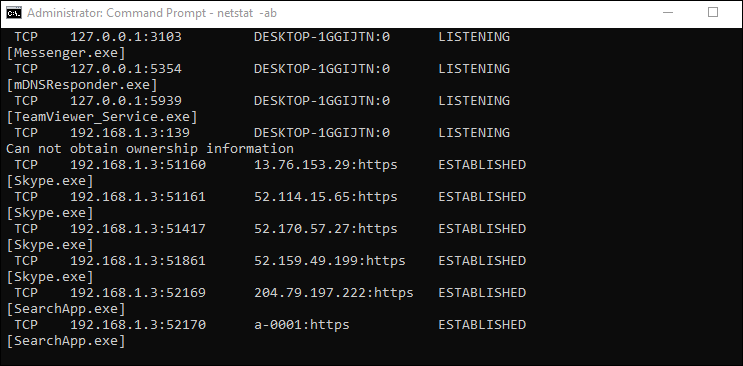
- Type netstat -ab > press Enter > look for items in the «LISTENING» state.
- The alternative is to use a third-party app: We like TCPView, Nirsoft CurrPorts, and PortQry Command Line Port Scanner.
This article outlines how to check for open ports in Windows 10, which is necessary if an application cannot access the internet or you want to block an application.
How to Check If a Port Is Open With Netstat
The easiest way to check if a port is open on Windows 10 is by using the Netstat command. ‘Netstat’ is short for network statistics. It will show you what ports each internet protocol (like TCP, FTP, etc.) is currently using.
The command has many parameters, but the ones you’ll need to use to check if a port is open are (a), which provides the active ports, and (b), which will tell you the name of the processes using those ports.
-
Select the Start menu and type «command.» Right-click on the Command Prompt app and select Run as administrator.
-
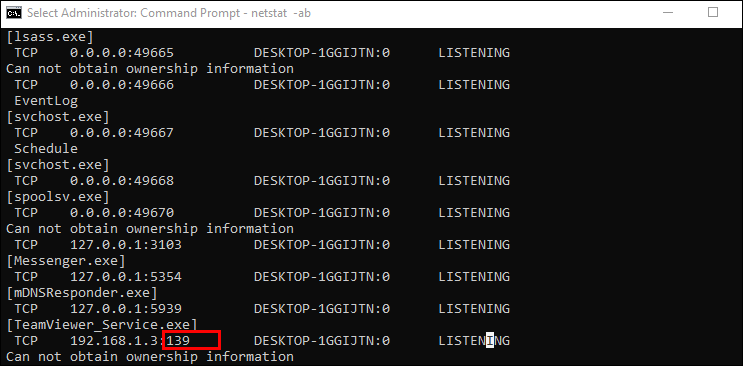
Type netstat -ab and press Enter. You’ll see a long list of results, depending on what’s currently connecting to the network. You’ll see a list of running processes. The open port numbers will be after the last colon on the local IP address (the one on the left).
-
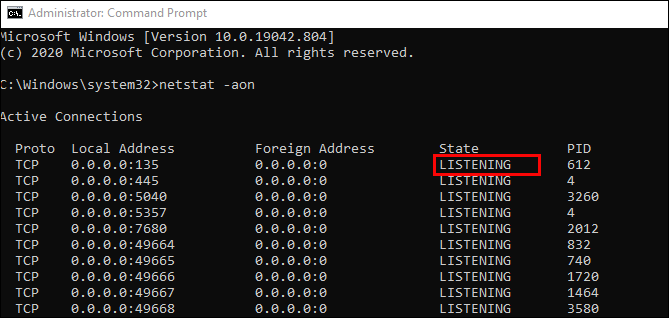
Look for the items on the list with a state of «LISTENING.» These are the processes that are communicating via one of the currently opened ports.
-
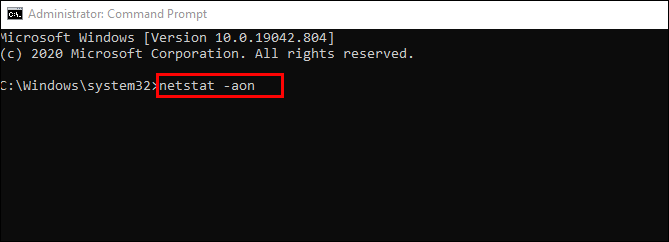
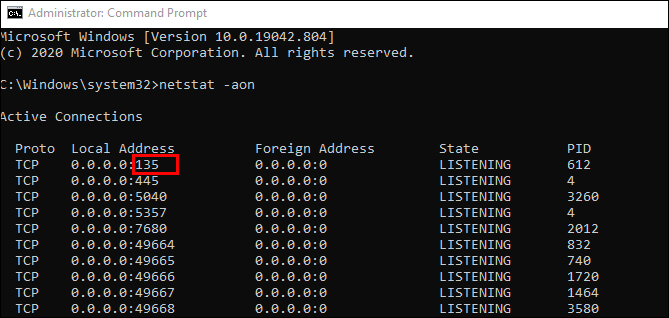
If you want to know the program’s name that has a specific port open, then type netstat -aon and press Enter. This command will show the protocol the app is using, the local and remote IP addresses, and most importantly, the PID of the application using that port (the number on the far right). Remember to look for the LISTENING status.
-
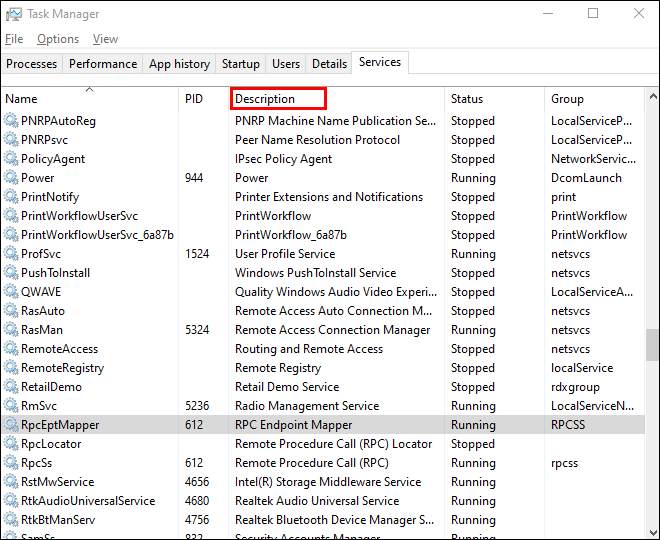
To find the application related to that PID, right-click the task manager and select Task Manager. Select the Details tab. Look in the PID field for the PID you noted from the command prompt screen.
How to Check If a Port Is Working Using Third-Party Apps
If you don’t want to use the command prompt to check for open ports, there are very easy-to-use third-party apps that can help.
TCPView
TCPView is a utility included in Microsoft Sysinternals that shows you a list of all running processes and their associated open ports. This app displays ports opening and closing and packet transfers, all in real-time.
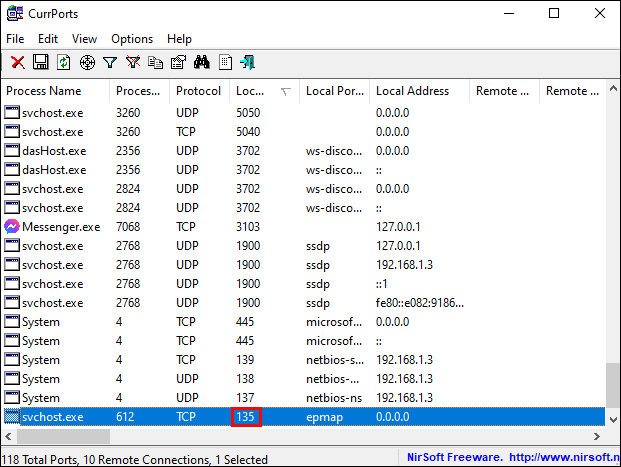
Nirsoft CurrPorts
Nirsoft CurrPorts is another utility to see all ports currently being used by applications and services on your system. Just look for the local ports column to see which of your computer’s ports are active.
The list also includes ports that are being connected to on the remote end (the server out on the internet).
PortQry Command Line Port Scanner
Install PortQry Command Line Port Scanner for another command-line utility dedicated to scanning your computer for open ports. Once you install it, open Command Prompt in administrator mode. PortQry automatically installs in the C:\PortQryV2 directory, so change the directory of your command prompt to that directory.
Type the command portqry.exe -local to see all open TCP and UDP ports for your machine. It’ll show you everything you can see with the NetStat command, plus port mappings and how many ports are in each state.
What Is a Port?
Applications running on your computer reach out and get information and data from servers elsewhere on the internet. These applications and the server know how to communicate based on their IP address and the port number.
Think of the IP address as a street address and the port number as the apartment number. If either the server or application attempts to communicate using any other port number, it won’t work. Every other door will be «locked» because other ports are closed.
Thanks for letting us know!
Get the Latest Tech News Delivered Every Day
Subscribe
Maybe you’re troubleshooting a network connectivity issue for a specific program and need to check whether its port access is open. What if you need to confirm that your NAS device can communicate with your Windows 10 PC? Whatever reason you need to look for open ports, this article provides detailed steps to check them on Windows 10 using several available tools, either built-in or free to download and use.
There are a couple of handy tools in Windows to scan open ports. You’ll see how to do so on NetStat, PortQry.exe, and NirSoft CurrPorts.
Using NetStat to Check for Open Ports in Windows 10
One of the simplest ways to check for open ports is to use NetStat.exe. You can find this tool in the System32 folder on Windows 10. With NetStat, you can see open ports or ports that a specific host uses.
Netstat is short for network statistics. It shows protocol statistics and the current TCP and IP network connections. The two commands needed to identify open ports in netstat -ab and netstat -aon.
Here’s an explanation of what each letter from the commands means.
- “a” displays all connections and listening ports.
- “b” shows all executables involved in creating each listening port.
- “o” provides the owning process ID related to each connection.
- “n” shows the addresses and port numbers as numerals.
Two commands are helpful, depending on your needs. The second option (netstat -aon) additionally provides a process ID you can later search for in the Task Manager.
Using ‘netstat -ab’ to Identify Open Ports
The first option you’ll use (netstat -ab) lists all active ports and the process that uses them.
- In the Cortana Search Bar, type the following:
cmdthen select Run as administrator.
- Now, type
netstat -ab, then press Enter.
- Wait for the results to load. Port names get listed next to each local IP address.

- Look for the port number you need; if it says LISTENING in the State column, it means your port is open.

Using ‘netstat -aon‘ to Identify Open Ports
The second option(netstat -aon) includes process IDs, which you’ll use to identify a task/application in the Task Manager. Some processes may be challenging to identify using netstat -ab, so netstat -aon gets used. As referenced above, “a” represents all connections and ports, “o” represents the owning process ID, and “n” represents the addresses and port numbers as numerals.
Using netstat -aon comes in handy when netstat -ab isn’t enough to identify what program has a specific port tied up. In that case, follow these steps:
- In the Cortana Search Bar, type “
cmd“ and choose “Run as administrator.”
- Once inside, type the following command without quotes:
netstat -aonthen press Enter.
- You will now see five columns: Protocols, Local Address, Foreign Address, State, and PID (Process ID). In the Local Address, you have a port number. For example: 0.0.0.0:135. Here, 135 is the port number.

- In the “State” column, you will see whether a specific port appears opened. For opened ports, it will say LISTENING.
- To verify which app uses a particular port, find the PID (the number from the last column) for a specific port.

- Open the Task Manager by pressing Ctrl + Shift + Esc.
- Go to the Details or Services tab to see all processes on your Windows 10 system. Sort them by the PID column to find the PID for the port you’re trying to troubleshoot. You can see which app uses the port in the Description section.


Checking for Open Ports with NirSoft CurrPorts
If you find the Command Prompt solution too tricky, a simpler alternative is to use NirSoft CurrPorts. This tool displays your currently opened ports (TCP, IP, and UDP). You’ll also see information about a specific process, such as name, path, version info, etc.
This tool has been around for quite a while and is available for Windows 10. You can find the NirSoft Currports download link at the bottom of Nirsoft’s website.
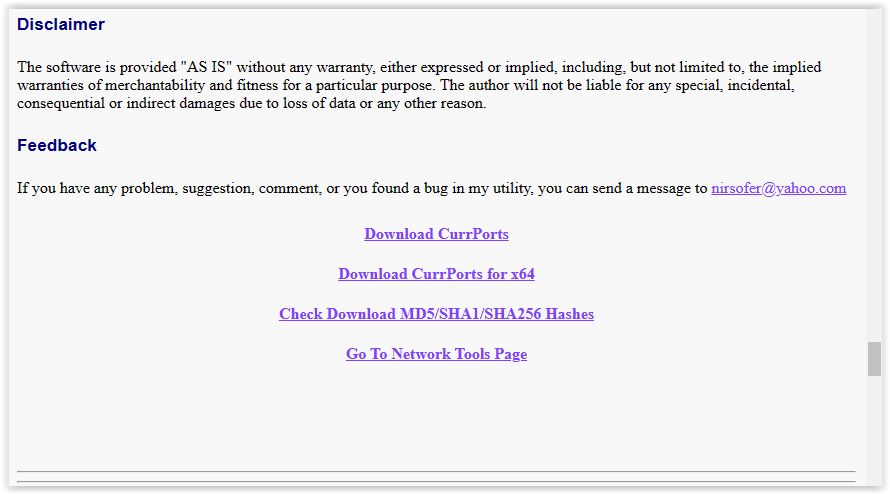
Note: Ensure you download the correct version. They have 32-bit and 64-bit releases. The app is portable. Unzip the folder, then run the executable file.
Once you have CurrPorts running, perform the following steps:
- You’ll see a list of your computer processes. Sort them by Local Port to search through them more easily.

- Now, find and select the port you are troubleshooting.
- You can now see all the process details, such as Process Name, Process ID, State, etc.

Another way is to double-click on a process to see its details in a single window.
Checking for Open Ports Using PortQry.exe
PortQry.exe is another handy tool that lets you scan open ports. You download PortQry (scroll down to see the download) and extract it to run it through the Command Prompt. You can also download PortQryUI, a Graphical User Interface (GUI) for PortQry (more on that below), as an add-on if you don’t want to use the command line.
With portqry.exe, you insert specific parameters that can be found in the executable’s folder.
How to Run PortQry.exe Using the Command Prompt
- Download PortQry, then unzip the files to your chosen location. The default is “C:\” but can be changed if desired.
- If in the default directory, type
cd c:\PortQryV2\in the Command Prompt to set the location of the executable file. - If in a custom directory, type
cd [drive letter]:\[folder1]\[folder2]\but replace all content in the square brackets with actual names. Include all folders needed. - Type
portqry.exe -localto launch it. This command displays the TCP and UDP ports the specified ‘localhost’ uses. - In addition to all the parameters NetStat displays, Portqry shows you several port mappings and the number of ports in each state.
- You can also check for open ports for a remote host. Run portqry.exe -n [hostname/IP] in the Command Prompt. Replace the hostname and IP sections with the remote host’s name and IP address. Add -e [port_number] to the command line to look for a specific port.
How to Run PortQry.exe using the UI Add-On
For those preferring to use a graphical interface instead of commands when using PortQry.exe, Microsoft offers an add-on named PortQryUI.
The PortQryUI add-on already includes the necessary version of PortQry, so you don’t need both downloads to use it.
- Download PortQryUI, then unzip the files to your chosen location. The default is “C:\” but can be changed if desired.
- Launch Windows Explorer, navigate to the PortQryUI.exe file location, then click it to launch the UI.
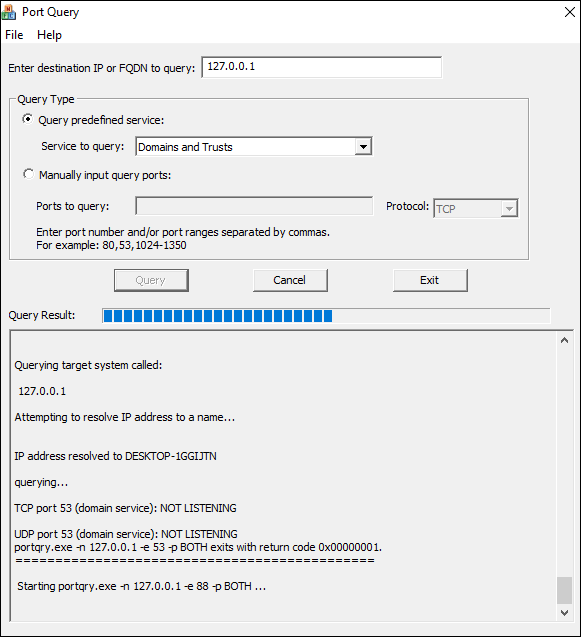
- To view TCP and UDP ports for the ‘localhost’ (your PC), leave the Destination IP as 127.0.0.1 so it passes through the network’s devices and configuration settings (network card, router’s config, etc.) and not just read from the local PC.
- To view all TCP and UDP ports, click on Manually input query ports, then type 1-65535 in the Ports to query section. Also, select TCP, UDP, or Both from the Protocol dropdown.
- To filter your TCP/UDP ports list, click Query predefined service, then choose which service to query. You can only select one at a time.
- You can also check a remote host by changing the FQDN or domain in the query box at the top.
- If you want to check a specific port, enter the number in Ports to query.
In closing, knowing how to check if a specific port is open is beneficial if you’re troubleshooting a program’s network connection or need a port for a particular game. Luckily, it’s not as challenging to do as it looks.
Out of all the options listed above, Netstat is recommended as it’s built into the OS and usually gives you all the details you need. There might be a few extra steps required compared to CurrPorts, but you don’t have to download anything, and there’s nothing to screw up.
How do I check if Port 3306 is open in Windows 10?
To verify if port 3306 is open, you can use NetStat, CurrPorts, or PortQry.
We recommend NetStat, as you won’t have to download new software. Run the Command Prompt as administrator. Type the following command: netstat -ab and hit Enter. Wait for the results to load. Port names will be listed next to the local IP address. Just look for port 3306. You can press Ctrl + F and type 3306 in the word box to search for it. If the port is open, it will show in the results as LISTENING.
To check if port 3306 is open via CurrPorts, just sort by Local Port, then find port 3306. If the port is available, it will show in the list.
To use PortQry.exe to find port 3306, use the Command Prompt. Type -e [3306], then press Enter.
What are Predefined Services in PortQueryUI?
Predefined Services offers details on a small handful of services such as Domains and Trusts, Networking, Exchange Servers, etc. The option queries all required ports for the specified services and displays them in the UI.
For those who don’t know where Predefined Services resides, it is directly under the Help tab and in the UI. Both serve different needs.
The Help tab option immediately displays all predefined services without testing any ports, providing a quick reference to each port name, value, and protocol used for each listed service.
The UI option lets you specify what service you want to view and see port statuses.