
Knowing how to run Microsoft Defender (formerly Windows Defender) from the command line can be very useful. Perhaps you’ve been locked out of its UI due to malware, are trying to run a scan from recovery media, or are using a GUI-less Windows Server install. In any of these situations, knowing a scan command or two can save you a lot of trouble.
Though Microsoft Defender is easier to control from the Windows Security app, command-line antivirus is also quite simple and presents many of the same options. Importantly, it also allows you to automate your anti-malware tasks if you wish. You could create a script to automatically perform a quick scan at a certain time, for example, or to perform the same scans across multiple PCs.
In this tutorial, we’ll be showing how to update Microsoft Defender with CMD, as well as how to perform a quick, full, or custom scan. By the end of it, you should have a good idea of how command-line antivirus works.
⚠️ Please note: The process described below is the same in Windows 11 as it is in Windows 10. However, bear in mind that we’ll be using screenshots from Windows 10, so your UI may look a little different. We’ll point out any changes you need to be aware of as they come up.
How to Check for Updates for Microsoft Defender in the Command Line
One task that admins are particularly eager to automate is updates. Knowing how to update Microsoft Defender from the command line will allow you to build it into an automatic update script so you never forget.
- Open Command Prompt
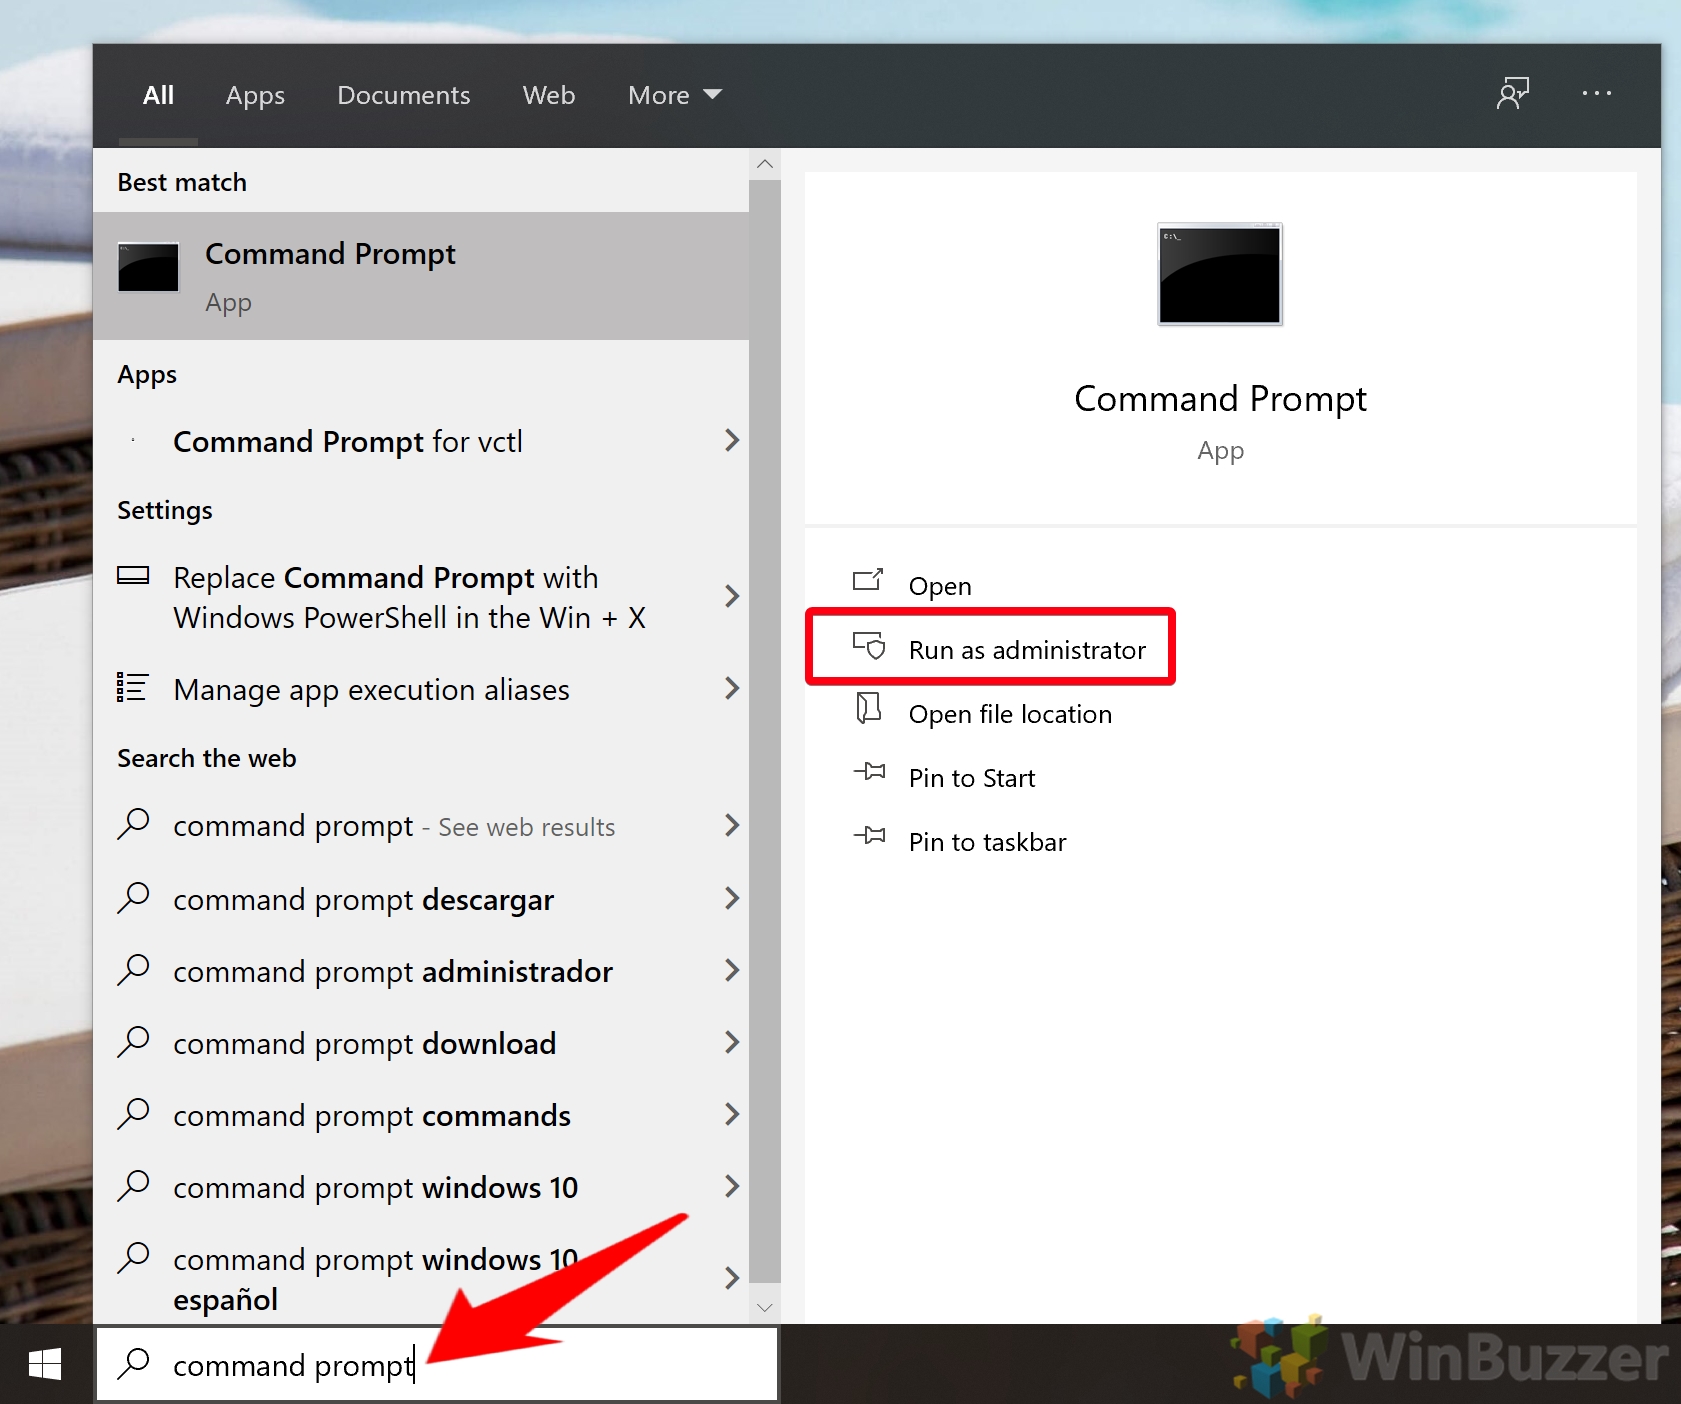
Press Start and then type “Command Prompt”. With the application selected, click “Run as administrator” in the sidebar.

- Open and update the command line antivirus
To open the location of the command line anti-virus in CMD, paste the following:
cd C:\ProgramData\Microsoft\Windows Defender\Platform\4.18*Now you can run a Windows Defender command-line update by typing:
MpCmdRun -SignatureUpdateThe tool will check for the most recent update and download and install it automatically if one is available.

- How to remove previously installed Microsoft Defender updates
So you know how to install updates, but what if you downloaded a faulty one? You can uninstall the most recent definitions with CMD.
First, open CMD by typing “Command Prompt” in your Start menu and then clicking “Run as administrator” on the right-hand side.
- Navigate to the Windows Defender folder and run the remove command
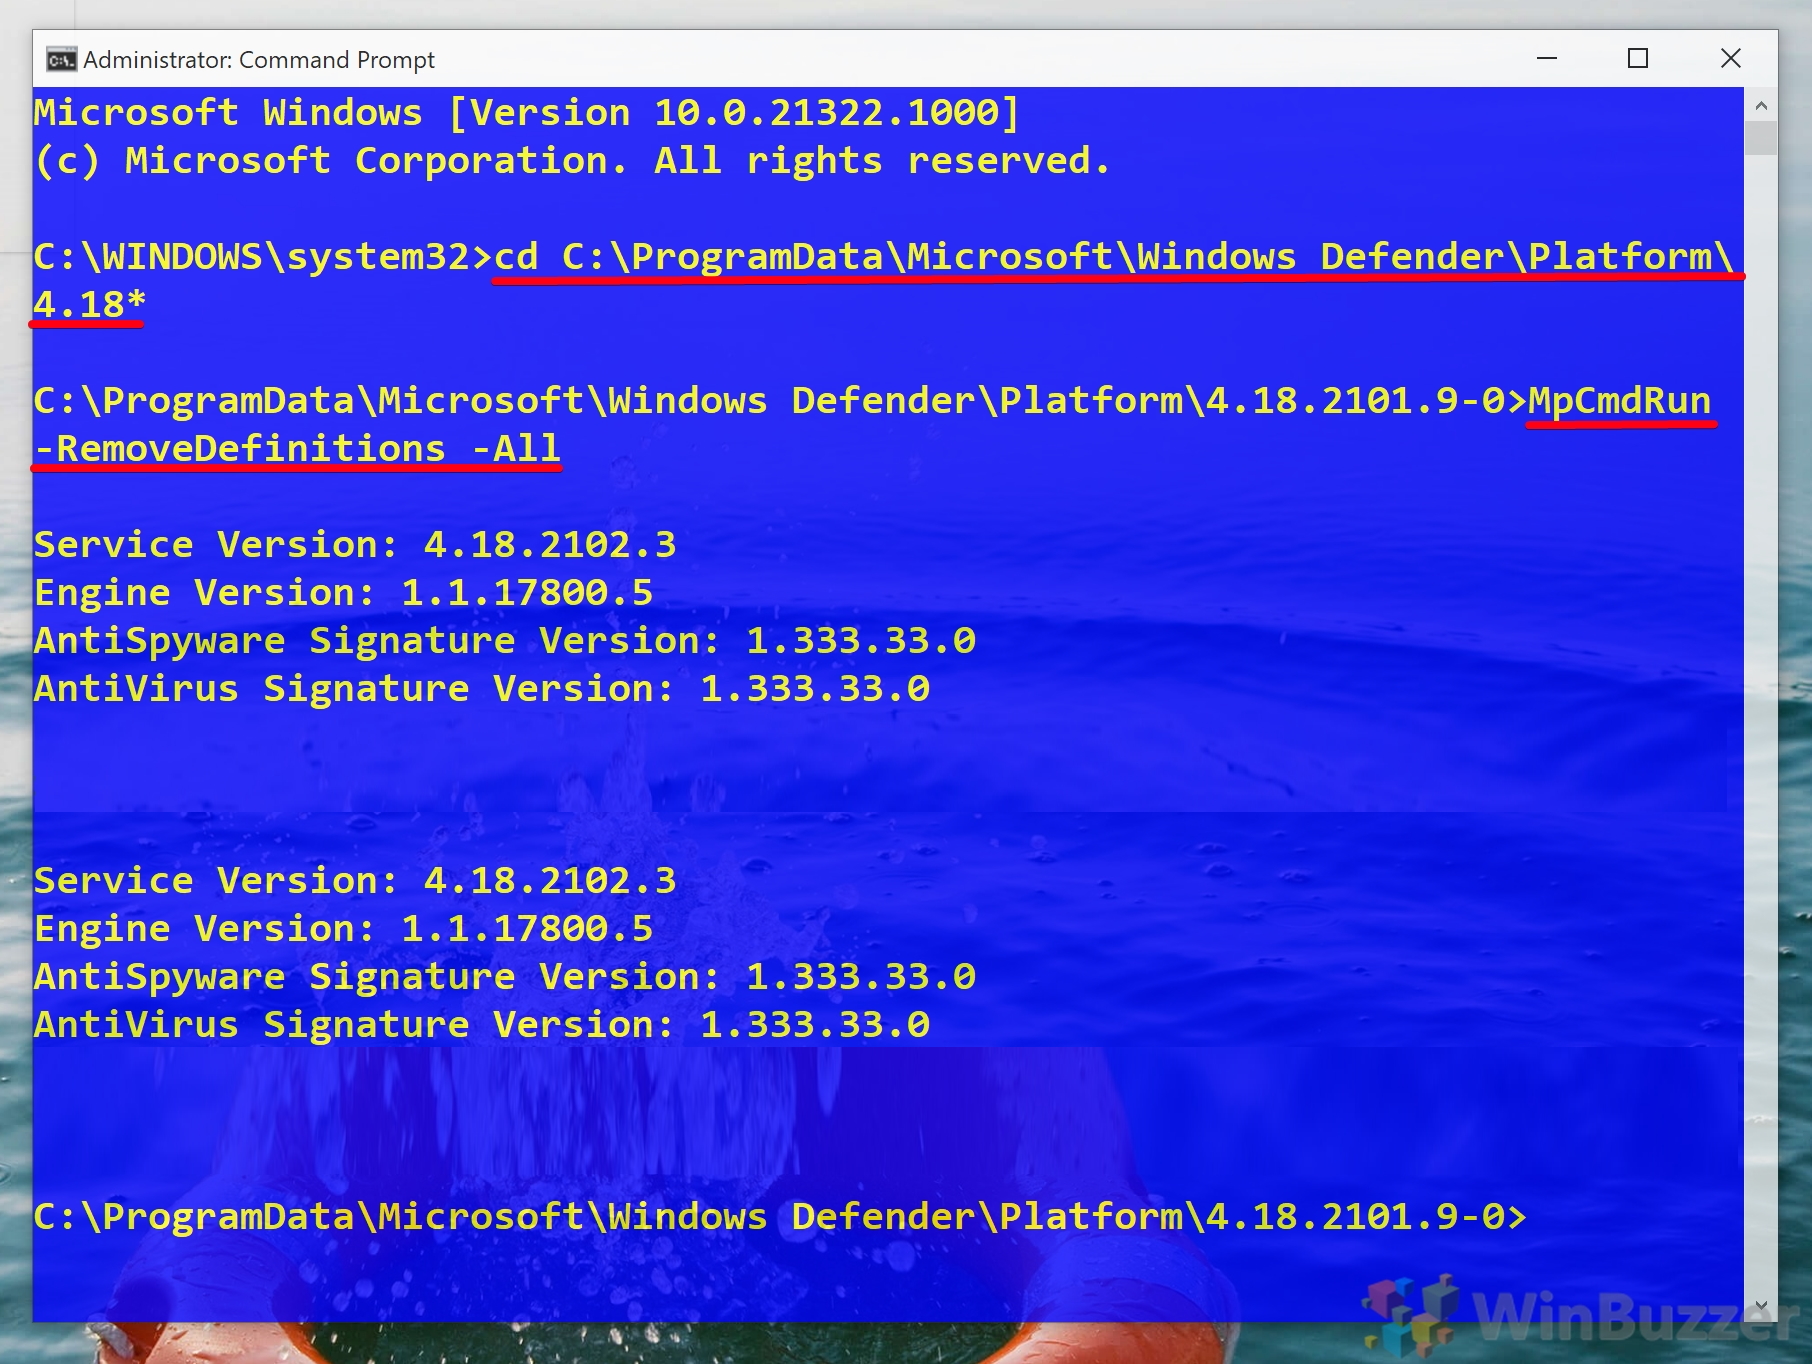
In your CMD window, type the following to navigate to your Windows Defender folder.
cd C:\ProgramData\Microsoft\Windows Defender\Platform\4.18*Then, run the following command to uninstall the most recent definitions:
MpCmdRun -RemoveDefinitions -AllThe
-Alloption restores previous definitions from the default set of signatures.
- Rollback the engine version
To roll back the engine version, type the following and press Enter:
MpCmdRun -RemoveDefinitions -Engine
- Remove dynamic signature updates
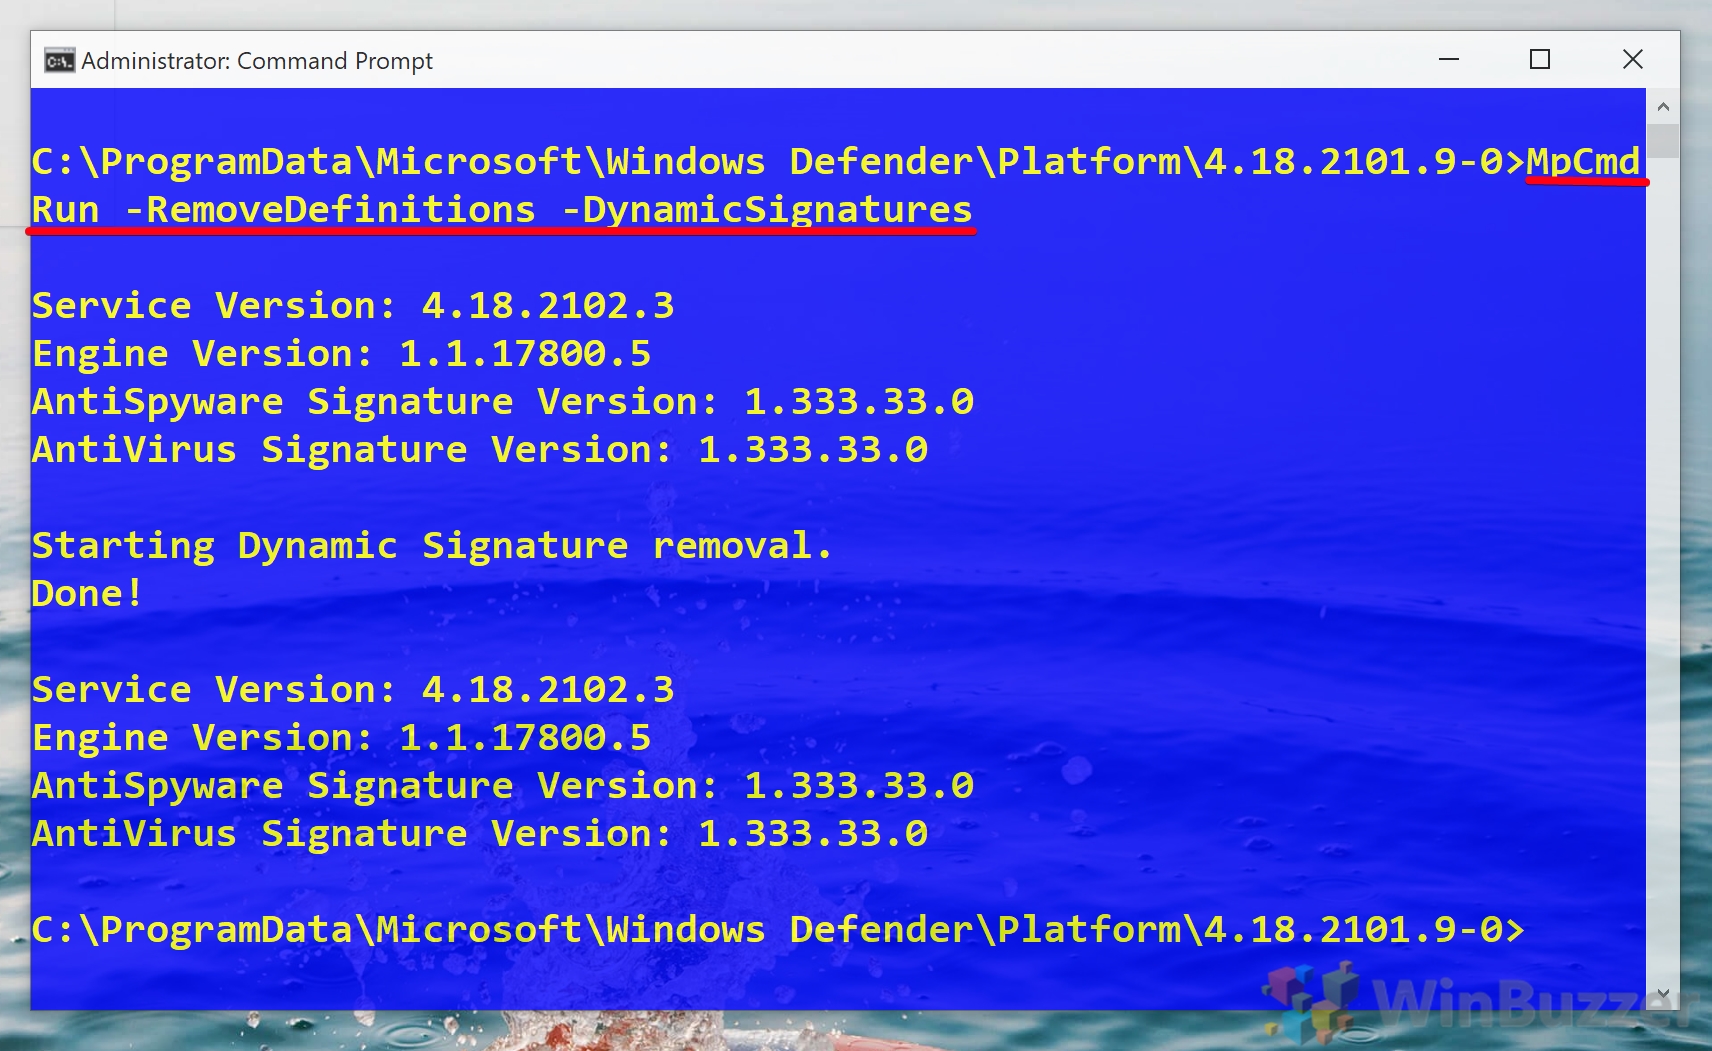
You can uninstall only dynamic signatures by typing the following command and pressing Enter:
MpCmdRun -RemoveDefinitions -DynamicSignatures


How to Perform a Quick Virus Scan with the CMD Scan Command
In most cases, you should run a quick scan before any other type. This will cause Windows Defender to scan the most commonly infected files so you can quickly take action. You can use Windows Defender in the Command line to start one in less than a minute.
- Open Command Prompt
Press the Start button and type “Command Prompt”, then click “Run as administrator” on the right-hand side.
- Navigate to the Windows Defender folder and run the quick scan command
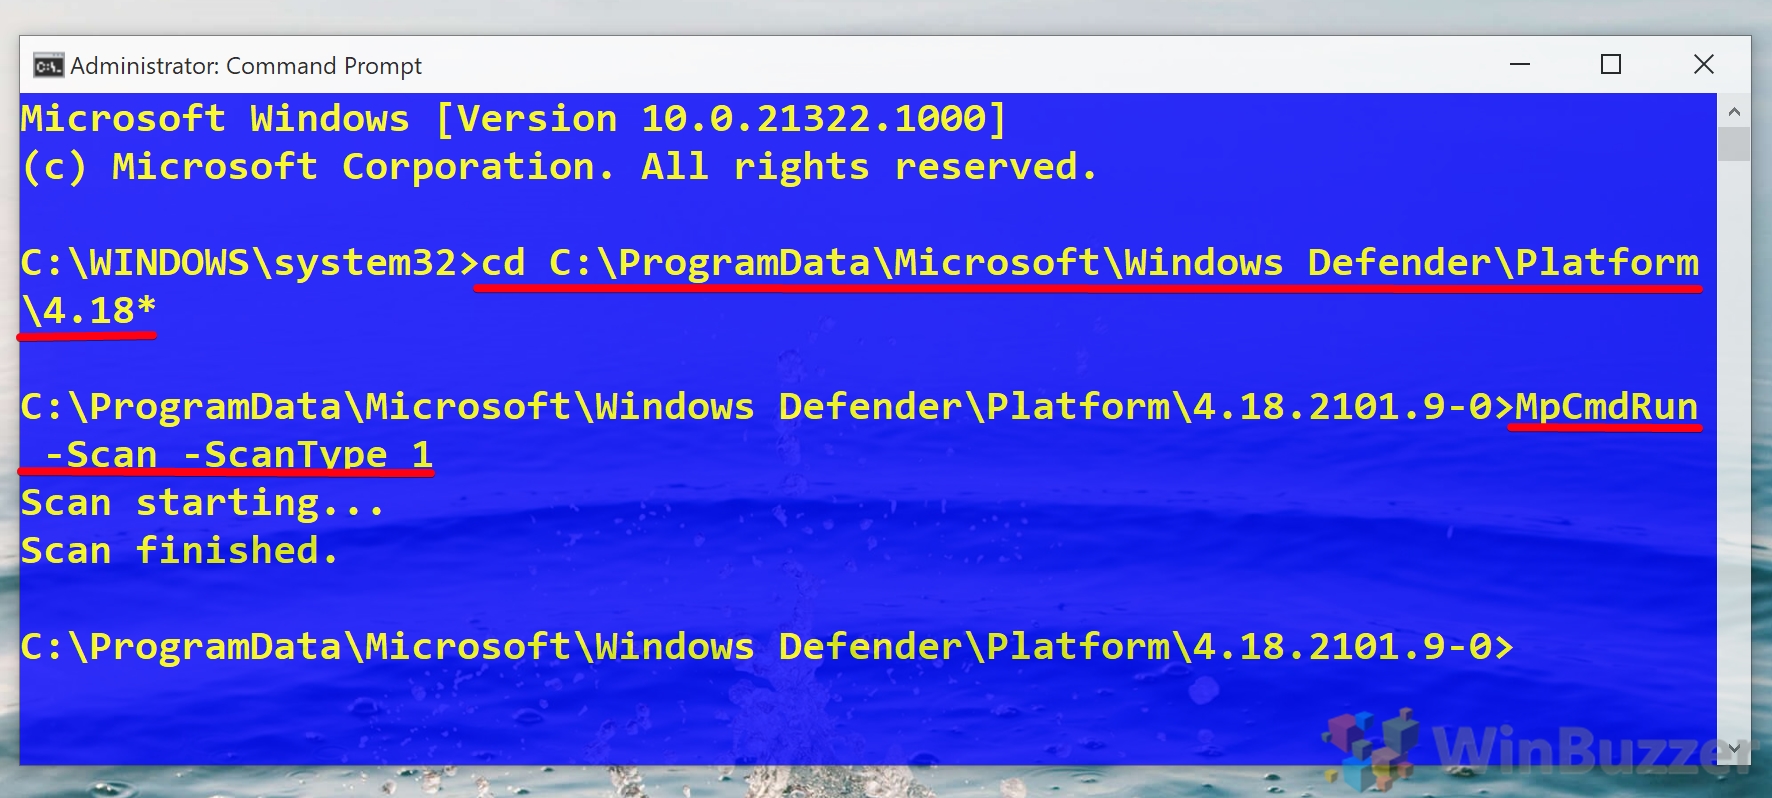
First, we need to navigate to the folder where Windows Defender is installed.
cd C:\ProgramData\Microsoft\Windows Defender\Platform\4.18*
Now we’re ready to run the CMD quick scan command:
MpCmdRun -Scan -ScanType 1The scan will begin, stopping itself automatically if it takes longer than a day.


How to Perform a Full Virus Scan via a Microsoft Defender CMD Command
So, your quick scan found some issues or found no issues, but you’re still seeing virus symptoms. The full scan will check every file on your PC for malware. Here’s how you can run it with a CMD scan command:
- Open Command Prompt
Press Start and then type “Command Prompt”. With the application selected, click “Run as administrator” in the sidebar.
- Open the Windows Defender folder and run the full CMD scan command
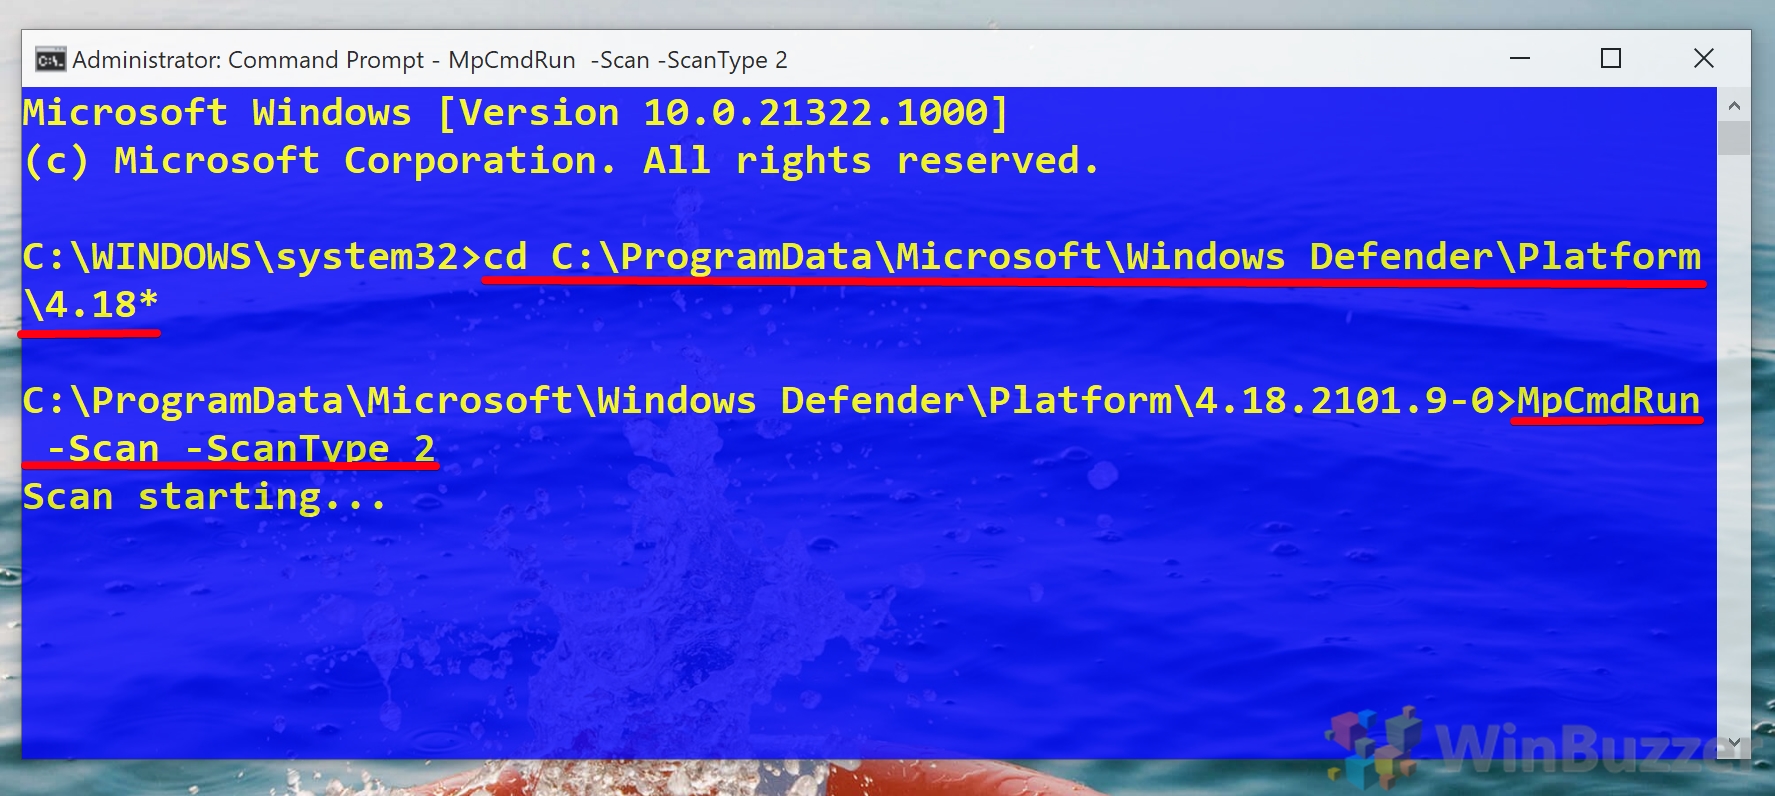
Before we can run our CMD scan, we need to navigate to the folder our anti-virus tool lives in:
cd C:\ProgramData\Microsoft\Windows Defender\Platform\4.18*Now we can run our full command-line anti-virus scan:
MpCmdRun -Scan -ScanType 2If you followed the quick scan section, you’ll notice that this command is identical, except the scan type has been changed from
1to2.The scan will start and will take a very long time. The more files you have on your PC, the longer it will take.


How to Perform a Custom Command Line AntiVirus Scan
If you just want to tell if a file you just downloaded is safe, you can perform a custom CMD scan by pointing it to a specific folder or file.
- Open Command Prompt
Press the Start button, type Command Prompt, then click “Run as administrator” on the right-hand side with it selected.
- Run the custom malware scan
In your CMD window, type the following to navigate to your Windows Defender folder.
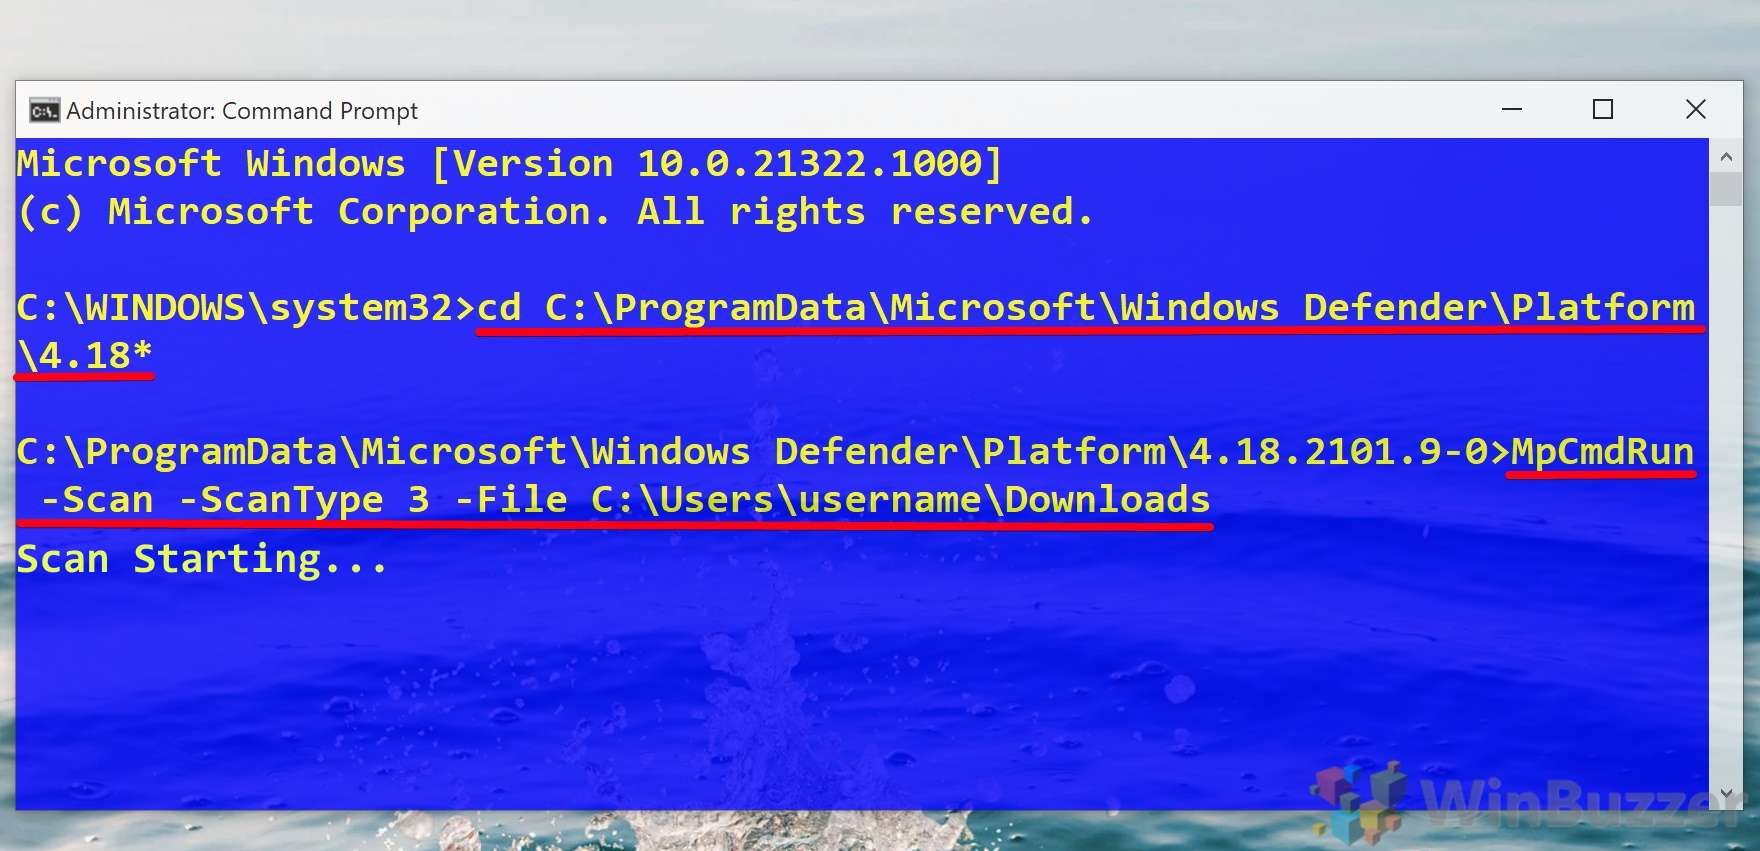
cd C:\ProgramData\Microsoft\Windows Defender\Platform\4.18*Now run the following command, switching C:/file/or/folder/path with the path to your file or folder.
MpCmdRun -Scan -ScanType 3 -File C:\file\or\folder\pathThe scan will start, and shouldn’t take too long if there are only a few files.

- Optional: Run the custom scan command with a timeout option
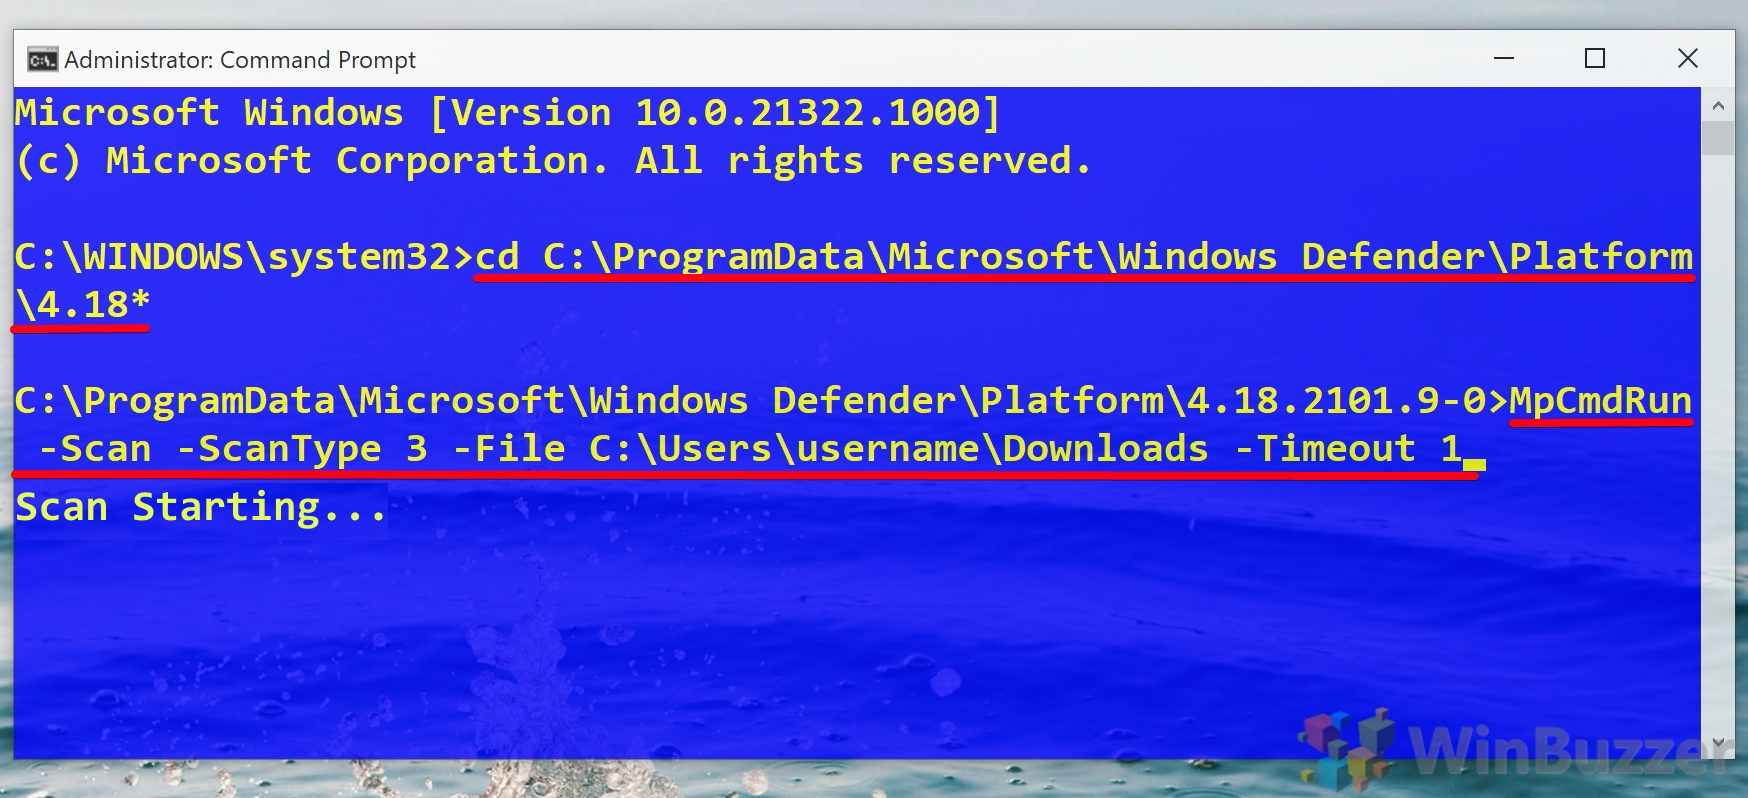
You can also define a timeout period for your scan in case it takes too long. Simply navigate to your Defender folder with
cd C:\ProgramData\Microsoft\Windows Defender\Platform\4.18*and run the following command:MpCmdRun -Scan -ScanType 3 -File C:\your\folder\or\file\path -Timeout 1Remember to switch the file path for the folder of your choice and that the timeout number represents days, not hours.


How to Perform a Boot Sector Malware Scan with the Microsoft Defender Command Line Tool
If you have a particularly nasty virus, it may have attacked your boot sector – the part of your PC that stores instructions that inform the startup process. Because such modifications can make it difficult to boot into your OS and cause other unwanted behavior, this can be hard to fix.
Thankfully, Windows Defender has a specific tool to find and resolve these issues – the boot sector scan. Even better, you can run it from the command line if you can’t access your normal OS. Here’s how:
- Open Command Prompt
Press Start and type “Command Prompt”, then click “Run as administrator” in the right-hand panel of the Start menu.
- Run a boot sector CMD scan
First, navigate to the Windows Defender folder with:
cd C:\ProgramData\Microsoft\Windows Defender\Platform\4.18*Then, run the following command:
MpCmdRun -Scan -ScanType -BootSectorScanThe command line anti-virus tool will then scan your boot sector for any malicious code and remove it if it can.


How to Restore Quarantined Items via a Microsoft Defender CMD Command
Last but not least, the Windows Defender Command-line tool lets you list and restore items that have been automatically quarantined. This can be useful if you’re sure a safe item has been removed.
- Open Command Prompt
Press Start, then type Command Prompt. With the tool selected, press “Run as administrator” on the right-hand side.
- Restore quarantined items
Navigate to the Microsoft Defender folder with the following command:
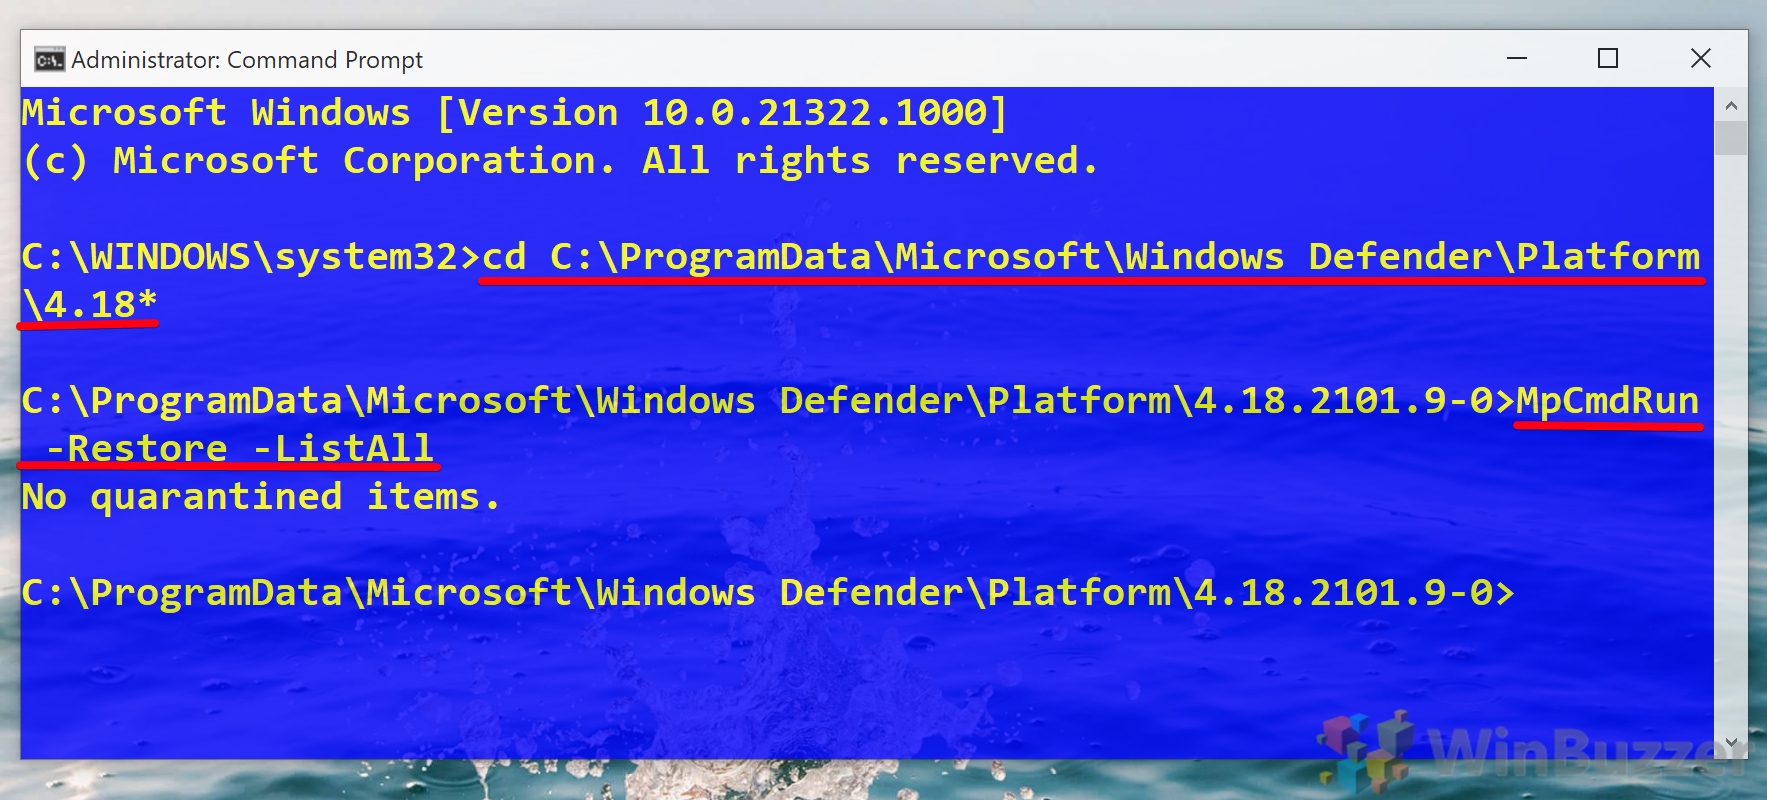
cd C:\ProgramData\Microsoft\Windows Defender\Platform\4.18*Now you can run the following command to view your quarantined items:
MpCmdRun -Restore -ListAllReference the list and type the following to restore a specific quarantined item:
MpCmdRun -Restore -Name ITEM-NAMEAlternatively, restore a file to a specific path with:
MpCmdRun -Restore -Name ITEM-NAME -FilePath PATH\TO\RESTOREYour items will be returned to their original or specified location.

With that, you should have all the tools you need to perform command line antivirus activities. However, to get the most out of Windows Defender, you may want to learn how to perform a scheduled scan or turn on the hidden adware scanner.

FAQ – Frequently Asked Questions about Microsoft Defender CMD Usage
How can I schedule regular Microsoft Defender scans using CMD?
Use Windows Task Scheduler to create a task that runs the appropriate MpCmdRun command at your desired frequency. This isn’t covered in the tutorial but leverages the commands shown.
What are the differences between dynamic signatures and regular updates?
Dynamic signatures are frequently updated definitions to respond to emerging threats, while regular updates are more comprehensive but less frequent updates to Defender’s threat database.
Can I use CMD to configure Microsoft Defender’s real-time protection settings?
CMD doesn’t directly allow you to change real-time protection settings. These settings are typically adjusted through the Windows Security app or Group Policy Editor.
How do I check the health and status of Microsoft Defender via CMD?
Run “MpCmdRun -GetFiles” in CMD. This generates a report with information about Defender’s health and status, including recent activity and detection statistics.
Is it possible to update Microsoft Defender offline using CMD?
Yes, you can download the latest update package on another computer, transfer it to the offline machine, and use CMD to apply the update manually.
How do I disable Microsoft Defender using CMD?
Disabling Defender via CMD is not recommended and typically requires Group Policy changes. However, it can be temporarily turned off via the Windows Security app.
Can CMD commands be used to manage Microsoft Defender on remote computers?
Directly managing Defender on remote computers via CMD isn’t straightforward. It usually involves remote desktop or network management tools.
How do I interpret the scan results provided by CMD?
The CMD output will list detected threats and actions taken. For detailed analysis, refer to the Defender security logs in the Windows Event Viewer.
Can I use CMD to add or remove exclusions in Microsoft Defender?
Adding or removing exclusions via CMD isn’t directly supported. Use the Windows Security app for managing exclusions.
How do I restore Microsoft Defender to its default settings using CMD?
There’s no direct CMD command to reset Defender to default settings. This typically requires manual adjustments in the Windows Security app.
Is it possible to use CMD to view the update history of Microsoft Defender?
CMD doesn’t provide a direct way to view update history. This information can be found in the Windows Security app under the virus & threat protection updates section.
Can I use CMD to check which version of Microsoft Defender I am running?
Yes, navigate to the Defender folder in CMD and run “MpCmdRun -GetFiles”; this generates a report that includes version information.
How do I troubleshoot Microsoft Defender issues using CMD?
Use “MpCmdRun -GetFiles” to generate a detailed report for troubleshooting. For more complex issues, Windows Event Viewer or the Security app may provide additional insights.
Can CMD be used to manage Microsoft Defender’s cloud-based protection?
Managing cloud-based protection settings is not directly possible through CMD. These settings are typically configured in the Windows Security app.
Is there a way to use CMD to view all currently active Defender settings?
CMD doesn’t provide a comprehensive view of all active Defender settings. For a complete overview, use the Windows Security app or Group Policy Editor.
Related: How to Exclude a File or Folder from Microsoft Defender Scans
Microsoft Defender, formerly known as Windows Defender is incredibly useful for a free tool, providing Windows 10 users with competitive anti-virus technology and protecting against rootkits, ransomware, unwanted programs, and more. However, occasionally the program will keep flagging a file or folder that you know is safe. In these cases, it’s useful to know how to exclude a folder from Microsoft Defender scans.

Last Updated on November 7, 2024 11:13 pm CET
Click Start. In the search bar, type CMD . Right-click CMD.exe and select Run as Administrator. On the User Account Control (UAC) prompt, click Yes. In the command prompt window, type SFC /scannow and press Enter . System file checker utility checks the integrity of Windows system files and repairs them if required.
How do I run a virus scan from CMD?
Method 2. Run Windows Defender Antivirus Go to “Settings” > “Update & Security” > “Windows Security”. Click “Virus & threat protection”. In the “Threat history” section, click “Scan now” to scan for viruses on your computer.
How do I completely scan my computer?
Click the Quick Scan button. Windows Defender scans your computer and reports any findings. Click Advanced Scan in the Windows Defender Security Center window to choose among a full scan, a custom scan, or an offline scan. Windows Defender scans your laptop according to your choice and reports any findings.
How do I clean up my computer using command prompt?
Open Command Prompt, type cleanmgr, and hit Enter. In the Drive Selection window, select the drive you want to clean up and click OK. Next, in the Disk Cleanup window, select all the files you want to delete and click OK. Finally, click on Delete Files to confirm the action.
Is CMD EXE a virus?
What is Cmd.exe? The legitimate Cmd.exe file is an important Windows command processor located in C:\Windows\System32. Spammers mimic its name to plant a virus and spread it on the Internet.
What is CMD EXE used for?
cmd.exe is the default command-line interpreter for the OS/2, eComStation, ArcaOS, Microsoft Windows (Windows NT family and Windows CE family), and ReactOS operating systems. The name refers to its executable filename.
How do I scan in Windows?
Scan a picture or document with Windows Scan app Make sure your scanner is turned on. In the search box on the taskbar, type Windows Scan, and then select Scan from the results. Do one of the following: On the Scan page, do the following: Select Scan at the bottom of the screen to scan your document or picture.
How do I scan on my laptop Windows 10?
How to Scan Documents in Windows 10 From the Start menu, open the Scan app. (Optional) To change the settings, click the Show More link. Click the Preview button to make sure your scan appears correct. Click the Scan button.
How do I run a scan on Windows 10?
Run a malware scan manually Select Start > Settings > Update & Security > Windows Security and then Virus & threat protection. Open Windows Security settings. Under Current threats, select Quick scan (or in early versions of Windows 10, under Threat history, select Scan now).
What are the CMD commands for Windows 10?
21 CMD Commands All Windows Users Should Know ASSOC: Fix File Associations. FC: File Compare. IPCONFIG: IP Configuration. NETSTAT: Network Statistics. PING: Send Test Packets. TRACERT: Trace Route. POWERCFG: Power Configuration. SHUTDOWN: Turn Off Computer.
How do I run chkdsk in C?
Directly after that, type CHKDSK, then a space, and then the letter of the drive you want to check, followed by a colon. Your main hard drive will almost always be the C drive, so to check that, type CHKDSK C: and then hit Enter. The program will then run and check your disk for errors, and fix any that it finds.
Why does cmd keep popping up?
If the system partition contains bad sectors or gets infected by unknown virus or malware, CMD may not be able to work correctly. Therefore, the other way to fix CMD randomly popping up issue is to repair bad sectors with partition manager software and cleanup virus by applying anti-virus software in PC.
What is cmd 32 exe?
When you boot up your Windows PC, you may encounter a black pop up window with the title bar showing C:\WINDOWS\system32\cmd.exe. Eventually, the prompt goes away but you’ll notice slow computer performance as reported by affected users. The cmd.exe runs the Command Prompt, a command-line interpreter for Windows OS.
Where can I find cmd?
Right-click Start and choose Command Prompt or Command Prompt (Admin) from the Quick Link menu. You can also use keyboard shortcuts for this route: Windows key + X, followed by C (non-admin) or A (admin). Type cmd in the search box, then press Enter to open the highlighted Command Prompt shortcut.
How do I use CMD?
How to Open the Command Prompt in Windows 10 Type “command prompt” into the Start menu to search for it. Press Win + R to open the Run box, then type “cmd” and hit Enter to open it. Press Win + X (or right-click the Start button) and choose Command Prompt from the menu.
What is CMD in keyboard?
The Command or Cmd key (sometimes referred to as the Apple key) is one of the most useful keys on a Mac keyboard. The Command key is used with a single letter key for many of the Mac’s most common actions: Command-C to copy, Command-P to print, Command-V to paste and so on.
What is full form CMD?
CMD Full Form Full Form Category Term Command General CMD Chief Managing Director Business Organizations CMD Command Prompt Computing CMD Chairman & Managing Director Business CMD.
How do I scan to PDF in Windows?
Scan a paper document to PDF using a preset (Windows) Choose Tools > Create PDF > Scanner > [document preset]. Note: Click Scan. If prompted to scan more pages, select Scan More Pages, Scan Reverse Sides, or Scan Is Complete, and click OK.
How do I enable scan to computer?
Enable scanning to a computer (Windows) Open the HP Printer Assistant. Windows 10: From the Start menu, click All Apps, click HP, and then select the printer name. Go to the Scan section. Select Manage Scan to Computer. Click Enable.
How do I scan a document and email it?
Use the Google Drive (for Android) or Notes (for iOS) app to scan the documents.How to scan with your phone (+ sign and email it) Click on the share icon on the top right corner. Choose the email or drive that you would want to share the file. Enter the email addresses of the recipients. Hit the send button.
SFC full form is System File checker and the deployment of its command refers to starts scanning promptly to rescue Windows from issues. DISM or Deployment Image Servicing and Management remediates Windows PE Environment and for this, it takes the help of various kinds of files.
CHKDSK is also a tool that investigates flaws on a disk and its meaning is Check Disk. Let’s explain each of the three System troubleshooting tools and how to use them one by one in the subsequent paragraphs. See: What is SFC (System File Checker) and How to Run in Windows 11 or 10?
SFC /Scannow, DISM.Exe, CHKDSK Windows 10 and 11
Here is how to run SFC /Scannow, DISM.Exe, and CHKDSK in Windows 11 and 10
SFC /Scannow Windows 11 or 10
The first utility of SFC /Scannow, DISM.Exe, CHKDSK Windows 10 or 11 is sfc /scannow. It is a significant built-in tool that digs out the messed up files and traces out faulty changes in files.
The main function of this utility is to Scan thoroughly and confirm the system file’s edition.
SFC identifies the system file if anyone tampers and brings back the file’s appropriate version from %systemroot%\system32\dllcache. This original file supersedes the corrupt one with the help of SFC.
When you encounter any type of error on your System, the first universal suggestion is to run SFC /scannow. The mess up may be buggy Windows system, for instance, BSOD, or application crashing, etc.
How to Run SFC Command
Step 1 – Press Windows and S keys.
Step 2 – Type cmd.exe.
Step 3 – Select “Run as administrator”.
Step 4 – Write the following code and hit Enter.
sfc /scannow
Step 5 – The command will start working and show the status in real time so here you need to wait patiently.
SFC Report
After the verification is 100% complete, you may witness one of the below notes –
1. Windows Resource Protection did not find any integrity violations
This note indicates that there are no lost or distorted files detected on your system.
2. Windows Resource Protection could not perform the requested operation
If you witness this error, run SFC in safe mode, and confirm that underneath %WinDir%\WinSxS\Temp, PendingDeletes, and PendingRenames folders exist.
3. Windows Resource Protection found corrupt files and successfully repaired them. Details are included in the CBS.Log %WinDir%\Logs\CBS\CBS.log.
All the necessary actions are taken into account and thus, all the issues are solved.
4. Windows Resource Protection found corrupt files but was unable to fix some of them. Details are included in the CBS.Log %WinDir%\Logs\CBS\CBS.log.
Many times SFC repairs and handles the mess up, but all the time it is not possible. In these cases, you should proceed according to the SFC report.
How to Run SFC /SCANNOW from Desktop in Windows 11 or 10
DISM or Deployment Image Servicing and Management
The second tool of SFC /Scannow, DISM.Exe, CHKDSK Windows 10 or 11 is DISM. Whenever you come across flaws like BSOD or applications crashing, it refers to the corruption of files. Under those circumstances, two functions can settle down the mess and one you regularly use is SFC command. However, in some severe cases, SFC fails to resolve the issues, and this is when DISM comes into the scenario.
Deployment Image & Servicing Management or commonly known as DISM is the tool that settles down component store falsification. This falsification intercepts SFC from operating accurately.
However, this utility is also capable of rectifying issues and handling Windows image. In addition, it can also manage Windows Recovery Environment, Windows Setup, and Windows PE.
DISM takes the assistance of three main options to rectify the Windows Image troubles on your machine. These equipment are entitled as CheckHealth, ScanHealth, and RestoreHealth respectively.
Use DISM with CheckHealth Option
In order to detect the presence of corruption, /CheckHealth switch is used along with DISM. It will only see if corruption exists, but it does not rectify it.
Step 1 – First of all, click on Start.
Step 2 – Type cmd.
Step 3 – Then press Ctrl + Shift + Enter on the keyboard.
Step 4 – Input this piece of code and to execute its duty hit Enter –
DISM /Online /Cleanup-Image /CheckHealthUse DISM with ScanHealth
To examine the Windows Image for any glitcches, execute DISM command with the /ScanHealth switch. Well, this command line might take a few minutes to complete the process.
Step 1 – Click on Search.
Step 2 – Type cmd and select Run as administrator.
Step 3 – Write down the following code and press Enter –
DISM /Online /Cleanup-Image /ScanHealthUse DISM with RestoreHealth
To examine with Windows Image for existing sufferings and rectify it, you should employ DISM command with the /RestoreHealth switch.
Step 1 – Open command prompt as administrator.
Step 2 – Copy this command, paste it, and press “Enter” to execute –
DISM /Online /Cleanup-Image /RestoreHealthStep 3 – Allow it to perform the scan accurately and completely and it may take more than 10 minutes to finish. And if you see that the scan got stuck at around 20%, don’t worry as it is a normal phenomenon.
Step 4 – Once the DISM scan is over, reboot the machine.
What is DISM in Windows 10 (Deployment Image Servicing and Management)?
CHKDSK Command
The third and final pillar of SFC /Scannow, DISM.Exe, CHKDSK Windows 11 or 10 is DISM. This is another repair utility that Microsoft contributes for hard disk scanning and repairing. Users popularly know it as Chkdsk aka Check Disk. People commonly run this tool to inspect their faulty drives and rectify the issues in them if required.
How to Use CHKDSK Command
Step 1 – First of all, launch the Elevated Command prompt using either of the ways.
Step 2 –If you see a UAC prompt, agree by clicking on Yes.
Step 3 – The format of the command line is similar to – chkdsk [Drive:] [parameters]
Step 4 –chkdsk command exhibits the disk’s status but doesn’t rectify errors from a volume. Hence, after the drive letter, write the following parameters – /f /r /x
The parameter f directs CHKDSK to fix the errors that it will discover on the volume.
The parameter r instructs CHKDSK to trace out the poor sections in the volume and retrieve the readable data.
The parameter x compels the volume to dismount before the commencement of the process.
Step 5 – So, the entire command will be like this – chkdsk [Drive:] [parameters]. After input of the drive letter and parameters, the command will look like this
chkdsk C: /f /r /x
Step 6 – So type this command and press ‘Enter’.
How to Check Faulty Drives with Chkdsk in Windows 10
Note – Noteworthy is CHKDSK requires to lock the drive if the drive holds the System files. If the drive doesn’t contain an operating system or it’s external, then command starts to execute within no time. When you type the command and execute it will ask to scan the disk before the boot of the machine. Hence, write y aka yes, and reboot the machine. The command will begin its impact prior to the Operating System loads.
In this manner, SFC /Scannow, DISM.Exe, CHKDSK Windows 11 or 10 play a significant role to troubleshoot mess up.
Methods:
SFC /Scannow Windows 11 or 10
DISM or Deployment Image Servicing and Management
CHKDSK Command
That’s all!!
Download Windows Speedup Tool to fix errors and make PC run faster
Windows Defender on Windows 11/10 has the ability to scan, update, or run other tasks from the command prompt. The application MpCmdRun.exe is situated in the %ProgramFiles%\Windows Defender folder respectively and is called the Microsoft Antimalware Service Command Line Utility. You can use this tool to automate and troubleshoot Microsoft Antimalware Service.

To do so, open the command prompt as an administrator. Type the following to get the entire list of commands:
"%ProgramFiles%\Windows Defender\MpCmdRun.exe"
Run Defender Quick scan from the command line
So for instance if you wish to run a Quick scan from the command line, you can use -Scan 1 parameter:
"%ProgramFiles%\Windows Defender\MpCmdRun.exe" -Scan -ScanType 1
Run Defender Full scan from the command line
To perform a Full scan, use:
"%ProgramFiles%\Windows Defender\MpCmdRun.exe" -Scan -ScanType 2
Purge Windows Defender Definitions cache
At a command prompt (admin) enter the following command and hit Enter:
%ProgramFiles%\Windows Defender\MpCmdRun.exe -removedefinitions -all
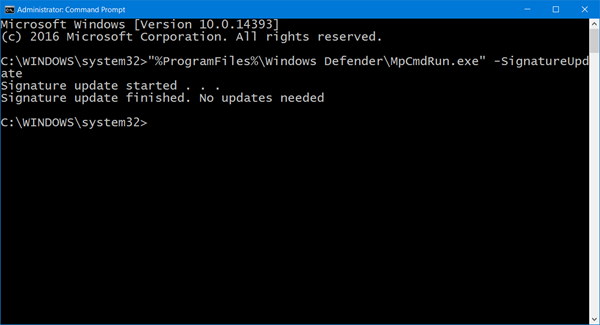
Update Windows Defender Quick from the command line
To Update Windows Defender or to create a shortcut to update your Windows Defender you can use the following command:
"%ProgramFiles%\Windows Defender\MpCmdRun.exe" –signatureupdate
You can also create desktop shortcuts to run the following commands.
Read: You can also update Windows Defender definitions using Windows PowerShell.
MpCmdRun.exe process
Here is the entire list which I have copy-pasted from the command prompt results:
MpCmdRun.exe [command] [-options]
Command Descriptions:
- -? / -h : Displays all available options for this tool
- -Trace [-Grouping #] [-Level #] : Starts diagnostic tracing
- -RemoveDefinitions [-All] : Restores the installed signature definitions to a previous backup copy or to the original default set of signatures
- -RestoreDefaults : Resets the registry values for Microsoft Antimalware Service settings to known good defaults
- -SignatureUpdate [-UNC] : Checks for new definition updates
- -Scan [-ScanType] : Scans for malicious software
- -Restore -Name <name> [-All] : Restore the most recently or all quarantined item(s) based on name
- -GetFiles : Collects support information
- -Restore : Restore or list quarantined item(s)
- -AddDynamicSignature : Loads a dynamic signature
- -ListAllDynamicSignatures : List the loaded dynamic signatures
- -RemoveDynamicSignature : Removes a dynamic signature.
Hope this helps you get started. For details, you may visit Microsoft.
Anand Khanse is the Admin of TheWindowsClub.com, a 10-year Microsoft MVP (2006-16) & a Windows Insider MVP (2016-2022). Please read the entire post & the comments first, create a System Restore Point before making any changes to your system & be careful about any 3rd-party offers while installing freeware.
Reader Interactions
Download Article
Download Article
This wikiHow will teach you how to scan Windows 10 for errors using the System File Checker (SFC) tool. Before you can use SFC, you need to make sure you have an updated version of Windows.
-

You’ll see this key with the Windows logo on your keyboard near Alt and Ctrl. You can also use the mouse to click the Windows logo and open the Start menu that way.
-
As you type, you’ll see search results display above the Start Menu.
Advertisement
-
It lists under the «Best match» header and a menu will pop up.
-
A Command Prompt window will open. If you’re prompted to allow the app to make changes, click Yes.
-
There is a space before each «/» and make sure you type the command exactly as shown so DISM.exe will run.
- It will take a minute or two to start up and about 30 minutes to finish.
- When it’s done, you’ll see «The operation has completed successfully.»
-
The DSIM.exe should fix whatever corrupt files or damaged files it finds, and the SFC scan will make sure there are no damaged or corrupt files left.[1]
- If you see «Windows Resource Protection found corrupt files and repaired them,» you may want to enter «sfc /scannow» again until you see «Windows did not find any integrity violations.»[2]
- Type «Exit» and press Enter to close the Command Prompt window.
- If you see «Windows Resource Protection found corrupt files and repaired them,» you may want to enter «sfc /scannow» again until you see «Windows did not find any integrity violations.»[2]


Advertisement
What is the Windows command to scan for errors?
Use SFC /scannow and press Enter to scan for errors using System File Checker.
How do you fix corrupted files in Windows 10?
Using the System File Checker tool can repair missing or corrupted files. When you run the commands, DISM will use Windows Update to install the files needed to fix the corruption.
Should I run CHKDSK or SFC first?
Run CHKDSK first to check the Drive Integrity, followed by SFC to check Windows Files Integrity.
How do you check for Windows errors in the Command line?
Open the Start menu and type «command prompt. Click the first option. Type the command SFC /scannow and press Enter.
Thanks for submitting a tip for review!
References
About This Article
Article SummaryX
1. Press the Windows key.
2. Type «Command Prompt».
3. Right-click the «Command Prompt — App» result.
4. Click Run as administrator.
5. Type «DISM.exe /Online /Cleanup-image /Restorehealth» and press Enter.
6. Enter «sfc /scannow» and press Enter.
Did this summary help you?
Thanks to all authors for creating a page that has been read 70,521 times.