
If you see the error message Windows Sandbox failed to initialize, Error 0x800736b3, 0x80070490, etc. on your Windows 11/10 PC, read this post to learn how to fix the issue. Windows Sandbox provides a temporary desktop environment to run untrusted or questionable applications in isolation. It allows users to try out new software or browse potentially unsafe websites without risking the main operating system.

A few users have reported that when they try to launch Windows Sandbox, a message appears on their screen and it fails to start. The complete message reads:
Windows Sandbox failed to initialize.
The above message is sometimes accompanied by different error codes, such as:
Windows Sandbox failed to initialize.
Error 0x80370106. The virtual machine or container exited unexpectedly.
Would you like to submit feedback about this issue?
or,
Windows Sandbox failed to initialize.
Error 0x800736b3. The referenced assembly is not installed on your system
Would you like to submit feedback about this issue?
or,
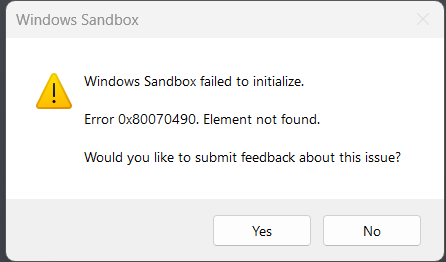
Windows Sandbox failed to initialize.
Error 0x80070490. Element not found
Would you like to submit feedback about this issue?
There’s another variation of the same message that you may encounter on your system. The message reads Windows Sandbox failed to start and is linked to error codes 0x80070002, 0x80070569, 0x800706d9, 0xc0370106, 0x80070057, etc.
Why is my Windows Sandbox not working?
There could be many reasons behind the issue when Windows Sandbox fails to initialize. This may happen when virtualization is not enabled or the Windows Sandbox feature is not enabled on your system. This could also happen due to Hyper-V conflicts, third-party software conflicts, and outdated or incompatible drivers.
If you’re experiencing issues with loading Windows Sandbox on your Windows 11/10 PC, read this post to learn how to fix the issue.
TheWindowsClub has over 15K posts that can help you troubleshoot Windows, and based on our experience, we suggest the following solutions to fix the error message Windows Sandbox failed to initialize, Error 0x800736b3, 0x80070490, etc:
- Check system requirements
- Enable supported components
- Enable relevant services
- Install missing Visual C++ Redistributables
- Reset Windows Sandbox
Let us see this in detail.
1] Check system requirements
First and foremost, make sure your system meets the minimum requirements for Windows Sandbox. It is currently not supported on Windows Home, so make sure you’re running it on Windows 10 Pro or Enterprise, build 18305, or Windows 11 (64-bit version). The rest of the hardware requirements are as follows:
- ARM64 (for Windows 11, version 22H2 and later) or AMD64 architecture
- At least 4 GB of RAM (8 GB recommended)
- At least 1 GB of free disk space (SSD recommended)
- At least two CPU cores (four cores with hyper-threading recommended)
2] Enable supported components
Windows Sandbox relies on virtualization technology to create an isolated environment for installing and running applications, and it requires specific components and processes to function properly. Following are some key components required for running Windows Sandbox:
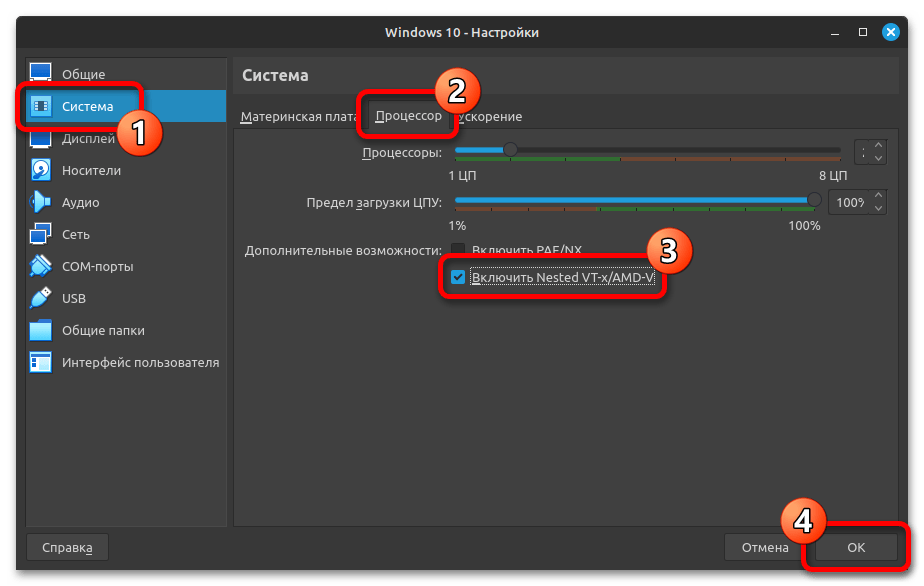
A] Virtualization Technology: Make sure virtualization is enabled in your computer’s BIOS or UEFI settings. The virtualization technology is usually referred to as Intel Virtualization Technology (VT-x) for Intel processors or AMD Virtualization (AMD-V) for AMD processors. Refer to your system’s documentation for detailed instructions on how to enable virtualization on Windows 11/10.

B] Hyper-V: Hyper-V is a hypervisor-based virtualization software that comes bundled with Windows 10 Pro and Enterprise editions. You need to install and enable Hyper-V on your system for Windows Sandbox to work.
Press Win+R and type ‘optionalfeatures’ in the Run dialogue box. Press the Enter key. In the Windows Features popup, make sure the option for Hyper-V is checked.

C] Windows Sandbox: Certain advanced features, including Windows Sandbox, are disabled by default in Windows. You need to enable Windows Sandbox on your PC before trying to launch the app.

Navigate to Windows Sandbox in the Windows Features popup, and make sure the option is checked. Alternatively, open PowerShell and execute the following command
Enable-WindowsOptionalFeature -FeatureName "Containers-DisposableClientVM" -All -Online
Note: You need administrative privileges to enable and configure Windows Sandbox and Hyper-V. Make sure you have the necessary permissions or log in as an administrator to enable these features.
3] Enable relevant services
A few services (background processes in Windows) are specific to Windows Sandbox and are required for it to function properly. If these services are stopped, you need to start them manually to run the Sandbox environment.
Type ‘services’ in the Windows Search bar and click on the Services app on top of the search results. In the Services window, navigate to Hyper-V Remote Desktop Virtualization Service and double-click on it. Select Automatic under Startup type and click on the Start button. Click Apply and then OK.

Apply the same setting to all Hyper-V services, including:
- Hyper-V Host Service
- Hyper-V Time Synchronization Service, and
- Virtual Disk
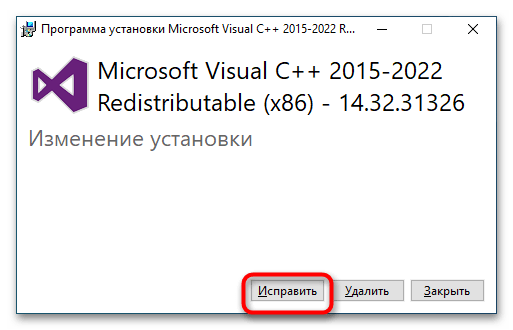
4] Install missing Visual C++ Redistributables
Visual C++ Redistributables are necessary code libraries that can prevent Windows Sandbox from initializing if they are missing or improperly installed. You may reinstall them on your PC to ensure the proper working of Windows Sandbox.
Navigate to the official Microsoft Visual C++ download page and download the required version of Visual C++ Redistributables. Double-click on the downloaded files to install them on your PC. Reboot if prompted.
5] Reset Windows Sandbox
Next, try resetting Windows Sandbox to its default state.
Press Win+R, type ‘optionalfeatures’ in the Run dialogue, and click OK. In the Windows Features dialog, scroll down and uncheck the Windows Sandbox option. Click OK and wait for Windows to uninstall and disable the feature. Restart your PC to apply the changes.
Again, open the Windows Features dialogue and check the Windows Sandbox option. Click OK and wait for Windows to install and enable a clean version of Sandbox on your system. Reboot the PC and check if Windows Sandbox is now able to initialize.
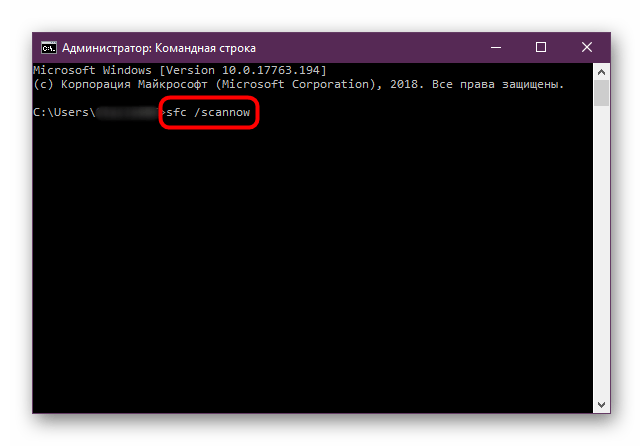
If the issue persists, run the SFC and DISM tools to fix corrupt or missing system files. Also, install pending Windows updates if any, and check for software conflicts by running Windows in a clean boot state.
I hope this helps.
Read: How to transfer Files to Windows Sandbox.
Is Windows Sandbox available for Windows 11 Home?
Windows Sandbox is currently supported only on Pro/Enterprise/Education editions. Though it is officially not available for Windows Home, you may install and enable Windows Sandbox in the Home edition using workarounds, provided your system meets the minimum hardware requirements for running Sandbox.
Read Next: Windows Sandbox item is greyed out.
The “Windows Sandbox Failed to Initialize” error is a message that users may encounter when attempting to launch the Windows Sandbox feature on their Windows operating system. Windows Sandbox allows users to run applications in an isolated and secure environment. When users see the “Windows Sandbox Failed to Initialize” error, it means that there is an issue preventing the proper startup of the Windows Sandbox environment. In this guide, we’ll fix the Windows Sandbox Failed to Initialize error on Windows 11/10, the causes behind this error, and straightforward solutions to get your Windows Sandbox back on track.
Page Contents
Here are common reasons for the Windows Sandbox failed to initialize error:
- Virtualization not enabled: Virtualization needs to be enabled in the BIOS/UEFI settings.
- Hyper-V conflicts: Hyper-V may conflict with Windows Sandbox. Ensure only one is enabled at a time.
- Windows Sandbox feature not installed: The Windows Sandbox feature must be installed through the Windows Features menu.
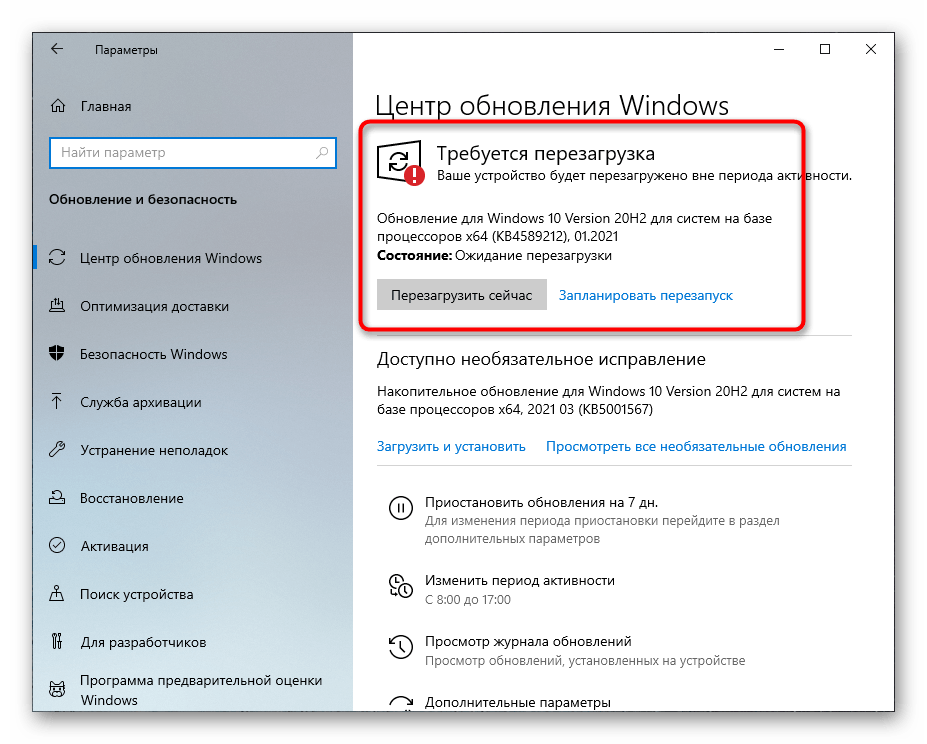
- Windows Update: Ensure the Windows operating system is up to date with the latest updates.
- Third-party software conflicts: Some third-party antivirus or security software may interfere with Windows Sandbox.
- Hardware requirements: Check if the system meets the hardware requirements for Windows Sandbox.
- Graphics driver issues: Outdated or incompatible graphics drivers can cause problems with Windows Sandbox.
Below are several effective solutions to fix the “Windows Sandbox Failed to initialize” error:
Solution 1: Run the Windows Services Required by Sandbox
1. Press the Windows key + R. Type “services.msc” and click OK.
2. Right-click on the “Hyper-V Remote Desktop Virtualization Service” option and select “Properties”.
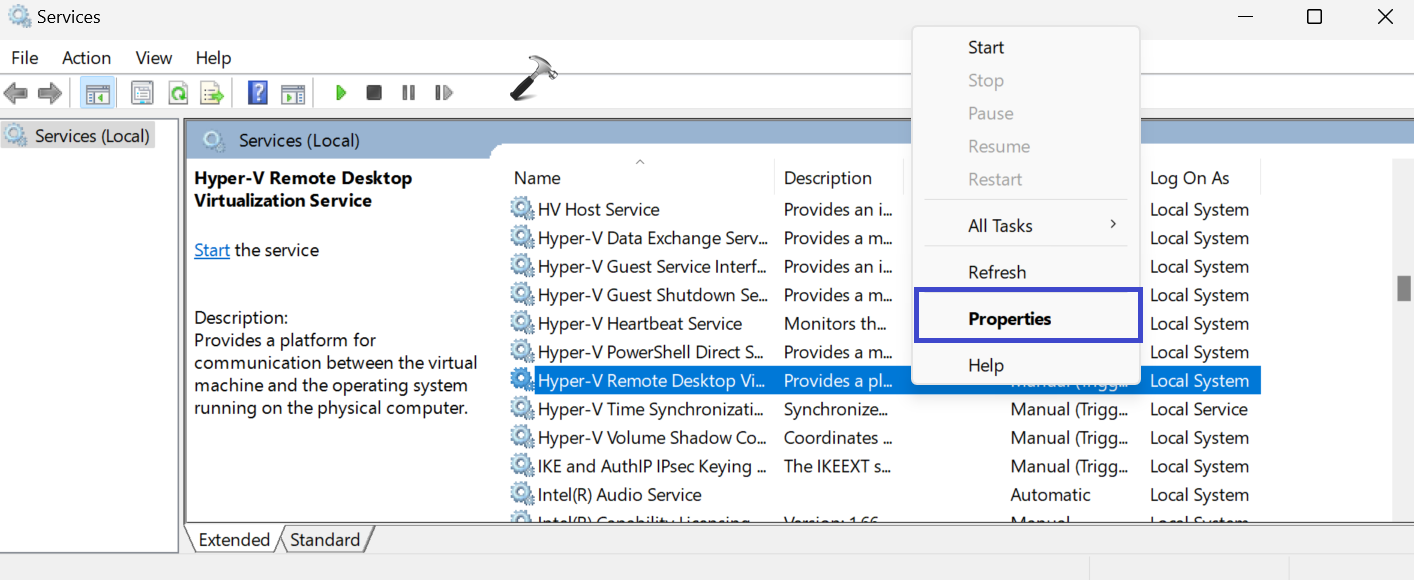
3. Make the startup type “Automatic” and then click on the “Start” button.

4. Click OK followed by Apply.
Solution 2: Use Built-in Troubleshooting Tools
1. Open the Command Prompt and run as administrator.
2. Type the following command and press Enter:
msdt.exe -id DeviceDiagnostic

Press Enter.
3. This will open the Device Diagnostic troubleshooter. (See the below image)
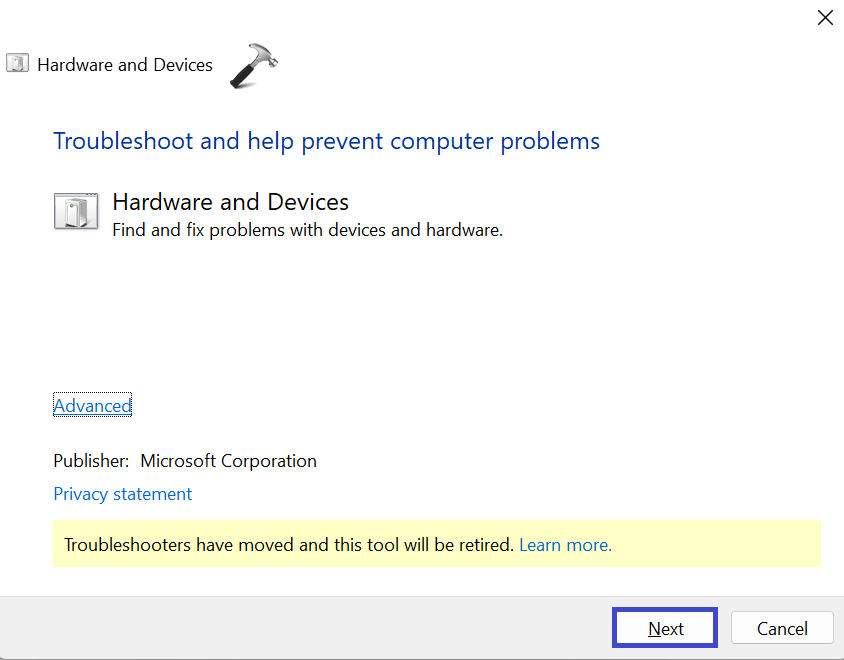
Click Next.
Follow the on-screen instructions to troubleshoot the problem.
Solution 3: Restore Windows
1. Open the search bar and type “Create a Restore Point” and select “Best match“.
2. Under the System Protection tab, click on the “System Restore” option. Press Next.
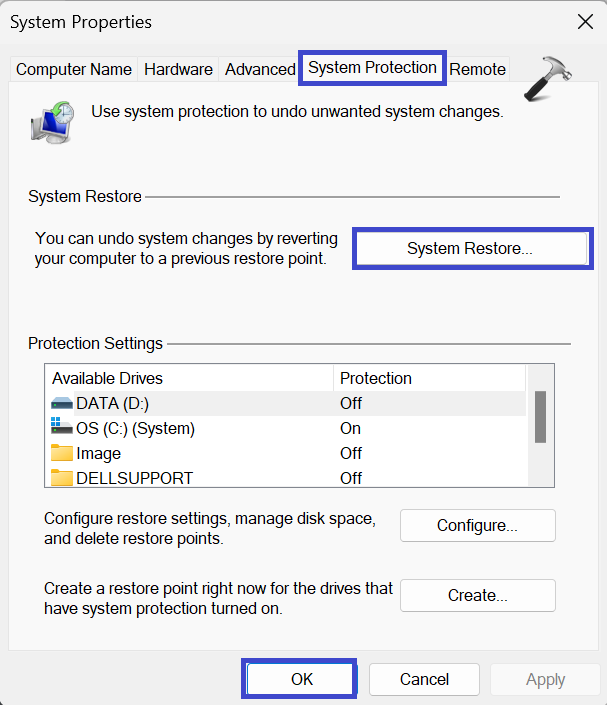
3. Now, select “Show more restore points“.
4. Select the preferred restore point and then click Next.
5. Finally, click the “Finish” option.
Solution 4: Update Your Device
1. Open the Settings App and go to Windows Update.
2. Now, click on “Check for Updates“.

3. If there is any update available, then update your device.
Solution 5: Restart Hyper-V on Windows Features
1. Press the Windows key + R. Type “optionalfeatures” and press Enter.
2. Expand the Hyper-V option.
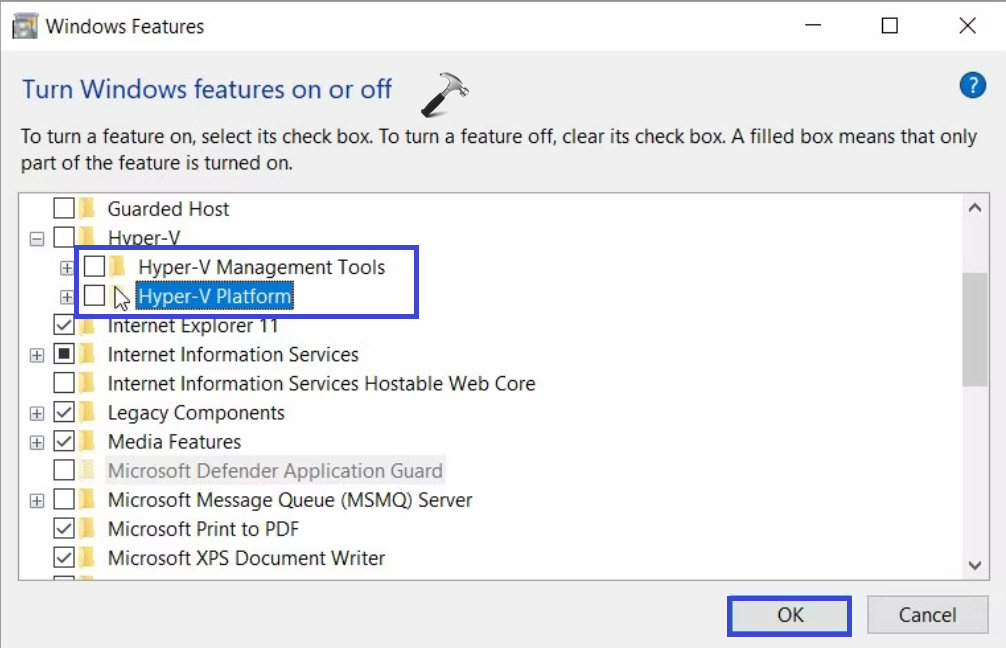
3. Uncheck the “Hyper-V Management Tools” and “Hyper-V Platform” options.
4. Click OK.
Solution 6: Repair Corrupted or Missing System Files
1. Open the command prompt and run as administrator.
2. Copy and paste the below command:
DISM /Online /Cleanup-Image /ScanHealth
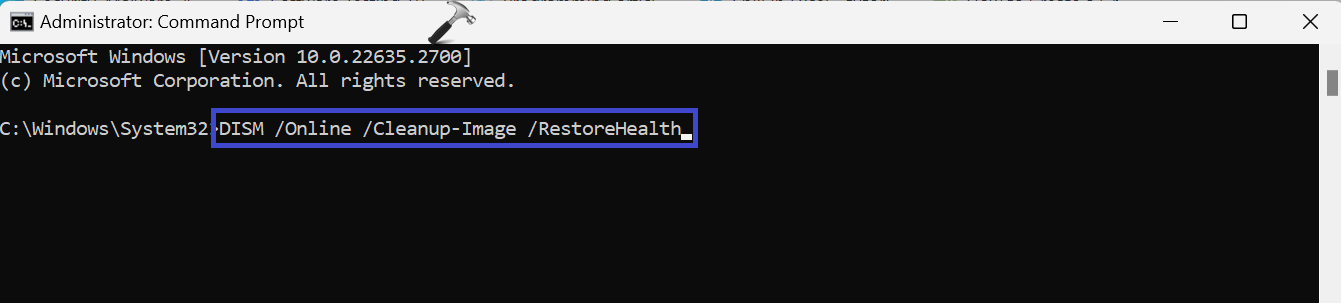
Press Enter.
Wait for the command to execute.
3. Now, copy and paste the below command:
sfc /scannow
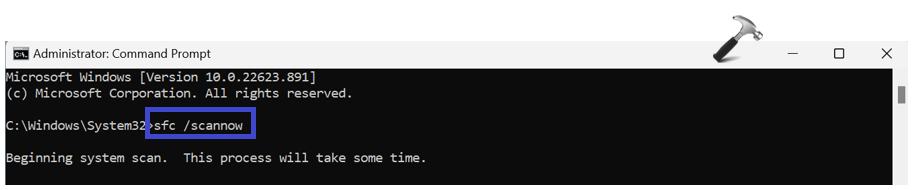
Press Enter.
4. Restart the PC after executing the above commands.
Solution 7: Disable/Re-Enable Windows Sandbox Tool
1. Press the Windows key + R. Type “optionalfeatures” and press Enter.
2. Uncheck the “Windows Sandbox” option. Click OK.
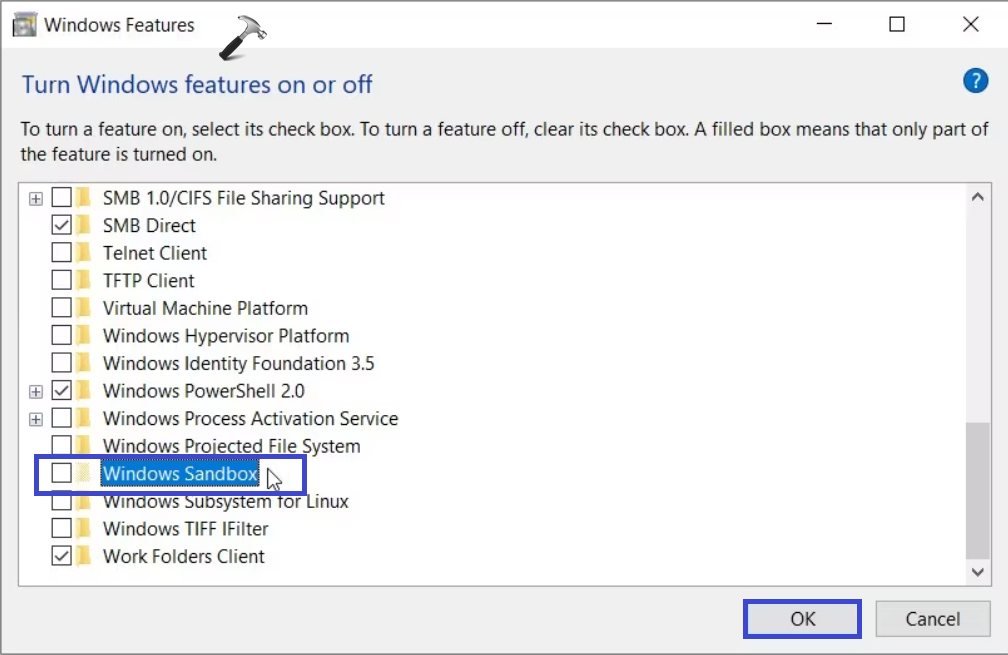
3. A dialog box will appear. Select the “Restart now” option.
4. When the device boots up, check the “Windows Sandbox” box.
5. Again, a dialog box will appear. Select the “Restart now” option.
That’s It!
RELATED ARTICLES
Все способы:
- Способ 1: Включение Windows Sandbox
- Способ 2: Активация виртуализации
- Способ 3: Переустановка компонентов Microsoft Visual C++
- Дополнительные решения проблемы
- Вопросы и ответы: 1
Способ 1: Включение Windows Sandbox
«Песочница» в Windows 10 представляет собой временную среду с рабочим столом для изолированного запуска сторонних приложений. По умолчанию она доступна только в таких редакциях, как Windows 10 Pro и Enterprise, но при желании ее можно активировать и в Домашней редакции операционки. Для этого потребуется специальный скрипт, за счет которого встроенная утилита DISM установит все необходимые программные компоненты в систему.
Перед тем как переходить к включению «Песочницы» через скрипт, отметим, что процедура не всегда завершается успешно, и гарантировать полную работоспособность невозможно. Лучше предварительно создать точку восстановления, чтобы была возможность откатить состояние системы в случае непредвиденных обстоятельств.
Подробнее:
Инструкция по созданию точки восстановления Windows 10
Откат к точке восстановления в Windows 10
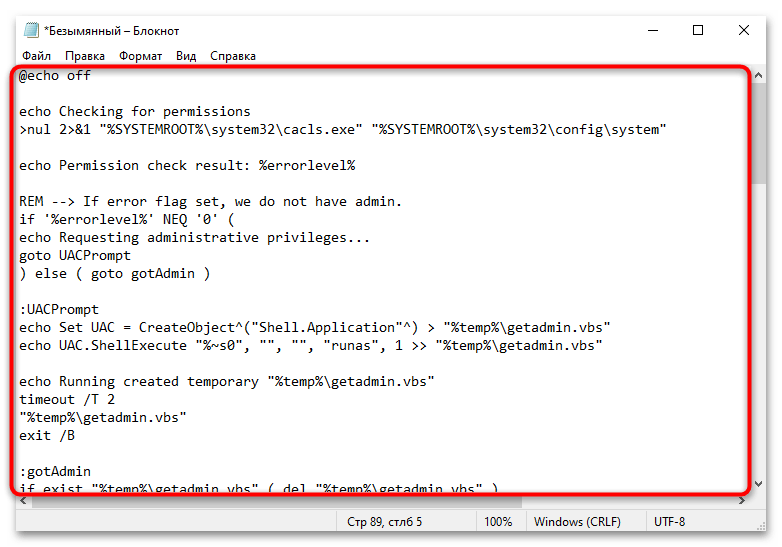
Если ранее виртуальная среда уже включалась, то это могло произойти не совсем правильно, отчего возникают проблемы с использованием функции. Ниже мы предлагаем руководство по созданию скрипта, который должен работать:
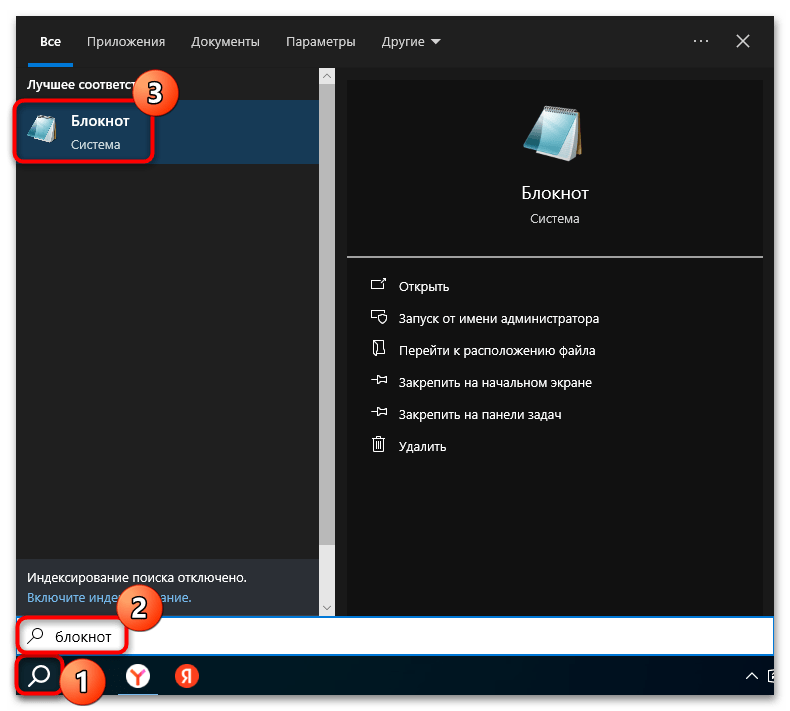
- Запустите встроенный «Блокнот». Найти его можно в главном меню или с помощью строки системного поиска.
- В окне редактора вставьте такое содержимое:
@echo off

echo Checking for permissions

>nul 2>&1 "%SYSTEMROOT%\system32\cacls.exe" "%SYSTEMROOT%\system32\config\system"

echo Permission check result: %errorlevel%

REM --> If error flag set, we do not have admin.

if '%errorlevel%' NEQ '0' (

echo Requesting administrative privileges...

goto UACPrompt

) else ( goto gotAdmin )

:UACPrompt

echo Set UAC = CreateObject^("Shell.Application"^) > "%temp%\getadmin.vbs"

echo UAC.ShellExecute "%~s0", "", "", "runas", 1 >> "%temp%\getadmin.vbs"

echo Running created temporary "%temp%\getadmin.vbs"

timeout /T 2

"%temp%\getadmin.vbs"

exit /B

:gotAdmin

if exist "%temp%\getadmin.vbs" ( del "%temp%\getadmin.vbs" )

pushd "%CD%"

CD /D "%~dp0"

echo Batch was successfully started with admin privileges

echo .

cls

GOTO:menu

:menu

Title Sandbox Installer

echo Select Action

echo 1 Install

echo 2 Uninstall

echo 3 Exit

set /p uni= Enter your option:

if %uni% ==1 goto :in

if %uni% ==2 goto :un

if %uni% ==3 goto :ex

:in

cls

Title Install Sandbox

pushd "%~dp0"

dir /b %SystemRoot%\servicing\Packages\*Containers*.mum >sandbox.txt

for /f %%i in ('findstr /i . sandbox.txt 2^>nul') do dism /online /norestart /add-package:"%SystemRoot%\servicing\Packages\%%i"

del sandbox.txt

Dism /online /enable-feature /featurename:Containers-DisposableClientVM /LimitAccess /ALL /NoRestart

goto :remenu

:un

cls

Title Uninstall Sandbox

pushd "%~dp0"

Dism /online /disable-feature /featurename:Containers-DisposableClientVM /NoRestart

dir /b %SystemRoot%\servicing\Packages\*Containers*.mum >sandbox.txt

for /f %%i in ('findstr /i . sandbox.txt 2^>nul') do dism /online /norestart /remove-package:"%SystemRoot%\servicing\Packages\%%i"

del sandbox.txt

goto :remenu

:remenu

cls

echo Restart computer?

echo 1 Yes

echo 2 No

set /p uni= Input 1 or 2:

if %uni% ==1 goto :re

if %uni% ==2 goto :ex

:re

shutdown /r /t 0 /f

goto :ex

:ex
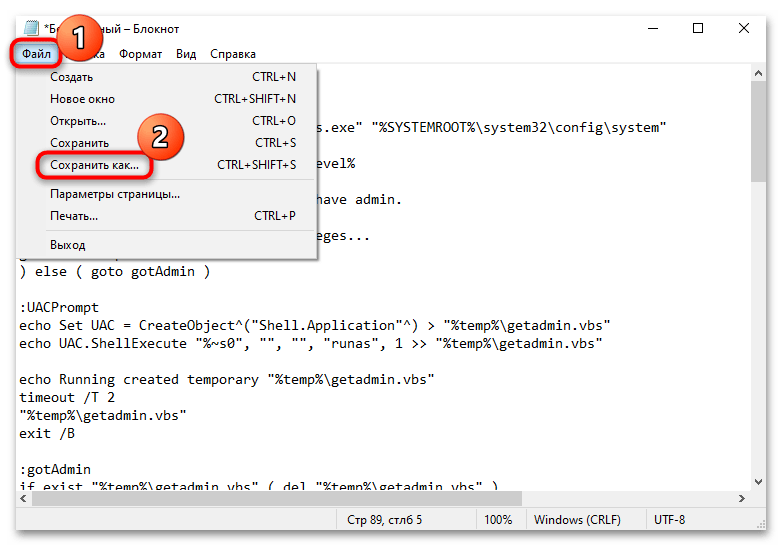
exit - Кликните по вкладке «Файл» в «Блокноте», затем выберите пункт «Сохранить как».
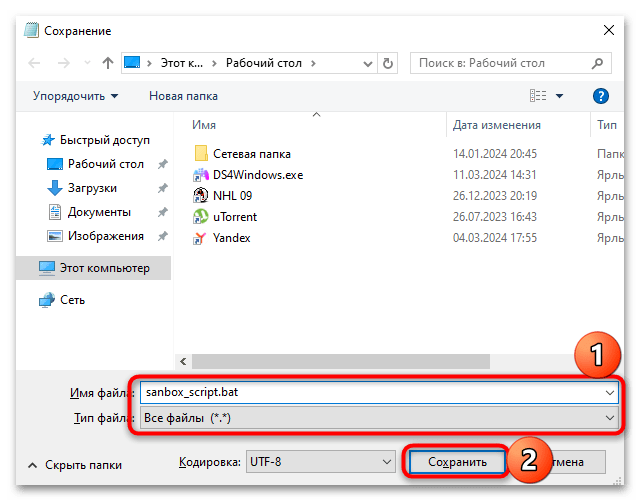
- В открывшемся окне укажите путь, куда будет сохранен будущий скрипт, затем в меню «Тип файла» выберите «Все файлы» и задайте имя документу, обязательно прописав его расширение —
.bat. - Запустите скрипт и дождитесь окончания установки необходимых компонентов. После потребуется перезагрузить компьютер и проверить, работает ли «Песочница» в данной редакции ОС.
При активации функции Windows Sandbox в редакции Windows 10 Home нет гарантий, что она будет работать стабильно. В некоторых случаях все дело в самой операционке, и сделать с этим вряд ли что-то получится (разве что перейти на другую редакцию для использования инструмента). Иногда же проблема кроется в недостатке других компонентов либо в отключенных службах виртуализации. Если после создания и запуска скрипта у вас отобразилось сообщение, что «Песочницу» не удалось инициализировать, попробуйте воспользоваться нашими рекомендациями ниже, чтобы исправить ситуацию.
Способ 2: Активация виртуализации
В первую очередь проверьте, активна ли виртуализация. Делается это с помощью встроенных средств системы или через BIOS/UEFI компьютера. Но в ситуации с Windows 10 Home рекомендуем воспользоваться вторым вариантом, поскольку программный компонент Hyper-V, отвечающий за виртуализацию на основе гипервизора, попросту может отсутствовать в редакции Home. О том, как активировать виртуализацию для процессоров AMD и Intel, ранее мы писали более развернуто.
Подробнее: Включаем виртуализацию в BIOS

Если процессор не поддерживает виртуализацию, тогда запустить «Песочницу» в Домашней редакции «десятки» вряд ли получится.
Способ 3: Переустановка компонентов Microsoft Visual C++
Для корректной работы многим компонентов системы требуется наличие файлов библиотеки Microsoft Visual C++. Windows Sandbox – не исключение, поэтому проверьте, присутствуют ли нужные данные. Если нет, их потребуется дополнительно установить. Также дело может быть в том, что они повреждены. В любом случае после запуска инсталлятора будет предложено восстановить недостающие файлы.
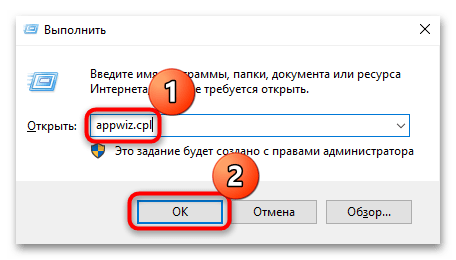
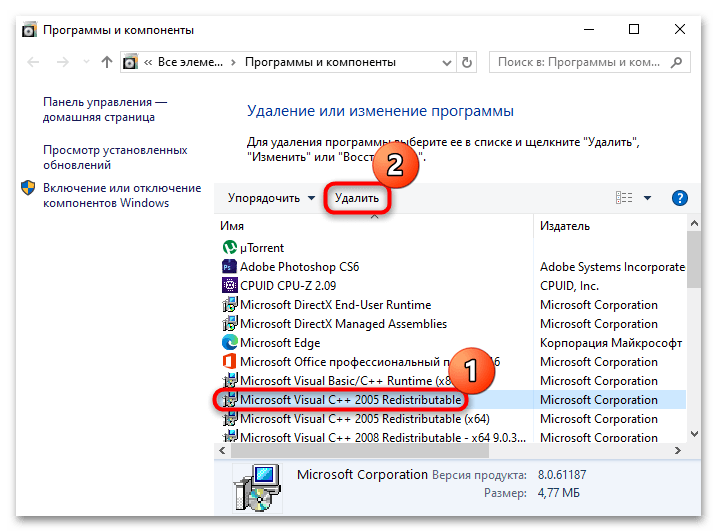
- Если ранее компоненты библиотеки Microsoft Visual C++ были установлены, перед переустановкой их нужно удалить с компьютера, чтобы избежать возможного конфликта ПО. Если софт не инсталлировался, сразу переходите к Шагу 4 данной инструкции. Для начала потребуется открыть раздел «Программы и компоненты»: одновременно нажмите на клавиши «Win + R», затем введите команду
appwiz.cplи нажмите на кнопку «ОК». - Найдите строку «Microsoft Visual C++» с версией софта, выделите ее и нажмите на кнопку «Удалить». Если компонентов несколько, проделайте процедуру с каждым из них и перезагрузите компьютер.
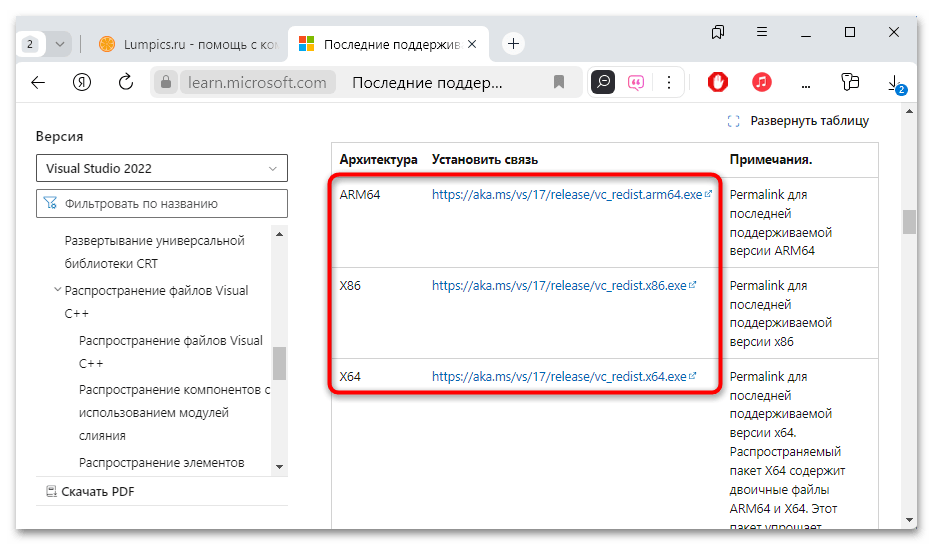
- Перейдите по ссылке ниже, чтобы скачать инсталлятор библиотеки с официального сайта компании Microsoft. Причем загружать нужно тот файл, который соответствует разрядности вашей системы.
Скачать Microsoft Visual C++ с официального сайта

Читайте также: Определяем разрядность используемой ОС Windows 10
- Далее останется запустить скачанный файл и установить нужное программное обеспечение, следуя инструкциям пошагового мастера.
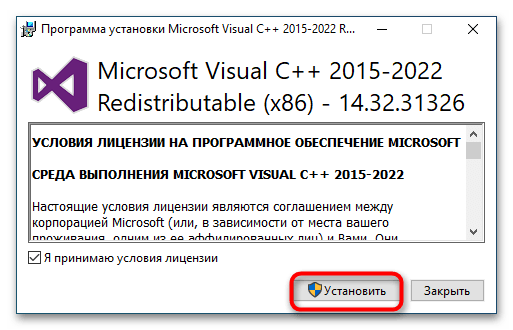
Если же установщик нашел файлы библиотек, но оказалось, что они повреждены, он предложит их восстановить.
Дополнительные решения проблемы
Если предлагаемые выше способы не помогли, тогда следует проверить целостность системных файлов, поскольку при их повреждении системные функции и компоненты могут работать некорректно. Для этого в Windows предусматривается специальная утилита, которая запускается через консоль «Командная строка». Более детально о способах восстановления данных системы мы писали в отдельном материале.
Подробнее: Как проверить целостность системных файлов в Windows 10
Также можете проверить наличие актуальных версий драйверов для устройств и программных компонентов системы, от чего во многом зависит и работа самой операционки. В этом помогут как встроенные возможности «десятки», так и сторонние приложения для проверки и обновления ПО.
Подробнее: Как проверить обновления драйверов в Windows 10
В качестве альтернативного варианта, если так вышло, что в Windows 10 Home не удалось установить «Песочницу», которая свойственна другим редакциям системы, есть смысл воспользоваться виртуальной машиной VirtualBox или VMWare. Установите на нее Виндовс 10, после чего запустите подозрительный софт. Принцип будет тем же — вы откроете приложение в безопасной для основной ОС среде, поскольку действия, совершаемые внутри виртуалки, не влияют на хостовую Windows. Добавим, что такие эмуляторы требуют виртуализации, поэтому ваш процессор должен ее поддерживать.
Подробнее: Включение виртуализации в Windows 10 через виртуальную машину
Несмотря на то что такой метод кажется довольно трудоемким, иногда он является единственным выходом.
Подробнее: Как установить Windows 10 в VirtualBox
Наша группа в TelegramПолезные советы и помощь
The Windows Sandbox tool acts as a temporary virtual desktop environment. However, while trying to use this tool, you might bump into the “Windows Sandbox failed to start” error. This post from MiniTool tells you how to fix it.
Windows Sandbox is helpful, especially when you download an executable file or an app from risky sources and install it in Sandbox. However, when you try to start Windows Sandbox on Windows 11, you may meet the “Windows Sandbox failed to initialize” issue or “Windows Sandbox failed to start” issue.
Tips:
Tip: It’s recommended to back up your important data in advance since the apps you download may be malware which could hurt your computer and lead to the “data loss” issue or even corrupt your Windows. To do that, you can try the professional backup software – MiniTool ShaodwMaker.
MiniTool ShadowMaker TrialClick to Download100%Clean & Safe
Besides, the issue always comes with different error codes, such as:
- Windows Sandbox failed to initialize. Error 0x80004001. Not implemented.
- Windows Sandbox failed to initialize. Error 0x800700cb. The system could not find the environment option that was entered.
- Windows Sandbox failed to start. Error 0x80070015. The device is not ready.
- …
The following lists some reasons for the issue:
- Services are disabled
- System files are corrupt or missing
- System requirements don’t meet
- The Sandbox feature is not enabled
- Third-party antivirus software
- Outdated graphics driver
Here, we provide some solutions for the “Windows Sandbox failed to initialize” issue:
You can disable and re-enable the Windows Sandbox tool to fix the “Windows Sandbox failed to initialize” issue.
Step 1: Type Windows Features in the Search box.
Step 2: Locate Windows Sandbox and uncheck the box and click OK. Then, check it again and click OK.

Fix 2: Start Sandbox Services
The Sandbox error usually appears when some of Windows’ services are disabled. So, you can start them to fix the issue:
Step 1: Press Win + R to open the Run dialog box. Type services.msc and press Enter.
Step 2: Locate the Hyper-V Remote Desktop Virtualization Service, right-click it to select Properties.
Step 3: Next, go to the General tab and click the Startup type drop-down menu to select Automatic.
Step 4: Click the Start > Apply > OK to save these changes.
Fix 3: Restart Hyper V and Other Programs
It’s recommended to restart the Hyper V and other programs to fix the “Windows Sandbox failed to initialize” issue.
Step 1: Type Windows Features in the Search box.
Step 2: Find Virtual Machine Platform and Windows Hypervisor Platform, and check the boxes beside them.
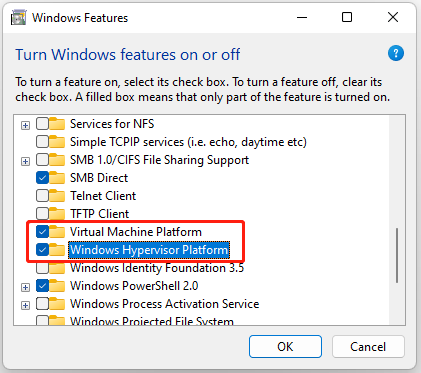
Step 3: Click the OK button.
Fix 4: Try the Troubleshooter
If the Sandbox error is caused by hardware-related problems, you can fix it with the Hardware and Devices troubleshooter.
Step 1: Press Windows+ I to open Settings.
Step 2: Go to System, then click Troubleshoot and click Other troubleshooters.
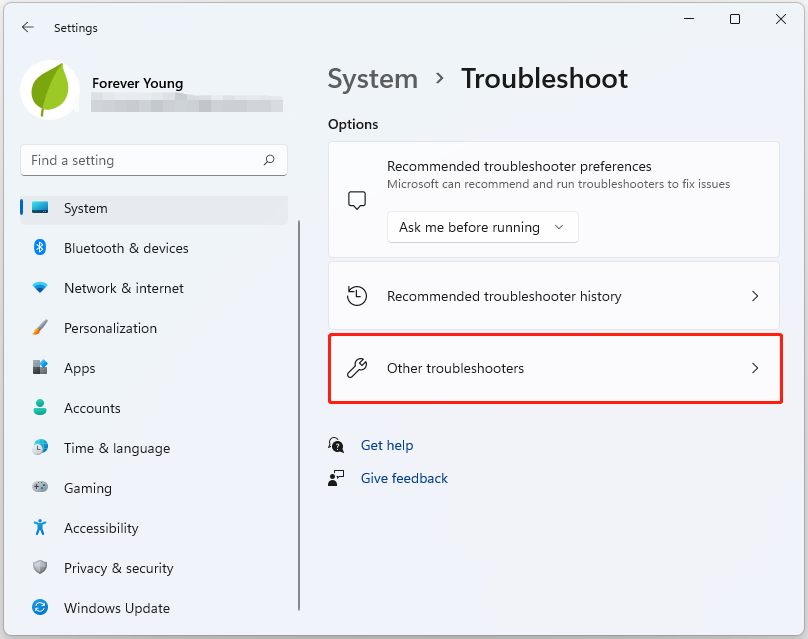
Step 3: Select hardware or device and click Run. Follow the onscreen instructions and restart the computer.
Fix 5: Run SFC
You can also run SFC to fix the “Windows Sandbox failed to initialize” issue. Follow the guide:
Step 1: Launch Command Prompt as administrator.
Step 2: Type sfc /scannow and press Enter. This process may take you much time to scan, and you just need to wait patiently.
Fix 6: Restore Windows to the Previous State
If you have created a system restore point or system image backup with Windows snap-in tools, you can try using the restore point to restore your computer to fix the error message. Here are the steps:
Step 1: In the Search menu, input control panel and open it.
Step 2: Click Recovery and click Open System Restore to continue.
Step 3: In the Restore system files and settings interface, click Next to continue.
Step 4: Select a restore point and click Next to continue.
Step 5: You need to confirm the restore point and click Finish. After the system restore is finished, try to shut down your computer again.
Fix 7: Check for Updates
It’s recommended to update your Windows 11/10 to the latest version to remove the annoying issue. Follow the guide below:
Step 1: Press the Windows + I keys together to open Settings.
Step 2: Go to Updates & Security.
Step 3: Click the Windows Update section, and click the Check for updates button to check if there are any new updates. Then Windows will search for available updates. Just follow the on-screen instructions to finish the process.
Final Words
Here are all of the methods to fix the “Windows Sandbox failed to initialize” issue on Windows 11/10. You can try them one by one. I hope that this post can be useful to you.
Windows Sandbox Failed to Initialize: Fixes and Solutions
Windows Sandbox is an incredible tool introduced in Windows 10 Pro and Enterprise editions. It provides users with a lightweight, isolated environment to run applications safely without affecting the host system. However, encountering the «Windows Sandbox failed to initialize» error can be frustrating. This issue could arise from various factors, ranging from configuration problems to software conflicts. In this article, we’ll explore the causes behind this error and provide detailed solutions to help you fix it.
Understanding Windows Sandbox
Windows Sandbox creates a separate environment that emulates Windows. Here, you can run untrusted software without the risk of threatening your main operating system. Once you close the sandbox window, all its contents and activities are completely discarded, providing a safe zone for testing applications or browsing suspicious websites.
While it is a valuable feature, not all machines are configured appropriately to support it. Users may experience issues that prevent Windows Sandbox from working correctly, which brings us to the problem at hand – failing to initialize.
Common Causes of the Initialization Error
-
System Requirements: Windows Sandbox has specific hardware and software requirements. If your system does not meet these, the sandbox will not initialize.
-
Virtualization Disabled: Windows Sandbox depends heavily on hardware virtualization, which needs to be enabled in your BIOS settings.
-
Device Configuration: Misconfigured Windows settings or group policies can impede Windows Sandbox from starting up.
-
Corrupted System Files: Corrupted or missing system files can disrupt the functions necessary for Windows Sandbox to initialize properly.
-
Incorrect Windows Features: Windows Features associated with virtualization and sandboxing must be enabled.
-
Conflicting Software: Certain third-party applications or security software might conflict with or block the Windows Sandbox.
Checking System Requirements
Before diving into troubleshooting, it is essential to confirm that your system meets the requirements for Windows Sandbox:
- Operating System: Windows 10 Pro or Enterprise (build 1903 or higher).
- 64-bit Architecture: You must have a 64-bit version of Windows.
- Minimum RAM: At least 4 GB of RAM (8 GB recommended).
- CPU: Multicore processor with support for virtualization.
- Hardware Virtualization: Must support Hyper-V and be enabled.
You can check your Windows version by pressing Win + R, typing winver, and pressing Enter. The information will display your build version and whether it meets the requirements.
Solutions for Fixing the Windows Sandbox Initialization Error
If you’ve confirmed that your system meets the prerequisites but still face the initialization error, here are various steps to troubleshoot and resolve the issue.
Solution 1: Enable Virtualization in BIOS
- Restart Your Computer.
- Enter BIOS/UEFI Setup: This usually involves pressing
F2,F10,Delete, or another key depending on your system during boot. - Find Virtualization Settings: Under CPU or Advanced settings, look for options like «Intel VT-x,» «Intel Virtualization Technology,» or «AMD-V.»
- Enable Virtualization: Change the setting to Enable.
- Save and Exit BIOS: After making changes, make sure to save before exiting.
Solution 2: Ensure Windows Features are Enabled
- Open Windows Features: Press
Win + R, typeoptionalfeatures, and hit Enter. - Check for Relevant Features: Ensure that the following options are checked:
- Hyper-V
- Windows Hypervisor Platform
- Containers
- Restart Your Computer: For the changes to take effect properly.
Solution 3: Update Windows
Running an outdated version of Windows may lead to compatibility issues. To update Windows:
- Open Settings: Press
Win + I. - Go to Update & Security: Click on ‘Windows Update’.
- Check for Updates: Click on the ‘Check for updates’ button and install any updates if available.
Solution 4: Run System File Checker
Corrupted system files might be preventing Windows Sandbox from initializing. Running the System File Checker (SFC) can help:
- Open Command Prompt as Administrator: Type
cmdin the Windows search bar, right-click on Command Prompt, and select ‘Run as administrator’. - Type the Command: Enter the command
sfc /scannowand press Enter. This will run a scan on your system files. - Wait for the Scan to Complete: If the utility finds any issues, it will attempt to fix them.
Solution 5: Check for Conflicting Applications
Sometimes, third-party applications interfere with Windows Sandbox. Ensure that there are no incompatible virtualization programs installed, such as VirtualBox or VMWare.
- Uninstall Third-Party Virtualization Software: Go to Settings > Apps and uninstall any conflicting software.
- Disable Security Software Temporarily: Some security programs may block sandboxing. Consider temporarily disabling them to see if they are the cause.
Solution 6: Check Group Policy Settings
For users with Windows Pro or Enterprise, certain Group Policy settings might impact Windows Sandbox:
- Access Group Policy Editor: Press
Win + R, typegpedit.msc, and hit Enter. - Navigate to the Following Path: Computer Configuration > Administrative Templates > Windows Components > Windows Sandbox.
- Ensure No Policies are Preventing Startup: Look for any enabled policies that might restrict the use of Windows Sandbox.
Solution 7: Re-enable Windows Sandbox
Sometimes, simply disabling and re-enabling the Windows Sandbox can reset any misconfiguration.
- Access Windows Features: Press
Win + R, then enteroptionalfeatures. - Locate Windows Sandbox: Uncheck the checkbox next to it, click OK, and let Windows make the changes.
- Restart Your Computer.
- Reopen Windows Features: Go back and check the box to re-enable Windows Sandbox.
Solution 8: Reset Network Adapter
Network issues might prevent Windows Sandbox from initializing. Resetting the network can sometimes resolve these issues.
- Open Settings: Press
Win + I. - Go to Network & Internet: Click on Status.
- Reset Now: Scroll down and select ‘Network reset’. Follow the on-screen instructions to reset your adapters.
Solution 9: Update Drivers
Outdated drivers can lead to various functionalities being affected. Ensure your hardware drivers are up to date.
- Open Device Manager: Right-click on the Start button, and select Device Manager.
- Expand Relevant Categories: Check for any warning icons next to essential components like Network adapters, processors, and graphics.
- Update Drivers: Right-click on any driver needing an update and select Update driver.
Solution 10: Create a New User Profile
Corruption in the user profile could lead to issues with Windows Sandbox. Creating a new user profile might help.
- Open Settings: Press
Win + I. - Navigate to Accounts: Click on ‘Family & other users’.
- Add Someone Else to This PC: Click on ‘Add someone else to this PC’ and follow the prompts to create a new account.
- Log In to New Profile: Restart your computer and log in to the new profile.
Conclusion
Dealing with the «Windows Sandbox failed to initialize» error can be frustrating, but with these comprehensive solutions, you should be able to diagnose and resolve the issues effectively. Always ensure that your system meets the minimum requirements and that all related settings are correctly configured.
Remember, if persistent issues occur despite attempting these fixes, it might be worth considering a full reinstall of Windows after proper backups have been made. It’s preferable to tackle such errors before they affect your workflow; Windows Sandbox offers a unique and vital environment for safely testing and running unknown applications. Always use this valuable tool wisely!