Маршрутизация в Windows

Маршрутизация – это процесс передачи IP-трафика адресатам в сети, то есть процесс передачи пакетов от хоста-источника к хосту-адресату через промежуточные маршрутизаторы. Изучая эту статью предполагается что вы изучили материал основы компьютерных сетей.
Изучим как работает маршрутизация в Windows, что бы понять как она работает, а не просто прочитать и забыть, вам необходимо несколько виртуальных машин, а именно:
- ВМ с Windows XP.
- 2 ВМ с Windows Server 2003.
Учтите, что при настройке виртуальных машин, в настройках сети нужно указать «Внутренняя сеть» и задать одинаковое имя сети для всех машин.
Если вы не поленитесь и установите три виртуальные машины, а так же изучите этот материал до конца, то у вас будет практическое понимание работы сети в операционных системах семейства Windows.
Содержание:
- Таблица маршрутизации
- Статическая маршрутизация
- Маршрутизация по умолчанию
- Динамическая маршрутизация, протокол RIP
Для простоты передачи данных хост-источник и маршрутизатор принимают решения о передаче пакетов на основе своих таблиц IP-маршрутизации. Записи таблицы создаются при помощи:
- Программного обеспечения стека TCP/IP.
- Администратора, путем конфигурирования статических маршрутов.
- Протоколов маршрутизации, одним из которых является протокол передачи маршрутной информации – RIP.
По сути, таблица маршрутизации – это база данных, которая хранится в памяти всех IP-узлов. Цель таблицы IP-маршрутизации это предоставление IP-адреса назначения для каждого передаваемого пакета для следующего перехода в сети.
Пример маршрутизации в Windows
Допустим, у нас есть три узла:
- Windows XP.
- Windows Server 2003 – 1.
- Windows Server 2003 – 2.
Хост XP имеет один сетевой адаптер (интерфейс) с IP-адресом 192.168.0.2 и маской подсети 255.255.255.0. Маршрутизатор Server1 имеет два интерфейса с IP-адресами 192.168.0.1 и 192.168.1.1 и масками подсети 255.255.255.0. Маршрутизатор Server2 также имеет 2 сетевых адаптера с IPадресами 192.168.1.2 и 192.168.2.1 и масками подсети 255.255.255.0. Таким образом, мы имеем 3 сети: сеть с IP-адресом 192.168.0.0 (Net 1), сеть с IP-адресом 192.168.1.0 (Net 2), сеть с IP-адресом 192.168.2.0 (Net 3).

Таблица маршрутизации
Таблица маршрутизации по умолчанию создается на узле автоматически с помощью программного обеспечения стека TCP/IP.
При настройке сетевого подключения на хосте XP были статически заданы IP-адрес 192.168.0.2 и маска подсети 255.255.255.0, основной шлюз задан не был. Программное обеспечение стека TCP/IP автоматически создало таблицу маршрутизации по умолчанию.
Что бы просмотреть таблицы маршрутизации на узле XP выполним команду route print в командной строке (Пуск -> Выполнить -> cmd).
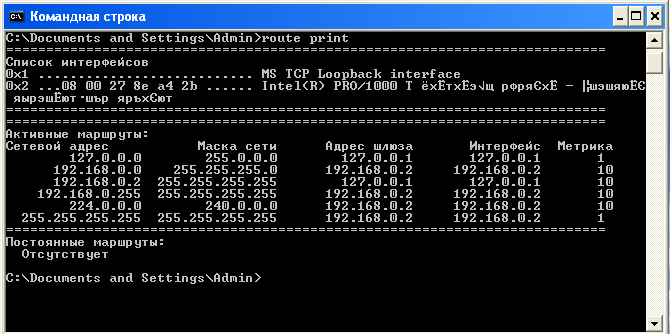
Таблица маршрутизации содержит для каждой записи следующие поля: Сетевой адрес (Network Destination), Маска сети (Netmask), Адрес шлюза (Gateway), Интерфейс (Interface) и Метрика (Metric). Разберем каждое поле подробнее.
Сетевой адрес. Поле определяет диапазон IP-адресов достижимых с использованием данной таблицы.
Маска сети. Битовая маска, которая служит для определения значащих разрядов в поле Сетевой адрес. Маска состоит из непрерывных единиц и нулей, отображается в десятичном коде. Поля Сетевой адрес и Маска определяют один или несколько IP-адрес.
Адрес шлюза. В этом поле содержаться IP-адрес, по которому должен быть направлен пакет, если он соответствует данной записи таблицы маршрутизации.
Интерфейс. Данное поле содержит адрес логического или физического интерфейса, используемого для продвижения пакетов, соответствующих данной записи таблицы маршрутизации.
Метрика. Используется для выбора маршрута, в случае если имеется несколько записей, которые соответствуют одному адресу назначения с одной и той же маской, то есть в случае если одного адресата можно достичь разными путями, через разные маршруты. При этом, чем меньше значение метрики тем короче маршрут.
На начальном этапе работы (т.е. с таблицами маршрутизации по умолчанию) маршрутизатор (хост) знает только, как достичь сетей, с которыми он соединен непосредственно. Пути в другие сети могут быть «выяснены» следующими способами:
- с помощью статических маршрутов;
- с помощью маршрутов по умолчанию;
- с помощью маршрутов, определенных протоколами динамической маршрутизации.
Рассмотрим каждый из способов по порядку.
Статическая маршрутизация
Статические маршруты задаются вручную. Плюс статических маршрутов в том, что они не требуют рассылки широковещательных пакетов с маршрутной информацией, которые занимают полосу пропускания сети.
Минус статических маршрутов состоит в том, что при изменении топологии сети администратор должен вручную изменить все статические маршруты, что довольно трудоемко, в случае если сеть имеет сложную структуру с большим количеством узлов.
Второй минус заключается в том, что при отказе какого-либо канала статический маршрут перестанет работать, даже если будут доступны другие каналы передачи данных, так как для них не задан статический маршрут.
Но вернемся к нашему примеру. Наша задача, имя исходные данные, установить соединения между хостом XP и Server2 который находится в сети Net3, то есть нужно что бы проходил пинг на 192.168.2.1.
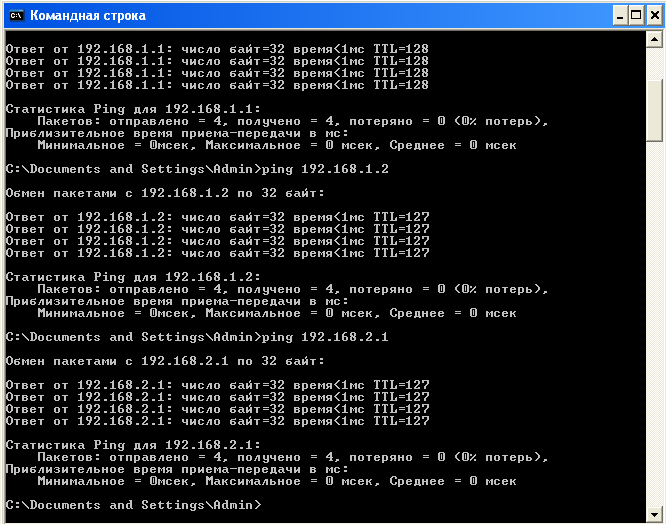
Начнем выполнять на хосте XP команды ping постепенно удаляясь от самого хоста. Выполните в Командной строке команды ping для адресов 192.168.0.2, 192.168.0.1, 192.168.1.1.
Мы видим, что команды ping по адресу собственного интерфейса хоста XP и по адресу ближайшего интерфейса соседнего маршрутизатора Server1 выполняются успешно.


Однако при попытке получить ответ от второго интерфейса маршрутизатора Server1 выводится сообщение «Заданный узел недоступен» или «Превышен интервал ожидания для запроса».

Это связано с тем, что в таблице маршрутизации по умолчанию хоста XP имеются записи о маршруте к хосту 192.168.0.2 и о маршруте к сети 192.168.0.0, к которой относится интерфейс маршрутизатора Server1 с адресом 192.168.0.1. Но в ней нет записей ни о маршруте к узлу 192.168.1.1, ни о маршруте к сети 192.168.1.0.
Добавим в таблицу маршрутизации XP запись о маршруте к сети 192.168.1.0. Для этого введем команду route add с необходимыми параметрами:
route add [адресат] [mask маска] [шлюз] [metric метрика] [if интерфейс]
Параметры команды имеют следующие значения:
- адресат — адрес сети или хоста, для которого добавляется маршрут;
- mask — если вводится это ключевое слово, то следующий параметр интерпретируется как маска подсети, соответственно маска — значение маски;
- шлюз — адрес шлюза;
- metric — после этого ключевого слова указывается метрика маршрута до адресата (метрика);
- if — после этого ключевого слова указывается индекс интерфейса, через который будут направляться пакеты заданному адресату.
Индекс интерфейса можно определить из секции Список интерфейсов (Interface List) выходных данных команды route print.
Выполним команду route print.

Теперь мы видим , что хост XP имеет два интерфейса: логический интерфейс замыкания на себя (Loopback) и физический интерфейс с сетевым адаптером Intel(R) PRO/1000. Индекс физического интерфейса – 0x2.
Теперь, зная индекс физического интерфейса, на хосте добавьте нужный маршрут, выполнив следующую команду:
route add 192.168.1.0 mask 255.255.255.0 192.168.0.1 metric 2 if 0x2
Данная команда сообщает хосту XP о том, что для того, чтобы достичь сети 192.168.1.0 с маской 255.255.255.0, необходимо использовать шлюз 192.168.0.1 и интерфейс с индексом 0x2, причем сеть 192.168.1.0 находится на расстоянии двух транзитных участка от хоста XP.
Выполним пинг на 192.168.1.1 и убедимся, что связь есть.
Продолжим пинговать серверы, теперь проверьте отклик от второго маршрутизатора, присоединенного к сети Net2 (Server2). Он имеет IP-адрес 192.168.1.2.
Получаем сообщение «Превышен интервал ожидания запроса». В данном случае это означает что наш хост XP знает как отправлять данные адресату, но он не получает ответа.
Это происходит по тому, что хост Server2 не имеет информации о маршруте до хоста 192.168.0.1 и до сети 192.168.0.0 соответственно, поэтому он не может отправить ответ.
Для этого необходимо выполнить команду route add с соответствующими параметрами, однако сначала необходимо узнать индекс интерфейса с адресом 192.168.1.2.
На Server2 выполним команду route print и посмотрим индекс первого физического интерфейса. Далее, с помощью команды route add добавьте на Server2 маршрут до сети Net1, аналогично тому, как мы добавляли маршрут хосту XP.
В моем случае это команда:
route add 192.168.0.0 mask 255.255.255.0 192.168.1.1 metric 2 if 0x10003
0x10003 — это индекс физического интерфейса сервера 2.

Индекс физического интерфейса может быть разным, обязательно обращайте на него внимание.
После того, как удостоверитесь в наличии связи между узлами XP и Server2, выполните команду ping 192.168.2.1, т.е. проверьте наличие маршрута узла XP до сети Net3 (192.168.2.1 – IP-адрес маршрутизатора Server2 в сети Net3).
Вместо ответа вы получите сообщение «Заданный узел недоступен». С этой проблемой мы сталкивались еще в самом начале лабораторной работы, машина XP не знает путей до сети 192.168.2.0.
Добавьте в таблицу маршрутизации хоста XP запись о маршруте к сети 192.168.2.0. Это можно сделать путем ввода в командной строке хоста XP команды route add с соответствующими параметрами:
route add 192.168.2.0 mask 255.255.255.0 192.168.0.1 metric 3 if 0x2
Я не буду подробно описывать как полностью настроить статическую маршрутизацию между узлами, думаю что суть ясна. Если у вас появились вопросы — задавайте их в комментариях.
Маршрутизация по умолчанию
Второй способ настройки маршрутизации в Windows — то маршрутизация по умолчанию.
Для маршрутизации по умолчанию необходимо задать на всех узлах сети маршруты по умолчанию.
Для добавления такого маршрута на хосте XP выполните следующую команду:
route add 0.0.0.0 mask 0.0.0.0 192.168.0.1 metric 2 if 0x10003Эта команда сообщает хосту XP о том, что для того, чтобы достичь любой сети, маршрут к которой отсутствует в таблице маршрутизации, необходимо использовать шлюз 192.168.0.1 и интерфейс с индексом
0x10003.Это так называемый маршрут по умолчанию.
Проверьте работоспособность с помощью команды ping.
Динамическая маршрутизация, протокол RIP
Протокол RIP (Routing Information Protocol или Протокол передачи маршрутной информации) является одним из самых распространенных протоколов динамической маршрутизации.
Его суть заключается в том, что маршрутизатор использующий RIP передает во все подключенные к нему сети содержимое своей таблицы маршрутизации и получает от соседних маршрутизаторов их таблицы.
Есть две версии протокола RIP. Версия 1 не поддерживает маски, поэтому между сетями распространяется только информация о сетях и расстояниях до них. При этом для корректной работы RIP на всех интерфейсах всех маршрутизаторов составной сети должна быть задана одна и та же маска.
Протокол RIP полностью поддерживается только серверной операционной системой, тогда как клиентская операционная система (например, Windows XP) поддерживает только прием маршрутной информации от других маршрутизаторов сети, а сама передавать маршрутную информацию не может.
Настраивать RIP можно двумя способами:
- В графическом режиме с помощью оснастки “Маршрутизация и удаленный доступ”.
- В режиме командной строки с помощью утилиты netsh.
Рассмотрим настройку в режиме командной строки с помощью утилиты netsh.
Netsh – это утилита командной строки и средство выполнения сценариев для сетевых компонентов операционных систем семейства Windows (начиная с Windows 2000).
Введите в командной строке команду netsh, после появления netsh> введите знак вопроса и нажмите Enter, появиться справка по команде.
Введите последовательно команды:
- routing
- Ip
- rip
- ?
Вы увидите, что среди доступных команд этого контекста есть команда add interface, позволяющая настроить RIP на заданном интерфейсе. Простейший вариант этой команды – add interface «Имя интерфейса».
Если ввести в Windows XP в контексте netsh routing ip rip команду add interface "Net1", то получим сообщение «RIP должен быть установлен первым». Дело в том, что Установить RIP можно только в серверной операционной системе. В Windows Server 2003 в RIP включается в оснастке «Маршрутизация и удаленный доступ» (Пуск –> Программы –> Администрирование –> Маршрутизация и удаленный доступ). Таким образом, включить RIP в нашем случае можно только на маршрутизаторах Server1 и Server2.
Настроим RIP на Server1. Но сначала нужно выключит брандмауэр.
Теперь в оснастке «Маршрутизация и удаленный доступ» в контекстном меню пункта SERVER1 (локально) выберите пункт «Настроить и включить Маршрутизация ЛВС
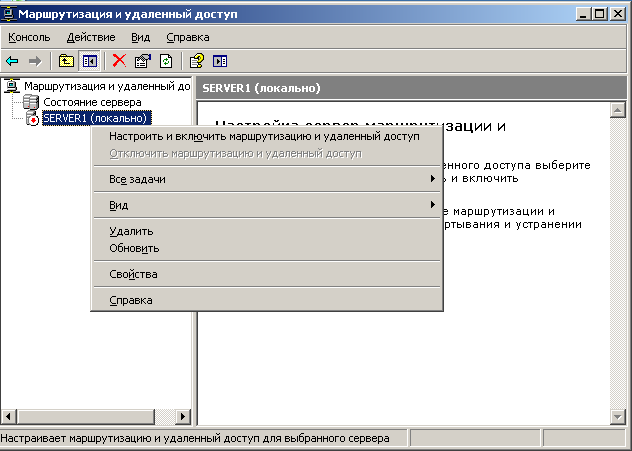
маршрутизацию и удаленный доступ».
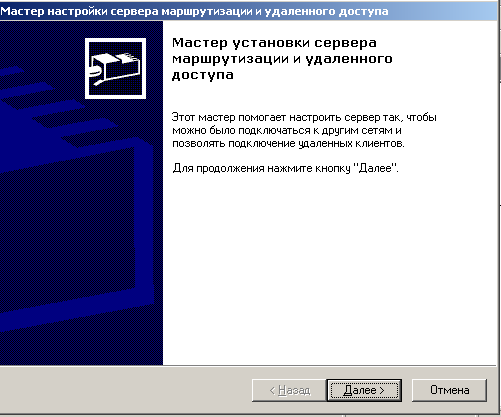
В появившемся окне мастера нажмите «Далее».
На следующем этапе выберите «Особая конфигурация» и нажмите «Далее».
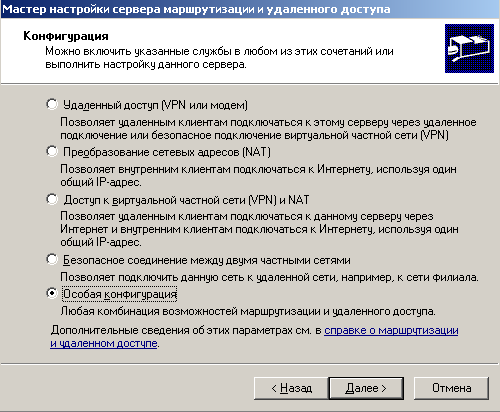
После чего нужно выбрать «Маршрутизация ЛВС» и завершить работу мастера.
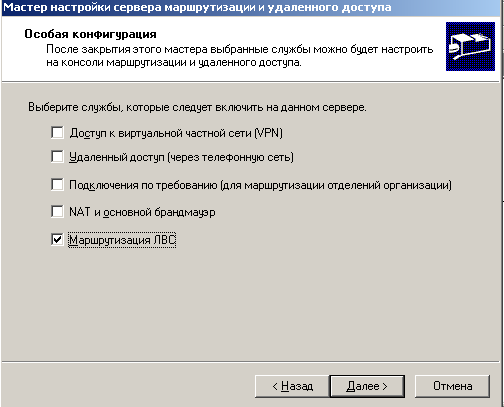
То же самое нужно выполнить на Server2.
Настройка через оснастку
В контекстном меню вкладки «Общие» (SERVER1 –> IP-маршрутизация –> Общие) нужно выбрать пункт «Новый протокол маршрутизации».
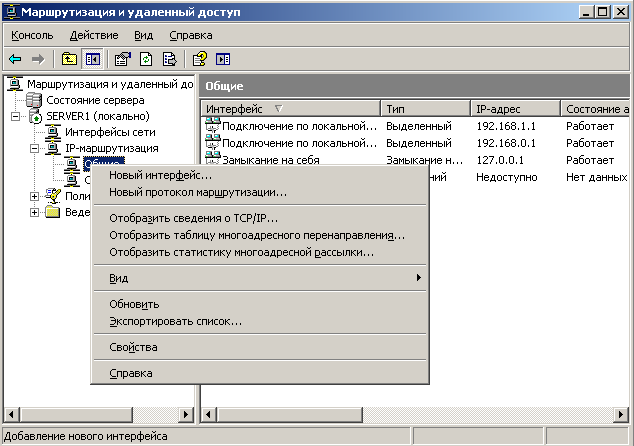
Затем выделяем строку «RIP версии 2 для IP».
В контекстном меню появившейся вкладки «RIP» выберите «Новый интерфейс». Выделите строку «Подключение по локальной сети» и нажмите ОК.
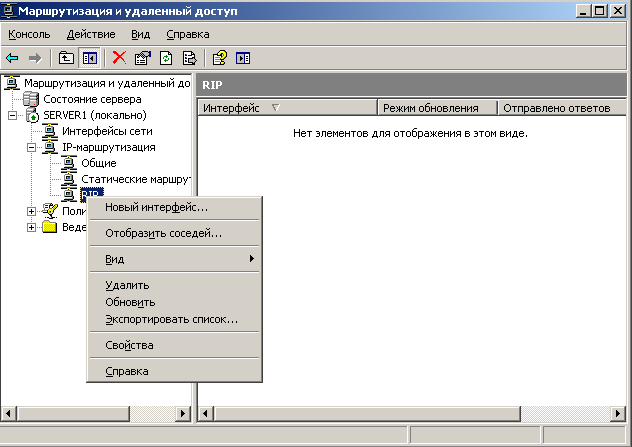
Перед вами появиться окно.
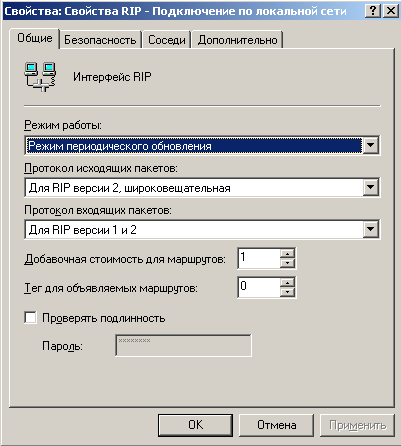
В появившемся окне необходимо задать следующие настройки:
- Режим работы –> Режим периодического обновления.
- Протокол для исходящих пакетов –> Для RIP версии 1.
- Протокол входящих пакетов –> Только для RIP версии 1.
Оставьте оставшиеся настройки по умолчанию и нажмите ОК.
Далее необходимо выполнить эти действия для второго сетевого интерфейса.
После выполните те же действия для Sever2.
Проверьте, с помощью команды ping, работу сети.
Поздравляю! Маршрутизация в Windows изучена.
Static routes define fixed paths for network traffic that would otherwise have their path calculated automatically. This guide explains static routes, why you would use them, and provides step-by-step instructions showing how to add and remove static routes on Windows. It also looks at adding persistent routes and other tips for network management on Windows.
Get full control over your Windows networks with NinjaOne’s powerful endpoint management tools.
Try it for free.
What are static routes?
In computer networking, a “route” is the path network packets take to reach their destination. Data from your computer is broken into small packets for transfer over the local network (for example, between your computer and wireless printer), or for transmission over the internet (such as when you submit an online form). Network routing then takes care of making sure all of these packets reach their destination where they can be re-assembled into the original complete message.
Computer networks are designed in this way so that if there’s a disruption somewhere in the network, packets can be re-routed through a different connection. When there is no disruption, routing protocols can optimize for efficiency, sending data through different paths simultaneously to improve speed.
The key components in network routing are:
- Routing table: This is where each device (including your Windows PC) stores the information about the routes to different destinations.
- Next hop: Most network routes need to cover large distances over complex networks. The “next hop” is the next stop along the path to the destination (for example, there is a hop between your PC and a wireless printer — packets need to go first to your Wi-Fi router, then your printer).
- Routing protocols and metrics: Routing protocols are the software that is used by network devices to keep routing tables up-to-date with the latest paths data should take. This is done based on the number of hops, bandwidth, and/or latency.
Usually, routes are automatically calculated by the routing protocol and stored in a routing table based on routing metrics. These dynamic routes change based on network conditions. The default route can be set for all traffic with no route otherwise assigned in the routing table.
Static routes can be manually configured in a devices routing table, to set fixed paths traffic should take instead of dynamic routes or the default route. If this route is broken, traffic will not be able to reach the destination and a dynamic alternate route will not be calculated.
Why do you need to use static routes?
In some situations, the dynamic route is not the route you want specific traffic to take. You may want to take a known optimal route or send traffic along a secure connection. Example use-cases for static routes include:
- Sending traffic via a known reliable route that avoids faulty networking conditions that are outside your control or that fully utilizes a better connection for optimization.
- Building efficient networks using low-power devices that do not need to run routing protocols.
- Maintaining full control over the path network traffic takes for optimization or to ensure protected data only travels over your secure network infrastructure.
- Ensuring network traffic takes a predictable path for troubleshooting or easier management.
- Adding redundancy and resiliency to your networks by providing a known alternative path as a fallback to dynamic routes.
Static routes are frequently used to ensure certain traffic is sent over a VPN connection. This can be important when you handle sensitive data that you do not want routed over the internet. While static routes are usually not required for day-to-day tasks on home Windows PCs, there are situations where they are added for troubleshooting or to set up remote networks for work-from-home setups.
IP addresses and network masks
Route tables use the IPV4 or IPV6 IP address of the destination and hops to identify routes. You’ll need a basic understanding of IP addresses and network masks to write effective static routes.
How to use the route command for Windows
The route command is built-in to Windows and lets you view currently set static routes, as well as adding, removing, and editing them. The route command is available in all versions of Windows including Windows 11, Windows 10, and Windows Server. The route command can be run from either the Command Prompt or PowerShell, and needs to be run as an administrator.
To open PowerShell or the Command Prompt to use the route command, right-click on the Start menu, and then:
- Click Terminal (Admin) if you’re using Windows 11
- Click Command Prompt (Admin) if you’re using Windows 10
How to list static routes on Windows
To list the existing static routes, enter the following command:
route print
This will output the current route table, showing all the currently configured static routes. You can use this command to verify that you’ve successfully added, removed, or edited a static route.
How to add a static route on Windows
The below example route command adds a static route:
route add 0.0.0.0 mask 0.0.0.0 192.168.77.1
The command is constructed as follows:
- The route executable is called.
- The add command tells it to add a static route to the routing table.
- The first 0.0.0.0 is the destination network. In this case, 0.0.0.0 matches all networks.
- The second 0.0.0.0 specifies the subnet mask this static route should apply to, in this case again matching all subnets.
- 192.168.77.1 specifies the gateway address. This is the next hop through which all matching traffic will be sent.
This static route sends all network traffic to 192.168.77.1, effectively adding a default route.
The next example adds a route to a specific network:
route add 192.168.10.0 mask 255.255.255.0 192.168.77.1
The command differs from the previous example:
- 192.168.10.0 is the destination network.
- 255.255.255.0 specifies the subnet mask this static route should apply to, in this case matching all addresses in the 192.168.10.0 subnet.
- 192.168.77.1 specifies the gateway address. This is the next hop through which all matching traffic will be sent.
In effect, this static route sends traffic destined for the 192.168.10.0 network to 192.168.77.1.
How to remove a static route on Windows
To delete a static route, use the route delete command, and match the details with the static route you wish to delete.
route delete 0.0.0.0 mask 0.0.0.0 192.168.77.1
The above command deletes the static route created in the previous step.
How to remove all static routes on Windows
To delete all static routes on Windows, use the command:
route -f
Make a static route permanent/persistent on Windows
Static routes will be cleared from the route table on Windows when you reboot. To make a persistent route — one that is permanent and will survive a reboot — add the -p parameter to your route add command:
route -p add 0.0.0.0 mask 0.0.0.0 192.168.77.1
Troubleshooting and best practices for managing static routes
If you are manually managing static routes on Windows machines, you should document which routes are set on which machines to avoid a forgotten static route, causing a troubleshooting issue.
You should also regularly review which static routes are set (this can be done using the route print command in Windows), and remove ones that are no longer required. Network monitoring solutions will assist with identifying network changes and broken routes that may need to be addressed.
If you are working in an enterprise environment with multiple devices that all require the same static routes, you should implement them at the network level rather than per device.
Windows route management tools
In addition to the route command that is built into Windows, you can use the following tools to manage routes and perform other networking tasks on Windows:
- NetRouteView is a free routing utility for Windows that provides a graphical interface for viewing, adding, and modifying static routes.
- Angry IP Scanner and Advanced IP Scanner can help you find and identify devices on your local network, and manage static routes on connected Windows devices by executing remote commands or scripts.
Effortlessly manage your Windows networks with NinjaOne’s time-saving automations and comprehensive control over devices.
➤ Find out more.
Not sure how to learn routing manually? Watch our video on how to add or remove a static route on Windows.
Managing large Windows networks efficiently
If you need to manage static routes on a fleet of Windows devices, either on a single network or in bring-your-own-device (BYOD) scenarios with traveling or remote employees, you shouldn’t rely on manually adding static routes and other network configurations to individual devices.
The NinjaOne remote management and monitoring platform (RMM) helps you secure, manage, and monitor Windows devices at scale, ensuring that they are all correctly configured. This allows you to deploy updated networking and security policies from a centralized interface, removing the time-consuming tasks of updating, cataloging, and enforcing static routes and other policies.
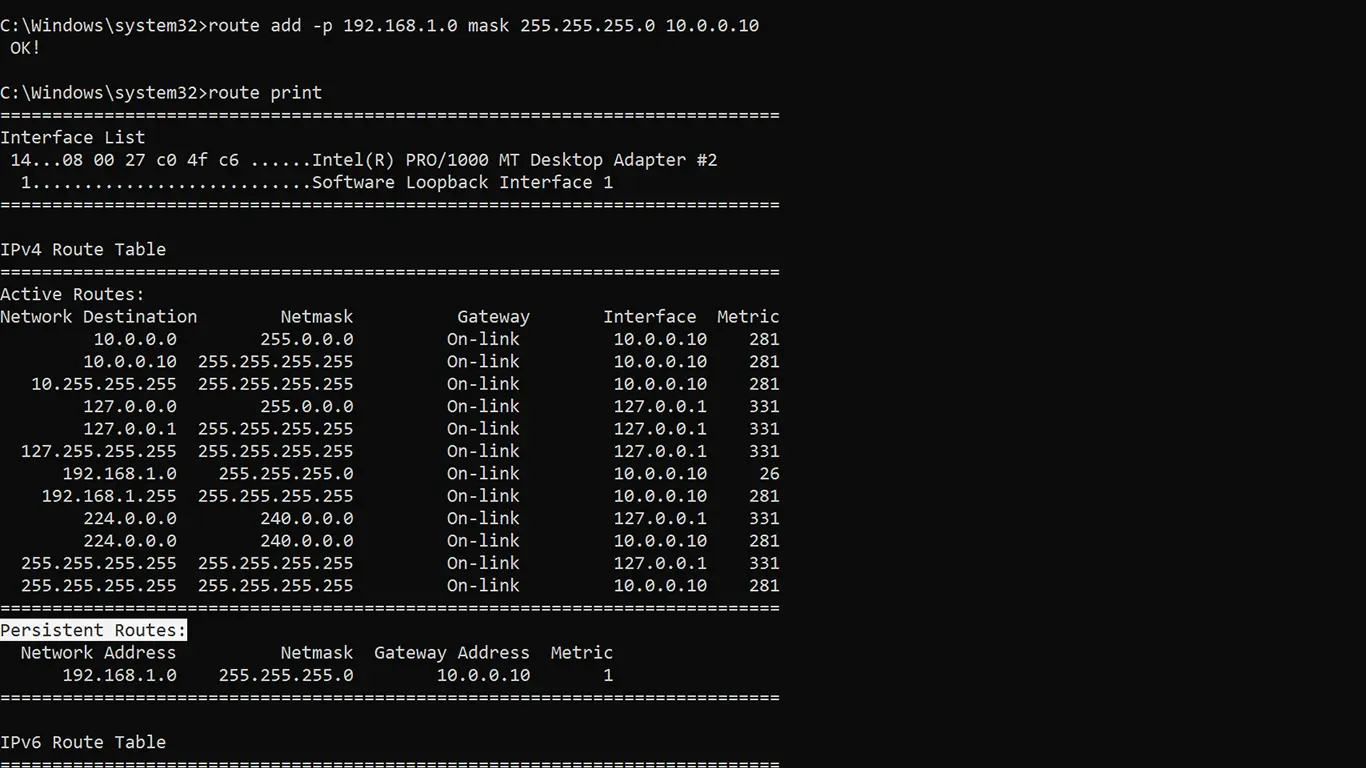
Adding a static route in Microsoft Windows 10 or Server is done by using the route add command.
The following is the general syntax of the route add command we need to follow to add a permanent static route in Windows:
route add -p <destination> mask <subnet-mask> <gateway>For example, the following route command tells the windows to add a new persistent route to the 192.168.1.0/24 network, using 10.0.0.1 as the gateway to reach the network.
route add -p 192.168.1.0 mask 255.255.255.0 10.0.0.1When you want to add a static route to a single host, use the netmask 255.255.255.255.
For example, the following command adds a static route to the destination host 192.168.1.100 with the gateway address 10.0.0.1.
route add -p 192.168.1.100 mask 255.255.255.255 10.0.0.1The most important part of the route add command is the -p option. Without the -p switch, our new route would not be persistent. It will disappear the next time you reboot your Windows PC/Server.
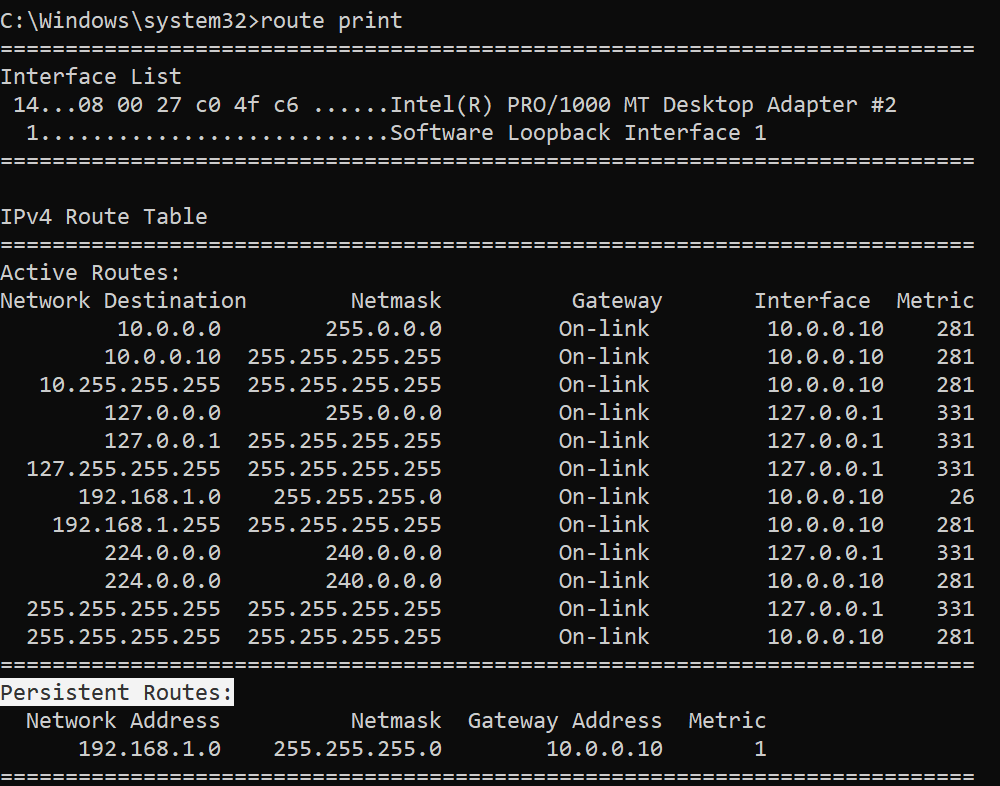
We can print the windows routing table using the route print command. Under the Persistent Routes header, you will see the list of permanent static routes.
Following is another static route example with a metric value:
route add -p 192.168.1.0 mask 255.255.255.0 10.0.0.1 metric 5In case if you have more than one network interface, you could also specify the interface ID using the if command option.
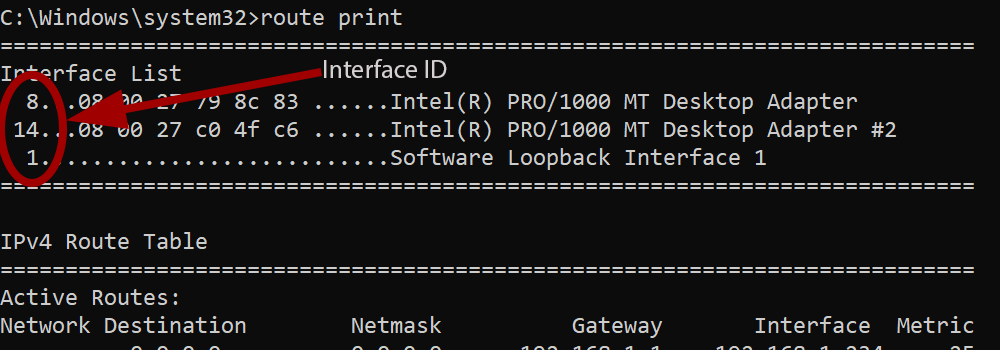
route add -p 192.168.1.0 mask 255.255.255.0 10.0.0.1 if 1When specifying the network interface, you have to provide the interface ID which you can find using the route print command.
Windows hold permanent static routes in the following registry
location: HKEY_LOCAL_MACHINE\SYSTEM\CurrentControlSet\Servi.
ces\Tcpip\Parameters\PersistentRoutes
Sometimes you need to manually add, change, or remove a route on a Windows machine. Here is quick guide to help you accomplish these tasks.
First start by opening a CMD prompt by going to start then typing cmd.
These commands should work for Win XP, Win Vista, Win 98, Win NT, Win 2000, Win 2008, Win 2012, Win 7, Win 8, Win 10.
Show the Current Routing Table
C:\>route print
===========================================================================
Interface List
 11...54 ee 75 5b e3 c9 ......Intel(R) Ethernet Connection (3) I218-LM
 13...5c e0 c5 7f e4 c8 ......Intel(R) Dual Band Wireless-AC 7265
===========================================================================

IPv4 Route Table
===========================================================================
Active Routes:
Network Destination        Netmask          Gateway       Interface  Metric
          0.0.0.0          0.0.0.0   192.168.177.1    192.168.177.30     10
        127.0.0.0        255.0.0.0         On-link         127.0.0.1    306
     192.168.60.0    255.255.255.0         On-link      192.168.60.1    276
     192.168.60.1  255.255.255.255         On-link      192.168.60.1    276
   192.168.60.255  255.255.255.255         On-link      192.168.60.1    276
    192.168.177.0    255.255.255.0         On-link     192.168.177.1    276
    192.168.177.1  255.255.255.255         On-link     192.168.177.1    276
  192.168.177.255  255.255.255.255         On-link     192.168.177.1    276
===========================================================================
Persistent Routes:
  None
The default route is represented by A destination/netmask of 0.0.0.0. If there isn’t a route with a more specific destination and netmask, the default route is used.
Use this subnet calculator if you need help subnetting.
Add a Static Route
To add a route to the routing table use the route add command. An example looks like this:
route add 10.0.0.0 mask 255.0.0.0 192.168.177.1You can optionally add a metric 2 to the end if you want to add a specific weight to the route. The routes with the lowest metric will take precedence over higher metrics. By default, static routes have a metric of 6.
You can also optionally add a IF 2 to the end. This will force the route to use interface 2. You can see what interface numbers you have with the route print command.
Active Routes:
Network Destination        Netmask          Gateway       Interface  Metric
         10.0.0.0        255.0.0.0         On-link     172.16.177.30      6
Remove a Static Route
To remove a route you must use the route delete command and the destination.
route delete 10.0.0.0Change a Static Route
If you simply want to update a static route you can use the route change command.
route CHANGE 157.0.0.0 MASK 255.0.0.0 157.55.80.5 METRIC 2 IF 2Troubleshooting
If you get the following error:
The requested operation requires elevation.
To resolve this you will need administrator access to the system. Go to the start menu and when you type cmd right click on the cmd.exe program and click Run As Administrator. This opens a CMD prompt with more privileges.
For any further help you can use the built in help the route command provides. Simply type route and hit enter.
C:\>route

Manipulates network routing tables.

ROUTE [-f] [-p] [-4|-6] command [destination]
                  [MASK netmask]  [gateway] [METRIC metric]  [IF interface]

  -f           Clears the routing tables of all gateway entries.  If this is
               used in conjunction with one of the commands, the tables are
               cleared prior to running the command.

  -p           When used with the ADD command, makes a route persistent across
               boots of the system. By default, routes are not preserved
               when the system is restarted. Ignored for all other commands,
               which always affect the appropriate persistent routes. This
               option is not supported in Windows 95.

  -4           Force using IPv4.

  -6           Force using IPv6.

  command      One of these:
                 PRINT     Prints  a route
                 ADD       Adds    a route
                 DELETE    Deletes a route
                 CHANGE    Modifies an existing route
  destination  Specifies the host.
  MASK         Specifies that the next parameter is the 'netmask' value.
  netmask      Specifies a subnet mask value for this route entry.
               If not specified, it defaults to 255.255.255.255.
  gateway      Specifies gateway.
  interface    the interface number for the specified route.
  METRIC       specifies the metric, ie. cost for the destination.

All symbolic names used for destination are looked up in the network database
file NETWORKS. The symbolic names for gateway are looked up in the host name
database file HOSTS.

If the command is PRINT or DELETE. Destination or gateway can be a wildcard,
(wildcard is specified as a star '*'), or the gateway argument may be omitted.

If Dest contains a * or ?, it is treated as a shell pattern, and only
matching destination routes are printed. The '*' matches any string,
and '?' matches any one char. Examples: 157.*.1, 157.*, 127.*, *224*.

Pattern match is only allowed in PRINT command.
Diagnostic Notes:
    Invalid MASK generates an error, that is when (DEST & MASK) != DEST.
    Example> route ADD 157.0.0.0 MASK 155.0.0.0 157.55.80.1 IF 1
             The route addition failed: The specified mask parameter is invalid.
 (Destination & Mask) != Destination.

Examples:

    > route PRINT
    > route PRINT -4
    > route PRINT -6
    > route PRINT 157*          .... Only prints those matching 157*

    > route ADD 157.0.0.0 MASK 255.0.0.0  157.55.80.1 METRIC 3 IF 2
             destination^      ^mask      ^gateway     metric^    ^
                                                         Interface^
      If IF is not given, it tries to find the best interface for a given
      gateway.
    > route ADD 3ffe::/32 3ffe::1

    > route CHANGE 157.0.0.0 MASK 255.0.0.0 157.55.80.5 METRIC 2 IF 2

      CHANGE is used to modify gateway and/or metric only.

    > route DELETE 157.0.0.0
    > route DELETE 3ffe::/32
Check out this article for more cool Windows CLI commands.
Last Updated :
01 Nov, 2022
A routing table is a part of a computer’s operating system. It contains the details of the best way to reach different networks, such as your home or office network. The table helps your computer send data to different networks and devices. Windows uses a routing table to determine the best way to send data to a specific destination. A routing table is used in every operating system. It contains the details of the best way to reach different networks, such as your home or office network. The table helps your computer send data to different networks and devices. Windows uses a routing table to determine the best way to send data to a specific destination. You can add a static route to the routing table to save time if your home or business is frequently visited. You can also add alternate routes to your home or business if you have trouble reaching the original location via the routing table.
Interfaces and Route Table on Windows:
The Command route print prints the list of All Interfaces and the IPv4/v6 Routing Table. It is followed by a comma-delimited argument, which describes the command to run (e: -f). If there are no arguments then it reports all installed ports for each configured interface; if not supplied this would report only the ones present on that port range. The format uses spaces as normal in names. Below is the Snapshot after running route print on Windows.


Adding Static Route to the Routing Table:
To add a static route, press and hold the Windows key and the R key, then press Enter on your keyboard; this opens the Run dialog box. Type route print and press Enter on your keyboard. This opens Windows’ Routing and IP Configuration dialog box. In this dialog box, click on Add → Next → Next; this opens the Add Default Route window. In this window, enter the details for your new default route, then click on Add → Close → OK → Apply → Close→ OK → OK; Now you are now finished adding a static route to the Windows Routing Table.
The command to add an entry from cmd is as below
route add Destination_Address
MASK Subnet_Mask Gateway_IP Metric
Example: route add 192.168.39.0
MASK 255.255.255.0 192.148.0.2

Below is the output of the route print after adding the static route.

Alternate routes can be useful for travelers or for businesses with multiple locations throughout town or regionally. For example, if you live far from work you may want an alternate route, so you don’t have to constantly drive back and forth all day long between home and work each day; alternatively, if you’re a business owner with several locations throughout town or regionally, alternate routes can be useful for customers who need several locations open for business each day they can easily reach their location by traveling along different roads through town or regionally instead of having to travel back-and-forth on one road each day between their locations. Adding an alternate route to your home or business is easy with a properly functioning routing table; however, many users neglect to add them until they experience problems reaching their location via that main route. Adding a static route can also be effective when adding an alternate route for quick access for frequent use by family members or friends; either way, adding a static route or alternate route is easy with just a few steps.
