
Все о перемещаемых профилях и перенаправлении папок простыми словами
Уровень сложностиПростой
Время на прочтение10 мин
Количество просмотров8.3K
Предисловие
Давно хотел написать про перемещаемые профили, но не было времени. Много в Интернете читал разные отзывы, мнения, комментарии и т. д. Много статей и видеороликов, выкладываемых в сеть, были раскрыты не полностью, а в общих чертах. Такое ощущение, что человек сам не до конца понимает сути вопроса (в чем я сомневаюсь), или считает, что все уже обладают достаточными знаниями и потому многие детали не раскрываются. Пропускались мелочи, на которые стоило бы обратить внимание. Полностью раскрытую тему нигде не нашел, поэтому и решился за написание этой статьи.
Я хотел написать для людей, которые не имеют практического опыта работы с перемещаемыми профилями, не знают, как правильно все сделать, чтобы не было потом больно и обидно за бесцельно потраченные силы и время.
Короче — здесь все для новичков. Разжевано до мелочей. Если все вами будет сделано правильно, проблем не возникнет.
Прежде чем сесть за написание этой статьи, я подключил 56 компьютеров к серверу и все 56 работают через перемещаемые профили. Уже прошло более полугода после подключения последней машины и около 10 месяцев с момента подключения первого компа. Поэтому имею хоть и небольшой, но в данном вопросе хороший опыт.
Уверен, что в комментариях появится много негативных отзывов. Появятся вопросы, обсуждения и осуждения. Я готов к этому. И поэтому начну с небольшой вводной части.
1. Что нам дает перемещаемый профиль и перенаправление папок кроме головной боли?
1.1 Возможность работать со своими документами с любого компьютера, введенного в домен.
1.2 Нет страха, что ваш компьютер сдохнет (сломается, сгорит и т.д.) и все ваши данные будут утеряны, потому как на флешку скинуть с рабочего стола все ценное никогда нет времени, а все ценное мы всегда храним на рабочем столе. Просто берем другой комп и работаем на нем, как на своем.
1.3 Можно экспериментировать с операционкой как вздумается, потому что если ОСЬ накроется медным тазом, всё, что хранилось на рабочем столе, в загрузках, в документах сохранено на сервере.
1.4 Юзер, зная, что содержимое его рабочего стола и остальных папок находятся на сервере в распоряжении сисадмина, вряд ли будет хранить конфиденциальную информацию на своей машине. Даже если она запаролена.
2. Какую головную боль может дать перемещаемый профиль и перенаправление папок?
2.1 Пользователю — никакую. Юзер даже временами не может понять, что сервер помер и он работает с документами в автономном режиме.
2.2 Сисадмину — если все сделано правильно, тоже проблем не будет. Но это при соблюдении необходимых требований.
Немного дегтя в бочку с профилями.
Не стоит разворачивать перемещаемый профиль и перенаправление папок на обычном компьютере, на котором развернут домен. Даже если у вас не один контроллер домена, а целых три (в чем я очень сомневаюсь), и тогда с тремя контроллерами ваша папка с профилями на двух дочерних контроллерах не пригодится.
Да, она реплицируется с первого контроллера на остальные два. Да, все данные профилей у вас дважды будут продублированы. Но если основной контроллер не будет работать, юзеры не смогут подключиться к серверу, потому что их профили жестко привязаны к основному контроллеру домена. И единственным временным вариантом будет работа юзеров в автономном режиме, пока не восстановится основной контроллер.
Чтобы этого избежать, необходимо соблюсти следующие требования к железу:
-
Под домен выделить настоящий сервер, на котором имеется возможность создать RAID‑массивы.
-
Под систему выделить 2 HDD и ввести их в RAID 1.
-
Под профили пользователей выделить не менее 3 HDD и ввести их в RAID 5.
-
Сервер должен иметь опцию возобновления работы после отключения электроэнергии.
Или другой вариант:
-
Сейчас продаются материнские платы с поддержкой RAID 1, 5,10,50. На этой матери собрать компьютер, накатить Server 2016/2019. И в итоге получим не полноценный, но вполне рабочий и надежный сервер. Даже если отключится питание от сервера, всегда можно потом вручную его запустить.
-
На черный день иметь бэкап системы вместе с GPO, с пользователями и т.д. Лучшим вариантом будет бэкап через Акронис. Ну это мое личное мнение. Вольному – воля.
И только при соблюдении этих условий можно разворачивать перемещаемый профиль и перенаправление папок.
Часть 1
Создание папок пользователей в AD и перемещаемого профиля.
-
Открываем на сервере «Пользователи и компьютеры» в AD.
-
В общем подразделении «users» определяемся с правами доступа. Для администраторов нам понадобится группа безопасности «Администратор», а для юзеров — «Пользователи домена».
-
Создаем расшаренную папку — желательно на отдельном диске (на чистом для начала). Объясняю — если с профилями пойдет что‑то не так (пропишете не тот путь) — их удалить тяжело, если совершены ошибки с профилями. Я просто форматировал диск. Потом, когда все будете делать без ошибок, расшарите папку там, где нужно будет.
-
Я создал расшаренную папку под названием «ПРОФИЛИ ЮЗЕРОВ». Это моя папка. Ваша может называться как угодно. Даем полный доступ к этой папке группе безопасности «Пользователи домена». Во вкладке «Безопасность\Дополнительно» убираем наследование.
-
Создаем Подразделения Администраторов и Юзеров в текущем контейнере — т.е в своем домене.

1. Затем создаем подразделения юзеров по отделам, а уже в подразделениях отделов создаем учетные записи пользователей.

1. Открываем свойства учетной записи пользователя Иванова. (Все остальные учетки юзеров создаются по такому же принципу). По умолчанию создаваемые учетные записи имеют группу безопасности «Пользователи домена». Это нам и надо. Ничего не меняем.

Щелкаем на кнопку «Профиль».

Путь к профилю – ничего не вписываем.
Подключить – выбираем диск (это не диск, а папка пользователя на сервере, хотя она будет выглядеть как сетевой диск) и вводим \\имя сервера\имя расшаренной папки\имя отдела\ и %username%
%username% — это переменная пользователя, чтобы вручную не вписывать пользователей в расшаренной папке.
У меня получилось так: \\Virtual-server\профили юзеров\БУХГАЛТЕРИЯ\%username%
Как только нажмем ОК, сразу в расшаренной папке появится папка с именем пользователя Иванова. Затем то же самое делаем с учеткой Петрова и с учеткой Сидорова. В результате в папке БУХГАЛТЕРИЯ появятся личные папки юзеров.
Т.е. переменная %username% преобразуется в имя пользователя в структуре папок.
Удобно.

Для чего такие манипуляции? Для того, чтобы юзер, который входит под своей учетной записью, попадал именно в свою папку на свой рабочий стол, т.е. пропишется имя профиля, а в расшаренной папке появится папка с именем профиля.
В эти папки юзеров будут перенаправляться все служебные папки на основании групповой политики– так они и называются – ПЕРЕНАПРАВЛЯЕМЫЕ ПАПКИ.
В дальнейшем, когда мы создадим несколько GPO с разными параметрами для разных юзеров, их можно будет применять конкретно к определенным компьютерам или для всех пользователей или по отдельности. Об этом в следующей статье.
На данном этапе мы создали структуру профилей пользователей отделов и распределили эти профили по своим папкам. Пока эти папки профилей пустые.
На этом первый этап закончен.
Часть 2
Создание групповой политики ПЕРЕНАПРАВЛЯЕМЫХ ПАПОК
1. В AD запускаем «Управление групповой политикой»
-
В «Объекты групповой политики» создаем новую политику правой клавишей мыши «Создать» и присваиваем ей понятное имя, для чего эта политика предназначена. Для бухгалтерии я присвоил имя — ПРОФИЛИ БУХГАЛТЕРИЯ.
-
ВНИМАНИЕ! Для каждого отдела создаем отдельную GPO с пропиской пути под свой отдел! Позже все поймете.
-
Дальше выделяем созданную ГПО и правой клавишей мыши нажимаем «Изменить». Откроется «Редактор управления групповыми политиками».
-
Открываем этот путь — Конфигурация пользователя\Политики\Конфигурация Windows.
-
Нас интересует вкладка «Перенаправление папки». Открываем ее.

В правом столбце видны папки, которые можно перенаправить. Можно перенаправить только «Рабочий стол» и все. Ну еще добавить «Документы». Но я перенаправляю все папки, кроме «Сохраненные игры». Игры – и так понятно. Некогда играть на работе.
Хотя «Контакты», «Ссылки» и «Поиски» почти никогда не нужны. Это решать каждому, кто какие папки будет перенаправлять.
Далее правой клавишей мыши щелкаем на папке Рабочий стол и открываем вкладку «Свойства».
1. Открывается такое окно:

1. В первой строке надо установить значение «Перенаправлять папки всех пользователей в одно расположение».
2. Во второй строке установить значение «Создать папку для пользователя на корневом пути».
3. И в третьей строке ввести путь своей расшаренной папки, там где будут храниться профили. Обратите внимание — путь перенаправления папок для разных отделов.
Для бухгалтерии после \\имя сервера\имя расшаренной папки\ надо вписать Бухгалтерия, для планового отдела вписать Плановый отдел и т. д.
Об этом я говорил в п.3 Второго этапа.
4. В этом окне есть еще кнопка «Параметры».

-
Первую галку снимаем, вторую оставляем, третью я снял, т.к. у меня нет таких Осей.
-
«Удаление политики». На свое усмотрение, но иногда не корректно папки перенаправляются обратно. Я с этим столкнулся несколько раз. Поэтому я не собираюсь менять политику и оставил точку в первом окне.
-
Нажимаем ОК. Это значит, что папки будут перенаправлены в расшаренную папку и в папку профиля, уже ранее созданного. Все взаимосвязано. Профиль каждого пользователя и GPO имеют одинаковый путь.
-
Как только закончили с этой GPO‑шкой, редактор групповой политики закрываем. Но она еще не привязана к пользователям и компьютерам.
На этом второй этап закончен.
Часть 3
Настройка и привязка GPO к конкретному объекту
Возвращаемся в «Управление групповой политики».
Для того, чтобы привязать GPO к кому-либо объъекту, просто перетаскиваем ее в нужную папку. Т.е. GPO с названием ПРОФИЛИ БУХГАЛТЕРИЯ перетаскиваем в подразделение БУХГАЛТЕРИЯ. Таким образом, эта политика распространяется на всех, кто находится в данном подразделении. И на юзера Иванова, и на юзера Петрова и на Сидорову.
Но если вы по ошибке перетащите GPO-шку в подразделение Петрова, тогда политика будет работать только на юзера Петрова. Я пару раз в запарке ошибался, а потом не мог понять, почем все работает не так.
Но необходимо для созданной GPO-шки установить свои правила применения. Иначе она не будет работать.
Выделяем свою GPO и видим такое окно.

1. В фильтрах безопасности вкладки «Область» добавляем «Компьютеры домена» и «Пользователи домена». По умолчанию там находится группа безопасности «Прошедшие проверку». Мы ее пока удаляем.
2. Смотрим вверху вкладку «Делегирование»
Внизу справа этого окна нажмем кнопку «Дополнительно».

Вот тут и добавляем группу «Прошедшие проверку». Этой группе даем права — только чтение.
«Компьютерам домена» и «Пользователям домена» даем права «Чтение» и «Выполнение групповой политики».
«Контроллеры домена предприятия» — только чтение.
«Система» — права не применяются. У меня пусто.
«Администраторы домена» и «Администраторы предприятия» – полные права, кроме «Выполнение групповой политики».
Примечание! Здесь нужны только «Компьютеры домена», «Пользователи домена» и «Прошедшие проверку». Остальных можно удалить. GPO будет работать исправно, но тогда вы не сможете изменить GPO при необходимости. Поэтому пусть все остается так, как есть.
Вот только после этого GPO считается настроенной
Для обновления на сервере GPO нажать «Пуск»\ Выполнить» и ввести команду «gpupdate /force». Применятся и обновятся все политики.
Теперь дело за малым — надо все проверить.
Заходим на проверочном компе (не на сервере) под созданным пользователем — Иванова и ждем-с. На компьютере будет подготавливаться рабочий стол.
После того, как открылся рабочий стол, на сервере открываем расшаренную папку с именем профиля Иванова.
В папке профиля Иванова должны появиться эти служебные папки:

Это означает, что GPO по перенаправлению папок отработало на УРА.
На этом закончен этап создания групповой политики перенаправления папок и перемещения профиля пользователя.
На этом третий этап закончен.
Часть 4
Заключительная
Теперь для остальных отделов надо создать такие же групповые политики.
Но не надо создавать их заново. Просто в «Объекты групповой политики», копируем созданную политику для Бухгалтерии, вставляем ее в «Объекты групповой политики» (с сохранением существующих разрешений,

Переименовываем на имя другого отдела, правой клавишей – изменить.
Опять идем по пути — Конфигурация пользователя\Политики\Конфигурация Windows\Перенаправление папки.
В перенаправляемых папках только меняем имя отдела, как я говорил ранее.
В итоге получится несколько разных политик для разных отделов.
Напоминаю – это политики для перенаправления папок и перемещения профилей.
Создание групповых политик для разных задач разным пользователям будет разъяснено в другой статье.
Теперь один из важных моментов.
Если отключился основной контроллер, отвалился сетевой провод, умер коммутатор, как юзер сможет работать без подключения к серверу?
Просто. В автономном режиме.
А для этого надо этот режим включить.
После того, как вы вошли в свою учетку (к примеру Иванова) и откроете «Мой компьютер», то увидите примерно такую картинку:

1. Ваши локальные диски.
2. Сетевой диск под названием профиля юзера.
На самом деле это не сетевой диск, а папка профиля на сервере. Для того, чтобы включить автономный режим, правой клавишей мыши щелкаем по этой сетевой папке. Выскакивает такое окно:
Нас интересует вкладка «Автономные файлы». Открываем ее.
Ставим галочку в квадратике «Всегда доступны вне сети» и нажимаем «Синхронизировать».
Начнет выполняться синхронизация ваших файлов в специальную папку.

После синхронизации можете спокойно работать, не боясь, что при отключении от сервера вы не попадете на свой рабочий стол.
При запуске с отключенным сервером загрузка произойдет несколько медленнее ввиду того, что компьютер будет искать сервер. Не найдет его и применится автономный режим. Ничего с рабочего стола не пропадет, все файлы останутся на своих местах.
Вы можете продолжать работать как ни в чем не бывало. Как только сервер снова будет в работе, примерно через 1–2 минуты произойдет репликация вашей машины с сервером и все измененные файлы реплицируются на сервер.
Таким вот образом можно быть уверенным, что все ваши данные под надежной защитой.
Теперь о необходимом.
Мы получили новый рабочий стол, новые системные папки в профиле юзера. Но эти все папки пустые. Остался последний штрих — надо всю информацию юзера с его компьютера перенести на сервер.
Все очень просто. Открываем профиль пользователя на рабочем компьютере, и с каждой системной папки копируем все в такие же папки, которые находятся на «сетевом диске»

Поверьте, то, что я здесь выкладываю, я проверил все на своих серверах и машинах юзеров. Много было ошибок, пока не отработалась технология и последовательность создания и применения перемещаемых профилей.
Ну на этом пока все. Всем желаю удачи.
Roaming user profiles allow a user to log on to any Windows computer in an organization and get their familiar environment, settings, and personal files/folders. In this case, the user profile files are stored in a shared network folder on a file server and are downloaded over the network when the user logs on to the computer. All changed settings and files are synchronized with the server when the user logs out.
In this article, we’ll look at how to configure Windows roaming user profiles in an Active Directory domain.
Roaming profile benefits:
- Users can access their environment’s personal files and settings from any computer in the domain;
- User files are stored on the server, making them easier to back up centrally;
- On a file server, you can apply size quotas to user profiles and specify prohibited file types using FSRM;
- If the user’s computer fails, their data is not lost.
The downside of a roaming profile is that it takes time for the computer to download the profile files from the server when the user logs in. This raises network usage and extends the time it takes for users to log in and log out.
Create a shared network folder to store user files on Windows Server.:
- Open the Server Manager > File and Storage Services > Shares;
- Select Tasks > New Share > SMB Share – Quick;

- Select the local drive where the roaming user profiles will be stored. It is not recommended to store them on the C: drive. Preferably, they should be on a separate drive;
- Set share name (Profiles);

- To hide other users’ profiles, select Enable access-based enumeration;
- Disable inheriting folder permissions;

- Set the NTFS folder permissions according to the table:


| Principal | Access | Applies to |
| Domain Users | Traverse folder / execute file List folder / read data Create folder / append data |
This folder only |
| CREATOR OWNER | Full control | Subfolders and files only |
| Administrators | Full control | This folder, subfolders and files |
| SYSTEM | Full control | This folder, subfolders and files |

Now you need to configure the Profile Path parameter in the user properties.
- Open the Active Directory Users and Computers (ADUC) mmc snap-in;
- Find the user and open his properties;
- Go to the Profile tab;
- In the Profile path attribute, specify the UNC path to the network folder you created. For example, \\fs01\profiles\%username%;
- Use this user account to log on to a domain Windows computer. Check that a directory containing the user profile has been created in the shared folder on the server.
Don’t worry about the .V6 ending the user profile folder name. This is the reference information for the profile version. In this case, it means that the version of the profile that is used is for Windows 10 1607+.
You can use the SetADUser cmdlet in the AD PowerShell Module. To set the path to the user profile directory:
Set-ADUser j.brion -ProfilePath \\fs01\profiles\%username%
Note. In Windows Server RDS farms, the use of user profile discs (UPD) or FSlogix profile technology is preferable to roaming user profiles.
You can configure all computers in a particular domain OU to use roaming profiles by using Group Policy.
- Open the Group Policy Management console (gpmc.msc) and create a new GPO for the OU containing the computer objects;
- Edit the GPO and navigate to Computer Configuration > Policies > Administrative Templates > System > User Profile;
- Enable the Set roaming profile path for all users logging onto this computer policy and specify the path to the shared folder (\\fs01\profiles\%username%). Windows replaces the %USERNAME% environment variable with the user name when the user logs on to the computer;

- After the policy is applied, all users will use roaming profiles when they log on to computers in this OU.

Прочитано: 19 075
Ранее я как-то работал с перемещаемыми профилями в Active Directory и это было удобно в плане что все Ваши настройки, файлы всегда у Вас под рукой, не важно сидите ли Вы за компьютер в шоуруме или на складе. Так что сегодня я покажу все действия которые я проделал чтобы пока конкретно для себя сделать данную надстройку.
Первым делом подключаюсь/авторизовываюсь (Login: ekzorchik, Password: 712mbddr@, Group: Domain Admins) к контроллеру домена srv-dc.polygon.local (Server 2012 R2 Standard) либо по RDP, по VNC или же физически подойдя к нему, как в прочем принято у Вас в организации или какие методы используете Вы лично.
Шаг номер один:
Создаю специальный каталог где будут располагаться перемещаемые профили и профиль к профилю не будет иметь доступа, что Важно. Т.к. в моей сети (она тестовая) нет файлового сервера то в роли месторасположения под профили выступит логический диск E контроллера домена. Создаю каталог к примеру с именем profile, после через правый клик мышью по нему открываю его свойства (Properties) — вкладка Sharing — Advanced Sharing
- Share this folder: отмечаю галочкой
- Share name: profile$
- Limit the number of simultaneous users to: 50
После нажимаю Permissions и для всех Everyone проставляю все галочки на доступ:
- Full Control → Allow
- Change → Allow
- Read → Allow
и нажимаю Apply — Ok — Apply — OK, после все еще находясь в свойства каталога profile перехожу на вкладку Security — Advanced — вкладка Permissions — Change permissions, здесь отменяю наследование свыше стоящего: нажимаю Disable inheritance → Convert inherited permissions into explicit permissions on this object и привожу права к следующему виду:
А после пробрасываю текущие права внутрь каталога E:\profile отметкой пункта: Replace all child object permissions entries with inheritable entries from this object — подтверждаю Yes — Ok — Ok
Далее открываю оснастку: Active Directory Users and Computers
Win + X — Control Panel – Active Directory Users and Computers, затем в моем случае в организационном контейнере IT открываю свойства (Properties) учетной записи alektest через правый клик мышью по ней. После перехожу на вкладку Profile и прописываю путь до создаваемого перемещаемого профиля:
- Profile path: \\srv-dc\profile$\DefaultUserV2\%username%
После этого тестирую, как работает вот таким вот образом настройка на работу перемещаемого профиля с одной рабочей станции на другую.
На W7X86
Теперь открываю оснастку управления профилями системы и вижу, что текущий профиль не локальный как если бы пользователь домена или не домена авторизовался в системе:
Пуск — Панель управления — Система — Дополнительные параметры системы – вкладка: Дополнительно — Профили пользователей: Параметры
Если настроить систему на максимальную производительность, добавить ярлыки, файлы в текущий профиль, то при заходе уже на другую систему, к примеру W7X64 все сделанные настройки перенесутся, но для этого нужно завершить текущее подключение: Пуск — Выйти из системы. (Это обязательное условие).
По итогу когда авторизовался под учетной записью alektest на рабочей станции W7X64 все необходимые вынесенные ярлыки отобразились на рабочем столе, выставленные параметры пользовательского окружения также были применены к текущему заходу.
Как же работает перемещаемый профиль: если пользователь уже зашел в систему с использованием перемещаемого профиля, то он первый раз создается, при выходе в каталог на сервере где предопределен путь его хранения копируются только сами изменения сделанные в текущем сеансе, а не весь профиль. Как и говорил выше, изменения синхронизируется с сетевой папкой только когда пользователь делает Log Off (Завершение сеанса) в этом достигается огромнейшее преимущество, что при авторизации на различных компьютера пользователь получит свою систему.
Если же учетная запись (к примеру alektest2) была в домене, но перемещаемый профиль не был настроен, то что произойдет с имеющимися файлами (к примеру на W7X86 на «Рабочем столе» сейчас имеются 7 файлов изображений).
Смотрю какой тип профиля сейчас:
Пуск — Панель управления — Система – Дополнительные параметры системы – вкладка: Дополнительно — Профили пользователей: Параметры
- Имя: POLYGON\alektest2
- Размер: 26,0 Мб
- Тип: Локальный
- Состояние: Локальный
Включаю использование перемещаемых профилей в свойствах учетной записи на домен контроллере: Profile path: \\srv-dc\profile$\DefaultUserV2\%username%
Затем на рабочей станции W7X86 делаю завершение сеанса, после снова авторизуюсь на ней же и проверяю, какой профиль сейчас:
Пуск — Панель управления — Система – Дополнительные параметры системы – вкладка: Дополнительно — Профили пользователей: Параметры
- Имя: POLYGON\alektest2
- Размер: 26,0 Мб
- Тип: Перемещаемый
- Состояние: Перемещаемый
Вспомнив, что на рабочем столе должны быть файлы изображений, проверяю, да так и есть. Теперь делаю Logoff, но уже авторизуюсь на другой станции W7X64 и проверяю все то же самое, итог все соответствует тому моменту когда пользователь имел свои файлы, свои настройки рабочего места.
Пока могу сказать, что использование перемещаемых профилей может сэкономить время при перенастройке системы, переезда пользователя из одного отдела в другой. Теперь не важно нужно ли пользователю подменить кого-то его файлы перемещаться за ним.
На заметку: По практике использования перемещаемых профилей важно чтобы пользовательский профиль был не большого размера, а все тяжеловесные файлы хранились на общем диске, где доступ к которому сделан посредством GPO.
Если пользователей несколько, т. е. Тех кого переводим на использование перемещаемых профилей, то практичнее будет задействование групповых политик домена: (srv-dc)
Win + X — Control Panel — Administrative Tools — Group Policy Management
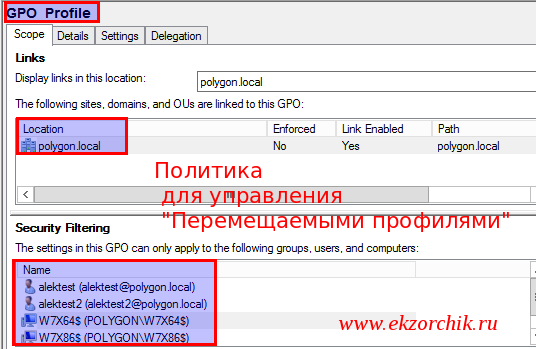
GPO_Profile — Computer Configuration — Policies — Administrative Templates — System — User Profiles
- Add the Administrators security group to roaming user profiles: Enable
- Disable detection os slow network connections: Enable
- Prompt user when a slow network connection is detected: Disabled
- Set roaming profile path for all users logging onto this computer: Enabled (\\srv-dc\profile$\DefaultUserV2\%username%)
GPO_Profile — User Configuration — Policies — Administrative Templates — System — User Profiles:
- Limit Profile size: Enabled
- Custom Message: У вас слишком большой профиль, почистите его.
- Max Profile size (KB): 1048576 (1Gb)
- Show registry files in the file list: отмечаю галочкой
- Notify user when profile storage space is exceeded: отмечаю галочкой
- Remind user every X minutes: 15
На заметку: из скриншота выше в политике нужно указывать имена учетных записей и всех компьютеров на которых будет работать перемещаемый профиль. Т.е. кто бы не зашел на данные компьютеры у него будет перемещаемый профиль, а если он есть еще и в политике то у него будет ограничение в 1Gb и сообщение при: Пуск — Завершение сеанса:
You have exceeded your profile storage space. Before you can log off, you need to move some items from your profile to network or local storage
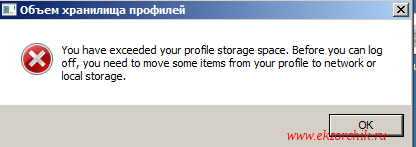
Это у меня тестовый пользователь alektest закинул себе на рабочий стол несколько образов и хотел завершить сеанса, но к его сожалению у него ничего не вышло, сработало ограничение в 1Gb.
Также выводится, какие пользовательские файлы учетной записи alektest занимают большой объем и их нужно как правильно говорит информационное окно «Объем хранилища профилей» переместить на другой логический диск или в сетевую папку.
Удаляя самостоятельно подозрительно большие файлы данное окно выше автоматически подсчитывает размер текущего профиля, когда все нормально, то выводится сообщение: «В вашем профиле имеется доступное месторасположения». Раз так, то и выход может быть осуществлен корректно.
На заметку: Чуть больше информации по этой теме Вы можете найти у меня на блоге с платной подпиской:
- GPO Настройки политики перемещение папок и профиля
- Как пересоздать перемещаемый профиль на Server 2012 R2 TS
Как использовать настройку перемещаемых профилей уже решать Вам с учетом ваших задач. Я же для себя сделал напоминалку. Она работает. Что-либо еще добавить пока не зачем, лучше когда что-то будет интересное, а пока все, с уважением автор блога Олло Александр aka ekzorchik.
A roaming user profile is a file synchronization concept in the Windows NT family of operating systems that allows users with a computer joined to a Windows domain to log on to any computer on the same domain and access their documents and have a consistent desktop experience, such as applications remembering toolbar positions and preferences, or the desktop appearance staying the same, while keeping all related files stored locally, to not continuously depend on a fast and reliable network connection to a file server.
Method of operation
[edit]
All Windows operating systems since Windows NT 3.1 are designed to support roaming profiles. Normally, a standalone computer stores the user’s documents, desktop items, application preferences, and desktop appearance on the local computer in two divided sections, consisting of the portion that could roam plus an additional temporary portion containing items such as the web browser cache. The Windows Registry is similarly divided to support roaming; there are System and Local Machine hives that stay on the local computer, plus a separate User hive (HKEY_CURRENT_USER) designed to be able to roam with the user profile.
When a roaming user is created, the user’s profile information is instead stored on a centralized file server accessible from any network-joined desktop computer. The login prompt on the local computer checks to see if the user exists in the domain rather than on the local computer; no pre-existing account is required on the local computer. If the domain login is successful, the roaming profile is copied from the central file server to the desktop computer, and a local account is created for the user.
When the user logs off from the desktop computer, the user’s roaming profile is merged from the local computer back to the central file server, not including the temporary local profile items. Because this is a merge and not a move/delete, the user’s profile information remains on the local computer in addition to being merged to the network.
When the user logs in on a second desktop computer, this process repeats, merging the roaming profile from the server to the second desktop computer, and then merging back from the desktop to the server when the user logs off.
When the user returns to the first desktop computer and logs in, the roaming profile is merged with the previous profile information, replacing it. If profile caching is enabled, the server is capable of merging only the newest files to the local computer, reusing the existing local files that have not changed since the last login, and thereby speeding up the login process.
Due to the profile copying at login and logout, a roaming profile set up using the default configuration can be extremely slow and waste considerable amounts of time for users with large amounts of data in their account.
When Microsoft designed Internet Explorer, the programmers made an explicit decision to store cookies and favorites as tiny individual files less than a kilobyte each, rather than storing this data as a single large consolidated file. Microsoft also stores shortcut files in the Recent profile folder, linking to recently opened files and folders.
File servers tend to only transfer large files several megabytes in size at the fastest possible network speed. Hundreds of very small files only a kilobyte per file can reduce network performance by 90%. As a profile ages and accumulates hundreds to thousands of cookies, favorites, and Recent items, the login and logout times become progressively slower, even though these files occupy only a few megabytes of profile data.
Local caching of the user profile on a desktop computer hard drive can reduce and improve login and logout times, but at the penalty of cluttering up the hard drive with profile data from every cached user who logs in. Local caching is more suitable where people tend to use the same computer every day. Local profile caching is not useful where hundreds to thousands of students need to be able to use any computer across a school or university campus—the cumulative cached data from so many different profiles can consume all available lab computer disk space.
Users with a roaming profile can encounter crippling logon delays when logging in over a WAN. If connected to the domain from a remote site, after authentication, Windows will attempt to pull the user’s profile from the location specified in Active Directory. If the location happens to be across a WAN link it can potentially slow the WAN down to a crawl and cause the logon to fail (after a very lengthy delay).
Users with a roaming profile working from a remote site should login to the machine before connecting to the network, (so that the machine uses its cached local copy) and connect to the network after logon has completed. Another option is to remove the roaming profile path from Active Directory prior to their departure.[clarification needed] This must be done in enough time that the change is replicated to the relevant Domain Controller at the remote site.
Working with large files, such as editing raw videos, can cause excessive login and logout times, as Windows will copy files in the roaming profile to the computer on login and back to the server on logout.
In environments where the large files are not mission-critical and do not absolutely need to be backed up to a server on a per-login basis, the applications requiring such excessively large amounts of user data are instead usually run on a stand-alone local account that does not roam, to bypass these network storage and retrieval problems.
In a school environment, roaming can result in severe network congestion and slowness when an entire classroom of students log off computers at the same time, and then within minutes are attempting to log in somewhere else. Inconsistency in account data can result if the students begin to log into the second location before the profile uploading and log out from the first location has finished.
Misbehaving programs don’t exit
[edit]
Some programs installed on desktop computers do not properly release control of the User registry during logoff, and can result in corrupted profiles because the User registry copying never successfully completes. To deal with this, Microsoft created a utility known as the User Profile Hive Cleanup Service which will forcibly remap the file handles for these misbehaving programs so that the profile copying can finish successfully and the account logoff is successful.[1] However, the hung program may remain on the local computer still holding the local cached copy of the User registry in a busy state, until the computer is rebooted.
Synchronization at logoff
[edit]
The most recent version of a file in a roaming profile without redirection is stored only on the local computer, and stays there until the user logs off, whereupon it transfers to the server. If nightly server backups are done, and a roaming user does not log off for days at a time, their roaming account documents are not being included in the nightly backup.
Further, if a roaming user uses standby or hibernation to turn off the computer at night, their profile is still not copied to the network. In this manner it is possible for a roaming account’s documents to not be backed up for days to weeks at a time, and there is the potential for considerable data loss if the local hard drive suffers a catastrophic failure during these long periods of not logging off the roaming account from the local computer.
Due to the underlying file copying mechanism from server to desktop, roaming assumes the user account is logged on to only a single computer at a time. Documents in a roaming profile copied down to the local machine have no network awareness of each other, and it is not possible to use file locking to alert the user that the file is already open.
Logging onto multiple computers with one account, and opening the same document multiple times on each computer can result in inconsistencies and loss of saved changes if the file is modified on two different computers at the same time:
- When the first computer with the modified document logs off, the changes are written to the network copy of the profile.
- When the second computer logs off, the different document version overwrites the previously saved changes during profile logout.
Different versions of Windows may employ different incompatible user profile layouts. As such, a user that roams between computers with different operating systems needs separate roaming profiles for each operating system. Windows Vista and Windows 7 add «.v2» suffix to the user profile folder to isolate it from the user profiles of Windows XP and earlier. Even so, Microsoft TechNet advises users not roam between computers running Windows Vista/Windows Server 2008 and Windows 7/Windows Server 2008 R2. User profiles in Windows 8/Windows Server 2012 and Windows 8.1/Windows Server 2012 R2 are also not entirely backward-compatible, although they initially used «.v2» suffix as well. Microsoft later released hotfixes and instructions to enable these operating systems to append «.v3» and «.v4» suffixes respectively, segregating them from cross-OS access.[2][3][4][5]
To deal with these profile copying problems, it is possible to override the default operation of roaming, and set up user accounts so that certain parts of the profile are accessed by the local computer directly on a central file server rather than copying to the local computer first.[6] If the server goes down, users can still access some files with Offline Files Enhancements.
To the end-user, folder redirection generally does not appear to function any differently from using a normal standalone computer. Redirecting the user’s My Documents and Desktop to be accessed directly on a file server are the first two big steps for speeding up roaming profiles. However, as 3rd party software have begun to store more and more data in the Application Data portion of the roaming profile, it has also become useful to redirect that to also be accessed directly on the server.
The question may be raised as to why the entire roaming profile can not be accessed directly on the server, and no copying needs to be done at all. The reasoning for this appears to be that certain Microsoft programs running all the time on the client computer can not tolerate the sudden loss of their data folders if the server goes down or the network is disconnected. Some portions must still be copied back and forth before the desktop appears so that these folders are available if the network-redirected folders go down.
Some programs do not work properly with redirected profile folders that refer to a UNC file path on a server share: \\server\share\username\Application Data
- Unless the registry entry
-
[HKEY_CURRENT_USER\Software\Microsoft\Command Processor]
"DisableUNCCheck"=dword:1
- is set, Windows’ Command Processor cannot have a UNC working directory, so batch files usually fail.
-
- It is not possible to install Microsoft Office VSTO add-ins on a UNC path. (AppData can be a natural place for users to install addins without administration privileges.)
- Adobe Reader has been incompatible with Application Data located on a UNC file path since at least version 9.0, which would crash with a runtime error.[7] Adobe Reader X (10.0) is partially compatible but will not run in document protection mode on a UNC path.
- OpenOffice.org 3.3 is similarly incompatible with Application Data on a UNC path, and the software crashes on startup.[8] A fix has been developed and will be available in an upcoming release.
- Roaming Profiles and redirection are not supported by AutoCAD[9] 2013.
These problems with UNC paths can usually be fixed by having the folders redirected to a drive mapping for the UNC share:
- Drive N: (say) is mapped to
\\server\share\userhomedir - AppDir folder redirection to user home directory:
N:\Application Data
However, use of drive mappings is generally deprecated by Microsoft, and UNC-only redirection paths are the preferred implementation.
- Application software versions on various machines used with the same profile may need to be kept in sync, with the same options installed, otherwise software configuration files may refer to dynamic libraries or extensions or other resources that are not available on another machine, causing system crash or limited features or corruption of the configuration.
- Installing software under one account may cause software to be only partially functional for other accounts due to the resources being unavailable to other users depending on their access rights to the installer’s personal folders.
|
This section needs expansion. You can help by adding to it. (September 2014) |
Folder redirection with mandatory profiles
[edit]
Folder redirection may be used with mandatory profiles, and is useful in situations where it is desirable to «lock down» the general desktop appearance but still allow users to save documents to the network. For example, this can be used as a generic account for anyone to use without a password for temporary use.
Redirecting My Documents and the Desktop in a mandatory profile will allow documents to be saved, but at logoff, any changes to the desktop appearance such as the desktop picture, Internet Explorer cookies, Favorites, and the Recent documents opened list are reverted to the original state.[10]
Folder redirection with mandatory profiles is accomplished by denying write access to the central copy of the profile. When users log off, they may expect to regularly receive an error that the profile could not successfully be copied back to the server. A user should also be aware that storing data in certain locations may cause their data to be lost. For example, if the desktop is reset every time a user logs on with the mandatory profile’s desktop, then although it seems fine to save files on the desktop, when the user logs off, the profile does not get copied to the server, and when the user logs back on, any work saved on the desktop is permanently lost without any advance notice other than the error on logout that the profile could not be copied.
When user U logs into a Windows computer C joined to a domain, then C will consult the following locations to determine if the user has a roaming profile path configured:
- the “Set path for Remote Desktop Services Roaming User Profile” group policy for C, if the login is to a terminal server
- the msTSProfilePath attribute of U‘s LDAP object, if the login is to a terminal server
- the “Set roaming profile path for all users logging onto this computer” group policy for C
- the profilePath attribute of U‘s LDAP object
The first of these configuration settings that has a value overrides any later ones. LDAP attributes can be set by a domain administrator, or anyone else who has write access to the respective LDAP user object according to its access-control list. The value configured as the profile path is typically given as a UNC path to folder on an SMB file server, and the path typically contains the variable “%USERNAME%” to make it specific to the user. The roaming profile for Remote Desktop Server users is specified under the «Remote Desktop Services Profile» tab.
In Windows 2000 and later versions, a GUI interface for setting the profilePath attribute is available in the Active Directory Users and Computers snap-in. Windows NT 4.0 and earlier used the User Manager for Domains program. From many other operating systems, such LDAP attributes can be accessed e.g. with OpenLDAP command-line tools ldapsearch and ldapmodify (after SASL/GSSAPI authentication).
When a user logs into a computer joined to a domain, the Windows shell will check the above-mentioned LDAP attributes and group policy files to determine the roaming user profile path. It then calls the LoadUserProfile function. Microsoft has not documented the precise file synchronization algorithm that this function implements, but it involves comparing for each file found in both the local and the roaming profile the timestamps, to then replace any older file found on the computer. When the user logs off, the Windows shell calls UnloadUserProfile, which applies a similar file synchronization algorithm in the opposite direction, to allow changes made to the roaming profile to migrate back to the location where the user’s roaming profile is stored. In addition, since Windows 7, it has possible to specify a group policy “Background upload of a roaming user profile’s registry file while user is logged on” to apply this synchronization process to the NTuser.dat file at regular intervals (default is 12 hours). Logging into Windows via OpenSSH for Windows does not load a roaming profile.
Windows 95, 98 or Me
[edit]
Workstations running Windows 95, 98 or Me can also have roaming profiles, however the users roaming profile files in Windows 9x are stored in the users Home directory even if a separate location for roaming is specified. In order to use roaming profiles in Windows 9x each workstation needs to be set up to have separate profile settings for each user that logs into the local workstation enabled. Enabling separate desktop settings in Windows 9x is enabled under Passwords in the Windows Control Panel.
Roaming profiles on Windows 95, 98 and Me are all compatible with each other so if a network has mixture of Windows 95 and Windows 98 workstations the same user profile may be used for each workstation. This is also the case with Roaming profiles between Windows NT 4.0, Windows 2000, Windows XP but there may be some compatibility issues due to differences in each version of Windows. Roaming profiles in Windows Vista and Windows 7 are compatible with each other but these versions are not compatible with earlier versions of Windows. A separate profile folder with the extension .V2 will be created when using Roaming profiles with Windows Vista or 7. The easiest solution is to have all workstations running the same version of Windows. (see Compatibility section)
Novell eDirectory/Netware
[edit]
For roaming to work with Novell servers, the Novell product «ZENworks Desktop Management» needs to be installed on the server, and its associated workstation management package installed on each of the client computers. Within the directory, a User Package object is created, which enables roaming, specifies where the roaming profile is stored, and also stores any associated group policies for each version of Windows where users will login. The User Package also enables Dynamic Local User, which functions similar to Active Directory, allowing an account created in eDirectory to log in on any desktop computer even if no local account exists in advance, and assigns local account privileges such as User, Power User, or Administrator to the newly created local user account. For Windows NT the user profile files are stored in the users home directory under a subfolder for each version of Windows, for example in Windows NT 4.0 the folder will be called «Windows NT 4.0 Workstation Profile» and in Windows XP the folder will be called «Windows NT 5.1 Workstation Profile»
The User Package can be associated with a specific user account in the directory, or is associated with an organizational unit that then applies to all user accounts within that OU. The User Package also enables additional ZENworks Desktop Management functions, such as remote view and remote control of the desktop computer, network printers that follow the user from one desktop to the next, and the scheduling of events that are to be run wherever the user is logged in.
While Windows 3.x does not contain user profiles it was possible for users to have their own personalised desktop in a business environment. Windows 3.x had an administrative setup option which network administrators could use by typing setup.exe /a Windows could then be installed to a network share. Windows setup was then run from each local machine to install a few local files making Windows 3.1 capable of being run over a network. The local files could be saved to a user’s home directory on a Novell or Windows NT Domain network allowing the user to have his or her settings roam between machines, the local machine in this scenario did not require a hard drive and could have been booted from a floppy or network card.
Resetting a profile
[edit]
Occasionally a users profile may need to be reset if the profile becomes corrupt or to resolve an issue with an application, a reset would normally be performed by a systems administrator or helpdesk staff. To perform a reset the affected user needs to log out of the system and then the folder where the users roaming profile is stored on the server is then renamed, the user profile must also be deleted from the local workstation the user logs into otherwise the user will take the locally stored profile on next login. When the profile has been cleared from the local machine when the user logs in a new profile will be generated using the default profile stored on the workstation, when the user logs out the profile will be copied back to the location where the users roaming profile was stored.
- Enforcement of administrative control by using mandatory user profiles which helps to protect the user’s environment from being damaged by the user himself/herself.
- Users can access their data anywhere in the network with more reliability
- Easier backup as most data is in one location on the server
Each time a user logs into a workstation, all of the files and settings are transferred over the network; the result is that the login process takes longer than if the user were to use a local profile. This is particularly the case if the profile is large in size. The login time may be reduced if the profile is cached as some files can be loaded from the local workstation and by using folder redirection to redirect folders that can grow to a large size, like My Documents, to a network share.
However, this limitation has been addressed in Windows Server 2008 Active Directory by allowing folder redirection of almost all folders that were previously stored in a user’s profile (including My Music, Favorites, and others) to a centralized and secured network share. This means that a user’s roaming profile can easily be reduced to size smaller than 20MB, thus eliminating the long login times that were experienced with previous versions of AD. When using folder redirection and automatic caching of offline files, all of a user’s files and preferences are available offline and synced in a much more efficient manner than previously possible when the computer is reconnected to the network using Remote Differential Compression (RDC).
Another problem is related to different set of applications installed on machines, applications stores information into Local Settings and some into the registry, but only the registry is transferred across. It can corrupt application functionality under roaming profile.
Redirected folder sharing
[edit]
Redirected network folders are able to override the separation between 2000/XP and Vista/Win7. For example, both types of profiles can be redirected to use a single Documents folder, and a single Desktop folder, so that the user’s account documents are consistent between the two profiles, even if all other account settings will be different.
Redirected sharing of folders such as Application Data may lead to data corruption, since Microsoft did not intend this for their application data to be shared between the different OS versions.
User virtualization programs (such as AppSense) manage user profiles, settings, and data, storing them in a network share or the cloud.
- Folder redirection
- ^ «User Profile Hive Cleanup Service». Microsoft. Archived from the original on 2006-03-08. Retrieved 2010-02-22.
- ^ «Deploy Roaming User Profiles». TechNet. Microsoft. 19 March 2014. Retrieved 22 September 2014.
- ^ «Incompatibility between Windows 8 roaming user profiles and roaming profiles in other versions of Windows». Support (3.0 ed.). Microsoft. 26 January 2014. Retrieved 22 September 2014.
- ^ «Incompatibility between Windows 8.1 roaming user profiles and those in earlier versions of Windows». Support (3.0 ed.). Microsoft. 18 December 2013. Retrieved 22 September 2014.
- ^ Beach, David (31 July 2013). «Roaming Profile Compatibility — The Windows 7 to Windows 8 Challenge». Ask the Directory Services Team. Microsoft. Retrieved 22 September 2014.
- ^ Microsoft TechNet, Windows Server 2008, Group Policy Management, User Folder Redirection, Folder Redirection Overview [1]
- ^ Adobe knowledge-base: Runtime error | Roaming Profile workflows | Acrobat, Reader 9 http://kb2.adobe.com/cps/404/kb404597.html[permanent dead link]
- ^ bug report, Open Office 3.3 incompatible with redirected Application Data http://openoffice.org/bugzilla/show_bug.cgi?id=115778
- ^ Alex Numann [@GuamDon] (5 September 2013). «@AutoCAD Do I really need to pay for a subscription to get some tech support? Your product doesn’t work with network users? Very surprising» (Tweet) – via Twitter.
- ^ Microsoft MSDN, 2012-06-06, «Mandatory User Profiles», Quote: «[…] a user can modify his or her desktop, but the changes are not saved when the user logs off.», http://msdn.microsoft.com/en-us/library/windows/desktop/bb776895(v=vs.85).aspx
- Microsoft MSDN Library: Reference on User Profiles
- Microsoft TechNet: Windows Server 2003 Product Help: User Profiles best practices
- Microsoft TechNet: Windows Server 2003: Operations Whitepaper: Best Practices for User Profiles
WINDOWS
Introduction
In today’s computing environment, where users frequently switch between multiple systems and devices, maintaining a consistent user experience is essential. One of the most effective ways to achieve this in the Windows ecosystem is through Roaming User Profiles. This article delves deep into the concept of Roaming User Profiles, outlining their purpose, advantages, configuration, and best practices.
What is a Roaming User Profile?
A Roaming User Profile is a feature in Microsoft Windows that allows a user’s profile data—such as desktop settings, application preferences, and personal files—to follow them across multiple computers within a network. This capability is particularly beneficial in corporate environments, educational institutions, and other shared computer scenarios, ensuring a seamless transition for users.
Key Features of Roaming User Profiles:
-
User Data Availability: Access to personal settings and files from any networked client.
-
Consistency Across Devices: Maintains the same desktop environment, settings, and applications no matter where the user logs in.
-
Centralized Management: Administrators can manage user profiles from a centralized location, enhancing data security and ease of maintenance.
How Roaming User Profiles Work
Roaming User Profiles work by storing user data on a designated server, which is then synchronized with the computer the user logs into. Here’s a simplified overview of the process:
-
User Logs In: When a user logs in to a Windows system, their Roaming User Profile is downloaded from the server.
-
Settings and Files are Loaded: The user’s settings and files are applied to the local session, creating a familiar experience.
-
Changes are Synced Upon Logout: When the user logs out, any changes made during the session are uploaded back to the server.
This process involves:
-
Profile Loading: The system retrieves user profile data from the server.
-
Local Profile Creation: A local copy of the roaming profile is created on the user’s machine.
-
Data Synchronization: Upon logoff, changes are synchronized back to the server.
Benefits of Roaming User Profiles
Implementing Roaming User Profiles offers numerous advantages, including:
1. Improved User Experience
-
Consistency: Users have the same desktop settings regardless of the machine they use, minimizing disruptions and increasing productivity.
-
Reduced Setup Time: New users or those switching devices do not need to configure their settings manually.
2. Enhanced Data Security
-
Centralized Storage: User data is stored on a secure server, reducing the risk of data loss due to hardware failure or theft.
-
Backup Capabilities: Centralized profiles facilitate backup and recovery processes.
3. Simplified Maintenance
-
Easier Management for IT Administrators: Changes made to user profiles on the server can be propagated to all instances of that profile with ease.
-
Streamlined User Support: Common issues can often be resolved centrally, minimizing individual user troubleshooting.
4. Support for Mobile Users
-
Access Across Locations: Users can access their profiles from various computers on the same network or potentially through Virtual Desktop Infrastructure (VDI).
Configuring Roaming User Profiles
Setting up Roaming User Profiles involves a few essential steps:
Requirements:
-
Windows Server (preferably with Active Directory)
-
Client machines running a compatible version of Windows
-
Network share with appropriate permissions
Step-by-Step Configuration:
Step 1: Create a Network Share
-
On your Windows Server, create a folder designated for storing Roaming User Profiles.
-
Set NTFS permissions to allow read and write access for users and the necessary group policies.
Step 2: Configure Active Directory
-
Open Active Directory Users and Computers.
-
Locate the user account for which you want to enable the Roaming Profile.
-
Right-click the account and select Properties.
-
Navigate to the Profile tab and set the Profile Path to the network share you created (e.g.,
\\ServerName\Profiles\%USERNAME%).
Profile Path: \\YourServer\RoamingProfiles\%USERNAME%
Step 3: Testing
-
Have the user log on to a Windows client machine to ensure the profile is downloaded correctly.
-
Confirm that changes made during the session are correctly uploaded upon logout.
Best Practices for Roaming User Profiles
To maximize the effectiveness of Roaming User Profiles, consider the following best practices:
-
Implement Folder Redirection: Redirect important folders (Documents, Desktop, etc.) to network shares to improve load times and manage large profile sizes more effectively.
-
Regular Profile Cleanup: Regularly review and clean up profiles to remove old or inactive profiles that may consume server resources.
-
Monitor Network Performance: Since Roaming User Profiles rely on network bandwidth, ensure that your network is optimized to handle profile downloads/uploads, especially during peak hours.
-
Limit Profile Size: Keep profiles lean by avoiding excessive data storage within the profile, which can slow down the login/logout process.
Conclusion
Roaming User Profiles offer a practical solution for companies and institutions needing user data to roam seamlessly across multiple systems. Understanding how they work, along with proper configuration and management practices, ensures a secure and efficient user experience. By leveraging this feature, organizations can enhance productivity, streamline user management, and foster a consistent digital environment for all users.
With proper implementation, Roaming User Profiles can transform how users interact with their workspaces, paving the way for a more flexible and connected workforce.
For more detailed information, assistance, or troubleshooting, be sure to refer to the official Microsoft Documentation or consult your IT department.
Suggested Articles
WINDOWS
WINDOWS
WINDOWS
WINDOWS
WINDOWS
WINDOWS