
Capturing Wireless on Windows was always problematic, because other than on Linux or Mac it wasn’t possible to activate Monitor mode on the WiFi cards to capture the radio layer. All you could do was capture packets on your WiFi card from the Ethernet layer and up. That’s unless you spent money on the now discontinued AirPCAP USB adapters. But now there is a silver lining on the horizon in the form of the npcap library.
I have to admit that capturing wireless traffic isn’t my strong suit. Dealing with radio waves is a whole different topic than picking up packets from a cable, so there’s a different set of skills required to troubleshoot WiFi issues. But at least I know that there’s a difference between being able to use “Monitor Mode” and not being able to. Of course I can capture on a WiFi card, e.g. picking up packets like this on my “Wi-Fi 2” card:
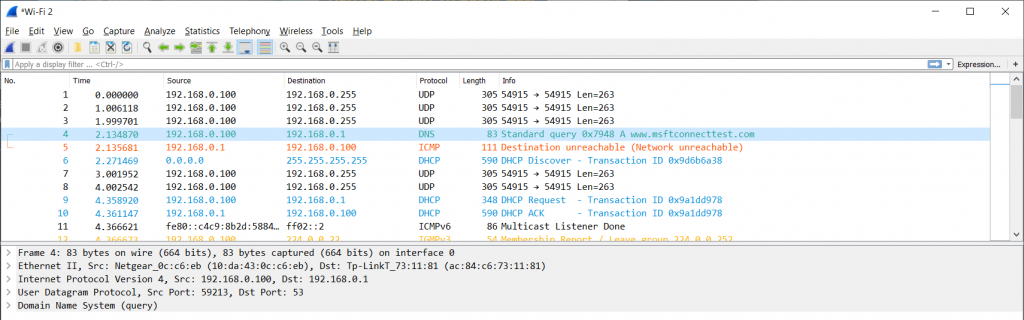
Figure 1 – “Wireless” capture without monitor mode
As you can see, the capture looks just like a normal Ethernet capture would. There’s nothing related to the radio layer, so troubleshooting the wireless connectivity is not possible this way. To get the radio layer information, you need at least three things (other than Wireshark, of course):
- A WiFi card that supports monitor mode.
- The npcap capture libraries (instead of WinPCAP).
- A tool to enable monitor mode
Requirement 1 – a WiFi card with monitor mode
Unfortunately, not all WiFi cards support monitor mode on Windows. There’s a matrix available that you can use to check if your card is supported: https://secwiki.org/w/Npcap/WiFi_adapters.
I use either Alfa cards or, in this case, a NetGear A6210, which I bought at a local electronics store.
Requirement 2 – the npcap libraries
Since Wireshark 3.0 came out WinPCAP is no longer the default capture library installed. Instead, the npcap libraries are used, which replace the discontinued WinPCAP libraries. If you want to know more about the differences between the two, check this comparison. If you recently installed Wireshark 3.x (or later) you should automatically have replaced WinPCAP with npcap, unless you didn’t allow the installer to do that. Important: you need to make sure “Support raw 802.11 traffic (and monitor mode) for wireless adapters” is checked:
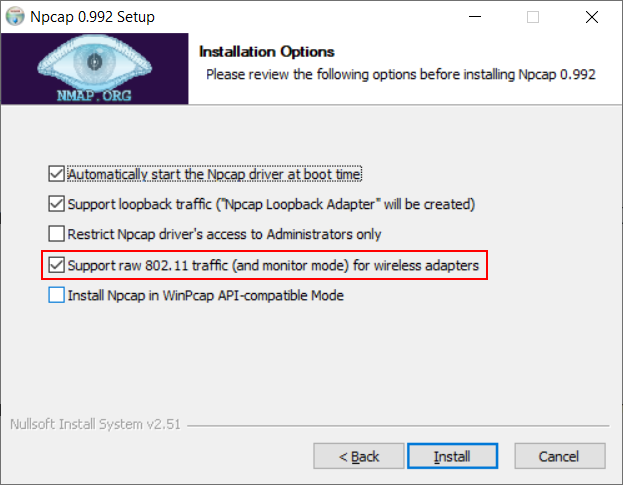
Figure 2 – npcap Installation Options
Requirement 3 – A tool to enable monitor mode
Figure 3 – enabling Monitor Mode fails
If you run Wireshark, you’ll notice that you have a “Monitor Mode” checkbox in the capture interface dialog for your WiFi cards. You can open that dialog from the main menu via “Capture” -> “Options” or by pressing CTRL-K. Unfortunately, even with npcap installed correctly it doesn’t seem to work if you click it (at least in my case), because the check mark disappears again after a short moment.
I’m not sure if that’s normal, but as far as I found out Wireshark can’t modify that setting because it doesn’t have the sufficient privileges to do that. You can either run Wireshark in administrative mode – which I strongly advise against, because it could allow malicious packets to compromise your system. Check out this blog post about “Attacking Wireshark” for details.
The much better plan is to use the wlanhelper utility in an elevated command prompt, which is why I added it specifically to the list of requirements. Fortunately, this comes as part of the npcap installation and is called wlanhelper.exe. You can find it in C:\Windows\System32\Npcap\
Check which mode your WiFi card is in using the “wlanhelper.exe” tool. You should run a command line prompt as administrator and change into the directory “C:\Windows\System32\npcap”. To check the current WiFi card mode, run this command (replace “Wi-Fi 2” with the name of your network card you want to manage):
C:\Windows\System32\Npcap>wlanhelper "Wi-Fi 2" mode
managed
“Managed” is the default mode that your card should usually be in. It means that it is ready to be used for normal WiFi connectivity. To put it into monitor mode you use the following command:
C:\Windows\System32\Npcap>wlanhelper "Wi-Fi 2" mode monitor
Success
But you may also see a result like this:
C:\Windows\System32\Npcap>WlanHelper.exe "Wi-Fi 2" mode monitor
Error: SetWlanOperationMode::SetInterface error, error code = 5 (Access is denied)
Failure
As you can see we got an error back, which is most likely caused by the fact that the command line prompt wasn’t started as administrator – so if you get this, close your command prompt and start it again, as administrator. If you’re not sure how to do that, follow these steps:
- Press CTRL & ESC to open the start menu
- type “cmd”, which should find the “Command Prompt” icon
- Click “Run as Administrator” or (if you want to impress people standing behind you) press CTRL & Shift & Enter to launch the icon in administrative mode.
- Confirm the User Access Control prompt
Now, we we run Wireshark again, we can “turn on” monitor mode (which we already did; we’re just telling Wireshark to try it to make it realize it works now):
Figure 4 – enabling Monitor Mode works
As you can see, the “Link-layer Header” changes from “Ethernet” to “802.11 plus radio tap header”, which tells us that we’re now going to capture radio layer information as well. Now, when we start a capture on a card like that, we’ll see a different story:
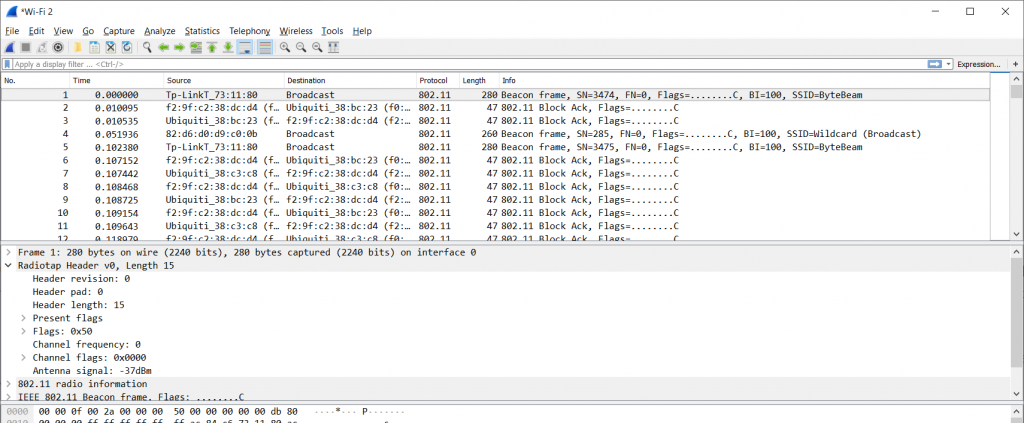
Figure 5 – Capturing with Monitor Mode enabled
We get a ton of management frames, and we also see the typical “Radiotap Header” that tells us about the radio layer. Exactly what we wanted.
Changing channels
One thing that will probably bug you is that Wireshark 3.x doesn’t yet come with a WiFi toolbar, which allows to change channels in a convenient way from the GUI. Unfortunately you’ll have to change channels manually until that problem is solved, and you can do that (again) with the help of the wlanhelper utility, using the according commands:
C:\Windows\System32\Npcap>wlanhelper
WlanHelper for Npcap 0.992 ( http://npcap.org )
Usage: WlanHelper [Commands]
or: WlanHelper {Interface Name or GUID} [Options]

OPTIONS:
mode : Get interface operation mode
mode <managed|monitor|master|..> : Set interface operation mode
modes : Get all operation modes supported by the interface, comma-separated
channel : Get interface channel
channel <1-14> : Set interface channel (only works in monitor mode)
freq : Get interface frequency
freq <VALUE> : Set interface frequency (only works in monitor mode)
modu : Get interface modulation
modu <dsss|fhss|irbaseband|ofdm|hrdsss|erp|ht|vht|ihv (VALUE)|..> : Set interface modulation
modus : Get all modulations supported by the interface, comma-separated
Final Words
Capturing Wireless on Windows got a lot easier now, and with npcap it’s also possible to capture on more recent cards than the old WinPCAP adapters which stopped at the 802.11n technology as far as I know. One thing to keep in mind: capturing in monitor mode means that the card becomes a “receive-only” card. So don’t be surprised when you lose connectivity if you have only one WiFi card in your system. If you need to stay connected to a wireless network while capturing it you need two cards – one in managed mode, one in monitor mode.
Table of Contents
Monitor Mode (Promiscuous Mode or Listening Mode) and Native Capture Mode or Normal Mode are the two capture modes supported by the wifi cards in Windows and then we will see the differences of performing a capture in monitor mode vs. native.
While the capture in normal mode, focuses on identifying WiFi access points, in the capture in monitor mode, you can capture all WiFi packets, including data packets.
Depending on the type of capture, native or monitor mode, we will get a different level of information about our WiFi network and surrounding devices, here are the differences for each of these types of capture.
Native capture mode
It is the capture that supports any standard software that uses wifi. When monitoring using Native Capture Mode, wireless cards operate as a standard Wi-Fi adapter and uses the manufacturer’s drivers that are installed on the computer.
By using Windows native mechanisms, the wireless card only captures a certain type of Management packets, specifically Beacon packets, that are broadcasted by access points. These packets are transmitted several times per second by access points to broadcast networks that are currently available.
Acrylic Suite tools are compatible with any WiFi card on the market in native or normal capture mode, analyze and interpret these packets, displaying the information they contain and storing it in pcap files or in the current project.
To perform a native data capture, no special hardware is required, it is sufficient to have an integrated wifi or usb card.
Monitor mode
Monitor capture mode vs. native mode is a data capture mode that allows using the WiFi adapter in listening mode or promiscuous mode. Operating in this mode, WiFi network cards are able to capture all types of WiFi Management packets (including Beacon packets), Data packets and Control packets. This way, it is possible to visualize not only access points but also clients that are transmitting within WiFi frequency bands.
How to capture in monitor mode in windows.
Monitor capture on Windows can be enabled using Acrylic Wi-Fi Sniffer (802.11a/b/g/n/ac) to allow the other Acrylic Suite products to communicate with it to capture in monitor mode and also provide these capture capabilities to third party tools such as Wireshark.
Acrylic Wi-Fi Sniffer allows monitor mode capture in a simple manner. Because it has been designed to be an easy-to-use and cost-effective alternative to use monitor mode capture in windows, it can retrieve all available data including information about SNR (Signal-to-Noise Ratio) values.
SNR is a good parameter to measure the quality of a communication since it takes into account the received signal strength and the noise present in the wireless environment. Its value varies between 0 (worst) and 100 (best) and is considered a good value above 20.
SNR is available in both Acrylic Wi-Fi Analyzer and Acrylic Wi-Fi Heatmaps through Acrylic Wi-Fi Sniffer, it also supports the latest 802.11ac standards with all channel widths (20, 40, 80 and 160 MHz).
You can check out Acrylic Wi-Fi Sniffer compatible cards.
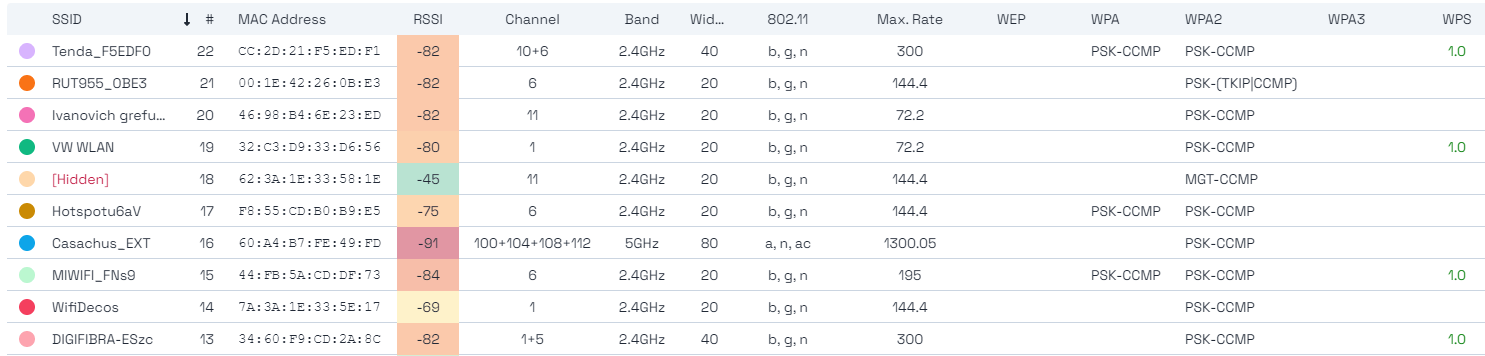
Available information with Acrylic Wi-Fi Analyzer
Native Mode
- SSID
- MAC address
- Signal strength
- Channels
- Channel width
- Bandwidth
- IEEE 802.11
- Maximum packet transmission rate
- Encriptation type (WEP, WPA, WPA2, WPA3, WPS PIN)
- Manufacturer
- Latitude and longitude (this information is available when a GPS device is connected)
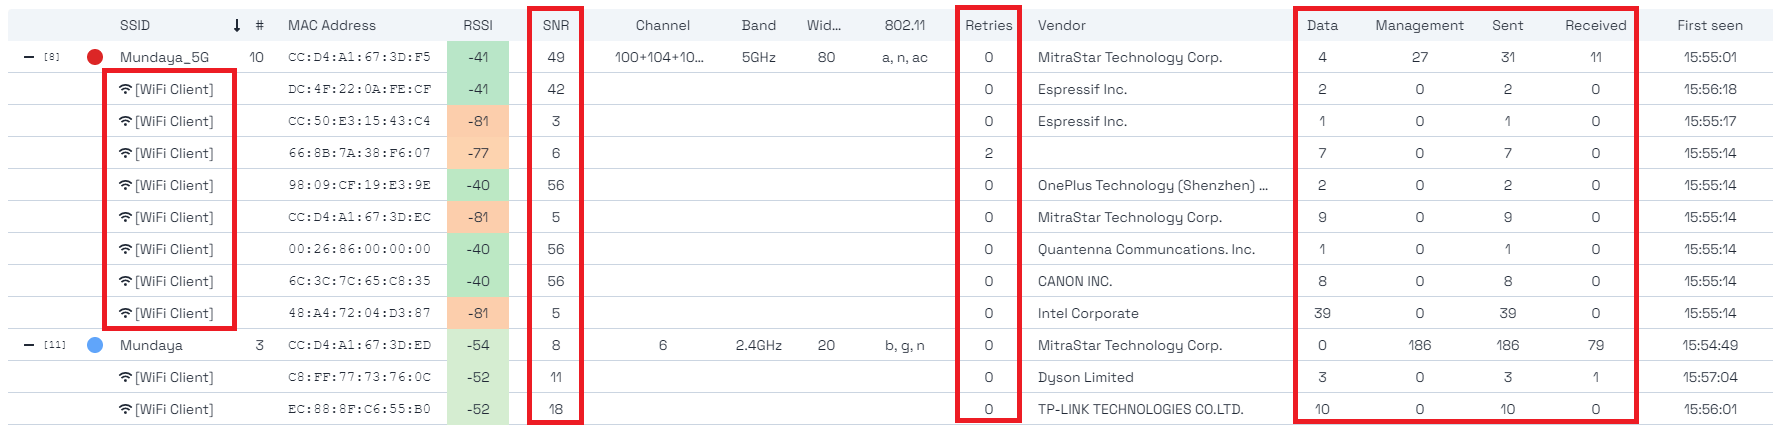
Monitor mode
While performing a data capture in monitor mode, Acrylic Wi-Fi Analyzer provides, in addition to all the information available with the normal mode capture, information about the following aspects:
- On which channels to monitor.
- Identification of the name of hidden wifi SSIDs.
- Client devices connected to the different access points (#)
- Retries of sent packets (Retries)
- Data packets (Data)
- Management packets (Mgt)
- Number of packets sent by that device.
- Number of packets received by that device.
Comparison: Monitor mode vs. native
Access Point Detection
SSID, RSSI, Mac, channel, vendor,…
Geopositioning capture with Latitude and Longitude
Available when GPS is connected
Network client detection
Clients of the network you are connected to
Wifi client detection
Clients connected to any AP
Detection of any wifi device
Phones, laptops, game consoles, televisions, …
Hidden SSID name detection
Find out the name of a hidden network
Noise measurements (SNR)
Measures signal interference
Data packet capture
Detect all wifi traffic
Transmission quality metrics
Packet resending rate
Plots available in using Acrylic Wi-Fi Heatmaps
Acrylic Wi-Fi Heatmaps in addition to making use of Acrylic Wi-Fi Sniffer, has built-in support for two additional methods to make use of the monitor mode, one, as implemented by Acrylic Wi-Fi Sniffer, is the capture through a Windows NDIS driver, and the other is the use of specialized Airpcap hardware, right now both the NDIS driver and these cards are obsolete and Acrylic Wi-Fi Sniffer is the recommended alternative to Airpcap. These two methods are maintained for compatibility, but are not guaranteed to remain available in future updates.
NDIS wifi driver
The NDIS driver, besides being included in Acrylic Wi-Fi Sniffer, is also available in Acrylic Wi-Fi Heatmaps and allows capture in monitor mode for 802.11a/b/g/n and 20MHz channel widths, always depending on the card, to activate the monitor capture mode it is necessary to have a compatible card and install the driver, which can be done from the application itself.
AirPCAP card
We can also perform a capture in monitor mode using specific Wi-Fi analysis hardware, such as the AirPcap cards developed by Riverbed. These cards are currently discontinued and do not support the new 802.11ac/ax standards. They only support capture in monitor mode, they are not valid for use as conventional Wi-Fi cards. If we perform a capture in monitor mode with an AirPcap card, we will be able to display, in addition to all the data available with a capture in monitor mode using a card compatible with the NDIS driver, information about the SNR (Signal-to-Noise Ratio) values.
In Acrylic Wi-Fi Heatmaps, the native capture mode, compatible with all wifi cards on the market, allows generating the following charts and diagrams (plots).
- RSSI Wifi heatmap (Signal strength)
- AP coverage
- Channel coverage,
- Maximum transmission rates supported
- Number of APs
- Channel overlapping
- Cell-grouped data
- Bandwidth*
- Latency*
- Packet loss*
- Roaming*
*Plots available when performing an active site survey.
Native
NDIS
Airpcap
Acrylic Wi-Fi Sniffer
Coverage per access point
Maximum transfer rates supported
Device density
Number of wifi clients
Interference, signal-to-noise ratio
SNR
Capture on latest 802.11 standards
802.11 a/b/g/n/ac, widths 20,40,80,160MHz
Normal Mode
Charts available when capturing in native mode:
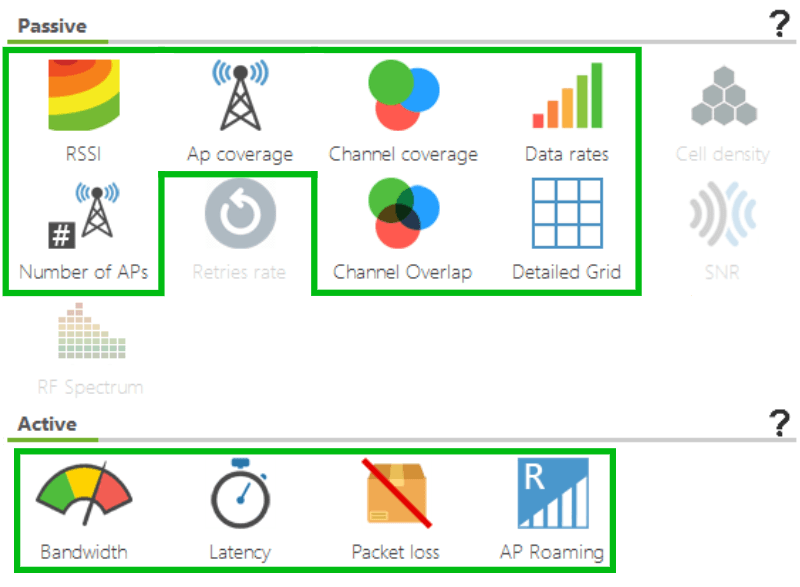
Monitor Mode
When performing data capture in monitor mode, in addition to all plots available using normal mode, we can show:
- Cell Density (the density of devices connected to access points)
- Retries rate
- SNR heatmap*
* Available using Acrylic Wi-Fi Sniffer or an AirPcap card
Acrylic Wi-Fi Sniffer allows capturing traffic transmitted using the latests 802.11ac standards with channel widths of 20, 40, 80 and 160Mhz. This enhancement applies to all software plots.
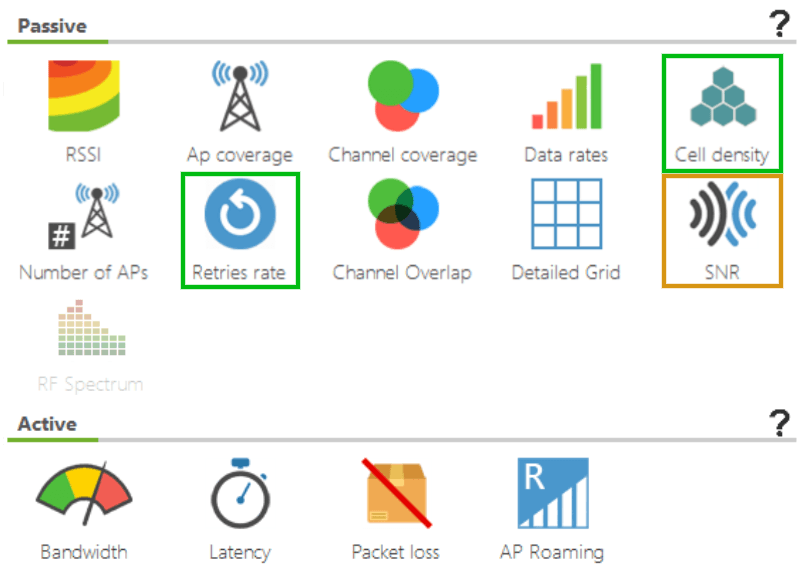
As you can see in the image, RF Spectrum graph is not available in any mode. This is because it is only available by using a specific device: a spectrum analyzer. If you want more information about what this chart is for, how to activate it and how to use it, please take a look at the article “Wi-Fi Spectrum Analysis, How to Perform One, and What Information It Provides“
10
Записи
3
Пользователи
1
Reactions
30.3 Тыс.
Просмотры
(@root)
Active Member
Присоединился: 6 лет назад
Записи: 18
Создатель темы 08/02/2019 9:46 дп
С беспроводными атаками в Windows всё довольно плохо. Одной из немногих бесплатных программ, которые умеют выполнять настоящие атаки на Wi-Fi в Windows (а не только показывать доступные сети или извлекать ранее введённые пароли от Точек Доступа), является программа Router Scan by Stas’M. Она умеет выполнять атаки на WPS, в том числе Pixie Dust. Также она может подбирать пароли от Точек Доступа — но делает это онлайн, то есть требуется постоянное присутствие около ТД, к тому же, это очень медленно.
Есть несколько платных решений для режима монитора Wi-Fi в Windows и даже для беспроводной инъекции — но я их не изучал, если у кого-то есть практический опыт, то поделитесь им в этой теме.
Некоторое время назад (сейчас уже снят с производства), можно было купить аппаратное решение AirPcap, с которым могли работать некоторые программы.
Итак, в этой теме делимся своим опытом по переводу Wi-Fi адаптера в режим монитора в Windows и атаками на Wi-Fi из Windows.
(@root)
Active Member
Присоединился: 6 лет назад
Записи: 18
Создатель темы 08/02/2019 10:05 дп
Npcap + Wireshark = режим монитора Wi-Fi в Windows
Теперь Npcap, которая пришла на смену WinPcap, в связке с Wireshark умеет переводить сетевые интерфейсы Wi-Fi в режим монитора и захватывать сырые Wi-Fi фреймы.
После долгих мук мне удалось таки заставить это работать.
Порядок действий следующий:
- удалите WinPcap
- установите Microsoft Visual C++ Redistributable 2013 ( https://www.microsoft.com/ru-RU/download/details.aspx?id=40784 )
- установите Npcap ( https://nmap.org/npcap/#download )
- установите Wireshark (если ещё не установлена)
- проверьте, чтобы в папках C:\WINDOWS\System32 и в C:\WINDOWS\SysWOW64 не было файлов wpcap.dll и Packet.dll. То есть эти файлы должны быть только в C:\Windows\SysWOW64\Npcap\ и C:\Windows\System32\Npcap\ и больше нигде
- запустите Wireshark с правами администратора
- в настройках интерфейса поставьте галочку в колонке Monitor Mode:
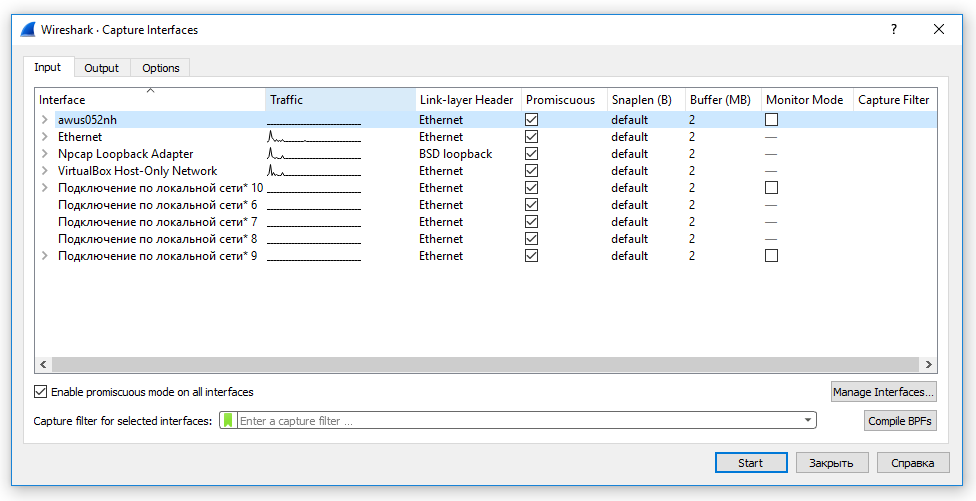
Удачно протестировано с Alfa AWUS052NH (идёт захват фреймов), но есть проблемы, о которых ниже.
Нерешённые проблемы:
- Не получилось менять номер канала для Wi-Fi адаптера Alfa AWUS052NH — всегда прослушивается только первый канал.
- При переводе адаптера Alfa AWUS036NHA Windows вылетает в синий экран смерти. Возможно, дело в кривых драйверах — нужно попробовать разные варианты. Например, Alfa AWUS036NHA нормально работает в Windows без установки драйверов от производителя. Можно попробовать установить или наоборот удалить эти драйвера.
Некоторые дополнительные подробности и примеры атаки «Взлом Wi-Fi без пользователей в Windows (с использованием Wireshark и Npcap для захвата PMKID)».
(@k0styan3)
Active Member
Присоединился: 4 года назад
Записи: 12
30/04/2021 12:29 пп
@root у меня встроенную карту(intel AC 3165,режим монитора поддерживается)не получилось перевести , а внешнюю-древнюю RT 2571WF — марка чипа ,перевелась с лета!но у нее только поддержка b\g , а n — не поддерживается….я так понял сейчас , когда у всех минимум n- этой стариной уже ничего не сделать?
(@root)
Active Member
Присоединился: 6 лет назад
Записи: 18
Создатель темы 30/04/2021 2:22 пп
Да, Точки Доступа на g встречаются уже как исключения. Но такой адаптер всё ещё можно использовать для атак на WPS.
(@root)
Active Member
Присоединился: 6 лет назад
Записи: 18
Создатель темы 30/04/2021 2:28 пп
Ещё можно попробовать атаки без клиентов https://hackware.ru/?p=6672 — благодаря обратной совместимости всех протоколов, ТД должна быть способна принимать подключения и на g и даже на b.
(@k0styan3)
Active Member
Присоединился: 4 года назад
Записи: 12
01/05/2021 12:17 пп
@root
спасибо за совет!
обязательно буду пробовать.но мне вообще очень интересно — на что ,кроме просто захвата пакетов(кстати — если в сети все клиенты работают на стандарте n, а моя карта — на g : она их трафик нормально увидит\сохранит?и она сможет кого-то отключить , чтобы хендшейк поймать?
запустил на другом компе убунту с aircrack ,так появился идиотский(возможно !), вопрос-вот мониторю я сеть Aircrack и решил отключить клиентов от сети — но в терминале то идет мониторинг,я нажал кнтр+с монитор остановился и я послал 5 комманд деаунтефикации ,а потом сразу включил монитор назад — я правильно действовал?
извините уж за кучу сумбурных вопросов ? …
(@mial)
Участник Admin
Присоединился: 7 лет назад
Записи: 267
01/05/2021 2:02 пп
@k0styan3, приветствую! Эта тема называется «Режим монитора Wi-Fi в Windows», то есть эти вопросы здесь не по теме.
Посмотрите сначала статьи здесь: https://hackware.ru/?p=372 . Если будут вопросы, то или здесь, на форуме, создавайте новые темы, чтобы не писать где попало, или спрашивайте там в комментариях.
(@k0styan3)
Active Member
Присоединился: 4 года назад
Записи: 12
05/05/2021 6:50 пп
проверьте, чтобы в папках C:\WINDOWS\System32 и в C:\WINDOWS\SysWOW64 не было файлов wpcap.dll и Packet.dll. То есть эти файлы должны быть только в C:\Windows\SysWOW64\Npcap\ и C:\Windows\System32\Npcap\ и больше нигде
у меня (винда 10,64 бит,карта встроенная intel AC3165 и D-link DWA 110)так вот при выполнении этой рекомендации в Шарке пропадают оба интерфейса из доступных с режимом монитора,и встроенная и юсб-шная.
если эти файлы скопировать обратно (из папки Npcap ),тогда появляется режим монитора для юсб-карты(но она древняя,поддержки n-нету!).хотелось бы конечно использовать интел….
(@root)
Active Member
Присоединился: 6 лет назад
Записи: 18
Создатель темы 06/05/2021 3:01 пп
Как человек, который потратил много безрезультатных часов, пытаясь что-то сделать в Windows с режимом монитора, мой вам совет — за то время, пока вы будете пытаться использовать режим монитора в Windows, вы сможете сходить в магазин за USB флешкой, установить на её Linux, всё настроить и разобраться с Linux.
А в Windows всё равно ничего не получится.
Я нашёл у себя адаптер без поддержки стандарта N и проверил — как выяснилось, он может выполнять атаки в том числе и на N. Подробности смотрите в статье «Для каких атак подходят старые Wi-Fi адаптеры»
Там же есть ссылки на статью про автоматическую сборку рукопожатий и про атаку Pixie Dust — в них всё очень просто, не нужно вручную выполнять деаутентификацию клиентов и прочее. Если у вас рукопожатия не будут захватываться, то это может быть связано с тем, что у ТД нет подключённых клиентов, или вы слишком далеко от них находитесь, но не с отсутствием поддержки стандарта N на вашем Wi-Fi адаптере.
(@k0styan3)
Active Member
Присоединился: 4 года назад
Записи: 12
06/05/2021 3:44 пп
@root
Спасибо вам за уделённое время!
Я тоже прихожу к выводу,что Линукс на флешке — это то,что надо!
И железо планшета задействуется(относительно новое)и геморроя поменьше!
Ещё раз спасибо вам!
Хорошего дня!
С уважением,Костя
Периодически возникает необходимость захватить служебный Wi-Fi трафик для дальнейшего анализа в Wireshark.
Wireshark использует библиотеку WinPcap для захвата трафика, а она не позволяет напрямую захватить Wi-Fi трафик и не позволяет включить Monitor Mode.
Я нашел два варианта захвата Wi-Fi трафика в Wireshark:
- Использовать специализированные Wi-Fi адаптеры с поддержкой библиотеки AirPcap;
- Использовать способ предложенный Acrylic.
Первый и второй вариант — платные. А т.к. данная задача возникает нечасто, хочется, что то бесплатное.
Решение нашлось…
У Microsoft есть замечательная утилита Microsoft Network Monitor. С помощью неё можно перехватывать трафик на сетевых интерфейсах включая и Wi-Fi интерфейсы в Monitor Mode.
Пример использования
После установки, запускаем Microsoft Network Monitor от прав Администратора!
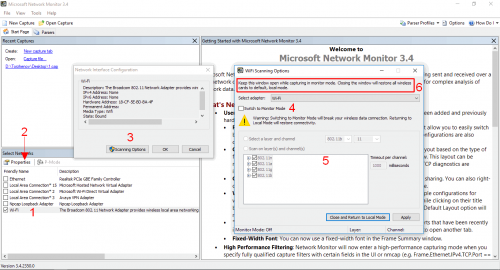
Выбираем Wi-Fi адаптер (1), открываем окно с настройками (2), открываем окно с настройками сканирования эфира (3).
Включаем если нужно Monitor Mode (4) и далее выбираем частоты и стандартны 802.11 (Wi-Fi) (5).
ВАЖНО!
Окно настроек сканирования не закрываем во время захвата Wi-Fi трафика. Иначе все сделанные настройки сбросятся по умолчанию (6).
Создаём новую вкладку (tab) для захвата трафика.
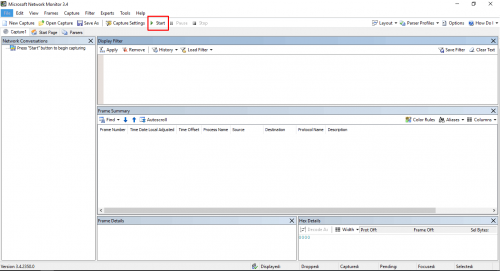
Нажимаем Start и…
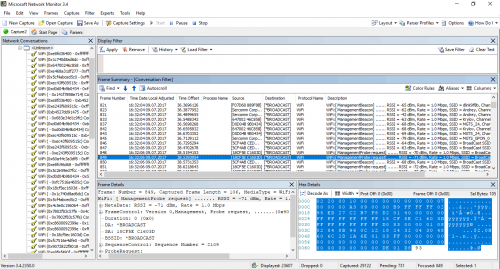
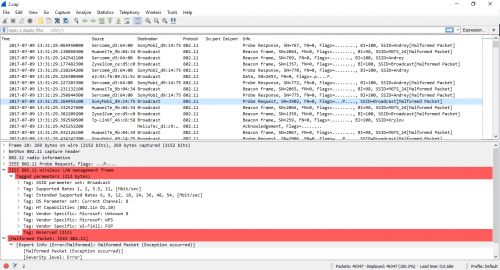
…видим наш Wi-Fi трафик.
Анализируем его на месте в Microsoft Network Monitor или сохраняем в файл pcap и открываем в Wireshark.
Ссылки
- Подборка ресурсов по захвату и анализу Wi-Fi трафика: Wireless Analysis Resources
- Подборка ссылок на темутику Wi-Fi: https://2keep.net/useful-links#wi-fi
The following two tabs change content below.
- Bio
- Latest Posts
В профессиональной сфере занимаюсь всем, что связанно с IT. Основная специализация — VoIP и сети передачи данных. Стараюсь не заниматься Windows серверами (но иногда приходится) и 1С.
It’s the era of network engineers, so if you’re a starter in the field of networking, gear up to enhance your skill set by learning about the monitor mode. When you analyze packets and do your penetration testing, it is essential to understand how the Wi-fi monitor mode works.
Table of Contents
Establishing a Wi-fi Connection for Monitor Mode
When you connect to a wireless network or Wi-fi, your system sends a packet to the Wi-fi device. Once the device receives the packet, it sends back an acknowledgment that confirms the establishment of the connection.
Likewise, if you want to connect to another device on the same network, the Wi-fi will send the same packet to that device.
The Basics of Monitor Mode
In Linux operating systems understanding the monitor, the mode is quite simple. You need to run a few commands that we will discuss further. But what exactly is a Wi-fi monitor mode?
There is a central device or system in the monitor mode that monitors all the packets sent to the Wi-fi over that specific network. In this mode, the Wi-fi itself doesn’t have the monitoring capability.
Effectively, the system in monitor mode receives all the packets that circulate over that network. To set your system to the monitor mode, there are three simple ways to configure it in Linux operating systems. Let’s explore these methods:
Use Airmon-ng
To use the Airmon-ng method, you will first need the aircrack-ng. Here is a quick guide:
- To install it, write the following command in your Ubuntu or Kali Linux command line:
sudo apt-get install aircrack-ng
- Once you enter the command, it will output the successful installation of the packages. Next, you need to check the Wi-fi interface. To do that, type the following command:
sudo airmon-ng
- It will display the drivers, chipset and the Wi-fi interface on the system. After checking the wi-fi interface, it’s time to check for any interfering processes. Use this command:
sude airmon-ng check
- It will display the number of processes that might potentially cause trouble in the monitor mode. So, it would help if you killed these processes by using the kill command. Type in the following:
sudo airmon-ng check kill
- The system will summarize all the processes that it has killed. It’s time for the interface to enable monitor mode. Type the following command:
sudo airmon-ng start wlp1s0
- In Kali Linux, you can enter the monitor mode on a wireless network through the ‘airmon-ng start wlan0’ command.
- As it creates a new interface, you can proceed to check it through the iwconfig command. Type the following:
iwconfig
- Now return to the original interface. Type the following command:
sudo airmon-ng stop wlp1s0mon
- You can recheck the interface by using the iwconfig command.
Use Iw Configuration Tool
Using the iw wifi configuration tool is a simple option to manage wireless network settings. It’s mainly more potent than some of the other tools. For example, you can use the same tool to obtain wifi network info, different wifi commands, wireless wlan0, bit rates, scanning, interface modes, HT, etc.
Check Interface Information
First, you must check the information of the interface. Use the following instruction:
$ sudo iw dev
Accessing Other Users’ Traffic
Next, you may need to access other users’ traffic, so you must switch to the Monitor mode. Use the following set of commands to switch to monitor mode. We will assume the interface name as wlp1s0.
$ sudo ip link set wlp1s0 down
$ sudo iw wlp1s0 set monitor control
$ sudo ip link set wlp1s0 up
You may recheck the interface by typing the following:
$ sudo iw dev
Returning to Managed Mode using the sudo ip link set
To return the mode to manage, use the following set of commands.
$ sudo ip link set wlp1so down
$ sudo iw wlp1so set type managed
$ sudo ip link set wlp1so up
Does My Wi-fi Support Monitor Mode?
One of the critical aspects of using the monitor mode is Wi-fi support. So, you must first ensure that your Wi-fi card support monitor mode. The checking method varies according to the operating system, so we will see how it works for Ubuntu Linux.
So, before you buy a new wifi adapter, let’s see if you can work with the current model.
Checking Wi-fi Support in Ubuntu Linux
Ubuntu Linux has a relatively simple way to check the mode monitor. You don’t need any additional tools. Here is how to do it:
Find the Network Interface Name
First, you must find out the wifi interface name. Go to your Linux command line and type the following command:
ip a
This command outputs all wireless and wired connections. The display will show the IP address and state of your connection. In this example, let’s assume your wifi interface name is ‘wlp1s0’.
Disable Wifi
Next, you must turn down the Wi fi network. You don’t need to switch off the wireless adapter. Instead, write this command:
sudo ip link set dev wlp1s0 down
Switch to Monitor Mode
Once you’ve set down the interface, it’s time to switch your Wi-fi card to monitor mode. Type this command.
sudo iwconfig wlp1s0 mode monitor
This command does two things. Firstly, it will verify if your wifi card supports monitor mode. Secondly, it will successfully switch your wifi to monitor mode. In case there is monitor mode support, it will give an error.
You can also double check by:
iwconfig
Alternative Managed Mode
If the previous command doesn’t run successfully, your wi-fi will switch to managed mode. Unfortunately, it also means that the monitor mode isn’t supported.
No Internet During Monitor Mode
Remember that the Wi-fi monitor mode disables the internet. So, you need to turn the way back to manage if you want to turn on the internet. Here is how to do it:
sudo iwconfig wlp1s0 mode managed
sudo ip link set dev wlp1s0 up
The Use of Monitor Mode
If you’re an ethical hacker, you need to learn how to use and enable monitor mode. It helps capture data packets to check if any wi-fi adapter or access point is left vulnerable on the line. In addition, you can access critical information about the network to enhance security and traffic using the monitor mode.
Conclusion
It doesn’t matter if you’re using mac or windows or any other operating system. Whether it’s Ethernet or wi-fi connection, monitor mode gives you a lot of power as an analyst and network manager. For example, you can configure different networks.
Now that you know how to configure your way to the monitor mode, you can efficiently analyze packet capture, configure channel settings, monitor data reception, and view all devices available on the networks.
Also, we saw how to check if your adapter supports monitor mode. So, if you find that your internet hardware peripherals support monitor mode, it will be easier for you to practice ethical hacking on your device.