
Download Windows Speedup Tool to fix errors and make PC run faster
Whenever a new update is downloaded on your Windows 11/10 PC, the OS replaces the Restart and Shutdown button with “Update and Restart“, and “Update and Shut down“. This is probably the best practice so that the update is not missed. But at times, users find that these buttons continue to display the same message even when they have performed those operations – ie, either restart or shut down your computer. This could happen if an update fails to install, and so your PC continues to prompt you every time to Update and shutdown. So what can you do in this case?
After a Windows Update, if the Update and Shut down or Update and Restart buttons are not working and won’t go away, even after shutting down or restarting, try the following suggestions:
- Restart File Explorer
- Run Windows Update Troubleshooter
- Set the Power button to Shut down
- Instantly Turn off without updating
- Run Windows Module Installer
- Enter Clean Boot State
- Reset Windows Update.
Let us see the procedure involved in detail.
1] Restart File Explorer
Restarting Windows File Explorer can fix a lot of things, especially when there is a problem with the user interface.
- Right-click on an open spot on the right side of the Taskbar
- Click on Task Manager
- Scroll down to Windows Explorer
- Right-click on Windows Explorer.
- Click on Restart.
In case you killed it, then you hit the Win+R and hit Enter after typing explorer.exe in it.
2] Run Windows Update Troubleshooter

Windows 11/10 has tons of auto-repair services built-in, which can fix small issues that used to get manually fixed. Here, you need to run the Windows Update troubleshooter to resolve this.
- Open Windows 10 Settings > Update and Security > Troubleshoot > Click on Windows Update, and ‘Run the troubleshooter’
- Open Windows 11 Settings > System > Troubleshoot > Click on Windows Update, and ‘Run the troubleshooter’
This will try detecting and then fix common issues that can be resolved by Windows itself. It may take several minutes to complete the process, so be patient. In the end, if you have some update pending that wasn’t realized by the system earlier, it will apply the fix by restarting the Windows Update service.
3] Set the Power button to Shut down
Change what the power button does. Open ControlPanel > Power Options and select Choose what the power buttons do from the left side. Set the Power button setting When I press the power button option to Shut down.
This should shut down the computer without installing the updates. Of course, this is just a temporary measure.
4] Instantly Turn off without updating
If you want to turn off your PC without questions, type “shutdown -s -f -t 0” in the Run prompt and hit Enter. Another thing you could try is to press Ctrl+Alt+Del and choose Shutdown from the bottom right menu.
5] Run Windows Module Installer
The Windows Module Installer is a built-in Windows 10 service. It lets you fix the Windows updates that are stuck.
To use this, open a command prompt with admin privileges.
Type the following and hit Enter:
SC config trustedinstaller start=auto
Once successfully executed, you should see [SC] ChangeServiceConfig SUCCESS display within the Command Prompt console.

Exit the command prompt and check if the buttons are back to normal.
6] Enter Clean Boot State
In case any third-party service is causing trouble for Windows Update, you can perform a clean boot. You will need to disable all third-party applications and services that start during Windows Boot and let only Microsoft services run. Once in Clean Boot State, use the Update and shut down button.
Read: Computer won’t restart after Windows Update
7] Reset Windows Update
Lastly, you can try resetting the Windows Update client using this official tool. It will not roll back nor will it delete any downloaded updates from the PC. Instead, it will:
- Configure the services and registry keys related to Windows Update for default settings.
- Clean up files related to Windows Update, in addition to BITS-related data.
If this is not comfortable for you, you can always manually reset the Windows Update Components.
Related read: How to shutdown without updating Windows.
Anand Khanse is the Admin of TheWindowsClub.com, a 10-year Microsoft MVP (2006-16) & a Windows Insider MVP (2016-2022). Please read the entire post & the comments first, create a System Restore Point before making any changes to your system & be careful about any 3rd-party offers while installing freeware.
If your PC or laptop won’t restart, that is a common problem, especially after a Windows update. If the restarting is taking too long, corrupt or broken system files can cause this problem. We have shown how to fix these issues in our Windows 10/11 PC stuck on restart guide.
Below are some of the variations of the issue you might also face and can be fixed with the solutions below:
- Computer won’t restart after update
Computer won’t restart or shutdown
Computer won’t restart properly
Computer won’t restart after power outage
Computer won’t restart in Safe mode
Computer won’t restart Windows 10
Computer won’t restart after Windows 11 update
Computer won’t restart after blue screen
Computer won’t restart after BIOS update
Computer won’t restart Dell, HP, Lenovo, Asus
Computer stuck on restarting screen
My laptop is stuck on restarting
What do I do if the computer won’t restart?
1. Run the Power troubleshooter
- Press the Windows key + I to open the Settings app.
- Choose the Update & Security option.

- Select Troubleshoot from the left pane.

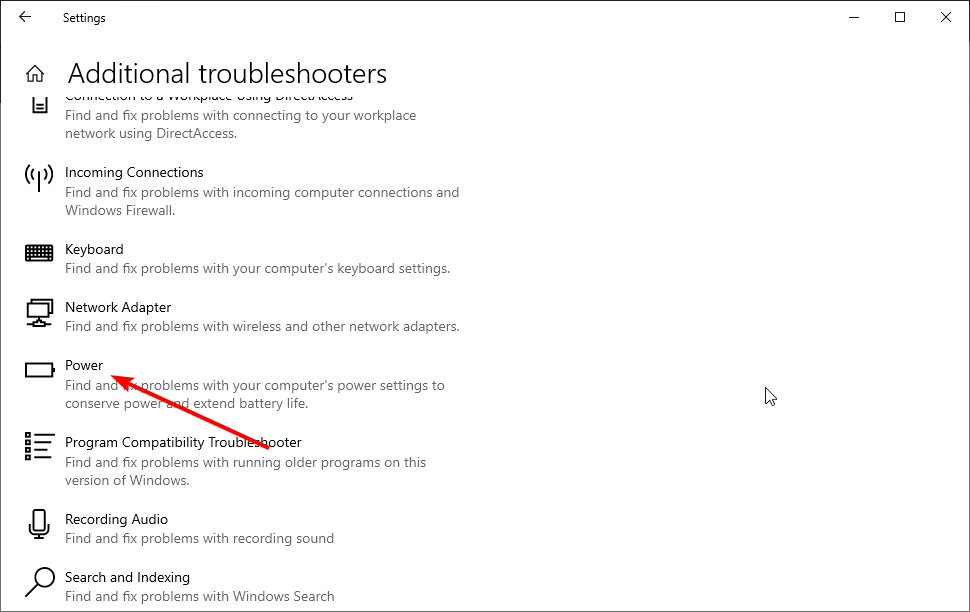
- Choose the Additional troubleshooters option.
- Click the Power option.
- Now, click the Run the troubleshooter button.


Let’s start by relying on the built-in troubleshooting tool to resolve the problem. Most reports suggest that the PC won’t restart properly problem occurred after an update, which isn’t uncommon for Windows 10.
Every major update is similar to a fresh installation regarding drivers, and meddling with those leads to massive issues. Either way, let’s give the troubleshooter a go; if it fails, we can safely move to the next step.
2. Try with the Clean Boot and SFC/DISM
- Type msconfig in the Windows Search bar and open System Configuration.
- Click the Services tab.

- Check the Hide all Microsoft services box and click the Disable all button to disable all active third-party services.
- Now, click the Apply and OK buttons.
- Finally, reboot your PC.


And, to address concerns about possible system corruption, we’ll need you to run two built-in utilities from the elevated Command Prompt. Here’s how to run SFC and DISM on Windows 10:
- Type cmd in the Windows Search bar.
- Right-click on Command Prompt and select Run as administrator.
- Now, type the command below in the command line and press Enter.
sfc/scannow
- After its done, type the following command and press Enter after each:
DISM /online /Cleanup-Image / ScanHealthDISM /Online /Cleanup-Image /RestoreHealth
- Reboot your PC when everything ends (it can take some time) with the physical button.


If you’ve upgraded to Windows 10 over the Windows 7 installation, it’s pretty standard for certain third-party apps to fail you later. On the same note, it’s not uncommon for that transition to come out with corruption of system files.
This consequently leads to Windows 10 or 11 not restarting issues.
To address the first possibility, you need to start your PC in the Clean Boot mode (without any third-party applications beginning with the system).
3. Boot into Safe mode
- Press Windows key + I to open Settings.
- Choose Update & Security.
- Select Recovery from the left pane.
- Under the Advanced startup, click Restart now.
- Choose Troubleshoot.
- Select Advanced options and then Startup settings.
- Click Restart.
- Choose Safe mode or Safe mode with Networking from the list.
- Try restarting your PC from Safe mode.

If the Clean Boot and utilities fail you, let’s ensure that some of the first-party secondary devices aren’t causing the problem. Some reports state that the Intel Management Engine (standard on many laptops) is causing the problem.
When in the Safe Mode, Windows 10 shouldn’t load this driver. If you can restart your device from Safe mode, we suggest checking the next step, which explains how to disable this service.
4. Disable Intel Management Engine
- Press the Windows + X keys and select Device Manager.
- Double-click on System devices to expand it.

- Right-click on the Intel(R) Management Engine Interface option.
- Choose Disable device from the contextual menu.
- Shut down your PC and start it again.
- Try restarting it again.


As we noticed in the previous step, the Intel Management Engine tends to break the restart option. This causes the Windows 10/11 not restarting problem.
5. Uninstall a third-party antivirus and scan for PUPs
- Download Malwarebytes AdwCleaner, here.
- Run the tool and click Scan Now.

- Wait until the tool scans your system and click Clean & Repair.

Specific third-party antimalware solutions and Windows 10 are not cooperating correctly, especially if you have an older version installed.
If your antivirus interferes with the PC system, it might cause such troubles and prevent Windows 10 from restarting. If this is the case, you might consider another antivirus solution.
Plenty of lightweight security software will work smoothly in the background while you do anything else.
To benefit from high-quality security and error-free running time, you should choose one of the best antivirus software in ESET NOD32.
6. Reset your PC
- Open the Settings app.
- Choose the Update & Security option.
- Choose Recovery from the left pane.
- Click the Get started under the Reset this PC section.
- Choose the Keep my files option.

- Finally, click Next, followed by the Reset button.


If you’re still stuck with the Windows 10/11 not restarting issue, you might need to reset your PC to factory values. We advise you to choose the keep my files option to prevent losing vital information.
- Fix: Windows 10/11 PC stuck on restart
- Computer restarted unexpectedly in Windows 11? Try these fixes
- May 2025 Patch Tuesday finally brings Recall & other AI features to Copilot+ PCs
- Microsoft releases Windows 10 (KB5058379/ KB5058392 / KB5058383/ KB5058387) May 2025 Patch Tuesday
- Microsoft releases Windows 11 (KB5058411, KB5058405) May 2025 Patch Tuesday
7. Perform a clean reinstallation
Finally, if none of the previous steps haven’t relieved you of the issue at hand and you’re still unable to restart your PC, we can only concur that a clean reinstallation is the next logical step.
If you’re unsure how to reinstall Windows 10, we have provided in-depth instructions in our guide. After the reinstallation, you shouldn’t have any more issues.
What do I do if my Windows 11 PC is not restarting?
If your Windows 11 PC is not restarting, you can try basic troubleshooting steps like disconnecting all connected devices. Also, you can use the built-in troubleshooter to detect and fix the glitches causing the problem.
Moreover, here are some error variations that you may encounter:
- Windows 11 not starting (black screen)
- Windows 11 stuck on working on updates
- Windows 11 stuck on boot screen
- HP laptop stuck on restarting screen Windows 11
- Windows 11 is stuck on restarting
- Windows 11 startup repair not working
Check our guide for more detailed fixes on the Windows 11 not restarting issue.
How do I force restart my computer?
If your Windows 10/11 PC fails to restart, you can perform a hard reboot. You only need to press and hold the power button for a few seconds till the computer powers off.
Then, wait a few minutes and press the power button to restart your PC. But we will advise you not to use this option often. If you’re looking to restart your PC with a keyboard, we also have an eye-opening guide on the same.
Our readers also complained that the Settings app is resetting on reboot. If you’re in the same situation, read the highlighted guide to fix it.
In contrast, many users reported random restart problems on Windows 11. To fix this, it’s advised to run the built-in troubleshooter and check your power settings.
This can be a severe issue, especially if your Windows 11 PC is stuck in a reboot loop, so you can’t boot properly to your PC. This is most likely caused by system damage or your hardware.
Your PC can also get stuck on an automatic repair loop, preventing you from using it. However, a couple of solutions might help with these issues.
Moreover, if restarting takes long on your PC, it might be due to the virus. This can be fixed by scanning for malware with Windows Defender or some of the best antivirus software for Windows 10.
Also, tell us whether one of the steps helped you in the comments below. Your feedback is of utmost importance to us.
Aleksandar Ognjanovic
Aleksandar’s main passion is technology. With a solid writing background, he is determined to bring the bleeding edge to the common user. With a keen eye, he always spots the next big thing surrounding Microsoft and the Windows OS.
Focused on Windows errors and how to solve them, he also writes about the OS’s latest features as well as its interface.
In his free time, he likes to read, listen to music, and enjoy the nature. Hiking is one of his newly found passions.
When you would like to turn off your PC, you will go to Start menu > Power, usually, you can decide to Sleep, Shut down or Restart on Windows 10/11, or sometimes, choose to Hibernate on some computers.
While you hit the shutdown button, nothing happens, there is no logout, no black screen, you just won’t shut down from the power button from start menu.
This shutdown problem is rather complicated, as it is difficult to figure out which part of the PC cause you to shut down improperly on Windows 10/11.
Therefore, it is required that you manage to resolve this power button issue with patience and methods below.
Solutions:
- 1: Build a Shutdown.exe
- 2: Check For Windows Update
- 3: Run System File Checker
- 4: Run DISM
- 5: Restore the Default Power Settings
- 6: Adjust Power Button Settings
- 7: Run the Power Troubleshooter
- 8: Update Drivers
- 9: Enter the Sleep Mode
But first off, if it is urgent to turn off your PC, you can try to reboot your PC or to close all the programs on Windows 10 with the presence of the not shutting down issue.
Restart your PC without Shutdown Button
If necessary, you can decide to force reboot your computer to see if it still doesn’t shut down on Windows 10.
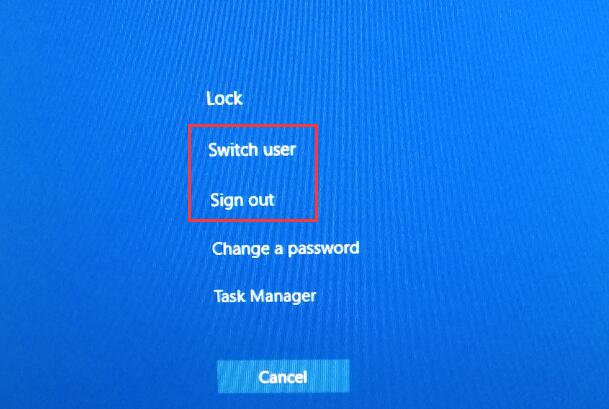
Press the combination key Ctrl + Alt + Delete to enter a window where you are able to Sign out or Switch user.
Unless you have recovered the shutting down from not working, or you must go ahead with in-depth methods.
Solution 1: Build a Shutdown.exe
Now that your shutdown button is missing or not working from Power, after build 14905, you may as well decide to build a shutdown.exe to see if it can return the shutdown or even power button back to Windows 10/11.
1. Right-click the computer desktop and select New and then Shortcut from the list.
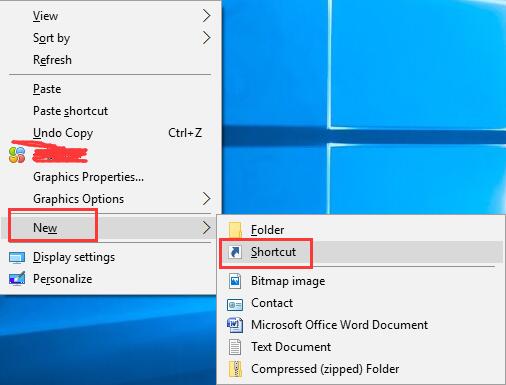
2. Type the location of the item as below and then hit Next.
%SystemRoot%\System32\Shutdown.exe -s -t 00 -f
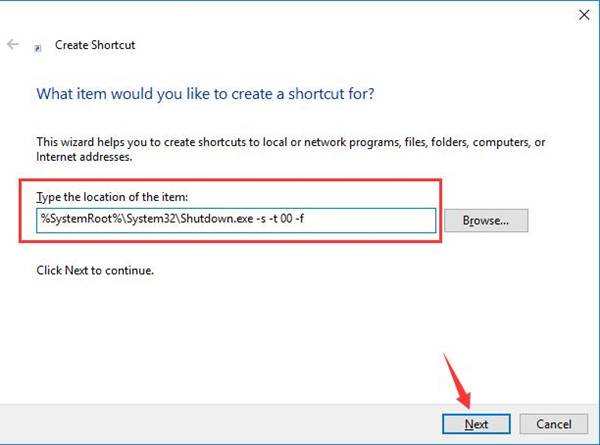
3. Then Type the name for this shortcut. You can see the exe is filled in automatically.
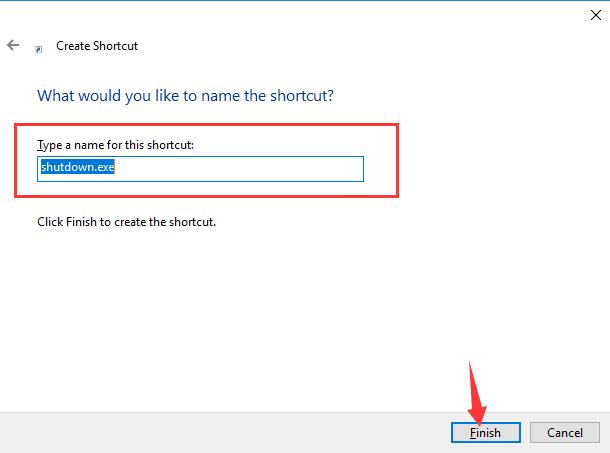
4. When finished, the shutdown.exe shortcut will come into your sight on the desktop.
5. Double click it to use it to shut down the PC.
You can see you are able to turn off your PC with this method.
But it can only be the second choice for it still won’t make the Shutdown button not working issue solved.
Solution 2: Check For Windows Update
It is necessary to make sure your Windows system is up-to-date to bring devices on Windows 10/11 to work as usual or better.
On the other hand, regarding the shutdown not working error on Windows 10/11, Windows update can recover some bugs related to power.
1. Go to Start > Settings > Update & Security.
2. Under Update & Security, choose to Check for updates.
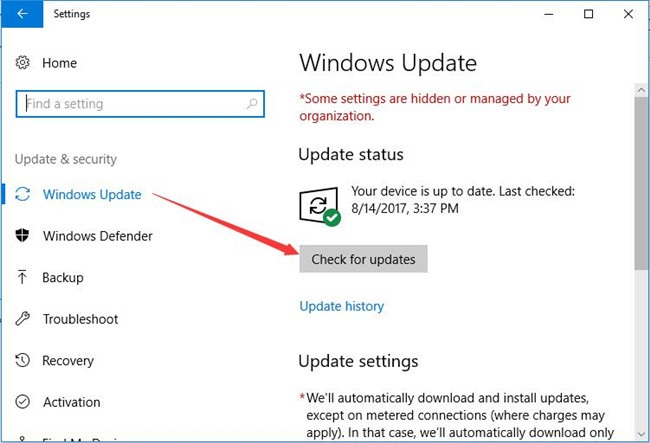
If there are any updates available, Windows 10 would install it automatically for you.
After that, you can see if the shutdown or power button not working issue vanished from Windows 10.
Solution 3: Run System File Checker
Corrupted files in the local disk may generate the laptop, desktop not shutting down in Power from start menu issue. At this moment, choose to use SFC to check if there are any problematic system files on your PC.
1. Hit the Start button and then type in Command Prompt in the search box.
2. Right click the result to Run as administrator.
3. In Command Prompt, type in SFC/scannow and stroke Enter to run this command.
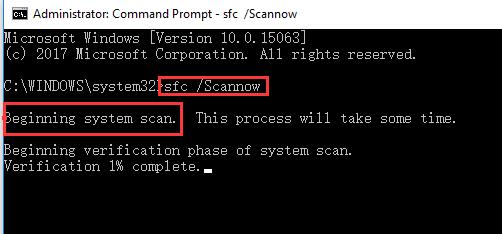
Then the system file checker tool would begin scanning the system files and correct them. Once it finished, try to click the Shutdown button from Power in Start menu to see if it is still missing or stuck.
Solution 4: Run DISM
DISM, short for Development Imaging and Servicing Management, is designed to repair system images. If something goes wrong in images, your Windows 10 may happen to shutdown errors, either. Shutdown button won’t work, and you would better use DISM to have a try.
1. Open Command Prompt as Administrator.
2. Input and hit Enter to execute the following commands one by one.
Dism /Online /Cleanup-Image /ScanHealth
Dism /Online /Cleanup-Image /CheckHealth
Dism /Online /Cleanup-Image/RestoreHealth
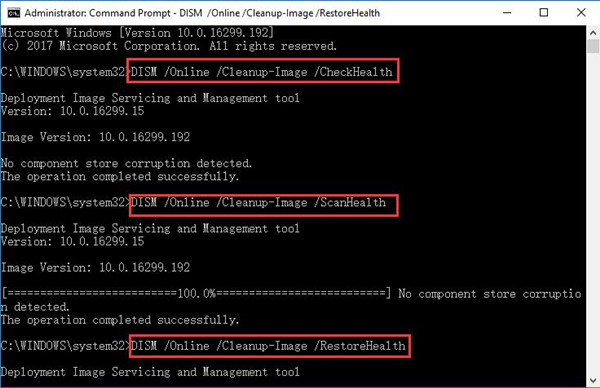
Windows DISM tool will have successfully resolved your system image corrupted issue. Can you shut down this time on Windows 10?
Solution 5: Restore the Default Power Settings
Sometimes, in order to save power, you may have accidentally set some settings for the power button which make one of the power options – Shutdown miss or not work from the Start menu on Windows 10.
Now you are suggested to set these settings related to power to the default.
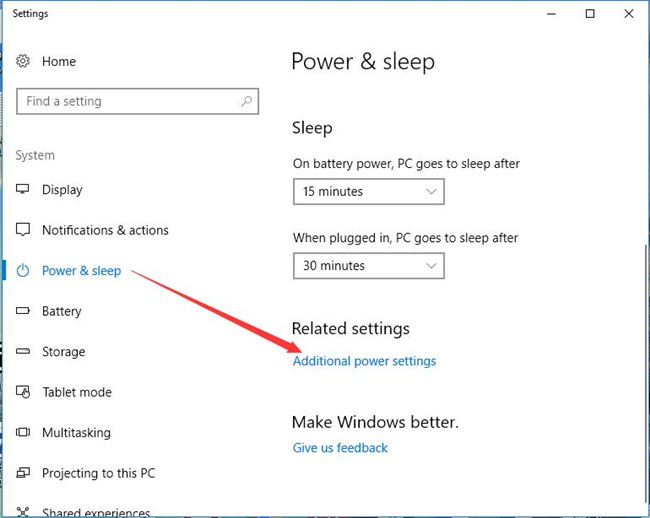
1. Navigate to Start > Settings > System.
2. Under Power & sleep, choose Additional power settings.
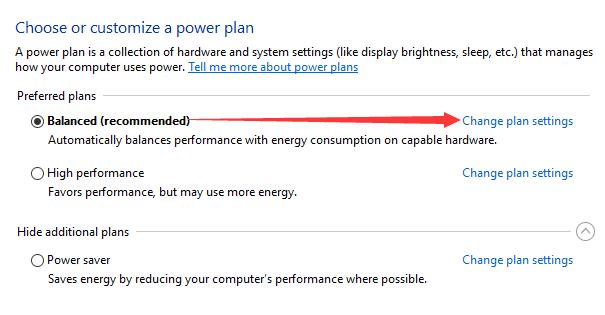
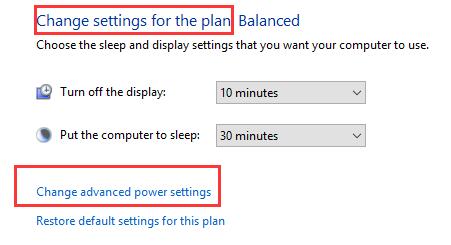
3. Then go to Change plan settings next to your Power Plan, such as Balanced.
4. Pick out Restore default settings for this plan.
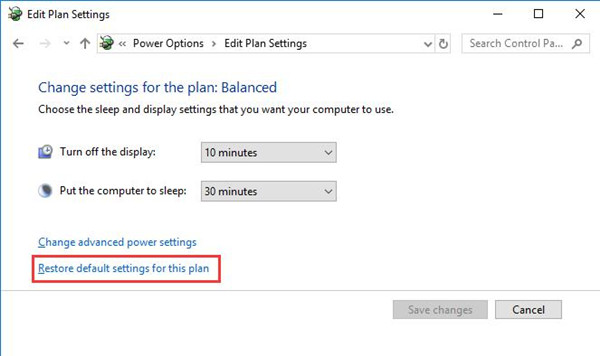
Then you can see all the power settings concerning your power plan, either Balanced or High Performance, or even Power Saver. Shut down your PC again by stroking the Power from the Start menu.
May this can help you solve the Power buttons issue or to say shutdown not working or missing errors.
Related: How to Manage Power Plan Settings on Windows 10/11
Solution 6: Adjust Power Button Settings
Click Shut down button in Start menu, nothing happens even after the ways above, it is feasible that you manage to change power button and lid settings for Windows 10.
1. Try the step 1 to 3 to Change plan settings.
2. Then in the following window, locate and choose Change advanced power settings.
3. In Power Options, expand Power buttons and lid, then make two changes:
Set Power button action to Shut down.
Set Sleep button action to Sleep.
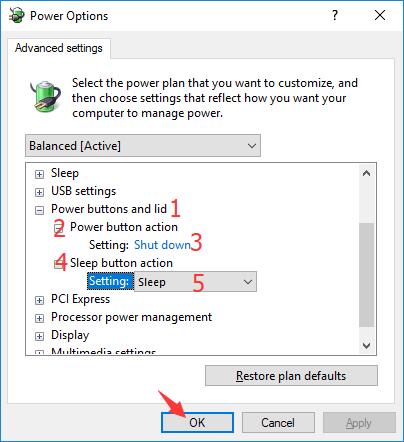
4. Then click Apply and OK to let these changes take effect.
Usually, when you check the shutdown issue in power, it will perish. You will not be plagued by this power button not working issue anymore.
Solution 7: Run the Power Troubleshooter
Shutdown button still doesn’t do anything on Windows 10? Windows 10 has prepared an embedded tool for you to troubleshoot this power button or shutdown problems.
This power troubleshooter enables you to change timeout settings for Windows 10, which is to say, it is capable of determining how long your PC waits before turning off the display.
As you can see, this troubleshooter may be a good helper for you to fix the shutdown or power button not working or missing error on Windows 10. Try it anyway.
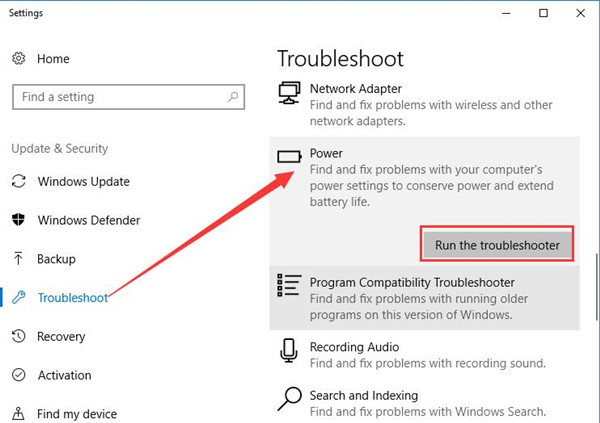
1. Search Troubleshoot in the search box and press Enter to navigate to the Troubleshoot settings.
2. Under Troubleshoot, find out Power and choose to Run the troubleshooter.
Just as you have known, this action can conserve power and extend battery life for your PC.
Maybe after the power troubleshooting, the computer’s power settings problems can be fixed, in this way, you are able to shut down normally from Start menu.
Solution 8: Update Drivers
Power or shutdown button does not work may lie in that your devices drivers are in bad performance on Windows 10, for they are outdated or incompatible with your PC.
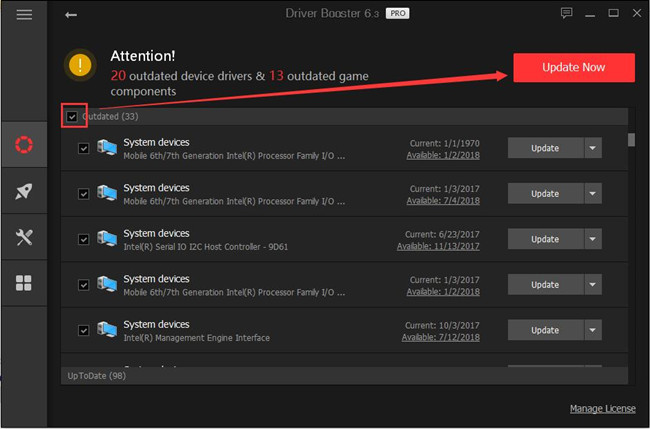
Driver Booster, an automatic driver downloading and updating tool, can help users to get the latest graphic driver, audio driver, USB driver, mouse driver etc. with one click. And as the best driver scanner, it can detect the most outdated and missing drivers for your computer.
So updating the missing or outdated drivers to get the shutdown buttons back maybe a good way.
1. Download, install and run Driver Booster on your computer.
2. Follow Scan > Update Now to update all the missing and outdated drivers automatically.
It will scan for your PC and download all the drivers for you within clicks. Just follow the steps to install the Windows 10 drivers on your PC.
It is likely that the shutdown button won’t work can never linger on your computer.
Solution 9: Enter the Sleep Mode
According to the reports from many clients, there is an ingenious method you can try when your shutdown button doesn’t do anything in Windows 10. You might as well choose to get into the sleep mode.
Go to Start > Power> Sleep.
Maybe when you log on to Windows 10 again, you can find the shutdown button back to work.
From this thread, it is foolproof for you to solve the shutdown or power button missing or stops working error on Windows 10.
For some users who have rightly come across the start menu not working issue on Windows 10, you can also try the solutions in this post, as these two buttons not working, start button or shutdown are problems of the same type.
More Articles:
How to Schedule Shutdown on Windows 10/11
[Fixed] Computer Shut Down After Inserting USB Devices
Fixed: Battery Icon Missing on Taskbar Windows 10/11
Update and Shutdown/Restart is not working. As you have probably noticed, every time a new update is released and is downloaded on your Windows 10 computer, the operating system replaces the Restart and Shut down button with “Update and Restart” as well as “Update and Shut down”. This is most likely done so that you won’t miss the update. However, some users noticed that there are times when these buttons still continue to display the same message even if they’ve already performed the required operations such as shutting down or restarting their PCs. Cases like this happen when an update wasn’t installed properly or has failed which is why your computer keeps on prompting you to Update and Shutdown every time. To fix this dilemma, follow the options laid out below.
Option 1 – Try restarting the File Explorer
Restarting the File Explorer can definitely help you fix lots of issues especially when there is some issue with the user interface including this one.
- On the right side of the Taskbar, right-click on any open spot.
- Then click on Task Manager.
- Next, scroll down until you see Windows Explorer.
- After that, right-click on it and select Restart.
- If you are able to kill its process, you have to tap the Win + R keys to open the Run dialog box and type “explorer.exe” in the field, and hit Enter to launch the Windows Explorer.
Option 2 – Try running the Windows Update Troubleshooter
As you know, Windows 10 has various auto-repair built-in tools to help users fix small issues which used to get fixed manually. And in this case, you will need the Windows Update Troubleshooter to fix the issue.
- Go to Settings and click on Update and Security.
- From there, click Troubleshoot and click on Windows Update and then click the “Run the troubleshooter” option.
- After that, it will try to detect and automatically fix common issues in the Windows Updates which can be resolved by Windows itself. Note that the process may take several minutes before it completes so you need to wait until it’s done. Once it’s done, in case you have some pending update that wasn’t realized by the system early on, it will apply the fix right away and restart the Windows Update service.
Option 3 – Try setting the Power button to Shut down
In case the first two options didn’t work out, you can try changing what the power button does. To do that, refer to these steps:
- Go to Control Panel > Power Options.
- From there, select the “Choose what the power buttons do” option from the left side.
- Then set the Power button setting the “When I press the power button” option to “Shut down”. After that, it will shut your computer down without installing the updates but obviously, this is only a temporary fix.
Option 4 – Turn off your PC instantly without updating it
- Tap the Win + R keys to open the Run dialog box.
- Type in “shutdown -s -f -t 0” in the field and hit Enter if you really want to turn off your computer without any delay.
- You could also tap the Ctrl + Alt + Del keys and select Shut down from the bottom right menu.
Just like the third option, this is also only a temporary fix.
Option 5 – Try running the Windows Module Installer
The Windows Module Installer is a built-in service in Windows 10 that allows you to fix the stuck Windows Updates in your computer. To use it, follow these steps:
- In the Cortana search box, type in “cmd” and from the search results that appear, right-click on Command Prompt and select the “Run as administrator” option from the context menu.
- Once you’ve opened Command Prompt as admin, type the SC config trustedinstaller start=auto command and tap Enter.
- After the command is executed, you will see the “[SC] ChangeServiceConfig SUCCESS” message displayed on the Command Prompt console.
- Now exit Command Prompt and then check if the buttons are now back to normal.
Option 6 – Put your PC in a Clean Boot State
- Log onto your PC as an administrator.
- Type in MSConfig in the Start Search to open the System Configuration utility.
- From there, go to the General tab and click “Selective startup”.
- Clear the “Load Startup items” checkbox and make sure that the “Load System Services” and “Use Original boot configuration” options are checked.
- Next, click the Services tab and select the “Hide All Microsoft Services” check box.
- Click Disable all.
- Click on Apply/OK and restart your PC. (This will put your PC into a Clean Boot State. And configure Windows to use the usual startup, just simply undo the changes.)
After putting your PC in a Clean Boot State, try creating a system restore point and see if the problem still occurs. Clean Boot troubleshooting is designed to help you isolate the problem. For you to execute a clean boot troubleshooting, you must do a couple of actions (the steps are given above) and then restart your PC after every action. You might have to disable one third-party app after the other to really isolate the issue. And once you’ve narrowed down the problem, you can either disable the third-party app that’s causing the problem or remove it. Note that you must switch your PC back into the Normal Startup mode after you’re done troubleshooting the problem. Here’s how you can do it:
- From the “Start” menu, go to System Configuration.
- After that, switch to the General tab and click the option for “Normal Startup”.
- Next, go to the Services tab and clear the checkbox for “Hide all Microsoft services”.
- Then find and click “Enable all” and if prompted, you have to confirm.
- Afterward, go to the Task Manager and enable all the Startup programs and confirm the action.
- Restart your PC when prompted.
Do You Need Help with Your Device?
Our Team of Experts May Help
Troubleshoot.Tech Experts are There for You!
GET HELP
Troubleshoot.Tech experts work with all versions of Microsoft Windows including Windows 11, with Android, Mac, and more.
Share this article:
You might also like
Access denied error code 16 is tied to websites, it is an error which you will encounter when trying to visit some specific website or if you are unlucky on all of the websites. Lucky for us this error is fixable and in order for us to do this, follow this guide for possible solutions.
- Check Date and Time, Incorrect date and time can often interfere with services in your Windows, browsers are not different and this can cause some websites not to be shown. Check your date and time and set it correctly if needed.
- Try to access the website from another device. If you manage to open a website on another PC or some other device then keep reading in order to find the solution, if you can not, then the problem is on the website itself.
- Turn off Firewall or antivirus. New antivirus and firewall applications can sometimes mark certain websites as malicious and will cut contact with them rendering them unable to be accessed or opened. Try turning the firewall and antivirus temporarily off and then try to access the website.
- Try opening web site in another browser. To eliminate browser-specific issues and their configuration, try opening the website in another browser.
- Disable PROXI server. Some applications, especially malicious ones can change your proxi setting in LAN. go to your LAN settings and turn off proxi if it is enabled.
- Reset your Browser. If this issue is caused by bad data in your browser or by its settings and preferences, resetting the complete browser will solve the issue.
- Use VPN. Sometimes the reason for you was not able to access some website might be because the site is not available for your region, to bypass this issue use VPN and reroute your location.
Read More
Runtime Error 5 — What Is It?
Runtime Error 5 is one of those errors that Windows users encounter at least once in their life.
Generally, when Runtime Error 5 occurs, the message that appears says ‘Invalid Procedure Call or Argument’. Runtime Error 5 occurs because the Quality Analyst function that resides within the Operating System behaves in an abnormal manner and the user receives a warning.
Solution
Error Causes
As explained above, Runtime Error 5 is caused because of the unexplained behavior of the Quality Analyst function.
The problem occurs when the function is lost and is not mapped to any drive. As a result, Windows is unable to find and load it and displays the error message. Runtime Error 5 is also caused by other reasons listed below as follows.
- When files of programs like Visual Basic use bad entries in the registry.
- When a user attempts to load Internet Explorer and a global cash of browser occurs, this also causes Runtime Error 5.
Since these types of errors can easily be fixed, it is strongly advised that a user takes the necessary actions to keep them from occurring in the future.
Further Information and Manual Repair
Some instructions for users to fix Runtime Error 5 as soon as it appears are listed below as follows.
- Users are recommended to restart their computers. However, prior to doing so, it is advised that any programs that are opened are closed and work is saved to prevent data loss. Once the computer restarts, users should load the program that triggered Runtime Error 5 once again to determine whether or not the error recurs.
- If the problem persists, the best approach is to uninstall the program causing the error. This can be accomplished by going to the ‘Control Panel’ and selecting the ‘Add/Remove programs’ option if one is using Windows XP or Windows 95. However, if a user is running Windows 7, the same task can be accomplished in the ‘Program and Features’ option. If there’s an option that allows you to clear personal settings and preferences, the box should be checked.
- Now reinstall the program using the latest version of the installer to stop encountering this error. Use any patch for the program if available. Run installer while following the instructions on the screen. Check the default settings as well. It is suggested to instantly install any patches if available.
- Another piece of advice is to simultaneously press ‘Ctrl, Shift, and Esc’. Windows task manager will appear. Go to the “processes” tab and select a process that doesn’t look familiar to you. Note the filename and click on the ‘End Process’ button. Load the program again and find out if the error occurs. Once the program causing the error is identified, the user can perform the steps listed above to resolve the problem.
Read More
Although the Google Chrome browser is one of the most used browsers, a lot of things could still go wrong when browsing the web using it. One of the errors you might encounter is the “ NETWORK_FAILED ” error. This kind of error in Chrome indicates that Chrome wasn’t able to send your request through the network connection. It could be that your computer has trouble connecting to a stable internet connection or there is some plugin in your Chrome browser that is causing the issue. The worst-case would be malware. But worry not for this post will guide you on what you can do when you encounter the NETWORK_FAILED error in Google Chrome. Make sure to follow each one of the options given below and see which one of them worked best for you.
Option 1 – Disable or remove any unwanted extensions in Chrome
As you know, browser extensions help in enhancing the browsing experience but there are also times when it does exactly the opposite, and such is the case with the NETWORK_FAILED error in Chrome. It could be that one of the extensions in your browser is the one that’s causing the trouble. To disable or remove these unwanted extensions, here’s what you have to do:
- Launch Google Chrome, press Alt + F, move to More tools, and click Extensions.
- Look for Search.tb.ask.com or any other unwanted add-ons, click the Recycle Bin button, and choose Remove.
- Restart Google Chrome, then tap Alt + F, and select Settings.
- Navigate to the On Startup section at the bottom.
- Select “Open a specific page or set of pages”.
- Click the More actions button next to the hijacker and click Remove.
Option 2 – Run the Malware Scanner and Cleanup tool in Chrome
If removing or disabling the unwanted extension didn’t help in fixing the error, you can try using the built-in malware scanner and cleanup tool in Google Chrome. These tools help you get rid of any unwanted pop-ups, ads, unusual Startup pages, toolbars, and even malware.
Option 2 – Run the Malware Scanner and Cleanup tool in Chrome
- Launch Google Chrome and then tap the Alt + F keys.
- After that, click on Settings.
- Next, scroll down until you see the Advanced option, once you see it, click on it.
- After clicking the Advanced option, go to the “Restore and clean up the option and click on the “Restore settings to their original defaults” option to reset Google Chrome.
- Now restart Google Chrome.
Option 3 – Try to disable the Proxy
If you are using a proxy, you might want to consider disabling it as it could have something to do with the NETWORK_FAILED error.
- Tap the Win + R keys to open the Run dialog box.
- Then type “cpl” and hit Enter or click OK to open the Internet Properties.
- After that, go to the Connections tab where you should see the LAN settings. Click on it.
- Next, uncheck the “Use a Proxy Server for your LAN” and ensure that the “Automatically detect settings” option is checked as well.
- Then click Ok and then Apply to save the changes made.
- Restart your PC.
Option 4 – Flush DNS and reset TCP/IP
- Click the Start button and type in “command prompt” in the field.
- From the search results that appear, right click on Command Prompt and select the “Run as administrator” option.
- After opening Command Prompt, you have to type each one of the commands listed below. Just make sure that after you type each command, you hit Enter
- ipconfig /release
- ipconfig /all
- ipconfig /flushdns
- ipconfig /renew
- netsh int ip set dns
- netsh winsock reset
After you key in the commands listed above, the DNS cache will be flushed and the Winsock, as well as the TCP/IP, will reset.
- Now restart your computer and open Google Chrome then try opening the website you were trying to open earlier.
Option 5 – Delete the WLAN Profiles
Deleting the WLAN Profiles might be a good idea if you are not able to connect to the internet on your computer and if you’re using Wi-Fi. It could be that the networks that were connected previously have gone rogue which is why it is not connecting properly. And so deleting the WLAN profiles would be for the best.
That should do it.
Read More
In this post, you will be guided on how you can turn on or turn off the Tailored Experiences feature in Windows 10 using three methods – via Settings, Registry Editor, and Group Policy Editor.
The Tailored Experiences feature in Windows 10 helps Microsoft in delivering recommendations about Microsoft Products. The diagnostic data that comes with it allows Microsoft to know about its consumers’ experiences as well as collect feedback. To simply put it, tailored experiences are personalized tips, ads, and recommendations that enhance Microsoft products and services for consumer needs. And when you enable this feature, Windows will collect information from your browser, apps, features, and many more.
After collecting information, it will offer contents that are tailored based on the data gathered on the lock screen of your computer, Windows tips, and other related functions. On the other hand, the diagnostic data is the one that allows Microsoft to get feedback from the customer. So if you’ve noticed some prompts when you use Windows that ask you about the experience, that’s actually a part of the diagnostic data.
A lot of users find this feature useful. However, there are also skeptical ones that don’t share the same sentiments. If you are one of the skeptical ones, you actually have the option to turn this feature off if you do not want Microsoft to show ads, recommendations, and so on. It is also recommended that you enable the Diagnostic Data collection as you can choose to delete any collected data, as well as control the feedback frequency from Automatic to Once a day, or once a week, or to never.
As mentioned, there are three methods you can choose from to either turn on or turn off Tailored Experiences. You can do it via Settings, Registry Editor, and the Group Policy Editor. To get started, follow the options provided below.
Option 1 – via Settings
To turn on or off Tailored Experiences using Settings, refer to these steps:
- Go to Settings and here, click on Privacy.
- Next, go to Diagnostic and Feedback.
- From there, toggle off the control under the Tailored experiences option to turn it off or toggle it on, if you want to turn it on.
Option 2 – via Registry Editor
To turn on or off Tailored Experiences via Registry Editor, follow the steps below.
- Tap the Win + R keys to open the Run dialog box and type “Regedit” in the field and then tap Enter to open the Registry Editor.
- Next, navigate to this registry path: HKEY_CURRENT_USERSoftwareMicrosoftWindowsCurrentVersionPrivacy
- After that, look for the DWORD named “TailoredExperiencesWithDiagnosticDataEnabled” and change its value to 0 if you want to turn it off or 1 if you want to turn it on.
Option 3 – via Group Policy Editor
To turn on or off Tailored Experiences using the Group Policy Editor, here’s what you have to do:
- Tap the Win + R keys to open the Run prompt and type “gpedit.msc” in the field and hit Enter to open the Group Policy Editor.
- Next, navigate to this policy setting: User ConfigurationAdminstrative TemplatesWindows ComponentsCloud Content
- Here, double click on the “Do not use diagnostic data for tailored experiences” option and select Enabled. Once you do that, you will see the following description:
“This policy setting lets you prevent Windows from using diagnostic data to provide tailored experiences to the user. If you enable this policy setting, Windows will not use diagnostic data from this device (this data may include browser, app, and feature usage, depending on the “diagnostic data” setting value) to customize the content shown on the lock screen, Windows tips, Microsoft consumer features, and other related features. If these features are enabled, users will still see recommendations, tips, and offers, but they may be less relevant. If you disable or do not configure this policy setting, Microsoft will use diagnostic data to provide personalized recommendations, tips, and offers to tailor Windows for the user’s needs and make it work better for them. This setting does not control Cortana tailored experiences, since there are separate policies to configure it.”
Read More
The Blue Screen of Death error or BSOD is definitely not an issue to face on your computer. Many users, if not all, have already experienced this headache at least once. One of these BSOD errors is the ATTEMPTED EXECUTE OF NOEXECUTE MEMORY error. The bug check error code for this is 0x000000FC and is usually caused by outdated or faulty drivers. In some cases, it could also be caused by an error in the Random Access Memory or RAM. This kind of error in the RAM might be physical, based on drivers, or even some kind of unwanted malware. So basically there are lots of possibilities why this particular BSOD error pops up.
If you are currently facing this BSOD error, read on and carefully follow the suggestions given below but before you do that, make sure to create a System Restore point just in case something goes wrong. This way, you can always undo those changes using the System Restore point. Once you have that covered, proceed to the options given below to fix the ATTEMPTED EXECUTE OF NOEXECUTE MEMORY error.
Option 1 – Try updating Windows 10 with all the security patches and updates
You might be able to fix the ATTEMPTED EXECUTE OF NOEXECUTE MEMORY error by simply updating your Windows 10 computer with all the security patches and updates. To do so, go to Settings then proceed to the Windows Update section > Update & Security > Windows Update, and then click on the Check for Updates option. After you do that, it will automatically find and install all the latest security patches and feature updates from Microsoft.
Option 2 – Try updating all your drivers
From time to time, drivers get corrupted or outdated so it’s no surprise that they conflict with the operating system and cause errors like the ATTEMPTED EXECUTE OF NOEXECUTE MEMORY BSOD error. To fix the problem, you need to update all your drivers. Follow the steps below to update your drivers.
- Tap the Win + R keys to launch Run.
- Type in devmgmt.msc into the box and tap Enter or click OK to open the Device Manager.
- After that, a list of device drivers will be displayed. If you see a red or yellow sign that shows up against the driver, right-click on the driver’s name and select “Update Driver Software” or “Uninstall”. And if you find any “Unknown device”, you need to update it as well.
- Select the “Search automatically for updated driver software” option and then follow the instructions to complete the process.
- Restart your PC.
Note: You also have the option to go directly to the website of your graphics card manufacturer and check if there’s a new update – if there is, download it.
Option 3 – Try running a Memory Check using Windows Memory Diagnostic
As mentioned, this error might be caused by some issues in the memory. To resolve it, you need to run the Memory Check on your Windows 10 PC. Refer to these steps to do so.
- Tap the Win + R keys to open the Run dialog box.
- Then type “mdsched.exe” in the field and hit Enter to open the Windows Memory Diagnostic.
- After that, the Windows Memory Diagnostic will give out two options such as:
- Restart now and check for problems (recommended)
- Check for problems the next time I start my computer
- Select any of the given options. After that, your computer will restart and check for memory-based issues upon the restart. If there are any issues, it will automatically them.
Option 4 – Try using the System File Checker via Command Prompt
System File Checker or SFC is a built-in command utility that helps in restoring corrupted files as well as missing files. It replaces bad and corrupted system files with good system files that might be causing the ATTEMPTED EXECUTE OF NOEXECUTE MEMORY BSOD error. To run the SFC command, follow the steps given below.
- Tap Win + R to launch Run.
- Type in cmd in the field and tap Enter.
- After opening Command Prompt, type in sfc /scannow
The command will start a system scan which will take a few whiles before it finishes. Once it’s done, you could get the following results:
- Windows Resource Protection did not find any integrity violations.
- Windows Resource Protection found corrupt files and successfully repaired them.
- Windows Resource Protection found corrupt files but was unable to fix some of them.
Read More
There are times when it is really inevitable to delete your hard drive partitions especially if you are already running low on disk space in your Windows 10 computer. Users typically delete the volume which is not being used in such cases in order to free up some space for the volume that’s running low on disk space.
To resolve the problem, users tend to use the Disk Management utility to delete hard drive partitions. However, some users reported that the “Delete volume” option is not available as it is grayed out. Thus, users aren’t able to delete hard drive partitions and aren’t able to free up disk space.
This kind of problem usually occurs when there is a Page file on the volume that you are trying to delete and so on. Oftentimes, this issue is mistaken for the problem where you are unable to delete an EFI-protected partition. However, in this case, not only you are unable to delete EFI-protected partition but also NTFS file systems. This is really hard to deal with but worries not for there are some potential fixes you can check out to resolve this problem.
Option 1 – Try to manage the Page file in the Partition
As mentioned earlier, if a Page file exists in a partition, you won’t be able to delete it. The page file is what stores your data when the system’s random access memory fills up. To resolve this, follow these steps:
- Go to the Start menu and type “View advanced system settings” in the field and open it from the search results.
- Next, click on Settings in the Advanced tab.
- On the new window that pops up, go to the Advanced tab and select Change.
- Next, uncheck the checkbox of “Automatically manage paging file size for all drives” and highlight the drive you want to delete.
- Then select “No paging file” and click on Set.
- Now click on the Apply and OK buttons on all the windows and restart your computer.
Option 2 – Delete storage partition via Command Prompt
- Tap the Win + X keys or right-click on the Start button and select Command Prompt (Admin) or you could also type in “cmd” in the Cortana search box and right-click on the Command Prompt icon and then select the “Run as Administrator” option from the context menu.
- Once you have Command Prompt pulled up as admin, type in and enter this command – diskpart
- After entering this command, the Diskpart Utility will start. Diskpart Utility is a command-line-based utility just like Command Prompt but it will get a UAC Prompt after you invoke it so you have to click Yes for the UAC Prompt.
- After that, type in list volume and tap Enter to see the list of all the partitions created on your PC. This includes both types of partitions that are visible to the normal users in the File Explorer as well as the ones that are created by Windows 10 by default which helps it in storing the boot files and other essential system files.
- You should see a list of all the partitions made on your computer. Select the partition you want to delete by its Unique Identification number as Volume X where X denotes the Unique Identification Number.
- Next, type in the select volume number command and hit Enter to select the desired volume.
- Then delete the volume you’ve selected and type in the delete volume command and hit Enter to delete the volume you just selected and convert it into unallocated space.
Option 3 – Delete storage partition via Windows PowerShell
- Start by tapping the Win + X keys or simply right click on the Start button and select Windows PowerShell (Admin) or you could also type in “Windows PowerShell” in the Cortana search box and right-click on the Windows PowerShell icon and select the “Run as administrator” option.
- Once you’ve opened the Windows PowerShell, type in the Get-Volume command and hit Enter to get a list of all the partitions on your PC.
- Next, select the drive letter you want to delete and then type in the Remove-Partition –DriveLetter command and hit Enter to delete the selected partition. Note that you need to replace the drive letter with the letter of the partition you want to get rid of.
- After that, it will ask you for confirmation. Just hit the Y key for Yes or hit the A key to say Yes to All. This will delete all the partition you’ve selected and will move them in as unallocated space.
Read More

I do not know about you, but I prefer to set my Windows to be more to my liking and not how Microsoft thinks it should be. Let’s face it, not all users feel comfortable whit Microsoft settings and idea how things should be.
One of the things I particularly did not like even in Windows 10 is icons that come by default on my taskbar, now so far, well until the latest Windows 11 update you could remove default taskbar icons the same way as in Windows 10, just right-click on them and unpin, sadly with latest update build on Windows 11 this option has been removed.
In order to remove default icons from the taskbar, one must go now to Windows 11 settings and choose from there which one you would like to be placed on it. Of course, this is nothing game-breaking but it still feels strange why the standard option has been removed, it just makes no sense but lately not many things that come from Microsoft do.
Read More
Many Minecraft players are experiencing Realms internal server error 500, luckily for all of that players, we are offering you solutions.
Preliminary Fixes
Before heading towards the fixes here it is suggested to try some quick tweaks that might work in your case to fix Minecraft Internal Server Error 500.
Restart your PC – Very first it is suggested to shut down your computer and after that restart the system. This worked for many players to get rid of the server outages issue.
Update your Windows version – Check if you are running an outdated Windows version then make sure to install the latest Windows update and then run the game.
Update Your Game Version – Also make sure you are running an updated version of Minecraft Realms. Installing the latest updates not only makes the game more stable but also helps you to solve common glitches and issues with the game. So, check if any recent updates are available to make sure to download and install them
Modify the Game Settings – Check if you have tweaked some of the game settings then this might be the reason for the problem. So try to reconfigure the settings to default. This may work for you.
Now after following the preliminary solutions check if the Minecraft Realms Internal Server Error 500 is resolved or else head to the next solution.
Check your Internet Connection
As said above if the internet connection is not working properly or it is preventing you from accessing the servers, then this can also cause the Internal Server Error 500 in the Minecraft server.
So, very first make sure your internet connection is stable and working properly. Also if you are using Wi-Fi then use a wired connection to get a stable network.
Moreover, if your internet connection is working fine then there is a possibility that your internet connection is causing interruption and preventing you from accessing the Minecraft Realms server.
So, if this is the case then here it is suggested to use a VPN connection to get exceptionally fast & reliable speeds without getting detected.
Check for the Minecraft Server Outage
Well, there is a possibility the Minecraft servers are down and if this is the case then you don’t have any other option than just waiting for the servers to get restarted and the service becomes available again.
Also, the service outages can affect the ability of the game and as a result, you are unable to play the game. Additionally, you can also inquire about Minecraft’s server status by visiting the Downdetector website.
But if you find the services are running fine then the issue is from your side.
Disable Background Applications
If you are still getting the Minecraft Realms Internal Server Error 500, then there are chances that other applications running in the background are causing a limit to your internet bandwidth.
It is suggested to disable the internet-connected apps and after that try connecting to Microsoft Realms again.
- Hit CTRL + SHIFT + ESC keys > to open the Task Manager.
- Then under the Process tab,> right-click on unwanted background process, > click on the End Task
After disabling the applications running in the background, relaunch Minecraft and check if the internal server error 500 still appears or not.
Delete UUID Files in Minecraft
If you are still getting the Minecraft Realms Internal Server Error 500 then here it is suggested to delete the UUID files in Minecraft.
- First, visit the website by clicking the https://mcuuid.net/ and enter all the credentials to get the player’s UUID
- Then login to the server > proceed to server files > head to the world
- Here locate the PlayerData folder > click to open it.
- And from here choose the file containing the same name like the player’s Username or UUID > after that hit the Delete
- Lastly, restart your server to save the changes
Remove Resource Packs & Mods
If you are getting the Minecraft realms internal server error 500 after the installation of a particular mod or the resource pack then this is what causing the issue while playing the realm.
So, here it is suggested to delete it immediately, also uninstall the mod as well as the resource pack you installed recently.
It is estimated this works for you but if you have a doubt related to any specific mod or the resource pack causing an error you should uninstall then also and check if the Minecraft internal error 500 is fixed.
Disable the Plugins
If you are still encountering the error then check for the plugins installed on your PC. Many times the installed plugin starts causing issues with the game as they are not compatible with the game version.
So here it is recommended to try disabling the plugins on the PC and check if this works for you.
- On your system > open the plugin window > rename the plugins files from “[plugin name].jar to [plugin name].jar.disabled”.
- Next restart the server and check if the Minecraft Realms Internal Server Error 500 problem is resolved or not.
Uninstall & Reinstall Minecraft
If none of the above-given solutions works for you then here it is suggested to uninstall and reinstall Minecraft.
Well, it is suggested to uninstall the game using the third-party uninstaller. Manually uninstalling the program won’t remove it completely, some of its registry entries, junk files are left behind and causes interruption when the next time you install it.
If you are looking to uninstall it manually then follow the steps given:
- Hit Window + R key > to open the Run box
- And in the run box type appwiz.cpl command > hit Enter
- Now the application manager window pops up on your screen > locate the Minecraft application > right-click to Uninstall
And as the uninstalling process is completed > head to the Minecraft official website and tries downloading and installing the game.
Check if the Minecraft Realms Internal Server Error 500 is resolved or not.
Contact Support Center
If after trying all the solutions given you are still unable to fix the error then the only option left is to contact the Customer Support Center and fill the form in the link and describe the problem in a detailed way.
And within few days you will get feedback from them to fix Minecraft Realms internal error 500.
Read More
If you are trying to start a service using the Windows Services Manager but you got an error message stating, “The executable program that this service is configured to run in does not implement the service”, then you’ve come to the right place as this post will provide you instructions on how you can fix this error.
Since almost all program requires service to run on your computer, if the service is not listed in the corresponding registry key, then you will most likely encounter this error on your Windows 10 computer. Here’s the entire content of the error message:
“Windows could not start the service on Local Computer. Error 1083: The executable program that this service is configured to run in does not implement the service.”
To fix this error, you have to add the service name in the respective host in the Registry Editor, and to do that, here are some steps you need to take on.
Step 1: The first thing you have to do is to take note of the service name that’s given in the error message. For instance, you get the “Windows Management Service.
Step 2: Next, you need to open the Services Manager by tapping the Win + R keys and typing “services.msc” in the Run dialog box, and then tapping Enter.
Step 3: After opening the Services Manager, look for the Windows Management Service and once you see it, double click on it. This will open a new mini window.
Step 4: From the newly opened window, copy the Service name and the Path to executable under the General tab. If the path to the executable is displayed as “C:/Windows/system32/svchost.exe -k netsvcs –p”, you need the “netsvcs” part only. Note that it can be different for different services and you need the part that comes after “-k”.
Step 5: Now tap the Win + R keys again to open Run utility and type “Regedit” in the field and click OK to open the Registry Editor.
Step 6: After that, navigate to the following registry path:
ComputerHKEY_LOCAL_MACHINESOFTWAREMicrosoftWindows NTCurrentVersionSvchost
Step 7: From the given registry path, look for a key named “REG_MULTI_SZ” located on your right-hand side. This key is named after the “Path to executable” part. For instance, you should see “netsvcs”.
Step 8: Double click on the REG_MULTI_SZ key and enter the Service name that you’ve copied earlier and then write it down at the end of the preset list.
Step 9: Now save the changes you’ve made and try to open the program or run the service again.
Read More
Error Code 0x8000222 — What is it?
Error Code 0x8000222 is an error that occurs during the installation process for Windows 10. It is also present in past versions of the software, going all the way back to Windows 7 and even affecting Windows software products, including Microsoft Word, PowerPoint, and other items in the Microsoft Office Suite.
Common symptoms include:
- Inability to complete the installation process for new versions of the operating system, Microsoft Office programs, or other Windows-based software
While there are several factors that can contribute to the appearance of Error Code 0x8000222 during the installation process, most of these factors can be addressed using a few high-level methods. These methods do require some advanced knowledge and computing skills, so if you are unable to complete the steps below successfully or do not have confidence in your ability to undertake these methods on your own, contact a qualified computer repair service that is familiar with the Windows 10 installation process.
Solution
Error Causes
There are a few different issues that can cause Error Code 0x8000222 to arise during the installation process on your Windows operating system. The first is a corrupted file in your system library or dynamic link library, also called the DLL. The second is interference by your proxy, firewall, or antivirus software that inhibits the machine from being able to access the files that it needs to successfully complete the installation of your Windows operating system or software.
Further Information and Manual Repair
To address and resolve Error Code 0x8000222 on your Windows operating system, regardless of the version of the software that you are using, there are a few steps that you can take. Keep in mind that these steps do require some advanced skills and knowledge about your computer, so if you don’t believe that you can undertake these steps on your own or if the following methods do not fully resolve the issue on your device, talk to a qualified computer repair technician for assistance.
Here are the best ways to address Error Code 0x8000222 on your Windows machine:
Method One: Fix Your DLL Dependencies Registry
Before implementing this method, make sure that a proxy is not active on your computer. To check to see if there is an active proxy, simply press the Windows key together with the “R” key and type in the command “cmd”, then when the prompt opens up, type in the following command: “netsh winhttp import proxy source=ie”. From the box that follows, if you see a message saying that there has been an error writing in the proxy settings and that access has been denied, it means that you can turn off the proxy setting in your Internet Explorer and the error will go away on its own.
If you do not have an active proxy, it is time to check and see whether your DLL dependencies are properly set up. To do so, open up the command prompt again by pressing the Windows key and “R” key at the same time and typing in “cmd”. Once the command prompt is active, simply typing in “regsvr32 Officevalidator.dll”, then attempt to resume your installation once it has been complete.
In some cases, you may need to restart your computer before attempting the Windows installation process.
Method Two: Turn Off Firewalls and Antivirus Software Before Installing
If the above method did not successfully resolve the problem, you can go into your control panel and turn off any firewalls or antivirus programs that may be interfering with your ability to complete the Windows installation process. Depending on the programs that you use for your antivirus needs, you may need to restart your computer before you reattempt to do the installation process.
You should be able to turn your firewall and antivirus programs back on once the installation process has run through to completion.
In most cases, taking the steps above will fully resolve the appearance of Error Code 0x8000222 on your Windows 10 machine.
Method Three: Use An Automated Tool
If you wish to always have at your disposal a utility tool to fix these Windows 10 and other related issues when they do arise, download and install a powerful automated tool.
Read More
Copyright © 2023, ErrorTools. All Rights Reserved
Trademark: Microsoft Windows logos are registered trademarks of Microsoft. Disclaimer: ErrorTools.com is not affiliated with Microsoft, nor claims direct affiliation.
The information on this page is provided for information purposes only.
Is your Windows 10 Start button unresponsive? This guide provides a range of solutions to fix the Start button issue in Windows 10, helping you restore its functionality and regain quick access to your apps, settings, and files.

Table of Contents
We are listing down the methods you can follow to fix Windows button not working on your PC.
Method 1: Sign out and re-login on your account
Sometimes a simple re-login can help you fix the issue with your Windows key. Here is how to sign out of your account and re-login:
1. Move your cursor and click on the Windows logo or the start menu.
2. Click on your profile icon and select Sign-out.
3. Now, type your password and re-login into your account.
4. Finally, check if your Windows key is working or not.
Method 2: Disable the Game Mode in Windows 10
If you use the game mode on your Windows 10 system, then it is the reason why you are facing the issue with your start button. Follow these steps to fix the Windows button not working by disabling the game mode:
1. Click on your Windows icon from the taskbar and type settings in the search bar. Open Settings from the search results.

2. Go to the Gaming section from the menu.

3. Click on the Game Mode tab from the panel on the left.
4. Finally, make sure you turn off the toggle next to Game Mode.

After you disable the game mode, hit the Windows key on your keyboard to check if it works or not.
Also Read: Fix Windows 10 Updates Won’t Install Error
Method 3: Enable Windows key within the Registry Editor
The Windows registry editor has the ability to enable or disable your keyboard keys. You may accidentally disable the Windows key in the registry editor of your system. Therefore, to fix Windows 10 start button not working, you can follow these steps to enable the Windows key using registry edit:
1. Click on the Windows menu and type run in the search bar.
2. Once you open the run dialog box, type regedt32 in the box and click OK.
3. If you get any confirmation message, click on YES.
4. After the registry editor opens, go to HKEY_LOCAL_MACHINE.
5. Click on the System.
6. Tap on CurrentControlSet.
7. Click on the Control folder.

8. Scroll down and open the Keyboard Layouts folder.

9. Now, if you see any scancode map registry entry, make a right-click on it and click on delete.
10. Click on YES if any warning message pops up on your screen.
11. Finally, restart your computer and check whether the Windows key starts working on your system.
However, if you are unable to find the scancode map registry entry key, then it might not be available on your system. You can try the next methods to fix Windows 10 start menu frozen.
Method 4: Run System File Checker Scan
By default Windows 10 comes with a system file checker tool known as the SFC scan. You can perform an SFC scan to find corrupt files on your system. To fix Windows button not working issue, you can follow these steps to execute the SFC scan on your system:
1. Click on the Windows icon in your taskbar and search Run in the search bar.
2. Once the run dialog box opens, type cmd and click on Ctrl + Shift + Enter on your keyboard to launch the command prompt with administrative permissions.
3. Click on YES when you see the prompt message that says ‘do you want to make changes on your device.’
4. Now, you have to type the command following command and hit enter: sfc /scannow

5. Finally, wait for your system to scan and fix the corrupt files automatically. Do not shut down or exit the window on your system.
After the scan completes, you can restart your computer and check whether this method could resolve Windows 10 start button not working issue.
Also Read: How to Repair Corrupted System Files in Windows 10
Method 5: Use Powershell Command
If you want to make adjustments to your system, then the PowerShell command can help you execute various commands to fix the issues in your system. Many users were able to fix the start menu not working issue by performing the PowerShell command.
1. Click on the Windows icon and type run in the search box.
2. Open the Run dialog box from the search results and type PowerShell in the box. Click on Ctrl + Shift + Enter on your keyboard to launch the PowerShell with administrative permissions.
3. Click on YES when you see the prompt message that says ‘do you want to make changes on your device.
4. Now, you have to type the following command and hit enter. You can directly copy-paste the above command.
Get-AppXPackage -AllUsers | Foreach {Add-AppxPackage -DisableDevelopmentMode -Register “$($_.InstallLocation) \AppXManifest.xml”}

5. After the command completes, you can check if the Window key starts working on your system.
Method 6: Disable the Filter keys feature on Windows 10
Sometimes, the filter key feature on Windows 10 causes the window key from working properly. Therefore, to fix Windows 10 start menu frozen, you can disable the filter keys by following these steps:
1. Go to the search bar by clicking on the start menu in your taskbar and type the control panel.
2. Open the Control Panel from the search results.

3. Set the View mode to category.
4. Go to the Ease of Access settings.

5. Select ‘Change how your keyboard works’ under the ease of access center.

6. Finally, you can uncheck the box next to ‘Turn on Filter Keys’ to disable the feature. Click on Apply and then OK to save the changes.

That’s it; you can try using the Windows key on your keyboard and check if it works properly or not.
Method 7: Use DISM command
DISM command is pretty much similar to an SFC scan, but executing a DISM command can help you repair the image of Windows 10.
1. Open the Run dialog box by searching run in the search bar of your system.
2. Type cmd and click on Ctrl + Shift + Enter from your keyboard to launch the command prompt with administrative permissions.
3. Click on YES to allow the app to make changes on your device.
4. Type the following command in the command prompt:
Dism /Online /Cleanup-Image /StartComponentCleanup
5. After the command completes, type another command Dism /Online /Cleanup-Image /restorehealth and wait for it to complete.

6. Once the command completes, you can restart your computer and check if the Windows key starts working properly or not.
Method 8: Update Video and Sound drivers
If you are using outdated video and sound card drivers on your system, then they might be the reason why your Windows key is not working, or the start menu may get frozen. Sometimes, updating your sound and video card driver can help you resolve the issue.
1. Click on the Windows icon in your taskbar and search device manager.
2. Open the Device Manager from the search results.

3. Double-click on the Sound, video, and game controller.
4. Now, make a right-click on your Audio Driver and select Update driver.

5. Finally, click on Search automatically for drivers. Your system will automatically update your sound driver. However, you also have the option of manually updating your sound driver, but it may be time-consuming for some users.

Also Read: How to Backup and Restore Device Drivers in Windows 10
Method 9: Check for new Windows updates
You may be using an outdated Windows version on your system, and it might be the reason why your Windows key is not functioning properly. Therefore, make sure you keep your Windows 10 up to date. Windows 10 automatically download the updates, but sometimes due to unknown issues, you may have to download the updates manually. Follow these steps to check for available Windows updates for your system:
1. Go to your search bar in the taskbar and go to the Settings app.
2. Click on Update and Security.
3. Under Windows Update, click on check for updates.
4. Finally, your system will automatically show you the available updates. You can click on Install Now to download the available updates if any.

After updating your Windows 10, you can check whether this method could fix the start menu not working in Windows 10.
Method 10: Restart Windows Explorer
Some users could fix the Windows key not working in Windows 10 by restarting the Windows explorer. When you restart Windows Explorer, you will also force the start menu to restart as well.
1. Press Ctrl + Alt + Del from your keyboard and select task manager.
2. Click on the Process tab.
3. Scroll down and locate Windows explorer.
4. Finally, make a right-click and select Restart.

After the Windows explorer restarts, you can check whether your start menu is working properly or not.
Method 11: Create a New User Account
If you are still unable to access Windows 10 Start Menu, you can create a new user account. Many users were able to fix the Windows key by creating a new user account. Follow these steps to create a new user account on your system.
1. Click on your Windows icon and search settings in the search bar. Alternatively, you can click on Windows + I keys from your on-screen keyboard to open settings.
2. Click on the Accounts section.

3. Now, click on family and other users from the panel on the left.
4. Select ‘Add someone else to this PC.’

5. Now, a Microsoft account window will pop up, where you have to click on the ‘I don’t have this person’s sign-in information’ We will be creating a new user account without a Microsoft account. However, you have the option of creating a new user with a new Microsoft account.

6. Click on Add a user without a Microsoft account.

7. Finally, you can create a username and set a password for your new account. Click on next to save the changes and create the account.
That’s it; your Windows key will start functioning properly with your new user account.
Also Read: How to Fix Windows 10 running slow after update
Method 12: Run a Malware Scan
Sometimes, the malware or virus on your system may prevent the windows key from functioning properly. Therefore, you can run a malware or virus scan on your system. You can use the free version of Malwarebytes, which is good antivirus software. You have the option of using any other antivirus app of your choice. Running a malware scan will remove harmful third-party apps or software that were causing the Windows key from losing its functionality.
1. Download and install Malwarebytes on your system.
2. Launch the software and click on the Scan option.

3. Again, click on the start scan button.
4. Finally, wait for Malwarebytes to finish scanning your device for any virus or harmful apps. If you find any harmful files after the scan, you can easily remove them from your system.
Method 13: Reinstall Windows 10
If none of the above methods works, you can reinstall Windows 10 from scratch. However, make sure you have the Windows 10 product key handy. Moreover, having a fast USB thumb drive or external SSD is a plus for installing Windows 10 on your system.
Recommended: Fix Keyboard Not Typing in Windows 10 Issue
We hope that this guide was helpful and you were able to fix Windows 10 start button not working issue. If you still have any queries regarding this article, then feel free to ask them in the comments section.