
Audio issues on your PC can be incredibly frustrating, especially when you’re trying to watch a video, attend a meeting, or listen to music. Fortunately, most sound problems can be fixed by following a series of troubleshooting steps. This article provides a comprehensive guide to resolving audio issues in Windows. The tips are listed in order, so start with the first one, see if that helps, and then continue to the next one if it doesn’t.
Run the Windows audio troubleshooter
If you are using a Windows 11 device, start by running the automated audio troubleshooter in the Get Help app. It will automatically run diagnostics and attempt to fix most audio problems. If you are using an older version of Windows or a mobile device, please skip to General troubleshooting steps.
Run the troubleshooter in Get Help
If the Get Help app is unable to resolve your sound or audio issue, try the possible solutions listed.
General troubleshooting
Please try the following general troubleshooting steps to help solve the audio problem.
If multiple audio output devices are available, check that you have the appropriate one selected. Here’s how:
-
Select the Speakers icon on the taskbar.
-
Next, select the arrow to the right of the speaker volume slider to open a list of audio devices connected to your computer. The tool tip should display as Select a sound output when hovering over the arrow.
-
Check that your audio is playing to the audio device you prefer, such as a speaker or headphones.
If this doesn’t help, continue to the next tip.
Try these steps:
-
Check your speaker and headphone connections for loose cords or cables. Make sure all cords and cables are plugged in.
-
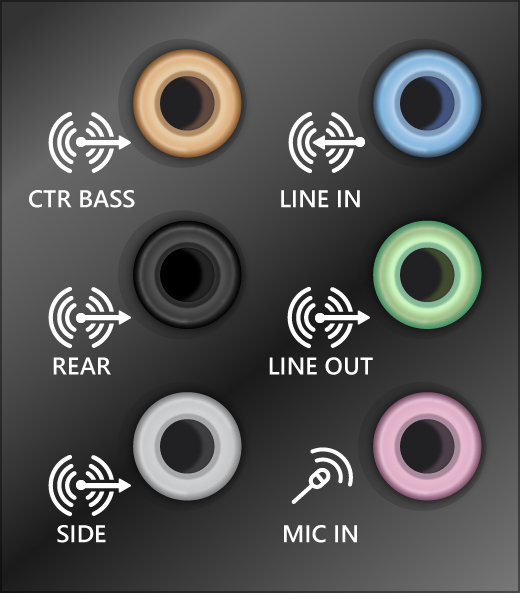
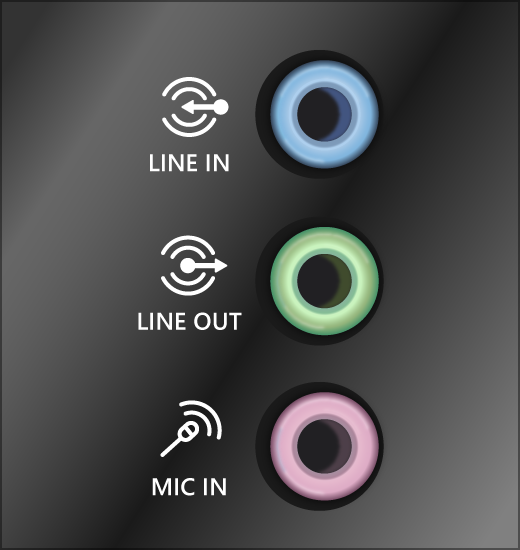
If you have multiple 5mm jacks to plug into, especially on a surround sound system, make sure all cords and cables are plugged into the correct jack.
-
If it’s not clear which jack goes with which cord, consult your hardware manufacturer, or try the most obvious outputs one at a time and see if they work.

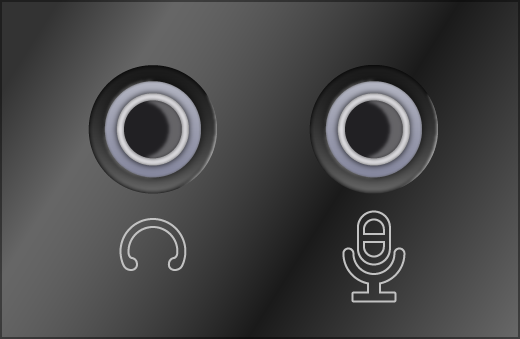
Note: Some systems use a green jack for output and a pink jack for mic input and others will be labeled «headphone» or «microphone.»
-
-
Make sure the power is turned on.
-
Make sure the mute setting is not turned on and try turning up all the volume controls.
Note: Some speakers and apps have their own volume controls. Be sure to check them all.
-
Try connecting your speaker and headphones to a different USB port.
-
It’s possible that your speakers won’t work when your headphones are plugged in. Unplug your headphones and see if that helps.
If you’re still having audio problems, see the next sections for additional troubleshooting.
Sometimes having audio enhancements on can result in audio issues. Disabling them may resolve your issue.
-
Select Start > Settings > Sound.
-
In the Output section, select the audio device you’re using (e.g., your speakers or headphones).
-
On the page that opens, scroll to Advanced settings,then set Audio enhancements to Off from the dropdown menu.
If turning off audio enhancements doesn’t help, see the next sections for additional troubleshooting.
-
Select Start > Settings > System.
-
Scroll down and select Troubleshoot > Other troubleshooters.
-
Go to Audio section and click the Run button to start the audio troubleshooter.
Check to make sure your audio devices aren’t muted and haven’t been disabled.
-
Select and hold (or right-click) the Speakers icon on the taskbar.
-
Next, select the arrow to the right of the speaker volume slider to open a list of audio devices connected to your computer. The tool tip should display as Select a sound output when hovering over the arrow.
Note: If you don’t see Speakers displayed, it may be in the overflow area. Select Show hidden icons to check there.
-
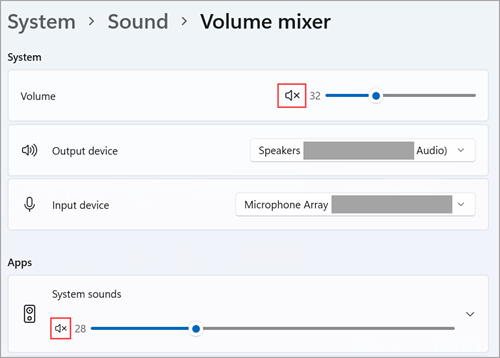
Select settings icon to the right of the Volume mixer slider to open Volume mixer settings. The tool tip should display as More mixer settings when hovering over the settings icon.
-
You’ll see a set of volume controls for your devices. Make sure none of them are muted. If any of them are muted, you’ll see an «x» next to the volume control . To unmute do one of the following:
-
Select the volume control and adjust to the desired volume level.
-
Select the Unmute speakers icon .

-
-
Check your device properties to make sure that your devices have not been disabled by mistake. Select Start > Settings > System > Sound .
-
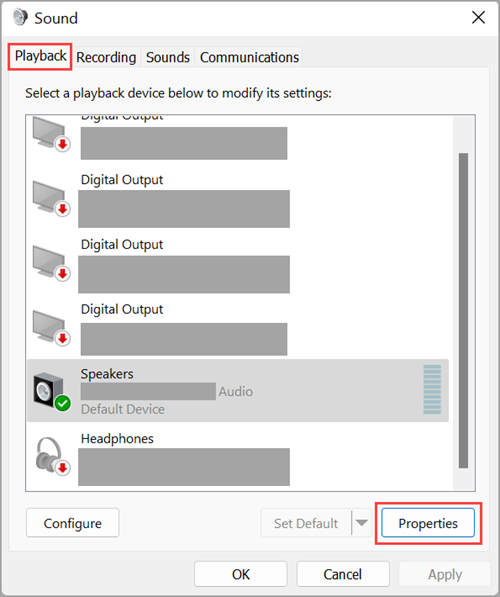
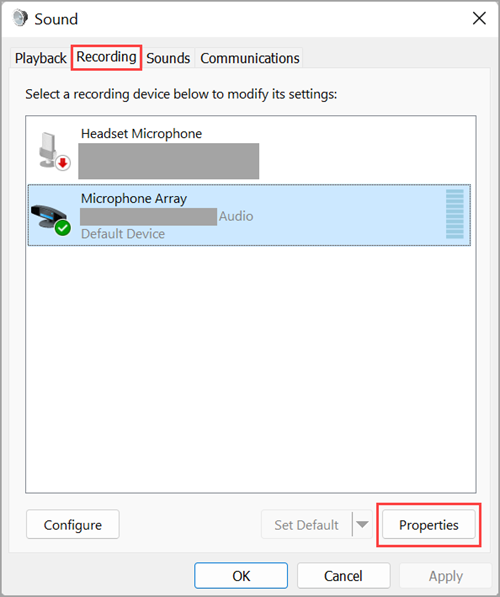
Under Advanced, select More sound settings and select either the Playback (output) or Recording (input) tab.
-
Select your device and then select Properties.
-
Next to Device usage, check that Use this device (enable) is selected from the list for the output and input devices.


If that didn’t solve your problem, continue to the next tip.
If you’re connecting to an audio device—such as headphones or speakers—using USB or HDMI, you might need to set that device as the default audio device. If you’re using an external monitor that doesn’t have built-in speakers, make sure that the monitor isn’t already selected as your default output device. if it is, you won’t have any audio. You can check that when you set your default output audio device. Here’s how:
-
Select Start > Settings > System > Sound .
-
In the Output section, select the device you want to use for playback as your output device. When you select this device, you’re also setting it as the default.
If setting your audio device as the default device doesn’t help, continue to the next tip for additional troubleshooting.
To check for updates:
-
Do one of the following:
-
If the status says, «You’re up to date,» go to the next tip.
-
If the status says, «Updates are available,» select Install now.
-
-
Select the updates you want to install, then select Install.
-
Restart your PC and check if your sound is working properly.
If that didn’t solve your problem, continue to the next tip.
Many updates require you to restart your device.
To check and see if you have installed updates pending and need to restart:
-
Save your work and close all open applications.
-
Select Start > Power . If you have installed updates pending, you’ll see options to Update and restart and Update and shut down.
-
Select one of those restart options to apply the updates.
Need help with Windows Update? See Troubleshoot problems updating Windows.
If restarting doesn’t help, see the next section for additional troubleshooting.
Hardware problems can be caused by outdated or malfunctioning drivers. Make sure your audio driver is up to date and update it if needed. If that doesn’t work, try uninstalling the audio driver (it will reinstall automatically). If that doesn’t work, try using the generic audio driver that comes with Windows. If you’re having audio issues after installing updates, try rolling back your audio driver.
To update your audio driver automatically:
-
In the search box on the taskbar, type device manager, then select it from the results.
-
Select the arrow next to Sound, video and game controllers to expand it.
-
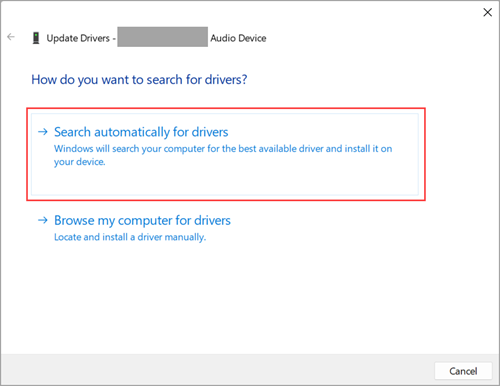
Select and hold (or right-click) the listing for your sound card or audio device, such as headphones or speakers, select Update driver, then select Search automatically for drivers. Follow the instructions to complete the update.


If Windows doesn’t find a new driver, look for one on the device manufacturer’s website and follow those instructions. If that doesn’t work, try uninstalling your audio driver.
To uninstall your audio driver:
-
In the search box on the taskbar, type device manager, then select it from the results.
-
Select the arrow next to Sound, video and game controllers to expand it.
-
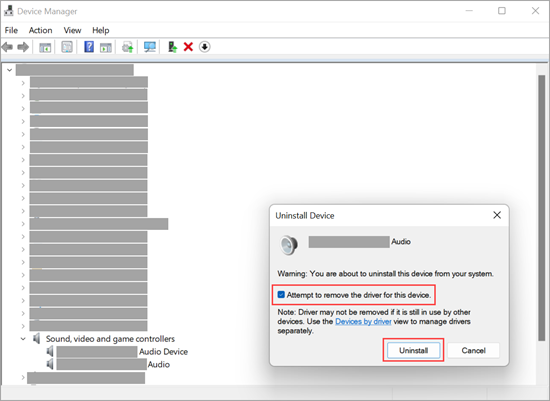
Select and hold (or right-click) the listing for your sound card or audio device, select Uninstall device, select the Attempt to remove the driver for this device check box, and then select Uninstall.

-
Restart your PC.
Note: Be sure to save your documents and any other current work before you restart.
-
This restart will automatically prompt your PC to reinstall your audio driver.
-
To restart, select Start > Power > Restart .
-
If those options didn’t work, try using the generic audio driver that comes with Windows.
To use the generic audio driver that comes with Windows:
-
In the search box on the taskbar, type device manager, then select it from the results.
-
Select the arrow next to Sound, video and game controllers to expand it.
-
Select and hold (or right-click) the listing for your sound card or audio device, then select Update driver > Browse my computer for drivers > Let me pick from a list of available drivers on my computer.
-
Select the audio device whose driver you want to update, select Next, and then follow the instructions to install it.
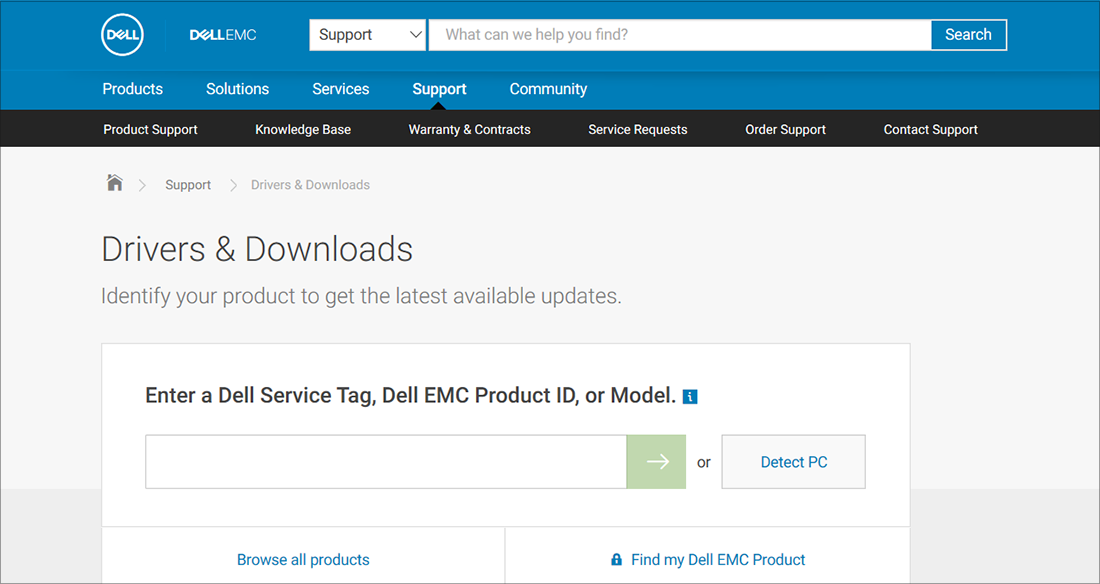
If these steps didn’t solve your audio issue, visit your device manufacturer’s website and install the most recent audio/sound drivers for your device. The following is an example of a driver download page for a sound device manufacturer.
If you have audio issues after installing updates
If your audio was working before you ran Windows Update and now isn’t working, try rolling back your audio driver.
To roll back your audio driver:
-
In the search box on the taskbar, type device manager, then select it from the results.
-
Select the arrow next to Sound, video and game controllers to expand it.
-
Select and hold (or right-click) the listing for your sound card or audio device, then select Properties.
-
Select the Driver tab, then select Roll Back Driver.
-
Read and follow the instructions and then select Yes if you want to roll back your audio driver.
If rolling back your audio driver didn’t work or wasn’t an option, you can try to restore your PC from a system restore point.
Restore your PC from a system restore point:
When Microsoft installs updates on your system, we create a system restore point in case problems arise. Try restoring from that point and see if that fixes your sound problems. For more info, see «Restore from a system restore point» in Recovery options in Windows.
Some audio problems might be caused by an issue with the audio system’s IDT High Definition Audio CODEC. This can be fixed with a manual driver update which allows you to choose the sound driver you want to use.
Note: Not all systems will have an IDT High Definition Audio CODEC.
To check and see if you have one, and to manually update the driver:
-
In the search box on the taskbar, type device manager, then select it from the results.
-
Select the arrow next to Sound, video and game controllers to expand it.
-
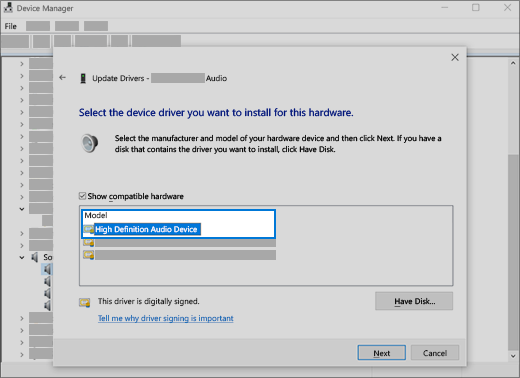
Look for IDT High Definition Audio CODEC. If it’s listed, select and hold (or right-click) it and select Update driver, then select Browse my computer for drivers > Let me pick from a list of available drivers on my computer.
-
You’ll see a list of pre-installed drivers. Select High Definition Audio Device, and then select Next.
-
In the search box on the taskbar, type control panel, and then select it from the results.
-
Select Hardware and Sound from the Control Panel, and then select Sound.
-
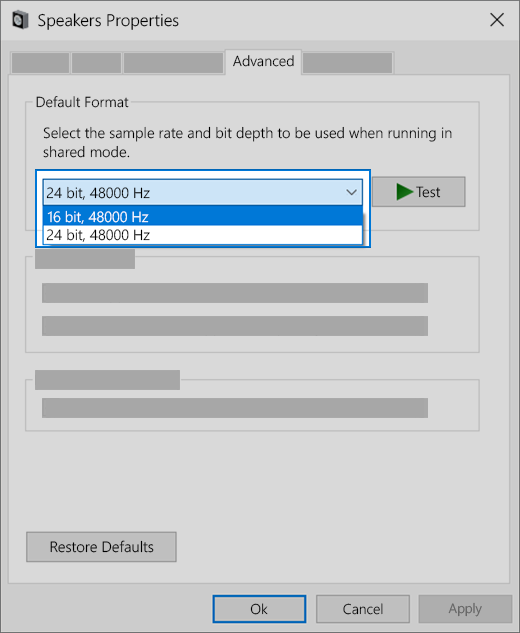
On the Playback tab, select and hold (or right-click) Default Device, and then select Properties.
-
On the Advanced tab, under Default Format, change the setting, select OK, and then test your audio device. If that doesn’t work, try changing the setting again.
If trying different audio formats doesn’t help, see the next sections for additional troubleshooting.
-
In the search box on the taskbar, type services, then select it from the results.
-
Select each of the following services, select and hold (or right-click), select Restart, and then select Yes:
-
Windows Audio
-
Windows Audio Endpoint Builder
-
Remote Procedure Call (RPC)
-
If restarting these services doesn’t resolve your issue, see the next sections for more troubleshooting.
-
Select Start > Settings > Privacy & security.
-
Under App permissions, select Microphone.
-
Make sure that the Microphone access and Let apps access your microphone toggles are turned On.
-
If you’re having this issue with a specific app, scroll down under Let apps access your microphone and make sure that the toggle next to that specific app is turned On as well.
You are here:
Home » Windows 10 » How To Restart The Audio Driver In Windows 10/11
There is a built-in sound troubleshooter in Windows 10/11, which is pretty good at diagnosing and fixing common sound issues. When you are experiencing sound issues, you should run the sound troubleshooter (called Audio troubleshooter in Windows 11) before doing anything else.
If the troubleshooter fails to diagnose the issue, you can then try manually checking sound settings and restore sound settings to their defaults.
Reinstalling the audio driver is the last resort while troubleshooting sound issues. Before reinstalling the audio driver, you can try restarting the audio driver.
While restarting the audio driver might not fix the issue all the time, it might help at times. Besides, you can restart the audio driver with a few mouse clicks.
Complete the directions given below to restart the audio driver in Windows 10/11 via Device Manager.
Step 1: Open the Device Manager by right-clicking on the Start button on the taskbar and then clicking the Device Manager option. Alternatively, you can quickly launch the Device Manager by pressing the Windows logo + X keys and then pressing the M key.

Step 2: In the Device Manager, expand Sound, video and game controllers to see your audio driver entry.
Step 3: Right-click on your audio driver entry and then click Disable device option. Click the Yes button to disable the device driver. If you are asked to reboot your PC, save your work, close all programs, and reboot your PC once.


Step 4: Finally, right-click on the audio driver entry and click Enable device option. This will start the device driver again.

Check if the sound issue has been resolved. If not, try to uninstall the audio driver, reboot your PC once, and then install a fresh copy of the same.
You can also contact Microsoft support for assistance.
Also, learn how to simultaneously use speakers and headphones in Windows 10.
Readers help support Windows Report. We may get a commission if you buy through our links.
Read our disclosure page to find out how can you help Windows Report sustain the editorial team. Read more
An audio driver is essential, but if issues occur, you need to restart the audio driver on Windows 10.
Also, you can read about what to do if you’re unable to install drivers on Windows 10 if you need more information on the subject matter.
Join us while we show you the best way to restart drivers on your PC.
Why should I restart the audio driver?
- Troubleshooting – If you’re experiencing issues with a particular audio hardware device or peripheral, restarting the driver can help resolve the problem. It clears any temporary glitches or conflicts that may have occurred.
- Driver updates – Sometimes, a restart is necessary after installing audio driver updates or making changes to the system for the changes to take effect. Hence, it ensures that all updates are applied.
- Compatibility issues – Restarting the audio driver can help resolve any compatibility issues that may arise after connecting a new device or installing new software. It can fix driver error issues on Windows 10.
- Performance improvement – Restarting the driver allows it to refresh its processes and can improve the device’s performance.
- Optimize system resources – Audio devices can consume significant system resources. So, restarting the driver can help release any allocated resources that may not be freed correctly and improve the system’s performance.
You can check our article about ways to fix this driver has been blocked from loading error on your computer.
How can I restart the audio driver in Windows 10?
Use the Device Manager
- Right-click the Start button and select Device Manager from the drop-down menu.

- Expand the Sound, video, and game controllers categories to view the audio devices.
- Then, right-click on the audio device you want to restart and select Disable device from the drop-down menu.

- In the new window, click Yes to confirm the process.
- Now, you may need to repeat this step for each device if you have multiple audio devices.
- After disabling the audio device, right-click on it again and select Enable device from the drop-down menu to initiate the restart process for the audio driver.
- Once the driver is restarted, you should see the audio device re-enabled in the Device Manager.


The above steps will disable the audio driver to stop its process running on your computer and enable the device to initiate its restart.
- Microsoft wants Windows 10 users to upgrade to Windows 11 or Copilot + PCs
- Deleting ‘inetpub’ folder lets hackers permanently stop Windows updates, Microsoft warns
Further, you can check our comprehensive article on how to fix the Windows encountered a problem installing the driver error on Windows 10.
Likewise, we have a post about easy steps for updating outdated drivers on Windows 10.
Should you have further questions or suggestions regarding this guide, kindly drop them in the comments section. We’d like to hear from you.
Henderson Jayden Harper
Windows Software Expert
Passionate about technology, Crypto, software, Windows, and everything computer-related, he spends most of his time developing new skills and learning more about the tech world.
He also enjoys gaming, writing, walking his dog, and reading and learning about new cultures. He also enjoys spending private time connecting with nature.
Способ 1: Управление службами
Традиционно перезапуск служб в Windows 10 выполняется через встроенную оснастку управления службами.
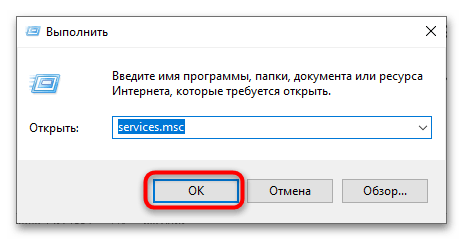
- Откройте оснастку «Службы», для чего вызовите нажатием клавиш Win + R окошко быстрого запуска и выполните в нем команду
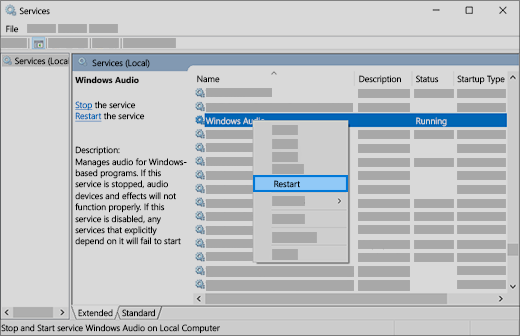
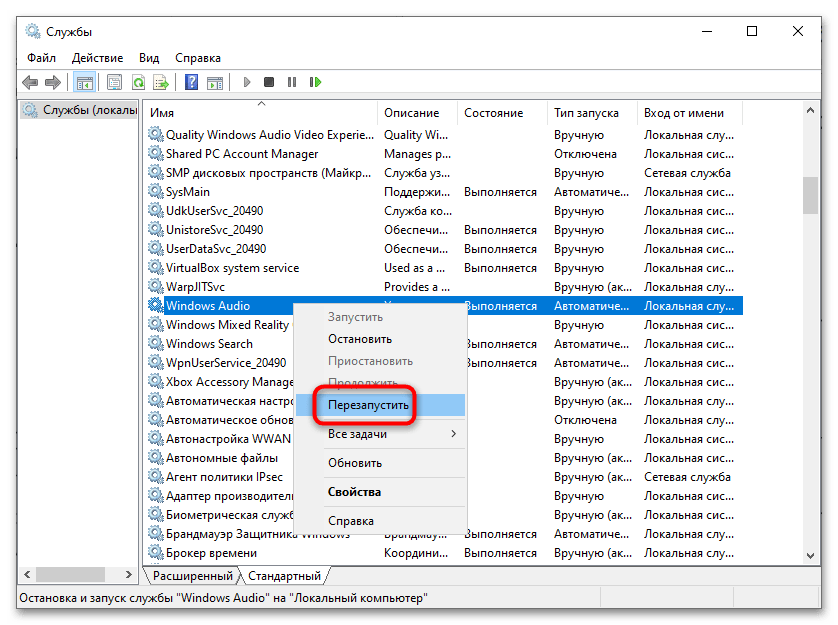
services.msc. - Откроется окно оснастки, отыщите в списке службу с именем «Windows Audio», кликните по ней правой кнопкой мыши и выберите из контекстного меню опцию «Перезапустить».
Альтернативный вариант:
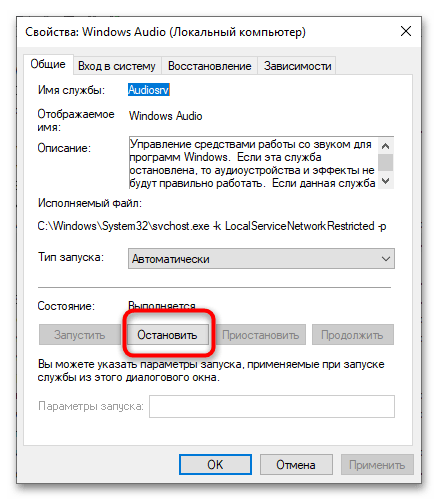
- Отыщите службу «Windows Audio» и откройте ее свойства двойным по ней кликом.
- В окошке свойств нажмите кнопку «Остановить».
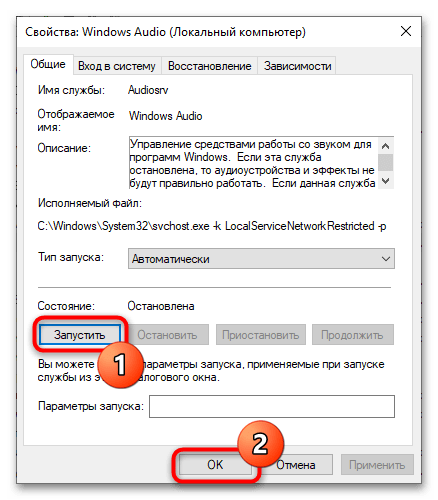
- После того как служба будет остановлена, запустите ее нажатием кнопки запуска, расположенной в этом же окне. Нажмите в окне свойств «OK» и завершите работу с оснасткой.
Способ 2: Консоль «PowerShell»
Пользователи, владеющие навыками работы в консоли, могут использовать для перезапуска службы аудио классическую «Командную строку» или «PowerShell».
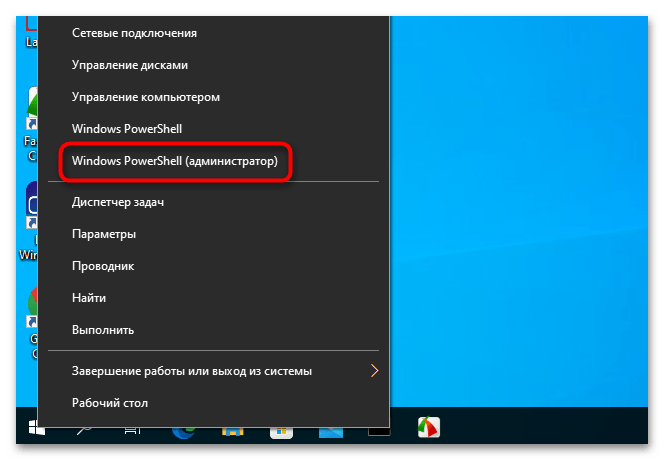
- Откройте консоль «PowerShell» из контекстного меню кнопки «Пуск».
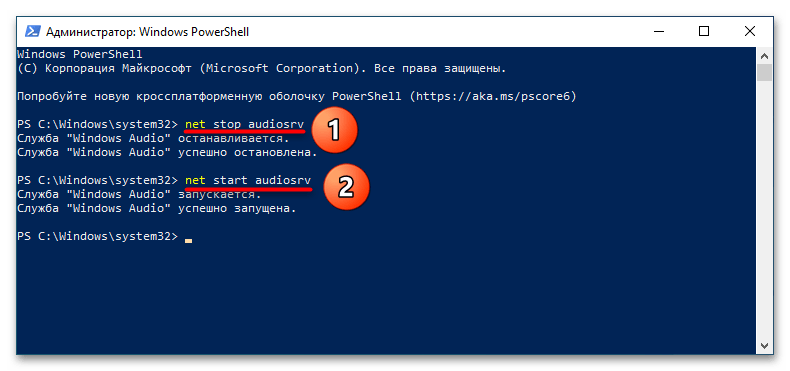
- Выполните одну за другой команды
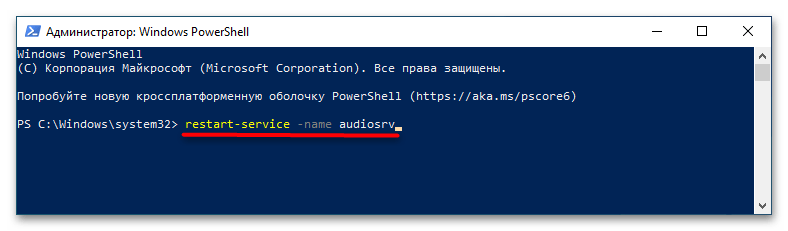
net stop audiosrvиnet start audiosrv, нажимая после каждой из них Enter. - Также вместо двух приведенных выше команд можно использовать одну –
restart-service -name audiosrv. Однако работает эта команда только в «PowerShell», тогда какnet stop audiosrvиnet start audiosrvможно использовать и в классической «Командной строке».
Способ 3: «Диспетчер задач»
Перезапустить службу звука в Windows 10 можно также и средствами штатного «Диспетчера задач».
Подробнее: Запуск «Диспетчера задач» в Windows 10
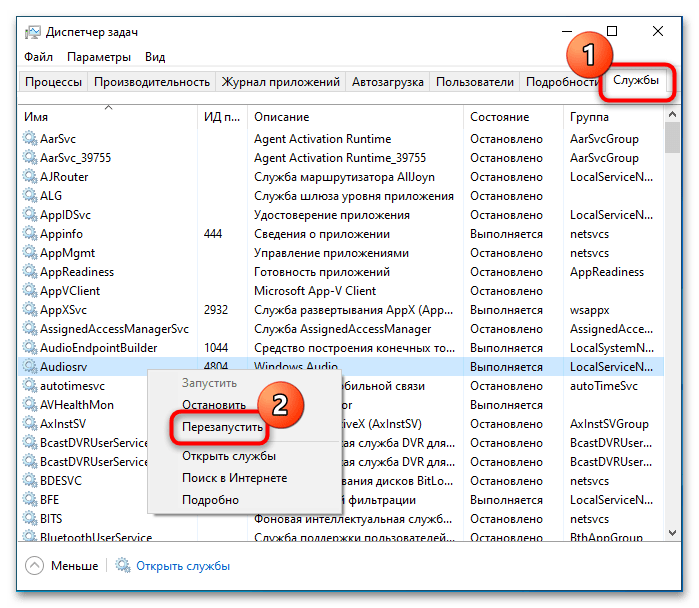
- Откройте «Диспетчер задач» любым удобным способом и переключитесь на вкладку «Службы».
- Отыщите в списке службу с именем «Audiosrv», щелкните по ней правой кнопкой мыши и из контекстного меню воспользуйтесь опцией «Перезапустить».
В результате службы будет сначала остановлена, а затем автоматически запущена.
Наша группа в TelegramПолезные советы и помощь
How to Restart Audio Driver in Windows 10
Restarting the audio driver in Windows 10 can fix many sound-related issues. The process involves uninstalling the current driver and either allowing Windows to reinstall it or manually installing it again. It’s a quick and easy way to resolve audio problems like no sound, crackling, or distortion. Let’s dive into the step-by-step details.
In this section, we’ll walk through the process of restarting the audio driver on your Windows 10 computer. Follow these simple steps to troubleshoot and resolve your audio issues.
Step 1: Open the Device Manager
First, right-click the Start button and select «Device Manager.»
You can also access Device Manager by pressing the Windows key + X and selecting it from the list. This tool will show you all the hardware devices installed on your computer, including the audio driver.
Step 2: Find Your Audio Driver
Next, expand the «Sound, video and game controllers» category.
Look for your audio device in the list. It will usually have a name like «Realtek High Definition Audio» or something similar. This is the driver you need to restart.
Step 3: Uninstall the Driver
Right-click on your audio device and select «Uninstall device.»
A window will pop up asking if you want to uninstall the driver. Don’t worry, this is just temporary. Confirm the uninstallation.
Step 4: Restart Your Computer
Restart your computer to complete the uninstallation process.
When your computer restarts, Windows will automatically attempt to reinstall the audio driver. This is often enough to resolve many audio issues.
Step 5: Manually Reinstall the Driver (if needed)
If Windows doesn’t reinstall the driver, go back to Device Manager, right-click on your computer name at the top of the list, and select «Scan for hardware changes.»
Windows will search for any missing drivers and reinstall them. If this doesn’t work, you may need to download the driver from the manufacturer’s website and install it manually.
After you finish these steps, your audio should work correctly again. If you’re still having issues, you might need to update the driver or check if your hardware is functioning properly.
Tips for Restarting Audio Driver in Windows 10
- Make sure to create a system restore point before making changes. This way, you can easily revert back if something goes wrong.
- Keep your audio driver updated to avoid future issues. Check the manufacturer’s website regularly for updates.
- If the automatic reinstall doesn’t work, try downloading the driver directly from the manufacturer’s site.
- Sometimes restarting the Windows Audio service can also help. You can do this by typing «services.msc» in the Run dialog and restarting the Windows Audio service.
- Ensure your Windows updates are current, as they often include important driver updates.
Frequently Asked Questions
What happens if I uninstall my audio driver?
Uninstalling the audio driver removes it temporarily. Windows will usually reinstall it automatically upon restart, restoring your audio functions.
Why is my audio not working even after restarting the driver?
There could be various reasons, including outdated drivers, hardware issues, or incorrect settings. Try updating the driver or checking your audio settings.
Can I use third-party software to manage my drivers?
Yes, third-party driver management tools can simplify the process and ensure your drivers are always up to date.
Is it safe to uninstall my audio driver?
Yes, it is safe to uninstall the driver as long as you follow the steps correctly. Windows handles the reinstallation process, minimizing risks.
How often should I update my audio driver?
Regularly check for updates, especially when you notice audio issues. Keeping your drivers updated ensures optimal performance.
Summary
- Open the Device Manager.
- Find your audio driver.
- Uninstall the driver.
- Restart your computer.
- Manually reinstall the driver if needed.
Conclusion
Restarting the audio driver in Windows 10 is a straightforward process that can resolve many common sound issues. From accessing Device Manager to reinstalling the driver, each step is designed to get your audio back to working condition. Remember to keep your drivers updated and create system restore points for added security.
For further reading, you might want to explore articles on keeping your Windows 10 system optimized. If restarting the driver doesn’t fix your issue, investigating hardware problems or looking into third-party driver management tools could be beneficial.
Don’t let audio problems ruin your experience. With these steps, you should be able to tackle any issues and enjoy crystal-clear sound once more.
Kermit Matthews is a freelance writer based in Philadelphia, Pennsylvania with more than a decade of experience writing technology guides. He has a Bachelor’s and Master’s degree in Computer Science and has spent much of his professional career in IT management.
He specializes in writing content about iPhones, Android devices, Microsoft Office, and many other popular applications and devices.
Read his full bio here.