
Уровень сложностиСложный
Время на прочтение12 мин
Количество просмотров11K
Все привет! В продолжение статьи о возможностях PowerShell, хочу поделиться несложной реализацией создания REST API и простого Web-сервера, используя только PowerShell на базе класса .NET HttpListener. Такая реализация позволяет настроить endpoint-ы (конечные точки) для обработки GET и POST запросов, которые принимают параметры в заголовке запроса, использовать Basic-авторизацию (на основе Base64), обрабатывать любые коды возврата, а так же без лишнего кода, отдавать информацию в разных форматах: json, xml, html, csv. Хочу акцентировать, что данное решение, возможно, не является самым правильным, тем не менее успешно помогло мне покрыть потребности нескольких задач и хотел лишний раз продемонстрировать возможности языка.
Для начала расскажу, кому и зачем данная реализация может понадобиться, далее приведу пример работы с готовым решение и разберем основные моменты для создания своего сервера. Стоит сразу упомянуть, что существует кросс-платформенный Web Framework Pode, и это не единственное решение, успел попробовать как минимум три, но, пожалуй, самое интересное, поддерживаемое и задокументированное. Мне же хотелось иметь свою реализацию, где будут отсутствовать сторонние зависимости, и немного больше понимать, что происходит на стороне сервера во время его работы, в частности, для отладки.
Кому и зачем данная реализация может понадобиться? Приведу свой пример, у меня была задача удаленно реализовать доступ к десктопному приложению, у которого для специфического взаимодействия с ним была возможность выполнять только локальные команды через консоль. Из условий, не было возможности настроить и использовать на машинах WinRM и OpenSSH, ввиду ограничений в компании со стороны ИБ, в то же самое время HTTP был валидным и стандартизированным (после HTTPS) решением. В результате, выполнение и вывод команд получилось автоматизировать, а в дополнение к этому, добавить настройки реестра, чистку temp и логов, что расширило возможности и позволило инженеру DevOps внедрить их в свой Pipeline, используя привычный интерфейс.
Во-вторых, работая системным администратором, в качестве интерфейса для автоматизации задач я использовал WinForms, редко Telegram. Тогда мне очень хотелось попробовать реализовать свой Web-интерфейс для визуализации подобных задач. Важно заметить, что не обладаю сильными познаниями в области систем CI/CD, и конечно, рациональнее использовать, например, интерфейс Jenkins для подобных целей. Тем не менее подобное решение имеет место, т.к. Jenkins все таки не содержит такой кастомизации, как собственный интерфейс.
В-третьих. У меня есть небольшой проект, целью которого является поиск и доставка контента из конкретного torrent-трекера Кинозал до телевизора с Plex (на эту тему у меня есть отдельная статья на Habr). Так сложилось, что за основу я выбрать язык Bash, т.к. планировал запускать бота удаленно и использовать только REST API интерфейс для взаимодействия со всеми сервисами. В течении всего времени эксплуатации, мне не хватало такого функционала, как остановка и повторный запустить torrent-клиента (qBittorrent), или просматривать свободное место на диске, узнать размер конкретных директорий и файлов, а так же возможности их удаления. По аналогии с другими сервисами, мне хотелось использовать единый интерфейс (REST API), в попытках найти готовое решение в виде десктопного приложения для Windows, вспоминая, что уже взаимодействовал с Open Hardware Monitor, используя его как клиент (в режиме HTTP), уже писал модуль для получения метрик через REST API (с возможностью отправки их в InfluxDB и визуализацией в Grafana). Но этого было мало, например для просмотра и удаления файлов можно настроить сервер Everything (который тоже имеет HTTP-сервер). Тут я понял, для покрытия нескольких специфических и не сложных задачи устанавливать дополнительно 2-3 сервиса нерационально, по этому решил написать отдельное решение.
Далее, речь пойдет про WinAPI, решение, с помощью которого у меня получилось покрыть все мои потребности, а конкретно: удаленная остановка и запуск служб и процессов, вывод метрик, максимально приближенных к диспетчеру задач (список физических и логических дисков, показатели IOps, потребление RAM, нагрузка CPU, количество запущенных процессов, потоков, дескрипторов и т.п.), а так же просматривать список директорий и файлов, их размер и количество, с возможностью удаления.
Как это выглядит на практике. Для установки и запуска данного сервиса я попробовал реализовать два решения. Запуск в виде исполняемого файла (используя модуль ps2exe), в таком варианте можно запускается отдельная консоль, где можно наблюдать весь лог и завершать процесс при закрытии консоли. Второй вариант, это запуск фонового процесса, в таком случае для чтения лога используется файл. Но такое решение не самое удачное, т.к. модуль имеет ограничение, которое позволяет запускать любой скрипт только в PowerShell 5.1 и командлеты из версии Core попросту не буду работать.
Второй вариант, это запуск в качестве службы, процесс установки получилось так же автоматизировать, достаточно на любой машине, где есть доступ в интернет запустить этот скрипт. Настроить свои данные для авторизации и задать свой номер порта (предварительно открыть его в firewall) в конфигурационном файле, после чего, начать взаимодействовать на любой системе, используя Invoke-RestMethod или Curl:
.")
lifailon@hv-devops-01:~$ user="rest"
lifailon@hv-devops-01:~$ pass="api"
lifailon@hv-devops-01:~$ curl -s -X GET -u $user:$pass http://192.168.3.100:8443/api/service/winrm # запрашиваем статус службы WinRM
{
  "Name": "WinRM",
  "DisplayName": "Служба удаленного управления Windows (WS-Management)",
  "Status": "Stopped",
  "StartType": "Automatic"
}
lifailon@hv-devops-01:~$ curl -s -X POST -u $user:$pass --data '' http://192.168.3.100:8443/api/service/winrm -H "Status: Start" # запускаем службу
{
  "Name": "winrm",
  "DisplayName": "Служба удаленного управления Windows (WS-Management)",
  "Status": "Running",
  "StartType": "Automatic"
}
Пример простого Web-сервера был скорее эксперимент, чем необходимость (очень уж хотелось закрыть старый гештальт). Тем не менее выглядит решение так:

Естественно, для обработки кнопок в браузере не обошлось без JavaScript, особых познаний языка тут не требуется, нашел буквально первый пример в интернете как создать кнопки и обработать их действие при нажатии, ознакомившись с основами HTML-синтаксиса и додумав логику, все получилось сделать достаточно просто. Вот пример с комментариями:
# Типовое условие для проверки вхождения на соответствие метода (GET) и конечной точки (/service)
elseif ($context.Request.HttpMethod -eq "GET" -and $context.Request.RawUrl -eq "/service") {
    # Получаем массив из списока служб, используя кастомную функцию для вывода с подробной информацией
    $Services = Get-ServiceDescription *
    # Формируем текст HTML-документа, задаем заголовок страницы и открываем тело страницы
    $GetService = "<html><head><title>Service</title></head><body>"
    # Добавляем заготовленные кнопки, которые перенаправляет на другие url
    $GetService += $BodyButtons
    # Указываем на создание таблицы и задаем имена столбцов
    $GetService += "<table border='1'>"
    $GetService += "<tr><th>Name</th><th>Status</th><th>Action</th><th>Start Type</th></tr>"
    # Передаем в цикл список служб и забираем значения
    foreach ($Service in $Services) {
        $name   = "<b>$($Service.Name)</b>"
        $status = $Service.Status
        # Проверяем статус службы, если работает, красим в зеленый цвет
        if ($status -eq "Running") {
            $status = "<font color='green'><b>$status</b></font>"
        } else {
            $status = "<font color='red'><b>$status</b></font>"
        }
        $StartType  = $Service.StartType
        # Заполняем значения столбцов, по анологии с наименованием столбцов (в блоке <tr>)
        $GetService += "<tr><td>$name</td><td>$status</td>"
        # Создаем кпноки, которые при нажатии ссылаются на функции startService и stopService, которые в качестве параметра передают наименование службы
        $GetService += "<td><button onclick='startService(""$($Service.Name)"")'>Start</button> "
        $GetService += "<button onclick='stopService(""$($Service.Name)"")'>Stop</button></td>"
        $GetService += "<td>$StartType</td></tr>"
    }
    $GetService += "</table>"
    $GetService += '
    # Формируем в блоке <script> функции, для обработки нажатия на кнопки
    <script>
        function startService(serviceName) {
            sendServiceAction("Start", serviceName);
        }
        function stopService(serviceName) {
            sendServiceAction("Stop", serviceName);
        }
        # Данная функция принимает действие и отправляет соответствующий POST-запрос, для его обработки другой конечной точкой
        function sendServiceAction(action, serviceName) {
            var request = new XMLHttpRequest();
            request.open("POST", "/api/service/" + serviceName, true);
            # В заголовок запроса передаем статус с содержимым действия (Status: <Stop/Start>) и обновляем страницу (reload)
            request.setRequestHeader("Status", action);
            request.onreadystatechange = function () {
                if (request.readyState === 4 && request.status === 200) {
                    console.log("True");
                    location.reload();
                }
            };
            request.send();
        }
    </script>
    </body></html>
    '
    # Передаем сформированные данные и код ответа в функцию, для отправки ответва клиенту
    Send-Response -Data $GetService -Code 200 -v2
}
Для сравнения интерфейса, приведу пример управления службами, используя простой Jenkins Pipeline. Из явных преимуществ, такой интерфейс универсален для обеих систем (Windows и Linux), логика преимущественно на PowerShell и Bash (в моем случае), а доступ настраивается централизованно через Ansible, где в свою очередь используя ssh и winrm. Такой доступ можно заменить на REST-запросы, при наличии подобного сервера на каждой удаленной машине (например, в виде установленной службы). Безусловно, это более современное и правильное решение, но не взаимозаменяемое, речь только про интерфейс взаимодействия, где мы можем в одном интерфейсе управлять сразу с несколькими машинами.

По аналогии со службами, обработал остановку и запуск процессов.

Из интересного на мой взгляд, написал простую функцию для поиска исполняемого файла в системе, который отвечает за запуск процесса конкретного приложения. Если такой процесс не получается найти, то мы получим в ответ код 400: Bad Request. Process <$ProcessName> could not be found. В таком случае, можно воспользоваться заголовком Path, который принимает путь до исполняемого файла.
function Find-Process {
    param (
        $ProcessName
    )
    $ProcessPath = (Get-ChildItem "C:\Program Files" | Where-Object Name -match $ProcessName).FullName
    if ($null -eq $ProcessPath) {
        $ProcessPath = (Get-ChildItem "C:\Program Files (x86)" | Where-Object Name -match $ProcessName).FullName
    }
    if ($null -eq $ProcessPath) {
        $ProcessPath = (Get-ChildItem "$home\AppData\Roaming" | Where-Object Name -match $ProcessName).FullName
    }
    $ProcessNameExec = "$ProcessName"+".exe"
    (Get-ChildItem $ProcessPath -Recurse | Where-Object Name -eq $ProcessNameExec).FullName
}

> Find-Process qbittorrent
C:\Program Files\qBittorrent\qbittorrent.exe

> Find-Process nmap
C:\Program Files (x86)\Nmap\nmap.exe

Find-Process telegram
C:\Users\lifailon\AppData\Roaming\Telegram Desktop\Telegram.exe
Для сбора метрик используется CIM (Common Information Model). Сам скрипт сервера, описание с примерами, как и набор функций опубликованы на GitHub.

Так как PowerShell Core является кросс-платформенным решением, class System.Net.HttpListener работает и в системе Linux, используя такую же логику и возможности сразу нескольких языков (например, Bash), можно управлять службами на платформе Windows через systemctl используя REST API.
Что важно, при возникновении ошибки, мне хотелось, что бы данный сервер только логировал ее, но при этом продолжал функционировать (фактически, перезапускался). Для это достаточно вынести слушателя с циклом в отдельную функцию и запускать ее внутри еще одного бесконечного цикла, где присутствует дополнительная обработка ошибок в блоках try-catch-finally.
Вот базовый пример, без лишнего кода с описанием:
# Заполняем переменны с номером порта и данными для авторизации
$port = 8443
$user = "rest"
$pass = "api"
# Формируем строку Base64 из данных логина и пароля
$cred = [System.Convert]::ToBase64String([System.Text.Encoding]::UTF8.GetBytes("${user}:${pass}"))

# Функция для логирования запросов
function Get-Log {
    ### Debug (Get all Request, Headers and Response parameters):
	# Используя содержимое запросов (Request), чтение передаваемых заголовков и ответа (Response), можно расширить возможности логирования для отладки процесса
    # $context.Request | Out-Default
    # foreach ($header in $context.Request.Headers) {
    #     Write-Host "$header = $($context.Request.Headers[$header])"
    # }
    # $context.Response | Out-Default
	# Забираем содержимое из запроса: адрес клиента, наименование агента, метод и url конечной точки
    $remote_host   = $context.Request.RemoteEndPoint
    $client_agent  = $context.Request.UserAgent
    $method        = $context.Request.HttpMethod
    $endpoint      = $context.Request.RawUrl
    $response_code = $context.Response.StatusCode
    $date = Get-Date -Format "dd.MM.yyyy hh:mm:ss"
	# Выводим в консоль или в файл
    "$date $remote_host $client_agent => $method $endpoint => $response_code"
    # "$date $remote_host $client_agent => $method $endpoint => $response_code" | Out-File $Log_Path -Encoding utf8 -Append
}

# Функция для ответа клиенту
function Send-Response {
    param (
        $Data,
        [int]$Code
    )
    # Проверяем код ответа, если он равен 200 (успех), то конвертируем данные перед отправкой клиенту
    if ($Code -eq 200) {
        # Дополнительно можем проверить название агента на клиентской стороне, который может выступать в роли браузера или явно задан тип данных HTML
        if (($context.Request.UserAgent -match "Chrome") -or ($context.Request.ContentType -match "html")) {
            # Конвертируем полученные данные в HTML и указываем тип контента в ответе
			$Data = $Data | ConvertTo-Html
            $context.Response.ContentType = "text/html; charset=utf-8"
        }
		# Далее проверяем только тип контента из заголовка (если он задан явным образом), и конвертируем вывод в соответствующий тип данных
        elseif ($context.Request.ContentType -match "xml") {
            $Data = ($Data | ConvertTo-Xml).OuterXml
            $context.Response.ContentType = "text/xml; charset=utf-8"
        }
        elseif ($context.Request.ContentType -match "csv") {
            $Data = $Data | ConvertTo-Csv
            $context.Response.ContentType = "text/csv; charset=utf-8"
        }
		# По умолчанию, конвертируем в JSON
        else {
            $Data = $Data | ConvertTo-Json
            $context.Response.ContentType = "text/json; charset=utf-8"
        }
    }
    # Указываем код статуса для ответа
    $context.Response.StatusCode = $Code
    # Преобразуем данные в массив байтов, используя кодировку UTF-8 (особенно важно, при передачи в формате HTML)
    $buffer = [System.Text.Encoding]::UTF8.GetBytes($Data)
    # Выполняем функцию логирования
    Get-Log
    # Забираем число количества байт буффера для записи в поток, который передается в параметр ответа. Это является важным условием, что все даныне были переданы и прочитаны на стороне клиента.
    $context.Response.ContentLength64 = $buffer.Length
    # Передаем массив байтов (наш буффер ответа с данными) в поток ответа, обязательно нужно передать параметры смешения (если бы нужно было начать запись с определенного места в массиве) и длинны буффера
    $context.Response.OutputStream.Write($buffer, 0, $buffer.Length)
	# Данный метод обновляет буфер вывода, убеждаясь, что все данные из буфера отправлены клиенту
    $context.Response.OutputStream.Flush()
	# Закрываем поток ответа
    $context.Response.OutputStream.Close()
}

# Создаем сокет слушателя
Add-Type -AssemblyName System.Net.Http
$http = New-Object System.Net.HttpListener
# Указываем адрес слушателя (+ что бы слушать на всех интерфейсах) и порт
$http.Prefixes.Add("http://+:$port/")
# Указываем использование базового метода аутентификации
$http.AuthenticationSchemes = [System.Net.AuthenticationSchemes]::Basic
# Запускаем сокет (начинаем слушать запросы на указанном порту)
$http.Start()
# Обработчик try-finally нужен для закрытия сокета в случае его непредвиденного завершения
try {
    # Отправляем в бесконечный цикл прослушивание входящих запросов, пока свойство IsListening объекта $http равно true
    while ($http.IsListening) {
	    # Используем асинхронный режим, для ожидания новых запросов
        $contextTask = $http.GetContextAsync()
        # Синхронно ожидает завершения асинхронной задачи, чтобы дождаться завершения асинхронной операции, прежде чем продолжить выполнение кода
        while (-not $contextTask.AsyncWaitHandle.WaitOne(200)) { }
		# Получение результата асинхронной задачи
        $context = $contextTask.GetAwaiter().GetResult()
        # Проверяем полученные данные авторизации (в формате Base64) из заголовка запроса на соответветствие переменной $cred
        $CredRequest = $context.Request.Headers["Authorization"]
        # Write-Host $CredRequest
        $CredRequest = $CredRequest -replace "Basic\s"
        if ( $CredRequest -ne $cred ) {
            # Если авторизационные данные не прошли проверку (неверно передан логин или пароль), передаем в функцию ответа параметры с текстом ошибки и кодом возравата 401
            $Data = "Unauthorized (login or password is invalid)"
            Send-Response -Data $Data -Code 401
        }
        else {
            # Если авторизация прошла, проверяем метод и url конечной точки на соответветствие, что бы его обработать
            if ($context.Request.HttpMethod -eq "GET" -and $context.Request.RawUrl -eq "/api/service") {
                $GetService = Get-Service -ErrorAction Ignore
                Send-Response -Data $GetService -Code 200
            }
            # Дальше по аналогии дополнительными условиями (elseif) добавляем обработку других конечных точек
            elseif ($context.Request.HttpMethod -eq "GET" -and $context.Request.RawUrl -eq "/api/process") {
                $GetService = Get-Process
                Send-Response -Data $GetService -Code 200
            }
	        # Если не одно из методов не прошел соответветствие, отправляем ответ с кодом 405
            elseif ($context.Request.HttpMethod -ne "GET") {
                $Data = "Method not allowed"
                Send-Response -Data $Data -Code 405
            }
            # Если не одно из условий не подошло, отправляем ответ с кодом 404
            else {
                $Data = "Not found endpoint"
                Send-Response -Data $Data -Code 404
            }
        }
    }
}
finally {
    # Освобождаем сокет
    $http.Stop()
}
Итог. Взяв за основу такой скелет и доработав под себя логику, можно автоматизировать процессы конкретного приложения, у которого не предусмотрен внешний интерфейс для подобных задач. В свою очередь, на стороне клиента взаимодействовать с ним, используя любой удобный интерфейс с REST-клиентом.
This article describes the software and hardware requirements for a SystemWeaver REST API server application. To obtain a delivery of the REST API Server, contact support@systemite.se..
- Software Requirements
- Hardware Requirements
- Installation Disk Size
- Data Disk Size
- Memory(RAM)
- CPU
- Installing the REST API
- Running as a Service
- DLQ Logging During Initial Implementation
- What’s Next?
Prerequisites
-
A SystemWeaver Server installation of release R32 or later
-
A delivery of the SystemWeaver REST API server that is compatible with the installed main or mirror server
-
The software and hardware requirements outlined below are fulfilled
Software Requirements
The SystemWeaver REST API Server runs on all 64-bit versions of Windows supported by Microsoft, both desktop and server OS without restrictions. With that being said, we recommend the following Windows editions:
- Windows 10, Professional or Enterprise or later
- Windows Server 2019 or later
In addition, if not already installed, the server requires:
- .NET 6 or later
Hardware Requirements
Installation Disk Size
The actual software needs 10MB of disk space.
Data Disk Size
The SystemWeaver REST API can run on any modern disk. However, if it is located on the same machine as the main or mirror server, please read SystemWeaver Server — Software and Hardware Requirements.
Memory(RAM)
The required amount of RAM for the SystemWeaver REST API is highly dependent on the number of requests from concurrent users and the size of the data these requests result in. Unlike the SystemWeaver main or mirror server, the SystemWeaver REST API does not cache the complete database in memory, but only the current requests being processed. The general recommendation is to have memory allocated to the SystemWeaver REST API that amounts to 2 to 3 times the size of the database. For example, if the database is 10GB, you are recommended to have 20-30GB RAM for the SystemWeaver REST API Server.
If too little RAM is available, the SystemWeaver REST API Server may start swapping memory to disk which will drastically reduce performance. We recommend regular monitoring of the resource utilization, e.g., by using monitoring functions in Windows like the Task Manager, etc. in order to detect the need for upgrades of the server platform.
CPU
The SystemWeaver REST API server can run on any standard 64-bit computer. The minimum recommendation however is to use a standard performance computer with at least 8 cores. Just as for RAM, we recommend regular monitoring of the resource utilization, e.g., by using monitoring functions in Windows like the Task Manager, etc. in order to detect the need for upgrades of the server platform.
Installing the REST API
Place the installation directory on the designated server. To maximize performance, If there is enough available RAM, it is recommended to install the SystemWeaver REST API Server on the same machine as the SystemWeaver server or mirror server that it is connected to.
For large installations and/or for heavy use, the REST API should not be installed on the main server machine and should not be configured to connect to the main server. Instead, the REST API should be installed on a mirror server machine and connect to a mirror server.
Running as a Service
We recommend the REST API be run as a Windows service. If interested, SystemWeaver offers an optional Monitor Service that allows you to run multiple SystemWeaver servers, e.g., mirror server, REST API, in one service.
Example of Monitor Service running the main server, the notification server, and the REST API:
<SystemWeaverMonitor wcfServicePort="9090">
	<Servers>
		<Server restart="true">
			<exe>C:\work\SystemWeaver\bin\swDBServer.exe</exe>
			<ini>C:\work\SystemWeaver\bin\swServer.ini</ini>
			<propsC:\work\SystemWeaver\bin\swServer.props< props>
		</Server>
		<Server restart="true" startDelay="10000">
			<exe>C:\work\SystemWeaver\bin\swNotificationServer.exe</exe>
			<ini>C:\work\SystemWeaver\bin\swNotificationServer.ini</ini>
			<props>C:\work\SystemWeaver\bin\swNotificationServer.props</props>
		</Server>
		<Server restart="true" startDelay="10000">
			<exe>C:\Work\Restapi\SystemWeaver.RestApi.exe</exe>
		</Server>
	</Servers>
</SystemWeaverMonitor>
To make the Rest API server work in the Monitor Service, the user running the Monitor Service must be local administrator.
The Rest API needs to be started by an administrator so it can be accessed from outside the server.
DLQ Logging During Initial Implementation
To troubleshoot any issues that arise during the initial implementation of the REST API, we recommend that you be sure to configure DLQ logging for the SystemWeaver server. See Maintaining TcpSubServer DLQ Logging. Once you are satisfied with the stability of the installation, you can deactivate the logging.
What’s Next?
To configure the REST API, see Configuring the SystemWeaver REST API Server.
WinAPI
📝 Publication on Habr
🔎 Test version: README
REST API and Web server on base .NET HttpListener and backend only PowerShell Core (except for Web endpoints where minimal HTML, CSS, and JavaScript are used). Using WinAPI, you can quickly set up remote communication with Windows OS using API, without the need to configure WinRM or OpenSSH and get control from any platform, including Linux via browser or any REST client.
🔗 Implemented:
- ✅ Frontend web interface
- ✅ Viewing and filtering Windows events
- ✅ More than 20 unique endpoints
- ✅ Authentication
- ✅ Response codes handling
- ✅ Converting to 4 data types
- ✅ Error handling
- ✅ Control module
- ✅ Logging
🍿 The server functionality is implemented in the Kinozal-Bot project.
🐧 Since the server is built on .NET, this implementation is cross-platform, you can try managing Linux services from a Windows system: dotNET-Systemd-API.
➡️ 🚀 Install
➡️ 📊 Examples
🎉 Web server

- Process management:

- Service management:

- Hardware statistics:

- Physical and logical disk statistics, metrics IOps, SMART (via embedded module Storage 2.0) and current network stats.
To give you an example, a file download from the Internet was taking place on a remote machine:

- Sensors from LibreHardwareMonitor:

📄 Viewing and filtering Windows events

📚 Implemented endpoints
All GET requests can be output in one of the following formats: JSON (default), HTML, XML, CSV. When using a browser for GET requests, by default the response is processed in table format using HTML markup.
- GET
/api/service — Get list all services
/apt/service/service_name — Get list service by the specified name passed in URL (using wildcard format)
/apt/process — Get a list all running processes in an easy-to-read format (includes CPU and IOps performance)
/apt/process/process_name — Get list running processes by the specified name passed in URL (using wildcard format)
/api/files — Get a list of files and directories at the specified path in the Path header with the size, number of child files and directories, date of creation, access and modification
- GET metrics from WMI/CIMv2 (Common Information Model)
/api/hardware — Output of summary statistics of metrics close to Task Manager
/api/performance — Output metrics from Counter
/api/cpu — CPU use to procent for all core and total
/api/memory — Memory use to GB and procent
/api/memory/slots — Number of memory slots and their frequency
/api/disk/physical — List of all physical disks, model, size, operation status and errors
/api/disk/logical — List of all logical disks, model and size
/api/disk/partition — List partitions of all physical disks
/api/disk/smart — Temperature, health status, power on hours, start and stop cycle count
/api/disk/iops — Read and write speed, queue, Input and Output operations per second for all physical disks
/api/video — List of all video adapters, video memory size and resolution
/api/network — List of all network adapters and their settings
api/network/ipconfig — Settings for all network interfaces
api/network/stat — Network connection statistics (ports)
api/network/interface/stat/current — Current statistics of the active network interface (formatted dat)
api/network/interface/stat/total — General statistics of the active network interface since system boot (raw data)
/api/update — Windows update list
/api/software — Installed software list
/api/driver — Unique driver list
- GET metrics from Open Hardware Monitor via WMI/CIM
/api/sensor — Summary table of all sensors
Source module: PowerShellHardwareMonitor (module installation is not required)
- Web
HTTP server. Endpoints only via Web Browser.
/service — Checking status, starting and stopping services
/process — Characteristics as well as starting and stopping processes
/events/list — List of all Windows event providers
/events/<Event_Name> — List of all events of the selected log with the ability to filter by content
💡 Use the text entry form to filter messages through the browser
- POST
/apt/service/<Service_Name> — Stop, start and restart services by name (only one at a time, not wildcard format), status is transmitted in the request header (Status: <Stop/Start/Restart>). Upon execution, the service status is returned in the format of a GET request.
/apt/process/<Process_Name> — Check the number of running processes (Status: Check), stop a process by name (Status: Stop) and start a process (Status: Start). To start a process, you can use the function to search for an executable file in the file system by its name, but you can also pass the path to the executable file through the request header (e.g. Path: C:\Program Files\qBittorrent\qbittorrent.exe).
/api/file-delete — Deleting the file or directory specified in the header Path one at a time
To find an executable file, the Find-Process function is used to scan the following directories:
"C:\Program Files",
"C:\Program Files (x86)",
"C:\Users\<UserName>\AppData\Roaming",
"C:\Users\<UserName>\Documents"
🚀 Install
Use in PowerShell Core.
Use the NuGet package manager:
Install-Module ps.win.api -Repository NuGet -AllowClobber
💡 You must have a NuGet repository registered:
Register-PSRepository -Name "NuGet" -SourceLocation "https://www.nuget.org/api/v2" -InstallationPolicy Trusted
You can use this command to install a module (includes the server part) from the GitHub repository:
Invoke-Expression(New-Object Net.WebClient).DownloadString("https://raw.githubusercontent.com/Lifailon/WinAPI/rsa/WinAPI/Deploy/deploy-module-ps.win.api.ps1")
Wait for the command output: Completed
To find out where the module is installed, use the command:
> $(Get-Module ps.win.api).Path
C:\Users\lifailon\Documents\PowerShell\Modules\ps.win.api\0.4.3\ps.win.api.psm1
You can configure port, login and password for connect to the server in the configuration file WinAPI.ini, which is located in the directory with the module:
port         = 8443
user         = rest
pass         = api
Open the specified port on your firewall:
New-NetFirewallRule -DisplayName "WinAPI" -Profile Any -Direction Inbound -Action Allow -Protocol TCP -LocalPort 8443
Use the following commands to start and check the operation status server: Start-WinAPI and Test-WinAPI
> Start-WinAPI
> Test-WinAPI

Port Status
---- ------
8443 Open
To stop the server: Stop-WinAPI
> Stop-WinAPI
> Test-WinAPI

Port Status
---- ------
8443 Closed
Each call to the endpoint is logged to the WinAPI.log file. You can disable logging:
Or output the current log in the console (tail mode):
> Read-WinAPI
06.02.2024 04:41:58 Start server
06.02.2024 04:41:58 192.168.3.99:18447 Mozilla/5.0 (Windows NT 10.0; Win64; x64) AppleWebKit/537.36 (KHTML, like Gecko) Chrome/121.0.0.0 Safari/537.36 => GET / => 200
06.02.2024 04:43:45 Start server
06.02.2024 04:43:55 192.168.3.99:19107 Mozilla/5.0 (Windows NT 10.0; Win64; x64) AppleWebKit/537.36 (KHTML, like Gecko) Chrome/121.0.0.0 Safari/537.36 => GET /process => 200
06.02.2024 04:43:56 192.168.3.99:19107 Mozilla/5.0 (Windows NT 10.0; Win64; x64) AppleWebKit/537.36 (KHTML, like Gecko) Chrome/121.0.0.0 Safari/537.36 => GET /service => 200
...
Specify the data source for the /api/sensor endpoint (default: LibreHardwareMonitor):
SensorSource = OpenHardwareMonitor
💡 For the endpoint to work, you must download the portable version of the LibreHardwareMonitor (Default) or OpenHardwareMonitor program in path C:\Users\<UserName>\Documents\LibreHardwareMonitor and C:\Users\<UserName>\Documents\OpenHardwareMonitor\OpenHardwareMonitor.
For a quick installation LibreHardwareMonitor, use this command in your terminal:
Invoke-Expression(New-Object Net.WebClient).DownloadString("https://raw.githubusercontent.com/Lifailon/PowerShell.HardwareMonitor/rsa/Install/Install-LibreHardwareMonitor.ps1")
Install OpenHardwareMonitor:
Invoke-Expression(New-Object Net.WebClient).DownloadString("https://raw.githubusercontent.com/Lifailon/PowerShell.HardwareMonitor/rsa/Install/Install-OpenHardwareMonitor.ps1")
There are other ways to start the server, but they are not supported since version 0.4 and the advent the module.
- Running service (added in version 0.3.1)
💡 For reason unknown to me, the service doesn’t process all the code on startup (doesn’t create an ini file and hangs at POST request to stop the process).
To install the server part as a service (used NSSM), download scripts to automatically deployument, start, stop and remove.
- Running executable (added in version 0.3.0)
💡 PowerShell 5.1 acts as the default handler (limitations of the ps2exe module), which prevents all endpoints from working correctly
There are two options for launching using an executable file (build script).
winapi-console.exe — process startup in a window with logging output of connections to the server
winapi-process.exe — background process startup
To stop the background process, use the command: Get-Process *winapi* | Stop-Process
📡 Module
Module for server management (starting and stopping background process) and interaction with remote server. The module implements most of the functions used in the server part to run on a local computer and receive the same information from a remote computer via WinAPI.
> Import-Module ps.win.api
> Get-command -Module ps.win.api

CommandType     Name                             Version    Source
-----------     ----                             -------    ------
Function        Find-Process                     0.4.3      WinAPI
Function        Get-CPU                          0.4.3      WinAPI
Function        Get-DiskLogical                  0.4.3      WinAPI
Function        Get-DiskPartition                0.4.3      WinAPI
Function        Get-DiskPhysical                 0.4.3      WinAPI
Function        Get-Driver                       0.4.3      WinAPI
Function        Get-Event                        0.4.3      WinAPI
Function        Get-Files                        0.4.3      WinAPI
Function        Get-Hardware                     0.4.3      WinAPI
Function        Get-HardwareNoJob                0.4.3      WinAPI
Function        Get-IOps                         0.4.3      WinAPI
Function        Get-MemorySize                   0.4.3      WinAPI
Function        Get-MemorySlots                  0.4.3      WinAPI
Function        Get-NetInterfaceStat             0.4.3      WinAPI
Function        Get-NetIpConfig                  0.4.3      WinAPI
Function        Get-NetStat                      0.4.3      WinAPI
Function        Get-Performance                  0.4.3      WinAPI
Function        Get-ProcessPerformance           0.4.3      WinAPI
Function        Get-Smart                        0.4.3      WinAPI
Function        Get-Software                     0.4.3      WinAPI
Function        Get-VideoCard                    0.4.3      WinAPI
Function        Get-WinUpdate                    0.4.3      WinAPI
Function        Read-WinAPI                      0.4.3      WinAPI
Function        Start-WinAPI                     0.4.3      WinAPI
Function        Stop-WinAPI                      0.4.3      WinAPI
Function        Test-WinAPI                      0.4.3      WinAPI
The format is always the same, if you don’t use the ComputerName parameter, the function runs locally on your computer. If you use the ComputerName parameter, we access the desired endpoint and get a response from the WinAPI server.
Example:
> Get-DiskPhysical | Format-Table

Model                         Size   PartitionCount Interface Status ConfigManagerErrorCode LastErrorCode
-----                         ----   -------------- --------- ------ ---------------------- -------------
WD PC SN740 SDDPNQD-1T00-1027 954 Gb              4 SCSI      OK                          0

> Get-DiskPhysical -ComputerName 192.168.3.100 -Port 8443 -User rest -Pass api | Format-Table

Model                  Size    PartitionCount Interface Status ConfigManagerErrorCode LastErrorCode
-----                  ----    -------------- --------- ------ ---------------------- -------------
ST1000DM003-1CH162     932 Gb               1 IDE       OK                          0
WDC WD2005FBYZ-01YCBB2 1863 Gb              1 IDE       OK                          0
MSI M390 250GB         233 Gb               3 SCSI      OK                          0
💡 The Get-Hardware function uses the ThreadJob module, the script provides automatic installation in case of its absence. This is the only function which execution time was reduced by half due to threads (on average 3.3 seconds versus 1.4 seconds).

🔒 Authorization
Base authorization has been implemented (based on Base64).
Default login and password:
$user = "rest"
$pass = "api"
- Example 1.
$SecureString = ConvertTo-SecureString $pass -AsPlainText -Force
$Credential = New-Object System.Management.Automation.PSCredential($user, $SecureString)
Invoke-RestMethod -Credential $Credential -AllowUnencryptedAuthentication -Uri http://192.168.3.99:8443/api/service
- Example 2.
$EncodingCred = [System.Convert]::ToBase64String([System.Text.Encoding]::UTF8.GetBytes("${user}:${pass}"))
$Headers = @{"Authorization" = "Basic ${EncodingCred}"}
Invoke-RestMethod -Headers $Headers -Uri http://192.168.3.99:8443/api/service
- Example 3. cURL client. Receiving data in different formats.
user="rest"
pass="api"
curl -s -X GET -u $user:$pass http://192.168.3.99:8443/api/service | jq  -r '.[] | {data: "\(.Name) - \(.Status)"} | .data'
curl -s -X GET -u $user:$pass http://192.168.3.99:8443/api/service/win
curl -s -X GET -u $user:$pass -H 'Content-Type: application/json' http://192.168.3.99:8443/api/service/winrm
curl -s -X GET -u $user:$pass -H 'Content-Type: application/html' http://192.168.3.99:8443/api/service/winrm
curl -s -X GET -u $user:$pass -H 'Content-Type: application/xml' http://192.168.3.99:8443/api/service/winrm
curl -s -X GET -u $user:$pass -H 'Content-Type: application/csv' http://192.168.3.99:8443/api/service/winrm
curl -s -X GET -u $user:$pass http://192.168.3.99:8443/api/process
curl -s -X GET -u $user:$pass http://192.168.3.99:8443/api/process/torrent
It is possible to configure filtering by IP address or subnet. It is possible to configure other authentication methods to HttpListener.
📢 Response code
200. Request completed successfully.
400. Bad Request. Invalid header and service or process could not be found.
401. Unauthorized. Login or password is invalid.
404. Not found endpoint. Response to the lack of endpoints.
405. Method not allowed. Response to other methods.
⚠️ Operational stability
Processing of simultaneous requests from several clients (managed to test three simultaneous connections).
If the previous request has not been processed yet and a new request from the same client arrives, the server terminates with an error, this behavior was detected in the browser when quickly refreshing pages, to handle this event is implemented automatic restart of the server. For Web-client such restart is processed without error and in the process of page refresh the response of the last request is returned.
In Invoke-RestMethod and curl, interrupting the previous request and sending a new one to another endpoint works without error and the response of the last request is returned (taking into account the processing time of the previous one).
🐧 Examples POST request from Linux client
- Stop and start service WinRM:
First find the service to pass its full name to the to url for POST request (example, using part of the name in GET request).
user="rest"
pass="api"
curl -s -X GET -u $user:$pass http://192.168.3.99:8443/api/service/win | jq -r .[].Name
curl -s -X POST -u $user:$pass --data '' http://192.168.3.99:8443/api/service/winrm -H "Status: Stop"
curl -s -X POST -u $user:$pass --data '' http://192.168.3.99:8443/api/service/winrm -H "Status: Start"
curl -s -X GET -u $user:$pass http://192.168.3.99:8443/api/service/winrm | jq -r .Status
- Stop and start process qBittorrent:
First find the process by its name in wilcard format using a GET request. Using Check in the Status header, we display the number of running processes. To stop the process, use header Status: Stop. To run the process, two examples are given using the name to find the executable and the second option, specify the full path to the executable.
user="rest"
pass="api"
curl -s -X GET -u $user:$pass http://192.168.3.99:8443/api/process/torrent
curl -s -X POST -u $user:$pass --data '' http://192.168.3.99:8443/api/process/qbittorrent -H "Status: Check"
curl -s -X POST -u $user:$pass --data '' http://192.168.3.99:8443/api/process/qbittorrent -H "Status: Stop"
curl -s -X POST -u $user:$pass --data '' http://192.168.3.99:8443/api/process/qbittorrent -H "Status: Start"
- Stop and start process Plex Media Server:
If the service in the name contains spaces, pass the name in the url request using the underscore (_) delimiter.
user="rest"
pass="api"
curl -s -X POST -u $user:$pass --data '' http://192.168.3.99:8443/api/process/plex_media_server -H "Status: Stop"
curl -s -X POST -u $user:$pass --data '' http://192.168.3.99:8443/api/process/plex_media_server -H "Status: Start" -H "Path: C:\Program Files\Plex\Plex Media Server\Plex Media Server.exe"
- Delete file
First, we look through the parent directories and look for the required file. In the Path header we pass the FullName of the desired file (or directory).
curl -s -X GET -u $user:$pass http://192.168.3.99:8443/api/files -H "Path: D:/"
curl -s -X GET -u $user:$pass http://192.168.3.99:8443/api/files -H "Path: D:/Movies"
curl -s -X GET -u $user:$pass http://192.168.3.99:8443/api/files -H "Path: D:/Movies/The-Flash"
curl -s -X GET -u $user:$pass http://192.168.3.99:8443/api/files -H "Path: D:/Movies/The-Flash/4 sezon"
curl -s -X GET -u $user:$pass http://192.168.3.99:8443/api/files -H "Path: D:/Movies/The-Flash/4 sezon/The.Flash.S04E23.1080p.rus.LostFilm.TV.mkv"
curl -s -X POST -u $user:$pass -data '' http://192.168.3.99:8443/api/file-delete -H "Path: D:/Movies/The-Flash/4 sezon/The.Flash.S04E23.1080p.rus.LostFilm.TV.mkv"
🔌 Windows client
$user = "rest"
$pass = "api"
$EncodingCred = [System.Convert]::ToBase64String([System.Text.Encoding]::UTF8.GetBytes("${user}:${pass}"))
- Stop service WinRM:
$Headers = @{"Authorization" = "Basic ${EncodingCred}"}
$Headers += @{"Status" = "Stop"}
Invoke-RestMethod -Headers $Headers -Uri http://192.168.3.99:8443/api/service/winrm
Invoke-RestMethod -Headers $Headers -Method Post -Uri http://192.168.3.99:8443/api/service/winrm
- Start service WinRM:
$Headers = @{"Authorization" = "Basic ${EncodingCred}"}
$Headers += @{"Status" = "Start"}
Invoke-RestMethod -Headers $Headers -Method Post -Uri http://192.168.3.99:8443/api/service/winrm
📬 Change data type
Examples:
user=rest
pass=api

curl -s -X GET -u $user:$pass -H 'Content-Type: application/json' http://192.168.3.99:8443/api/service/win | jq
[
  {
    "Name": "WinAPI",
    "DisplayName": "WinAPI",
    "Status": "Stopped",
    "StartType": "Manual"
  },
  {
    "Name": "WinDefend",
    "DisplayName": "Служба антивирусной программы Microsoft Defender",
    "Status": "Running",
    "StartType": "Automatic"
  },
  {
    "Name": "WinHttpAutoProxySvc",
    "DisplayName": "Служба автоматического обнаружения веб-прокси WinHTTP",
    "Status": "Running",
    "StartType": "Manual"
  },
  {
    "Name": "Winmgmt",
    "DisplayName": "Инструментарий управления Windows",
    "Status": "Running",
    "StartType": "Automatic"
  },
  {
    "Name": "WinRM",
    "DisplayName": "Служба удаленного управления Windows (WS-Management)",
    "Status": "Stopped",
    "StartType": "Manual"
  }
]

curl -s -X GET -u $user:$pass -H 'Content-Type: application/xml' http://192.168.3.99:8443/api/service/winrm | xq
<?xml version="1.0" encoding="utf-8"?>
<Objects>
  <Object Type="System.Management.Automation.PSCustomObject">
    <Property Name="Name" Type="System.String">WinRM</Property>
    <Property Name="DisplayName" Type="System.String">Служба удаленного управления Windows (WS-Management)</Property>
    <Property Name="Status" Type="System.String">Stopped</Property>
    <Property Name="StartType" Type="System.String">Manual</Property>
  </Object>
</Objects>

curl -s -X GET -u $user:$pass -H 'Content-Type: application/csv' http://192.168.3.99:8443/api/service/winrm
"Name","DisplayName","Status","StartType" "WinRM","Служба удаленного управления Windows (WS-Management)","Stopped","Manual"

curl -s -X GET -u $user:$pass -H 'Content-Type: application/html' http://192.168.3.99:8443/api/service/winrm
<!DOCTYPE html PUBLIC "-//W3C//DTD XHTML 1.0 Strict//EN"  "http://www.w3.org/TR/xhtml1/DTD/xhtml1-strict.dtd"> <html xmlns="http://www.w3.org/1999/xhtml"> <head> <title>HTML TABLE</title> </head><body> <table> <colgroup><col/><col/><col/><col/></colgroup> <tr><th>Name</th><th>DisplayName</th><th>Status</th><th>StartType</th></tr> <tr><td>WinRM</td><td>Служба удаленного управления Windows (WS-Management)</td><td>Stopped</td><td>Manual</td></tr> </table> </body></html>
📊 Output data examples
Service management
lifailon@hv-devops-01:~$ user="rest"
lifailon@hv-devops-01:~$ pass="api"
curl -s -X GET -u $user:$pass http://192.168.3.99:8443/api/service/win
[
  {
    "Name": "WinDefend",
    "DisplayName": "Служба антивирусной программы Microsoft Defender",
    "Status": "Running",
    "StartType": "Automatic"
  },
  {
    "Name": "WinHttpAutoProxySvc",
    "DisplayName": "Служба автоматического обнаружения веб-прокси WinHTTP",
    "Status": "Running",
    "StartType": "Manual"
  },
  {
    "Name": "Winmgmt",
    "DisplayName": "Инструментарий управления Windows",
    "Status": "Running",
    "StartType": "Automatic"
  },
  {
    "Name": "WinRM",
    "DisplayName": "Служба удаленного управления Windows (WS-Management)",
    "Status": "Stopped",
    "StartType": "Manual"
  }
]
curl -s -X GET -u $user:$pass -H 'Content-Type: application/json' http://192.168.3.99:8443/api/service/winrm
{
  "Name": "WinRM",
  "DisplayName": "Служба удаленного управления Windows (WS-Management)",
  "Status": "Stopped",
  "StartType": "Manual"
}
curl -s -X POST -u $user:$pass --data '' http://192.168.3.99:8443/api/service/winrm -H "Status: Start"
{
  "Name": "winrm",
  "DisplayName": "Служба удаленного управления Windows (WS-Management)",
  "Status": "Running",
  "StartType": "Manual"
}
Process management
curl -s -X POST -u $user:$pass --data '' http://192.168.3.99:8443/api/process/qbittorrent -H "Status: Check"
Number active qbittorrent processes: 0
curl -s -X POST -u $user:$pass --data '' http://192.168.3.99:8443/api/process/qbittorrent -H "Status: Start"
Number active qbittorrent processes: 1
curl -s -u $user:$pass http://192.168.3.99:8443/api/process/qbittorrent
{
  "Name": "qbittorrent",
  "ProcTime": "0 %",
  "IOps": 3,
  "IObsRead": "1,84 Mb",
  "IObsWrite": "0,00 Mb",
  "RunTime": "06:57:59",
  "TotalTime": "00:01:42",
  "UserTime": "00:01:09",
  "PrivTime": "00:00:33",
  "WorkingSet": "323,29 Mb",
  "PeakWorkingSet": "366,97 Mb",
  "PageMemory": "965,08 Mb",
  "Threads": 25,
  "Handles": 623,
  "Path": "C:\\Program Files\\qBittorrent\\qbittorrent.exe",
  "Company": "The qBittorrent Project",
  "Version": "v4.6.0"
}
curl -s -X POST -u $user:$pass --data '' http://192.168.3.99:8443/api/process/qbittorrent -H "Status: Stop"
Number active qbittorrent processes: 0
Hardware metrics (general summary, performance, cpu, memory and video)
curl -s -X GET -u $user:$pass http://192.168.3.99:8443/api/hardware
{
  "Host": "HUAWEI-BOOK",
  "Uptime": "17:17",
  "BootDate": "01.02.2024 09:05:04",
  "Owner": "lifailon",
  "OS": "Майкрософт Windows 10 Pro",
  "Motherboard": "HUAWEI MRGF-XX-PCB M1010",
  "Processor": "12th Gen Intel(R) Core(TM) i7-1260P",
  "Core": 12,
  "Thread": 16,
  "CPU": "14 %",
  "ProcessCount": 305,
  "ThreadsCount": 4641,
  "HandlesCount": 157065,
  "MemoryAll": "16 GB",
  "MemoryUse": "11,00 GB",
  "MemoryUseProc": "70 %",
  "WorkingSet": "11,06 GB",
  "PageMemory": "12,54 GB",
  "MemorySlots": 8,
  "PhysicalDiskCount": 1,
  "PhysicalDiskAllSize": "954 Gb",
  "LogicalDiskCount": 3,
  "LogicalDiskAllSize": "1053 Gb",
  "DiskTotalTime": "2 %",
  "DiskTotalIOps": 3,
  "DiskTotalRead": "0,015 MByte/Sec",
  "DiskTotalWrite": "0,000 MByte/Sec",
  "VideoCardCount": 3,
  "VideoCardAllSize": "1 Gb",
  "NetworkAdapterEnableCount": 3,
  "NetworkReceivedCurrent": "0,154 MByte/Sec",
  "NetworkSentCurrent": "0,044 MByte/Sec",
  "NetworkReceivedTotal": "4,13 GByte",
  "NetworkSentTotal": "0,34 GByte",
  "PortListenCount": 50,
  "PortEstablishedCount": 54
}
curl -s -X GET -u $user:$pass http://192.168.3.99:8443/api/performance
{
  "CPUTotalTime": "1 %",
  "MemoryUse": "30 %",
  "DiskTotalTime": "12 %",
  "AdapterName": "intel[r] wi-fi 6e ax211 160mhz",
  "AdapterSpeed": "0,093 MByte/Sec"
}
curl -s -X GET -u $user:$pass http://192.168.3.99:8443/api/cpu
[
  {
    "Name": "0",
    "ProcessorTime": "8 %",
    "PrivilegedTime": "6 %",
    "UserTime": "6 %",
    "InterruptTime": "0 %",
    "IdleTime": "79 %"
  },
  {
    "Name": "1",
    "ProcessorTime": "0 %",
    "PrivilegedTime": "0 %",
    "UserTime": "0 %",
    "InterruptTime": "0 %",
    "IdleTime": "99 %"
  },
  {
    "Name": "2",
    "ProcessorTime": "2 %",
    "PrivilegedTime": "0 %",
    "UserTime": "6 %",
    "InterruptTime": "0 %",
    "IdleTime": "98 %"
  },
  {
    "Name": "3",
    "ProcessorTime": "8 %",
    "PrivilegedTime": "18 %",
    "UserTime": "0 %",
    "InterruptTime": "0 %",
    "IdleTime": "76 %"
  },
  {
    "Name": "4",
    "ProcessorTime": "0 %",
    "PrivilegedTime": "0 %",
    "UserTime": "0 %",
    "InterruptTime": "0 %",
    "IdleTime": "99 %"
  },
  {
    "Name": "5",
    "ProcessorTime": "8 %",
    "PrivilegedTime": "18 %",
    "UserTime": "0 %",
    "InterruptTime": "0 %",
    "IdleTime": "76 %"
  },
  {
    "Name": "6",
    "ProcessorTime": "0 %",
    "PrivilegedTime": "0 %",
    "UserTime": "0 %",
    "InterruptTime": "0 %",
    "IdleTime": "100 %"
  },
  {
    "Name": "7",
    "ProcessorTime": "8 %",
    "PrivilegedTime": "18 %",
    "UserTime": "0 %",
    "InterruptTime": "0 %",
    "IdleTime": "76 %"
  },
  {
    "Name": "8",
    "ProcessorTime": "14 %",
    "PrivilegedTime": "12 %",
    "UserTime": "6 %",
    "InterruptTime": "0 %",
    "IdleTime": "68 %"
  },
  {
    "Name": "9",
    "ProcessorTime": "33 %",
    "PrivilegedTime": "18 %",
    "UserTime": "18 %",
    "InterruptTime": "0 %",
    "IdleTime": "60 %"
  },
  {
    "Name": "10",
    "ProcessorTime": "27 %",
    "PrivilegedTime": "12 %",
    "UserTime": "18 %",
    "InterruptTime": "0 %",
    "IdleTime": "68 %"
  },
  {
    "Name": "11",
    "ProcessorTime": "27 %",
    "PrivilegedTime": "18 %",
    "UserTime": "12 %",
    "InterruptTime": "0 %",
    "IdleTime": "62 %"
  },
  {
    "Name": "12",
    "ProcessorTime": "27 %",
    "PrivilegedTime": "6 %",
    "UserTime": "24 %",
    "InterruptTime": "0 %",
    "IdleTime": "71 %"
  },
  {
    "Name": "13",
    "ProcessorTime": "14 %",
    "PrivilegedTime": "12 %",
    "UserTime": "6 %",
    "InterruptTime": "0 %",
    "IdleTime": "76 %"
  },
  {
    "Name": "14",
    "ProcessorTime": "21 %",
    "PrivilegedTime": "18 %",
    "UserTime": "6 %",
    "InterruptTime": "0 %",
    "IdleTime": "69 %"
  },
  {
    "Name": "15",
    "ProcessorTime": "0 %",
    "PrivilegedTime": "0 %",
    "UserTime": "0 %",
    "InterruptTime": "0 %",
    "IdleTime": "94 %"
  },
  {
    "Name": "_Total",
    "ProcessorTime": "11 %",
    "PrivilegedTime": "9 %",
    "UserTime": "6 %",
    "InterruptTime": "0 %",
    "IdleTime": "80 %"
  }
]
curl -s -X GET -u $user:$pass http://192.168.3.99:8443/api/memory
{
  "MemoryAll": "15,73 GB",
  "MemoryUse": "10,98 GB",
  "MemoryUseProc": "70 %",
  "PageSize": "48,00 GB",
  "PageUse": "7,92 GB",
  "PageUseProc": "17 %",
  "PagePath": "D:\\pagefile.sys",
  "MemoryVirtAll": "63,73 GB",
  "MemoryVirtUse": "18,90 GB",
  "MemoryVirtUseProc": "30 %",
  "ProcWorkingSet": "11,02 GB",
  "ProcPageMemory": "12,62 GB"
}
curl -s -X GET -u $user:$pass http://192.168.3.99:8443/api/memory/slots
[
  {
    "Tag": "Physical Memory 0",
    "Model": "5200 Mhz  ",
    "Size": "2048 Mb",
    "Device": "Controller0-ChannelA",
    "Bank": "BANK 0"
  },
  {
    "Tag": "Physical Memory 1",
    "Model": "5200 Mhz  ",
    "Size": "2048 Mb",
    "Device": "Controller0-ChannelB",
    "Bank": "BANK 1"
  },
  {
    "Tag": "Physical Memory 2",
    "Model": "5200 Mhz  ",
    "Size": "2048 Mb",
    "Device": "Controller0-ChannelC",
    "Bank": "BANK 2"
  },
  {
    "Tag": "Physical Memory 3",
    "Model": "5200 Mhz  ",
    "Size": "2048 Mb",
    "Device": "Controller0-ChannelD",
    "Bank": "BANK 3"
  },
  {
    "Tag": "Physical Memory 4",
    "Model": "5200 Mhz  ",
    "Size": "2048 Mb",
    "Device": "Controller1-ChannelA",
    "Bank": "BANK 0"
  },
  {
    "Tag": "Physical Memory 5",
    "Model": "5200 Mhz  ",
    "Size": "2048 Mb",
    "Device": "Controller1-ChannelB",
    "Bank": "BANK 1"
  },
  {
    "Tag": "Physical Memory 6",
    "Model": "5200 Mhz  ",
    "Size": "2048 Mb",
    "Device": "Controller1-ChannelC",
    "Bank": "BANK 2"
  },
  {
    "Tag": "Physical Memory 7",
    "Model": "5200 Mhz  ",
    "Size": "2048 Mb",
    "Device": "Controller1-ChannelD",
    "Bank": "BANK 3"
  }
]
curl -s -X GET -u $user:$pass http://192.168.3.99:8443/api/video
[
  {
    "Model": "Intel(R) Iris(R) Xe Graphics",
    "Display": "3120x2080",
    "VideoRAM": "1 Gb"
  },
  {
    "Model": "Virtual Display Device",
    "Display": "3840x2560",
    "VideoRAM": "0 Gb"
  },
  {
    "Model": "Citrix Indirect Display Adapter",
    "Display": "x",
    "VideoRAM": "0 Gb"
  }
]
Disk metrics (Physical, Logical, SMART and IOps)
curl -s -X GET -u $user:$pass http://192.168.3.99:8443/api/disk/physical
{
  "Model": "WD PC SN740 SDDPNQD-1T00-1027",
  "Size": "954 Gb",
  "PartitionCount": 4,
  "Interface": "SCSI",
  "Status": "OK",
  "ConfigManagerErrorCode": 0,
  "LastErrorCode": null
}
curl -s -X GET -u $user:$pass http://192.168.3.99:8443/api/disk/logical
[
  {
    "Logical_Disk": "C:",
    "FileSystem": "NTFS",
    "VolumeName": "",
    "AllSize": "153 Gb",
    "FreeSize": "44 Gb",
    "Free": "29 %"
  },
  {
    "Logical_Disk": "D:",
    "FileSystem": "NTFS",
    "VolumeName": "",
    "AllSize": "800 Gb",
    "FreeSize": "413 Gb",
    "Free": "52 %"
  },
  {
    "Logical_Disk": "G:",
    "FileSystem": "FAT32",
    "VolumeName": "Google Drive",
    "AllSize": "100 Gb",
    "FreeSize": "42 Gb",
    "Free": "42 %"
  }
]
curl -s -X GET -u $user:$pass http://192.168.3.99:8443/api/disk/iops
[
  {
    "Name": "0 D: C:",
    "ReadWriteTime": "0 %",
    "ReadTime": "0 %",
    "WriteTime": "0 %",
    "IdleTime": "99 %",
    "QueueLength": 0,
    "BytesPersec": "0,000 MByte/Sec",
    "ReadBytesPersec": "0,000 MByte/Sec",
    "WriteBytesPersec": "0,000 MByte/Sec",
    "IOps": 0,
    "ReadsIOps": 0,
    "WriteIOps": 0
  },
  {
    "Name": "_Total",
    "ReadWriteTime": "0 %",
    "ReadTime": "0 %",
    "WriteTime": "0 %",
    "IdleTime": "99 %",
    "QueueLength": 0,
    "BytesPersec": "0,000 MByte/Sec",
    "ReadBytesPersec": "0,000 MByte/Sec",
    "WriteBytesPersec": "0,000 MByte/Sec",
    "IOps": 0,
    "ReadsIOps": 0,
    "WriteIOps": 0
  }
]
curl -s -X GET -u $user:$pass http://192.168.3.99:8443/api/disk/smart
{
  "DiskName": "WD PC SN740 SDDPNQD-1T00-1027",
  "Temperature": 61,
  "HealthStatus": "Healthy",
  "OperationalStatus": "OK",
  "MediaType": "SSD",
  "BusType": "NVMe",
  "PowerOnHours": null,
  "StartStopCycleCount": null
}
Network interface stats
curl -s -X GET -u $user:$pass http://192.168.3.99:8443/api/network/interface/stat/current
{
  "Name": "Intel[R] Wi-Fi 6E AX211 160MHz",
  "Total": "0,087 MByte/Sec",
  "Received": "0,063 MByte/Sec",
  "Sent": "0,024 MByte/Sec",
  "PacketsPersec": 416,
  "PacketsReceivedPersec": 189,
  "PacketsReceivedUnicastPersec": 189,
  "PacketsReceivedNonUnicastPersec": 0,
  "PacketsReceivedDiscarded": 0,
  "PacketsReceivedErrors": 0,
  "PacketsSentPersec": 226,
  "PacketsSentUnicastPersec": 226,
  "PacketsSentNonUnicastPersec": 0
}
curl -s -X GET -u $user:$pass http://192.168.3.99:8443/api/network/interface/stat/total
{
  "Name": "Intel[R] Wi-Fi 6E AX211 160MHz",
  "Total": "4,73 GByte",
  "Received": "4,36 GByte",
  "Sent": "0,37 GByte",
  "PacketsPersec": 9163133,
  "PacketsReceivedPersec": 5580358,
  "PacketsReceivedUnicastPersec": 5540535,
  "PacketsReceivedNonUnicastPersec": 39823,
  "PacketsReceivedDiscarded": 0,
  "PacketsReceivedErrors": 0,
  "PacketsSentPersec": 3582775,
  "PacketsSentUnicastPersec": 3572843,
  "PacketsSentNonUnicastPersec": 9932
}
Network stats and IP configuration
curl -s -X GET -u $user:$pass http://192.168.3.99:8443/api/network/stat | jq .[-1]
{
  "ProcessName": "svchost",
  "LocalAddress": "0.0.0.0",
  "LocalPort": 135,
  "RemotePort": 0,
  "RemoteHostName": "",
  "RemoteAddress": "0.0.0.0",
  "State": 2,
  "CreationTime": "2024-02-03T01:08:07+03:00",
  "RunTime": "3.16:47:13",
  "ProcessPath": "C:\\Windows\\system32\\svchost.exe"
}
curl -s -X GET -u $user:$pass http://192.168.3.99:8443/api/network/ipconfig | jq .[-1]
{
  "Description": "Hyper-V Virtual Ethernet Adapter #2",
  "IPAddress": "172.22.48.1 fe80::1637:f6c9:59b9:dc6f",
  "GatewayDefault": "",
  "Subnet": "255.255.240.0 64",
  "DNSServer": "",
  "MACAddress": "00:15:5D:CB:0C:CD",
  "DHCPEnabled": false,
  "DHCPServer": null,
  "DHCPLeaseObtained": null,
  "DHCPLeaseExpires": null
}
Driver, software and Windows update
curl -s -X GET -u $user:$pass http://192.168.3.99:8443/api/driver | jq .[-1]
{
  "DriverProviderName": "WireGuard LLC",
  "FriendlyName": "ProtonVPN Tunnel",
  "Description": "Wintun Userspace Tunnel",
  "DriverVersion": "0.13.0.0",
  "DriverDate": "2021-02-08T03:00:00+03:00"
}
curl -s -X GET -u $user:$pass http://192.168.3.99:8443/api/software | jq .[-2]
{
  "Name": "ILSpy",
  "Version": "8.0.0.7345",
  "Vendor": "ICSharpCode Team",
  "InstallDate": "16.10.2023",
  "InstallLocation": null,
  "InstallSource": "D:\\Install\\IDE\\.NET\\",
  "PackageName": "ILSpy-8.0.0.7345.msi",
  "LocalPackage": "C:\\Windows\\Installer\\21787.msi"
}
curl -s -X GET -u $user:$pass http://192.168.3.99:8443/api/update | jq .[0]
{
  "HotFixID": "KB5033918",
  "InstallDate": "13.01.2024",
  "Description": "Update",
  "InstalledBy": "NT AUTHORITY\\СИСТЕМА"
}
File system
curl -s -X GET -u $user:$pass http://192.168.3.99:8443/api/files -H "Path: D:/Movies"
[
  {
    "Name": "МДЖ-03",
    "FullName": "D:\\Movies\\МДЖ-03",
    "Type": "Directory",
    "Size": "14.243 GB",
    "Files": 9,
    "Directory": 0,
    "CreationTime": "25.10.2023 03:58:41",
    "LastAccessTime": "02.02.2024 02:45:19",
    "LastWriteTime": "25.10.2023 04:05:22"
  },
  {
    "Name": "Adventure-Time",
    "FullName": "D:\\Movies\\Adventure-Time",
    "Type": "Directory",
    "Size": "61.73 GB",
    "Files": 292,
    "Directory": 11,
    "CreationTime": "04.05.2023 10:05:23",
    "LastAccessTime": "02.02.2024 02:45:19",
    "LastWriteTime": "04.05.2023 10:06:22"
  },
  {
    "Name": "Prikluchenie-Dsheki-Chana",
    "FullName": "D:\\Movies\\Prikluchenie-Dsheki-Chana",
    "Type": "Directory",
    "Size": "22.862 GB",
    "Files": 95,
    "Directory": 0,
    "CreationTime": "10.07.2023 10:00:55",
    "LastAccessTime": "02.02.2024 02:45:19",
    "LastWriteTime": "10.07.2023 10:03:28"
  },
  {
    "Name": "Shaman-King",
    "FullName": "D:\\Movies\\Shaman-King",
    "Type": "Directory",
    "Size": "15.123 GB",
    "Files": 64,
    "Directory": 0,
    "CreationTime": "10.07.2023 10:03:10",
    "LastAccessTime": "02.02.2024 02:45:19",
    "LastWriteTime": "10.07.2023 10:07:01"
  },
  {
    "Name": "The-Cleaner-S02",
    "FullName": "D:\\Movies\\The-Cleaner-S02",
    "Type": "Directory",
    "Size": "7.829 GB",
    "Files": 6,
    "Directory": 0,
    "CreationTime": "25.10.2023 03:47:32",
    "LastAccessTime": "02.02.2024 02:45:19",
    "LastWriteTime": "25.10.2023 03:51:10"
  },
  {
    "Name": "The-Flash",
    "FullName": "D:\\Movies\\The-Flash",
    "Type": "Directory",
    "Size": "76.569 GB",
    "Files": 43,
    "Directory": 2,
    "CreationTime": "30.07.2023 01:13:20",
    "LastAccessTime": "02.02.2024 02:45:06",
    "LastWriteTime": "30.07.2023 03:22:09"
  }
]
curl -s -X GET -u $user:$pass http://192.168.3.99:8443/api/files -H "Path: D:/Movies/The-Flash"
There are 20 files in the season 4 directory:
[
  {
    "Name": "3 sezon",
    "FullName": "D:\\Movies\\The-Flash\\3 sezon",
    "Type": "Directory",
    "Size": "41.01 GB",
    "Files": 23,
    "Directory": 0,
    "CreationTime": "30.07.2023 01:13:20",
    "LastAccessTime": "02.02.2024 02:08:32",
    "LastWriteTime": "30.07.2023 01:14:37"
  },
  {
    "Name": "4 sezon",
    "FullName": "D:\\Movies\\The-Flash\\4 sezon",
    "Type": "Directory",
    "Size": "35.559 GB",
    "Files": 20,
    "Directory": 0,
    "CreationTime": "30.07.2023 01:22:15",
    "LastAccessTime": "02.02.2024 02:08:32",
    "LastWriteTime": "18.12.2023 12:00:37"
  }
]
curl -s -X GET -u $user:$pass http://192.168.3.99:8443/api/files -H "Path: D:/Movies/The-Flash/4 sezon/The.Flash.S04E20.1080p.rus.LostFilm.TV.mkv"
{
  "Name": "The.Flash.S04E20.1080p.rus.LostFilm.TV.mkv",
  "FullName": "D:\\Movies\\The-Flash\\4 sezon\\The.Flash.S04E20.1080p.rus.LostFilm.TV.mkv",
  "Type": "File",
  "Size": "1.786 GB",
  "Files": 0,
  "Directory": 0,
  "CreationTime": "30.07.2023 03:06:02",
  "LastAccessTime": "17.12.2023 11:45:02",
  "LastWriteTime": "30.07.2023 03:07:19"
}
❌ We’re deleting episode 20 of the serial:
curl -s -X POST -u $user:$pass -data '' http://192.168.3.99:8443/api/file-delete -H "Path: D:/Movies/The-Flash/4 sezon/The.Flash.S04E20.1080p.rus.LostFilm.TV.mkv"
Deleted successfully: D:/Movies/The-Flash/4 sezon/The.Flash.S04E20.1080p.rus.LostFilm.TV.mkv (File).
curl -s -X GET -u $user:$pass http://192.168.3.99:8443/api/files -H "Path: D:/Movies/The-Flash/4 sezon/The.Flash.S04E20.1080p.rus.LostFilm.TV.mkv"
Bad Request. Path could not be found.
curl -s -X GET -u $user:$pass http://192.168.3.99:8443/api/files -H "Path: D:/Movies/The-Flash"
There are now 19 files in the Season 4 catalog:
[
  {
    "Name": "3 sezon",
    "FullName": "D:\\Movies\\The-Flash\\3 sezon",
    "Type": "Directory",
    "Size": "41.01 GB",
    "Files": 23,
    "Directory": 0,
    "CreationTime": "30.07.2023 01:13:20",
    "LastAccessTime": "02.02.2024 02:45:06",
    "LastWriteTime": "30.07.2023 01:14:37"
  },
  {
    "Name": "4 sezon",
    "FullName": "D:\\Movies\\The-Flash\\4 sezon",
    "Type": "Directory",
    "Size": "33.773 GB",
    "Files": 19,
    "Directory": 0,
    "CreationTime": "30.07.2023 01:22:15",
    "LastAccessTime": "02.02.2024 02:45:06",
    "LastWriteTime": "18.12.2023 12:00:37"
  }
]
📑 Server log
Example of logging different clients: Google Chrome, PowerShell (Invoke-RestMethod) and curl.
PS C:\Users\lifailon\Documents\Git\WinAPI> . 'C:\Users\lifailon\Documents\Git\WinAPI\WinAPI\WinAPI-0.3.ps1'
Running on port 8443
192.168.3.99:49843 Mozilla/5.0 (Windows NT 10.0; Win64; x64) AppleWebKit/537.36 (KHTML, like Gecko) Chrome/120.0.0.0 Safari/537.36 => GET /api/service => 200
192.168.3.99:49843 Mozilla/5.0 (Windows NT 10.0; Win64; x64) AppleWebKit/537.36 (KHTML, like Gecko) Chrome/120.0.0.0 Safari/537.36 => GET /api/process => 200
192.168.3.99:49843 Mozilla/5.0 (Windows NT 10.0; Win64; x64) AppleWebKit/537.36 (KHTML, like Gecko) Chrome/120.0.0.0 Safari/537.36 => GET / => 200
192.168.3.99:49843 Mozilla/5.0 (Windows NT 10.0; Win64; x64) AppleWebKit/537.36 (KHTML, like Gecko) Chrome/120.0.0.0 Safari/537.36 => GET /service => 200
192.168.3.99:49843 Mozilla/5.0 (Windows NT 10.0; Win64; x64) AppleWebKit/537.36 (KHTML, like Gecko) Chrome/120.0.0.0 Safari/537.36 => POST /api/service/WinRM => 200
192.168.3.99:49843 Mozilla/5.0 (Windows NT 10.0; Win64; x64) AppleWebKit/537.36 (KHTML, like Gecko) Chrome/120.0.0.0 Safari/537.36 => GET /service => 200
192.168.3.99:49843 Mozilla/5.0 (Windows NT 10.0; Win64; x64) AppleWebKit/537.36 (KHTML, like Gecko) Chrome/120.0.0.0 Safari/537.36 => GET /process => 200
192.168.3.99:49843 Mozilla/5.0 (Windows NT 10.0; Win64; x64) AppleWebKit/537.36 (KHTML, like Gecko) Chrome/120.0.0.0 Safari/537.36 => POST /api/process/qbittorrent => 200
192.168.3.99:49829 Mozilla/5.0 (Windows NT 10.0; Win64; x64) AppleWebKit/537.36 (KHTML, like Gecko) Chrome/120.0.0.0 Safari/537.36 => POST /api/process/ => 405
192.168.3.99:49843 Mozilla/5.0 (Windows NT 10.0; Win64; x64) AppleWebKit/537.36 (KHTML, like Gecko) Chrome/120.0.0.0 Safari/537.36 => GET /process => 200
192.168.3.99:49843 Mozilla/5.0 (Windows NT 10.0; Win64; x64) AppleWebKit/537.36 (KHTML, like Gecko) Chrome/120.0.0.0 Safari/537.36 => POST /api/process/qbittorrent => 200
192.168.3.99:49843 Mozilla/5.0 (Windows NT 10.0; Win64; x64) AppleWebKit/537.36 (KHTML, like Gecko) Chrome/120.0.0.0 Safari/537.36 => GET /process => 200
192.168.3.99:49843 Mozilla/5.0 (Windows NT 10.0; Win64; x64) AppleWebKit/537.36 (KHTML, like Gecko) Chrome/120.0.0.0 Safari/537.36 => GET /api/hardware => 200
192.168.3.99:49843 Mozilla/5.0 (Windows NT 10.0; Win64; x64) AppleWebKit/537.36 (KHTML, like Gecko) Chrome/120.0.0.0 Safari/537.36 => GET /api/performance => 200
192.168.3.99:49843 Mozilla/5.0 (Windows NT 10.0; Win64; x64) AppleWebKit/537.36 (KHTML, like Gecko) Chrome/120.0.0.0 Safari/537.36 => GET /api/performance => 200
192.168.3.99:49843 Mozilla/5.0 (Windows NT 10.0; Win64; x64) AppleWebKit/537.36 (KHTML, like Gecko) Chrome/120.0.0.0 Safari/537.36 => GET /api/cpu => 200
192.168.3.99:49843 Mozilla/5.0 (Windows NT 10.0; Win64; x64) AppleWebKit/537.36 (KHTML, like Gecko) Chrome/120.0.0.0 Safari/537.36 => GET /api/cpu => 200
192.168.3.99:49843 Mozilla/5.0 (Windows NT 10.0; Win64; x64) AppleWebKit/537.36 (KHTML, like Gecko) Chrome/120.0.0.0 Safari/537.36 => GET /api/cpu => 200
192.168.3.99:49843 Mozilla/5.0 (Windows NT 10.0; Win64; x64) AppleWebKit/537.36 (KHTML, like Gecko) Chrome/120.0.0.0 Safari/537.36 => GET /api/cpu => 200
192.168.3.99:49843 Mozilla/5.0 (Windows NT 10.0; Win64; x64) AppleWebKit/537.36 (KHTML, like Gecko) Chrome/120.0.0.0 Safari/537.36 => GET /api/cpu => 200
192.168.3.99:49843 Mozilla/5.0 (Windows NT 10.0; Win64; x64) AppleWebKit/537.36 (KHTML, like Gecko) Chrome/120.0.0.0 Safari/537.36 => GET /api/memory => 200
192.168.3.99:49843 Mozilla/5.0 (Windows NT 10.0; Win64; x64) AppleWebKit/537.36 (KHTML, like Gecko) Chrome/120.0.0.0 Safari/537.36 => GET /api/memory => 200
192.168.3.99:49843 Mozilla/5.0 (Windows NT 10.0; Win64; x64) AppleWebKit/537.36 (KHTML, like Gecko) Chrome/120.0.0.0 Safari/537.36 => GET /api/memory => 200
192.168.3.99:49843 Mozilla/5.0 (Windows NT 10.0; Win64; x64) AppleWebKit/537.36 (KHTML, like Gecko) Chrome/120.0.0.0 Safari/537.36 => GET /api/memory => 200
192.168.3.99:49843 Mozilla/5.0 (Windows NT 10.0; Win64; x64) AppleWebKit/537.36 (KHTML, like Gecko) Chrome/120.0.0.0 Safari/537.36 => GET /api/disk/physical => 200
192.168.3.99:49843 Mozilla/5.0 (Windows NT 10.0; Win64; x64) AppleWebKit/537.36 (KHTML, like Gecko) Chrome/120.0.0.0 Safari/537.36 => GET /api/disk/logical => 200
192.168.3.99:49843 Mozilla/5.0 (Windows NT 10.0; Win64; x64) AppleWebKit/537.36 (KHTML, like Gecko) Chrome/120.0.0.0 Safari/537.36 => GET /api/disk/iops => 200
192.168.3.99:49843 Mozilla/5.0 (Windows NT 10.0; Win64; x64) AppleWebKit/537.36 (KHTML, like Gecko) Chrome/120.0.0.0 Safari/537.36 => GET /api/disk/iops => 200
192.168.3.99:49843 Mozilla/5.0 (Windows NT 10.0; Win64; x64) AppleWebKit/537.36 (KHTML, like Gecko) Chrome/120.0.0.0 Safari/537.36 => GET /api/disk/iops => 200
192.168.3.99:49843 Mozilla/5.0 (Windows NT 10.0; Win64; x64) AppleWebKit/537.36 (KHTML, like Gecko) Chrome/120.0.0.0 Safari/537.36 => GET /api/disk/iops => 200
192.168.3.99:49843 Mozilla/5.0 (Windows NT 10.0; Win64; x64) AppleWebKit/537.36 (KHTML, like Gecko) Chrome/120.0.0.0 Safari/537.36 => GET /api/disk/iops => 200
192.168.3.99:49843 Mozilla/5.0 (Windows NT 10.0; Win64; x64) AppleWebKit/537.36 (KHTML, like Gecko) Chrome/120.0.0.0 Safari/537.36 => GET /api/video => 200
192.168.3.100:55137 Mozilla/5.0 (Windows NT 10.0; Microsoft Windows 10.0.19045; ru-RU) PowerShell/7.3.7 => GET /api/service => 200
192.168.3.100:55147 Mozilla/5.0 (Windows NT 10.0; Microsoft Windows 10.0.19045; ru-RU) PowerShell/7.3.7 => POST /api/service/winrm => 200
192.168.3.100:55152 Mozilla/5.0 (Windows NT 10.0; Microsoft Windows 10.0.19045; ru-RU) PowerShell/7.3.7 => POST /api/service/winrm => 200
192.168.3.100:55175 Mozilla/5.0 (Windows NT 10.0; Microsoft Windows 10.0.19045; ru-RU) PowerShell/7.3.7 => GET /api/service => 200
192.168.3.100:55181 Mozilla/5.0 (Windows NT 10.0; Microsoft Windows 10.0.19045; ru-RU) PowerShell/7.3.7 => POST /api/service/winrm => 200
192.168.3.101:44112 curl/7.81.0 => GET /api/service/win => 200
192.168.3.101:44120 curl/7.81.0 => GET /api/service/winrm => 200
192.168.3.101:39642 curl/7.81.0 => POST /api/process/qbittorrent => 200
192.168.3.101:46296 curl/7.81.0 => POST /api/process/qbittorrent => 200
Background
To make any application accessible to the end-user, we need to host it on a server. So, in this article, we will learn how to host ASP.NET Web API REST Service in IIS 10. The following steps are required to host any application.

If you don’t know how to develop or create an ASP.NET Web API REST Service, please refer to my video as well as the article, using the following link.
Creating ASP.NET Web API REST Service (Article )
After creating Web API REST Service, if you don’t know how to publish ASP.NET Web API REST Service, please refer to my following article.
Publishing ASP.NET Web API REST Service Using File System Method
I hope you have learned how to create and publish ASP.NET Web API REST Service. Now, let’s start hosting Web API REST Service in IIS 10.
Step 1. Install IIS
Before hosting any application, make sure that IIS (Internet Information Services) is installed on your Hosting Server. If it is not installed or enabled, then follow the below steps.
- Click on the Windows icon at the bottom left corner find the «Control Panel» menu and click on it.
- In the «Control Panel», find the «Program and Features» option from the displayed list.
- This shows the list of installed programs. Find and click the «Turn Windows feature on or off» option from the left pane, as shown in the following image.

- Now, in the next popup, find Internet Information Services (IIS) and check on it.
- Click the «Next» button and then «Finish». It takes a few minutes to install IIS.
- After installing IIS, restart your machine.

Note. I have Windows 10 OS and the above process is for Windows 10 PC. The steps might differ depending on your Operating System version.
Step 2. Install .NET framework
Although Visual Studio is not required on your hosting Server, it must have .NET Framework installed, as per the .NET framework used to develop the application. If it is not installed, then please install the appropriate .NET Framework available on Microsoft’s official website.
I assume you have installed the .NET framework on your Hosting Server.
Step 3. Move the published code to the Hosting Server
Copy the «Published files» and paste those on the respective Servers where you want to host the Web API REST Service. In our last article, we published Web API REST Service in the E drive of my Server, as shown in the following image.
Step 4. Open IIS manager
Now, open the IIS Manager from the Windows menu or in any other way you have known.
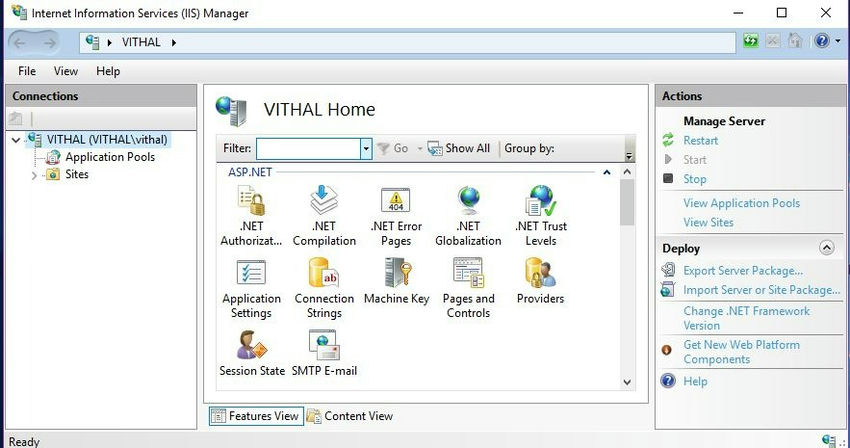
The above image is of the IIS 10 Manager of my Windows 10 machine. The view as well as options might be different on your machine depending on the OS version.
Step 5. Add Website
Right-click on «Site» in IIS and click on Add New Website, as shown in the following screenshot.
After clicking on the «Add Website» option, it displays the following configuration window.
I hope you understood the preceding configuration by highlighting the text.
Step 6. Define site name & application pool
Define the site name which will be useful to uniquely identify the site within the IIS Server. After specifying the site name, choose the Application Pool from available pools. You can even create a custom application pool with any desired name. Currently, our IIS Manager has the following Application Pools.
Choose the application pool depending on your application configuration. In this article, we are going to choose DefaultAppPool.
Step 7. Browse and select the published folder path
Now, choose the physical location of published code files by clicking on the «Browse» button, as shown in the following image.
Now, click on the «OK» button.
Step 8. Define IP address & port
Choose one IP address from the list of available IP addresses and define the unique port number for the application, which will be unique within the defined IP address.
Step 9. Choose protocol & hostname (optional )
Choose the protocol for your application i.e. HTTP or HTTPS which requires port 443 to be open and choose the Host name which will be used publicly to access the application. After defining all the configurations, the website configuration window will look like this.
Now, click on the OK button. It will create and add the application in IIS.
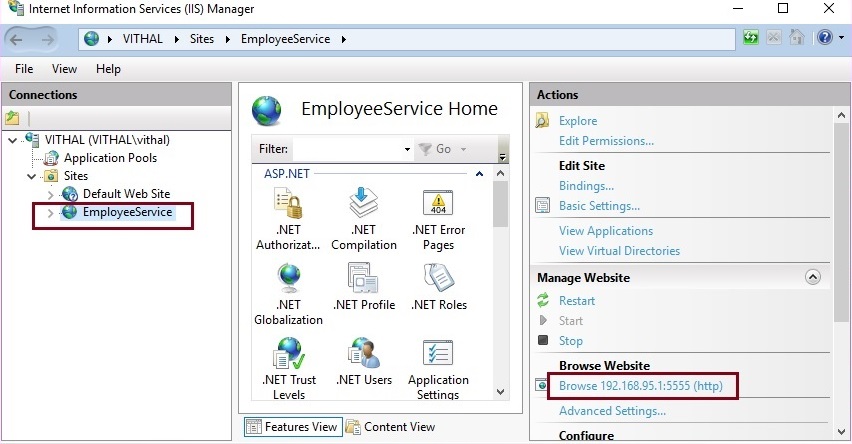
Step 10. Browse the URL with REST client
Browse the hosted application using REST client with base URL along with API, Controller name, and Action method name, with a pattern defined in the routing template inside the webapiconfig.cs file.
We can browse applications using the browser but then, we can only test the GET method. So, to test all types of Action Methods, we are using an advanced REST client which is a developer extension tool in Firefox browser.
Our hosted Web API REST Service includes these two methods, as given below.
- GetAllEmployees (GET )
- GetEmployeeById (POST ) which takes id as the input parameter
Browse the GetAllEmployees method using the Advanced REST client which has uses the HTTP GET verb.
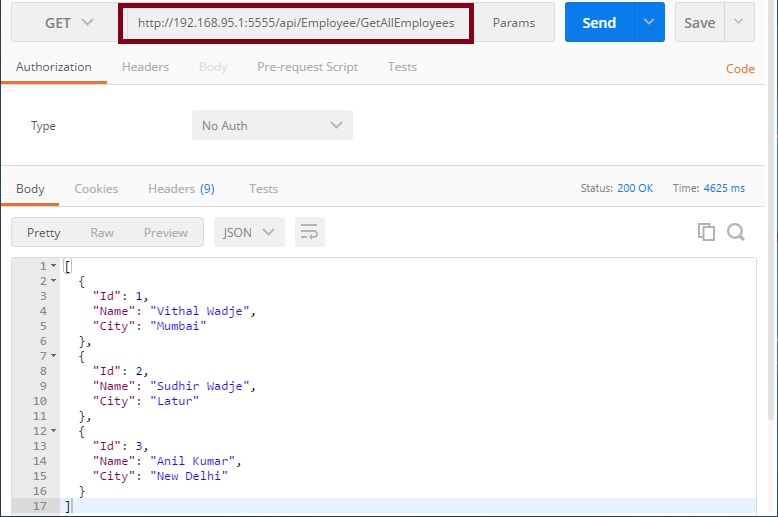
In the preceding screenshot, the GetAllEmployees hosted Web API REST method returns all the employee lists.
Now, browse the GetEmployeeById method using the Advanced REST client which uses the HTTP POST verb and takes id as input parameter.

From the above-desired output, it’s clear that our Web API REST Service is hosted on IIS successfully.
Note
- Download the Zip file of the Published code to learn and start quickly.
- This article is just a guideline to show how to host Web API REST Service on IIS.
- Optimize the speed by setting debug as false etc., from the web. config file as per your skills.
- In this article, the optimization is not covered in depth.
- Configure the authentication in IIS as per your REST Service.
Summary
I hope this article is useful for all readers. If you have any suggestions, please mention them in the comments section.
Read more articles on ASP.NET.
- Pass Dynamically Added HTML Table Records List To Controller In ASP.NET MVC
- Get Return Value From Stored Procedure Using Dapper ORM In ASP.NET MVC
If you are planning to build API and make them available as micro services and your code assets are C#/.NET Framework/Windows then you have some choices :
- ASP.NET Core comes with an internal web server called Kestrel : kestrel claims to be a light and fast web framework which runs ASP.NET Core applications without the need for IIS in front (you might decide that IIS is usefull for other things). Kestrel allows for middleware modules (like IIS ISAPI filters) that allow for adding features to the basic server.
- Katana (OWIN Microsoft implementation) is a collection of NuGET packages for building OWIN applications.
- Plain old IIS + ASP.NET REST API code
Some good information can be found here from uShip guys
I’m basically writing this for myself as a reminder for the new .NET Core Microsoft environment.