
Если команда SFC не помогает, в Windows 10 или 8 можно использовать команду DISM для исправления образа системы. А в Windows 7 и более ранних версиях поможет Средство проверки готовности системы к обновлению (System Update Readiness Tool), которое можно скачать с
сайта Microsoft.

Когда следует использовать эти команды
Эти команды пригодятся при диагностике неисправной операционной системы Windows. Если система выдает синий экран, сбоят приложения или не работают какие-то системные функции, может помочь команда SFC. Даже если после выполнения команды SFC ничего не будет исправлено, это даст возможность убедиться, что системные файлы не повреждены и можно продолжать диагностику другими способами.
Команда DISM в обычных обстоятельствах не требуется. Но если команда SFC не выполняется или не может заменить поврежденные файлы нормальными, DISM или Средство проверки готовности системы к обновлению может исправить саму операционную систему и создать условия для нормального выполнения команды SFC.
Исправление системных файлов командой SFC
Команду SFC следует выполнять от имени администратора. Чтобы это сделать, в Windows 10 или 8.1 нажмите правой кнопкой мыши на значке «Пуск» (Start) и выберите опцию «Командная строка (администратор)» (Command Prompt (Admin)). Кроме того, во всех версиях Windows можно выполнить поиск в меню «Пуск»/на начальном экране по словам «командная строка», нажать на нужной ссылке правой кнопкой мыши и выбрать «Запуск от имени администратора» (Run as Administrator).

Для полной проверки системы введите в окне командной строки следующую команду и нажмите [Enter]:
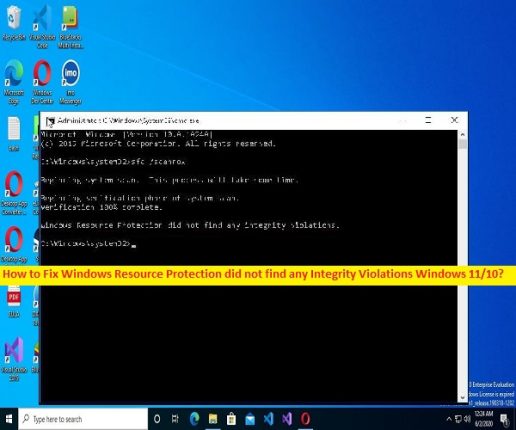
sfc /scannowНе закрывайте окно, пока не завершится выполнение команды. Процесс может оказаться довольно продолжительным. Если все в порядке, по итогам проверки появится сообщение «Защита ресурсов Windows не обнаружила нарушений целостности» (Windows Resource Protection did not find any integrity violations).

Если появляется сообщение «Защита ресурсов Windows обнаружила поврежденные файлы, но не может восстановить некоторые из них» (Windows Resource Protection found corrupt files but was unable to fix some of them), для начала попытайтесь загрузить систему в безопасном режиме. В Windows 10, 8.1 или 8 для этого зажмите клавишу [Shift] при выборе опции «Перезагрузка» (Restart) в меню выключения, чтобы попасть на экран выбора дополнительных параметров загрузки. В Windows 7 и более ранних версиях перезагрузите компьютер и в процессе запуска зажмите клавишу [F8]. Загрузившись в безопасном режиме, вновь выполните команду sfc /scannow.
Исправление неполадок SFC командой DISM
В Windows 10, 8.1 и 8 исправить повреждение хранилища компонентов, препятствующее нормальной работе SFC, можно с помощью средства Deployment Image & Servicing Management (DSIM).
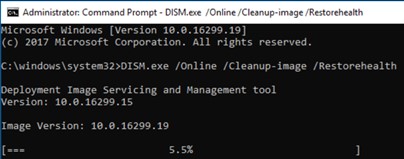
Для запуска этого средства откройте окно командной строки от имени администратора, введите указанную ниже команду и нажмите [Enter]. DISM проверит хранилище компонентов Windows на наличие повреждений и автоматически устранит любые обнаруженные неполадки.
DISM /Online /Cleanup-Image /RestoreHealthНе закрывайте окно командной строки до завершения процесса. Проверка может занять до 10 минут. Если индикатор прогресса долго держится на 20% – не волнуйтесь, это нормально.
Если по результатам выполнения команды DISM будут внесены какие-либо изменения, перезагрузите компьютер. После этого снова выполните команду SFC, и она сможет заменить поврежденные файлы правильными.

В Windows 7 и более ранних версиях команда DISM отсутствует. Вместо этого можно скачать с официального сайта Microsoft Средство проверки готовности системы к обновлению, которое позволяет проверить систему на наличие проблем и попытаться исправить их.
Восстановление системы или возврат в исходное состояние
Если проблемы сохраняются и исправить их с помощью этих инструментов не удается, можно принять более радикальные меры. Средство восстановления системы (System Restore) позволяет вернуть Windows к более раннему состоянию, что позволит решить проблему, если в том состоянии операционная система была еще исправна.
Можно также вернуть Windows к заводскому состоянию или переустановить. В Windows 10, 8.1 и 8 можно использовать функцию восстановления компьютера (Reset this PC), которая позволяет вернуть Windows к исходному состоянию. После этого придется переустановить все программы, но пользовательские файлы не пострадают. В Windows 7 и более ранних версиях следует использовать раздел восстановления, созданный производителем компьютера, или просто переустанавливать Windows с нуля.

Если при выполнении описанных выше команд возникают другие ошибки, попробуйте поискать по их описанию в Интернете. Часто в выводе команды содержится информация о файлах журнала (логах), в которых можно найти более подробные сведения об определенных проблемах. А в конечном итоге вовсе не обязательно тратить время на диагностику сложных проблем, когда можно просто восстановить заводское состояние или переустановить Windows.
У описанных выше команд есть и другие возможности. Например, с помощью SFC можно проверять и исправлять отдельные системные файлы. А с помощью DISM можно выполнить быструю проверку системы без исправления либо указать утилите на файл WIM или ESD, содержащий системные файлы Windows.
Автор: Chris Hoffman
Перевод
SVET
Оцените статью: Голосов
Windows 10 has many critical system files to run the operating system properly. If any of those system files get corrupted, the OS may pop up some error message on your screen.
Many users of this OS have reported an error message that says the Windows resource protection found integrity violations.

If you have faced the same error yet don’t know, why are you receiving this error and how to fix it, then you’ve come to the right place. Because we are going to show you the path to get rid of this error. For that, you need to follow the instructions from this article carefully.
Why Does the Integrity Violation Error Occur on Windows 10?
Windows 10 automatically checks for any error or corruption in the system files. If any system file contains any corruption, then it shows the integrity violation error.
Again, if any files get corrupted while updating the Windows, then it also shows the error while scanning the recently updated files.
Let’s come back to how you can fix the corrupted system file and resolve the integrity violation error message on your Windows 10 OS. The fix for this error is quite straightforward. You can fix it by applying the first method. However, if that doesn’t work for you, then you are recommended to try the 2nd method below.
Fix 1: Run the System File Checker Tool
The system file checker tool is a built-in feature of Windows 10 OS. This tool checks the system files and resolves the corrupted system files automatically.
Here is the instruction on how you can run the system file checker tool to resolve the integrity violation error on your Windows 10:
- Press the Windows key on your keyboard and type cmd on the search bar.
- Then, right-click on the “Command Prompt” option and click Run as Administrator.
- Now, type the following command in the command prompt and press Enter:
SFC /scannow
- It will scan your system for any errors so be patient till the process is finished.
- After the scan is completed, type the following command and hit Enter:
DISM /Online /Cleanup-Image /CheckHealth
DISM /online /cleanup-image /scanhealth
DISM /online /cleanup-image /restorehealth
- Finally, restart your computer after the scan finishes and check if the error is resolved or not. If not, then try the next method.
Fix 2: Run the DISM tool to Resolve Windows Updates Errors
The windows can show integrity violations error if any error occurred after updating your Windows 10. In that case, the DISM tool can fix these corrupted files of windows. Here is the instruction to run the DISM tool:
- Press the Windows key and type cmd on the search bar.
- Then, right-click on the “Command Prompt” option and click “Run as Administrator”.
- Now, type the following command in the command prompt and press Enter:
DISM.exe /Online /Cleanup-image /Restorehealth
Caution: The above command required System files to replace the corrupted ones. It will take those system files from the Windows Update. But if your Windows Update client is already broken, then you need to insert Windows 10 DVD or plug a bootable USB device containing Windows 10 installation files.
Use the following command on the command prompt if you are using a USB bootable Windows 10 files:
DISM.exe /Online /Cleanup-Image /RestoreHealth /Source:C:\RepairSource\Windows /LimitAccess
Note: Replace the C:\RepairSource\Windows path in the command above with the location of your repair source (USB drive or Windows DVD).
- After completing the repair process, type the following command on the command prompt:
sfc /scannow
- Now wait till the scanning process is over and restart your computer.
- Finally, run the windows update and after completing the updating process, check for the remaining error.
Hopefully, you’ll not be able to find the error message this time.
Frequently Asked Questions
How Do I Fix Windows Resource Protection Integrity Violations Error?
Do the following steps to fix the integrity violation error:
- At first, update your Windows.
- Then, open the command prompt as administrator and type the following commands.
- sfc /scannow.
- dism /online /cleanup-image /scanhealth.
- dism /online /cleanup-image /restorehealth.
- sfc /scannow.
- chkdsk /scan.
Note: Press Enter after Each command.
What Are Integrity Violations on Windows 10?
Integrity violation is customizing or deleting sensitive data of the system by an attacker without proper authorization. An integrity violation error occurs when the system file is corrupted by an attacker or accidentally, by yourself.
How Do I Fix Resource Protection Found Corrupt Files Error on Windows 7?
Follow the instructions below to fix the corrupt files error on Windows 7:
- At first, run the SFC scan as it will replace corrupt files with active ones. If the SFC scan doesn’t work for you then run the DISM Scan.
- If the SFC scan can’t fix the issue, then try running the SFC Scan in Safe Mode.
- Uninstall Recent Windows updates.
- Apply the System Restore at a restore point.
- If none of the above methods work for you then try resetting your Windows 7.
Conclusion
To put it simply, the Windows resource protection found integrity violations error occurs due to corrupted files and you can fix it by applying these two methods that are mentioned in this article. If none of the above methods work for you, then you can repair your Windows 10 by mounting the ISO file and selecting the “Change what to keep” option. It will repair the window and fix the mentioned error without deleting any files.
If you found this guide helpful then please share your experience with fixing the error in your comment section below.
-
Home
-
News
- Solved – Windows Resource Protection Found Integrity Violations Error
Solved – Windows Resource Protection Found Integrity Violations Error
By Aurelie | Follow |
Last Updated
When there are some problematic files on your computer, you may consider running a System File Checker scan to repair them. What to do if prompted by an error message saying that Windows Resource Protection found integrity violations error? In this post from MiniTool Website, we try our best to find some solutions to you.
Windows 10/11 comes with a powerful utility called System File Checker to check corrupted system files and then repair them with the cached copy. To do so, you need to run sfc /scannow in an elevated Command Prompt. After that, you might receive one of the following messages:
- Windows Resource Protection did not find any integrity violations.
- Windows Resource Protection found corrupt files and successfully repaired them.
- Windows Resource Protection could not perform the requested operation.
- Windows Resource Protection found corrupt files but was unable to fix some of them.
The last integrity violations error message indicates that you failed to fix your issue via an SFC scan. In this case, you need to address this issue manually. In the second part, we list some effective solutions for you.
Warning:
A computer with corrupted system files might experience frequent system or hard drive crashes or freezes, leading to unrecoverable data loss. To safeguard your data, it is of necessity to back up your crucial files in advance. Speaking of backup, a PC backup software — MiniTool ShadowMaker is a top option for you. This tool is compatible with almost all the Windows systems. It allows you to create an instant or scheduled backup for free. Download the trial and have a shot!
MiniTool ShadowMaker TrialClick to Download100%Clean & Safe
How to Fix Integrity Violation Error on Windows 10/11?
Fix 1: Run DISM Command to Repair Corrupted System Files
DISM, also known as Deployment Image Servicing and Management, is a command-line tool designed to prepare, modify, and repair system image. When SFC detects integrity violations error that it cannot fix, you can utilize DISM to repair these corruptions. Here’s how to do it:
Step 1. Type cmd in the search bar to locate the Command Prompt.
Step 2. Right-click on it to select Run as administrator.
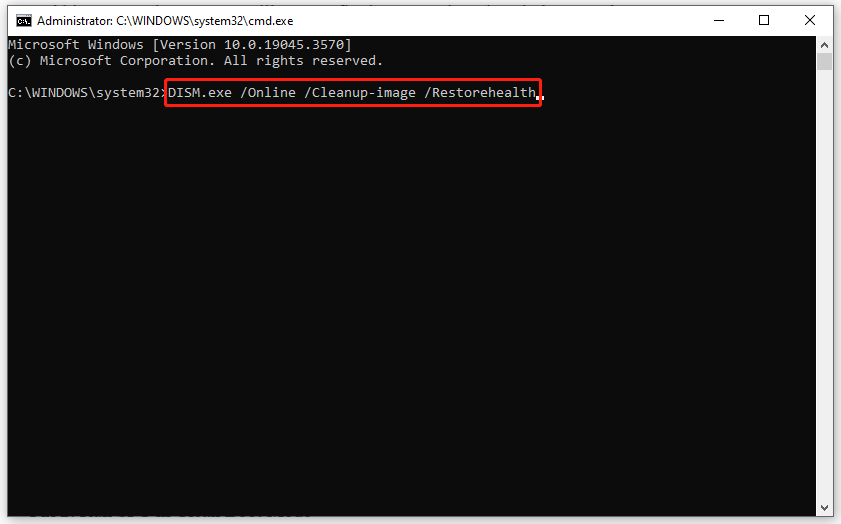
Step 3. In the command window, type DISM.exe /Online /Cleanup-image /Restorehealth and hit Enter. Then, DISM will start to fix the corruption via Windows Update.
If the Windows Update client is broken, you need to boot from a bootable USB drive to enter Windows Recovery Mode and then run the following command in Command Prompt. Remember to replace C:\RepairSource\Windows with the location of your repair source.
DISM.exe /Online /Cleanup-Image /RestoreHealth /Source:C:\RepairSource\Windows /LimitAccess
Step 4. After the repairing process is complete, run sfc /scannow in an elevated Command Prompt again to see if integrity violations error disappears.
Fix 2: Run SFC in Clean Boot Mode
Chances are that third-party software might be the culprit of integrity violations error. In this case, you need to start your computer in a clean boot state to exclude the interference of third-party software and then fix your issues with SFC and DISM. To do so:
Step 1. Press Win + R to open the Run box.
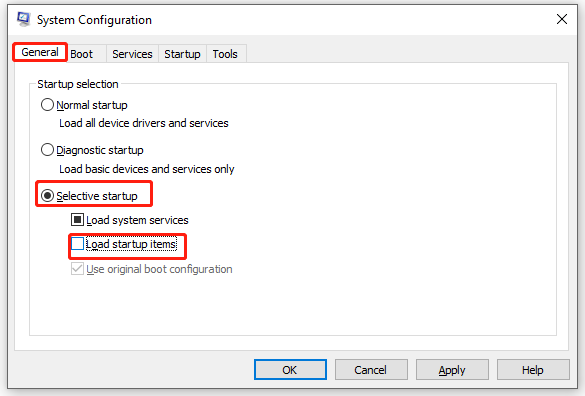
Step 2. Type msconfig and hit Enter to open System Configuration.
Step 3. In the General tab, tick Selective Startup > uncheck Load startup items > hit OK.
Step 4. In the Services tab, check Hide all Microsoft services and hit Disable all.
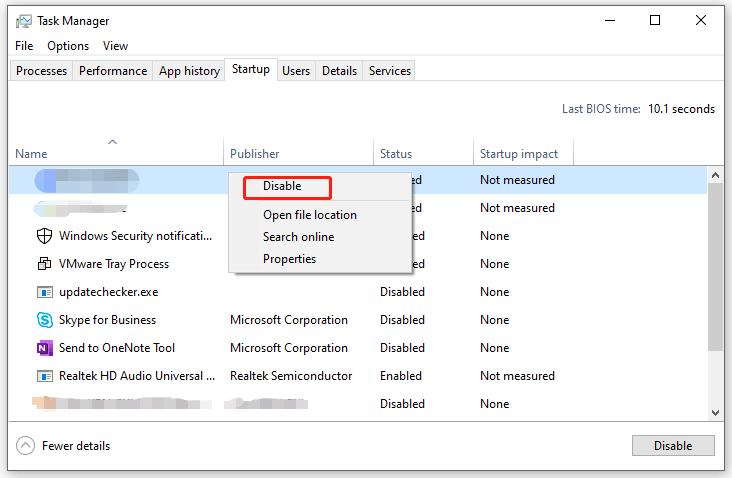
Step 5. In the Startup tab, click on Open Task Manager.
Step 6. Then, right-click on each enabled item and hit Disable.
Step 7. Go back to the Services tab of System Configuration, click on Apply & OK to save the changes.
Step 8. Reboot your computer to boot into a clean boot mode.
Step 9. Finally, run the following two commands one after another:
sfc /scannow
DISM.exe /Online /Cleanup-image /Restorehealth
Final Words
Now, you are not bothered by integrity violations error anymore. More importantly, we introduce a convenient tool called MiniTool ShadowMaker to back up your files in advance so as to keep your data safe. If you need to add an extra protection layer for your data, you can have a try.
About The Author
Position: Columnist
Aurelie is a passionate soul who always enjoys researching & writing articles and solutions to help others. Her posts mainly cover topics related to games, data backup & recovery, file sync and so on. Apart from writing, her primary interests include reading novels and poems, travelling and listening to country music.
Readers help support Windows Report. We may get a commission if you buy through our links.
Read our disclosure page to find out how can you help Windows Report sustain the editorial team. Read more
The Windows 10 OS comes with a System File Checker tool that allows you to check the system files for any corruption or serious problems and fix it. The System File Checker tool is particularly helpful if some Windows functions are not working. However, after running the System File Checker tool, some users have reported the Windows 10 resource protection found integrity violations error. Similar reports can also be seen in the Microsoft community forums.
I ran a system file checker scan and the results provided the following error message: “windows resource protection found integrity violations”. I did look at the cbs log but cannot find out the problem. Any ideas before I reimage the machine.
If you are also troubled by the Windows 10 resource protection found integrity violations error, this troubleshooting guide will help you resolve the problem.
How to fix Windows 10 resource protection found integrity violations
1. Run System File Checker Tool
- The error message hints at a possible corruption of some of the system files. To fix this you need to run the System File Checker tool again with some additional tools to fix the problem.
- Type cmd in the search bar.
- Right-click on Command Prompt option and select Run as Administrator.

- In the Command Prompt type, the following command and press Enter.
SFC /scannow - Wait for the System File Checker to scan your system for any errors.
- When the scan is complete, enter the following command one by one and hit enter.
DISM /Online /Cleanup-Image /CheckHealth
DISM /online /cleanup-image /scanhealth
DISM /online /cleanup-image /restorehealth - Once the repair process is over, restart the computer and check for any improvements.

12 best Registry cleaners for Windows 10 to use today
2. Fix Windows Updates Errors with DISM
- If the error occurred after updating your Windows 10 PC to the latest version, the DISM tool can help you to fix some Windows corruption errors.
- Type cmd in the search bar.
- Right-click on Command Prompt and select Run as Administrator.

- In the command prompt type the following command and hit enter.
DISM.exe /Online /Cleanup-image /Restorehealth - The above command uses Windows Update to provide the files that are required to fix corruptions. However, if your Windows Update client is already broken, then you need to use Windows DVD or Windows 10 Bootable USB Drive.
- If you are using a bootable UBS drive, use the following command instead:
DISM.exe /Online /Cleanup-Image /RestoreHealth /Source:C:\RepairSource\Windows /LimitAccess - In the above command, replace C:\RepairSource\Windows path with the location of your repair source (that is your bootable USB drive or Windows DVD).
- Once the repair process is over, type the following command and hit enter.
sfc /scannow - Wait for the System File Checker to finish scanning. Close the command prompt and run Windows Update again.

If the issue persists, try to perform a repair upgrade using the Windows ISO file. Simply download the Windows 10 ISO and mount it to your PC. Double-click on the mounted ISO and select Change what to keep option during configuration to repair Windows installation without deleting your files and programs.
RELATED STORIES YOU MAY LIKE:
- Top 4 best free DVD player software to download on Windows 10
- How to Create a Windows 10 Bootable UEFI USB Drive
- There were some problems installing updates but we’ll try again later [FIX]
Tashreef Shareef
Tashreef Shareef is a software developer turned tech writer. He discovered his interest in technology after reading a tech magazine accidentally. Now he writes about everything tech from Windows to iOS and streaming services to IoT at WindowsReport.
Sfc/Scannow command fails to execute with some errors: How to fix
In this article, we are going to discuss on How to Windows Resource Protection did not find any Integrity Violations error in Windows 11/10. You are provided here with easy steps/methods to resolve the issue. Let’s starts the discussion.
What is System File Checker (SFC) command?
SFC stands for System File Checker, is a build-in program/tool in Microsoft Windows Operating system versions including Windows 7, 8.1/8/10 and Windows 11. The purpose of this tool is to allow you to scan your computer for corrupted Windows System files and then this tool repair it and then restore into your computer. This tool is located in ‘C:\Windows\System32’ folder in Windows computer. You can use this tool to find and repair corrupted system files and registry keys in Windows computer with ease.
In Windows 10, SFC/scannow or SFC scan tool is integrated with WRP (Windows Resources Protection), which is provide security for registry keys and folders together with critical system files. TrustedInstaller.exe or Windows Modules Installer Service has full permission to Windows Resource Protection files and registry keys, which offer you can alter WRP-protected resources. This process is required to be running when you restore missing/corrupted WRP resources.
What is Windows Resource Protection did not find any Integrity Violations Windows 11/10?
It is quite simple & easy to run SFC/Scannow command in your Windows 10/11 computer via Command Prompt window. So, there is no need of additional applications or third-party applications to find and repair corrupted system files & registry keys in Windows computer as SFC scan tool is enough to perform this. However, several users reported they faced ‘Windows Resource Protection did not find any Integrity Violations’ message as result on Command Prompt screen when they execute SFC/Scannow command.
When you run SFC scan in Command Prompt and see this message, means you don’t need do anything. You computer doesn’t have any missing or corrupted system files. Sometimes, SFC scan tool executes with some other error messages including:
- Windows Resource Protection did not find any Integrity Violations Windows 11/10
- Windows Resource Protection could not perform the requested operation.
- Windows Resource Protection found corrupted files but was unable to fix some of them.
These error messages are appeared when you execute SFC scan in Command Prompt. These issues indicate SFC scan process fails to finsih execution for some reasons. The possible reasons behind these error can be the Windows Module Installer service is not running in your computer, corrupted in hard disk drive or bad hard disk sector, corruption in system image, and other issues in computer. One possible way to fix the issue is to run CHKDSK scan in computer to find and fix bad hard disk sector or corrupted hard disk drives. Let’s go for the solution.
How to Windows Resource Protection did not find any Integrity Violations fix in Windows 10/11?
Method 1: Fix SFC Scan Tool issue in Windows PC with ‘PC Repair Tool’
‘PC Repair Tool’ is quick & easy ways to find and fix BSOD errors, DLL errors, EXE errors, problems with programs/applications, malware or viruses infections in computer, system files or registry issues, and other system issues with just few clicks. You can get this tool through button/link below.
⇓ Get PC Repair Tool
Method 2: Start/Restart Windows Module Installer Service (TrustedInstaller.exe)
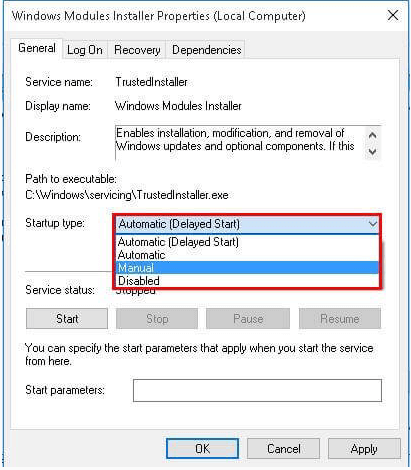
You can try to fix the issue by enabling or restarting Windows Modules Installer service in computer.
Step 1: Open ‘Services’ app in Windows PC via Windows Search Box
Step 2: Find and double-click ‘Windows Modules Installer’ service to open its Properties.
Step 3: Select ‘Manual’ from ‘Startup Type’ dropdown, and hit ‘Apply > Ok’ button to save the changes, and check if it works for you toward resolving the issue.
Method 3: Enable Windows Modules Installer Service or TrustedInstaller.exe via command prompt
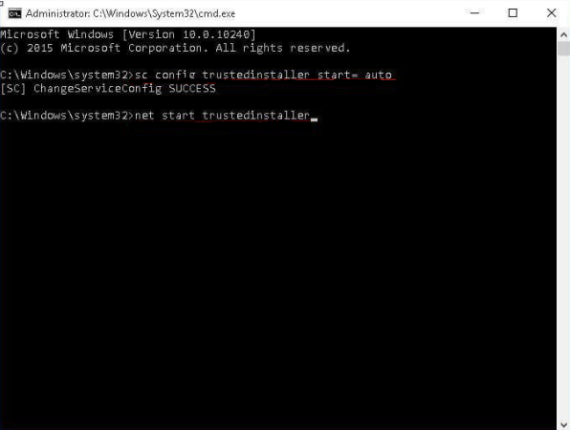
Step 1: Press ‘Windows + R’ keys on keyboard, type ‘cmd’ in ‘Run’ window and press ‘CTRL + SHIFT + ENTER’ keys on keyboard to open ‘Command Prompt as Admisntrator’
Step 2: Type the following commands and hit ‘Enter’ key after each to execute.
sc config trustedinstaller start= auto
net start trustedinstaller
Step 3: Once executed, retry running sfc/scannow command and check if the issue is resolved.
Method 4: Run CHKDSK scan
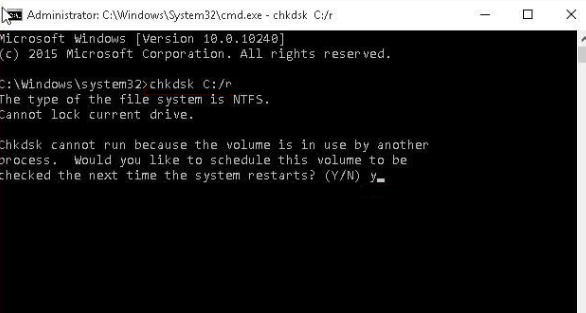
You can fix the issue by running CHKDSK scan in computer in order to repair corruption in hard disk drive or bad hard disk sector.
Step 1: Open ‘Command Prompt as Administrator’ using above method
Step 2: Type ‘chkdsk c: /r’ command and hit ‘Enter’ key to execute, and type ‘Y’ and hit ‘Enter’ key to confirm to execute this command. Wait to finish and once done, restart your computer and check if the issue is resolved.
Method 5: Run SFC scan in Safe Mode
If you are facing issue while running SFC scan in normal mode in computer, you can run this command in safe mode to fix the issue.
Step 1: Press & hold ‘SHIFT’ keys on keyboard and restart your computer to enter into Windows Recovery Environment screen.
Step 2: Now, go to ‘Troubleshoot > Advanced Boot Options > Restart’, and press ‘F4’ or ‘4’ key on keyboard to enter into Safe mode
Step 3: Once you are in safe mode in computer, ensure ‘PendingDeletes’ and ‘PendingRenames’ folder on computer, and then retry executing SFC scan command and check if the issue is resolved.
Method 6: Change Security Description
You can also try to fix the issue by changing security description.
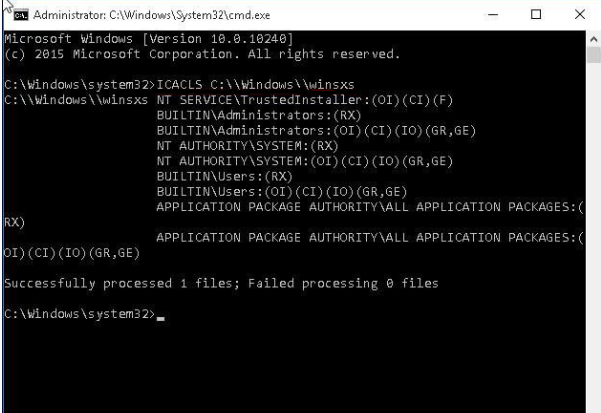
Step 1: Open ‘Command Prompt as Administrator’ using above method
Step 2: Type ‘ICACLS C:\\Windows\\winsxs’ command and hit ‘Enter’ key to execute and once executed, restart your computer and check if the issue is resolved.
Method 7: Run DISM scan
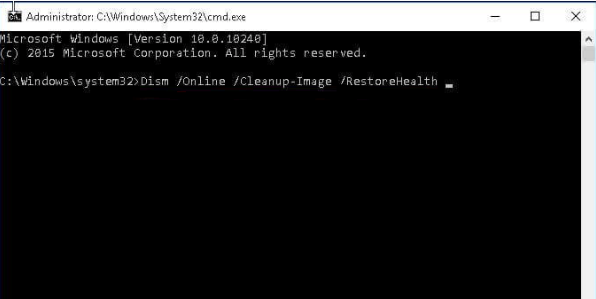
You can DISM Scan command in computer to repair corruption in system image in order to fix this issue.
Step 1: Open ‘Command Prompt as Administrator’ using above method
Step 2: Type ‘Dism /Online /Cleanup-Image /RestoreHealth’ command and hit ‘Enter’ key to execute and once executed, restart your computer and check if the issue is resolved.
Method 8: Delete registry keys for pending system repair
You can also try to fix the issue by deleting registry keys for pending system repair in computer.
Step 1: Open ‘Registry Editor’ app in Windows PC via Windows Search Box, and go to following path in left pane
HKEY_LOCAL_MACHINE\SOFTWARE\Microsoft\Windows\CurrentVersion\RebootPending
Step 2: Find and right-click ‘RebootPending’ key, and select ‘Delete’ to delete it. Once done, retry executing SFC scan in computer and check if the issue is resolved.
Conclusion
I am sure this post helped you on How to fix Windows Resource Protection did not find any Integrity Violations Windows 11/10 with easy ways. You can read & follow our instructions to do so. That’s all. For any suggestions or queries, please write on comment box below.